Sewing Room DIY

DSC_0015 (2)I ‘m still busy organising my new sewing room and making it my own space. Years ago (probably about 20!!) I bought a wooden storage unit at Ikea, i used it for general craft stuff for years but since my reorganisation it is my haberdash drawers. I’ve got a drawer for bindings and trimmings, one each for elastic, ribbon, zips and lace, in fact lace has got two drawers!!

I’ve painted them white to match my pegboard and some units. Eventually I’d like to give them a proper paint with undercoat etc, but at the moment a basic coat of gloss is sufficient.

Continue reading

Posted in Serendipity | Tagged | 7 Comments

Butterick Knitting Bag


Butterick 5006I need to make two bags for the local show in May, when I was looking round for inspiration and ideas I found this Butterick pattern (5006) on Minerva‘s website, even better they had a big sale on! I thought it looked pretty roomy, I liked all the pockets (nine altogether!) and I also liked the accessories that went with it, I’m hoping to make a couple of them in time for the show.

I decided to use the range of cotton sateen that I used for the backing on my friends Moorland quilt, it’s slightly heavier than quilting cotton and I think it looks pretty and ‘spring-y’. I bought the pattern with just trees and flowers on for the main bag and a geometric pattern for the lining at B&M Fabrics in Leeds. I decided it needed a darker fabric for the base for practical reasons and I found this quilting cotton at Samuel Taylors.

Knitting Bag

I wanted the bag to stand up on it’s own, I found a roll of very stiff interfacing whilst I was moving sewing rooms. I cut it out so the seams weren’t interfaced but I must admit it is so stiff it did make life a little difficult…

The pattern also called for iron-on fleece, I did have a momentary panic as I haven’t any, until I realized I have lots of batting and a can of spray basting…who needs iron-on!!

Knitting BagBeing a Butterick Pattern the instructions were straight forward, there’s just rather a lot of rectangular pieces, so I did have to be pretty methodical so as not to mix things up! I fussy-cut the pockets so a tree appears in the centre of the middle pocket. The bag was made using a different method to what I’m used to, so it was nice to learn a different way.  I was trying to work out why the bottom wasn’t interfaced, it’s because the front and back together form the base and the bottom fabric is effectively laid over it.The side panels were a bit fiddly, not helped by the stiff interfacing! I had to make sure the pockets and the bottom pieces were all lined up as well as negotiating the corners and making sure the pocket pleats didn’t get in the way.

Knitting BagI used a medium weight interfacing for the handles and also put a strip of batting down the middle to soften the hold. I cut the handles a bit wider as I prefer to fold the fabric in half and then fold the edges into the crease, so it’s four fabrics thick. I think it gives a neater finish. The tab was meant to have velcro on it but I’ve never managed to get a neat finish with velcro so I used a magnetic catch, they’re so easy to fit too.

My biggest problems came when it was time to do the lining. The instructions called for the lining to be stitched in with a gap left for turning…I just knew I wasn’t going to be able to get that bag turned through any hole I could leave in the side seam. Knitting BagI stitched the facing in whilst I thought about it…for a long time!!! In the end I left one side open and stitched the lining in effectively through the side seam, it was fiddly but doable. I then just hand-stitched the side seam.

I’m really pleased with my bag, I have to confess to major doubts half way through that it would come out good enough to enter a show, but I’m happy with it now. It’s bigger than I imagined but it will come in useful for my ripple blanket as it gets harder to carry around the bigger it gets!

Knitting Bag


Posted in My Monthly Challenge, Serendipity, Sewing | Tagged , , | 9 Comments

Sewing Room Pegboard

Honeybear Lane

Honeybear Lane

When I was planning my new sewing room I spent rather a lot of time browsing the internet looking for ideas, particularly for storage. I came across a post on Honeybear Lane about how to make a large pegboard for a sewing room, I loved the idea of having everything in its place but easily reachable. The tutorial was great in explaining how to make one.

The one on Honeybear Lane is 6′ x 4′, pretty big. It was also working out pretty expensive here in the UK, none of our general DIY stores seemed to sell pegboard either so postage had to added on. I wanted to use the heavier 6mm board to make sure it was strong enough. I found a company on ebay that sold 4’x4′ sheets, perfect size for my room!

Making a pegboardOur local timber merchant sold the moulding for round the edge, it came in 5m lengths, so I persuaded him to quarter it so I could manage it on the bus!

Mitering the corners was much easier once I borrowed my son’s saw as ours was as blunt as anything. I laid the pegboard on the garage floor and glued the moulding on with Gorilla glue, I used various stone flags as weights to try and keep the pressure on. It worked!

Sewing Room PegboardNext job was to paint it…luckily I’d saved the huge sheet of corrugated card that the pegboard was delivered in, it was ideal for painting it over as obviously the paint runs straight through the holes! I raised the board on small tins of tuna and gave it one coat of paint. It probably would have been better with a second coat but it had been blocking the dining room table for long enough and I decided that by the time it had everything hung on it, no one would be able to tell the difference! I now have several spotty tins of tuna 🙂

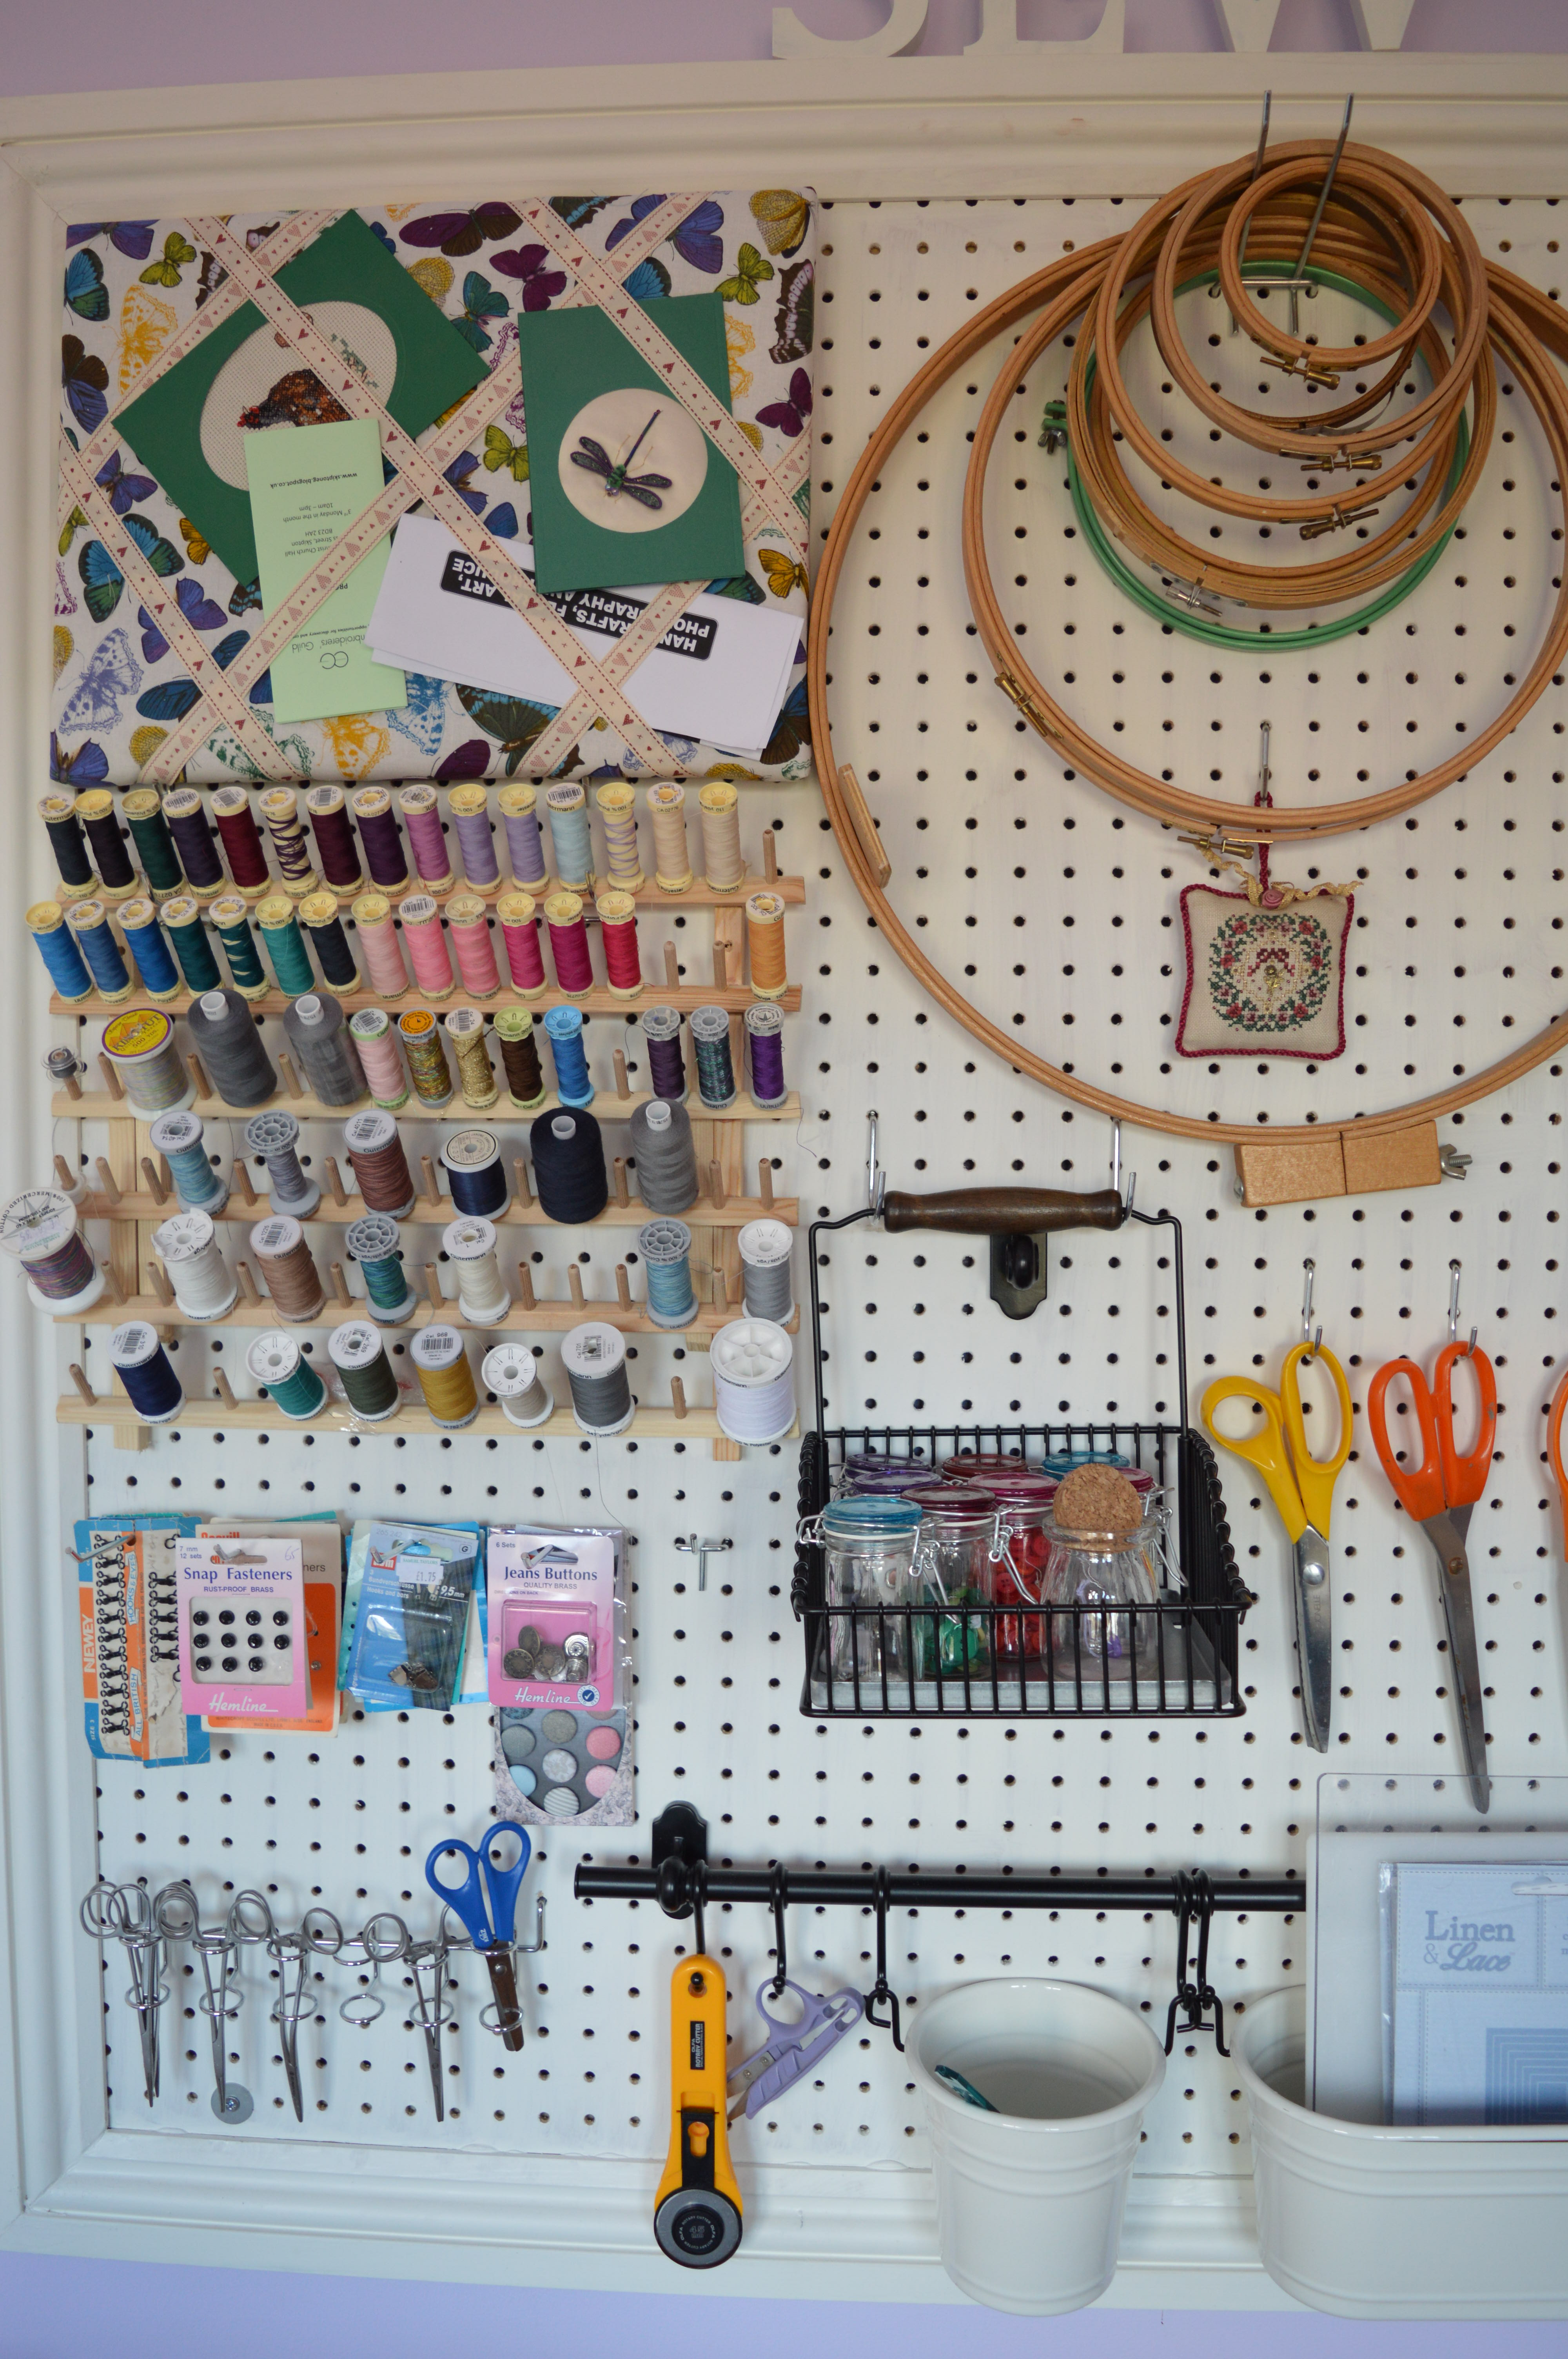
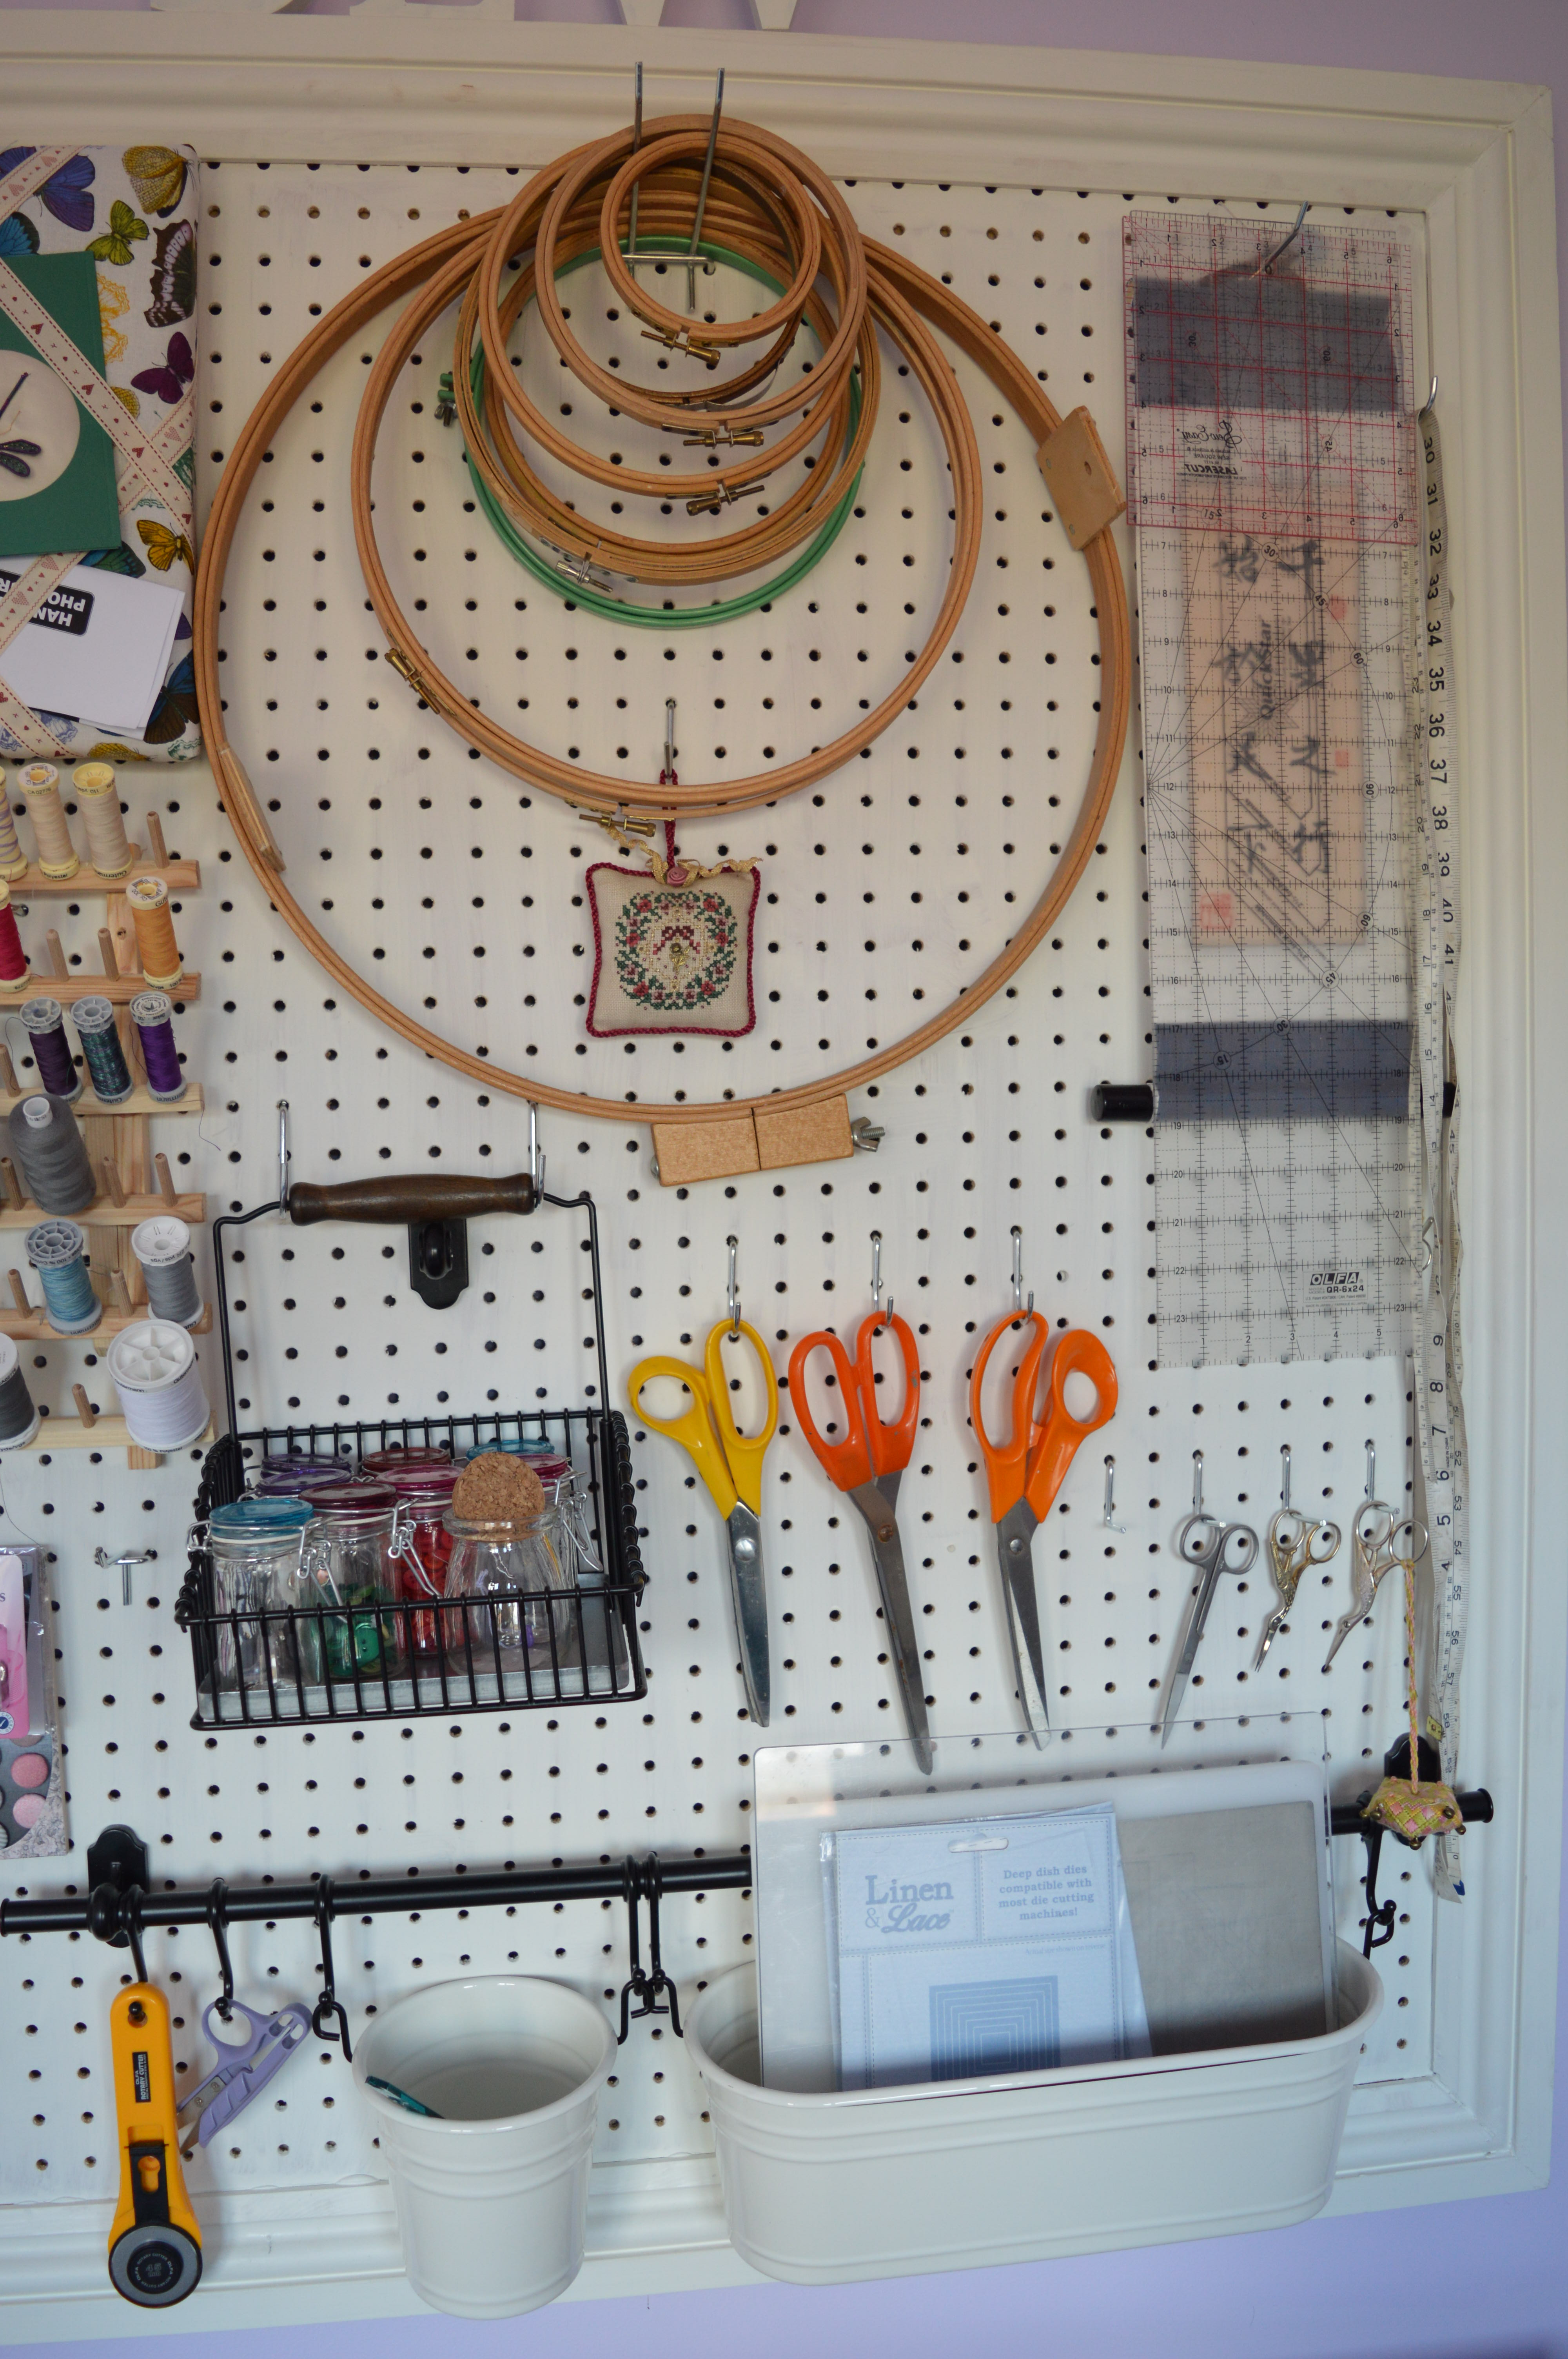
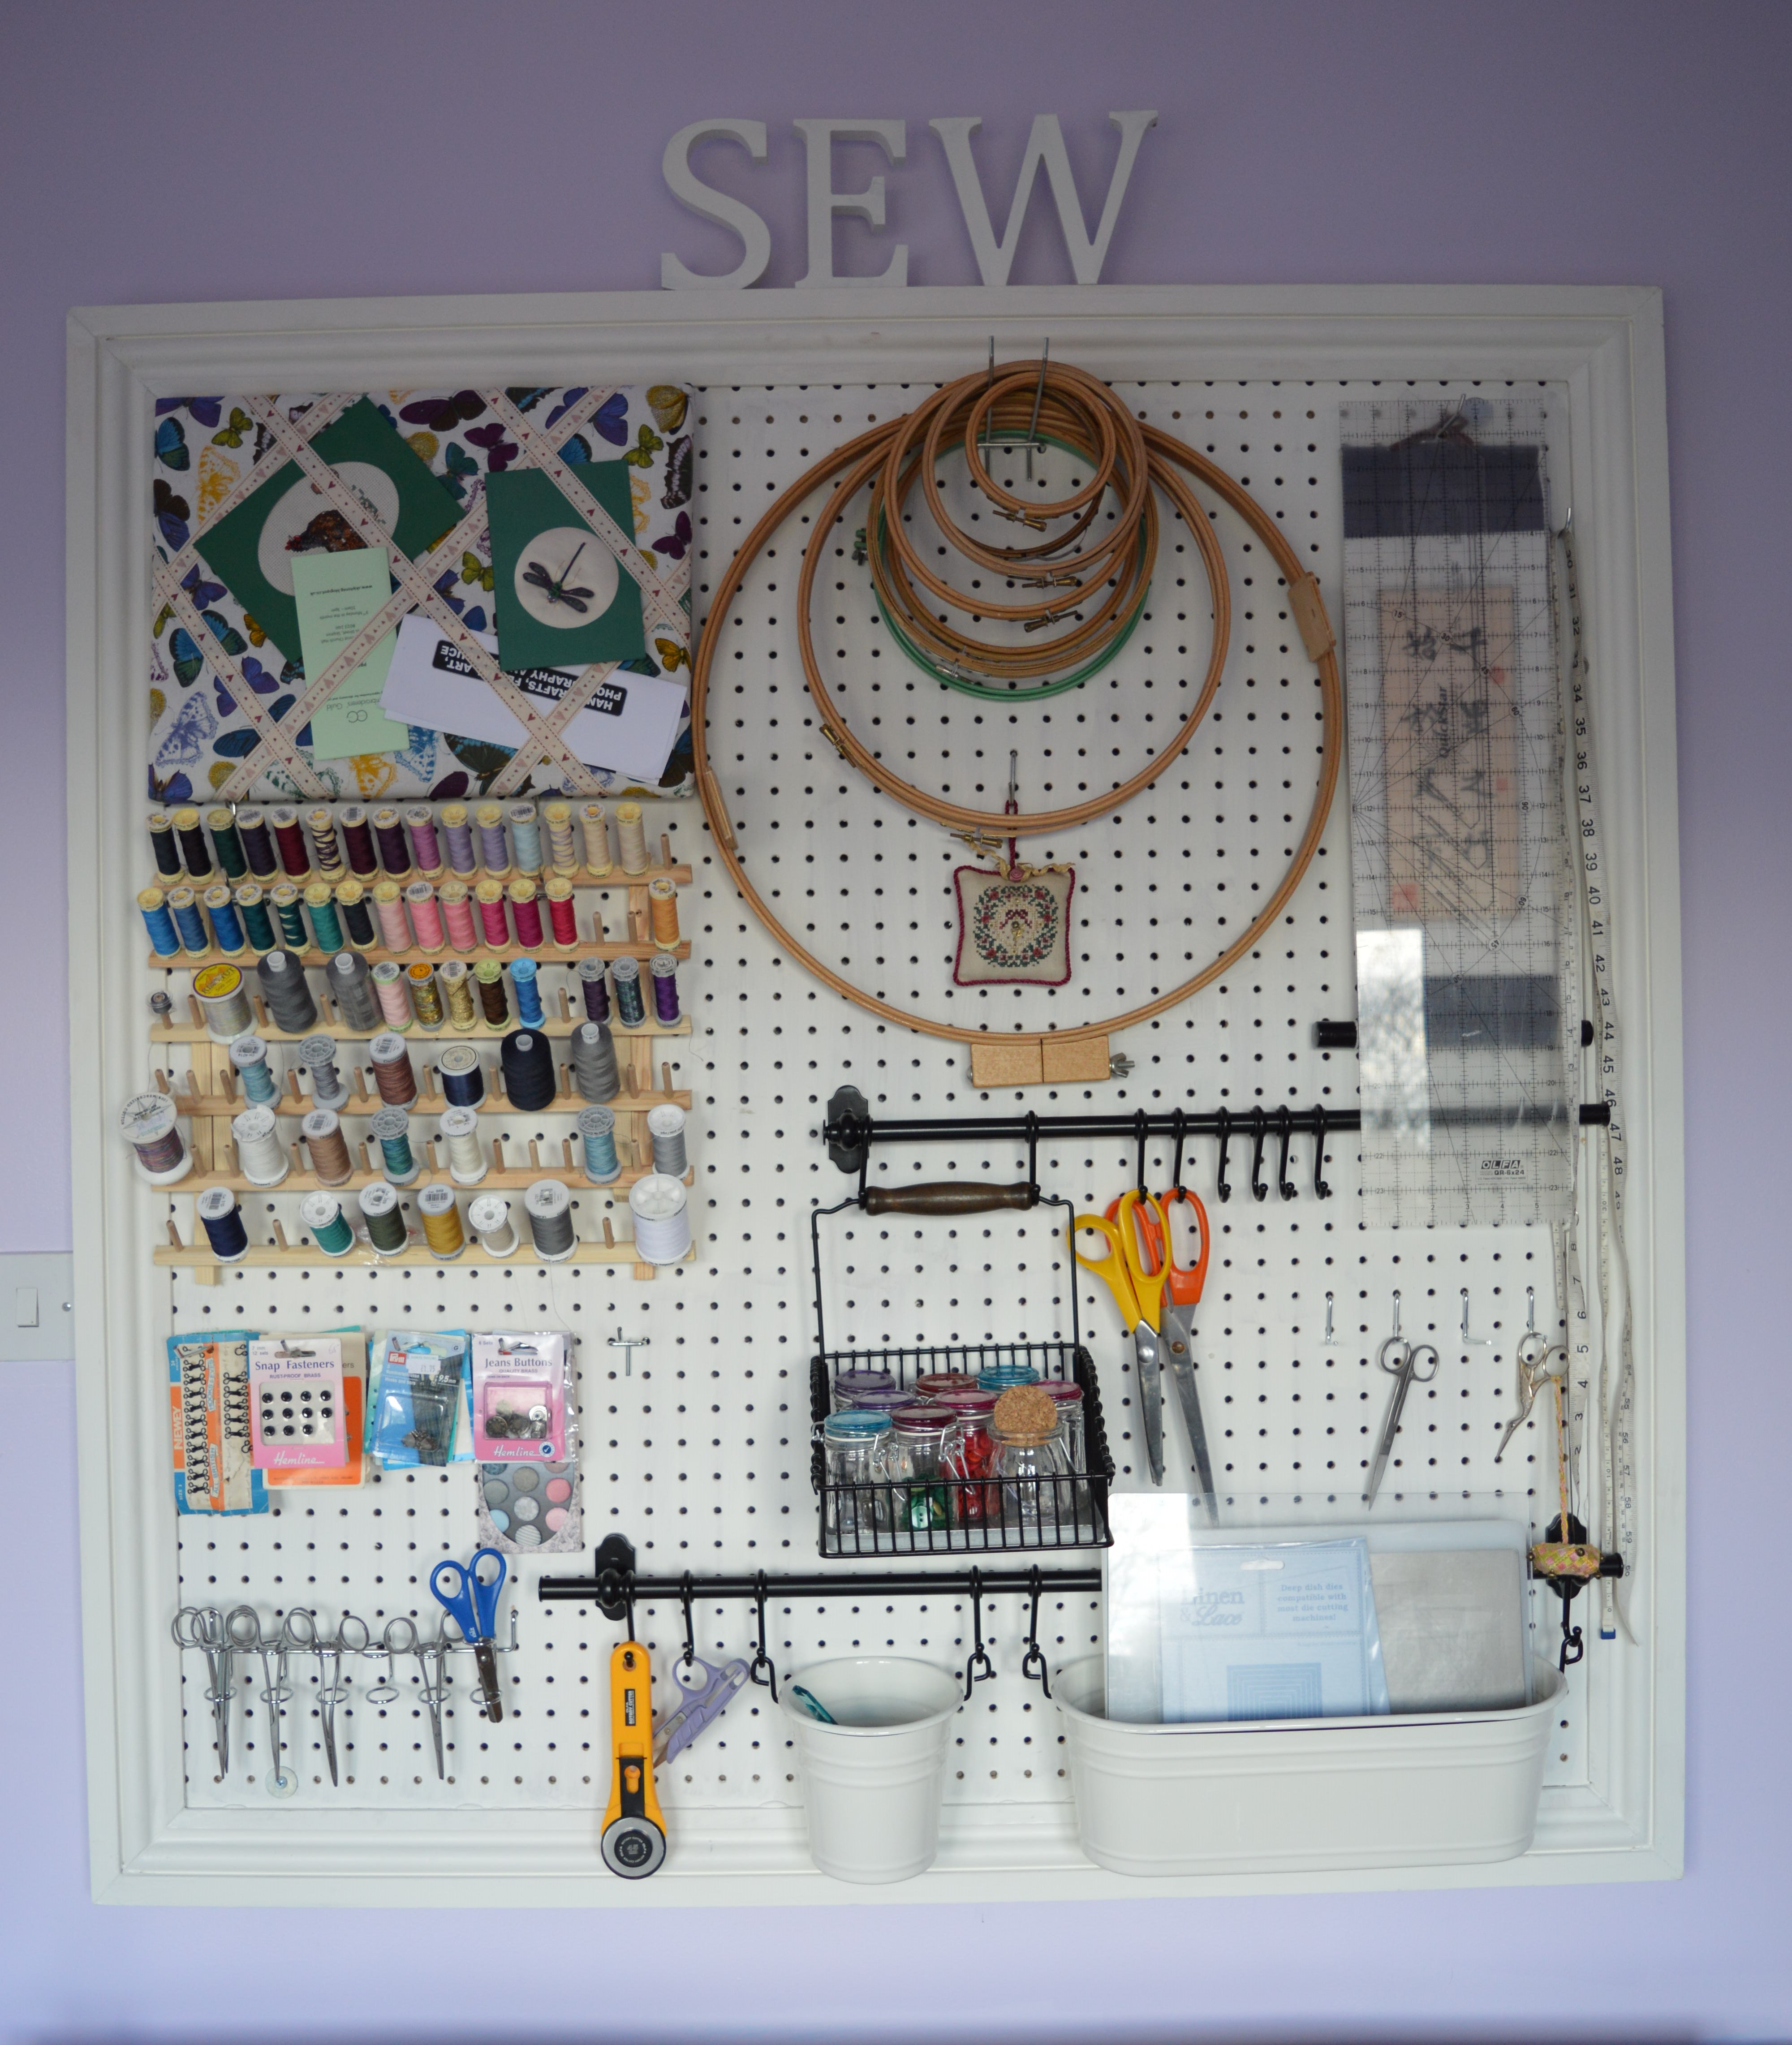
A trip to Ikea provided the hanging rails and enamel pails, these needed attaching before it went on the wall so I spent several days arranging things and seeing how it would work. I bought a mixed batch of pegboard hooks which has worked very well. The cork board (AKA Chocolate Firescreen!) is actually just sat on two hooks, the thread holder is from ebay and that is hung on hooks too. The hook collection included a screwdriver holder, this proved ideal for holding artery forceps (very useful, every home should have several!!)

Sewing Room PegboardLonger hooks proved useful for the quilting rulers and my collection of embroidery frames. I wasn’t planning originally to hang up all my haberdashery stuff, but having found I had rather a lot of press-stud cards etc (that’s what happens when you impulse buy for earrings instead of checking stock!) I hung them up and rather liked the effect.

The Ikea basket is handy for little spring top jars I bought at Poundstretcher for 50p each, I’ve got various buttons in them, a bottle of red ones, green ones, cute ones…

Sewing Room PegboardOnce I was happy with the arrangement I persuaded James (my eldest) to come round and put it up, I found some wood in the shed for battens to hold it just off the wall so I could still put the pegboard hooks in. James is a dab hand at doing that sort of thing, it would have taken me hours!

The finishing touch was some painted wooden letters from the craft section in our local garden centre.

My sewing room is coming together, not quite ready for the grand opening, but I’m winning!

Sewing Room Pegboard


Posted in Crafts, Serendipity, Sewing | Tagged , , | 16 Comments

April’s Challenge!

Some of you may have noticed that March’s challenge sort of disappeared under the radar…life just sort of took over!!!

cooltext156747814765691I was all geared up and keen to make my first pair of ginger jeans, I’d got the stretch denim, top-stitching thread, zip, jeans button…but I lost the download when I got my new computer, apparently the download section of your computer is not a storage place for downloads (well you learn something new every day!!). Closet Case Files kindly sent me another link but since then I’ve not had a moment to make them!

We’re just at the beginning of a lot of house decorating and reorganising etc, I’ve just about finished a three way swop of rooms upstairs…James’s room is becoming the guest room, the old guest room is my new super-duper sewing room, and Helen has her eyes on my old sewing room as a walk in wardrobe!!! So this month has been taken up with painting and moving furniture, not what I had in mind at the beginning of the month…and unfortunately my Ginger Jeans are not going to get made in April either!!!

B5006aMy monthly challenge for April has got to be to make two bags. I’ve entered two in the local show handicraft section so I’d better make them as it’s in the middle of May!

I’ve just started Butterick 5006 which is a large tote bag with lots of pockets, it’s officially a knitting bag and the pattern includes extras like a crochet hook roll up case and a pretty pincushion, if I manage to make the extras it might just give me the edge in the competition!!

The second bag is in a Lisa Lam book I’ve got, it’s a satchel, I’ve got some pretty floral furnishing weight fabric ready to make it.


Satchel…I will get those Ginger Jeans made, just not this month, I’ve got two quilts to make as well, one for the Hands2Help challenge which will just be a quick jelly roll race quilt. The second is for my goddaughter, I’m feeling very honoured as she has asked me to make her a quilt for her 18th birthday present, the fabric is hopefully flying over from the States as we speak 🙂


Posted in My Monthly Challenge, Serendipity, Sewing | Tagged , | Leave a comment

Splendid Sampler Quilt

splendid_button_TMWell we’re now eight weeks into the Splendid Sampler quilt along and it’s certainly pushing me out of my comfort zone! This week at home I’ve been doing lots of decorating and reorganising, I decided on Friday to have a rest day, otherwise known as a sewing day, so I caught up with my SS and I’ve got four blocks to show you;

Block 13 is a pinwheel design called Scrap Stars by Corey Yoda, I’ve not done a star shaped block before so I was really pleased with how well this one came out, I even managed to get my center nice and neat!

Splendid Sampler Continue reading

Posted in Serendipity | 3 Comments

Me-Made-May

Me-Made-May‘I, Margaret of https://thecraftycreek.com sign up as a participant of Me-Made-May ’16. I endeavour to wear one item of handmade clothing or accessory each day for the duration of May 2016′

That’s it, I’ve done it, I’ve signed a pledge for Me-Made-May!

Me-Made-May is organised by Zoe on So Zo…What Do You Know? It’s a month long challenge to wear items you’ve made yourself, everyone write’s their own personal challenge so you can make it as hard or easy for yourself as you want, I always include accessories as a useful ‘get out of jail free’ card!

Butterick 6258I did it for the first time last year and I found it really useful at identifying gaps in my wardrobe. Last year my gap was tops, I had lots of skirts, no trousers (still no trousers!!) but very few tops. Over the summer I tried to rectify that, I’ve made several sleeveless tops and quite a few shirts. Last May I also hadn’t discovered knits either, all my cardigans will come in useful for layering up, May in Yorkshire is not necessarily that warm!

So if you fancy a bit of a challenge, sign up to Me-Made-May, it’s a bit of fun but I found it quite useful exercise too, I’ll try and take photo’s each day (if I can find a willing photographer!) and maybe do a weekly post to show you 🙂

Posted in Dressmaking, Serendipity | Tagged | 2 Comments

Mary the Hippo


DSC_0005 (2)

Scottie DogMeet Mary, a very feminine hippo! I needed another soft toy for the show so I decided to make one that could be a large pincushion afterwards. I did this last year and it worked very well, I love my Scottie dog pincushion and a second one won’t come amiss.

I found the pattern on Stitch, Craft, Create. They named her, not me! Mary isn’t the first name that comes to mind for a hippo, but it seems to have stuck! The fabric was some I had in my stash, it’s one of those that is really pretty, I just never quite found a use for it. It’s got teacups and teapots on it. Continue reading

Posted in Crafts, Serendipity, Sewing | Tagged , | 11 Comments

Trellis Bead Bangle

One advantage I’ve found of moving sewing rooms is discovering UFO’s tucked away, completely forgotten about! I found a beaded bangle I had started two years ago at Denman.

Trellis BangleDenman is the Women’s Institute’s own residential college, it’s always a treat to go there and every other year our federation organises a big trip, three nights with a choice of courses. Last time it was beaded jewelry ( I just put my name down for whatever craft class is on!) we made beaded flowers, pendants, earrings etc. The last project was a swarovski encrusted pendant, just a bit too glitzy for me and quite expensive with all the crystals, I decided to give that one a miss. The tutor had some gorgeous bead kits, I made a necklace first, which I have to say I’ve worn quite a few times. On the last morning I started a trellis beaded bangle. It was quite complicated to get started, or rather to get the idea of how the pattern worked, so I was determined to sort it in my mind before I left, so the tutor was on hand to help. I made about an inch of the bangle, just enough to be able to pick it up again later…

…only I didn’t think it would be nearly two years!

Trellis BangleThe tutor was Sally Boehme, she was lovely and very patient. The bangle I chose was made from three different beads, some gorgeous peacock coloured seed beads, some pale amber seed beads and a lavender Czech faceted beads.

The peacock seed beads make a net around the Czech beads, with the amber ones acting like the king pin, linking everything together. It took a while to get my head round it again, it helped that I remembered how to hold it (fairly taut with the thread over a finger) to keep the pattern clear. On one row the three Czech beads are added between each amber bead, you can see them nestling here.

Trellis Bangle

The next row is where the peacock beads are added, so you just keep going round in a circle.

I started it at around 9.30 last night, I thought it would take quite a while but it was surprising how quickly it grew. I had a bit of a panic when I realized I was going to have to join a new thread in, I went on you-tube and found a very helpful tutorial on Bead School!

I finished it this morning, I thought it might be a bit complicated to join the ends together, but with Sally’s instructions it was actually fairly easy, just zig-zagging with beads.

Trellis Bangle

I think it’s a really pretty bangle, it’s quite flexible too so I think it will be fairly comfortable to wear. It’s a little snug getting it over my hand, I’m not pushing my luck with it until after the local show as it’s another entry completed, I’m making good progress so far 🙂

Trellis Bangle

Posted in Crafts, Serendipity | Tagged , | 6 Comments

Rose Fabric Box

Fabric Box

When I was moving all my sewing stuff into my new sewing room last week I found a box making kit which I had completely forgotten about, it was quite fortuitous really as I was looking at box kits on Google only a couple of weeks ago! Even luckier was the fact that despite no longer being in it’s bag, I still had all 28 pieces and the instructions!! I thought I’d better make it up before I lose it again! Continue reading

Posted in Serendipity | 11 Comments

Haberdashery Earrings

Earrings by Judith BrownI’ve been making myself some earrings, mainly because there’s a certain show coming up with a jewelry class…

Ali from Thimberlina gave me the idea with a photo she posted, they were made by Judith Brown, she has some stunning jewelry on her website, though none with press-studs at the moment that I could see.

I bought a card of press-studs in mixed sizes, together with some big ones that had 6 holes in. Samuel Taylors in Leeds had the jewelry bits, the earring hooks and the big circle. I thought I’d bought the usual jump rings, but actually they were split rings, a bit like a mini key ring. Whilst these were very fiddly to thread on, I found them easier to get a neat finish. My artery forceps came in very useful for holding the rings firm!

Making earrings

My first pair were fairly simple, four press-studs gradually getting smaller. I sussed out the technique on these, like which way round to attach studs to get them to face the right way! I also found out they’re not easy to photograph, I finally decided a sherry glass might work!


Press-stud earrings

I then started getting a bit carried away, I bent some eyes (as in hook and…) so they could be slotted onto the ring. I felt they needed a spacer of some kind. A rummage in my bead box and I found some tiny black beads which would just (some of them!) slide onto the ring. Three of these either side of the eyes worked out perfect.

The large press-stud has six holes so I could attach rings to the bottom three. My biggest challenge was to reproduce it for the second earring!

The only thing I haven’t sussed is how to secure the whole thing on the hook, at the moment it’s just hanging there, I tried giving one a squeeze and broke it! I’ve a colleague at work who makes jewelry so I’ll check with her, I’m wondering about a tiny black bead either side with the tiniest blob of glue on.

They’re just a bit of fun, but it’s another entry completed 🙂

Sewing Earrings


Posted in Crafts, Serendipity | Tagged , , | 4 Comments