I’ve finally managed to catch up with my phenology wheel, this is a group challenge from my stitch group, Skipton Stitchers. I was behind before I went on holiday over for six weeks having decide to do rather a lot of French knots for February! Three weeks ago I’d just finished March…
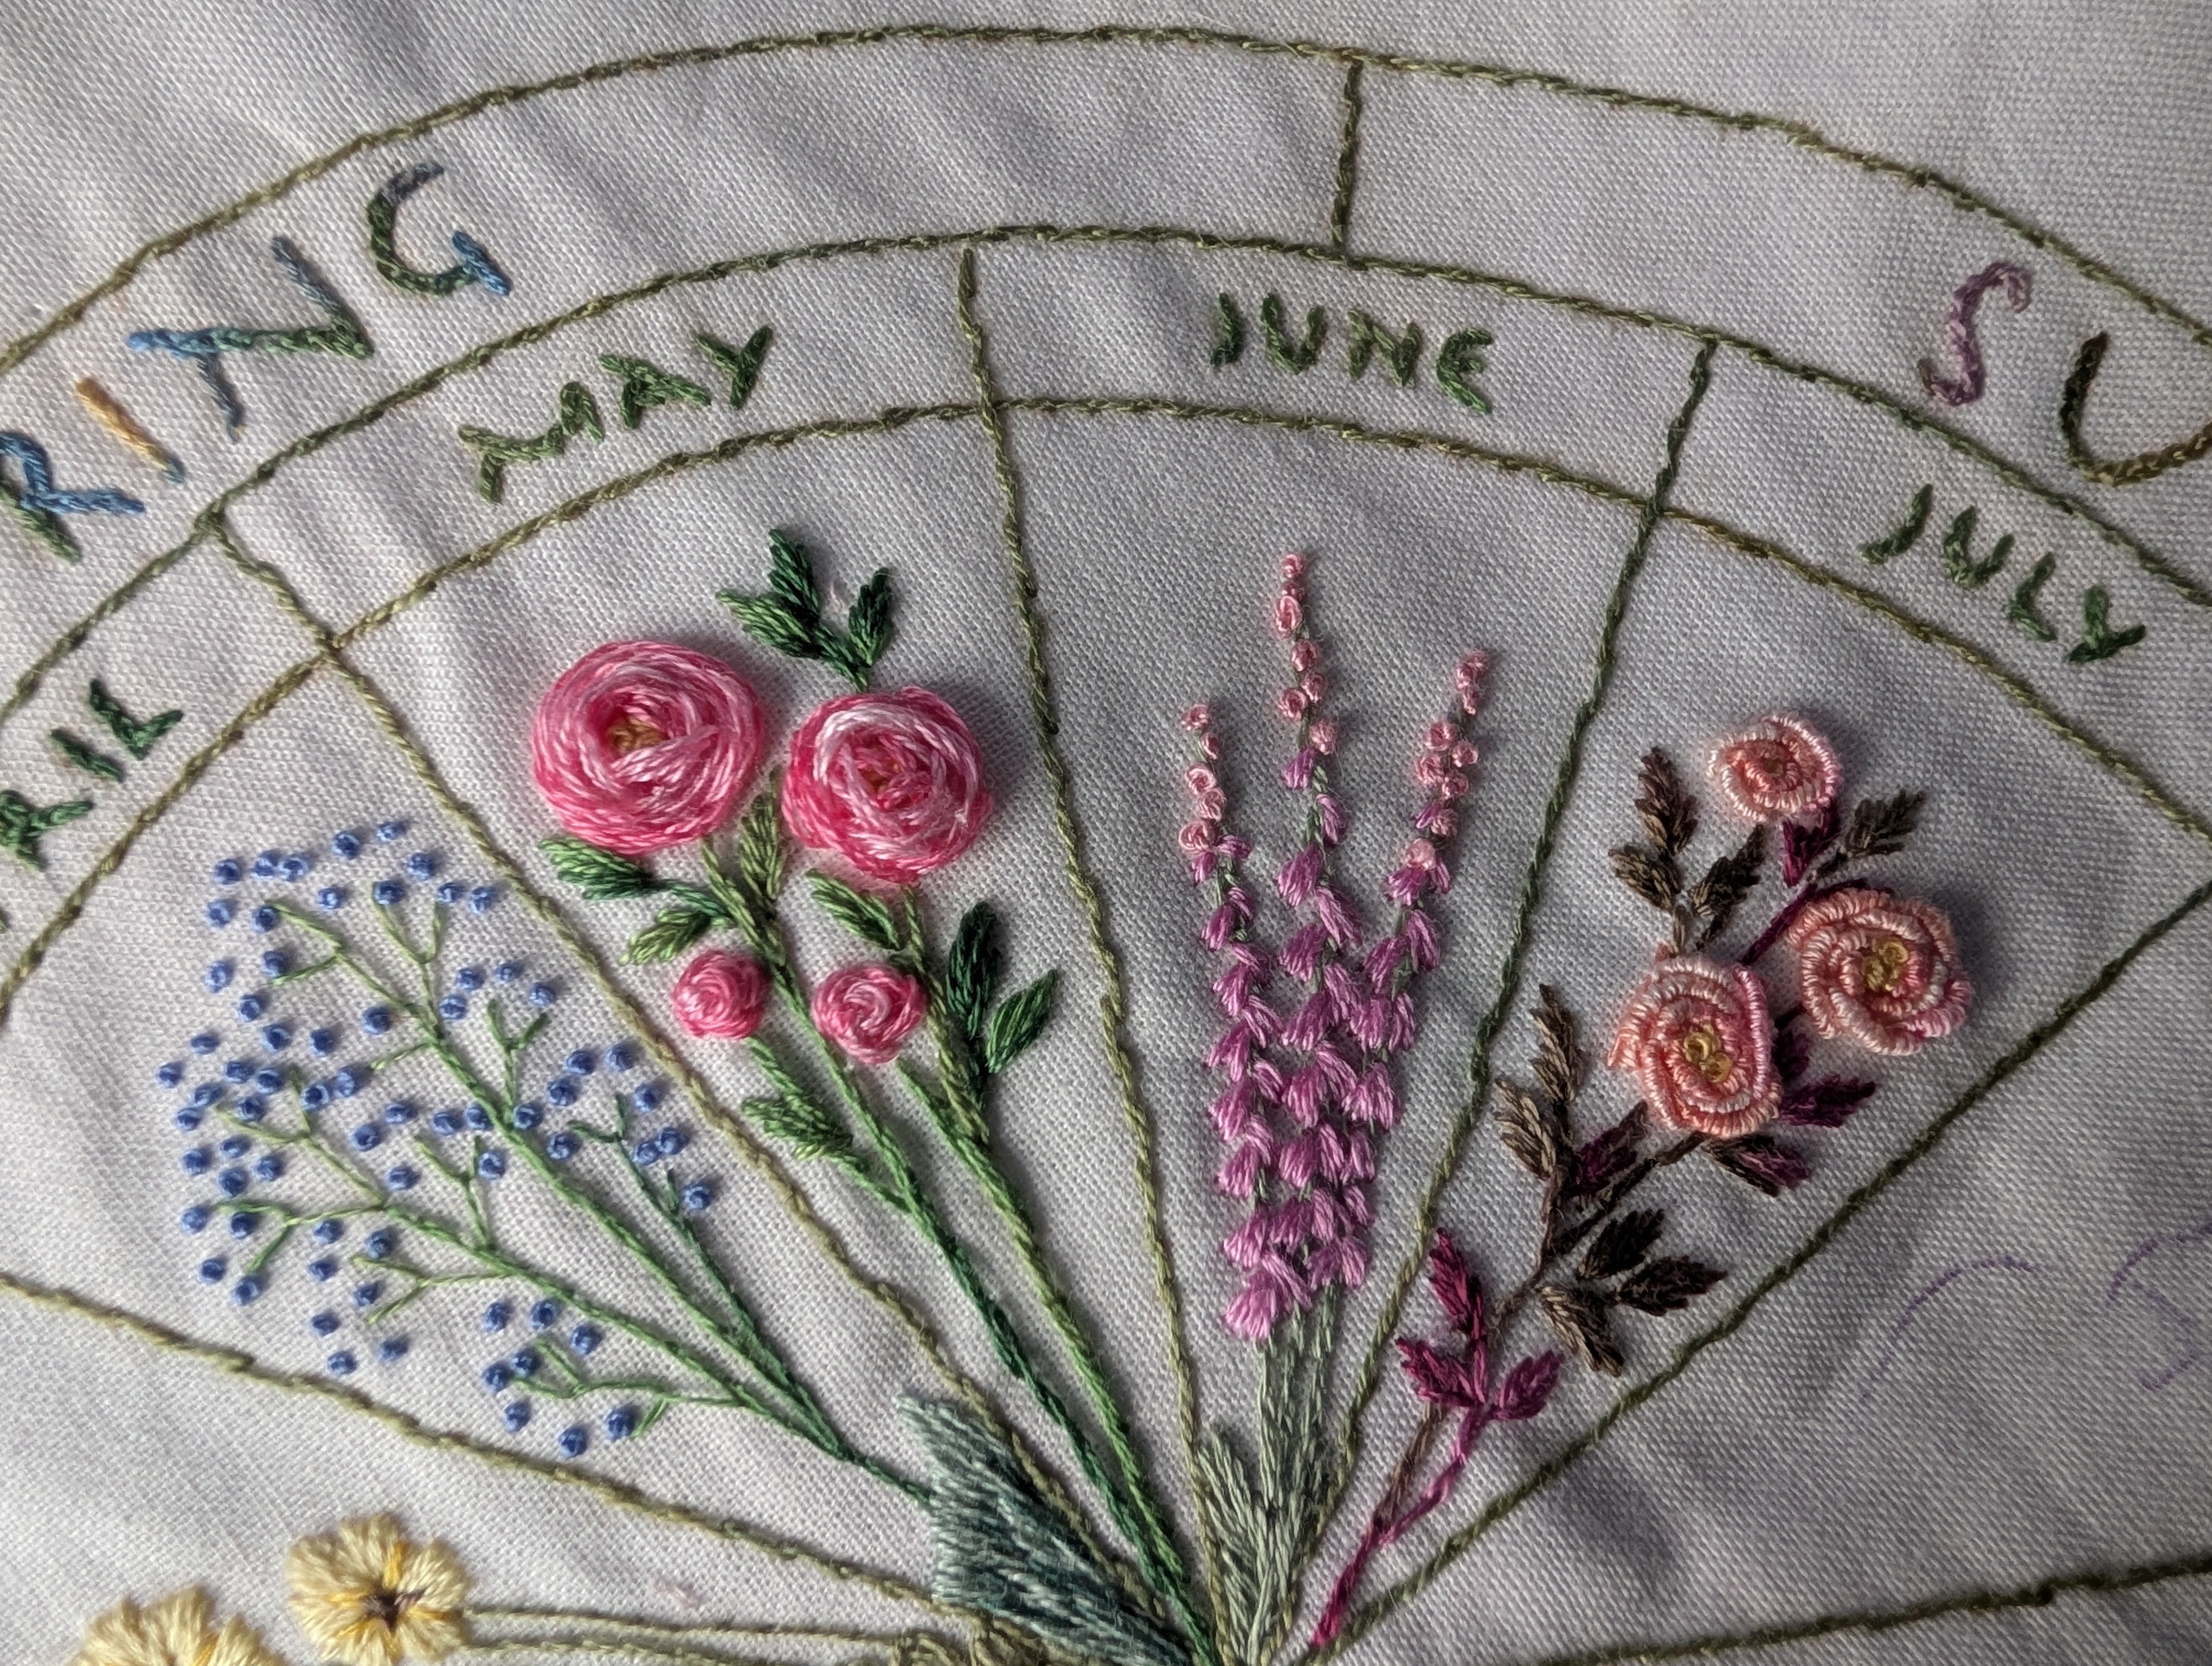
I made a concerted effort to catch up, I stitched brunnera Jack Frost for April, this was the first brunnera I grew, I love it, it has intense blue flowers, a bit like forget-me-nots, but they flower in spring, have variegated foliage and they’re perennials…and they’re happy in clay soil! It was yet more French knots!!
For May I chose to stitch paeonies, I missed most of them this year with being away. I just used woven wheel stitch with a variegated thread. I kept it fairly loose so it’s actually quite proud of the background.
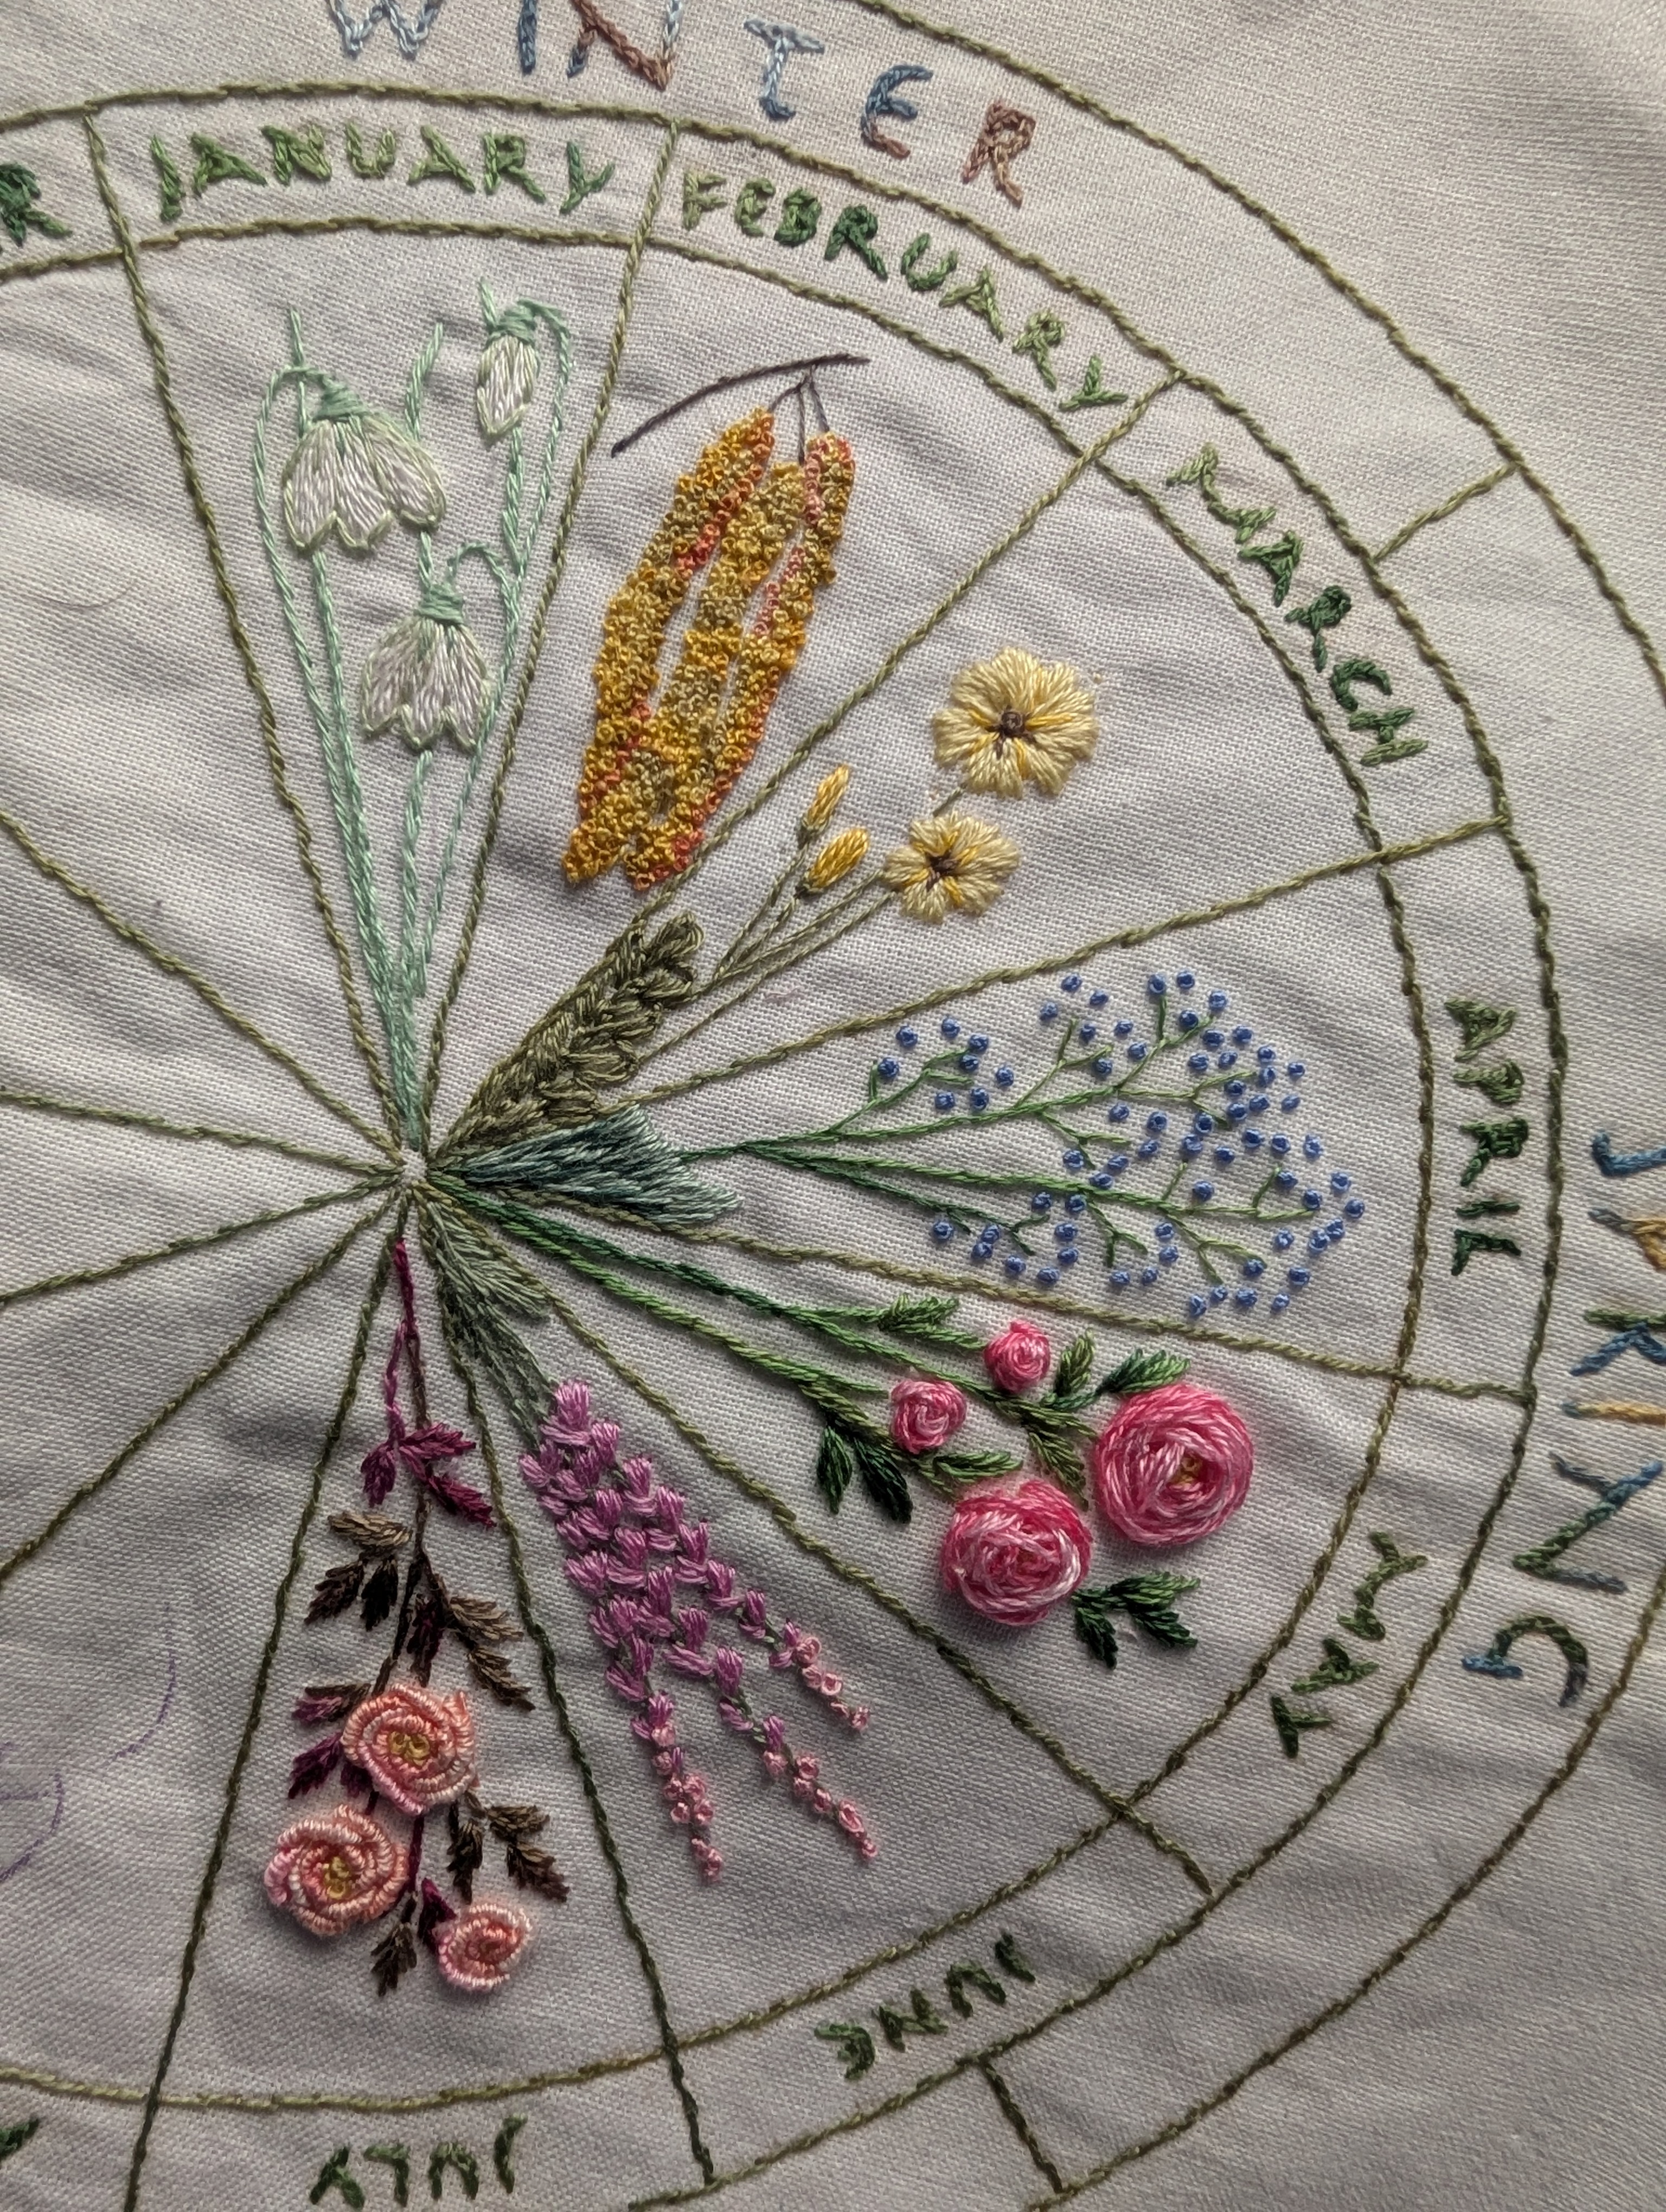
When we came back from our big adventure in mid June, the garden was full of foxgloves. I embroidered these with straight stitch and a few French knots at the top. July is rose month, I used a variegated peach thread with bullion knots round a central French knot. Here’s the phenology wheel so far…
I’m planning to do clematis for August and echinacea for September, not sure about the rest! I might add an extra primrose too, as that space looks a bit empty.
Hopefully now I’ll keep up to date, whilst I have got more holidays planned this year, they’re only short breaks!
This stitch-a-long is organised by Avis, we all post every three weeks on our chosen project, please follow the links to see what every one else is stitching.
Over the last couple of weeks I managed to finish my stitched journal of our big adventure round Europe. When I had the idea of a stitch journal I wasn’t sure how it would come out but I am well chuffed with the result!
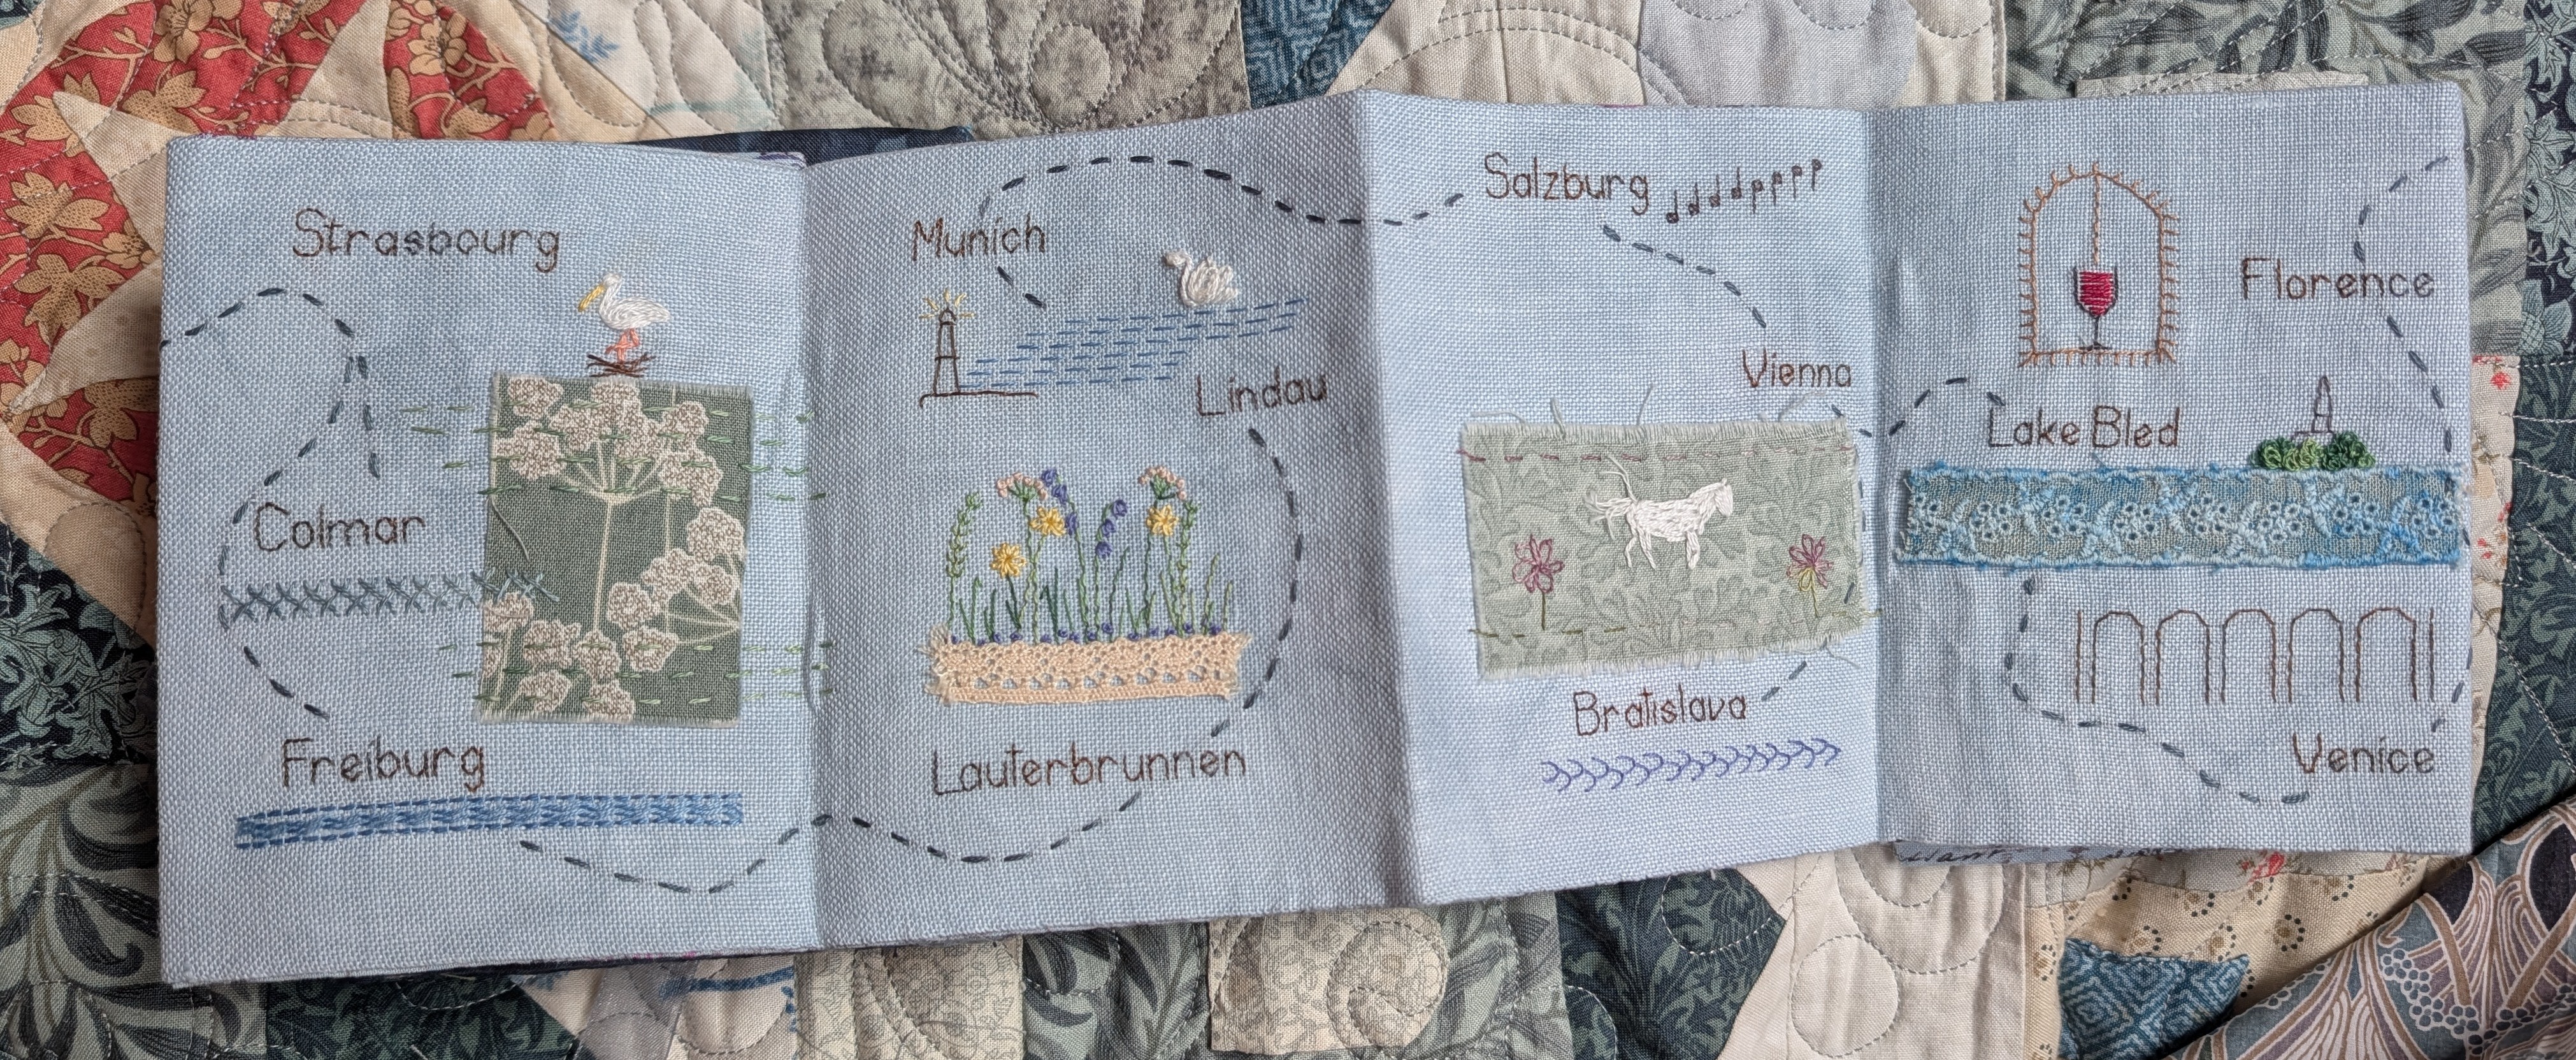
I took a strip of linen, some threads and a few scraps of lace and linen with me and stitched something to represent each place we went to. Before I went I pulled a thread top and bottom of the strip so I knew the straight outer edges, I also tacked lines where the page folds would be. I had a few places to finish off when I returned as I did get a bit behind, but the stitchings are as follows;
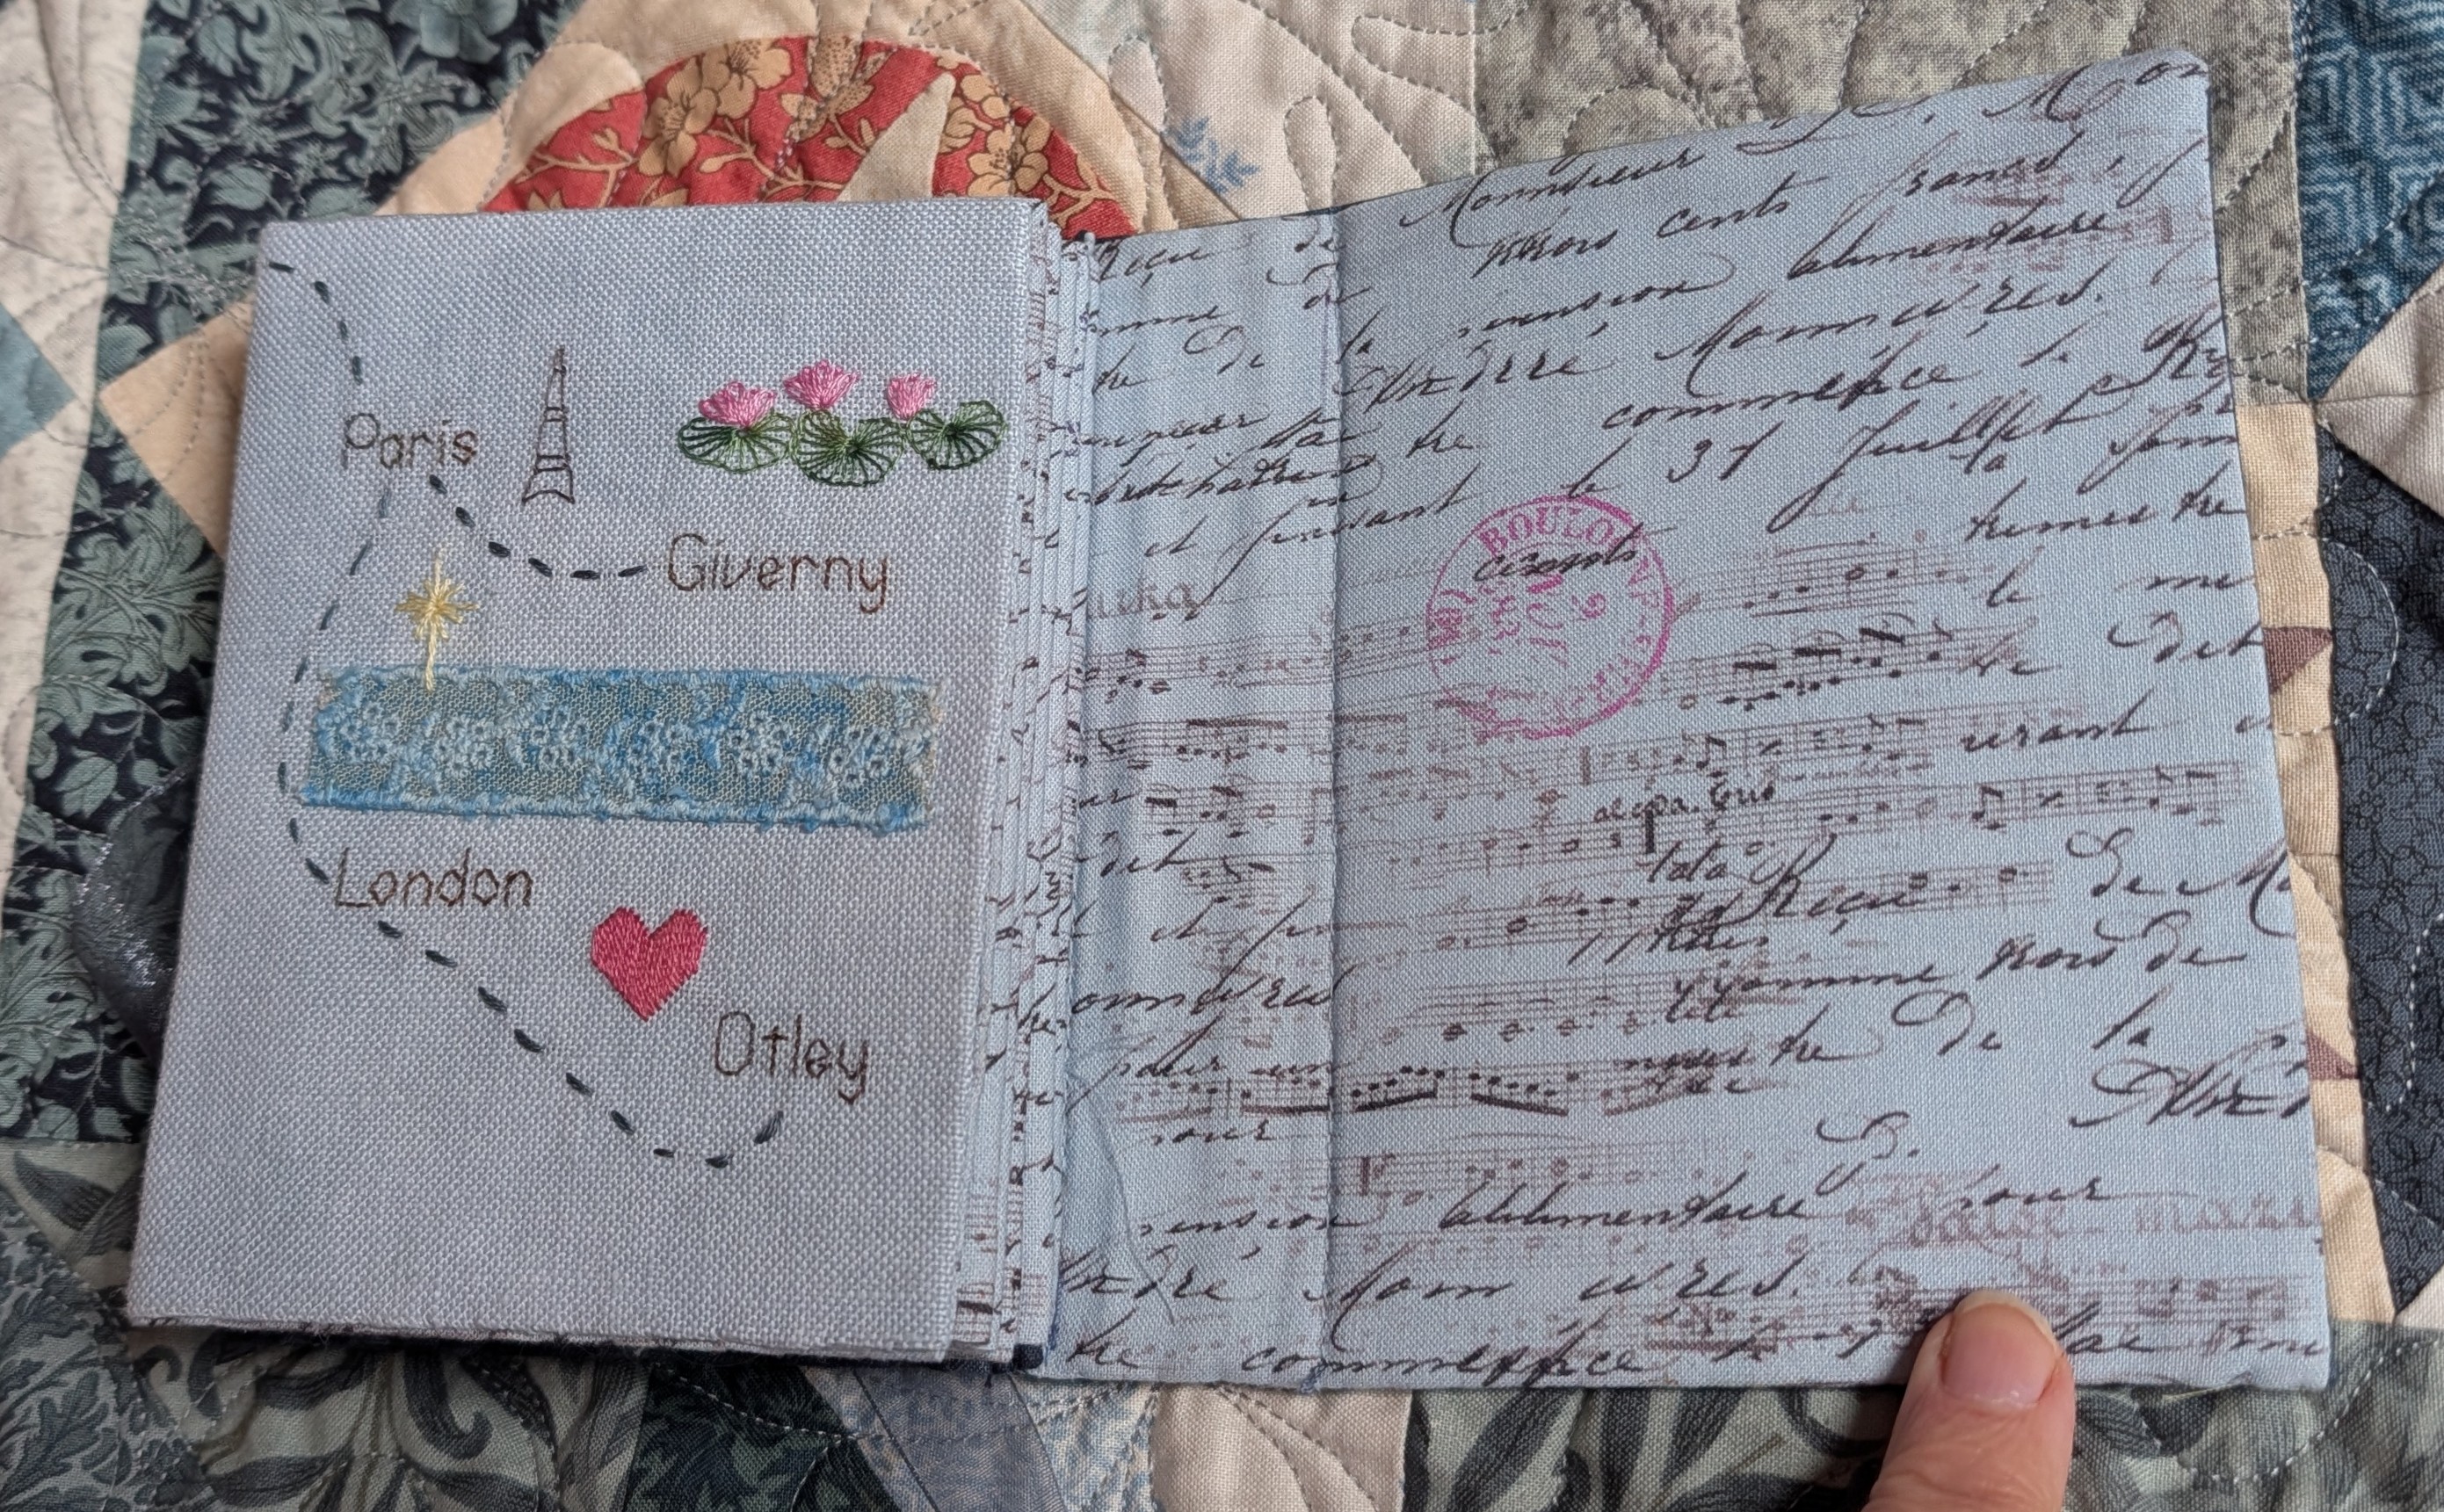
London – star for the Eurostar train and a strip of blue fabric for the English Channel
Ghent – wisteria, it was everywhere.
Bruges – lace
Maastricht- We stayed on a boat on the river
Cologne -Traditional German sausage
Trier- musical notes for an organ recital we went to.
Luxembourg – a very leafy city
Strasbourg – storks
Colmar – canals
Freiburg- narrow rills down each street in the old town
Lauterbrnnen – Meadows full of wild flowers
Lindau – Lake Constance and the lighthouse
Munich – swans
Salzburg – notes for the sSund of Music and Mozart
Vienna – White stallions
Bratislava – River Danube
Lake Bled – island with church on
Venice – Arches on buildings
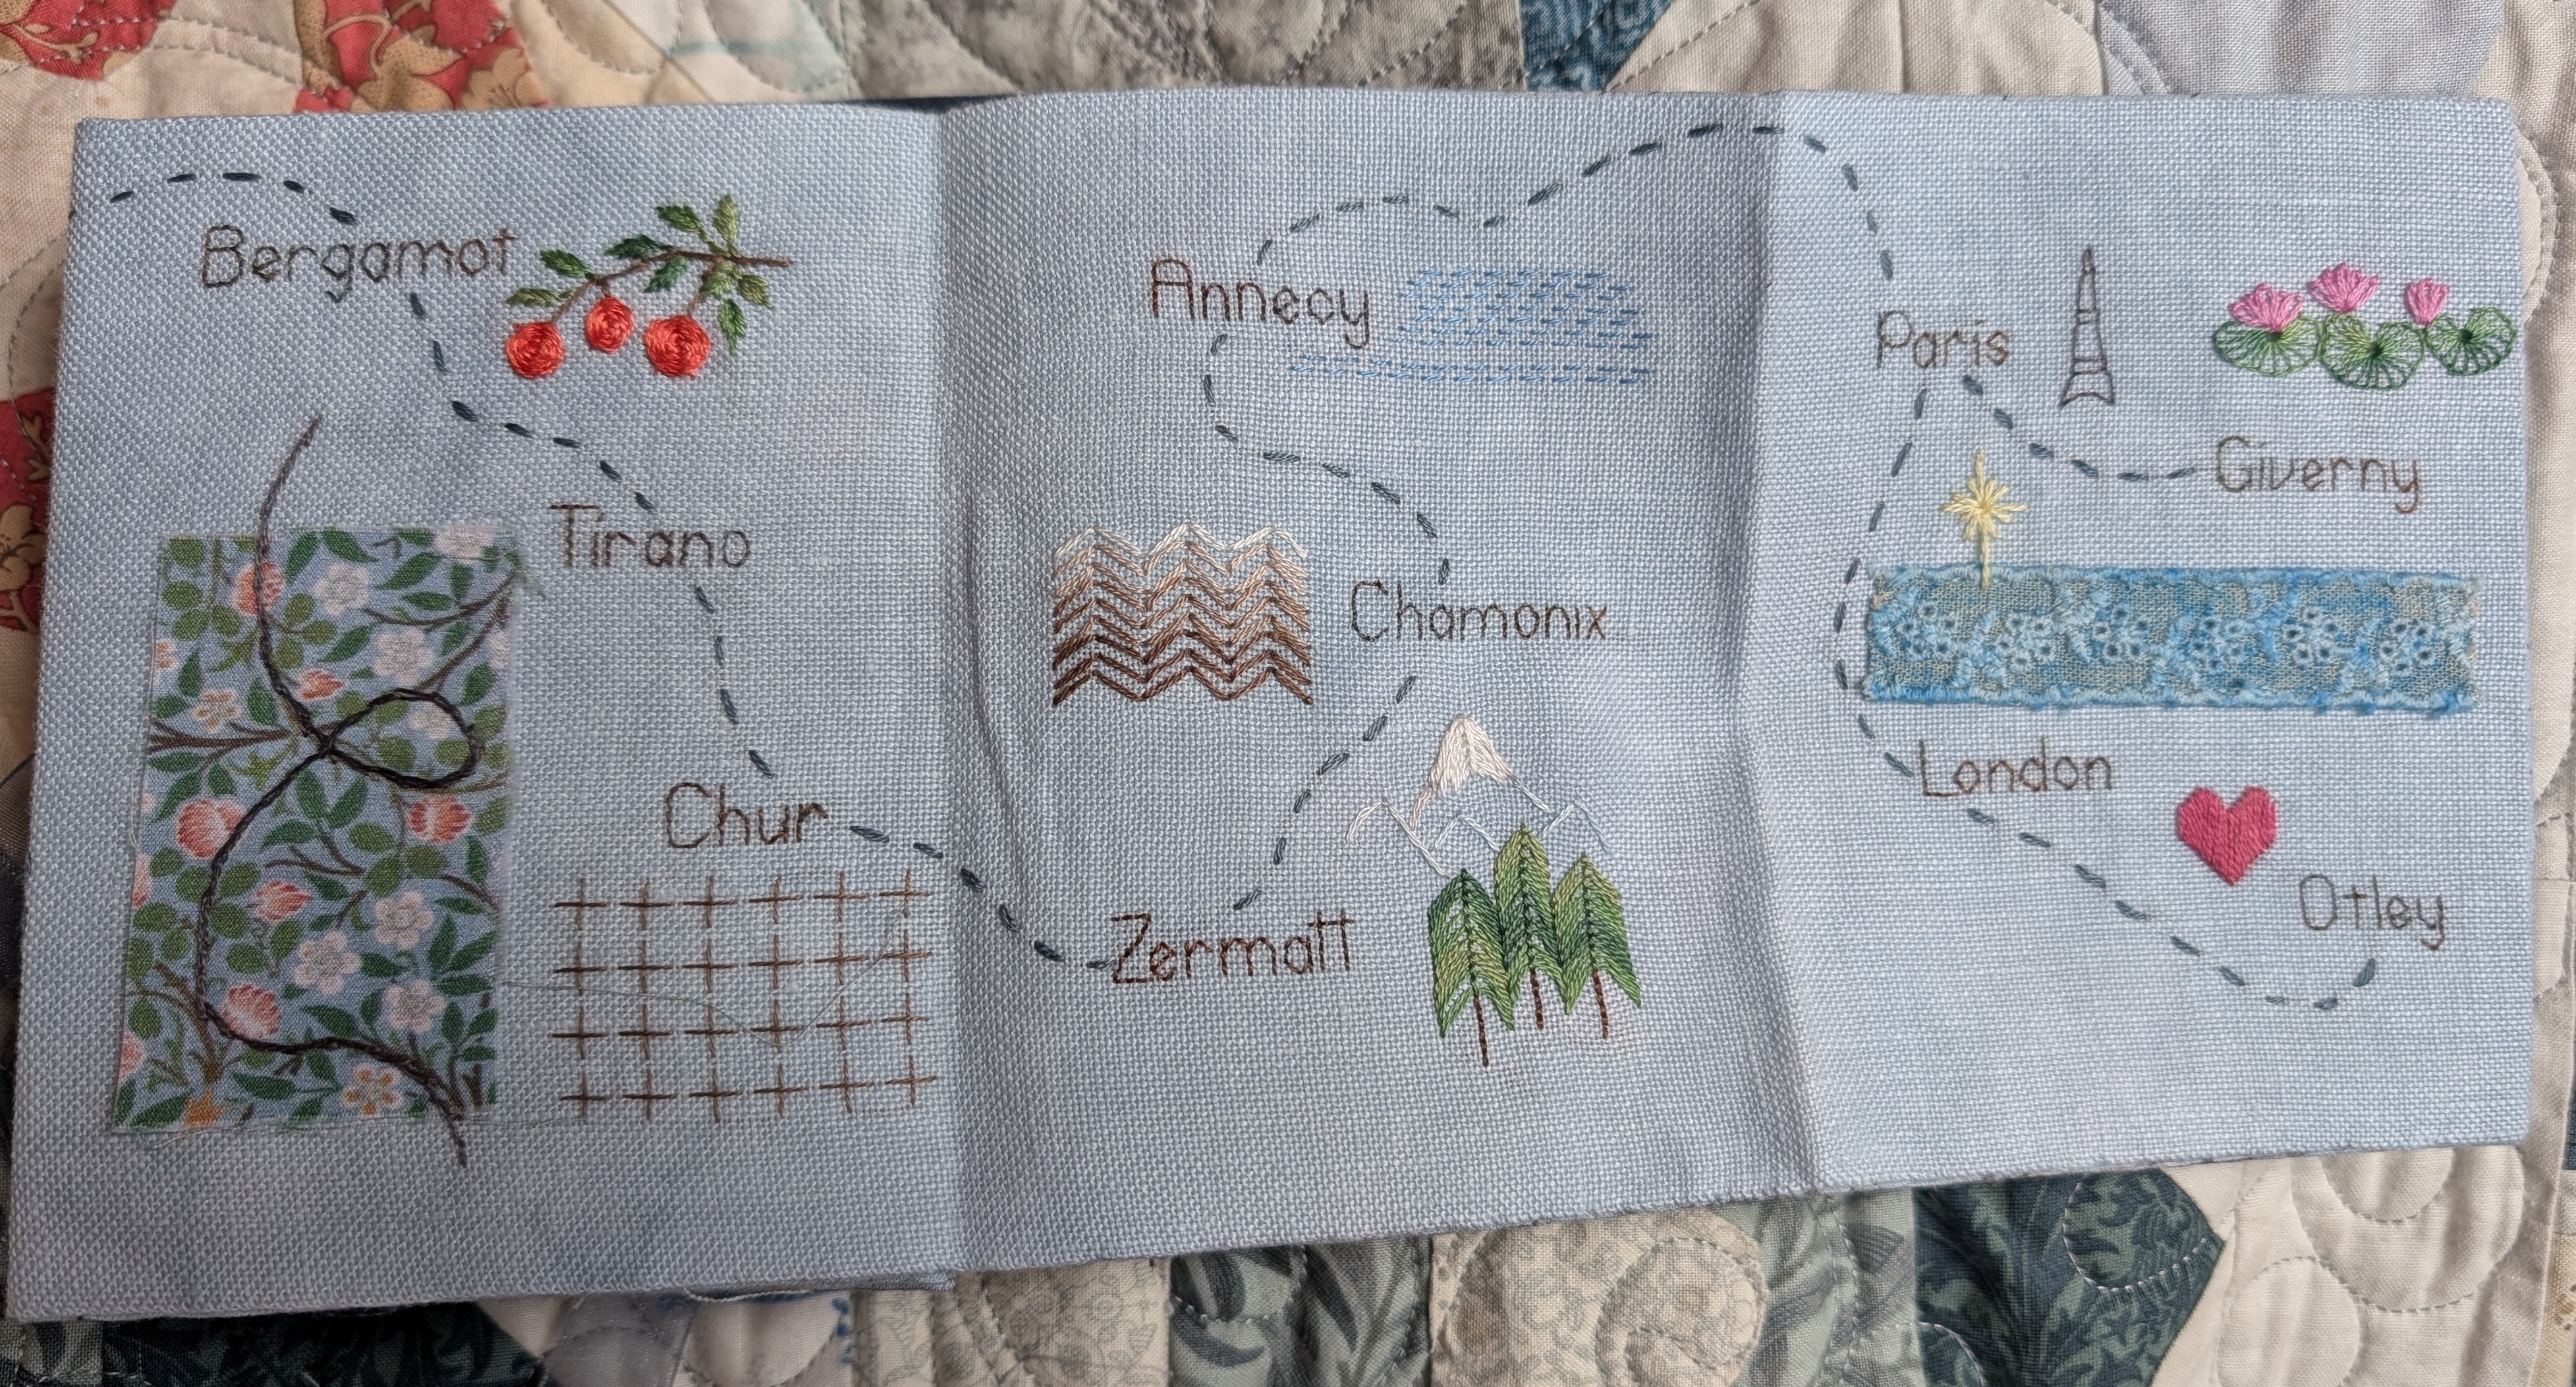
Bergamo – named after oranges.
Tirano – Start of the Bernina Express which also does a loop the loop
Chur – we stayed in an old prison
Zermatt – Matterhorn and forests
Chamonix – Mont Blanc and other mountains
Annecy – Lake
Paris – Eiffel Tower
Giverny – Monet’s garden
London – Eurostar back under channel
Otley where our other halves were waiting for us.
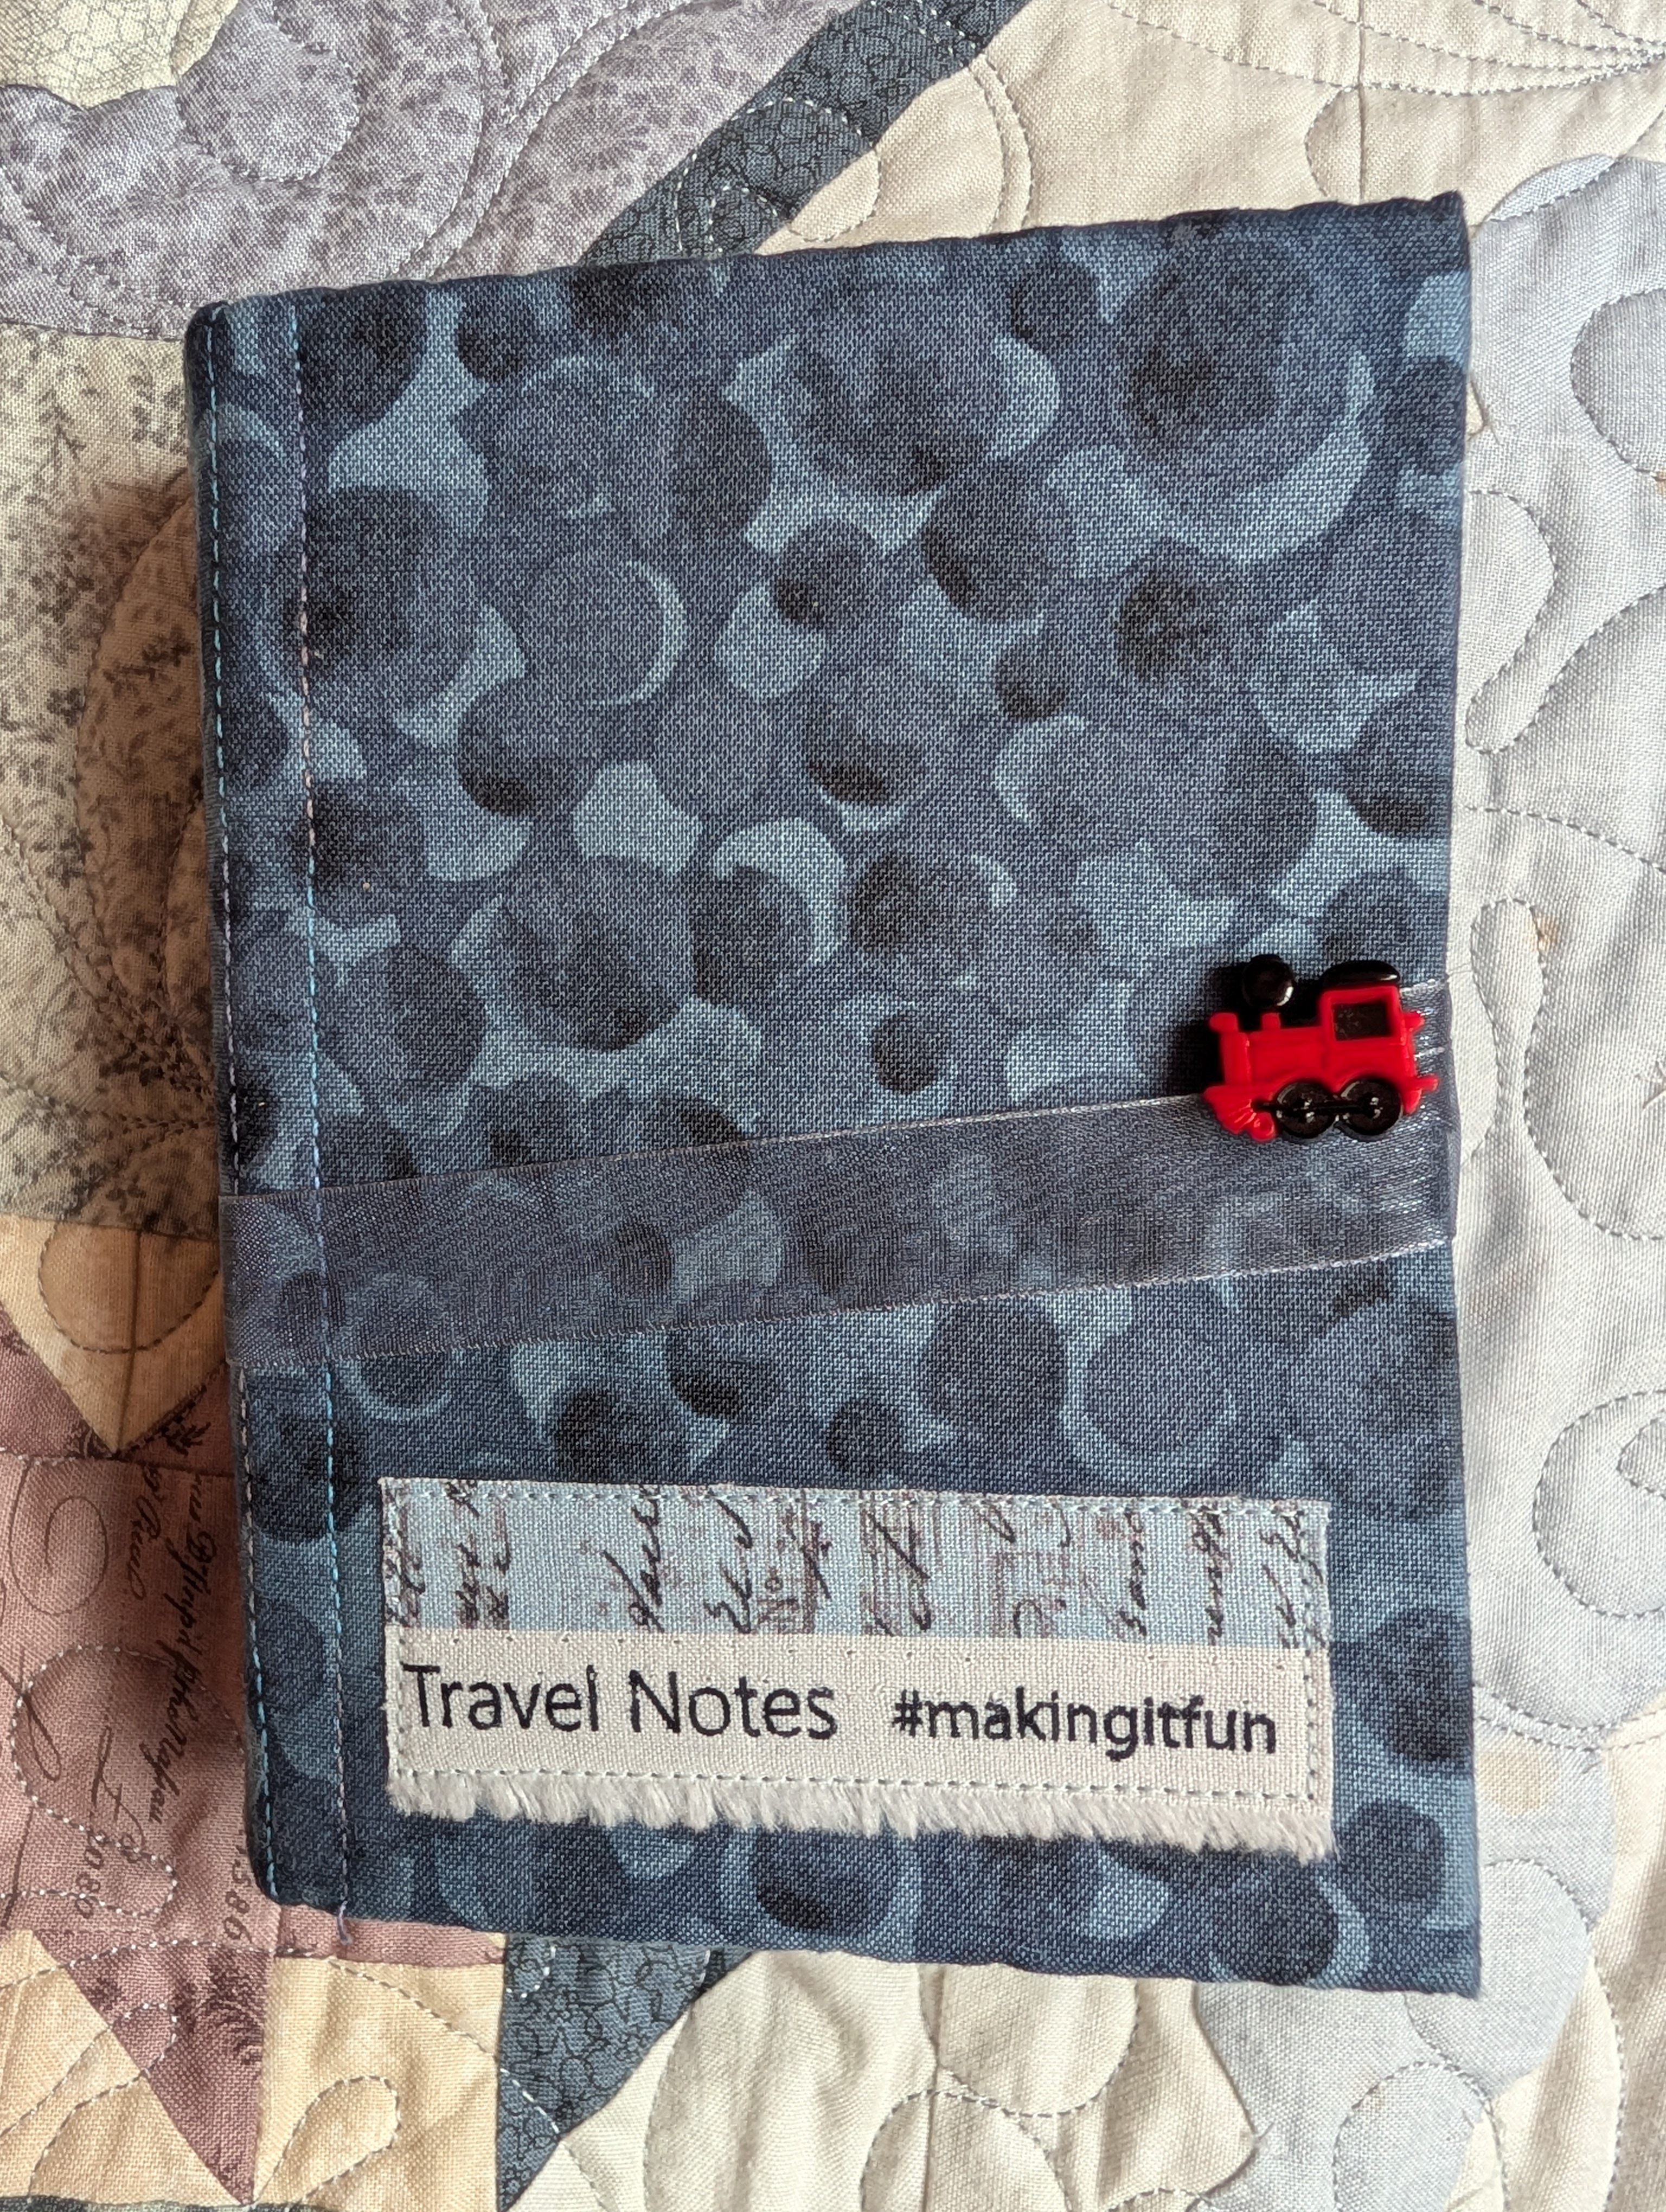
The pages are stiffened with some pelmet vilene, I wanted it fairly stiff so it would hold the folds OK. The cover is stiffened with bosal, I could have made it with the front and back cover separate, so they attached to the beginning and the end, but I decided I preferred a book with a spine, it does nicely hold it all in place.
I kept the front cover very simple. The name of the fabric I used to back the pages happens to be called ‘Travel Notes’ so a piece of the selvedge seemed perfect for the title.
I bought the two cute little train buttons from Etsy and then added a length of organza ribbon for the tie. I’ve put a short video on Youtube of the book so you can see better how it flows. My daughter is a whizz at these things so she has also taken a video too to edit so I can put it on Instagram!
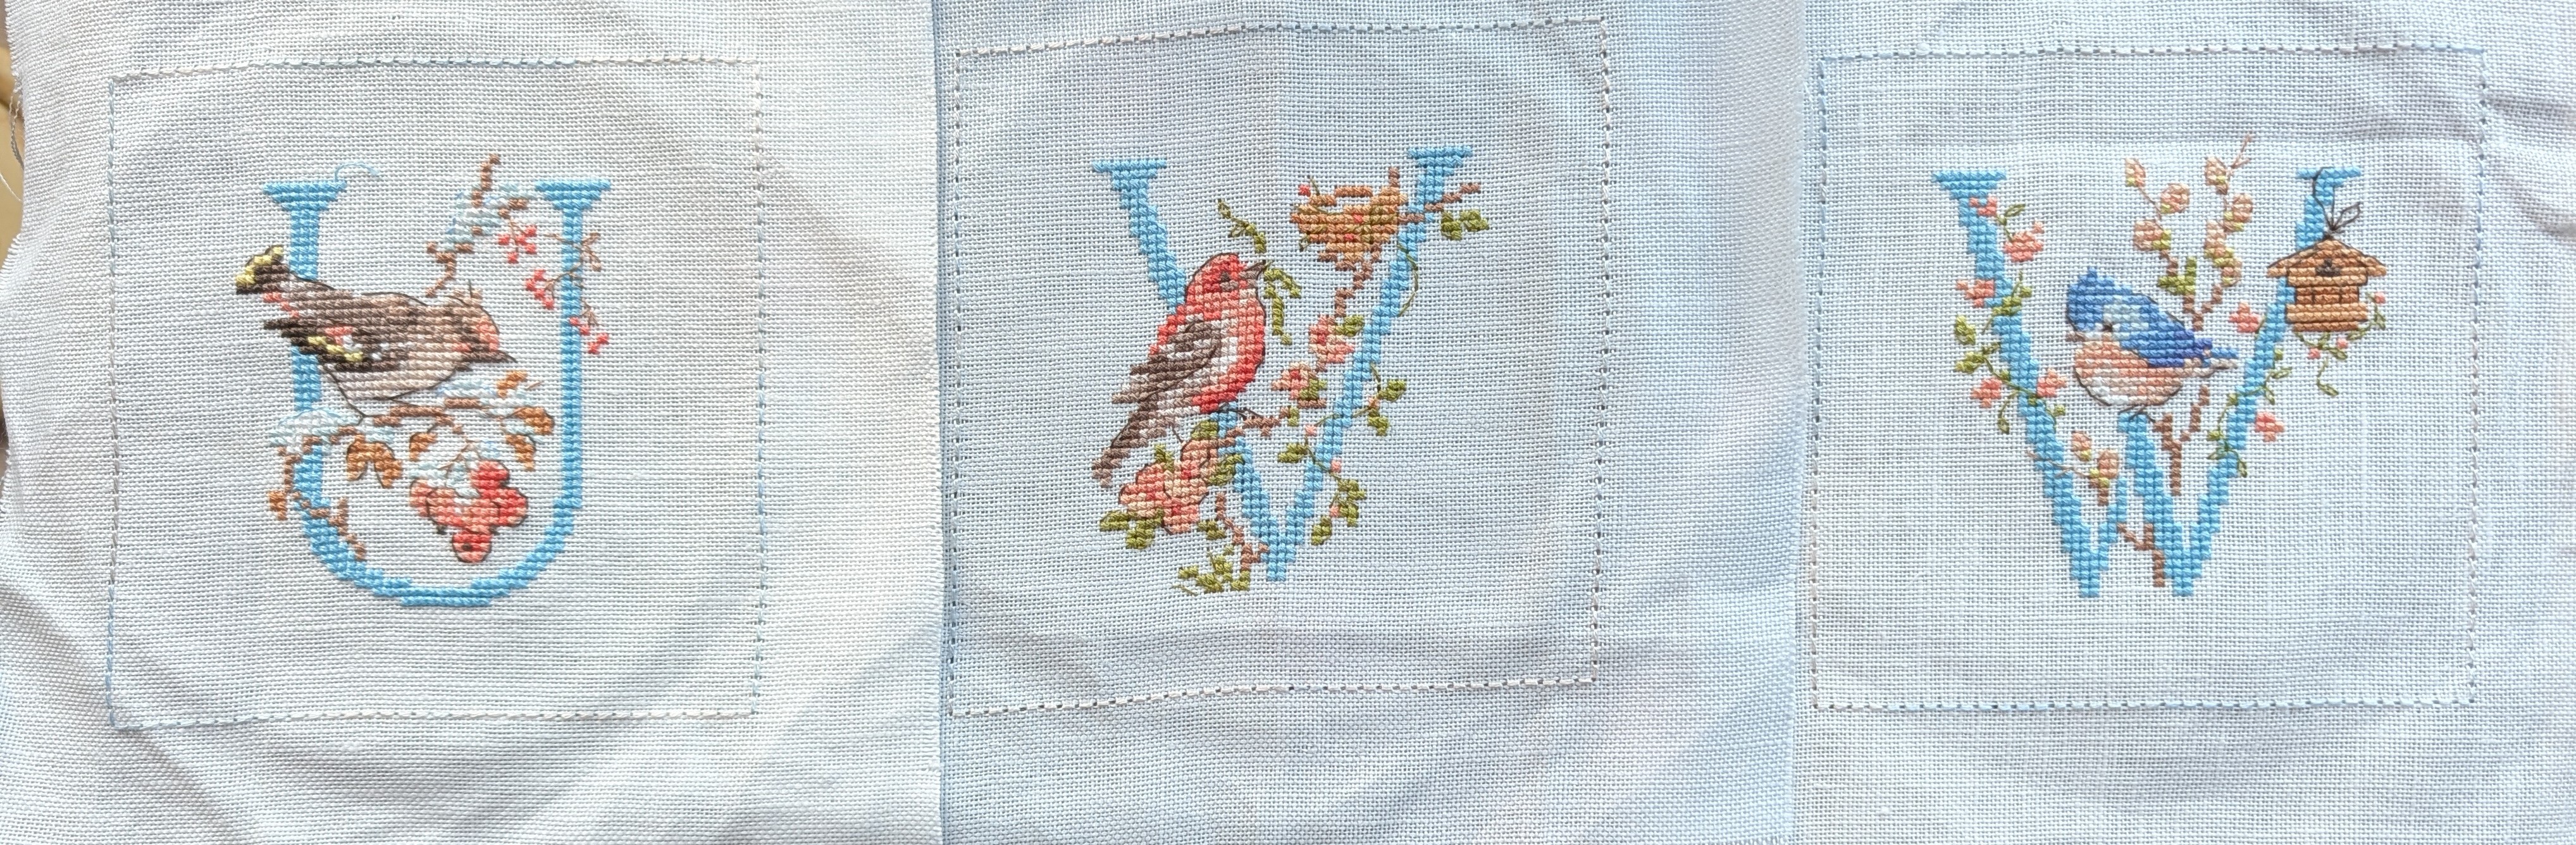
I can see light at the end of the tunnel with my bird alphabet, I’ve really enjoyed stitching them but I’m feeling ready for a finish – I’m quite impressed that I’ve got this far before itchy fingers started!!
Since I got back home from my travels I’ve stitched another three letters and caught up on back stitching round each page too.
I think U is a waxwing, V is a crossbill, W is one of the few I’m not sure about, it’s a cute little bird!! One thing I’ve liked with this pattern is that the vast majority of the birds are recognisable. I ordered this pattern from France, from Les Embrodeuses Parisienne.
I’m well on with stitching X too, I might even get it finished tomorrow as I’m off to a cricket match for the first time. It’s at Headingly and Yorkshire are playing, my OH suggested I took some sewing in case I get bored 🙂
I’m going to start creating the pages soon, adding a little interfacing and then whip-stitching two pages together. Hopefully I’ll have finished the book by the end of summer.
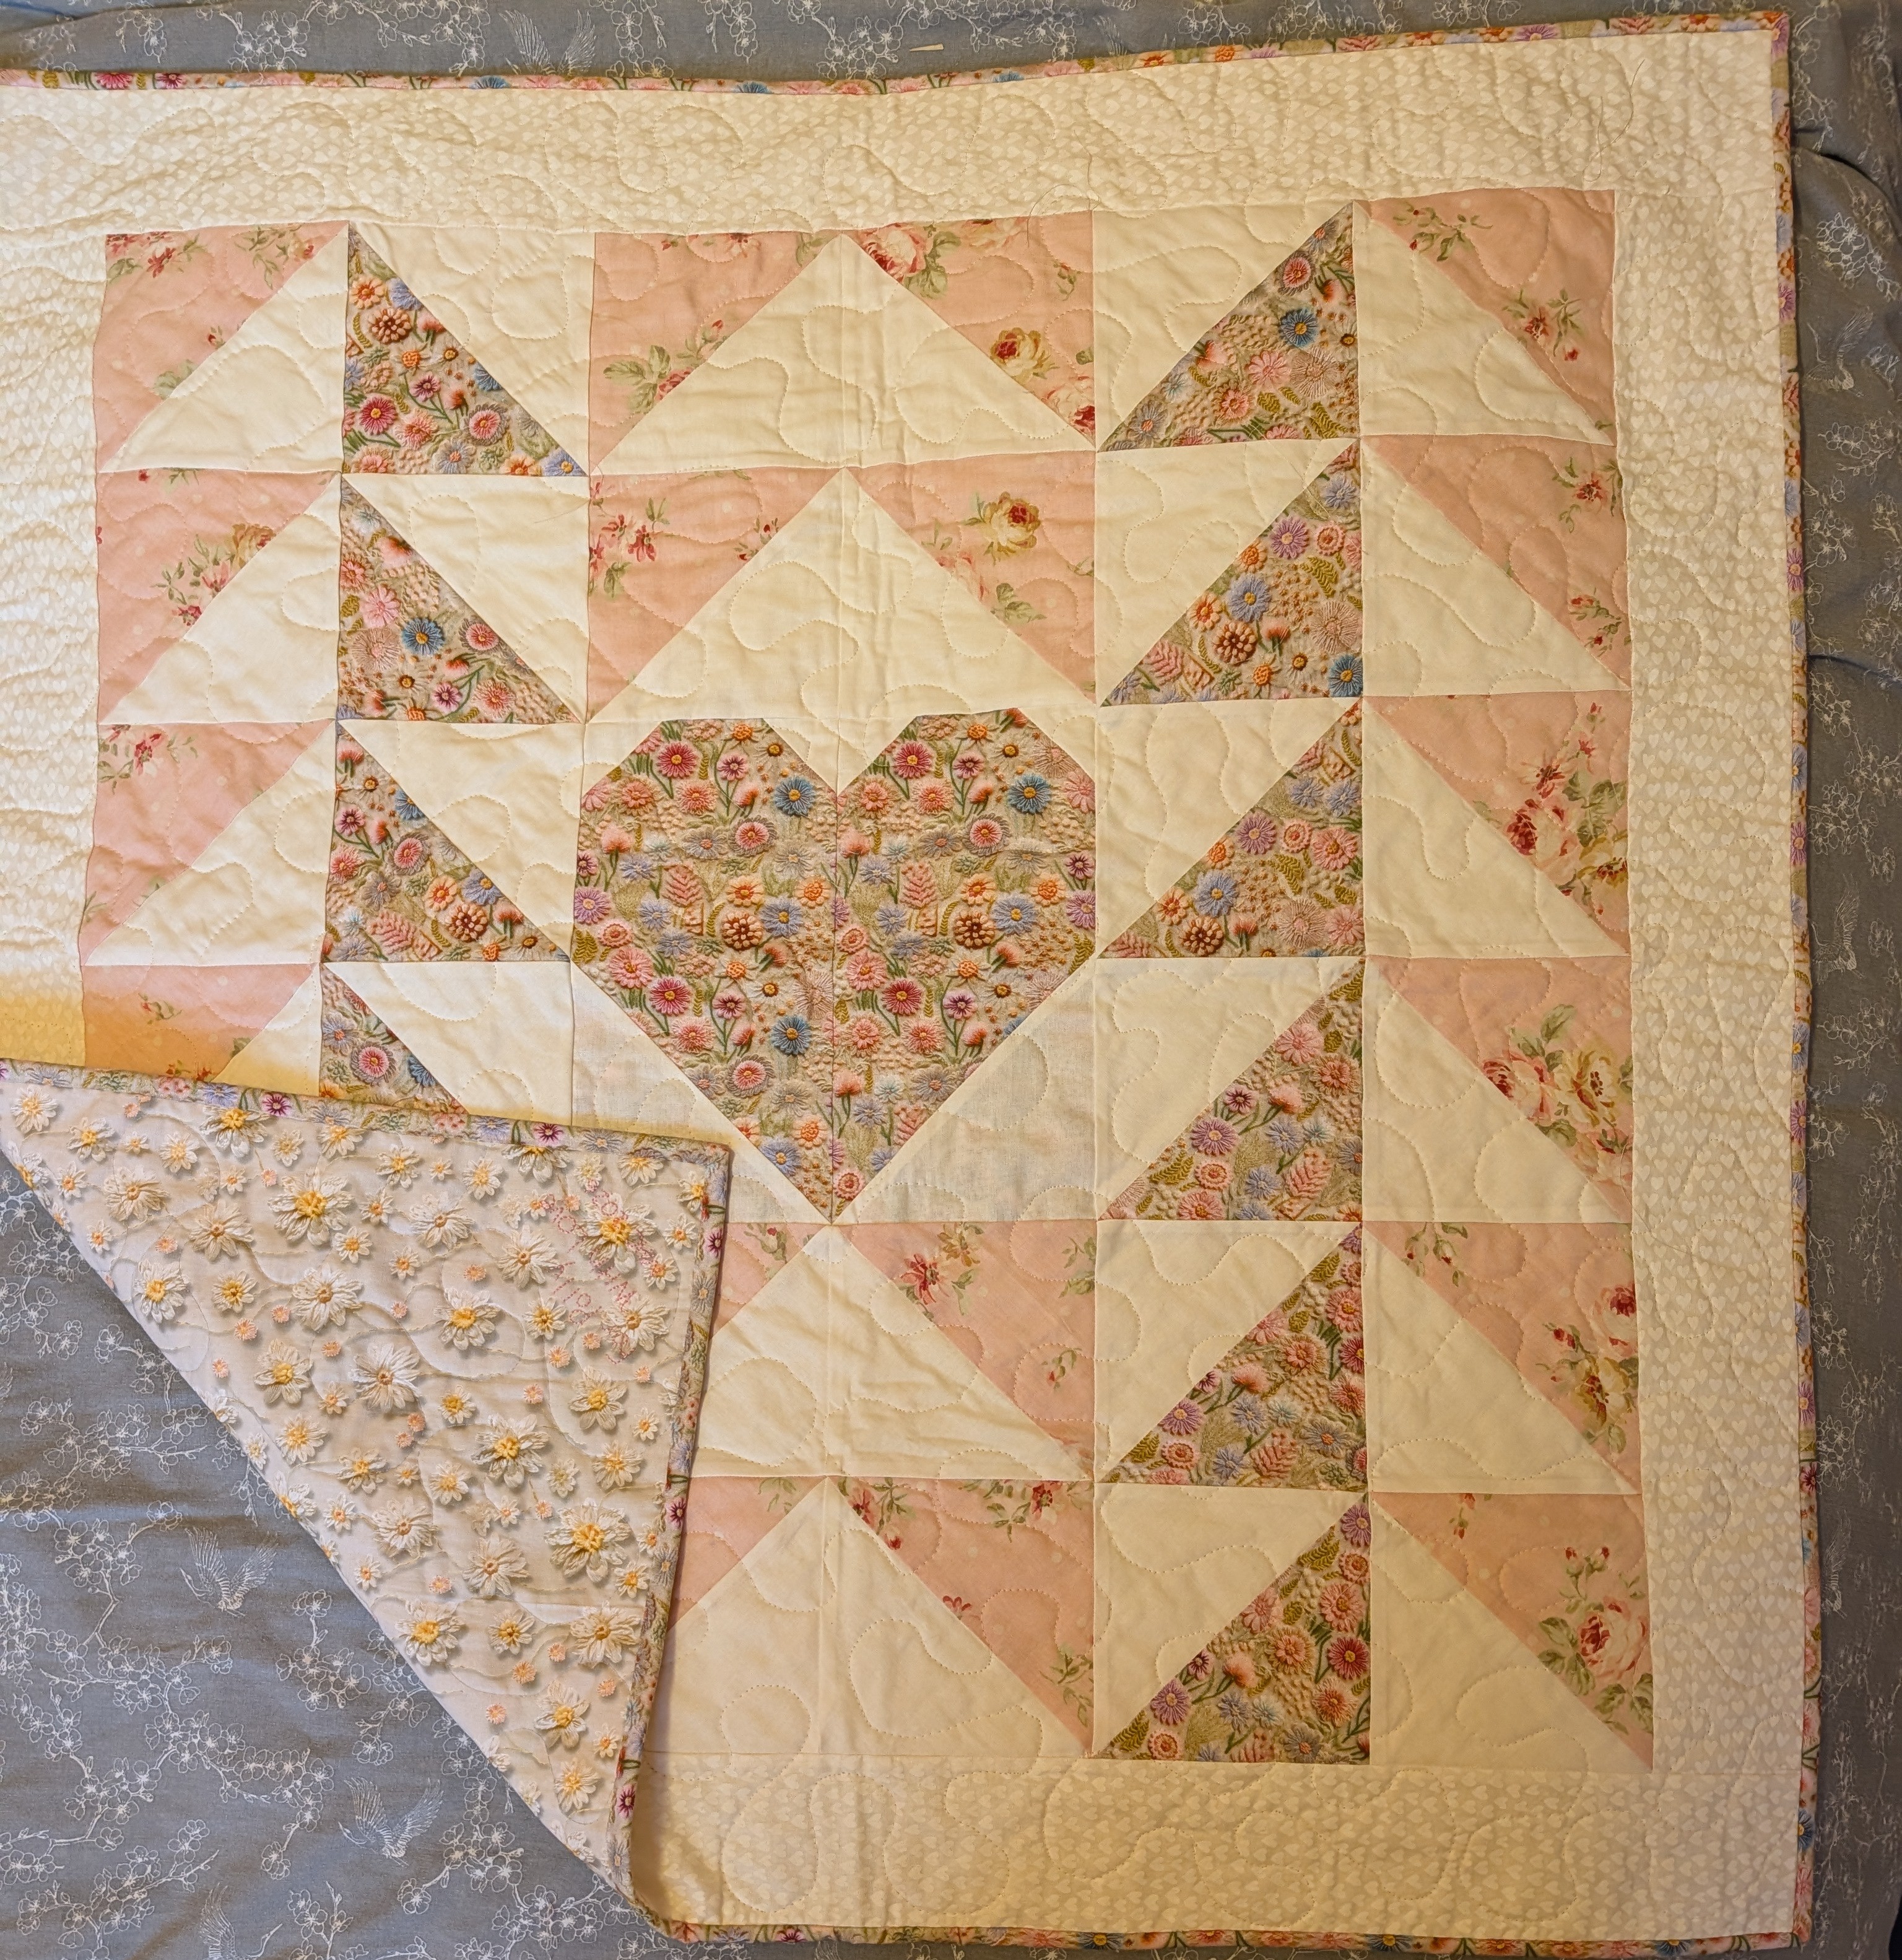
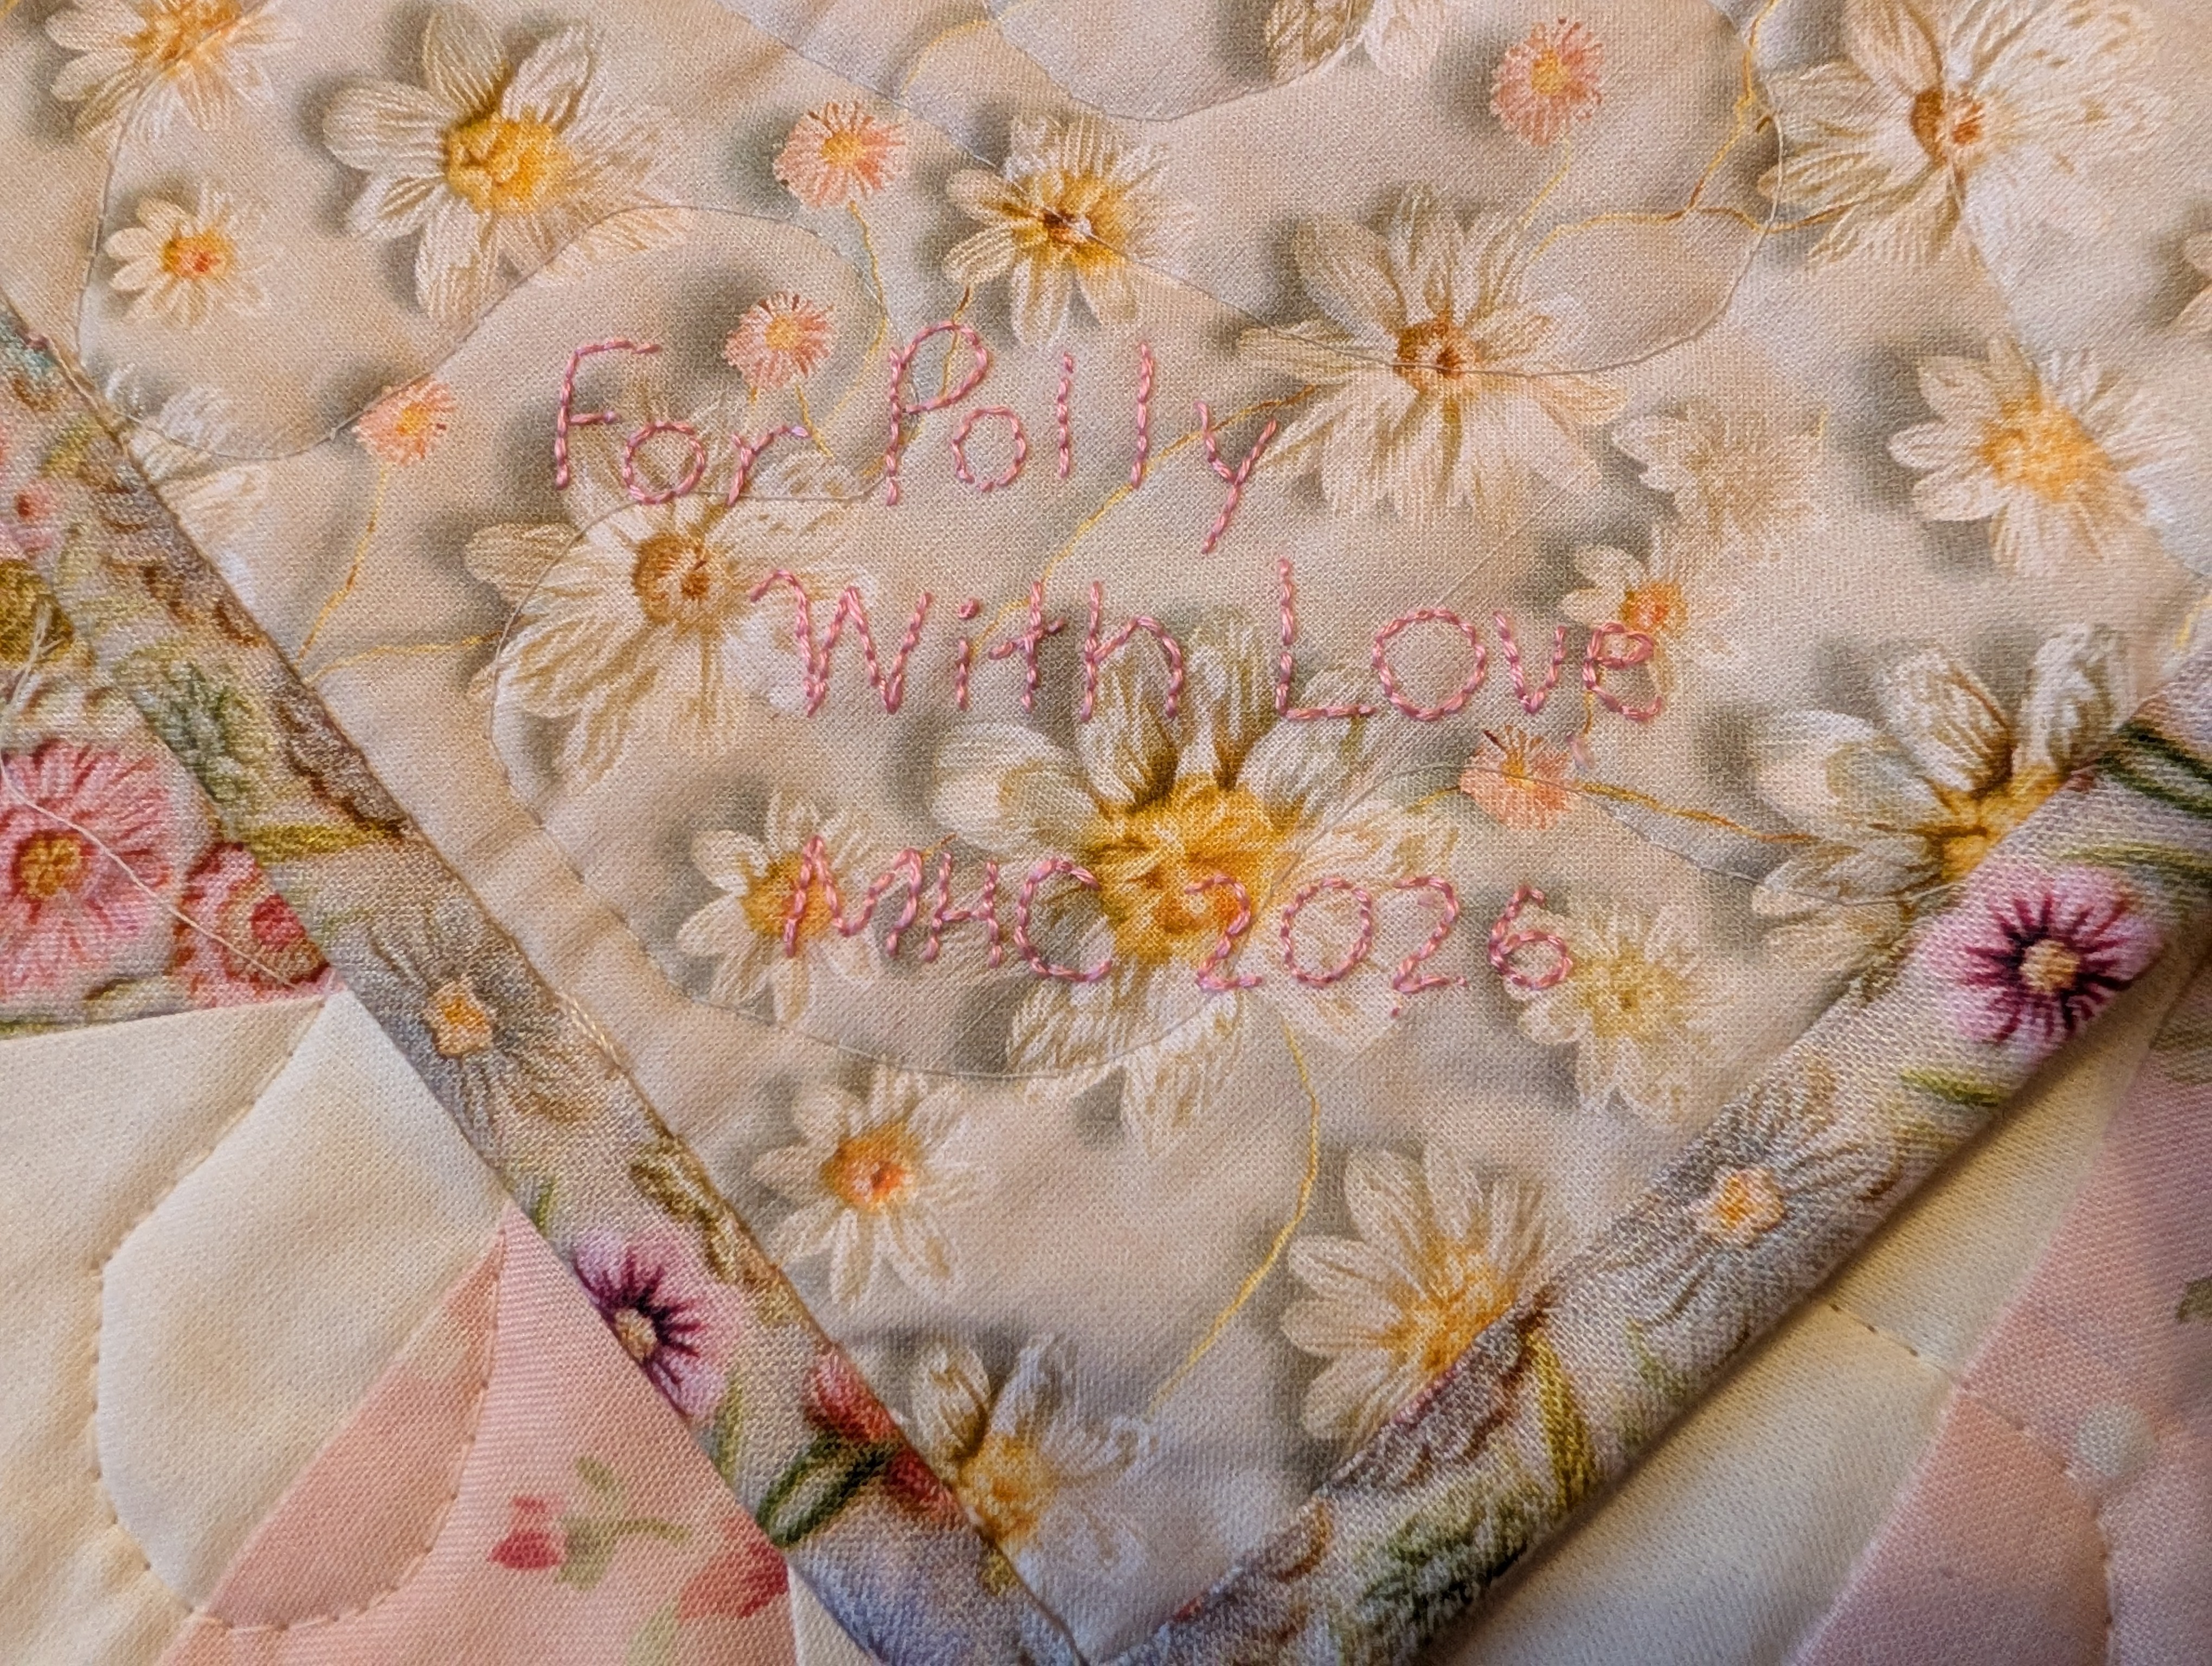
My new granddaughter was born on Tuesday, she’s gorgeous of course! She’s called Polly so I quickly finished her quilt by embroidering her name on the back.
Last time I posted about the cot quilt I had just finished piecing and sandwiching it…
It’s backed with a pretty daisy print, similar to the main heart fabric. I decided to do a simple meander round the quilt, though I did my usual with these quilts of starting with a heart in the middle. My meandering still isn’t perfect but it is improving, some of my stitches are a little big but I haven’t got as many wobbles!
I used the main heart fabric for the binding which makes a pretty edge. I usually try to follow a line of quilting on the back for the labelling, but there wasn’t a suitable one so I’ve just embroidered the details in the corner. I used a mid pink as I didn’t want it too bright but it’s such a busy print that with hindsight I would have been better with a darker one…not that I thought of unpicking it!!
We’re hoping to go round at the weekend to meet the new arrival and hopefully have a cuddle 🙂
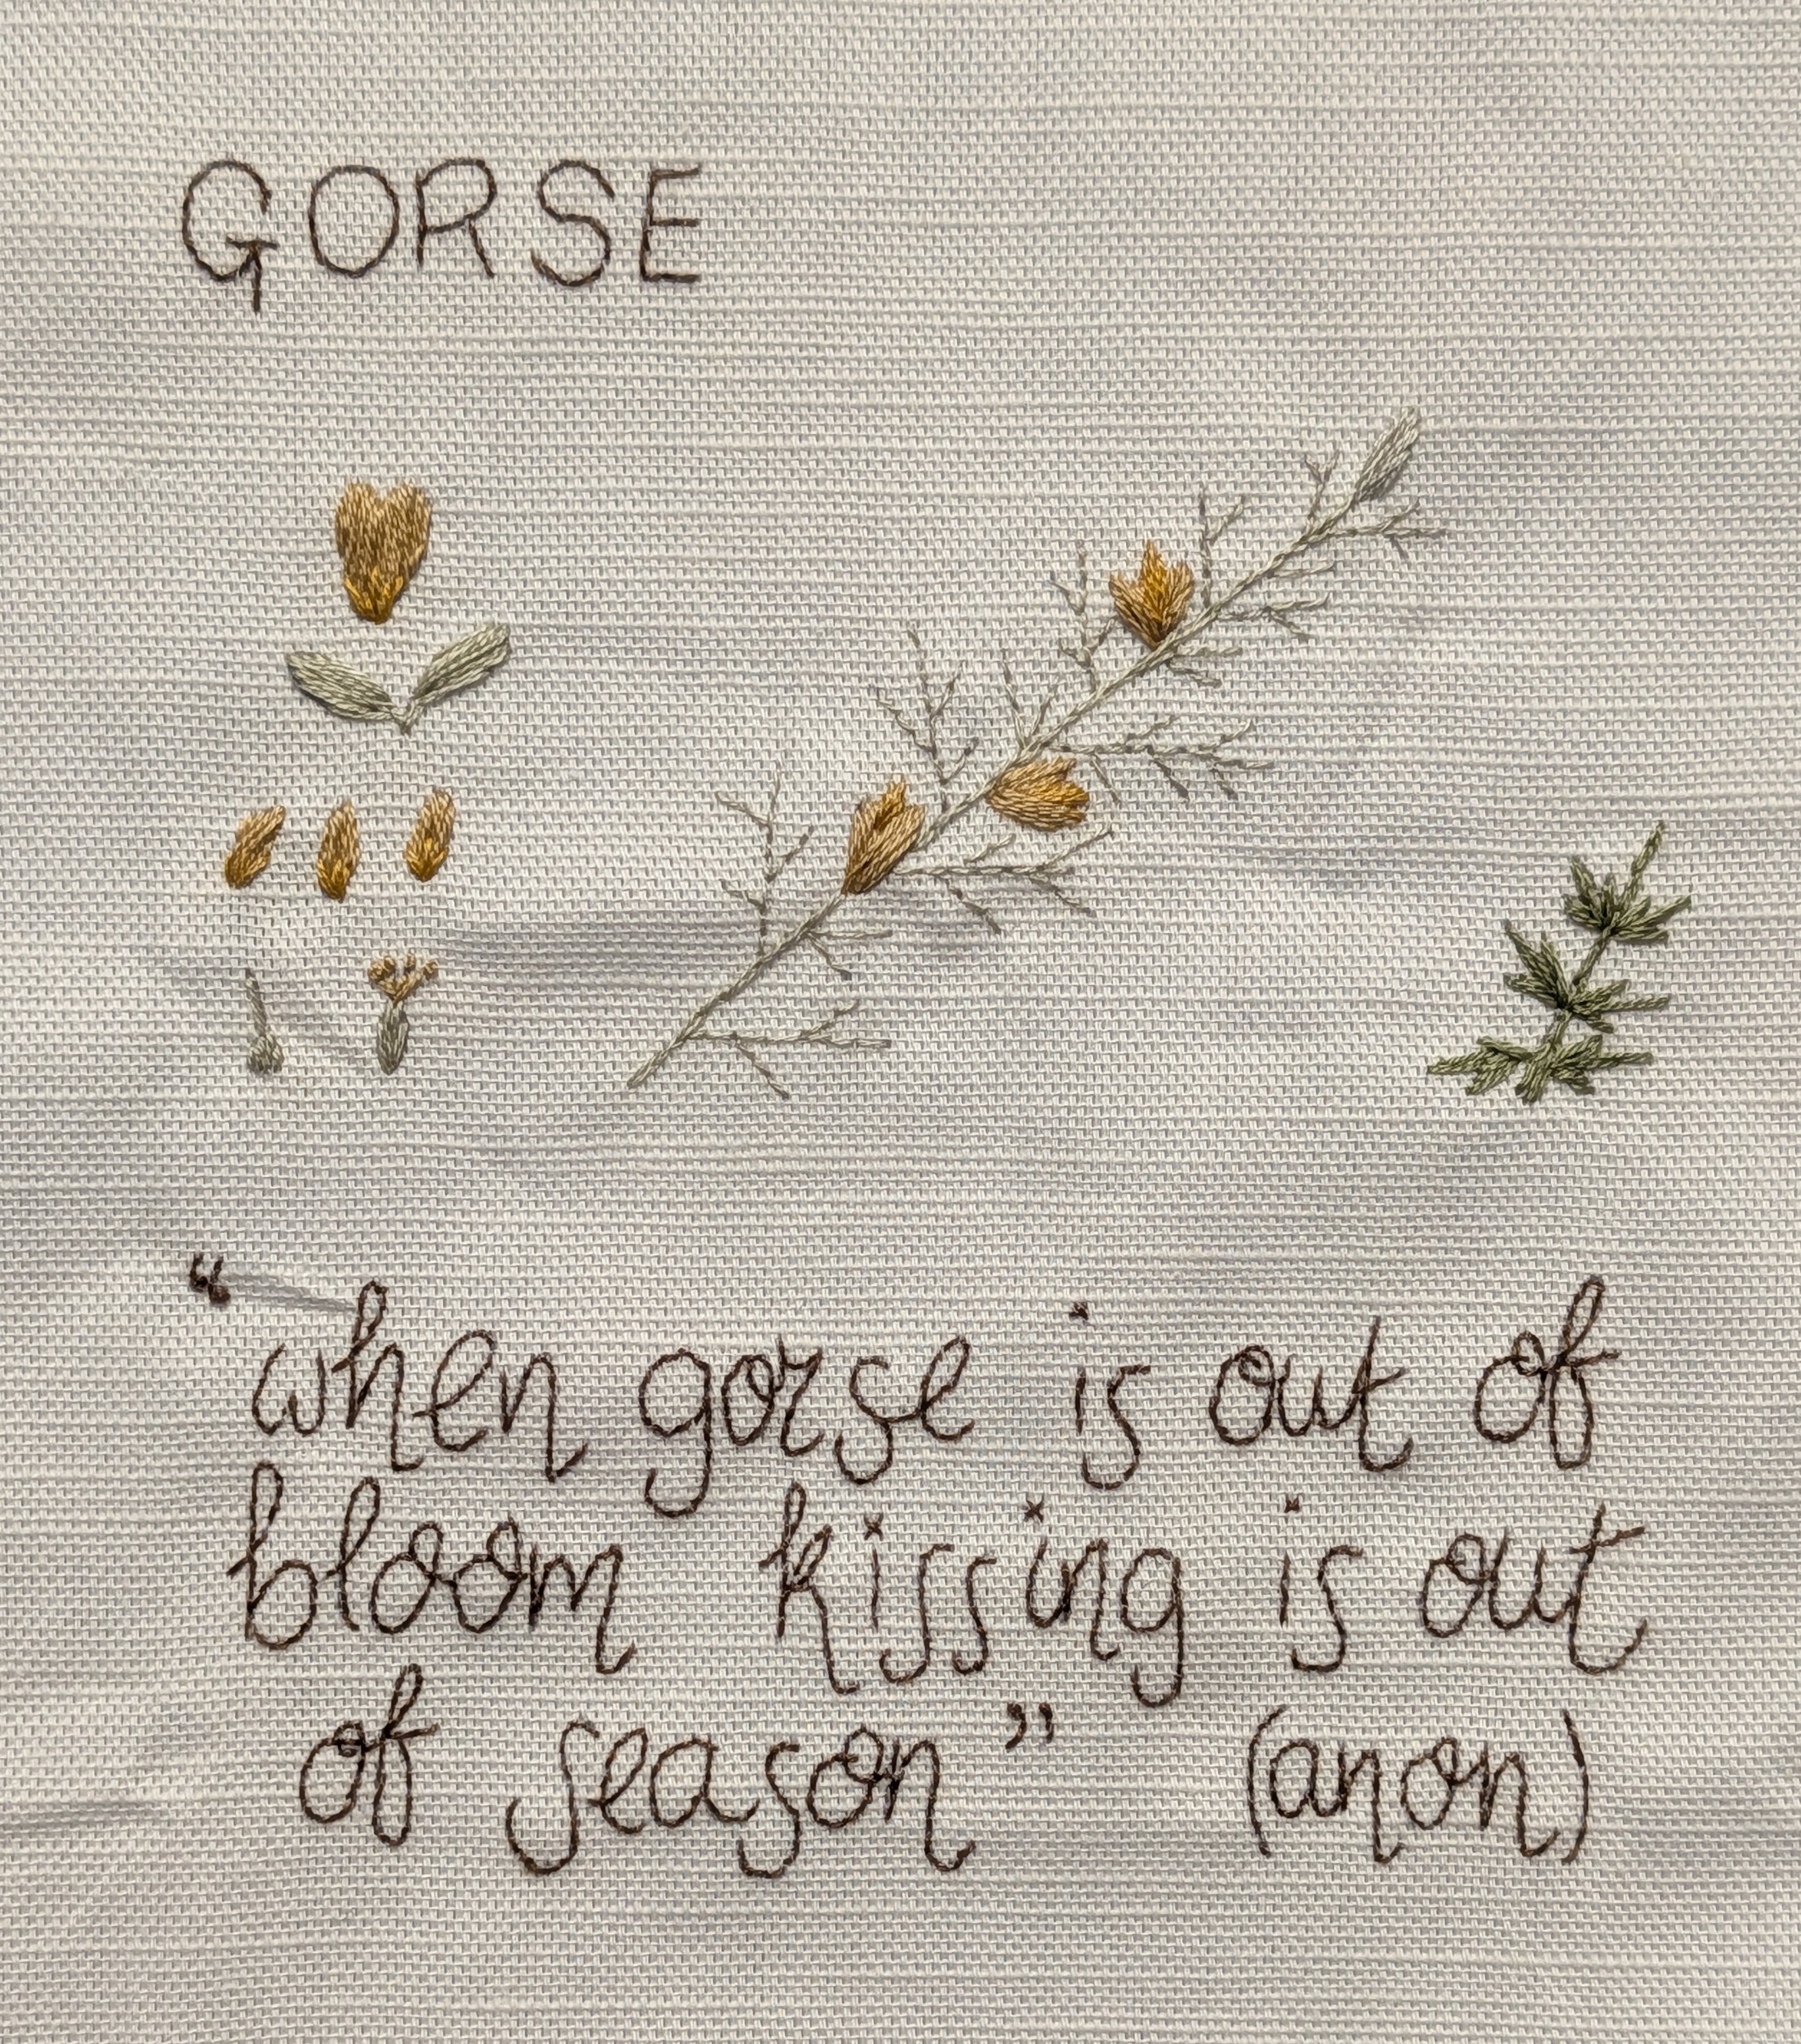
The three weeks since I came back from my travels have flown by but I have managed a little progress with my foragers book. This is a stitch-a-long by Pretty Little Fabrics and Trims, I get a pack each month with everything I need to make another page…I’m only four months behind!!
Last time I posted any actual progress with this project was back in April, I had just finished the February page of gorse…
With two months complete I could start to quilt my first double page spread. I trimmed the pages to 9″ square and stitched the two pages together. I then used spray baste to attach the batting. There’s no actual backing fabric so the quilting is just done onto the batting. I couldn’t find the original instructions for January (you haven’t seen my sewing room recently!!) so I did try to work out a quilting design using diagonal zigzags. I wasn’t happy with it after one side, so I left it and went on to the February page which I had a picture to see how she had quilted it.
I quilted round the embroidered part and then using a Frixion pen I drew diagonal lines across the borders one inch apart. It was nice and simple to quilt and didn’t take too long. I remembered the other side was quilted with lines across. I initially drew 1″ lies across, but I changed it a little when I started and stitched pairs of lines instead. I’m pleased with how the pages have turned out.
My next task is to bind the edges with some Liberty tana lawn. I think I’ve worked out how she puts the book together, I need to bind right round the two pages, I’m not folding in half first and just doing the square page, which puzzled me at first. I think we’ll stitch the centre of the pages to the spine and then stitch the two sides of binding together.
Last night I started the next page embroidery, wild garlic, which we have growing just outside our back gate on the old railway line. Hopefully I’ll manage to catch up over the next couple of months.
This Hand Quilt Along is an opportunity for hand quilters and piecers to share and motivate one another. We post every three weeks, to show our progress and encourage one another. If you have a hand quilting project and would like to join our group contact Kathy at the link below.
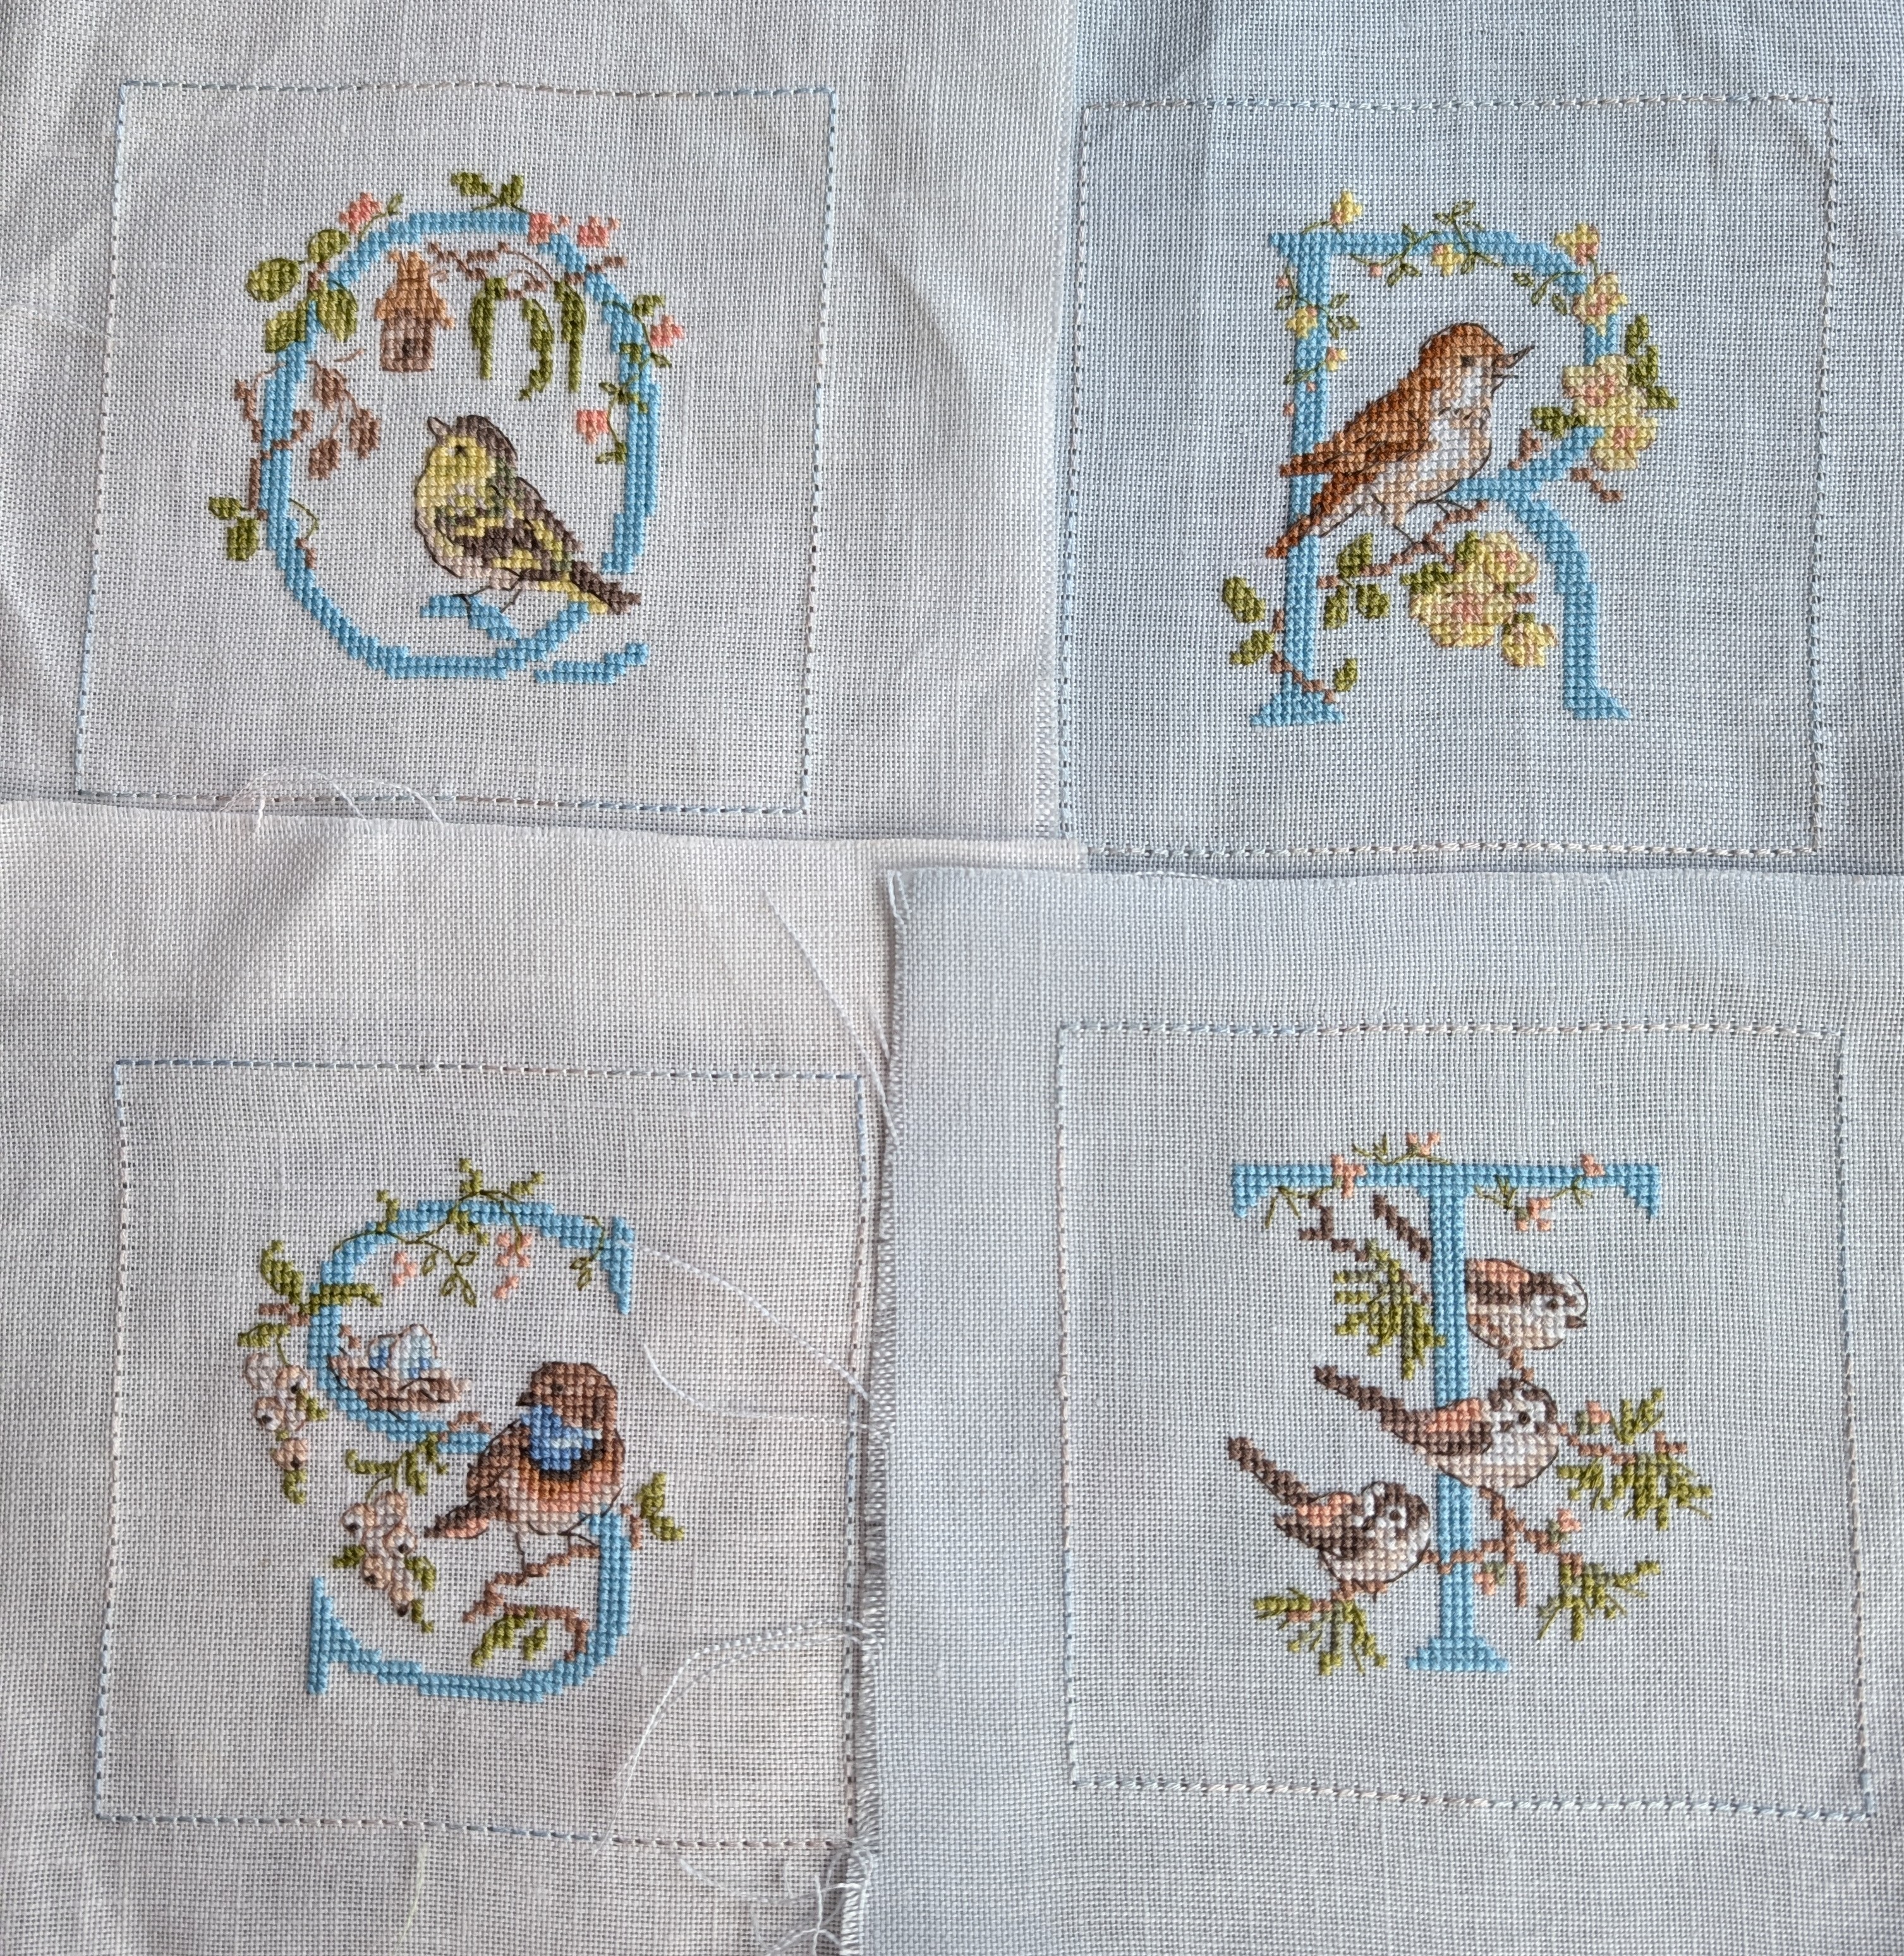
Whilst I was on my travels I had quite a lot of time sitting on trains, (four days worth according to the interrail app!) both my daughter and I spent some of the time stitching. I used to stitch on lake shores too whilst keeping an eye on my daughter swimming, several people stopped to see what I was stitching. I had packed some of my bird alphabet patterns and made sure I had lots of thread.
Before I went I had just finished the letter P, so I took the sheet of patterns which had Q to T and I just about finished the four letters over the six weeks.
I think birds portrayed are a yellowhammer, a warbler (R could be any number of little brown birds but as he is singing I’m plumping for a warbler!) a blue throat and long tailed tits.
As you can see I’ve already stitched the back-stitch edge round each one, I use this to whip-stitch the pages together. I might start making the pages soon so I’m not left with a big pile at the end. I’ve been stitching U since I got back home and it’s almost finished – I feel I’m on the home stetch now.
I’ve a new grandchild due later this month, a little girl this time, so as soon as I came back from my travels making a baby quilt was a priority. I found a simple but pretty quilt on Etsy, it’s called Heart Hug quilt, it has a central heart with half square triangles around it so nice and quick to make but pretty too.
The instructions said I would need half a metre of the light pink and a metre of the darker floral fabric. I found two pretty pink prints in my stash but I had less than half of each one. I found the darker one on ebay and ordered another metre. I also found some plain ivory which would do for the plain triangles, even if it wouldn’t stretch to the border.
The pattern makes the half square triangles by stitching two large squares round the edge and then cutting the block into four, corner to corner. As the pattern says this is a quick way of making a lot of half square triangle blocks, the disadvantage is that the edges of the blocks are on the bias, so not as stable.
Despite having less than half a metre of my two pink florals, I managed to cut all the necessary pieces, just changing one set of four from needing a large square to four smaller squares. The basic quilt went together easily and fairly quickly. My issues started when I came to stitch the borders on.
I found some white on white heart fabric in my stash (well, ivory) which was just big enough for the four borders. Now I’ve always been a bit lazy when stitching borders on, I just cut a long enough piece and stitch it on, taking care not to stretch either piece when stitching. In all the quilts I’ve made I’ve never had an issue with wavy borders…until now!
I knew I had to be careful due to the bias sides of the blocks, so I was very gentle so as not to stretch the triangular blocks. I stitched them all on and then put my quilt on the design wall, the borders would not lie flat. I did wonder if I would be able to press or quilt it out but in the end I decided I was going to have to unpick all the borders. Of course that had it’s pitfalls too as I could have stretched the bias-cut blocks whilst unpicking. I was very gentle!
I gave the quilt a good press with lots of Best Press and did it properly…I measured across the centre of the quilt, cut my border to the same length and made it fit with lots of pins to hold it in place. It worked, the borders now lay nice and flat.
On Sunday I sandwiched it with some Frankensteined batting (remnants stitched together) and in my dress-making stash I found a pretty daisy print which I’m using for the backing. It’s a bit frustrating that I bought some extra fabric but I’ll probably use it for the binding. Otherwise the whole quilt has been from my stash.
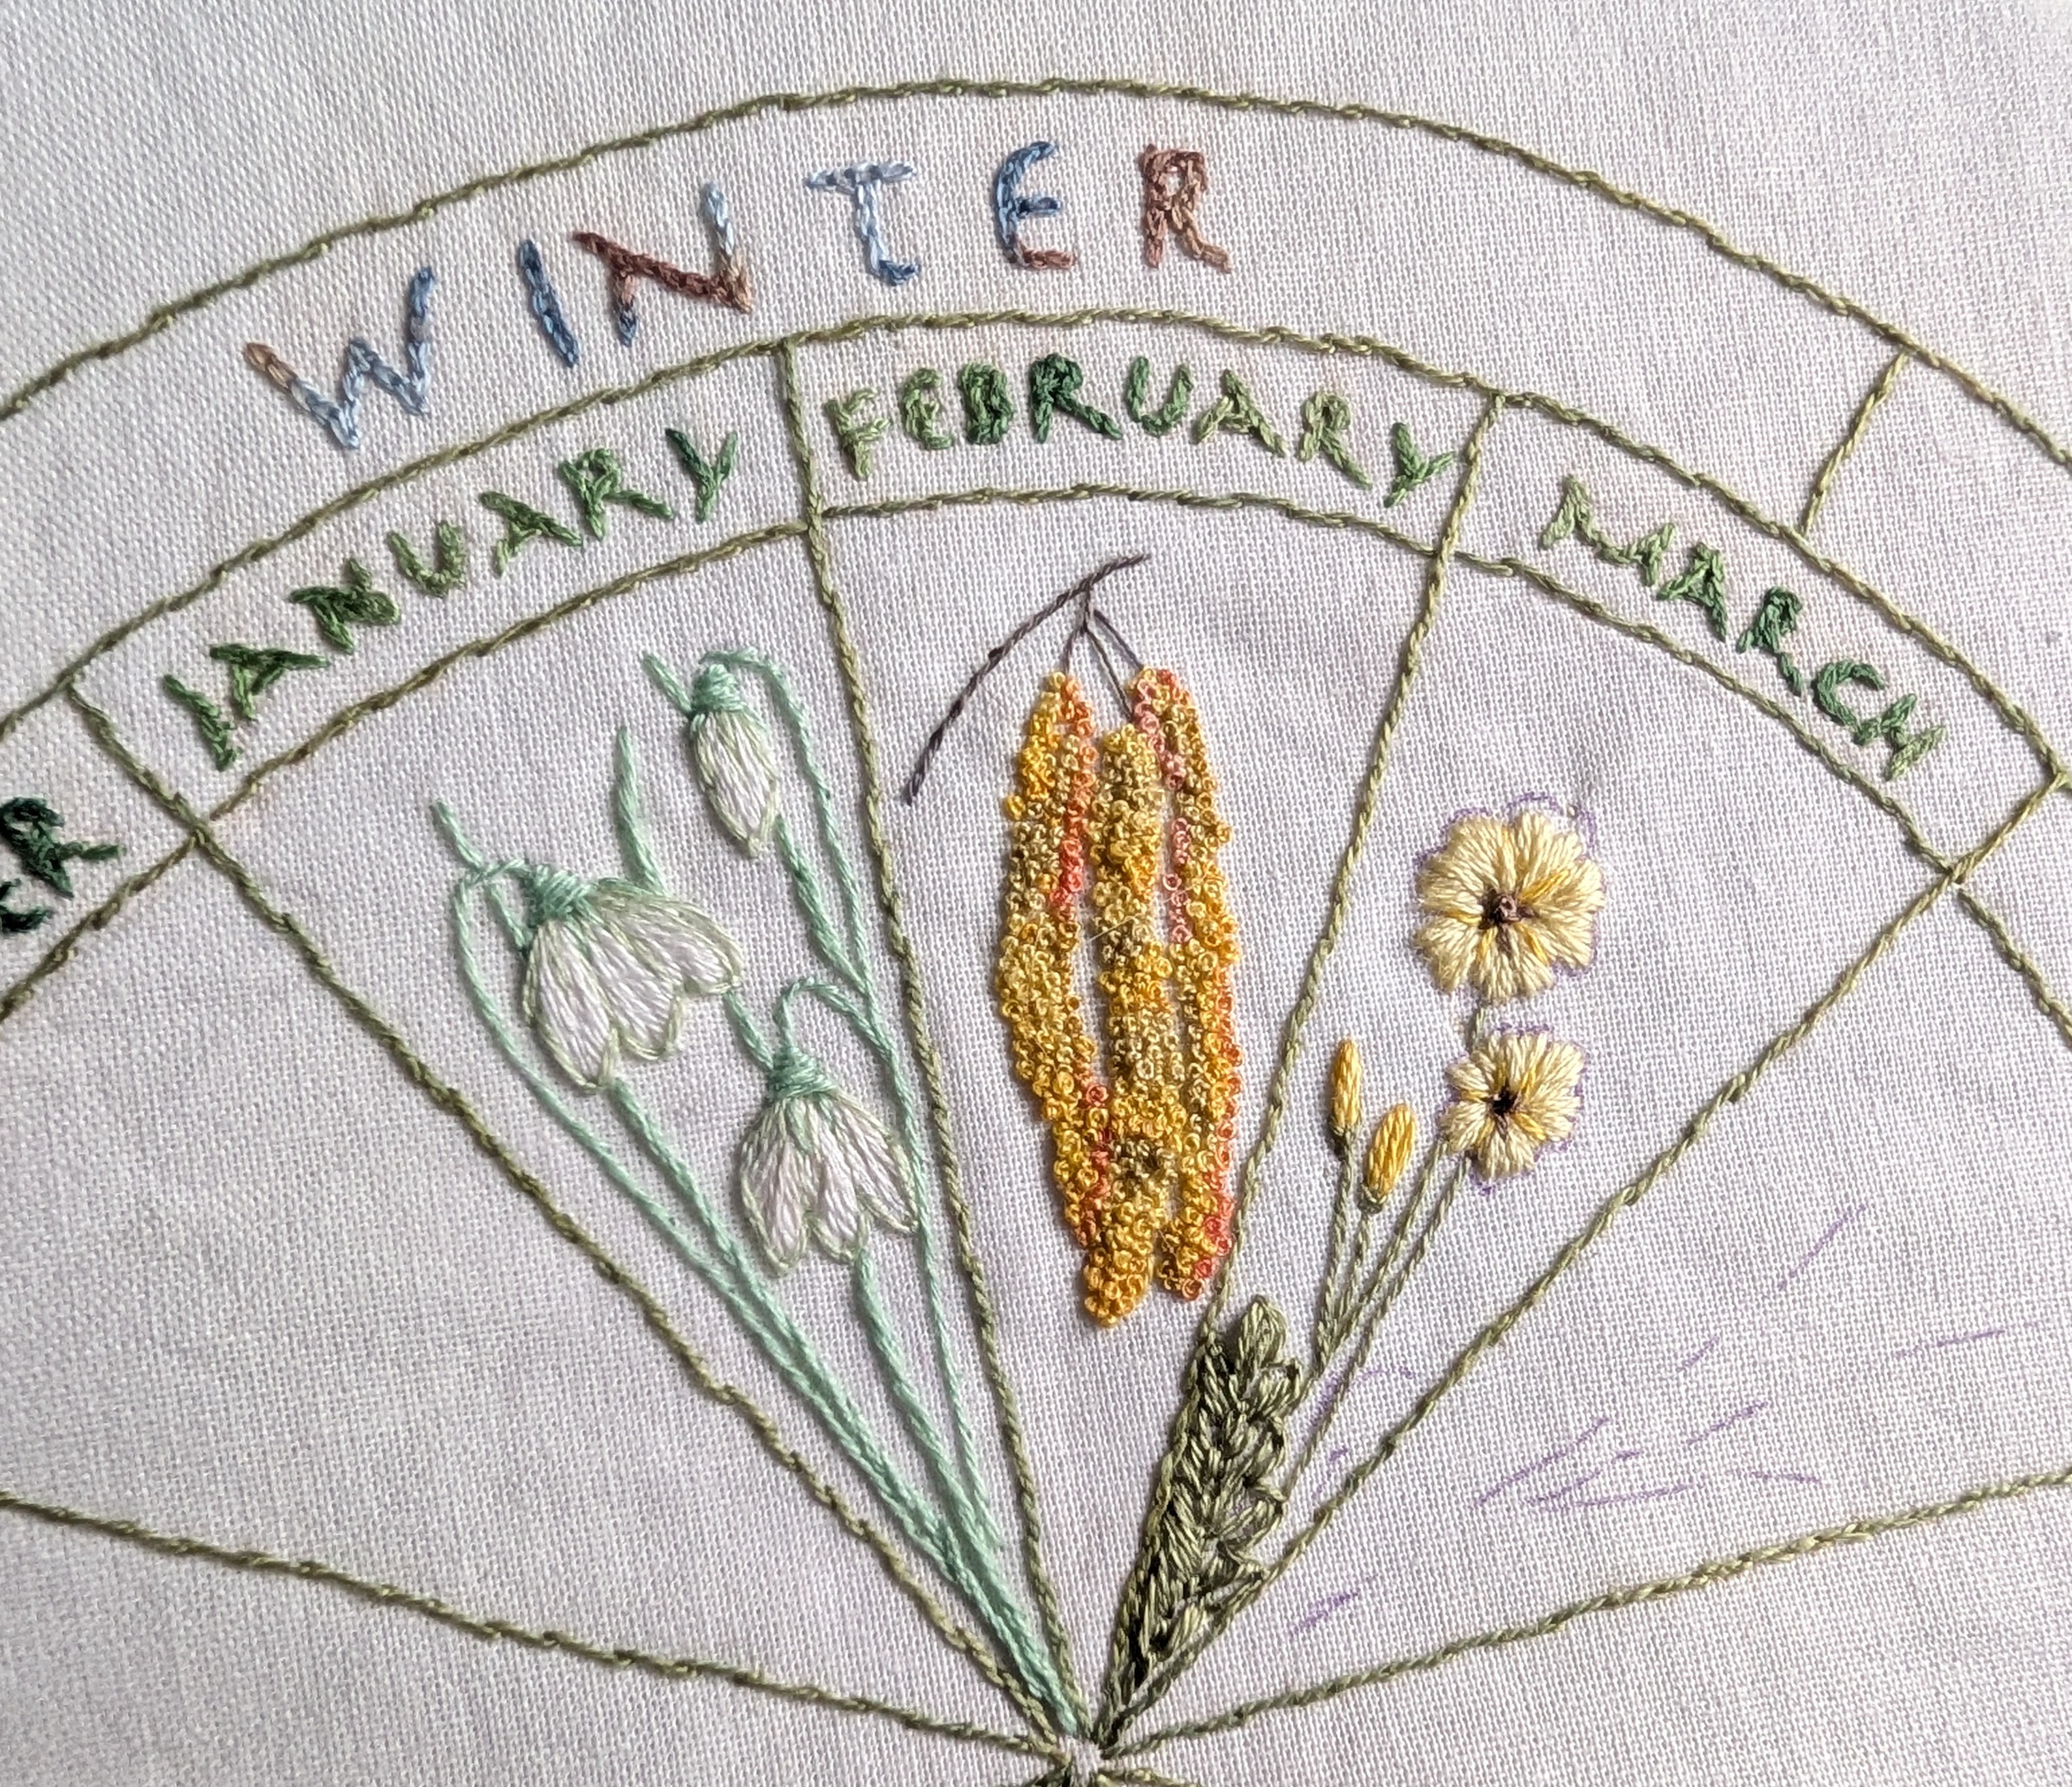
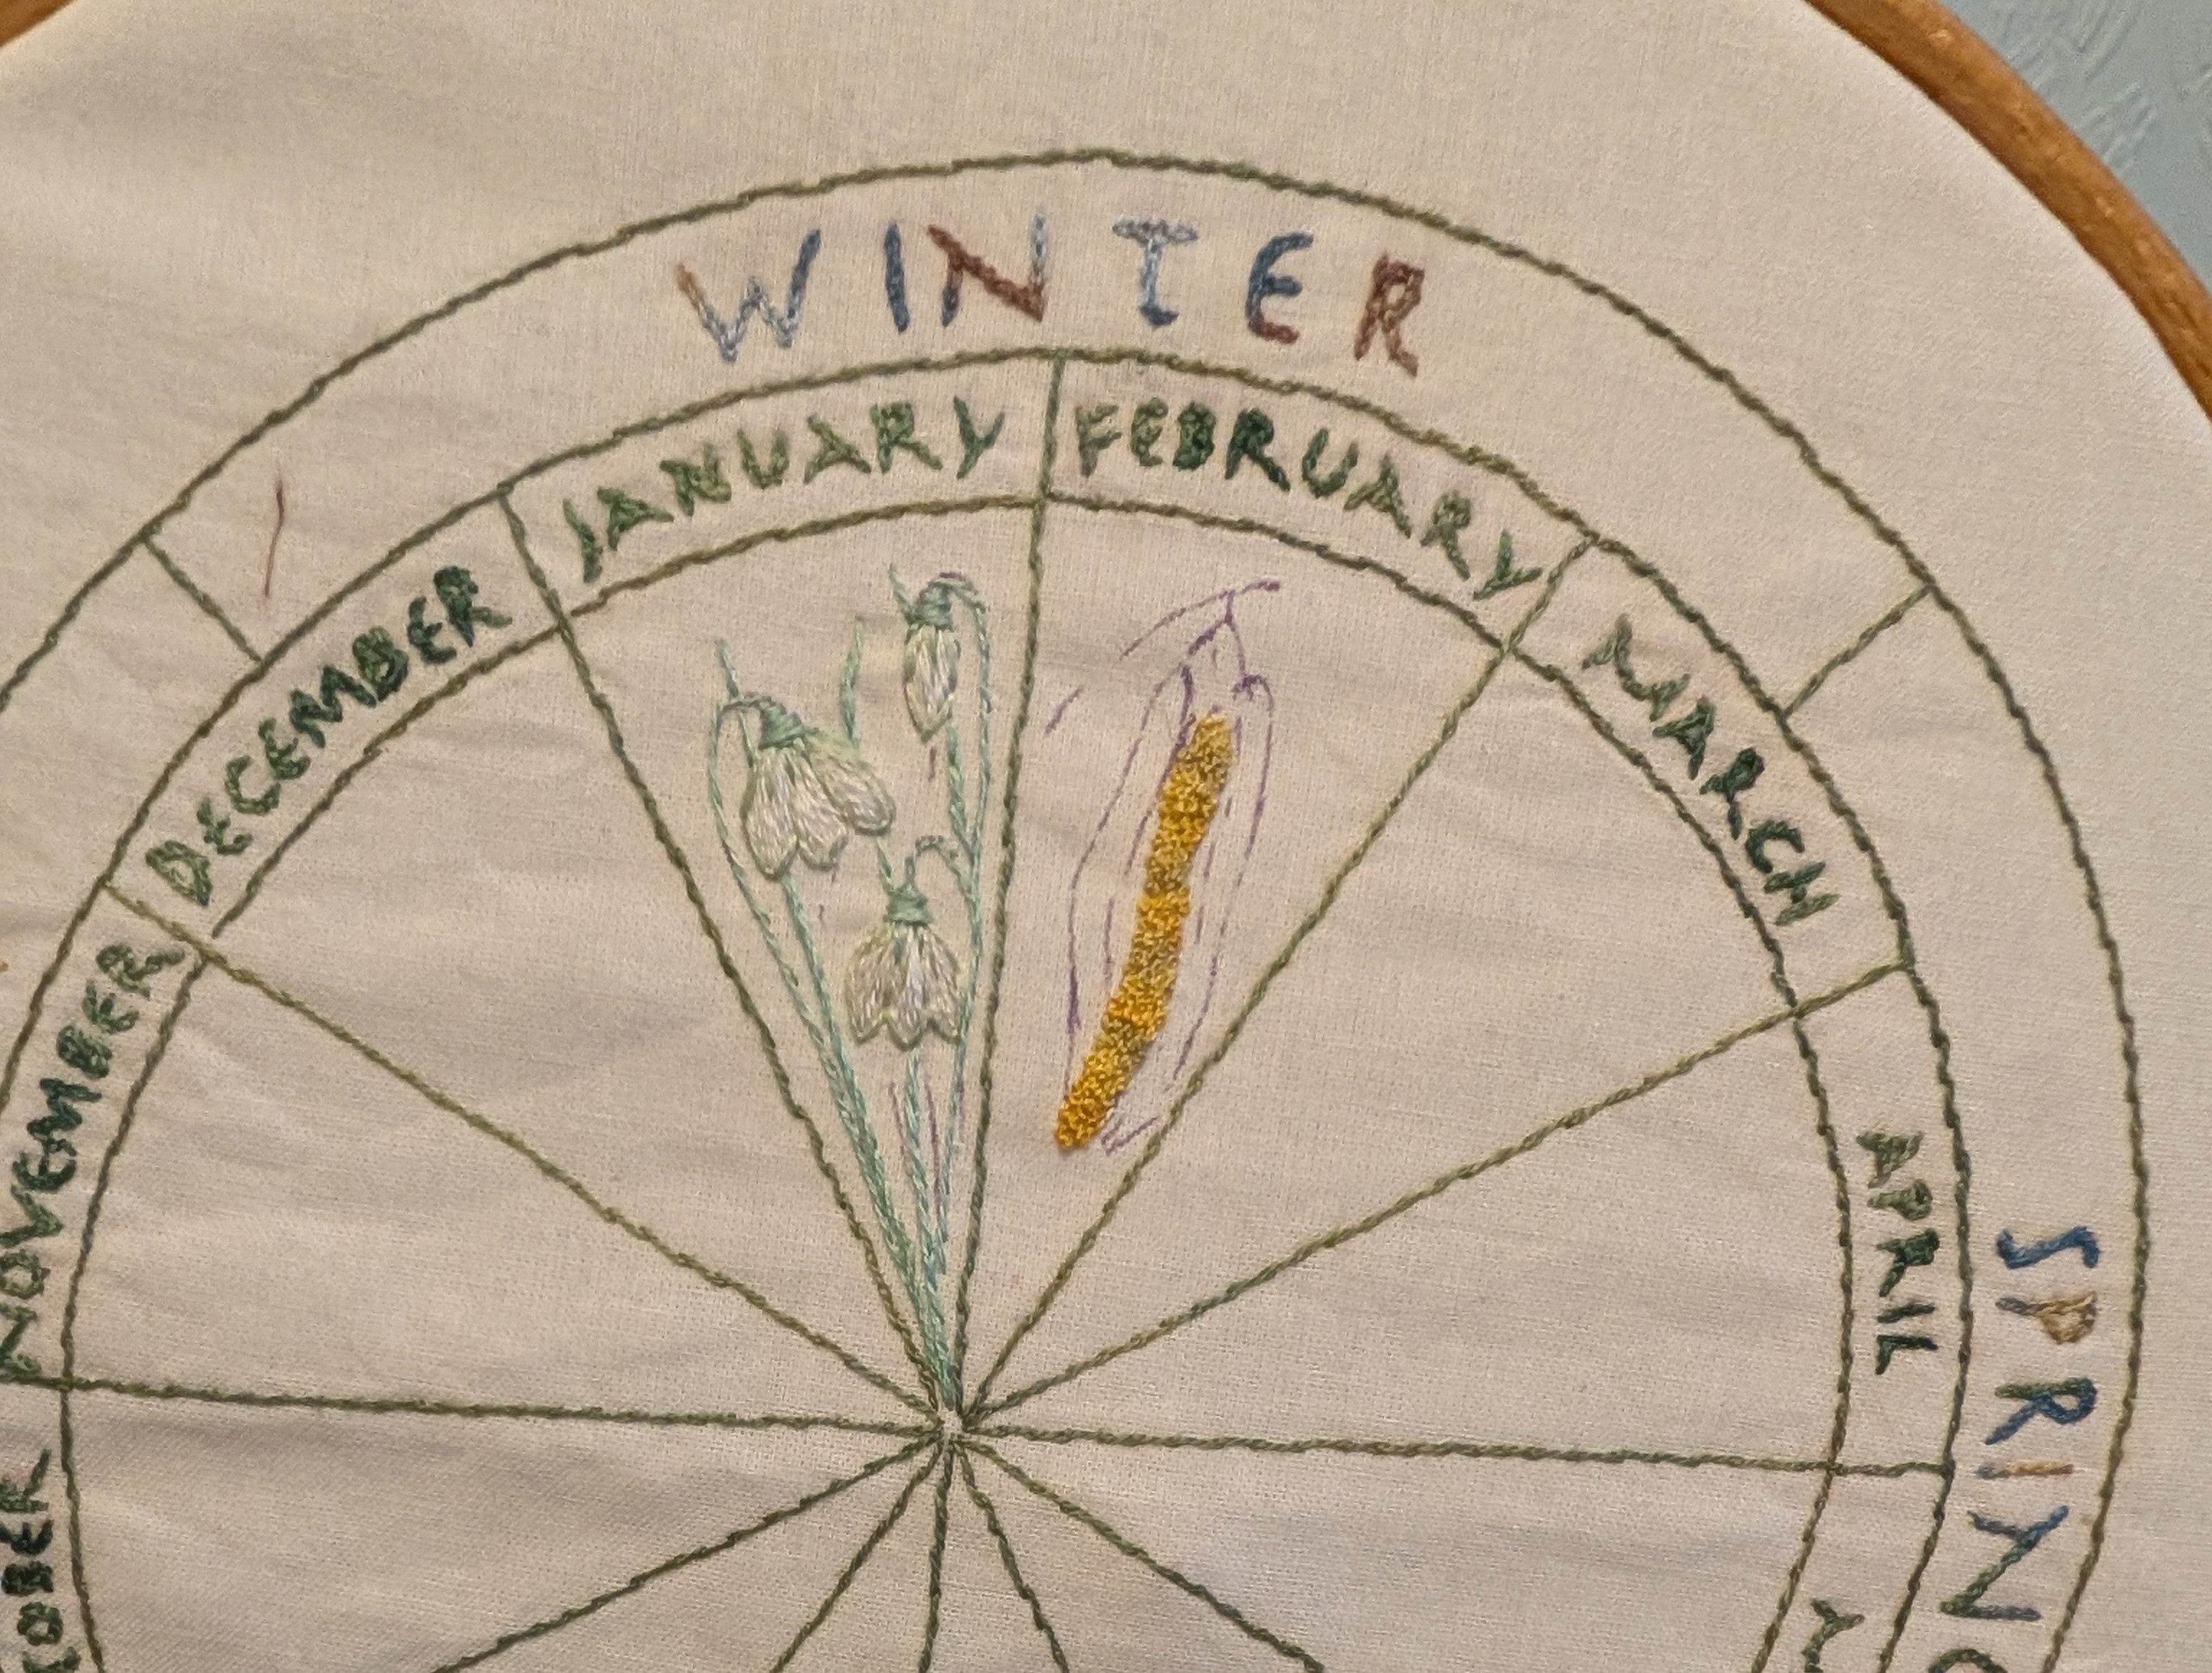
Last time I shared my progress with my phenology wheel was at the beginning of May, I had just started stitching catkins for February so I was already behind!
The French knots were taking forever, not helped by the fact that I was using a single thread of DMC. When I returned from my travels it was one of my priorities so I started stitching it on an evening.
I changed to two threads of DMC instead so it grew a little quicker and I don’t think it’s that noticeable. I used a second shade of DMC variegated which is slightly darker so the three catkins wouldn’t merge into one blob. It still took more than an evening to do one catkin, I nearly left it at two but I decided to spend one more evening stitching the third one. I’m pleased with how they have turned out.
As you can see I’ve also stitched March, some primroses, we have some near our pond in the garden and there’s also a few up the back lane. It still needs a good press to remove the Frixion pen marks but I thought I’d stitch April first. For April I’m going to stitch brunnera, I’ve got several brunnera plants in the garden, I love the sprays of intense blue flowers in spring and good foliage ground cover the rest of summer. It does mean more French knots though!!
Hopefully in three weeks time when I share another update on my wheel, I’ll have almost caught up.
Please follow the links to see what everyone else has been stitching…
Having been home a week I thought I’d better post about the last couple of weeks of our adventure round Europe.
Last time I posted we had just arrived in Tirano, Italy. Tirano is the start (or end!!) of the Bernina Express, one of the famous scenic rail journeys in Switzerland. It is stunning, both the scenery and the engineering involved. The train winds it’s way up the alps, zigzagging up the mountains and doing loops to gain height, the mountain sides are pretty sheer and you can feel the steepness of the track. There are panoramic carriages available at a price, but each train also has standard carriages which have the advantage of windows that open, much better for photos and great fun to just look straight out.
We stopped for a break in St Moritz, we walked around the lake, Helen went for a swim in a nearby small lake which is set up for outdoor swimming – it was very cold according to one German lady who was trying to get in – sometimes you don’t need to speak the language to understand what they are saying 🙂
We stayed overnight in Chur in a former prison – the rooms still had the metal cell doors on. It was clean and comfortable and more spacious than we thought it might be.
From Chur we took the Glacier Express to Zermatt, beautiful scenery but not as awe-inspiring as the Bernina. I was really looking forward to Zermatt and it didn’t disappoint. Yes it was busy, yes it was touristy, but not overly so. My parents came here several times with their youth club back on the 1950’s so we had heard alot about this car-free town in the alps. I had some old photos my parents had taken and with a little help from Google we managed to find the chalet they used to stay in, now a private house. I thought about my mum a lot inZermatt, it seemed strange to think she would have travelled up on the same train, walked round the same streets, we even found the English church just down from the chalet and I’m sure they would have gone to a service there.
We decided to treat ourselves to the train ride up to Gornagrat and it was definitely worth it. We had perfect weather for the views of the Matterhorn and we even managed to get that perfect refection photo when we stopped by the tarn on the way down. Stunning!
After three days in Zermatt we travelled over the alps to Chamonix, it was another stunning train ride, as awe-inspiring as the Bernina but it’s a route you don’t particularly hear of. Chamoix Mont Blanc is a lovely place, not chocolate-box pretty but relaxed and friendly. Helen had booked us a spa evening so we had quite a treat there. We took the train back up the valley a couple of stops so we could walk back through the trees, it was a pleasant six mile walk.
From Chamonix we travelled to Annecy. a pretty town with a few canals and a lake. The lake is a lot bigger than it looks, we went on a boat ride and what we thought was the other end was only about a third of the way down. We had our only really bad accommodation in Annecy, we’d booked an apartment through Airbnb, were always careful to read the reviews, whether they didn’t appear or somehow we missed them I don’t know. Within an hour of arriving the toilet wouldn’t flush, then three door handles fell off, the host wasn’t answering messages despite having read them. In the end we contacted airbnb support and to cut a long story short, we moved to a hotel at 10pm. I was quite impressed with Airbnb, they didn’t quibble, they tried to contact him, when we said we wanted to move they immediately refunded our money and gave us 30% off our hotel bill.
Our final stop was Paris. We had a few things booked for our three night stay, we went to the Palais Garnier which was beautiful, we visited Notre Dame and climbed the tower. The cathedral is beautiful, they have done such a good job restoring it after the fire.
We climbed the steps to Sacre Coeur, even inside the cathedral it was 35’C! We wandered down to Montmatre, we missed the artyfarty bit, but we found the fabric quarter, it was a bit like Goldhawk Road in London, rows of fabric shops! We found one particularly nice shop, three floors of fabric, I treated myself to a dress length 🙂
We also had a day in Giverny, to visit Monet’s garden. It was beautiful, the waterlillies were coming into flower and the borders were full of roses, poppies, hollyhocks, all sorts of flowers.
And that was the end of our big adventure! We travelled back on Eurostar last Friday, just before the heat got so bad they cancelled trains. It was a magical holiday and so special to be able to spend nearly two months travelling round with my daughter.
I’ve been back from my travels for a week now and having brought the sunshine with me it’s been so hot I’ve just been chasing the shade round the garden, sitting stitching, trying to finish one of my holiday projects.
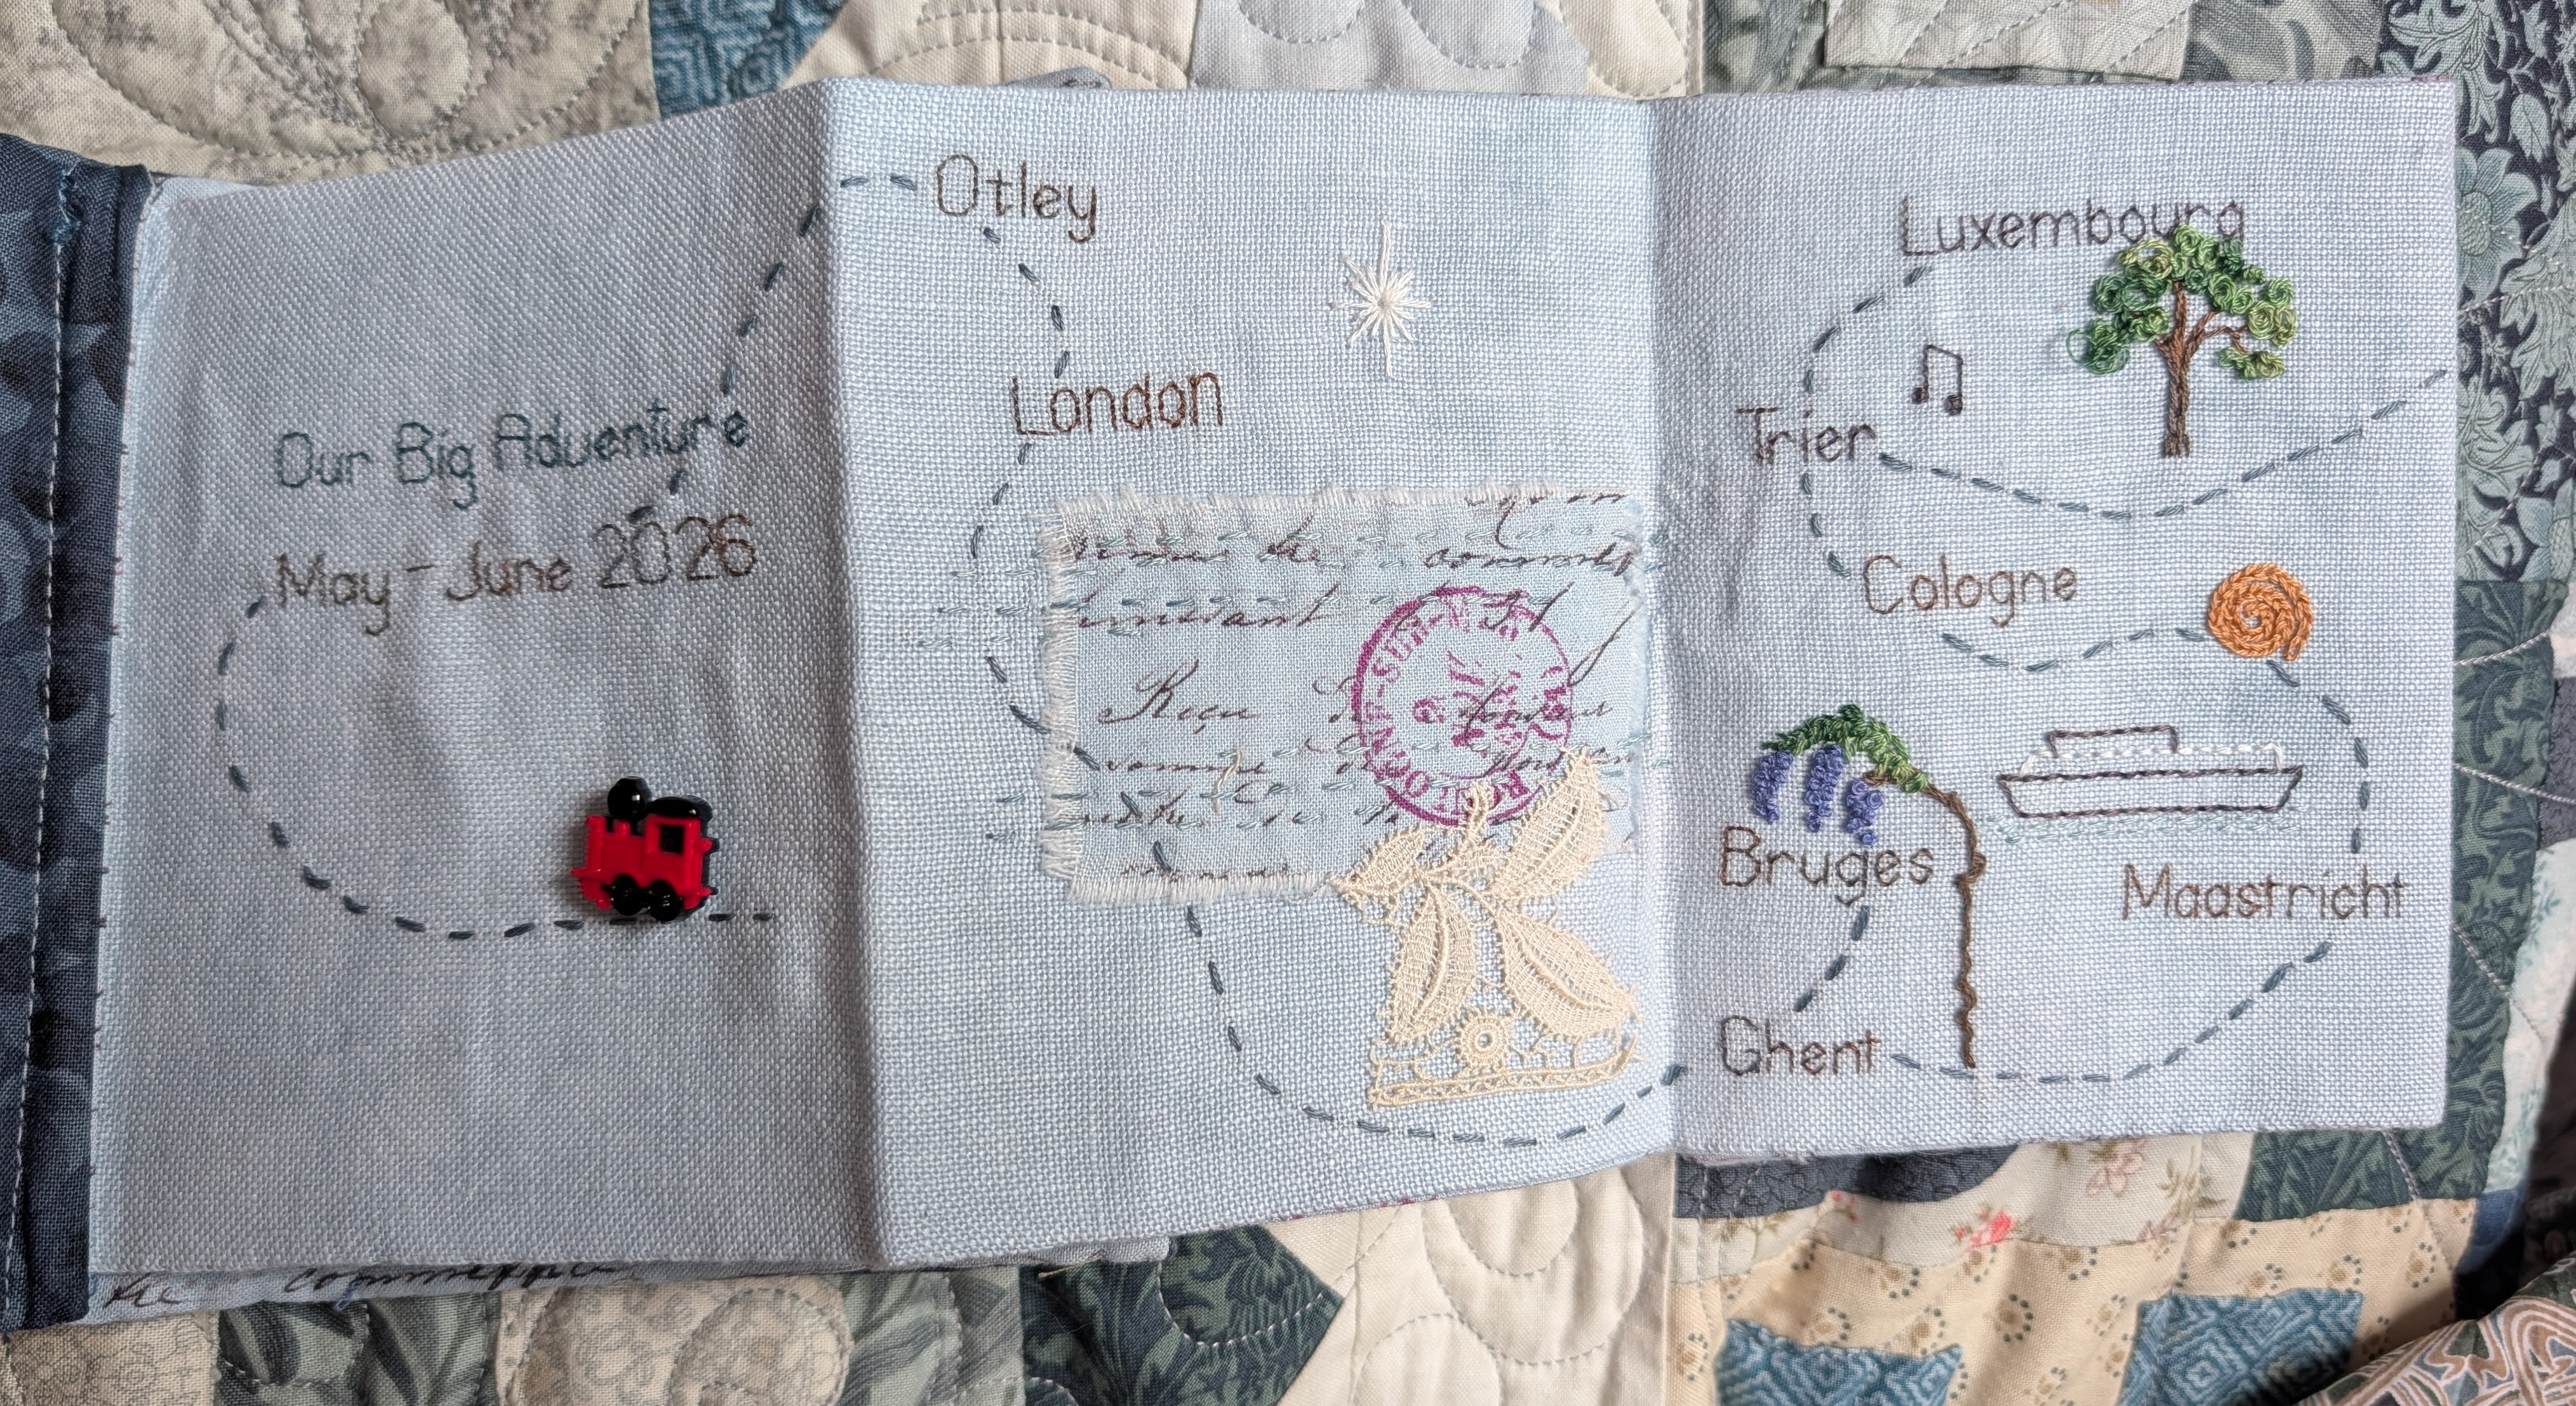
Before I went travelling with my daughter I decided I wanted to do some sort of travel journal in stitch, try and do a little stitching to record the places we went to. I found a length of over dyed linen in my stash which was long and narrow and even better it was overlocked down each side. I’ve no idea where it came from, it’s a softer linen, more like a dress weight. It wasn’t cut quite straight so I pulled a thread out to mark the two long edges and also tacked cotton along what would be the page edges. This proved very useful as however crumpled the piece was, I could always see where the pages would be. My plan was for a concertina book, so it could be folded out to show the whole trip.
I packed a little bag with some threads, little oddments of lace, tape and scraps of fabric so I could break up the pages if I needed to.
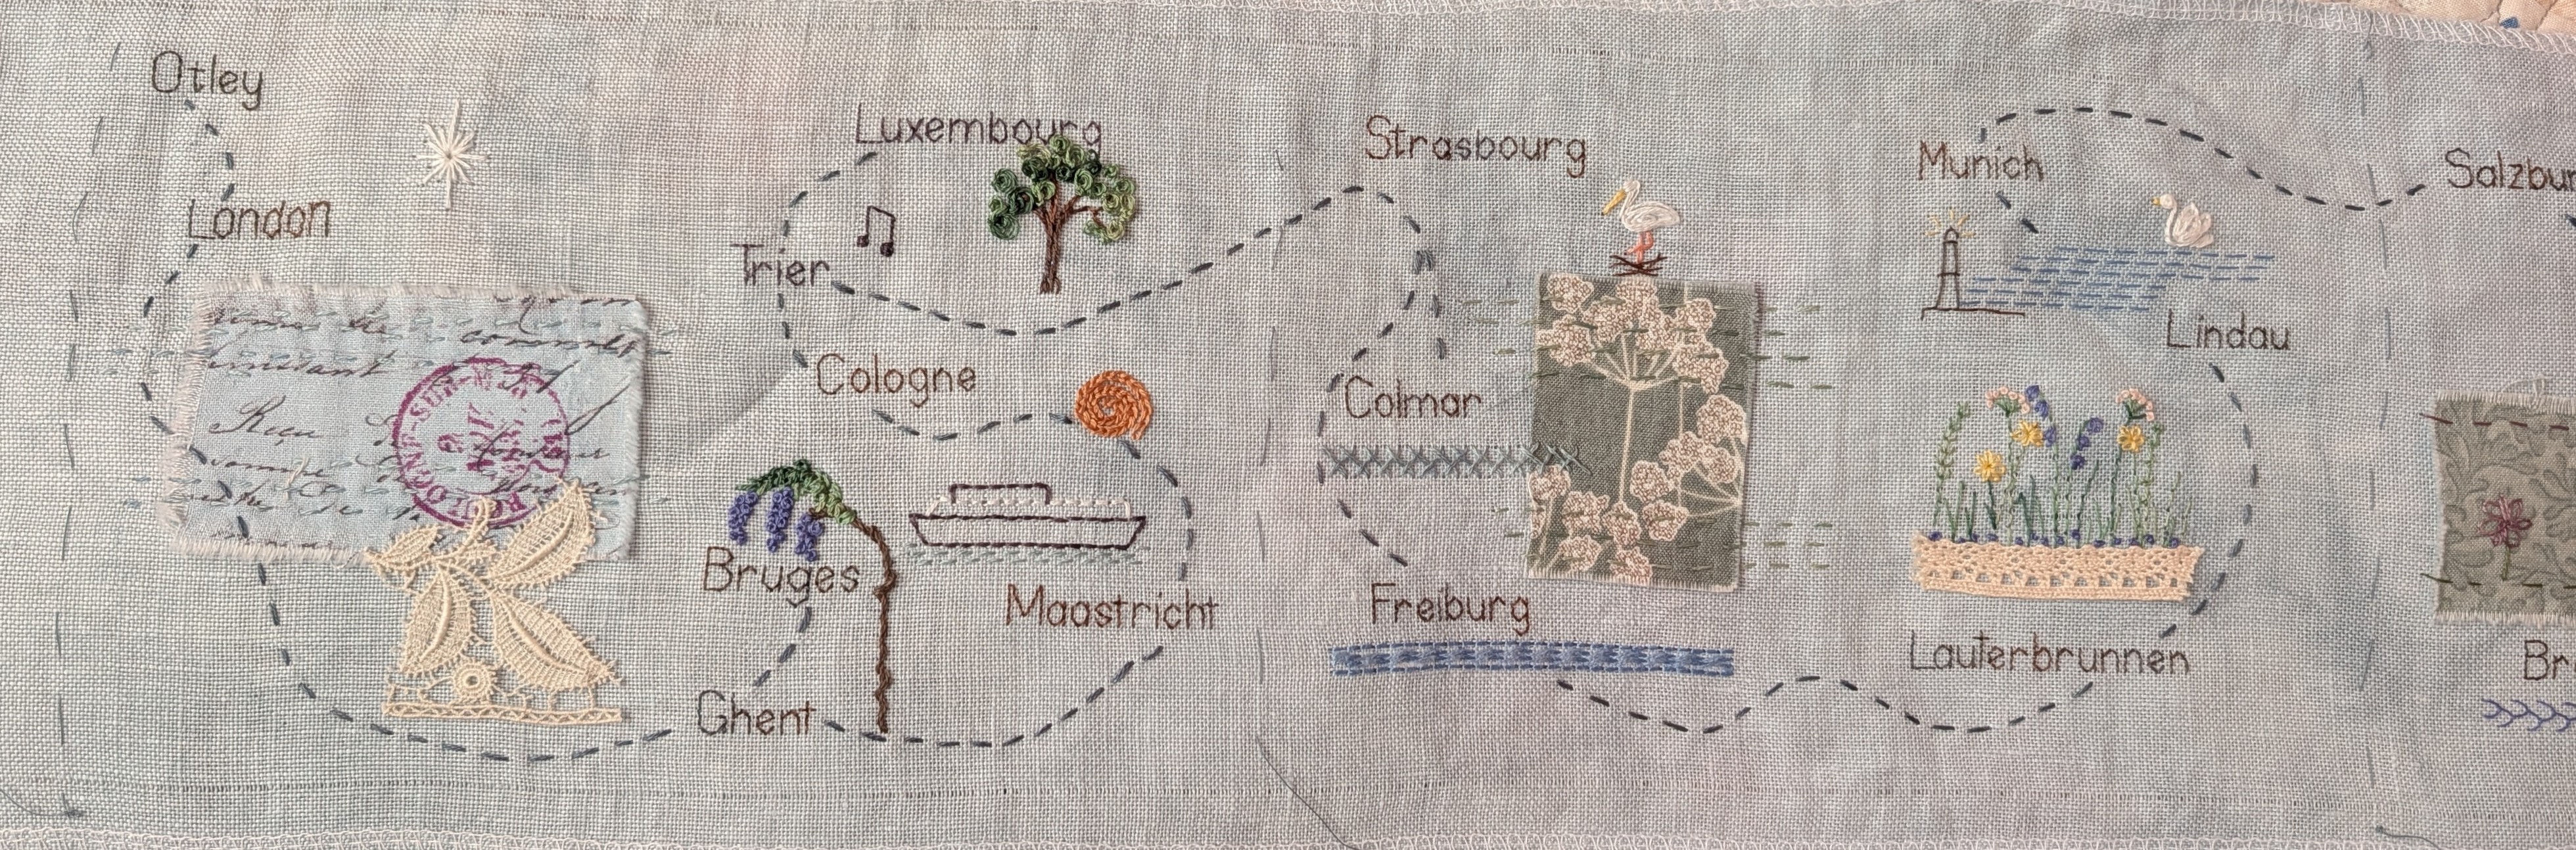
From the start I was a bit behind! I decided to embroider the major place names and of course that first day we had Otley, London and Ghent so by the end of the first stay in Ghent I was already behind. In my defence I was also trying to keep up with a written journal with little paintings in! I’d probably done my usual of over-committing with craft projects!!
I embroidered the star to represent Eurostar, the train between UK and Europe. In Ghent and Bruge there was lots of wisteria growing up the houses and other buildings, in fact it became one of the quotes from the holiday, “Ooh look, wisteria!” Of course Bruges (and Belgium in general} is also known for it’s lace, I had a scrap of lace in my bag so I cut the leaf motif off it.
In Maastrict we stayed on a boat, in Cologne we ate traditional sausages in a brewery. Whilst we were in Trier we went to an organ recital in the catherdral one evening. Luxembourg struck me as a very leafy city, helped by the huge gorge it’s built around.
On page two I settled down to about three places per page. In Strasbourg we saw storks on the top of trees in the park, I used blue lines of different stitches to represent rivers, canals, lakes etc so Colmar is famous for it’s canals and Freiburg for it’s fresh water rills down the streets.
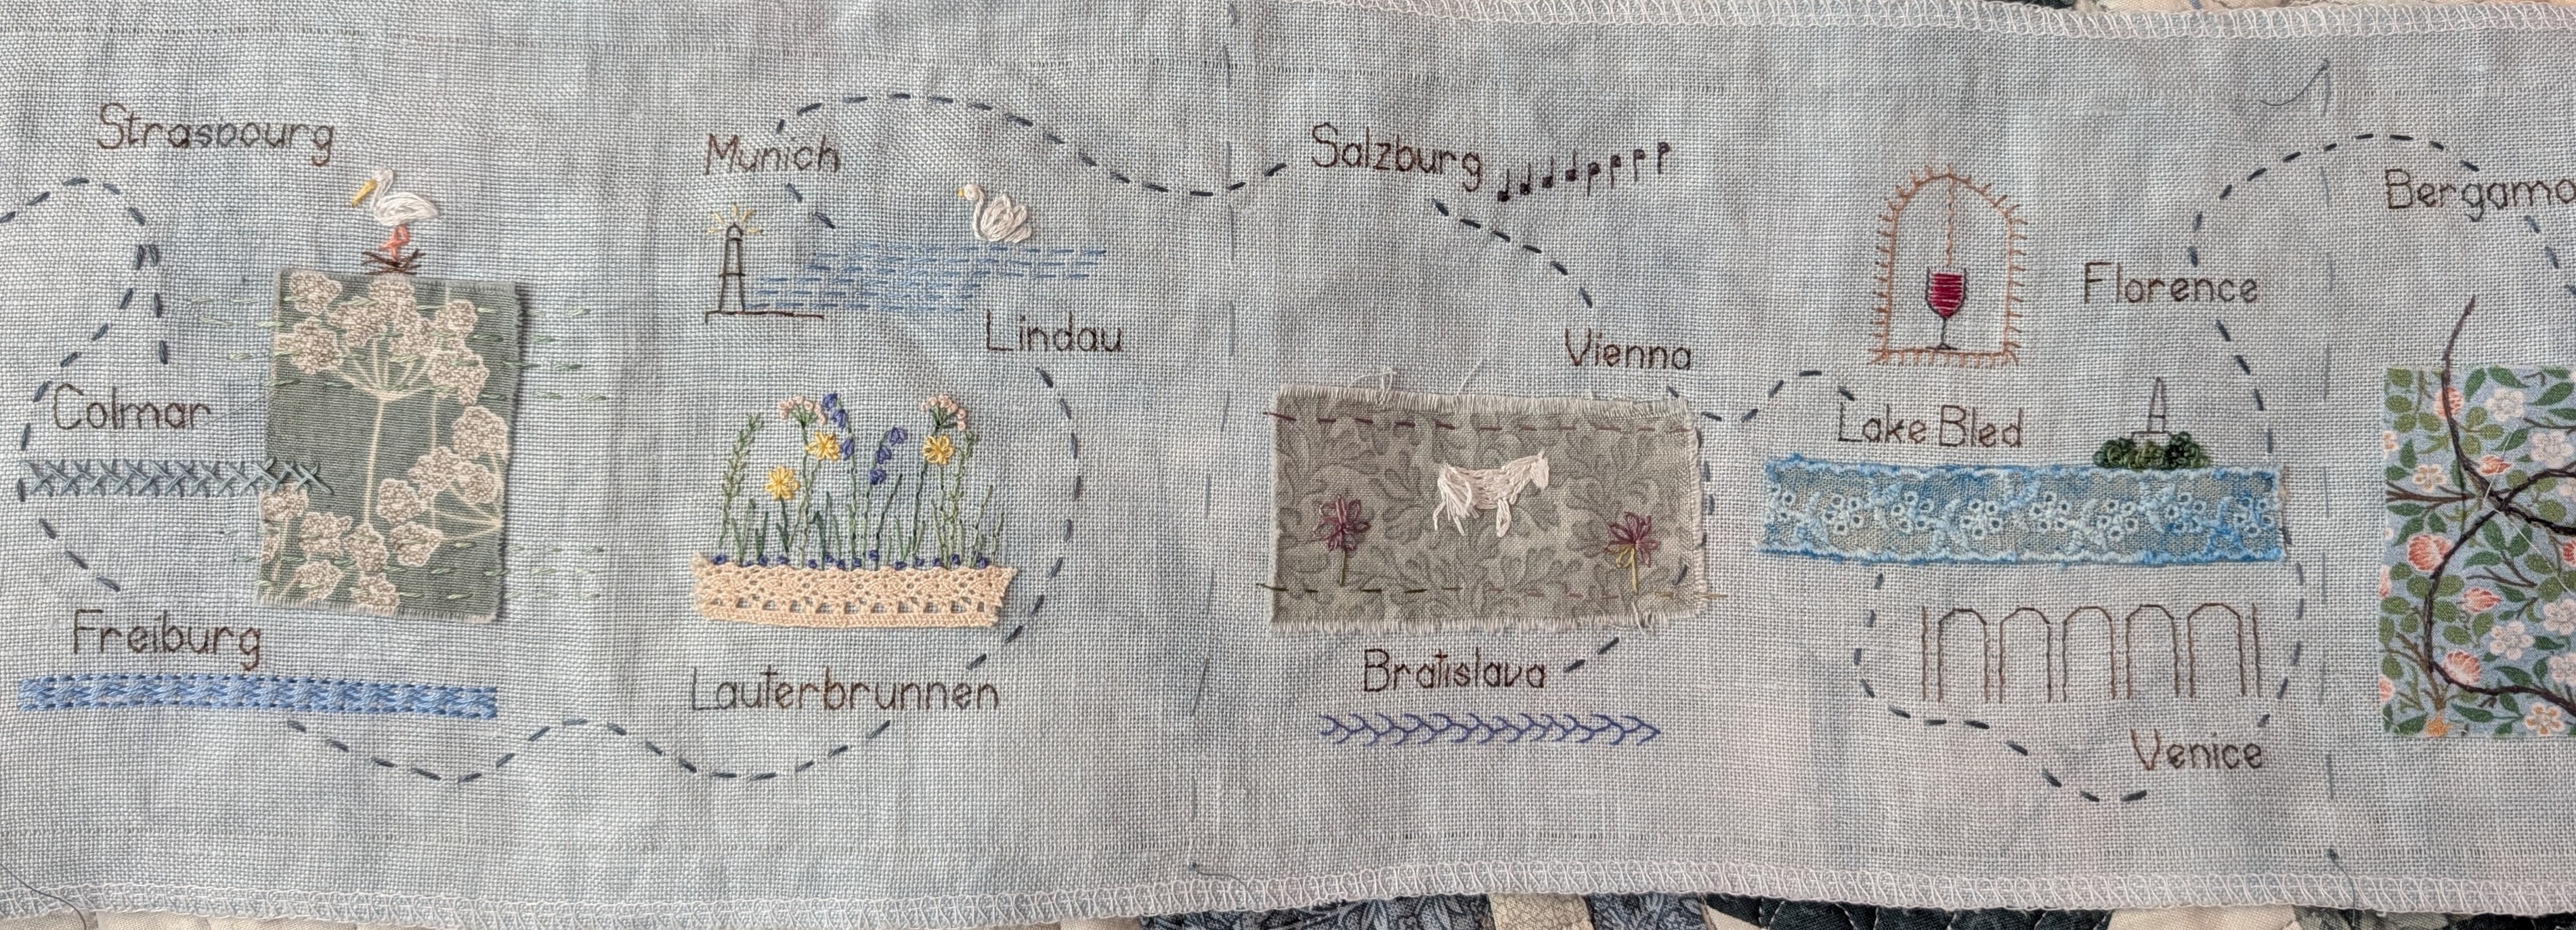
We then travelled to Switzerland to Lauterbrunnen where the meadows were full of flowers. Lindau has a lighthouse on the harbour and in Munich we saw several swans in the palace gardens.
Salzburg has links to the Sound of Music film, in Vienna we saw the beautiful white Lipizzaner horses. We also had a day trip to Bratislava which is on the river Danube.
From Vienna we travelled to Lake Bled in Slovenia, we stayed opposite the island on the lake. Venice is represented by arches, there are lots in St Marks Square. In Florence we sampled the wine windows 🙂
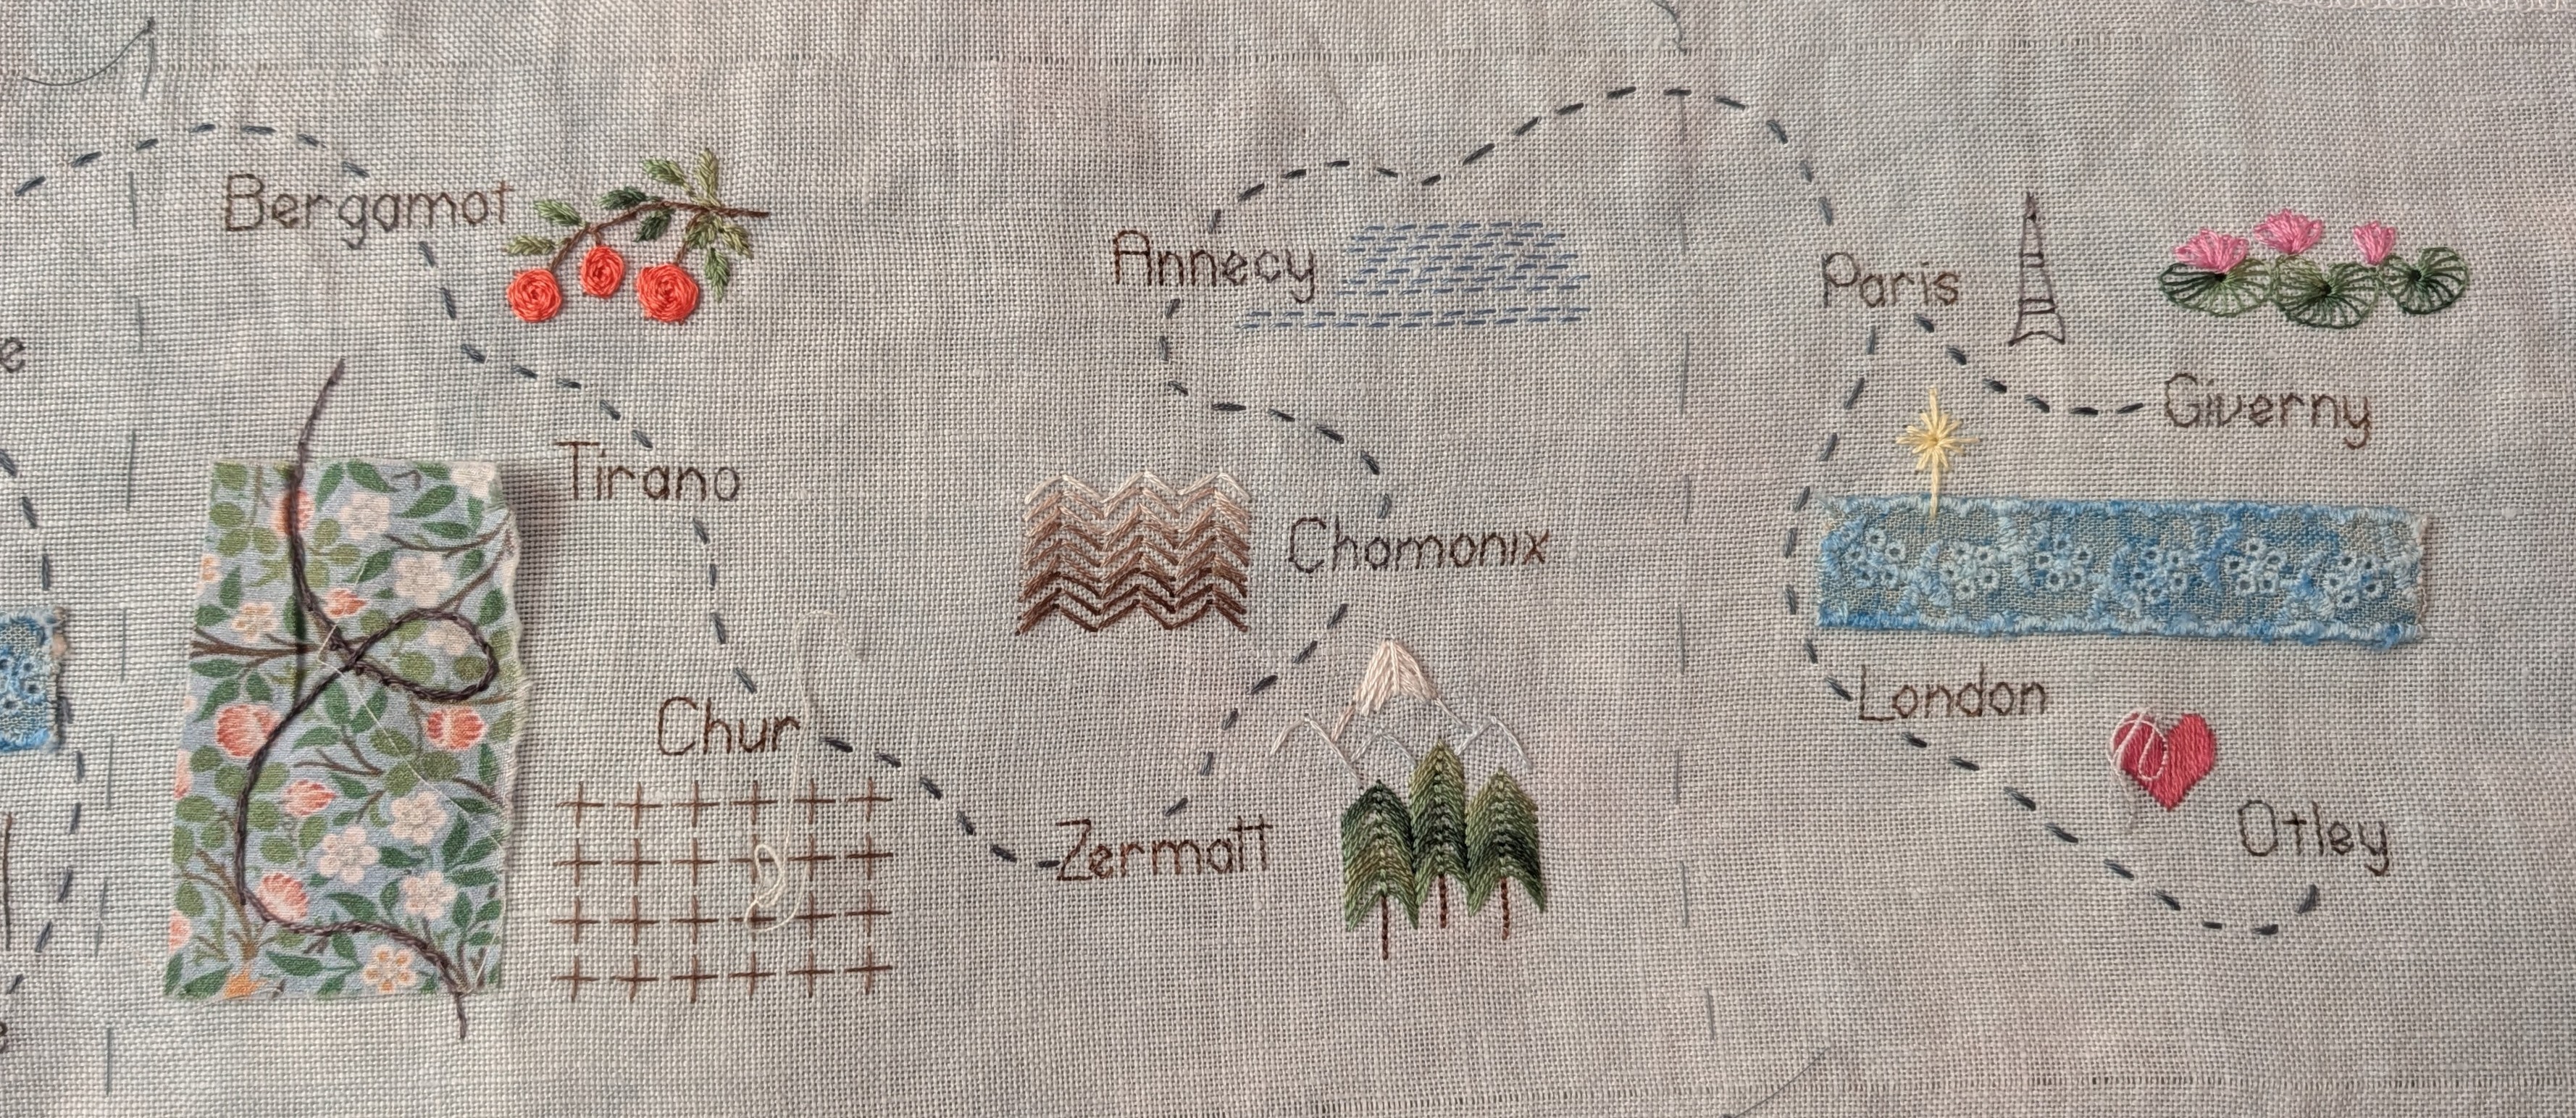
We then travelled to Bergamo which is linked to the Bergamot orange. I’ve just realised I’ve put a T on the end which will need unpicking! Tirano is the start of the Bernina Express railway line which winds it’s way over the alps to Chur, doing loops along the way.
In Chur we stayed in a converted prison (more spacious than the boat!!) In Zermatt we took the Gornagrat train up the mountains to see the Matterhorn. Chamonix is famous for Mont Blanc, though from the town itsself the mountain is not so distinctive a shape. Annecy has both canals and a lake.
Onto the last part of our big adventure; in Paris we saw the Eiffel tower and took the train out to Giverny where Monet’s garden is.
We caught the Eurostar back to London, under the channel, before heading to home where our OH’s were waiting.
I just need to stitch a title page before making it into a book.