I’m making slow but steady progress with the hand quilting of my Down the Rabbit Hole quilt, three weeks ago when I last showed you my quilt this is how far I’d got…
I’d just started the sunflower border quilting. Well I’ve managed at least a couple of evenings of quilting so I’ve made reasonable progress, I’ve now completed two sunflowers and a dresdon flower too, so I’m almost half way round this border. The insides of the Dresden flowers weren’t easy to quilt due to all the extra layers of fabric in seams extra, I ended up stab stitching most of it, so I was quite glad to move onto the next sunflower! I’ve not yet removed all the basting lines, so if you’re wondering what the straight lines are, that will be basting!
When I’m feeling optomistic I look and think there’s only two narrow and one wide border left, when I’m not so positive I look at the size of the rabbit border and wonder when I’ll finally finish this quilt…slow but steady!
This Hand Quilt Along is an opportunity for hand quilters and piecers to share and motivate one another. We post every three weeks, to show our progress and encourage one another. If you have a hand quilting project and would like to join our group contact Kathy at the link below.
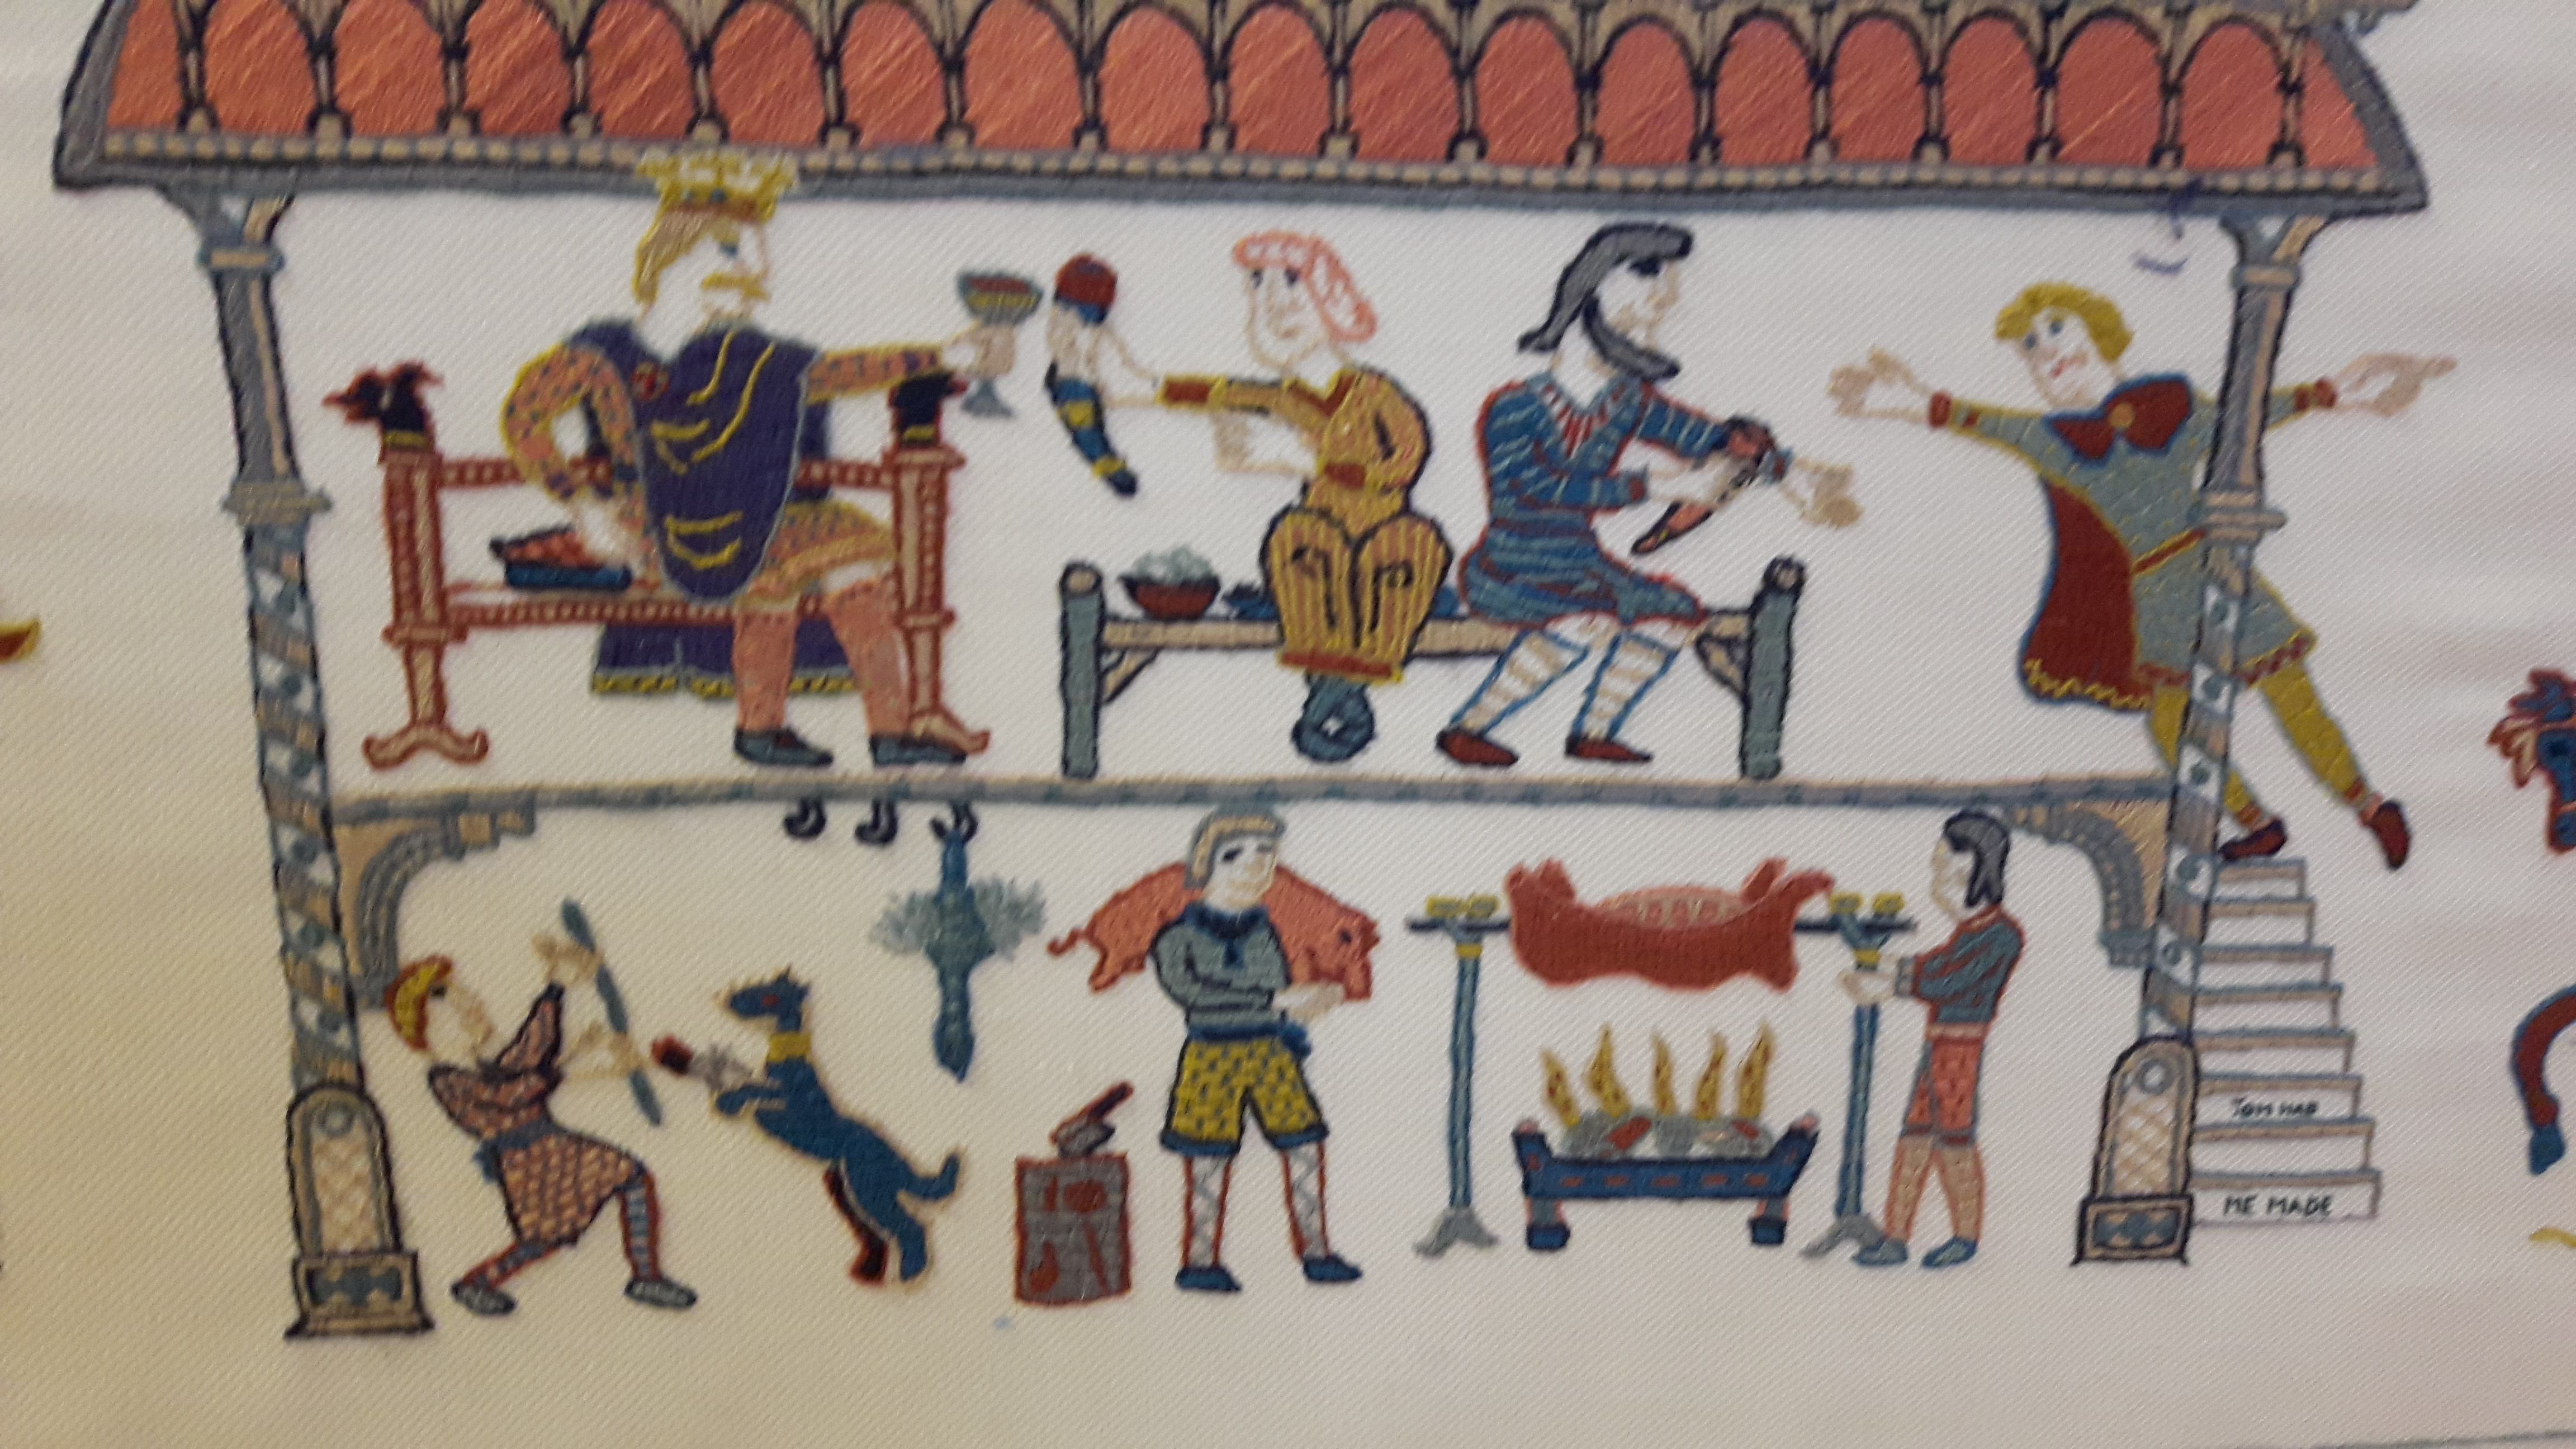
At my Guild meeting we had a fascinating talk about the Stamford Bridge Tapestries. Most people have heard about 1066 and the Battle of Hastings, all gloriously illustrated on the Bayeux Tapestries. 1066 was quite a tumultuous year here in Britain with three English kings and two major battles. I remember reading the Simon Schama book on the history of Britain, I was on the train going to work when I was reading about 1066, it was so exciting I didn’t want the train to get to Leeds!!
The Battle of Stamford Bridge here in Yorkshire happened just three weeks before Hastings, without it the outcome in Hastings would probably have been very different. The troops had to march from London up to Yorkshire (over 200 miles) there was then a very bloody battle with the Vikings which resulted in the Norwegians leaving in less than 30 boats, having arrived in over 300! The English troops rested in York for a couple of days before they heard France had invaded in the South, so the battle weary troops had to march back down to the south coast to fight another battle, and the rest is history, as they say!
As the battle of Stamford Bridge was really just as important as Hastings, someone in the village had the idea of making a tapestry to depict the story, along the lines of the Bayeux Tapestry. A team got together, they started about five years ago and have almost completed the twelve panels. They are amazing to see, each about 120cm across with lots of detail in the pictures. The team of embroiderers tended to specialise in certain bits, one lady was good at dogs, another horses etc, they tried to ensure characters were recognisable from one panel to the next by the colour of their clothing.
They used Bayeux stitch mainly which gives good coverage whilst being very economical with the thread. It was also interesting to hear how they transferred the outlines for the embroidery. They didn’t want to risk using supposedly disappearing pens on the front, so they traced a reversed outline onto calico which was the backing for the embroidery, they could then stitch a fine running stitch through both layers along all the lines, giving a clear outline on the front. Ingenious I thought!!
It is hoped the tapestry will be on permanent display in Stamford within the next few months, it will be worth a visit if you’re in the area. Apologies for the quality of my photos, they were taken on my mobile, there’s lots more photos on Skipton Embroiderer’s Guild website if you follow the link.
It was my Embroiderers Guild meeting on Monday and we were due to swap our Travelling Sketchbooks for the next round, so at the weekend I thought I’d better stitch something to go in the book. It was my turn to create something for a sketchbook on the theme of maps. As soon as I saw the theme I knew roughly what I wanted to do.
Whilst we were clearing out our ‘under the eaves’ space last month I came across some old maps of my Dad’s, I love looking at maps, both old and new, I can spend hours poring over them. These maps are from the 1950’s, mainly England and Scotland and what particularly appealed was that they are linen backed. I’ve seen a few embroideries on Pinterest that used maps as a base and it crossed my mind that being linen backed they would be a lot more robust for embroidering.
I chose a rectangle from one of the Scottish maps, choosing it mainly for it’s variety of topography, it had a loch, some mountains, wide valleys, a few features to work with. I realised as soon as I started sewing that one issue was that when coming back up with the needle it was difficult to hit the right spot and I didn’t want lots of holes, I quickly hit on the idea of making a hole from the top (sometimes several at a time) which I could then pass the needle through from underneath, it worked!
I just sort of made it up as I went a long, I used chain stitch and back-stitch for the rivers and the loch, fly stitch for the marshy bits, herringbone, feather stitch, lazy daisy, Algerian star, blanket…
The only other issue I had with sewing the maps was trying to secure threads at the back, I passed threads under some stitches, but at the end I also stuck a few short lengths of sellotape.
It was only when I was finishing off the embroidery on Sunday and sticking it in the sketchbook that I noticed a hand-written name and date on the margin of the map. I’ve no idea who the name was, but the date was 17th March 1953, 66 years earlier to the day!
It’s been an interesting project to stitch this time as it’s something I’ve fancied trying for a while, it hasn’t come out quite as well as I hoped but I will try again, maybe with some machine embroidery, or a little chiffon over areas, I think the idea needs developing a bit!
Thanks for all the helpful comments, I decided to take your advice and try and be a bit braver with my colours, adding the lime green contrast in particular!
I made another three blocks which incorporated both the green and the spotty purple and I cut a few more long blocks, then I took everything off the design wall and started afresh…
I tackled it in a different way this time. Last time I started at the top and worked my way down. This time I arranged them in block order, all the triangles first, then the big rectangles, the squares, next came the pieced squares and finally I filled in with the long, thin blocks. It did seem to come together better that way.
I have a vague hope that it might come together OK now…
I’ll sleep on it and see how it looks in the morning. If anything screams out at you, please let me know!
A couple of months ago I was asked to make a quilt to be auctioned for a charity. I’ve made several quilts for charity before, the difference this time is that someone else is buying all the fabric, which does put me under a little more pressure! It’s going to be auctioned at a charity ball, so I feel it has to be fairly striking, my usual soft palette won’t necessarily hit the mark in possibly subdues lighting after a few drinks! Having perused the internet I was taken with a quilt on the Tula Pink website called Flower Market. It also looked fairly quick to make as there’s several large pieces.
I went to the Harrogate quilt show to buy some fabric. Typically when you want something specific, it’s not there! I did however manage to find a fat quarter bundle of Tula Pink fabrics and some extra yardage. I gathered up some extra prints and plains too. I was reasonably happy with my haul at the end, though I wasn’t sure at all about the spots and stripes, but I was reassured by a store holder that the Tula Pink fabrics are designed to all coordinate as they use the same palette, this was my selection…
I think I should stick to my comfort zone when it comes to colours!! I just can’t get it to look right! I dropped a few fabrics straight away…the spots and stripes and the lime greens! There are five different blocks in the quilt arranged in a random fashion, I got five rows in on my design wall and I just didn’t like the effect…
I felt the issue was the big double size blocks, so I took those out…
I tried making the colours a bit more planned…
I took most of the single block pieces out as they seemed to stand out too much, I’ve also made a new block to trial which is the centre top one. This is where I am now, still not happy!
I could probably make another three, maybe four like the new block, if I could stretch to five new blocks I’d have another row. My thoughts at the moment (apart from panic!!) are that it’s only 45″ square at the moment, no where near big enough, I could sash the blocks, add a narrow border and then a pieced border using all the fabric left over. I could leave it as it is and put a wide plain border round…or I could scrap it for the charity auction and do something else, in which case it’s an expensive mistake! I’ve got to go into town tomorrow for some fabric anyway, so any thoughts, including sash colours would be very welcome!
I’ve read two books over the last few weeks, one I’ve had for many years, the second was bought in the last couple of years. As they are on the same subject, a biography and an autobiography, I thought it would be good to read them one after the other.
Beryl Markham was a fascinating woman, she was born in 1902 in England but when she was four her parents moved to British East Africa (Kenya) to farm and breed racehorses. Her mother and brother returned after only 2 years. Beryl spent her days playing with the local tribe, the Nandi Murani, learning to track and hunt with their chief. In 1919 a disastrous drought lead to the loss of the farm and the family fortune, her father left for Peru but Beryl stayed and became the first woman in Africa to be granted a race horse trainers license at the age of eighteen. In her late twenties Beryl learnt to fly and again became the first woman in Africa to hold a pilot’s license, she piloted mail across Africa and scouted for game for safaris. In 1936 she hit the headlines by becoming the first person to fly solo across the Atlantic from east to west, taking off in England and crash landing in Nova Scotia 21 hours later.
West with the Night is Beryl’s autobiography. Her descriptions of Africa are beautiful, she clearly loved the country and had a huge respect for the indigenous population, she spoke Swahilli, Nandi and Masai. Her friendship with Kibii, a boy from the Nandi Murani, lasted a lifetime. In her book she writes about her childhood escapades, her time as a racehorse trainer and then learning to fly, concluding with the record breaking flight across the Atlantic. She rarely mentions her social life at all which is where the next book comes in…
Circling the Sun is by Paula McLain, she says;
” …Neglected daughter, scourge of governesses, serial absconder from boarding school, by the age of 16 Beryl had been catapulted into a disastrous marriage, emerging from the wreckage vowing to take charge of her own destiny. Circling the Sun takes the reader from the spectacular beauty of the Rift Valley to the immaculate lawns of Nairobi’s Muthaiga Club, from the brittle glamour of the gin fueled Happy Valley set to the loneliness of life as a scandalous divorcee. “
You have to remember when reading these books that they are set in a very different time, when big game hunting in particular was acceptable. I loved both these books, West with the Night is beautifully written. Beryl achieved so much before she was even 30, I found her descriptions of Africa in the 1920’s fascinating. The book concentrates on what she did, rather than including the social side of her life. Circling the Sun fills in all the gaps, it is written sympathetically not salaciously, describing her relationship with her ‘step-mother’, her circle of friends which included Karen Blixen (Out of Africa) and Blor Blixen. She was married three or four times and had a son in London. She was a feisty, brave woman who worked hard to achieve what she wanted, refusing to be beaten by the gossip and tittle tattle and the inequalities that thrived in white African society.
I’m tempted to read Karen Blixen’s book now, I never even saw the film Out of Africa, there’s also another book about Beryl called Straight on Til Morning which look interesting.
There is an old saying here in the UK that if March comes in like a lion it will go out like a lamb, or visa versa. It’s definitely come in like a lion, so hopefully it will calm down a bit soon. We can have all weathers on one day at this time of year, on Sunday we had wind, hail, rain, snow and sunshine! My OH wanted a short walk as he’s counting his steps at the moment, I reassured him that any showers are blowing over quickly. Ten minutes after he left I looked out from the comfort of my sewing room to see huge snowflakes blowing sideways, a white-out! Five minutes later, blue skies and sunshine!
Such weather is not very conducive to gardening, especially to a fair-weather gardener like me! There’s been a lot of localised flooding and the clay soil is sodden, so I’m trying to avoid walking on it. I have managed to finally prune most of our roses, I’ve not quite managed to clear all the prunings up yet though…
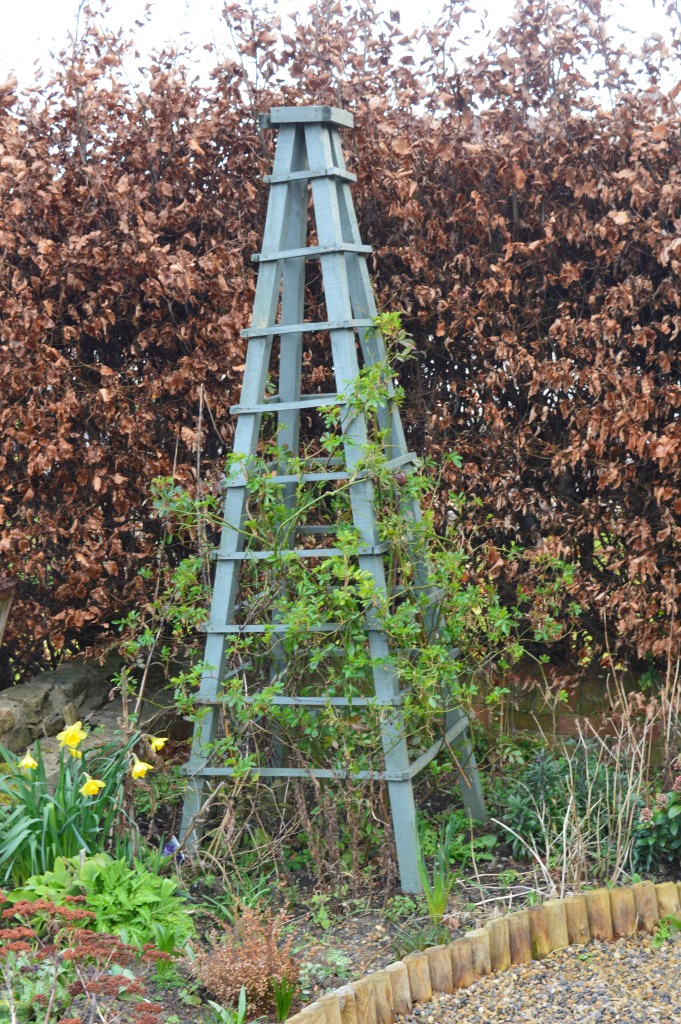
I even managed to tie in the climbing rose on my obelisk…
…and climbed a ladder to prune the rose over the arbour. As you can see there were a couple of branches I couldn’t quite reach, so I’ll have to wait for my taller OH to have a go.
The camelia next to the arbour is flowering nicely, it’s blooms have survived the weather better than I thought they might, though I think it’s frost that does the worst damage to these flowers.
I have a miniature flowering cherry in amongst my large group of pots, it’s just come into flower, it always looks so dainty.
As you can see from the photos, I still have a fair bit of tidying and pruning to do, there’s old growth on perennials such as sedums and peonies that still needs cutting back and the roses on the back fence still need pruning. It’s great to see everything starting to grow, there’s green shoots popping up all over the place and you can just see the beginnings of leaf buds on the trees. I’m on annual leave this week so, weather permitting, I’m hoping to get a fair bit of gardening (and sewing!) done.
It’s three weeks since I last showed you my Finery of Nature cross-stitch. This is a Dimensions cross-stitch kit I bought at an Embroiderers Guild meeting. I’ve changed the fabric from black aida to a soft duck egg blue even-weave. I’ve made reasonable progress over the last couple of weeks, this is where I was three weeks ago…
Since then I’ve stitched some french knots on the lily of the valley and I’ve started stitching a few of the metallic high lights. The pattern supplied gold thread, however I felt with my change of background I’d be better with silver. I have to say I’m still not convinced, I’m debating whether or not to undo the silver and replace with a suitable floss. It’s also couched down with the silver thread which is fiddly. I’m tempted at the moment to just do back-stitch with coloured floss. I might decide after I’ve stitched more flowers so I can try both ideas out.
I’ve also started the border, I’ve almost stitched three swirls and there are thirty-two altogether! This is why I’m trying to stitch them as I go along, rather than leaving them all to the end!!
This stitch-a-long is organised by Avis from Stitching by the Sea, we post our progress on a project every three weeks, it’s a great incentive and motivator. If you would like to join us please contact Avis. In the meantime please follow the links to see what everyone else is sharing.
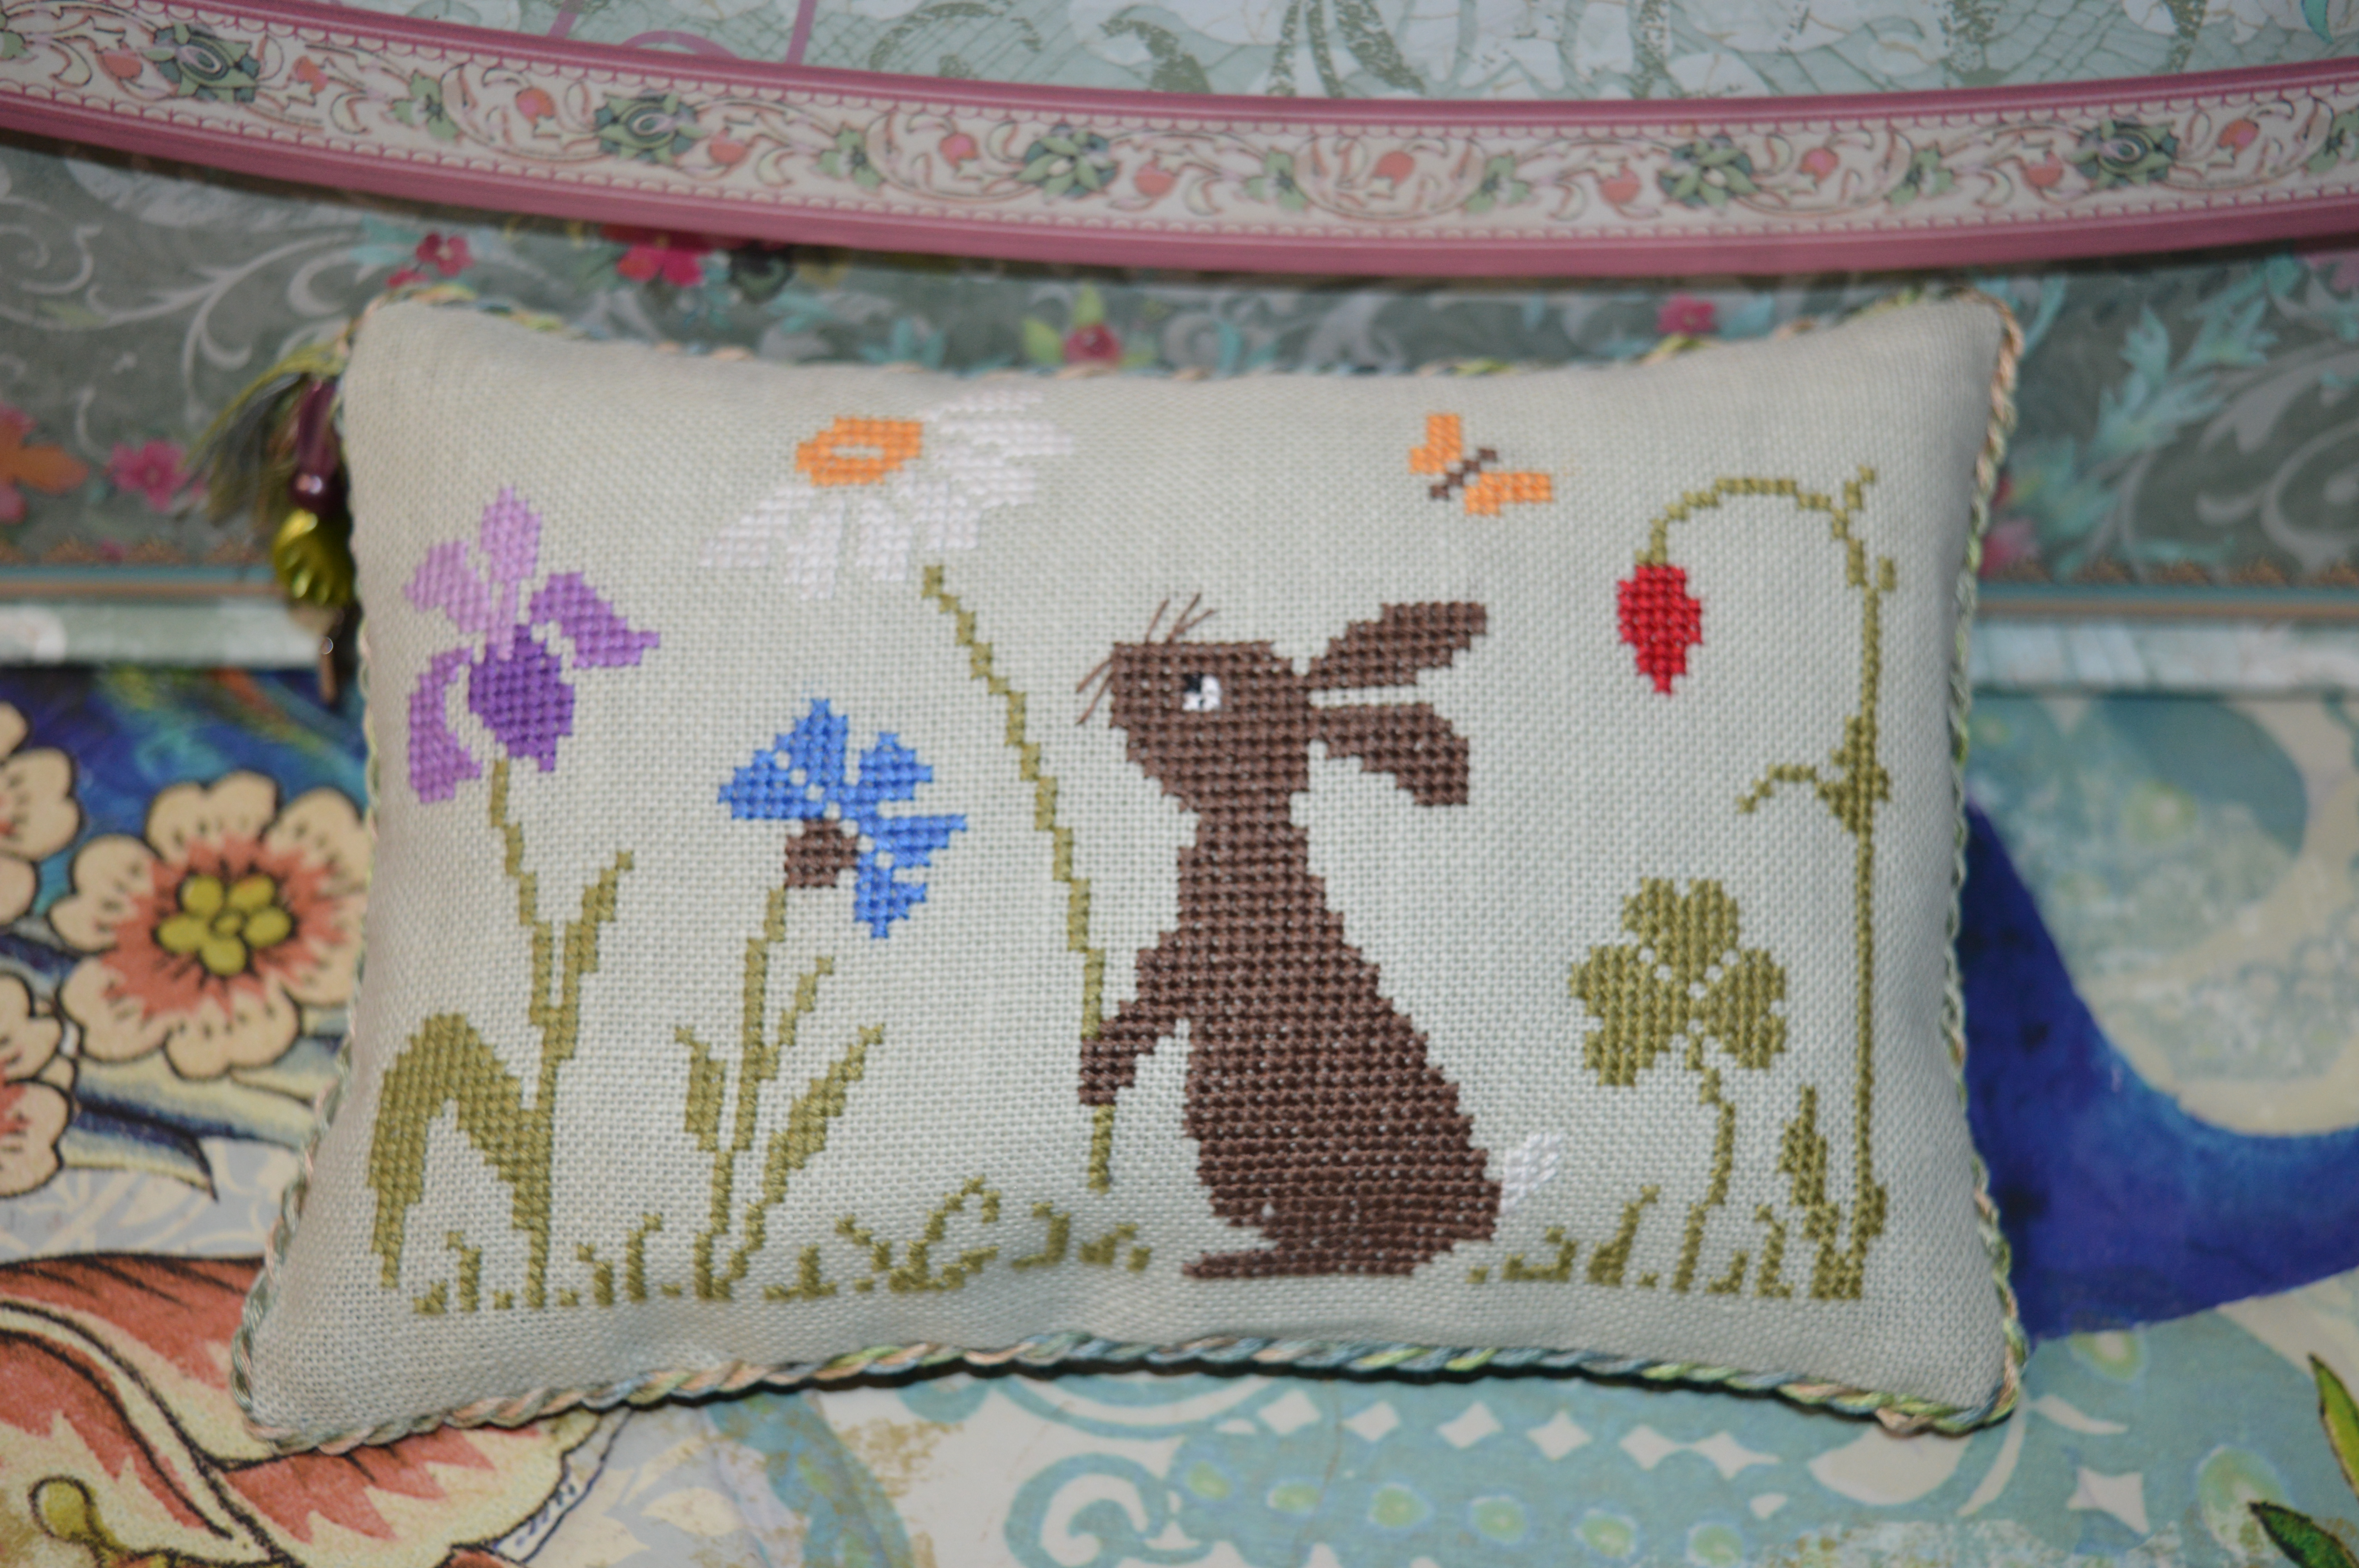
A couple of weeks ago on facebook a cute cross-stitch design popped up, well it was an instant impulse buy! The design is by the French designer Dany Chevallier, it’s called Ambience Printaniere, which I think would translate as Spring Air. I thought it was pretty and cute without being twee! Just right for a spring project. It’s a pair of designs, the second one being a rabbit with a daffodil.
It’s not taken long to stitch at all as it’s a pretty simple design, I think the simplicity is half of the appeal, the daisy and the iris are particularly effective. The only thing I changed was the colour of the rabbit, it was actually meant to be slightly darker, I had doubled up on this lighter skein of DMC in my stash so I decided to have a chocolate brown rabbit and I also gave him a white scud instead of a brown one, a rabbit has to have a white fluffy tail! He’s still fairly chocolaty, in fact he reminds me of some dark brown rabbits we used to have living in the fields behind us. There used to be lots of rabbits, the path would be littered with them if we walked the dogs on an evening, I think myxomatosis has reared it’s ugly head again as we rarely see a rabbit now.
I used my favourite bee fabric to back it. It crossed my mind today that I’ve used this fabric for lots of cross-stitch smalls, but I find it difficult to place in a quilt, I think it’s hovering between blue and green, so it doesn’t actually go with either. It’s perfect for my smalls though! Here’s a photo of the fabric matched with another cross-stitch small.
I decided with the simplicity of the design I didn’t want anything too fussy to trim it, I made some cord using a variegated DMC thread in soft shades of green, blue/grey and beige, it blends in nicely.I started and finished the cord at a corner, so I decided to make it into a tassel and add some dangly bits, namely some beads and charms. I found a rabbit in my stash and also one saying ‘wish’. I thought this was quite apt for spring and the hope of new beginnings.
My second finish today was the great tits card I made for my OH, it’s our wedding anniversary tomorrow, so I thought I’d better finish it!. I glued some batting onto card and then glued the cross-stitch round the back. I did the same with some quilting fabric on a larger piece of card and then glued the two together. I left it under a weight to dry overnight. I was a little disappointed this morning to see it wasn’t very straight across the top of the cross-stitch. This is the disadvantage of gluing, but when I’ve laced such pieces it’s ended up too bulky, I could almost do with doing a mixture of the two methods! Anyway I decided a bit of judicious trimming would hide the wiggly bit, I made some cord to go around the cross-stitch and added a navy blue ribbon bow. It looked much better.
I had placed a long length of ribbon between the cross-stitch and the backing and I used this to sellotape the cross-stitch to a card, I can then just tie it in a bow at the back afterwards.
I think he will like it! If I get a good response I might stitch a blue footed booby bird next year!
I’ve just finished the second block of my Coming Home quilt. This is a block of the month by Sarah Fielke (the same designer as my Down the Rabbit Hole quilt). On the last day of each month she releases the next pattern instructions and videos showing us how to do it. Sarah’s quilts always have a fair amount of needle turn applique so she demonstrates how to stitch different shapes. Last month it was circles, this month it was stars!
Last time I showed you this quilt I’d just finished the centre square with its eight houses…
This month we had to make four side sections, extending the central star. It took me ages to work out fabrics and colours, that bit of quilting doesn’t seem to get any easier! I’ve now got a spare applique star in grey and teal and several spare triangles! I don’t think it helps that after stitching blocks for the Splendid Sampler and also to a degree my Spring Wreath quilt, these triangles and squares seem huge, they’re like 4-5″, so any fabric makes a big impact. My design wall is so useful for this kind of predicament as I can try the colours out and stand back to look at the effect. This was my wall whilst I was still trying to decide!
The points on the stars were the hardest bit to get neat, trying to stuff the seam under such a tiny area. I’ve also decided I really don’t like cutting out triangles! My template seemed to find any excuse to move! I think I’m going to try a bit of tape underneath next time, see if that helps.
We could stitch two sides on, the top and bottom sections will be added next month when we stitch the four corner blocks, they’ve got appliqued flowers on. So my quilt is progressing nicely, it measures nearly 33″ across. I’ve just got to patiently wait another fortnight for the next installment!