A couple of months ago Deborah from Sweet Fallen Angels suggested a Christmas tree decoration swap. I thought it was a great idea, I make a handmade Christmas decoration for someone whilst someone else is making one for me! I love Christmas and especially a handmade Christmas. I signed up immediately.
I’ve been secretly sewing away my present which I will show you in the next couple of days. We had to have them in the post by the end of November as it was an international swap. So I’ve also been eagerly anticipating an arrival of a parcel from somewhere!
I was very surprised yesterday when not one but two little parcels arrived!
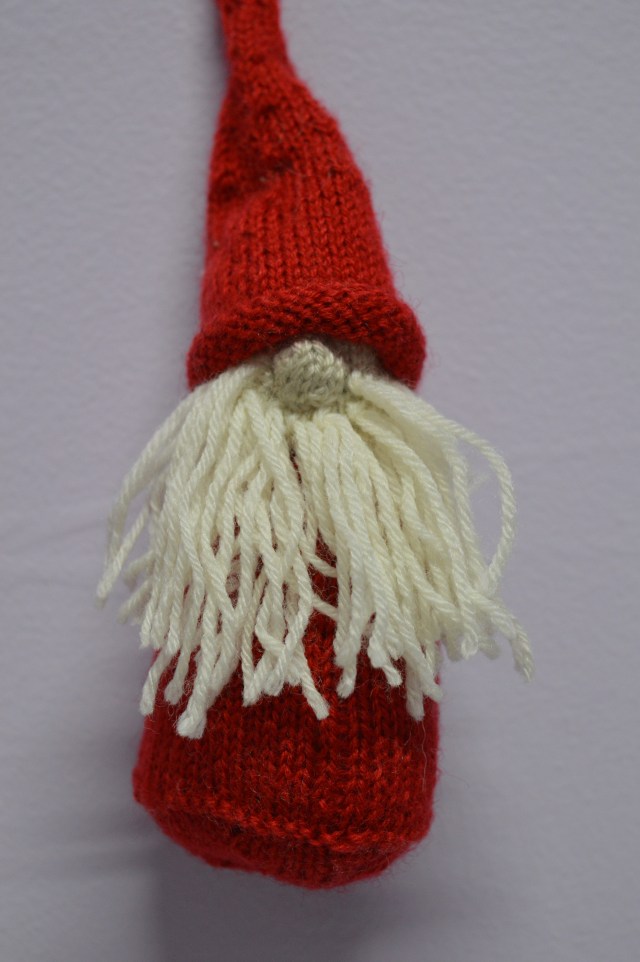
The first parcel I opened was from Linda of Linda’s Cr8tions, all the way from America. She has been secretly knitting a gorgeous gnome for me, isn’t he cute! I love his cheeky little round nose poking out above his woolly beard. It’s such fine knitting too, it’s lovely to have a knitted decoration as it’s something I never do, I have knitted years ago but I’m really not very good and it takes me FOREVER so I do admire beautiful knitting. I know just where he’s going to go at Christmas, he will look great on our mantelpiece next to the Santa’s and the reindeer! Thank you Linda 🙂
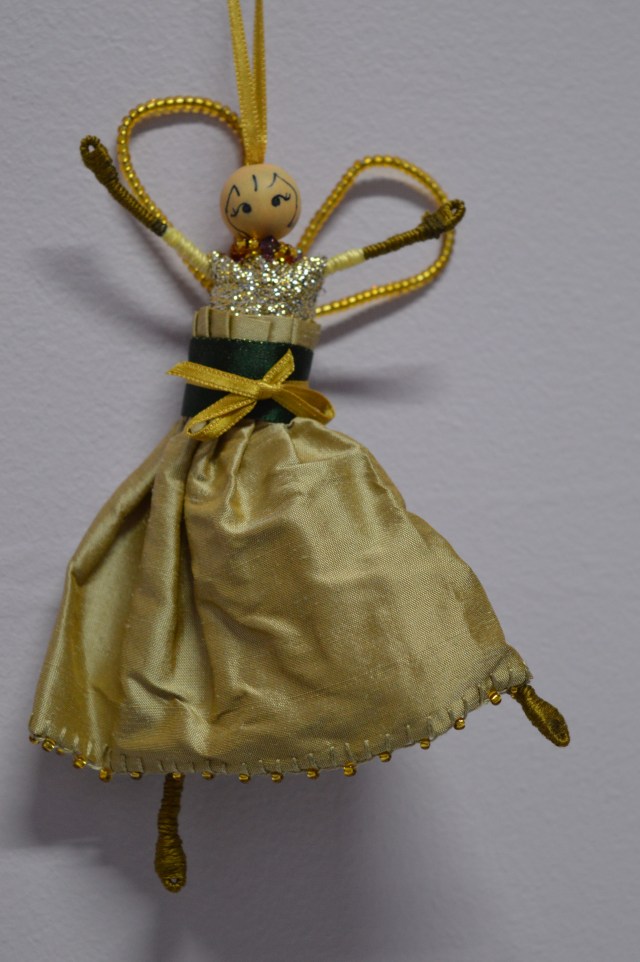
The second was a complete surprise, a lovely peg doll angel from Deborah as a thank you for taking part. She’s beautifully made with hand embroidery and beading, she’s all dressed up for Christmas with a silk skirt, a glitzy top, a little beaded necklace and of course a pair of gold wings. I can even move her legs and arms so she’s dancing! She will look lovely on our Christmas tree, skipping across the branches. To add to this, she was wrapped in a square of pretty quilting cotton which goes nicely with the collection I’ve just put together for my next Sarah Fielke quilt.
So thank you to Deborah for organising the swap, and especially for my little angel, it’s been a lovely start to Christmas.
OK, I’ve checked and the photo challenge from Postcard from Gibraltar for yesterday is definitely Climb, so here’s another collection of photos !
As most of you know, my favourite fell to climb is Catbells, it’s only little at 1480 feet but it’s quite a pull to get to the summit, and there’s glorious views all along the way up to distract you for a rest!
I’ve stitched various pictures of Catbells, this one is my most recent. It’s a for a quilt to be auctioned for an Ovarian Cancer charity, Kate from Tall Tales from Chiconia organises one each year and puts it all together. This year it’s called Teal it on the Mountain, so I could do another picture of Catbells.
This is the view as you’re just starting to come down from the summit towards Grange (for a nice cup of tea!) looking over Derwentwater towards Skiddaw on the left and Blencathra in the distance, the town of Keswick is nestled at the bottom.
Looking over to Borrowdale from the top. This was my 50th birthday walk and my two partners in crime are enjoying their lunch. We had a fabulous day!
Catbells from Keswick, taken from our hotel on the Heads.
This was my entry for the Sisterhood of the Travelling Sketchbook. The inchies on the left represent different aspects of the walk such as the launch across Derwentwater and the field patterns you can see in Newlands Valley on the far side of Catbells.
This was a little workshop we did at Embroiderers Guild called Rolling Landscapes, a long thin embroidery depicting Catbells and the nearby fells.
One of my early images of Catbells, this is the front cover of my Travelling Sketchbook on the theme of mountains. It is now filled with embroideries from my friends in my Embroiderers Guild.
My sister, me and Wags the dog on Catbells
A cute photo to finish, though it’s quite scary to think this was half a century ago!!! This is me near the top of Catbells with my elder sister and our dog Wags. As you can see I am very suitably dressed for walking in a little white dress and red shoes!! I’m not sure how much I walked that day but family lore says I climbed up Catbells under my own steam aged 4, bribed with squares of Kendal Mint Cake!
Editors note; I’ve just realised I’m completely out with my timing, I seem to have missed a couple of weeks somewhere, but having written the post I thought I may as well show you!
OK, I’m a day late, (or maybe more!!) but as I seem to have missed last weeks as well I thought I’d choose a few photos for this weeks theme, storm. Having done a fair bit of walking over the years I’ve a few storms to show you, although they’re only little storms as we’re fair weather walkers really! Our storms here in the UK also are usually a lot milder than other parts of the world we here about. It says it all that we still talk about the 1987 hurricane!!
The first one is a photo I think my daughter took of heavy rain in our garden, taken from the comfort of her bedroom !
This one isn’t actually a storm, but it looks quite dramatic! It’s a lunar eclipse from a couple of years ago.
So how would you knit a storm? This is the tornado in Wizard of Oz that whipped up poor Dorothy and Toto, it was knitted for the Tea and Tents WI camping festival as we always have a knitting theme. In case you haven’t sussed it it was wrapped around a rotary clothes line – brilliant idea!
We don’t get snow falls like we used to do, I remember building igloos when I was a child! The garden still looks pretty after a night of snow.
A Snowy Garden
I love seeing the weather forming across the valley, seeing the rain coming nearer (so long as I have all my wet weather gear!) This is Ullswater up in the Lake District. I always presumed everyone could recognise rain in the distance as being brought up walking alot it was something we always did. It was only when I was at work one day looking out of the window and I commented to a colleague that someone was copping a load of rain, she ( a self confessed townie!) didn’t have a clue what I was looking at, I then realised it’s a skill you learn from being outside in the countryside.
Two old ladies enjoying the snow!!
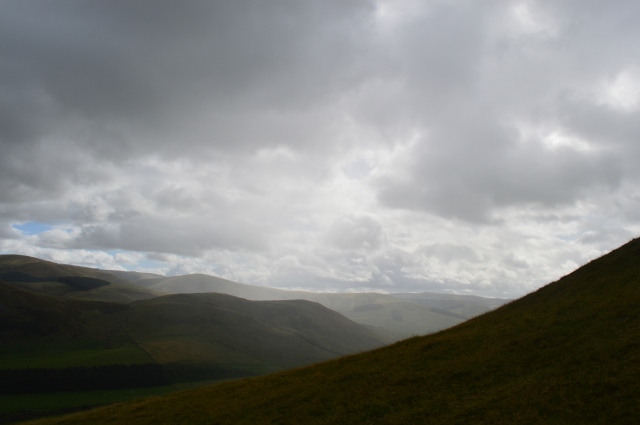
Another photo of the weather coming across the hills, this was from our last walk, St Cuthberts Way. We were really lucky on the whole as we kept seeing the rain coming across but it would go down the other side of the hill, though I think the one in the photo did make us rather wet!
I’m sure there will be much more dramatic photos of storms over on Postcard from Gibraltar, so follow the link to have a look.
Sometimes I find I have little things I want to share with you but they’re not really enough to write a whole post about, so I thought I’d lump three of them together, completely unrelated, a trio of little things…
I reorganised my sewing room recently and some of my stash is now in a set of four drawers. I decided to make some labels so I remember what’s in each one, but also to cover up the patches where someone has previously stuck a sticky label!
I found some old-fashioned parcel tags which I think were left over from my daughter making Christmas tags last year. I also dug out a little book of labels which came free with a magasine years ago, in fact it was in the charity shop pile! I cut out four labels and stuck them on the tags having written on with a silver gel pen. They needed a bit more, so I rummaged in my button box for mini buttons and glued three on each one.
I glued them onto the drawers and I think they look great. In fact I was so pleased with them I’ve made another eight for all my peacock boxes, as I’m forever pulling out the wrong box. These will just be blu-tacked on as I do change the boxes around and sometimes they will be better on the end, other times on the front; I’m gradually getting organised!
A couple of weeks ago I was in Duttons for Buttons buying some binca for my mum, I was stood at the counter just about to pay when a pair of embroidery scissors caught my eye on a nearby stand. Well it was love at first sight!! Aren’t they gorgeous!! I just love the peacock colours and the shape of the handles. Of course with at least half a dozen pairs of embroidery scissors they weren’t exactly a necessity, more of a complete impulse buy!! I wasn’t sure what they would be like to use with the shape of the handle, but they are actually really comfortable as well as beautiful!
Last January Catherine from Hillview Embroidery wrote a review about Advent Calendars for embroiderers. I was rather taken with the idea, so I kept an eye on the De Vere website and a couple of weeks ago a little box arrived. It was beautifully packaged, wrapped in tissue paper with a sprinkling of silver stars, 24 little bags filled with a different embroidery thread all wrapped in silver paper, string and pegs to hang it from and extra decorations such as cinnamon sticks attached to half a dozen of the bags. I’ve hung it up in my sewing room, just got to wait for December 1st!
If I save all the little bags and pegs I can even get a refill next year! I bought three cheese Advent Calendars as well for my OH and my kids, so they’re happy too 🙂
I’ve just finished the second part of Faby Reilly’s Christmas stitch-a-long. She’s releasing a design every two weeks, they’re Christmas card size but I’m making them into decorations. The designs are gorgeous, this was the first one…
I changed the colour scheme with that one as I’m a bit of a traditionalist at Christmas, I do like red and green with a bit of sparkle!
The second one is a beautiful snowflake design, I decided to use the colours Faby suggested with this one, though I did manage to use silver thread instead of gold by mistake! The fabric is actually the same as the one above, it’s not as grey as the photo suggests – winter lighting! I love the rice stitch border, it’s so delicate with the little bit of twinkle. I’d only used rice stitch once before and that’s on the Tall Year Square etui and they’re individual stitches which never seemed to look that neat, in a row like here they look much better.
Having stitched the design I had to decide how to make it up. I felt early on that this design would look good on point, I found some lovely red and gold check in my stash, I cut it on the bias so I could get the squares on point as well. I sprayed it liberally with starch before I sewed it to stop the bias from distorting the square.
I made a cord from some red and some silver grey DMC thread and stitched it round. I added a red bead on the corners and a dangly line of beads from the bottom. I used a few extra beads at the top to neaten up the join of the cord, I stitched both ends to the back and made it look like a mini tassel.
I love this one, though I’m tempted to give it as a present, I’ll see how I feel when I’ve finished all four! I might not be able to part with it!!
I’ve already started stitching the next one, it’s a gorgeous Christmas tree design, so we’re back to the traditional colour scheme!
Last year a few of us from my WI went to Alma House in Ripon for a workshop with Rachel Poole to make a stained glass nativity, we loved it and we were really proud of our nativities. So when we discovered Rachel would be doing another stained glass workshop myself and Theresa put our names down immediately. This time we would be making Christmas decorations.
It was a lovely autumn day when we drove over to Ripon, this was the canal just by the sandwich shop!
We had a great time at the workshop, Rachel is an excellent tutor, knowing we had been before she was happy for us to work on independently but more than happy to do quick refreshers in how to do various stages.
Rachel got everyone to tackle the holly first because as she said, everyone thinks it’s the most difficult where as actually it’s one of the easier ones to do! We learnt how to score the glass and break it and then how to grind the edges to neaten and smooth them off. We all then chose different decorations to make, cutting all the glass and grinding it before lunch.
Choosing glass reminded me a lot of selecting fabric, I fell for the same colours, purple, jade, blue! We flicked through the box containing little sheets of glass and all of a sudden I’d see one and think Oooh I like that!
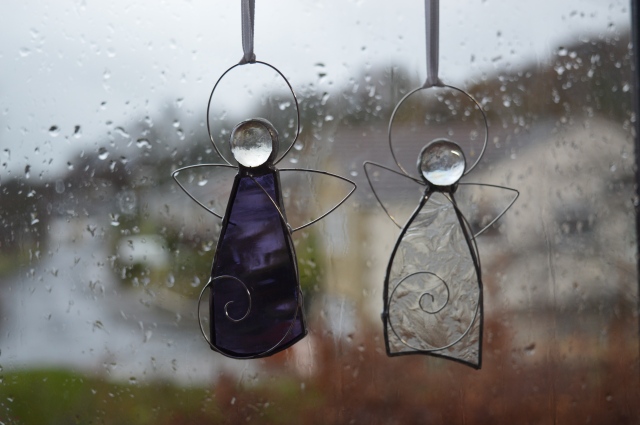
The Christmas decorations were made using the Tiffany technique, so we had to stick narrow copper tape around each piece of glass, then came the fun bit…
We had to soak each piece in acid and then solder all round, coating the copper tape completely. We could then solder different pieces together and add the silver wire to decorate. We learnt very quickly that the other end of the wire gets very hot when you solder!
We had a great time and we’re already looking forward to next years workshops with Rachel.
The days are getting shorter and shorter, it’s only about five weeks now to the shortest day, on the plus side after that the days will start getting longer! I managed to get home today just in time to take some photos of the garden, though the light was falling fast.
We’ve had quite a dry, mild November so far so there’s still a few leaves in the trees and it’s still lovely and crunchy underfoot when I walk the dogs up the back lane. Yesterday when I was walking them I happened to stop for Rosie just as the lightest ripple of a breeze went past, it was just enough to make dozens of leaves flutter to the ground. What amazed me was the sound, it was like raindrops falling, they tinkled down through the branches, fluttering like the poppy petals at the festival of Remembrance. I stood and listened to it for several minutes, it was quite magical.
My rose order from David Austin came this week, four rose bushes of various sizes. A special Claire Austin standard rose was earmarked to put over Zach’s ashes, my son James had promised me he would dig the hole and it was obviously quite important to him. So on Saturday night he came a dug a big hole and hammered the stake in for the standard rose. It’s amazing the difference young muscles make, it would have taken me for ever! It was too dark to start planting then, but first thing Sunday morning I soaked the bare roots, popped the little bag of ashes in the bottom, sprinkled some mycorrhizal funghi for good measure and planted the rose. The trunk is strapped to the stake so I need to keep an eye on it as it grows to loosen it as needed. Hopefully it will be glorious this summer!
The other three roses are two small ones for the patio area and a big shrub rose for in front of the big fence. I planted those too with the rest of the sachet of m.funghi, it’s meant to help with settling in and early root formation which really sets the rose off with a good start.
Down the drive I’ve a big mahonia, I have a love/hate relationship with it as when I’m walking down the drive it’s prickly!! However it has just come into flower, so at the moment it is forgiven!
Whilst I was down the drive I noticed how high the eunonymous has crept up the wall, I’m going to have to start pruning it soon or it will be in the gutters.
As the flowers and the foliage die back the other features in the garden start to take on more of a role in the garden. My collection of blue and grey planters looks pretty good in the summer, but I particularly like it in the winter for that little splash of colour.
The wire sculptures I have around the garden start to be noticeable too. The chicken has been hidden in the geraniums all summer…
From ground level the garden seems to be heading rapidly towards winter, so I was pleasantly surprised when I looked at the upstairs photo as it still looks fairly colourful, albeit with the soft colours of late autumn.
I’ve not been out much over the last couple of weeks due to a heavy cold, but hopefully now I’ll be able to get back to my three sessions a week and do a bit more tidying up and weeding.
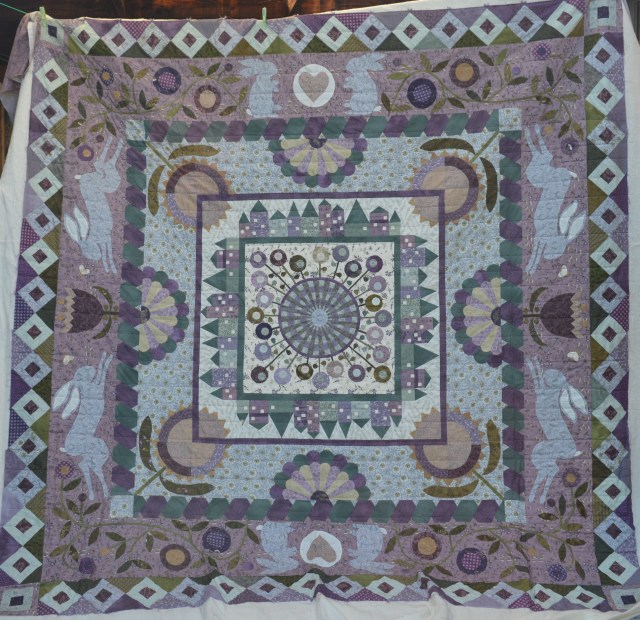
It’s three weeks since I last showed you my Down the Rabbit Hole quilt, in that time I’ve actually met the designer, Sarah Fielkes at a talk in Slaithwaite, thousands of miles from her home in Sydney. It was pretty exciting and inspiring.
Of course I took my quilt a long to show her and also asked her to sign a square of fabric. As soon as I got home I embroidered over it to make a ‘designer label’ for my quilt.
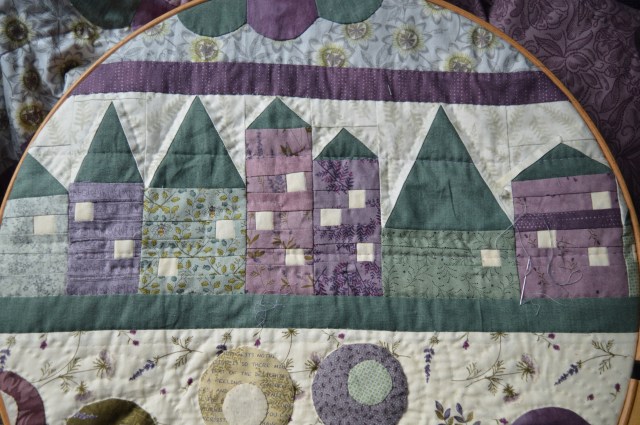
Despite all the excitement I haven’t managed to spend many hours quilting it. Three weeks ago I was just about to start quilting the houses…
I’ve prevaricated a bit about this border and how to quilt it, mainly because it’s foundation paper pieced, so there’s a lot of layers in places making it quite hard to quilt. I tried initially to quilt in the ditch round the roofs, but it just wasn’t happening so I decided to quilt 1/4″ out from the roofs, I even found a roll of 1/4″ masking tape to try and keep my seams even-ish and I think it did help.
Across the main block of houses I’ve stitched a sort of zig-zag line, going across the house but then going up or down around the windows, so I’m not going all the way round the windows, just two or three sides. Once I’ve got all the way round I might look and see if I need to do another row and perhaps stitch a little more in big roofs. I’m trying to quilt mainly in the same direction as I find it a very big quilt to manoevre around.
I didn’t quilt for long but I almost completed a row of houses. I’m stitching in the ditch on the purple border above as I go round.
I think I need a plan with this quilt. Every time I do a bit of quilting it grows a lot quicker than I anticipate, so I know if I made a concerted effort it would get finished in a reasonable length of time but…
I’m concentrating on my Tall Year Square etui at the moment, trying to get that finished, hopefully by Christmas. Once that is done my next SAL will be a (very pretty) cross-stitch, so I can do it in my ‘borrowed time’ , when I’m making tea, visiting my mum etc. I can then concentrate on my quilt better and hopefully get that finished.
It’s a plan!
Hand Quilt Along Links
This Hand Quilt Along is an opportunity for hand quilters and piecers to share and motivate one another. We post every three weeks, to show our progress and encourage one another. If you have a hand quilting project and would like to join our group contact Kathy at the link below.
I finally got round to sorting out my photos from our ‘big adventure’, our long distance walk, so I thought I would share some with you.
My friend and I try to do a long distance walk each year, we do lots of practice walks in the preceding months to get our fitness up (in theory!) and then complete the walk over about a week. Sometimes with the longer walks we would start the walk on day trips from home over the preceding month to cut down hotel time. There’s lots of official long-distance walks around the UK, there’s quite a few here in Yorkshire, so far we’ve done…
The Six Dales ; Otley to Middleham, our first one, 38 miles supposed to be walked in 2 days (no chance!) we enjoyed walking it over 3 1/2 days!
The Dales Way; Ilkley to Bowness on Windermere (84 miles) Lovely walk through the Yorkshire Dales to the Lake District.
Bay2Bay East; Grassington to Robinhoods Bay 100 miles
Bay2Bay West; Grassington to Barrow in Furness 100 miles, we had then walked across the country from one coast to the other.
Four Lakes Walk; this is an unofficial one in the Lake District, 38 miles over four days, we needed a shorter one that year as neither of us was brilliant health wise. We used a carry on service for the first time so our luggage was picked up and taken on to the next B&B, we decided that is the way forward!!
This year we went a little further afield to Border country, the bottom end of Scotland and Northumberland. It’s beautiful countryside round there but not an area either of us knew particularly well. We decided to walk St Cuthbert’s Way.
Cuthbert was born in AD634, at 16 he became a novice monk at Old Melrose in Scotland, within 10 years he was it’s Prior. Melrose was linked to the Priory on Lindisfarne, an island just off the Northumberland coast so eventually Cuthbert became Bishop of Lindisfarne. After he died his body seems to have been carried round the country as areas became unsafe. At one point it rested in a cave, now known as St Cuthberts Cave. This walk links all the places, starting at Melrose Abbey, walking past St Cuthberts Cave, to the Holy Island of Lindisfarne.
The first day involved climbing over the Eildon Hills, amazing views from the top, but for days when we looked back we could still see those hills! Typically I started with a heavy cold too!
On the second and third day we walked along the river banks which were very pretty with a touch of autumn colour…
…and typical Scottish architecture
We also walked for several miles along Dere Street which is an ancient Roman road, just a track now but as straight as a die as Roman roads always are. I really felt we were walking in the footsteps of history.
We walked through some ancient woodland too with huge oak trees…
Day four was our second big hill, called Wideopen Hill, it’s the highest point of the walk, the views were amazing. I took a video, I’ve put it on YouTube so I can share it with you, it’s very windy and a bit wobbly but hopefully the link works OK…
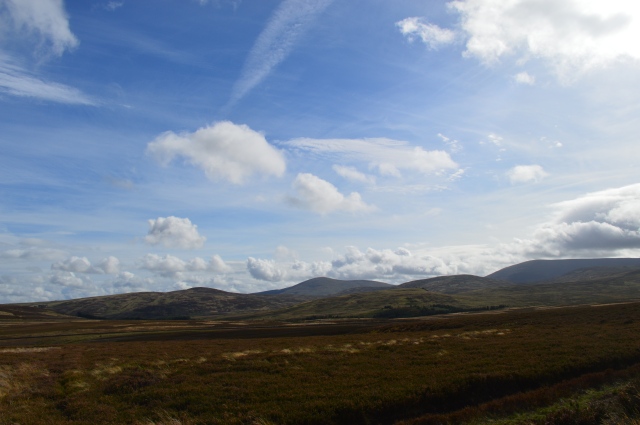
The views were amazing, I find it just as beautiful when the rain comes across…
and then five minutes later you get the rainbows!
That night we stayed in Morebattle, I loved the names of the streets there! Wouldn’t you just love that address!
We found St Cuthberts Way to be a very friendly and sociable walk, more so than any of the other walks, perhaps because there aren’t many tourists up there the locals seemed to go out of their way to be friendly. There aren’t that many options on places to stay on the walk so we also met up with the same walkers several times. At the pub in Morebattle there were three pairs of walkers staying and eating in the restaurant at the same time, we swopped stories and we did laugh that we’d all got slightly lost at the same point! Another diner suggested an Italian restaurant when we got to Wooler and two nights later we were all in the same Italian, together with another chap we met along the way!
From Morebattle it was a fairly easy walk to Kirk Yetholm, which is also the start of the Pennine Way (268 miles across the Pennines!)
Day Six was always going to be our toughest day, it was 13 miles, which is our upper limit, involved two hills and even the book said it was the hardest day!! We trotted up the first hill, no problem, crossed the border between Scotland and England…
We made it up the second hill, still looking good! We had planned to have our sandwiches on the top of the second hill (we do tend to graze all day, sausage roll break, banana break, coffee break, sticky bun break…and the official ‘lunch break’!!) As we reached the top we met another walker who was a bit younger and a lot fitter than us, he was aiming to do 20 miles a day! We got chatting and he decided to walk with us for a while, a bit of company. I was in front so I was pace-setting, but with someone else in the party you do tend to go just that little bit quicker. We fair yomped across the miles of moors on top. To be fair too it was pretty marshy so there really wasn’t anywhere obvious to stop for lunch.
As we came off the moors I spotted a pile of rocks, lunch! Our fellow walker carried on as we sat down for about 20 minutes to eat our sandwiches. And then we stood up!!!…
I have never crashed quite so much as I did at that point, my legs hurt, my feet hurt, my hips hurt, everything hurt!! I absolutely met my Waterloo with about three miles still to walk! Without my friend encouraging me and keeping me going I don’t know how I would have got to the hotel in Wooler, I was fighting back the tears as it was. We were staying that night in a Christian retreat / B&B, the owner was lovely and brought tea and homemade cakes to the lounge for us and sat and chatted with us, but all I could think of was the bath upstairs I wanted to soak in!! When we checked my friends fitbit we had actually walked about 17 miles!
Luckily the next day was much easier walking, still about 10-12 miles but manageable.
We had our lunch at St Cuthberts Cave where I spotted some very old graffiti inside!
We were just nearing the end when I saw a figure ahead on the path, my OH had come to pick us up and had walked a little way along the path, it was a lovely moment when I realised who it was!
Our husbands came up to join us for the last two nights, it helped us with getting on and off Lindisfarne and also gave us a good excuse to stay in a very nice, comfortable hotel. It was one of those with homemade biscuits in the room, complimentary mead, homemade jams etc and a HUGE rolltop bath I could soak in!
The final days walk was about six miles across to Lindisfarne. Lindisfarne is joined to the mainland by a causeway which is only crossable at low tide, this is one reason why husbands were needed to ensure we could get off the island afterwards. The crossing times are published on the internet and that day we had from about 10.30 to about 3.45. Good crossing times really.
We walked the first three miles and arrived at the causeway just as it opened. There is also a ‘Pilgrim’s Crossing’ which entails walking across the wet sands, following a line of poles to the island. It would have been nice to do in the summer, but the water can be knee deep, cold and walking on sand isn’t easy, none of which is great if you have no balance like me – so we chickened out and took the road round. The views across the sands to Bamburgh Castle were stunning, we could also hear a colony of seals barking in the distance.
Arriving on Lindisfarne was a weird experience, we both felt quite overwhelmed by all the tourists, too much noise and bustle, it was only then that we realised just how much solitude and quietness we had enjoyed for the previous week.
The walk ends at St Cuthberts Priory, we had our celebratory photos taken by his statue, my OH took a comical photo of us trying to do a selfie!
We then enjoyed lunch in a cafe with our OH’s. They had driven on the island in the morning so we had time for a little wander before we set off back to the hotel. There are lots of warning signs as you drive along the causeway to turn back if the sea has reached a certain point, there’s even a refuge half way along, a rickety wooden shed on stilts which I really wouldn’t want to spend the night in. Despite all the signs, that night someone thought they could beat the tide and had to be rescued by the Lifeboats!
Altogether we walked about 70 miles over the week, with walks varying from 7 miles to 17! It was a wonderful walk, very friendly with beautiful scenery and lots of peace and quiet!
We’re already planning next years walk – the Cleveland Way!
I had a wonderful evening yesterday, I went to a trunk talk by Sarah Fielke. Sarah is the designer of my Down the Rabbit Hole quilt which I made last year as part of her BOM and I’m now (slowly) hand-quilting. She lives in Sydney, Australia and she mentioned on Facebook a couple of months back that she was coming over to the UK to do a couple of talks and classes in two locations, I couldn’t believe it when I found one of them was only 30 miles away at Simply Solids! I booked as soon as tickets became available and persuaded a friend to come too.
Of course I packed my quilt into a bag to take with me, but I also took a couple of squares of fabric and a pencil as I had a plan!
I had no idea how big or small an event this would be, when we arrived it was clear it was a small, select audience of maybe twenty ladies, so it was a lovely personal talk. The two ladies I sat next to had also brought their DTRH quilts so at least I wouldn’t be the only one!
Sarah brought lots of quilts to show us, talking us through her life in quilting, quilts from her books, quilts given as presents, quilts with a story behind them. They were beautifully made, most were hand appliqued and hand quilted.
At the end she showed us her Down the Rabbit Hole quilt, it was wonderful to see it for real! Her applique is as perfect as it looks on the videos! She asked if anyone had made the quilt and of course the three of us said ‘Well, yes, actually…’ So we all took turns to hold ours up, it was fascinating to see how different they all looked with the different colourways. I think she genuinely loved seeing our quilts, especially when we mentioned we’d not done needle-turn applique before. Here’s a photo from facebook which Sarah shared of my quilt, it’s a terrible photo of me though, I look like Mrs Merton!!!
After the talk we all milled around the quilts, chatting and admiring the craftsmanship. I took my fabric squares out of my bag and asked Sarah to sign one of them (I thought I’d give her a choice of fabric!) she signed in pencil, big enough for me to embroider over for a label to go on the back of my quilt. This evening I embroidered over her writing so I now have a designer label for my quilt, just have to finish it!
I managed to get a photo of the two of us, I’m grinning like a cheshire cat, it was a great evening!


 I had a wonderful evening yesterday, I went to a trunk talk by Sarah Fielke. Sarah is the designer of my Down the Rabbit Hole quilt which I made last year as part of her BOM and I’m now (slowly) hand-quilting. She lives in Sydney, Australia and she mentioned on Facebook a couple of months back that she was coming over to the UK to do a couple of talks and classes in two locations, I couldn’t believe it when I found one of them was only 30 miles away at Simply Solids! I booked as soon as tickets became available and persuaded a friend to come too.


