Meeting Sarah

20181112_200251I had a wonderful evening yesterday, I went to a trunk talk by Sarah Fielke. Sarah is the designer of my Down the Rabbit Hole quilt which I made last year as part of her BOM and I’m now (slowly) hand-quilting. She lives in Sydney, Australia and she mentioned on Facebook a couple of months back that she was coming over to the UK to do a couple of talks and classes in two locations, I couldn’t believe it when I found one of them was only 30 miles away at Simply Solids! I booked as soon as tickets became available and persuaded a friend to come too.

Of course I packed my quilt into a bag to take with me, but I also took a couple of squares of fabric and a pencil as I had a plan!

I had no idea how big or small an event this would be, when we arrived it was clear it was a small, select audience of maybe twenty ladies, so it was a lovely personal talk. The two ladies I sat next to had also brought their DTRH quilts so at least I wouldn’t be the only one!20181112_200926

Sarah brought lots of quilts to show us, talking us through her life in quilting, quilts from her books, quilts given as presents, quilts with a story behind them. They were beautifully made, most were hand appliqued and hand quilted.20181112_201414

At the end she showed us her Down the Rabbit Hole quilt, it was wonderful to see it for real! Her applique is as perfect as it looks on the videos! She asked if anyone had made the quilt and of course the three of us said ‘Well, yes, actually…’ So we all took turns to hold ours up, it was fascinating to see how different they all looked with the different colourways. I think she genuinely loved seeing our quilts, especially when we mentioned we’d not done needle-turn applique before. Here’s a photo from facebook which Sarah shared of my quilt, it’s a terrible photo of me though, I look like Mrs Merton!!!46061352_10217375375084279_6215109473095122944_n

After the talk we all milled around the quilts, chatting and admiring the craftsmanship. I took my fabric squares out of my bag and asked Sarah to sign one of them (I thought I’d give her a choice of fabric!) she signed in pencil, big enough for me to embroider over for a label to go on the back of my quilt. This evening I embroidered over her writing so I now have a designer label for my quilt, just have to finish it!

DSC_0001 (2)I managed to get a photo of the two of us, I’m grinning like a cheshire cat, it was a great evening!20181112_195918

Posted in Down The Rabbit Hole, Quilting, Serendipity | Tagged , , | 24 Comments

Oh My Darling Clementine!

My latest Minerva make I can share with you is a denim skirt, I’ve been trying to pluck up the courage to make a pair of jeans for ages, like a couple of years! I’ve even bought all the necessaries, denim, patterns, top-stitching thread, needles, zips…all I needed was courage!! It had crossed my mind that sewing a denim skirt would be a good introduction, I could get used to the techniques, sewing denim, fly zips etc without the issue of fit quite as much. I had been keeping my eye open for a suitable pattern for a couple of months. When Minerva Crafts gave me the chance to try the Clementine Skirt Pattern, it was an opportunity not to be missed!

Clementine is a classic denim skirt designed by Merchant and Mills (M&M) from their new Made in Denim range. It’s got the fly zip, top-stitched pockets, back yoke, it’s described as a slim fitting jeans skirt. It was perfect to try out jeans sewing techniques without the hassle of trying to fit jeans.

I’ve not tried a Merchant and Mills pattern before so I was interested to see what their instructions were like, I was very impressed, I took it steady and methodically went through each stage and it went together perfectly.

M&M suggest making a toile first, both to check fit and to get used to the pattern, I must admit I didn’t, (it takes a lot for me to make a toile!!)DSC_0017 I decided that as my denim was pretty inexpensive I would jump straight in. It would have cost me more to make it in heavy calico. It was one of the lengths I bought at Fabworks at the Dewsbury meet-up, it was £5 for a 1.5metre piece, a bargain!

M&M also suggest using a heavy duty thread rather than a top-stitching thread as it’s easier to use. I’ve tried top-stitching thread with my machine before and it really didn’t like it, so I decided to use a variegated orange Gutermann quilting thread which I had in my stash instead, it stitched easily and I like the variegated effect.

A new denim sewing machine needle helped my elderly machine to cope, I also abandoned my usual flowerhead pins for heavier glass-headed ones or just traditional pins. In places I also used clover clips instead of pins as it was just too thick to get a pin in.

The only change I made to the pattern was to cut out the waistband lining from cotton instead of denim. My machine doesn’t like getting over big seams with the buttonhole foot on, I tested it over four layers of denim (a typical seam) and it wouldn’t go under. Using cotton just made it a little thinner. My denim is fairly heavy with no stretch, it’s actually about 180cm wide, I didn’t realise denim came in so many widths!

The first piece to tackle was the back pockets. I had a bit of fun here! I work in a cardiac unit, so I decided to sew an ECG on the back pockets. I drew it on paper first to get the scale right, I then drew it on the pockets with chalk and finally stitched along the line and just above it. I love it, this will be my sinus rhythm skirt!

The seams are all overlocked or zig-zagged on the inside and edge-stitched and top-stitched on the outside. The split on the skirt centre back went together smoothly, I was a bit apprehensive about the fly zip but I followed each step carefully, tacking by hand when it told me to, and it went in perfectly.

One thing I liked when stitching up this pattern is that all the fiddly bits are done whilst the pieces are fairly flat, so they are easy to manage. With pockets, zips and the split completed, I could now stitch the front to the back and see how it fitted! It was pretty good over my bottom, but it needed a fair bit taking in at the waist. Luckily most of the size adjustments are on the side seams, so it was an easy alteration. I decided the amount I had taken in would have been near enough a whole size, so I trimmed the waistband to a size 12 before stitching it on.

The belt loops were easy enough though I had to take it slowly with my machine as it was going through about eight layers of denim in places. The last thing to tackle was the buttonhole, to my relief I managed to get my buttonhole foot over the edge onto the waistband. I had a practice run first to make sure my machine new who was boss and then went for it! I stitched a keyhole buttonhole and it worked perfectly.

I had some jeans buttons in my stash, my OH looked rather bemused when I appeared from my sewing room asking for a hammer. I’ve not used them before but a couple of taps and it was secure. One thing I did forget though was to make sure the button was facing the right way up before hammering it together, as you certainly can’t shift it afterwards!

I’m really pleased with my denim skirt, I’ve worn it a lot over the last couple of months. I wore it to work one day and my colleagues loved it, I fancy making a midi length one next, maybe with a different rhythm on…and then hopefully I’ll tackle some jeans!


Posted in Dressmaking, Serendipity | Tagged , | 20 Comments

Tall Year Square Etui SAL

It’s three weeks since I last showed you my Tall Square Year etui, it’s a design by Betsy Morgan published in Classic Inspirations last year. I had just finished the winter side so all four seasons were complete, it was mini happy dance…Tall Year Square

Since then I’ve spent a fair few hours stitching my etui, I stitched the little square first which will be a side of the thimble keep in the middle. It has a robin in the middle to match the side.DSC_0002 (2)

The next piece to be stitched is the lid, this has a quarter in each season’s colours. I should really have done this as I went a long, instead I’ll have to get the sides out and work out what colours I used so it all co-ordinates. I’m making a slight variation to the design here, Betsy has the lid with the sides just folded over the edge, in other words it doesn’t have corners to hold it all firm. You can just about make it out in the photo from the magasine.  I’d rather have a box like lid with proper corners and sides so instead of the lid being a square with it’s corners chopped off, mine is a cross shape, I’m just extending the pattern a little so I can have straight sides to stitch together into corners. If you’re not following this then hopefully it will make  more sense when I’m making it up!DSC_0004 (2)

Anyway, back to the stitching! I’ve stitched the main outlines and the winter side of the top, it’s on ivory evenweave which looks nice and crisp against the colours. I’ve just realised that the floss I used for the flying geese border is the same in autumn as it is in winter, so I’ll have to have a slight change there.DSC_0003 (2)

This stitch-a-long is organised by Avis, we post about our own choice of projects every three weeks, it’s great for motivation and encouragement, so if you fancy joining our little party, please send a message to Avis. In the meantime please follow the links to see all the other wonderful projects;

AvisClaireGunCaroleLucyAnnKateJessSueConstanzeDebbierose,

ChristinaKathyMargaretCindyHelenStephLindaHeidi,

JackieSunnyHayleyTonyMeganCatherineDeborahConnieClare


I’ll also be linking up with Kathy’s Quilts for Slow Stitching Sunday, a celebration of all things hand stitched. So please follow the link for even more hand-stitching!

Posted in embroidery, Serendipity, Stitch-a-long | Tagged , , | 30 Comments

Friday Photo Challenge

It’s Remembrance Day this weekend, so the word for today’s Photo Challenge set by Postcard from Gibraltar is Remembrance.

Everyone has made a big effort this year for Remembrance Day as it’s 100 years since the end of WW1. There are some amazing displays of knitted poppies, the Women’s Institute have been involved in many, but often it is just community spirit that has created these beautiful displays.

My WI Craft Club spent an afternoon earlier in the year knitting poppies for Ripon, our Federation office is in Ripon so the WI were asked to make about 3,000, many WI’s within our Federation took part and our poppies were used to decorate the town hall…Image may contain: house and outdoor

Here in Otley someone had the vision to create a sea of 18,000 poppies, one for each resident of Otley, each one has been hand-knitted. The resulting display is stunning…Image result for otley poppies

A few years ago the Tower of London made a huge display of poppies pouring over the parapets into the moat, I went down to London especially to see it, it was very moving. This year they have lit thousands of lanterns in the moat for a river of light.Image result for tower of london poppies 2018

One of the most beautiful and moving displays I’ve seen is at St John’s churchyard in Slimbridge, a local artist (whose name unfortunately I can’t find) made lifesize sculptures of WW1 soldiers from chicken wire, they are positioned at the foot of every soldiers grave. The see-through nature of chickenwire makes it quite ethereal. Image result for slimbridge churchyard soldiers

A couple of years ago I embroidered a poppy with silk ribbon. This year I was asked to embroider a square for Embroiderers Guild for a map of Skipton, I decided to use my poppy to represent the cenotaph. I embroidered “Lest we forget” underneath and it is now part of our pictoral map.DSC_0159

Earlier this year I embroidered a Faby Reilly design of poppies, it’s a humbug shape and it’s now on display on our sideboard.

Faby Reilly Poppy Humbug

This was a proud Mum moment when my daughter laid the wreath on behalf of the Army Cadets in Otley.024 - Click to view full size photo

I’ll finish this post of remembrance with some photos of poppies from the summer.


Posted in Photo Challenge, Serendipity | Tagged , | 11 Comments

Christie SAL

I tried to resist the Christie SAL, honest!  I’m not exactly short of things to do! The designs are by Faby Reilly and every two weeks the pattern for a Christmas card is being released, there are four altogether. I love Faby’s designs but I decided I didn’t need four handmade Christmas cards. Then the first design came out….No automatic alt text available.

I was signed up in a matter of minutes! I had a little lightbulb moment that actually I don’t need to make cards, I can make decorations instead!

I’m a bit of a traditionalist at Christmas, I like red and green, with a bit of gold or silver for tasteful sparkle! I decided to change the colours using a mixture of DMC threads and a Weeks one too. I found some soft gold sequins in my stash which worked well with the gold thread. I was really pleased with how the first one came out.DSC_0609 (2)

Yesterday I finally got round to finishing it. I found in my stash a Christmas panel which came from my Mum’s house, it’s very pretty but I really can’t see me using it as a whole, round the edge were some squares including a lovely one of holly berries which went perfectly with the cross-stitch. I used a short strip of the red panel surround to make the cross-stitch into a rectangle, I embroidered some stars with the sequins and gold thread to bring it into the design. It still needed a bit more so I rummaged in my trim box and found some mini red pompom trim in just the right shade. I stitched it on with gold beads from the design in between each pompom. The trim adds a lovely bit of texture without being too much.DSC_0002

I stitched the holly fabric to the back, turned and stuffed it. My initial plan was to use a gold cord I made before to go round the edge but it look a bit too blingy, so I made another cord from dark red and green DMC thread. I’ve stitched it round and made a hanging loop. I’ve left the ends dangling at the moment as I’m tempted to ad some tiny bells to the ends, I’ll see what I can find at the Knitting and Stitching show in a couple of weeks time.DSC_0006

I love this little decoration, I can hang it on the tree, or just from a hook, or I can just prop it up somewhere. I’m now stitching design two, a snowflake or star design. It’s not too late  to join the SAL, if you’re tempted just follow the link to Faby Reilly. I’m now half way through the second Christie design so watch this space!Christie SAL Faby Reilly


Posted in embroidery, Serendipity, Stitch-a-long | Tagged , , , | 13 Comments

Stitches in Time

DSC_0016
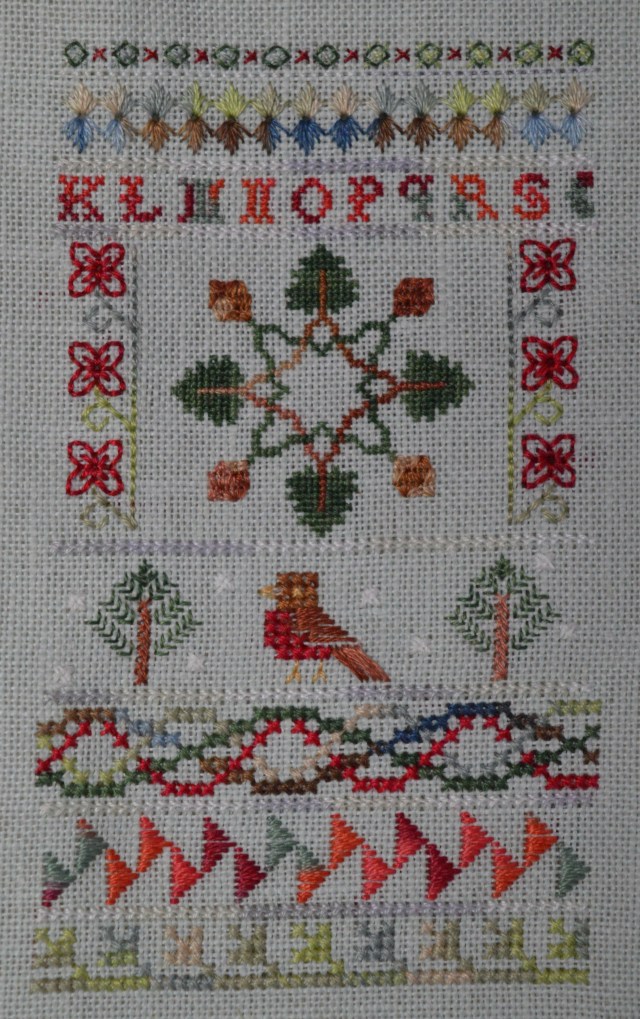
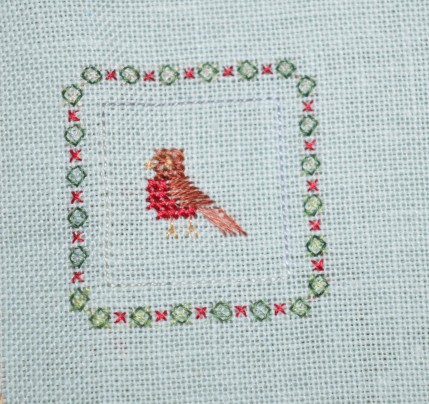
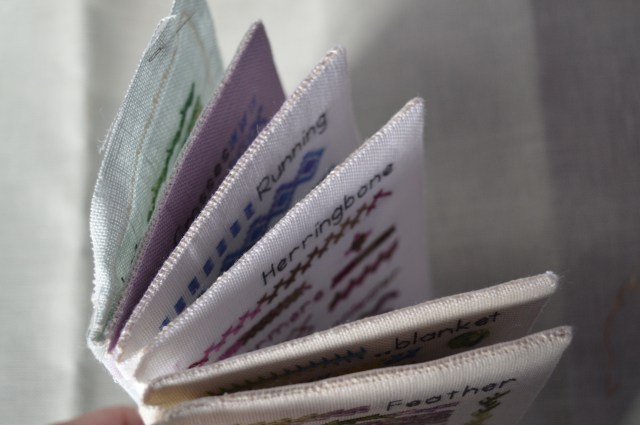
It was spring 2017 when I got inspired by various stitch samplers and textile books on Pinterest, it took me until early summer to formulate my ideas enough to start the project. I wanted a usable sample of stitches with a page or two per group. My original plan was to include little snippets of news too, but the news seemed very doom and gloom at the time, so I switched to making it my own little journal, where I was when I stitched a page, notable dates, it’s made a lovely record of 18 months of my travels and stitching.Stitch Sampler; www.thecraftycreek

I learnt lots of new stitches along the way, there’s over 150 different ones in the book, helped hugely by Sharon Boggon’s website Pintangle. She must have instructions on hundreds of stitches, a veritable treasure trove! I also used a different DMC variegated thread for each one, it does help to see how they stitch up and you know how much I like variegated threads!!Stitch Sampler; www.thecraftycreek

I stitched seven double page spreads and a front and back page too, I stitched the pages together by whip-stitching the back-stitches I’d made round each double page. Each page also had a bit of interfacing behind to to give it a bit of crispness. This is where I was last time I shared it with you…Stitch Sampler; www.thecraftycreek

All I had to do was make the cover!

I decided to keep the cover fairly simple and practical, so it’s made from quilting fabrics rather than embroidered. In my stash I had a gorgeous selection of William Morris inspired teal and navy fabrics, I’d been waiting for the right project for them and decided this was it! I did decide to embroider a little label just saying ‘Stitch’ though, with variegated thread of course! This was my original layout plan…DSC_0003 (2)

I worked out the measurements I wanted for the book with 3″ added on each end to fold over and make a pocket, this would also cover the end pages nicely. I stitched the top together, I initially added a layer of batting on the back to help soften it, but it came out too bulky so I cut it off later! I added interfacing to the back of the lining, I found in my interfacing drawer some very thick ‘stuff’ I have no idea what it is, I think I might have bought it to stiffen a pincushion a couple of years ago, it has a slight crunchy feel to it. I tested a scrap to see if it was iron on but it didn’t appear to be so I cut the exact size I wanted the book to end up.DSC_0001 (2)

I layered the cover together, securing it with clover clips and stitched three sides, I left the short back end completely open so I could manoevre the thick ‘stuff’ in afterwards! I turned it and pressed it, this is when I realised the batting was too bulky. Having cut it out I  could wriggle in the thick stuff fairly easily. Luckily I did a few small adjustments to check it was in the right place before I pressed it as the pressing fused it all together! I’ve still no idea what the ‘stuff’ is but it’s made a nice finish and takes a crease well – I pressed either side of the spine and it’s shaped the book nicely. Having slip-stitched the end I edge stitched round the whole piece to help keep the edges crisp. This is the one thing I would change – I didn’t think to change my bobbin thread and the start and finish looks a bit untidy!DSC_0005

The next job was to stitch the pages in. I spent a while fiddling here, trying to ensure the pages sat OK, I used the clover clips to hold them in place again before slip-stitching the sides and using herringbone over the end. The final stitching was to slip-stitch the flaps down and the basic book was finished. DSC_0007

The ‘Stitch’ label is just attached with Bondaweb, I wanted a pretty fastener so I made a cord with two DMC threads and stitched on two silver buttons, it just finishes it off nicely. I’ve a pretty co-ordinating booklet it slip in the back pocket in which to write the names of all the stitches.DSC_0010

I’m really pleased with how this sampler book has turned out, I’ve already used it for ideas on stitches. It’s also really nice that sharing this here has inspired others to start their own…DSC_0012DSC_0014

Stitch Sampler; www.thecraftycreek


Happy dance time again!

Posted in embroidery, Serendipity, TAST, Textile Books | Tagged , , | 38 Comments

A Quiet Charm

It’s time for a happy dance as last night I finally finished my hummingbird quilt…

Last time I showed it to you I was waiting, rather impatiently, for the border and binding fabric to arrive.Hummingbird quilt; www.thecraftycreek

As soon as the postman came with a squishy I set too to get it finished. I decided to make a 3″ border in green so it would hopefully follow on from all the squares being multiples of three inches. Once it was stitched I could press and sandwich the quilt.

The backing is a creamy patterned cotton, it’s in gentle stripes but luckily I don’t think they are so noticeable that I had to worry about them being straight along the edges. I pinned it to the lounge floor and spray basted the wadding and the quilt top.DSC_0017

I decided to keep the quilting fairly simple with diagonal squares which I hoped would work well with all the half square triangles. I did debate for quite a while where to start as the lines would be on every other square. In the end I decided to centre it on the star in the middle, so all the points of that star are quilted. I stopped just before each hummingbird, stitching a square into the block if it fitted. At the beginning I used a hera marker to draw the diagonal quilting lines, especially on the 6″ squares, but in the end I just eye-balled it! It quilted pretty nicely, though there are a couple of little tucks on the back.DSC_0013

I felt it still needed a bit round each bird as some of the blocks were just too big to leave without. I decided to use my free-motion foot to stitch in the ditch around each bird. It nicely gives them a bit of relief too. I thought the detailed pink bird would be pretty tricky, but actually it was fairly straight forward to go round all the feather tips, easier than the straight lines on others!Hummingbird quilt; www.thecraftycreek

For the border I stitched a sort of three leaf pattern on every other seamline with an arc inbetween, it worked well, not too difficult and looks effective.DSC_0002

Once the quilting was complete I trimmed the edges and stitched the binding round. I always hand-stitch the binding down on my quilts, it takes a while, like a couple of evenings, but I can sit and relax and let my mind wander! I think it gives a much nicer effect.DSC_0029

The last stitching to do was to embroider a label on the back with the quilts name and my initials. Every quilt needs a name, it took me ages to get into the hang of this but I quite like naming them now, it sort of comes to me as I’m stitching! This one is called A Quiet Charm. I learnt whilst making the quilt that the collective noun for hummingbirds is a charm. This was also my first attempt at a ‘low volume’ quilt, as in quiet, soft colours, nothing jumping out or contrasting too much, apart from the hummingbirds.DSC_0003

This quilt is for my niece, she moved house with her husband in the spring and now she’s expecting, so I’ve a baby quilt to make next! This quilt is for the guest room where there is hummingbird wallpaper.

I’m really pleased with this quilt as it’s the first one I’ve designed myself, obviously the hummingbird patterns were bought but otherwise I sort of made it up as I went a long. I like the effect of the low volume fabrics too. This was the nearest I could get to a whole quilt photo, I stood on a stool in the conservatory to get the natural light but the ceiling wasn’t high enough!!Hummingbird quilt; www.thecraftycreek

Posted in Quilting, Serendipity | Tagged , , , | 33 Comments

November’s Photographic Challenge

Wild Daffodil hosts a monthly photographic challenge, this months theme is patina which to me is the sheen of age, that lovely smooth, worn feel of wood or metal, even old stone steps that gives a hint of the history an object has witnessed.

In the summer I visited Blackwell, an Arts & Crafts style house near Windermere with my Embroiderers Guild. Every window had an individually designed handle and they all had that lovely worn look.

The beautiful oak features in Blackwell were wonderful to touch.

This is Piece Hall in Halifax, the original cloth market, it was re-opened last year after being restored. They’ve managed to keep that patina of age whilst updating it for modern use.Piece Hall

Well I had to squeeze in a Lake District photo if I could! This is Derwentwater, the launches run a regular service around the Lake which walkers use like buses. The boats were built in the 1920’s and 30’s and have a wonderful feel about them, layers of varnish polished by thousands of bottoms!

Launch on Derwentwater

This is Beverley Minster, it’s a stunning place, in these old church buildings you can see where people have walked or have touched things over hundreds of years.

Now that’s what you call patina! This is the kitchen at Harewood House. I wouldn’t like the job of polishing all that copper though!

New things can have a nice feel to them too particularly if they are craftsman made. This is a ‘bobbin’ I had turned for an embroidery about Catbells. I love the feel of it. To see more infor about this project, please follow the link to the original post

This is Pearl, my vintage Singer sewing machine, one day I will make a quilt on her…

For more patina photos follow the link to Wild Daffodil, she’s got some lovely photos of a fascinating house called Nuffield Place.

Posted in Photo Challenge, Serendipity | Tagged | 6 Comments

Monday’s Meander Round the Garden

I’ve made fairly good progress this week in the garden with several hours over the week. I’m still weeding and tidying, I’ll probably still be doing that in March when things start to appear again!

I’ve mainly been working on the big border by the tall fence. An overgrown philadelphus was dug up at the same time the fence wentup and of course as soon as you disturb all the soil, weeds appear from no where, so it’s been a bit of a battle which is not won yet! This was the bed last week…DSC_0620

…and after several hours it does look better, still a lot to do though but a satisfying amount of weed roots came up!DSC_0011

I’ll keep working my way round this bed as at the other end is my priority for the spring, just look at all that couch grass! I’m going to lift as many plants as I can and give the area a fresh start, doing my best around the shrubs. The osmanthus on the right of the photo is still filling the garden with scent from its little unassuming flowers.DSC_0012

I put some pansies in in the spring and they have been quietly flowering ever since, I love the colours of this one.DSC_0009 (2)

The penstemon by the conservatory is still covered in flowers too…DSC_0002

I was surprised today to see the flower buds on the magnolia stellata are already formed, they will get a lot bigger before they flower in the spring but they are there. I presume the reason they have such a leathery covering is to protect them over winter.DSC_0003

There’s a nice little autumn display in the Amber & Amethyst garden at the moment with a bright yellow rudbekia and the golden beech behind. DSC_0006

Hopefully in another weeks time I’ll have some roses to plant and more tidying up done!


Posted in Garden, Serendipity | Tagged | 9 Comments

Eighteen for 18

Another month has gone by! I’m doing pretty well on most of my challenges, I’m even starting to think about next years!!

  • 1 Etsy store opened; Still no where on this one, I really need to put aside a weekend for this, no sewing, just sorting out what I’m going to do!
  • 2 Tutorials; Still nothing written but I have got two ideas!
  • 3 Sessions a week in the garden; I’ve been pretty good with this one this month, I’ve been weeding, tidying up and moving plants around. It’s been fairly dry but pretty cold too, I’ve got my warm socks and gloves out. I’m still waiting for my bare-root roses to arrive but at least I’ve had more time to prepare the areas.
  • 4 Quilts;My total remains at three but I’m almost ready for a happy dance with the hummingbird quilt, just got to stitch the binding down. I’ve made my first Spring Wreath block and a few more Splendid Sampler blocks too.  I need to keep a head as I’ve just signed up for Sarah Fielke’s BOM next year!Spring Wreath BOM
  • 5 Craftsy Classes; I’m now at 4.5 classes, I watched three in October,Craftsy had a free weekend and I found they are great to have on to listen to whilst I’m sewing. The best one was by Sarah Fielke on different types of quilting, I picked up lots of little tips from the different classes.
  • 6 New Patterns; I’ve not stitched any new ones in September so it remains at five.
  • 7 Kits stitched; Completed I’ve not stitched any more this month so I’m just staying right on target with seven stitched over the year.
  • 8 Pages in my Stitch Sampler book ; Completed. I’ve stitched 10 pages for my stitch sampler, I still haven’t made the cover, though I now have in my mind how I’m going to do it, which always helps!DSC_0538
  • 9 Pounds Lost!!! Oh dear, our scales are still broken, really must remember to buy a new battery  🙂
  • 10 Mini Embroideries; Completed. I’ve not done any more this month, though there is one in progress for my Splendid Sampler quilt. 


  • 11 Letters to friends; No letter writing this month, so my tally remains at five.
  • 12 Boxes or Drawers sorted in sewing room; completed. I’ve done lots of sorting this month as I’ve had a big move round in my sewing room, more of that later! I sorted my dressmaking stash out, gave to charity length people had given me that I really couldn’t see me using, I sorted my wadding box out, anything big enough to do a Splendid Sampler block was kept. I also sorted out my cross-stitch fabric box, I rarely use aida now, so all that has gone to charity, leaving me more room for the various colours of even weave linen. So my tally is now 14, another challenge ticked off!
  • 13 New Recipes; We had a bit of a dinner party for Helen’s 21st last month, I tried two new recipes from the Ginger Pig Cookbook. a leg of lamb baked slowly in red wine and a pork joint cooked even more slowly in red wine! For her cake I baked an elderflower and lemon cake again, she wanted a horse themed cake, I looked on the internet and most of the ones I saw were rather young. I then spotted a tall cake with horses running round the edge. I made three cakes and stacked them, covered them with fondant icing and then painted the grass and flowers round the bottom. This was a lot easier than I thought it might be! The trickiest bit proved to be getting the cut out icing horses onto the cake! 21 candles later and she was happy with it! So my tally is now 10 new recipes.DSC_0605
  • 14 Less Lengths in my stash! There probably is about ten less lengths in my stash after my sort-out, not sure this equates to less overall in the year though!
  • 15 Posts a month; I’ve just done a quick tally and I counted 22 posts!!
  • 16 cross-stitch smalls; Completed. I finished August and September and made them up into mini pillows. I’ve just stitched the first of Faby Reilly’s Christmas stitch-a-long too, just got to make it into a decoration. So my tally is now 18.DSC_0611
  • 17 items of clothing made. I’m still at eight, so a bit of catching up to do here. I need some new winter clothes too so I must get some made.
  • 18 Walks; Complete. My friends and I walked about ten miles in Nidderdale a couple of weeks ago, so I’ve now done 18 walks over the year!

With two months still to go I’m pretty happy with my progress, hopefully this month I’ll have a few more ticked off.

Posted in Crafts, Eighteen for 18, embroidery, Quilting, Serendipity | Tagged | 11 Comments