Victoria at Harewood

On Tuesday I had a lovely day at Harewood House with my WI, we had a private tour of the Victoria exhibition, so we were looking round for an hour before the house opened to the public. Harewood is a stately home just a few miles from us, it was built in the 18th century and it’s the ancestral home of the Earl of Harewood and his family. They have strong links with the royal family, the current Earl’s father was the Queen’s cousin and Queen Victoria also at times stayed at Harewood. There was a recent dramatization of the life of Victoria on the BBC, I have to admit I missed it as I don’t particularly watch any TV, but I gather it was excellent. Harewood House was used in the filming for the inside of Buckingham Palace so they now have an exhibition about Victoria, including many of the costumes used in the programme.

Our tour was fascinating, our guide told us all about the filming, which rooms were used, who wore what, but also tied it in to the changes that were made to the house during the Victorian period together with extra artifacts from Victoria such as her sketchbooks.

The costumes were stunning, they were made by a theatrical costumier down in London and they were beautifully made, I loved all the extra little details like decorative buttons and tucks.

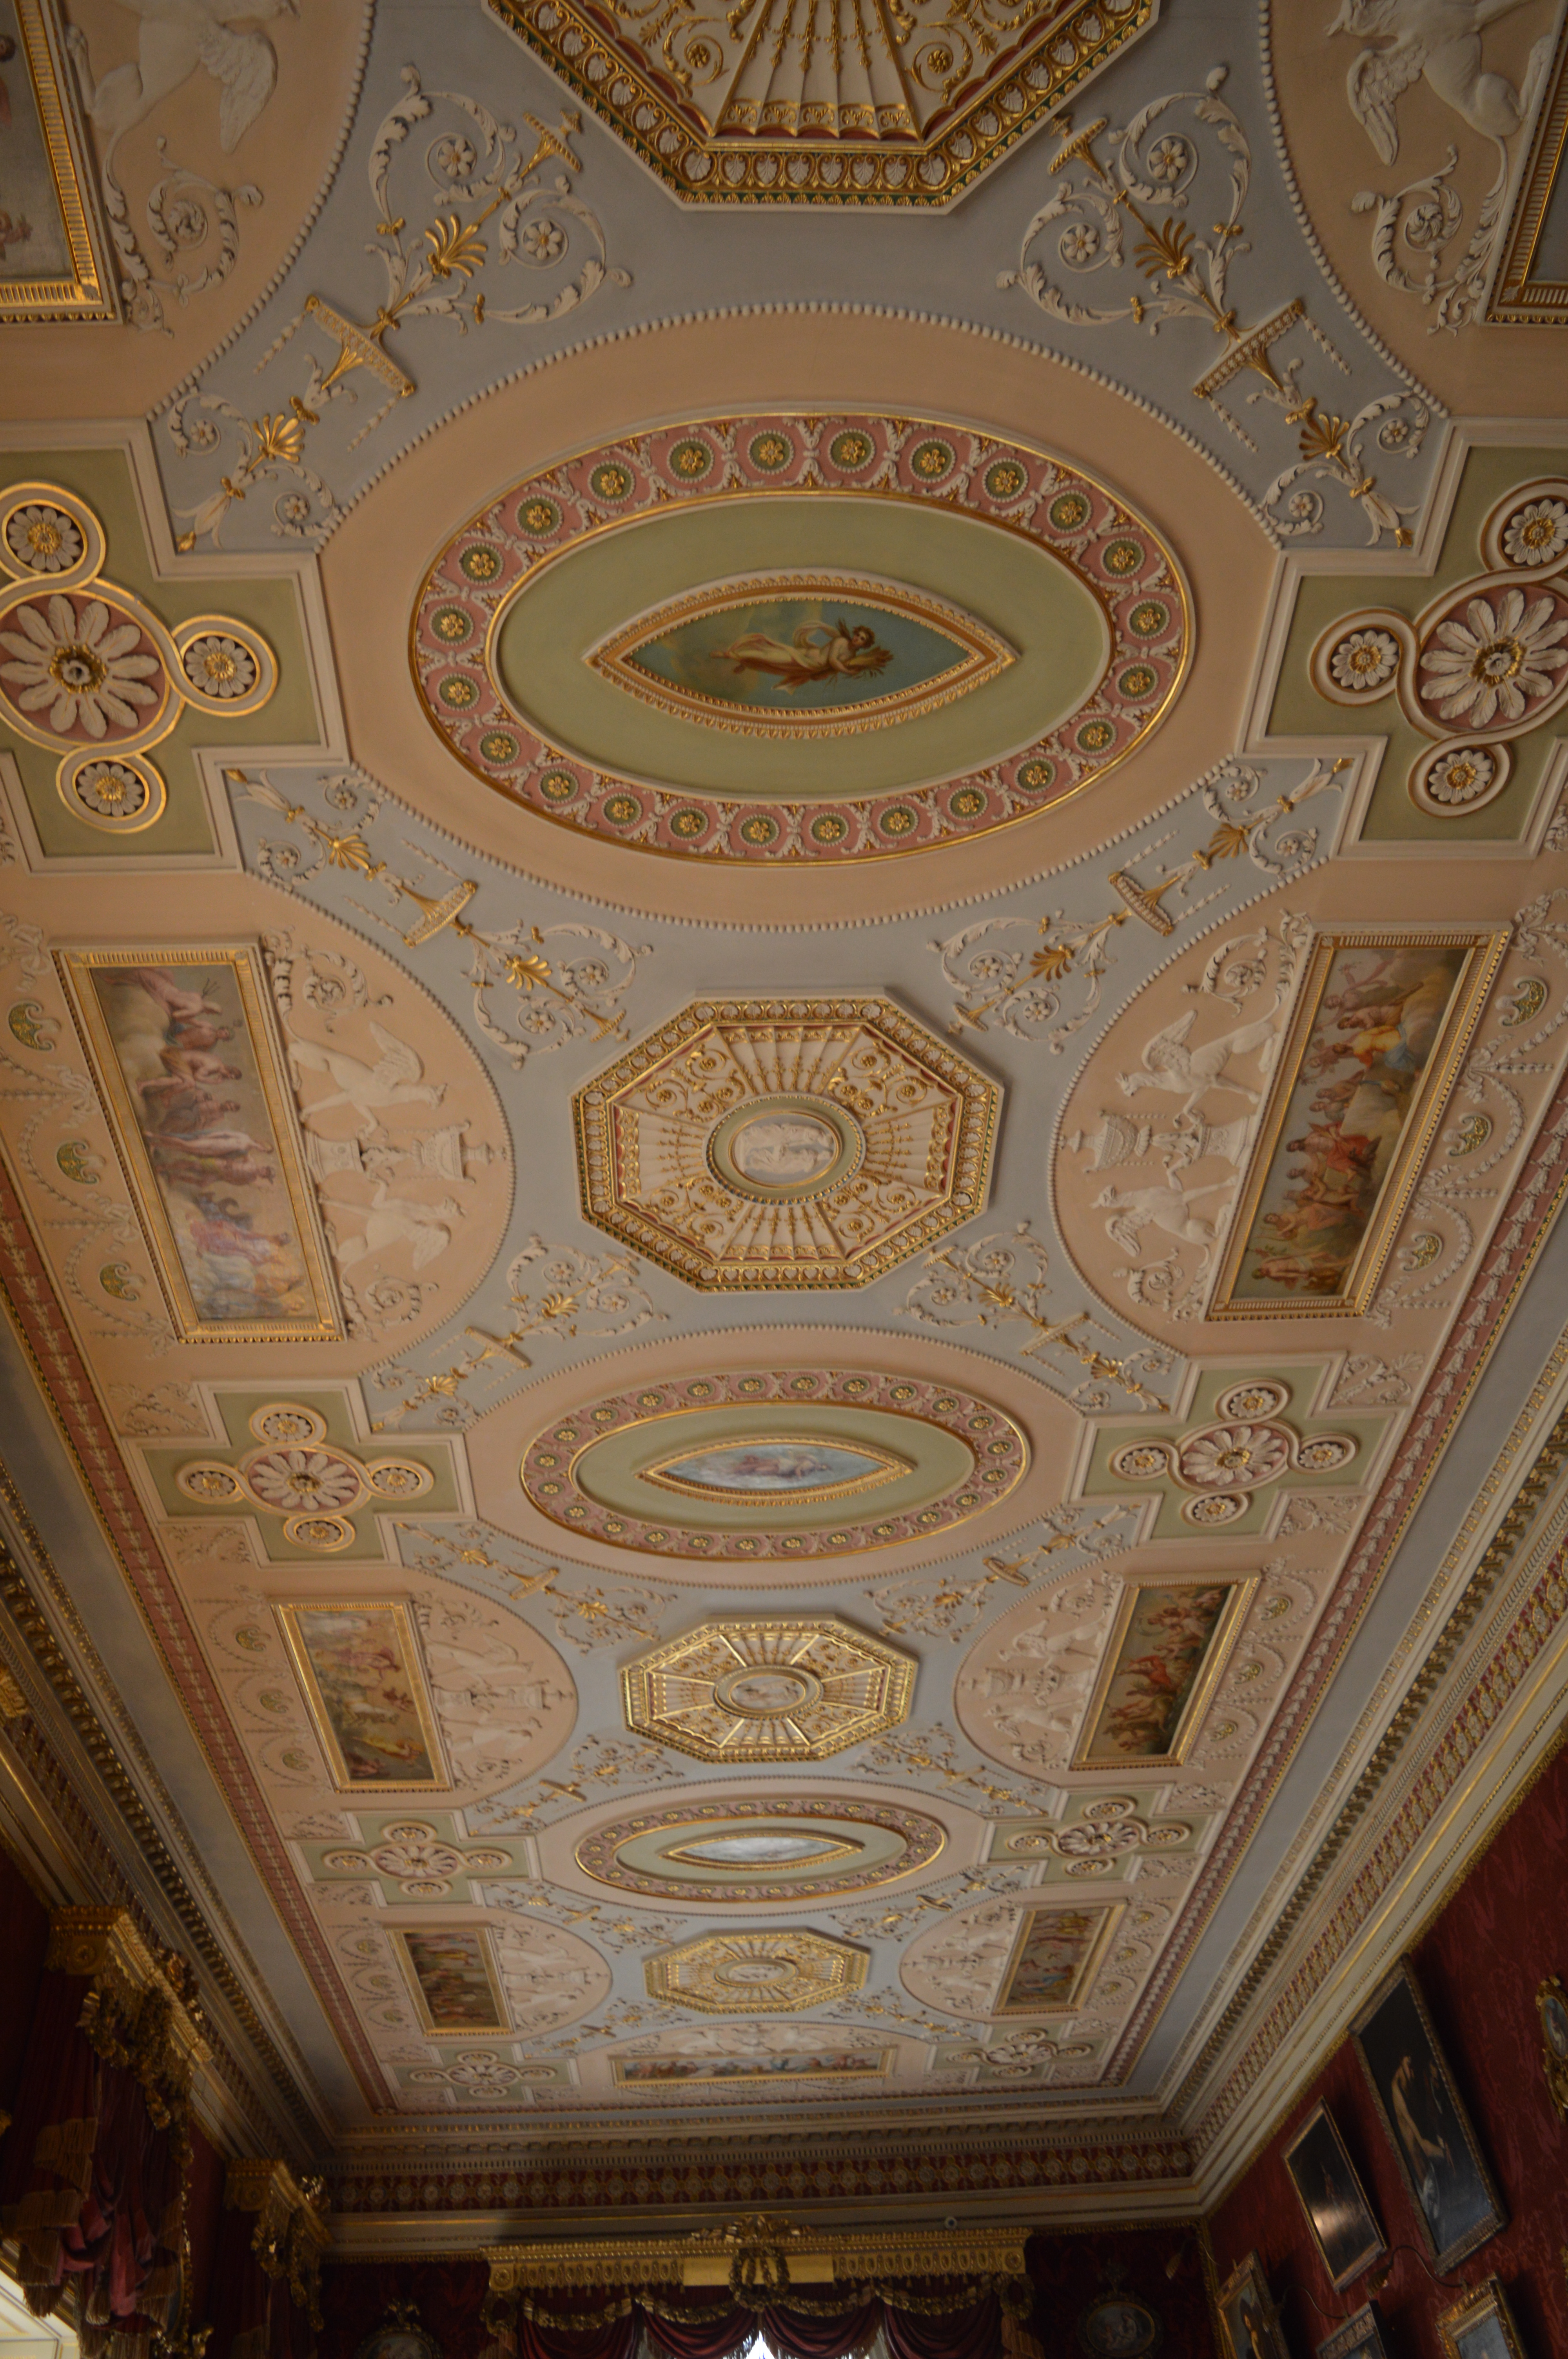
I’d forgotten just how beautiful Harewood House is, the original interior was designed by Robert Adam and the ceilings are absolutely stunning, many would have had a carpet designed to match too. Much of the furniture is by Chippendale (who was a local craftsman) one interesting point I learned was that the festooned pelmets in the gallery are actually carved from wood and painted to look like velvet! You can just see one at the bottom of the photo.

At Harewood you can also visit ‘below stairs’ which I think is the most interesting bit, seeing the kitchens with all the ranges and the huge collection of copperpans and jelly moulds.

The grounds around the house were designed by Capability Brown, it is very much parkland, rather than garden, but it’s very pleasant to meander round and they’ve also made a Himalyan garden, full of rhodedendrons, acers, magnolias, it looked lovely, though the gardener we were chatting to said it will be stunning in about two weeks time when all the candelabra primulas come out…typical!

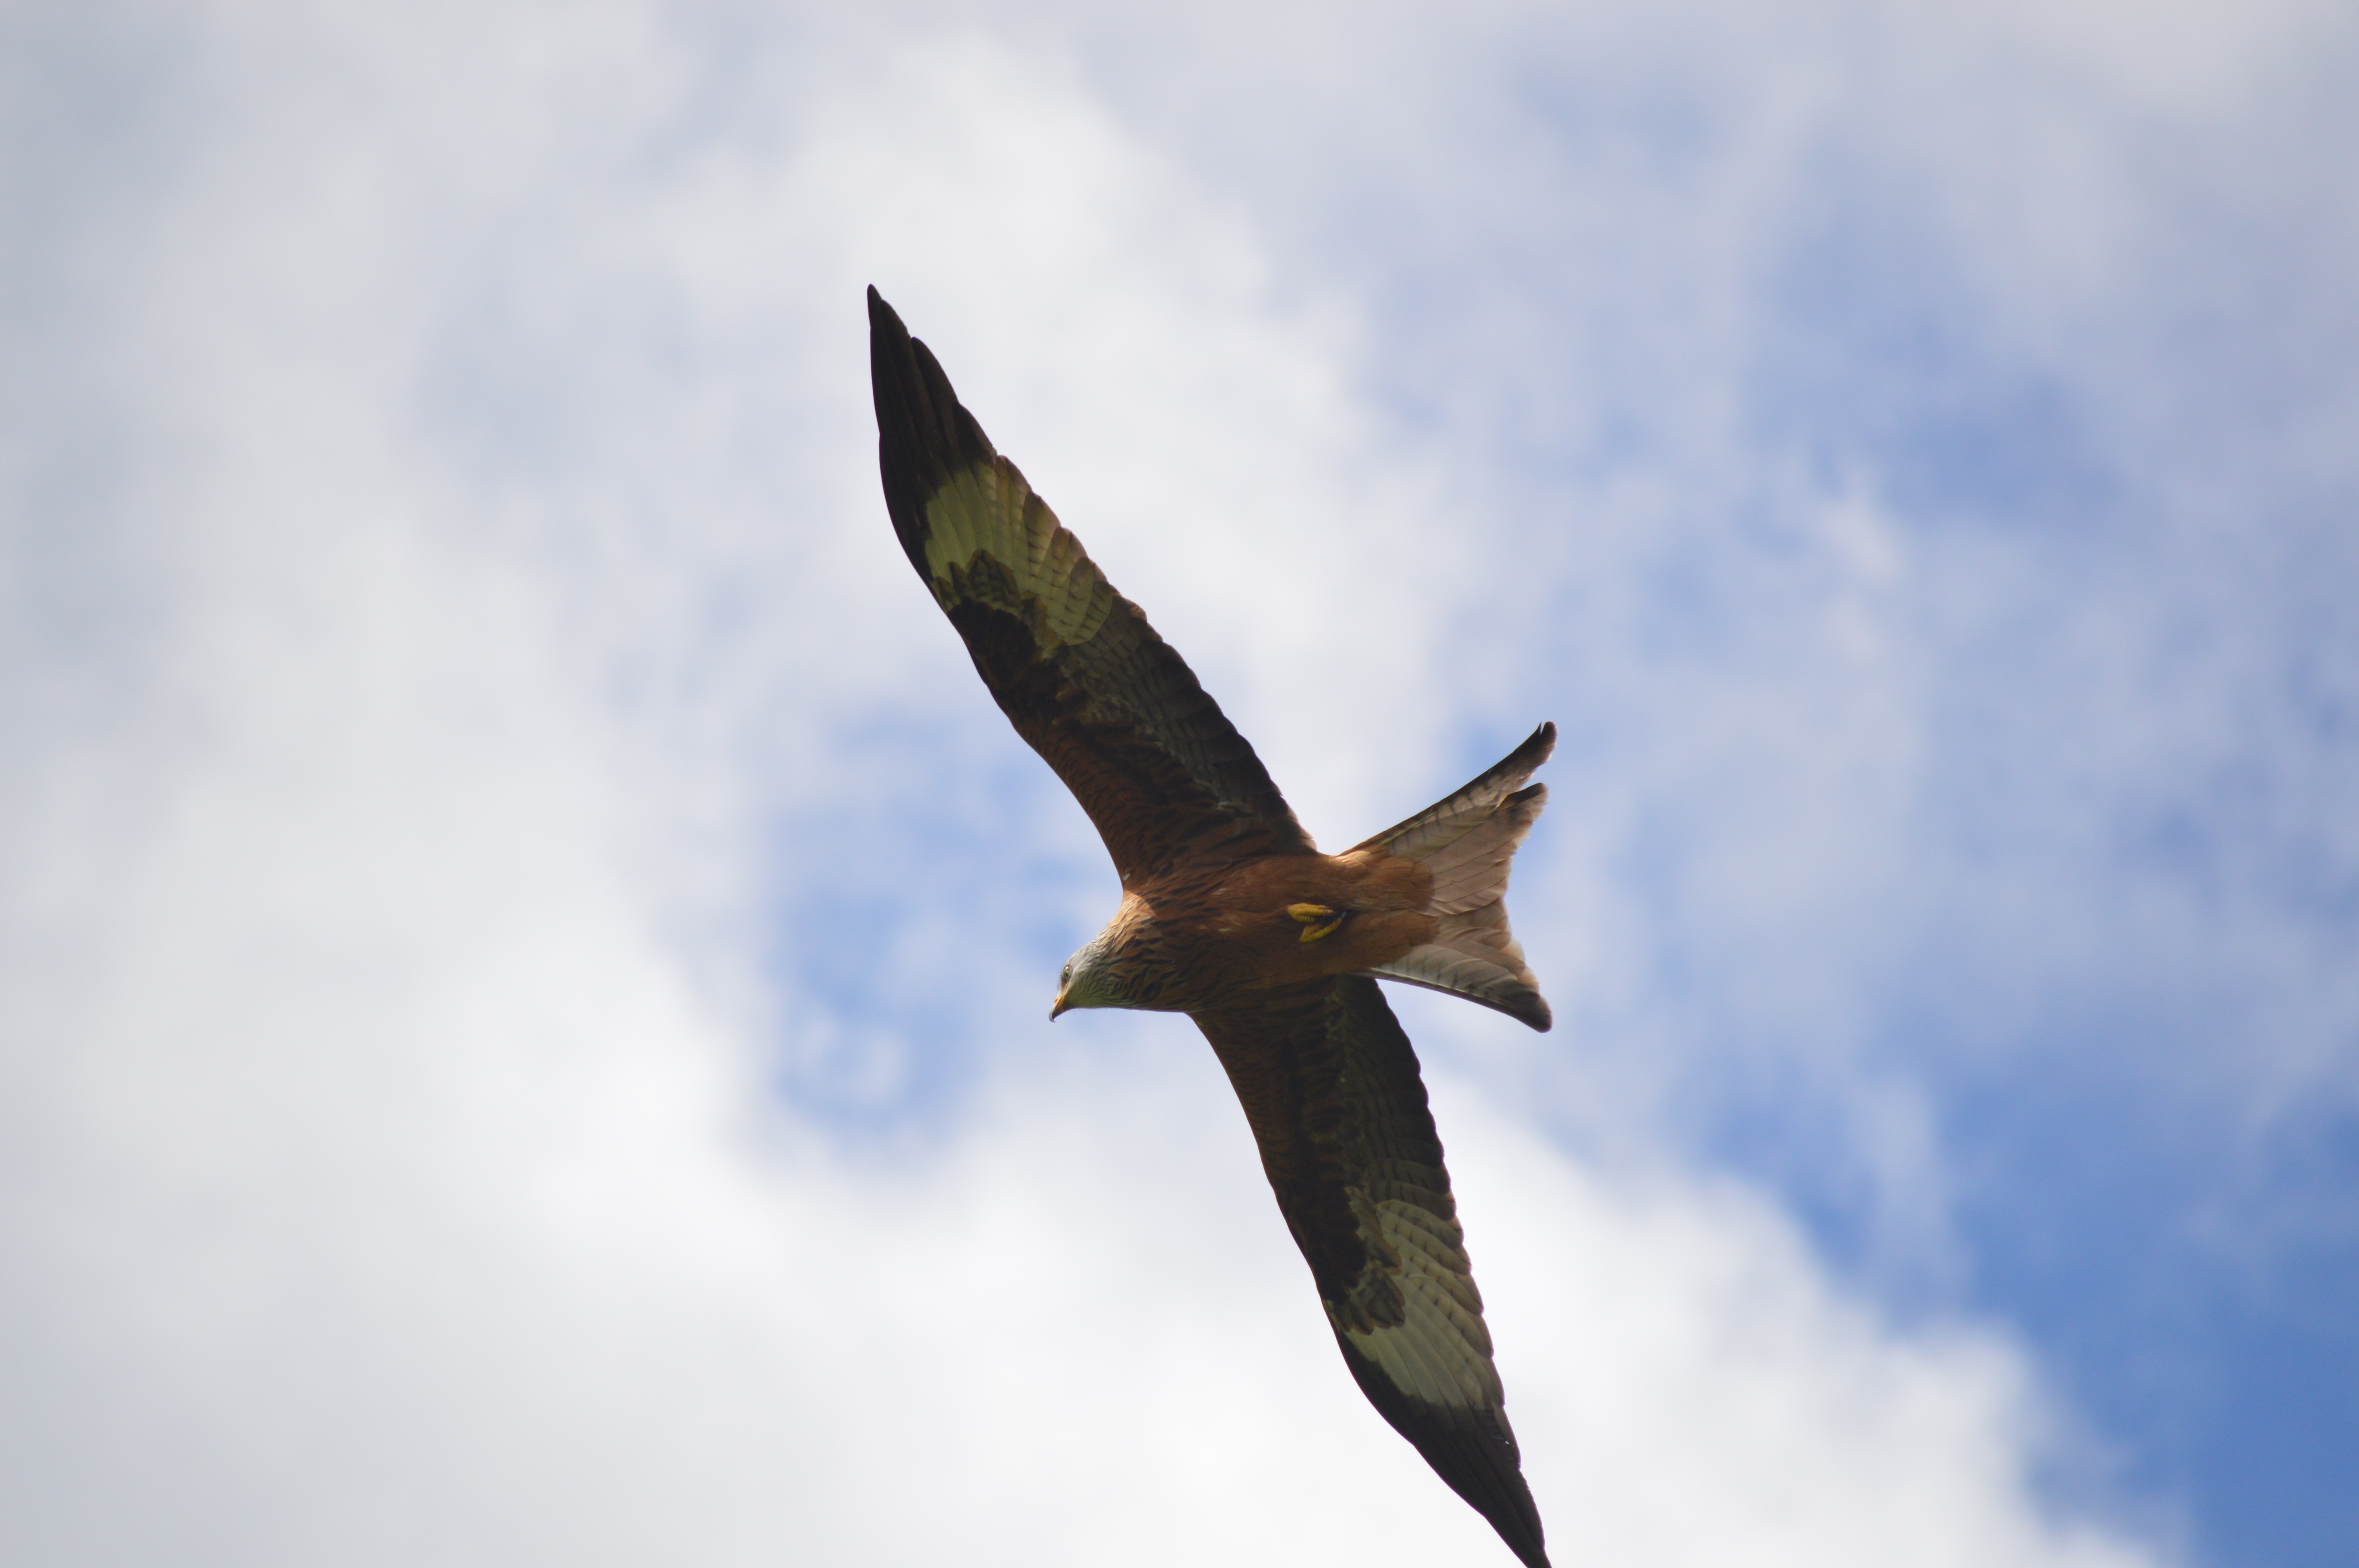
Harewood estate was also the base for the reintroduction of the Red Kite, it’s been hugely successful, we regularly see them wheeling about the skies above our house, though I wasn’t so keen when one flew low and dropped his dinner on our conservatory roof, it was a rather manky rabbit leg!! I managed to get a couple of good photos whilst we were at Harewood as they were flying fairly low. They are magnificent birds, I love seeing them around.

All in all it was a great day out, worth a visit 🙂

Posted in Serendipity | Tagged , | 6 Comments

Viewing the Cherry Blossom

In Japan, when the cherry blossom comes out, everyone goes to ‘view it’. I think it’s a beautiful tradition, they all take picnics down to the parks and sit under the cherry trees to admire the blossom, what a wonderful way to spend an afternoon or two! The cherry tree in Japanese is called Sakura and the tradition of viewing it is called Hanami.

85392183ad3c0aeb1cc8f8651ae40ee412c7f4ad6a609929fa7467b02e4c5cdc136c9c26

I’ve been looking into this for my Skipton Embroiderers Guild travelling Sketchbook project as the book I’ve to make an entry for this month is on trees. Here in the UK the blossom has been particularly beautiful this year, probably because we’ve not had much bad weather, the blossom seems to have lasted for weeks, so it was the tree that came to mind when I was trying to decide what to do.

I had a mooch round pinterest where there are some lovely embroideries of cherry trees, I was very tempted to do a tree, but eventually I decided on a branch. I particularly love the weeping branch of blossom by Judi Miller but I had to consider the constraints of time! I tried hand-drawing a branch but in the end I found a picture on pinterest of a stencil and I used that as a basis for my branch.

I wanted a blue background so I used some quilting cotton, it was fairly light-weight so I put some calico behind it, this also makes it easier with starting and finishing threads. I embroidered the branch first using a space-dyed thread I bought for my flower trellis, it’s a fairly soft brown. I used stem stitch, stitching along to the end of the longest branch, then from the start again to the end of the next one, this way I made the branch several rows thick at the start but tapering off for each twig.

DSC_0002

The flowers are all french knots with a DMC variegated thread. The first couple of bunches I did were a bit too regular in shape, I looked again at the original embroidery that had inspired me and realised I needed to be more random in the placing of the french knots!!

I ironed some woven interfacing on the back to give it a bit of stability and used the pink thread to do blanket-stitch all round the edge. I’m a bit frustrated by the crease down the side as I ironed and pressed it before I started!

DSC_0003

It’s only small so it really didn’t take long to do but I think it’s really pretty, I’m happy with this entry. On the facing page I added a couple of photos of cherry blossom on a blossom themed backing paper. I then wrote a bit about hanami and Sakura before finishing with this haiku by Kobayashi Issa;

In the city fields

Contemplating cherry trees

Strangers are like friends.

DSC_0001 (1)

Posted in embroidery, Serendipity, The Travelling Sketchbook | Tagged , , , | 14 Comments

Monday’s Meander Round the Garden


It was the Harrogate Spring Flower Show last week, an annual pilgrimage for my friend and I, we always have a great day out, mooching round the stalls and ending up with more bags than we can carry! Friday’s visit was no exception 🙂

I can’t resist a pretty aquilegia…or two! Erysimums (perennial wall flowers) are a favourite too, I like the standard purple ones which flower their socks off nearly all year, but I love the ones with two colour flowers, this time I bought one that’s a lovely rich amber and red/purple, and another that is a more pastel version. I usually fall for a clematis or two as well, I’m hoping my purchases this year will have nice big flowers on.

Yesterday was a lovely sunny day so I started weeding round the pond area ready to start planting some of my purchases. Everything is growing madly at the moment, including the weeds! I had some seriously big buttercups to dig out and there’s spots of yellow all over the garden where the dandelions are appearing.

Hostas

The pond area is looking lovely at the moment, the irises and the hosta leaves are starting to appear, there’s a pretty clump of erythronium pagodas, they always look so delicate. There’s also a few primulas in flower, I bought a couple of candelabra primulas at the show so I’ve planted those next to Hubert the Heron. Soloman’s Seal seems to appear from no where every year, it’s just starting to flower. I’ve got three brunnera plants in the garden (the one with little blue flowers) they all flower at slightly different times. This ones always the first to flower, it’s been out a few weeks now, whereas Jack Frost down near the house has barely started to flower, clearly position is everything!

The azalea at the front of the bed is another of my show buys, the flowers are a gorgeous coral pink, I planted one of the wall flowers and a pretty lavender and white aquilega next to it. I’ve had a bit of a clear out in the area next to the summerhouse, removing a couple of shrubs that were either not doing much or dead! I’ve got a camelia to go in there and I’ll probably fill the gaps with a couple more hostas. We must have quite a few toads and frogs around the pond as the hostas seem to escape major slug damage in this bed.

Our drive is greening up nicely, I’ve just today discovered why my golden philadelphus has never flowered…I’ve never pruned it! I love the leaves and it’s never got too big, so I left it, but apparently it needs pruning straight after flowering (I’ll have to pretend on that one!) to give the growth for next years flowers.

At the bottom of the drive we’ve got a Korean Fir, I keep threatening that one year when it gets too big it will be our Christmas tree, in the meantime, I enjoy the bright purple fir cones.

Abies

I’ve pretty much come to a halt with the house decorating so hopefully I’ll have more time and energy to sort the garden out…of course wintery showers are forecast this week! I finish with a photo of the blue camassias next to the conservatory. I’ve got several clumps of these around the garden and they always put on a good show.

Posted in Garden, Serendipity | Tagged | 13 Comments

Stitch-a-long 10

It’s three weeks since I last showed you my flower lattice embroidery, this is how far I’d got then;

I’ve managed to get a few extra supplies on e-bay since then with this embroidery in mind, I bought a big pack of Anchor perle 8 threads, the photo of my box of threads only shows the top layer! I was using some I’d found in my stash before and to be honest they look a bit shiny to me. I did look at some beautiful threads from an embroidery supplier but I’m afraid it came down to cost, I could get forty Anchor threads for the price of about five of these other ones. I love the colours of these Anchor ones too, hopefully they will be useful. On the auction side of ebay I also won the bidding for some silk ribbons and some silk embroidery threads, these look like they have been left over from a kit, judging by how much there is I don’t think the embroidery was finished! They feel gorgeous and the colours look useful for flowers!

I used the perle thread for the lower flowers of the hollyhocks. These are stitched with cast-on stitch, it took me ages to get my head round this stitch, I couldn’t get the hang of which way the thread was looped onto the needle. It’s basically a bit like casting on with knitting, the effect is of a buttonhole stitch over a single thread which can be looped round as needed. It is stitched using a milliners needle (or straw needle) I’d not come across these before I started this embroidery. They do make a big difference. Apparently the eye is no bigger than the shaft of the needle, as we would say at work, it’s very low profile! This is say compared to a chenile or a crewel needle where the eyes are somewhat bigger than the shaft. The advantage of the milliners needle becomes apparent when you are stitching 24 cast-on stitches, or making a bullion stitch, the loops just glide over the needle without jammimg on the eye.

It seemed to take ages to stitch the hollyhock, the lower flowers have three stitches with a total of forty loops on each one!! The top ones are stitched with DMC stranded cotton using bullion knots.

I’ve embroidered the little ladybird crawling up the agapanthus stem and added the leaves on the agapanthus too. I was pretty pleased with the hollyhock leaves as I dyed the ribbon myself using silk paints. The paints I’ve got are set using an iron, so it’s pretty easy to do.

The delphinium is embroidered using some of the silk ribbon I got on ebay. The 7mm strips were cut into short 4cm lengths, gathered along the two short sides and one long side, pulled into a rosette and stitched on. There’s a french knot in each one but they don’t seem to be centring the flower, so I might go back and stitch a lighter, bigger centre. I’ll have a play on the second delphinium first.

I think the rest of this diamond should be fairly quick, so hopefully in three weeks time I’ll be onto the next one, the irises.

I neede to get cracking with this embroidery as I’ve just bought a copy of Inspirations magasine and my next three embroidery projects are in there!!

There are quite a few of us taking part in the stitch-a-long now with some stunning projects being made, why not follow the links and see what everyone else is creating;

AvisClaireGunCaroleLucyAnnKateJessSueConstanzeDebbieroseChristinaSusan, Kathy MargaretCindyHelenStephLindaCatherine, Wendy


Flower embroidery

Posted in embroidery, Serendipity, Stitch-a-long | Tagged , , , , | 21 Comments

Making Chickens!

DSC_0002I had a lovely afternoon this week teaching my WI’s Craft Club how to make chicken pattern weights. It seemed a fairly apt project just after Easter.

ca990c37fdbb0029527e42eeb6967f8cOn the last series of Great British Sewing Bee I noticed quite a few of the contestants were using pattern weights rather than pins for holding the pattern still whilst cutting out, particularly for fabrics which damage or move easily.

I’ve seen a few chicken pin cushions over the last few months and they were on my list of to do one day, but when I saw a tutorial on Loganberry Handmade for these dinky ones, I thought they would be perfect and fun as weights.

I thought I’d better make one up before the Crafty Afternoon, so a couple of hours before they arrived I was busy making a chicken! It’s made from two 2.5″ squares and some scraps of felt for the beak, comb and tail. The instructions are really easy to follow luckily.

As the 2.5″ squares did make a pretty dinky chick, we made them slightly bigger using a 3″ square. The little blue one was the original one, all the others are 3″.

DSC_0004

To make them into weights I bought some pigeon grit from the pet shop. We keep chickens so we always have a supply of chicken grit in, which looks like it is made from chopped up cockle shells, it was a bit coarse for what I wanted which is why I got the finer pigeon grit. It’s very cheap too (no pun intended!) The fiddliest bit was filling the chickens with the grit, particularly as the only funnel I could find was huge. I put a tiny bit of stuffing in at the end, mainly to stop the grit from leaking out when I tried to stitch it closed.

The chickens were pretty quick to make, every one managed to make two. I fancy making myself another half dozen so I can try using them for cutting out.

DSC_0006


Posted in Crafts, Serendipity | Tagged , , | 11 Comments

Paisley Elephant Quilt

This is the third year I’ve taken part in the Hands2Help quilt challenge, it’s organised by Sarah from Confessions of a Fabric Addict. There are three charities to choose from each year or you can donate a quilt to a more local one if you wish (there are two in America and one in Canada). This year I’m doing both!

By chance my mum was having a clear out and found a quilt top she made years ago but never finished, she didn’t want it and she was more than happy for me to send it to Hands2Help. For those of us who live the other side of the pond Sarah kindly offers to quilt any top that is sent over, as otherwise postal costs would be pretty high, so I can send my Mum’s quilt over as it is.

I also offered to make one for a charity set up by a friend after her son died from cancer. Latch is a Welsh charity which gives emotional, financial and practical support for families with a child with cancer. The Emyr Owen Porthcawl branch are having a Charity Ball and Auction in May, so Sandra was very grateful for the offer of a quilt.

As the quilt is going to be auctioned I felt it needed a bit of Wow! factor, it’s got to appeal to enough people when it’s held up for bidding. I thought long and hard about this and eventually decided on the Paisley Splash pattern from Wyndham Fabrics. I first came across it when my daughter Helen decided she wanted an elephant quilt, she decided on a different one but I still love this one. It’s a free pattern which is designed as a cot quilt, however I felt if I enlarged it and put some borders round it I could get it near to single bed size. I’m hoping the elephant will appeal to young adults as well as children…and to parents and grandparents who might buy it to gift!

The pattern printed off on my computer to an A4 size elephant. I decided to enlarge it the oldfashioned way by drawing 1″ squares on the A4 and 2″ on the A2. I managed to draw the paisley splash bit freehand on another piece of A2.

Yesterday afternoon I raided my scrap box for some suitable patterns. I ended up with blues, greens, purples, pinks and the occasional bit of orange. I need to make this quilt fairly quickly (the event is on May 11th!) so I used Bondaweb, playing around with the shapes until I was happy with the colours and the arrangement. Having secured them on the background with the Bondaweb I used a narrow zig-zag to stitch them all on.

I’ve just started the borders now. After the two narrow borders, I’m planning to do a piano key border of all the different fabrics (plus a few extra!) I’ll probably then just add a narrow stripe of ivory and a deeper blue border. Hopefully that will get the quilt size up enough, at the moment it’s approximately 35″ x 43″. I’m pleased with it so far, I’m planning to quilt it with an all over swirly pattern, with the wind behind me I might get it finished by the weekend 🙂

Posted in Quilting, Serendipity | Tagged , , , | 17 Comments

A Dress for Easter … just!

It seems a while since I did any dress making, although in reality it’s probably not that long since I made my Coatigan. I kept promising myself that once I’d finished the Splendid Sampler quilt I would make myself some clothes…so I did!

Of course I made what I wanted to make rather than what I need! I need every day clothes like tops and trousers, so I made myself a dress!

I bought the fabric a couple of months back, I have to admit it was as much an impulse buy as you can get! I follow a few fabric shops on facebook (bad move!!) and this flashed up from Croft Mill, two clicks later and I’d bought 2.5 metres!I love the way it drapes, I can’t remember the fabric composition but it feels like viscose. The colours aren’t what I usually wear but equally they are colours I know I can wear! I have to admit though it’s one of those fabrics that I love one minute and really not so sure the next!

My original plan was to make Vogue 8997, a very elegant princess line dress, however I discovered it’s a very fabric hungry pattern, I looked through my stash of patterns and came across McCalls 6966, a shirt waister dress that has become a pretty iconic pattern amongst bloggers, I was beginning to feel I was the only one who hadn’t sewn it yet…which does have the advantage of being able to read all the reviews first…and it’s also one of my Sew Nine 2017 challenge!

Many reviews mentioned a size issue, which is surprising seen as the pattern offers cup sizes as well as bust size,but having read the ease measurements I can see why. I was a bit puzzled by the method of measuring cup size. I always understood that the cupsize was the difference between full bust and under the bust, which for me works out at a ‘C’ cup. The pattern ask you to measure the full bust and then the upper chest, which would have been an ‘A’ cup! I decided to go for ‘C’! I think officially I should have gone for a 16A, but I cut a 12C and it fits beautifully!

I decided to make view A which is sleeveless with a full skirt. The hem on the pattern is above knee, I rarely do knees!!! I decide to cut it as long as my fabric would allow, which was pretty much a maxi!

The fabric frays like anything so I decided any seam that wasn’t enclosed would be french seamed. I wasn’t sure about french seaming a skirt with a side pocket, but I found a tutorial on ‘In the Folds’ and followed it carefully, it works perfectly.

The pattern included a centre back seam in the skirt, but as it was perfectly straight and along the grain line, I just cut on the fold instead. The skirt is beautifully pleated which I must admit was a bit time consuming but I think it does  make a lovely drape to the skirt.A few people have also muttered about the amount of hand-stitching with this pattern, I enjoy the hand-stitching part and would actually expect a pattern with facings to have a fair bit of hand-sewing. The yoke, collar, front band, sleeve facing and hem all needed slip-stitching down, I suppose you could get away with machining some, but I like the hand-stitched finish.

The instructions are pretty straight forward, though I did my collar in a slightly different order. The night before I was due to stitch my collar on a post came up on facebook about tips on stitching collars..perfect timing!” Sew Sarah Smith posted ten tips for sewing perfect collars, some I was too late for as I’d already cut my collar out. Other tips were very useful, like always stitching from the centre back, she also recommends stitching the band to the neckline first, then the collar onto the band and the band facing last. I have to say it is a lot easier! It is certainly one of my better collars.

I hemmed it to above ankle length. I used bias binding to hem the skirt, stitching one side on the machine and the hand-stitching the other side.

Is it just me getting tight or are buttons getting more expensive? I went to a shop in Leeds which I wouldn’t consider to be in the expensive league, the first buttons to take my eye were 89 pence each…and I needed 14!!! I even looked at self cover ones but for so many it still worked out at a major expense. In the end I bought some pretty simple ones at 39 pence each.

I’m really pleased with this dress, it fits well and feels really comfortable to wear, I love the length of it too, I can see a few more being made as it feels like it could quite easily be worn as an everyday dress too. I finished it at about 10pm on Easter Saturday, just in time to call it an Easter dress 🙂

As well as completing one of my sew nine challenges, this dress also fits in with #EasterSpringDress2017 challenge organised by Judith Dee and Akram and the #sewtogetherforsummer, a challenge based around making a shirtdress, organised partly by Sew Sarah Smith…so that’ll be a win win win 🙂


Posted in Dressmaking, Serendipity | Tagged , , , , | 24 Comments

Lavender Sachet

I’ve finally got round to finishing the third pattern I’d down-loaded from Faby Reilly’s Lavender range. I stitched the card and the lavender bag for my mum for Mother’s Day, I was planning to make the sachet, together with a padded coathanger to give to her for her birthday just a few days later, but time ran away with itself.

I decided to make it for myself and make the padded coat-hanger as well as an entry for the handicraft section of our local show.

These designs have been lovely to stitch, there’s several different stitches in the pattern such as eyelet stitch and lots of french knots to give a bit of texture on the flowers. On the back of the sachet there is a simple pattern of eyelet stitches. It’s meant to have a few beads as well but having had a big sort out of my bead box, I couldn’t find the silvery ones I’d used before and all the others I tried just didn’t work. They may be hiding somewhere in my sewing room, if I find them in time I might try and stitch them on.

I’m still not sure how I’ve managed to accumulate such a huge collection of beads, seen as I’ve only done the occasional bead course and not particularly carried it on at home. I can only think my mum has destashed her beads to me!! Anyway, with this kind of project it comes in very useful; I added some blue/purple seed beads whilst I was whip-stitching the sides together. A bigger one was used for the corners and I found some lavender coloured beads for the hanging thread, I used a pattern of five lavender beads then one of the darker ones I’d used for the sides.

I wanted a dangly bit on the end so I payed around with a silver leaf charm and a flower bead and with the help of a few more seed beads and a pearly one, I made quite a nice dangly bit!

I stuffed it gently with a bit of toy stuffing and then added a generous amount of dried lavender.

All I’ve got to do now is make the padded coat-hanger, I’m thinking of using the ivory and silver quilting cotton to cover it.

I’m linking up with Kathy’s Quilts for Slow Stitching Sunday, why not follow the link and see what everyone else has been hand-stitching this week.


Posted in Crafts, embroidery, Serendipity | Tagged , , | 19 Comments

March Review

Sewing in March was limited to evenings as the days off were filled with workmen and decorating, the workmen have pretty much gone, but I still feel knee deep in painting, there’s a faint glimmer at the end of the tunnel though! My sewing room has become my refuge at the end of the day…

My sewing has been limited to quilting and embroidery this month, mainly because I was determined to finish my Splendid Sampler quilt before I started anything else major. Having worked on it for over a year I didn’t want it to end up as a UFO in the corner. It took me longer than I thought to stitch all the blocks together but I’m so proud of it, it’s definitely my biggest achievement in quilting!

I also managed to make a secondblock for Kate Chiconi’s Tealed with a Kiss quilt and got both blocks posted off. She’s just started quilting all the blocks before stitching them together.

My Down the Rabbit Hole quilt has gone untouched this month so I need to get cracking on that one, month three instructions have just been released and I’ve not quite finished month one yet!

Faby Reilly Design

It was our 10th wedding anniversary this month, I stitched a lovely card by Faby Reilly called Sweet Roses, I really like the message on it and my OH was really touched. We had a lovely weekend away in Matterdale near Ullswater in the Lakes, it rained, but it still looked beautiful. The little white cottage on the side of the fell is where we stayed, a lovely, cosy, welcoming B&B, some of it dates back to about 1670, so the walls are very thick!!

UllswaterUllswaterLowthwaite

It was also Mothers Day here in the UK, I decided to stitch another of Faby’s cards, a lavender one, together with  the coordinating lavender bag. She loved it, as a needlewoman herself she could appreciate the work that went into it!

Another present was a surprise for Kate of Tall Tales from Chiconia, I made a little pincushion that looks like a vintage caravan. She sounds really pleased with it and it hasn’t even arrived yet!

It was our first month for swopping our Travelling Sketchbooks at Skipton Embroiderers Guild, so it was with some trepidation that I started stitching my first entry. The book’s theme was garden birds, so I did an embroidery of a wren, having coloured the background with silkpaints. As this was definitely out of my comfort zone, to design and then stitch something, I was well chuffed with the result.

My lattice embroidery that I’m stitching for the three-weekly SAL group is progressing slowly. I still haven’t quite worked out a slot for this, I enjoy working on it when I do get it out to do (usually about two days before I’m due to post!) but I rarely think to get it out before. I don’t think it helps that it’s on quite a big frame and I’m trying to keep it tidied away in a bag to help it stay clean as this one is definitely not washable!!

This month I want to get some clothes made, I need some trousers, but I also want to make a dress. The Skipton Travelling book continues but I’m also anticipating the Sisterhood of the Travelling Sketchbook will arrive. Having spent the last twelve months travelling from Australia, to America and now Europe, it has finally arrived in England, so it will be my turn soon!

Stash Report

My stash is unchanged this month, this is good and bad…it’s good as it means I haven’t been tempted by any more dressmaking lengths (I don’t count quilting fabric!), but it also means I haven’t made any clothes!

Stash at end of March    54 lengths.


I have to finish with the photo of a gorgeous piece of embroidery my daughter stitched me for Mother’s Day. I love it, it’s hanging in my sewing room so I see it every day and smile 🙂

Posted in embroidery, Quilting, Serendipity, Splendid Sampler Quilt, Stitch-a-long, The Travelling Sketchbook | 11 Comments

Travelling Sketchbook

Skipton Embroiderers Guild are doing Travelling Sketchbooks at the moment. We are just in groups of six and the books are exchanged each month at the meeting. We could choose the theme of the book and the book I have this month is on walls.

I knew immediately what I wanted to do, a dry stone wall with lots of flowers in front of it. A few years ago I walked the Dalesway (84 miles from Ilkley to Windermere) with a friend, we started the practise walks in February when all the snowdrops were out, walked through the daffodils in March, then blossom trees in April, May bluebells…by the time we did the actual walk in June the wild flowers were stunning, in the fields, the hedgerows and of course at the bases of the dry stone walls. I took a photographic record of all the flowers we saw, we really felt we were walking through the seasons.

Dry stone walls are a big part of our landscape here in Northern England, many were built centuries ago and the skill apparent when you watch someone building one is amazing, there’s no mortar to hold it together, just very careful selection and positioning of the stones. As there are so many cracks and crevices in a dry stone wall they are a haven for nature, they provide a shelter belt for plants and flowers, creatures such as field mice, stoats, toads, newts, insects live within the wall and lichens and mosses grow on the actual stones.

You’ve got to admire the skill and fortitude of men who built walls like this one, hundreds of years ago… and trust me, that is as steep as it looks, we walked, or should I say staggered, up it!!

070

My original plan was to paint a dry stone wall with my silk paints and then stitch flowers on it. When I went into my textiles box where I keep ‘stuff’ for embroidery I spotted a piece of wool I’d won in one of the monthly raffles. It seemed pretty perfect texture-wise for a dry stone wall and also seemed apt when sheep are also a big part of our landscape.

I sketched a basic outline of a drystone wall on paper first, to give myself an idea of scale. I then stitched it with back-stitch using a lovely variegated thread. I was pretty pleased with it at this stage. I thought of using organza along the base to add colour but it didn’t look right, I then had this idea to embroider each stone with a different stitch, running, fly, cross, feather, herringbone…I think the idea was OK, it just didn’t have quite the effect I wanted. It might have worked better if I had painted the stones first, as it was it just seemed to look to busy and the stones lost their definition. However I wasn’t going to start undoing it, this is a learning experience after all!

I stitched a bit of greenery on the wall first, french knots for moss, feather and chain stitch for climbers and several stems ready for the flowers.

I started with the foxgloves just using a variegated DMC thread for french knots. I started at the top with one twist, moved to two twists a bit further down, and the bigger flowers at the bottom have three twists.

In the end I used french knots for all the flowers, varying the size with the number of threads (1-3) and the number of twists, for the bigger flowers like the poppies I also allowed the knot to form more loosely. Just using the one stitch I’ve hopefully represented foxgloves, poppies, cornflowers, cranesbill, violas and of course a carpet of buttercups along the base.

I like it now, I really wasn’t sure half way through but I’m happy with it, happy to put my name to it in someone elses book! Doing these travelling sketchbooks is making me a bit more confident with my embroidery, to think up and stitch an embroidery on a given theme is well out of my comfort zone but I am getting a bit more comfortable with it. Next months book is on trees, so I’ve already got a few ideas for that one.

Posted in embroidery, Serendipity, The Travelling Sketchbook | Tagged , , , , | 18 Comments