I’m on two weeks holiday from work at the moment, but I think I’ll be going back to work for a rest! I’m knee deep in decorating, my OH is away on Army Cadet Camp for a fortnight, so I decided to take the opportunity to redecorate our bedroom. It has been planned for a while but knowing how my OH hates the inevitable disruption I decided that was the time to do it. At the same time my son (who is a plumber) had a two week window when he could fit our new bathroom…oh and I’ve got a dinner party for about 12-14 friends on Saturday!
 Currently our clothes are in the lounge, the furniture is in the office, the bathroom was emptied into the dining room, I’m sleeping in the spare room, so my sewing room has become my sanctuary in which to escape on an evening.
I’ve been catching up on some of my block of the month quilts and I’ve finally decided on the sashing for my Splendid Sampler quilt. I’ve been mulling ideas around for a while, there’s some gorgeous sashing ideas on the facebook page but I wanted to keep it reasonably simple (as there are 100 blocks!) and it had to be suitable for quilt as you go.

James’s Quilt
All the quilting I’ve done so far has been all over patterns, mainly meandering swirls. The nearest I’ve been to following the design of the quilt is James’s chevron quilt, where I stitched a different pattern down each chevron. For the Spendid Sampler quilt I want to quilt each block individually and as even without sashing it would measure 60″ square, I knew I had to do it using the quilt as you go method (QAYG).
I’ve never done QAYG before, Kate from Tall Tales from Chiconia has written a great tutorial on QAYG for beginners which has been a big help, it all makes sense now! I just need to sash and quilt my blocks.
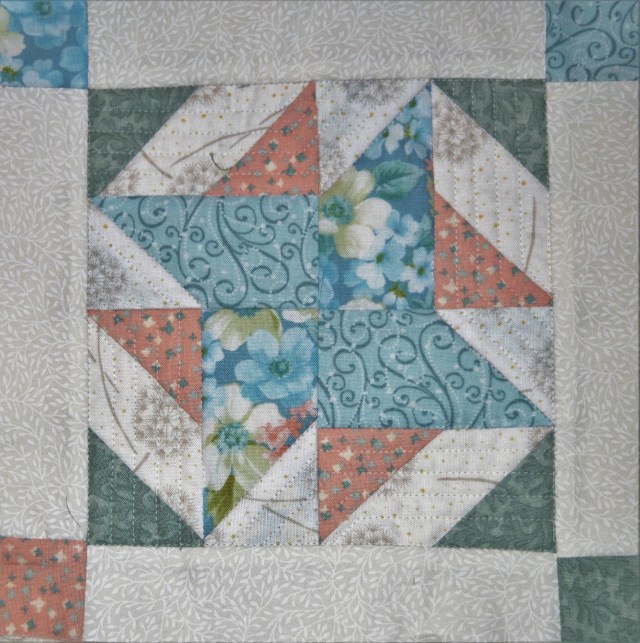
For the sashing I’ve decided to use 1 1/2″ strips in a patterned ivory with a coloured square at each corner. I’m going to try and use mainly the fabrics from each particular block for the corner squares. The idea is that when I then join the squares together with a darker cream strip the coloured squares will be divided from each other. Hope that is making sense!
Well I’ve quilted two blocks! I’m backing them with pretty floral cottons and using spray basting to sandwich the batting between the layers. I’ve got lots of batting remnants so hopefully I’ll reduce that particular stash!

The first one I quilted was a block by Katya Marek called Bee Happy. It’s made with English paper piecing (the only paper piecing I knew of until I started this quilt!) so all the pieces were tacked around the pattern pieces and then over-stitched together. I’ve not done EPP with such tiny or irregular shapes before and it took a bit to realise that I didn’t actually need to have everything neatly tucked under like in applique. As long as I remembered which seam I was stitching, it all came out fine! The biggest problem I had with this block was stitching the finished hexagon onto the block. The bee is meant to be flying straight across. I didn’t have the picture with me when I stitched it. The first attempt had the bee flying downwards, I undid it and stitched it flying upwards, much more positive!. When I got home and look at the pattern I realised I’d positioned it sides top and bottom rather than points. It’s staying as it is!

I quilted round the bee and then quilted his stripes in. These were meant to be EPP fabric stripes but I chickened out of that one! I quilted his wings and the hexagonal flower. I’m keeping the quilting pretty simple so I don’t make the job of quilting 100 blocks overwhelming!

The second block I’ve quilted is called Twirl Time by Sarah J Maxwell. I quilted round the outside of the four point star, leaving the centre plain.
I’m really please with these two blocks, they didn’t take long at all once I’d worked out what I was doing…just got to quilt my other 48 blocks now 🙂
I’m linking up with Young Texan Mama for Sew Cute Tuesday, why not have a look what everyone else has been sewing?


You’ve made a great start! If I can offer one suggestion, it’s to make the blocks a little bit larger than you think you’ll need, and not to quilt too densely, as this will shrink the block slightly. The only downside of QAYG is that you need all the blocks to be very exactly sized, so if you make the blocks a little large, then quilt, hopefully you will end up with something close to the right size.
LikeLiked by 1 person
Thanks Kate, I did think with 1 1/2″ sashing I’ve got room to trim it if I need to, I’ll double check the sizes before I start stitching them together. Thanks again for the tutorial 🙂
LikeLike
Pleasure, and I hope it comes together easily 🙂
LikeLike
This is going to look fab! Isn’t Kate’s tutorial good – I’ve thought I might have a god with the few splendid samplers blocks I made.
LikeLiked by 1 person
Thanks Ali, Kate’s tutorial came just at the right time! At least QAYG makes the quilting manageable 🙂
LikeLiked by 1 person
Am so glad you know what you’re talking about, Margaret, cause I’ve not a clue – but I appreciate there’s a lot more to quilting that I’d imagined. Yours is going to be fan-TAS-tic! 😘
LikeLiked by 1 person
Thanks Del, though you may be a bit optimistic thinking I know what I’m talking about 🙂
LikeLiked by 1 person
You know much better’n me! 😉
LikeLike
It’s looking good. You’re certainly busy ++!
The closest I’ve come to this type of work was in Knitting when I made a beautiful cover in squares joined together and backed. Lots of squares but one at a time it comes together. You’ve already fdoe 4% of your quilt blocks and we know that planning and thinking takes longest. Good luck.
LikeLike