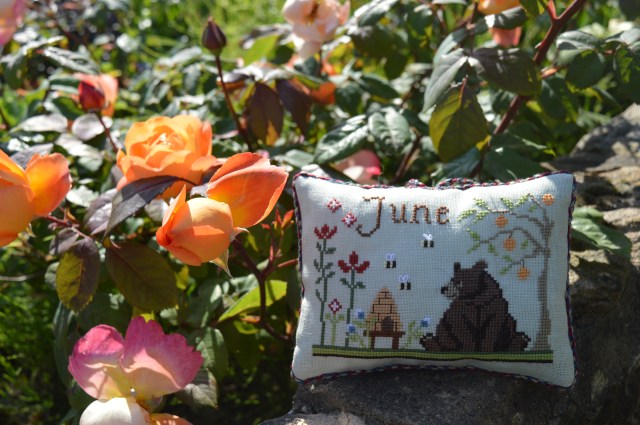
Where has this month gone, we’re a third of the way through already! So, here’s my cross-stitch smalls for the month…
The Joyful World SAL one for June has a very cute bear with a bee hive. That gave me a bit of a theme, so anything with bees came out, then butterflies to bunce it up a bit.
I’ve stitched the bumble bee one a couple of times now, I made the first one for my mum as she used to keep bees, I liked it so much I stitched myself one as well…
The lavender pot with bees buzzing round is by Lesley Tear, she kindly has it as a freebie on her website.
The two butterflies with lavender are both Faby Reilly designs, Again I made them for my mum for Mothers Day one year, I think the fob went round a padded coat-hanger.
Faby Reilly Design
The forget-me-nots are just about still in flower, so I included a little cross-stitch I stitched years ago, like when I was in my 20’s, together with a tiny box which is a Nutmeg Designs kit, I think it’s officially periwinkle, but it’ll pretend to be forget-me-nots!
The final one popped in of a bee is again one I made years ago for my mum, it was actually some voile I saw in a shop up I think in Pickering(we’re talking probably 20 years ago!!) I fussy-cut them and made a cushion, but I also made this little hanging one to go on a coathanger.
So I’ve ended up with quite a collection of bees! In case you’re wondering, our bumble bee nest under the eaves appears to be quieting off a bit, so hopefully my belief that the nest will be gone before the workmen arrive will come to fruition!
A couple of years ago my daughter was helping clear her other grandmothers house when she came across an unfinished old patchwork quilt stuffed inside a trunk. She brought it home for me to look at and asked me to finish it, thinking her grandmother had probably started it.
The more I looked at it the older I felt it was. It’s English paper piecing and many of the papers are still in the back, some of them are gorgeous, a glimpse into history. It looks like an old handwriting exercise book has been used, some letters, newspapers, I scanned them for dates to give me a clue who made it.
Whilst I couldn’t see a printing date on a newspaper, the events they were referring to were in the 1870’s. This means we need to look at least three if not four generations further back. I decided I needed some advice!!
I took it to my Embroiderers Guild where one of our members has worked in the textile department of a nearby museum. She felt the fabrics were scraps from a dressmaker, as they didn’t feel worn, like they still had some size in them. She felt my dating was about right, but also felt some of the fabrics were much earlier, like the 1750’s!!! By now I was beginning to wonder whether or not I should touch it!! She gave me contact details for the textile curator at the museum.
I had a long e-mail discussion with the curator, she was very helpful. She encouraged me to finish it, but to make a book detailing what I’ve done. So that’s my project for the next little while…
There’s one big piece and then several bits. The main piece measures 60″ by about 75″, my thought at the moment is to add one more strip. If I want to add more then I would have to find a light fabric that worked as there aren’t anymore light diamonds. Whenever I tried various shades of neutral fabric they just looked too new.
I’m hoping to quilt it on my vintage singer sewing machine. It’s a hand-crank from the 1870’s, so it feels right to use it, I don’t fancy hand-quilting it as, apart from it’s size, the fabric doesn’t feel like it would be easy to sew.
I’m hoping to be able to piece some of the backing papers together to maybe find out who made it, or at least a more accurate date, maybe a suggestion of a place, see if we can discover a bit of the history.
Hopefully in three weeks time when I next share this I’ll have pieced a few together.
Hand Quilt Along Links
This Hand Quilt Along is an opportunity for hand quilters and piecers to share and motivate one another. We post every three weeks, to show our progress and encourage one another. If you have a hand quilting project and would like to join our group contact Kathy at the link below.
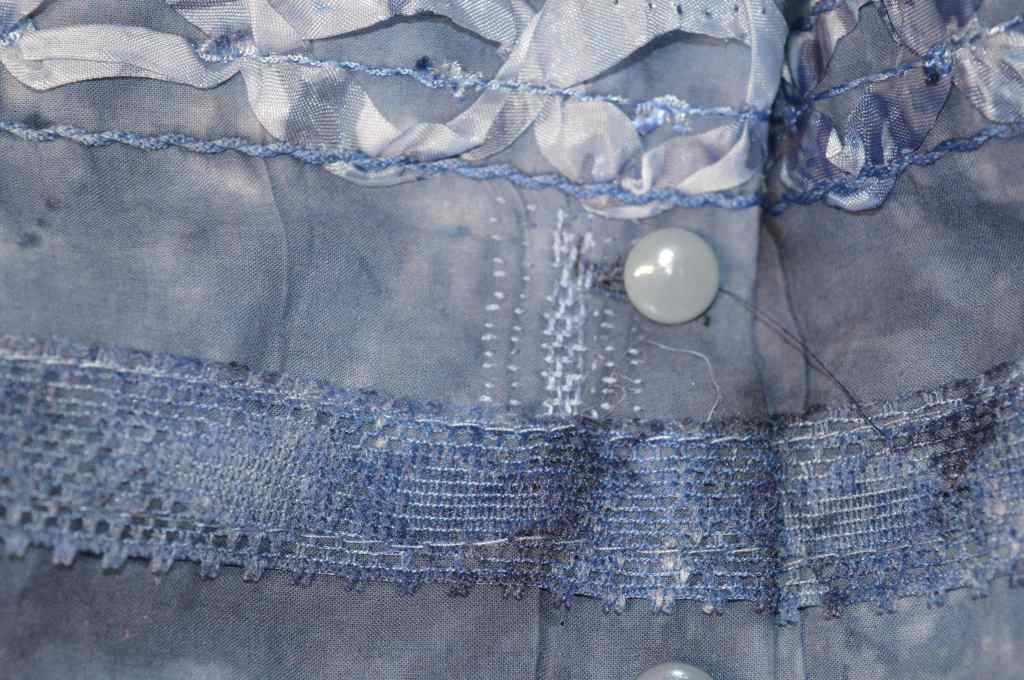
A few months ago I fell for a length of fabric on a de-stash facebook page. With hindsight I can probably see why it was being moved on. It’s lovely fabric and a bit different, but difficult to know what to stitch and the more you look at it the more flaws you see…
It’s an indigo tie-dye cotton, I haven’t washed it yet and I think I’ll put some colour catchers in too as I’m not totally convinced how fast some of the darker patches are! What makes it interesting is that it then has rows of lace and waves of ribbon stitched along it, it looks like it has been over-dyed once these were stitched on. There are areas where the stitching could have been more accurate, missing loops of ribbon etc, I was also intrigued that they used a stretch lace – I discovered that as I briefly thought it might be nice to cut away fabric behind a row of lace, I abandoned that idea!
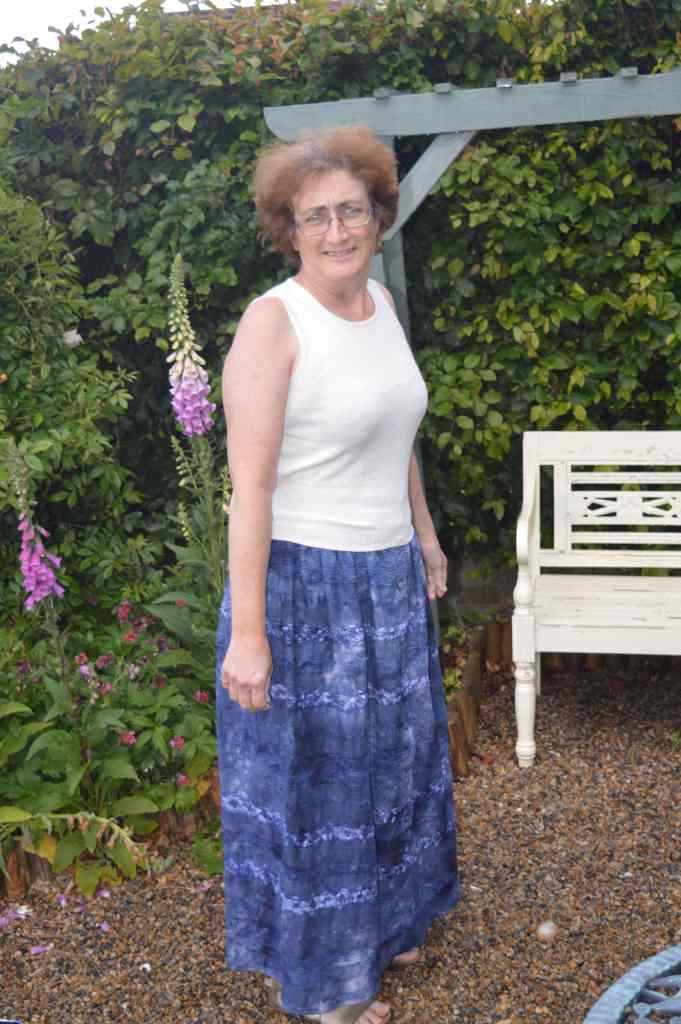
Having looked at the fabric, I decided when it came to patterns, the simpler the better. I decided on a basic gathered skirt with buttons down the front. I played with the stripes up and down or across, I liked them across and also felt it avoided the lace and ruffled ribbon bits in a waistband which could be bulky. Stitching it across also meant I didn’t have to have any seams in the skirt!
Having determined I didn’t have enough for a top as well I cut it so I had a wide area without lace or ribbon at the top and bottom so make hemmimg and waistband insertion easier. I also cut a waistband from a flat area.
It actually stitched very easily – to my surprise the stripes across were pretty even. I didn’t fancy stitching buttonholes over the lace or the ribbon so I positioned them slightly unevenly but on a flat area. Buttons aren’t a brilliant match, but they were the nearest I had in my stash. I’ll probably replace them when the shops re-open.
I was just stitching my buttonholes when I noticed a cut in the fabric, it was about an inch long, hidden in a narrow crease. Of course it would be right at the front on the buttonhole placket! I decided to be creative and do some visible darning!! Even though I didn’t set out to make it invisible, it actually blends in pretty well!
It’s a sort of comfortable every day skirt, easy to wear, I’m just not sure how well the fabric will hold up to everyday wear. I will just enjoy it while it lasts!
I managed to nip outside for a photoshoot in between hailstorms and downpours…
I’m taking part in Foot Square Freestyle this year which Kate Chiconi organises. We make three 12″ blocks a month, each person in the group is allocated a month and we make the blocks in their choice of colours. Usually they are posted out within the month, however at the moment we are holding them until it’s safe to post.
I’m enjoying trying different blocks each month. I’ve used my big patchwork block book again, I have a love hate relationship with it as it does have 365 designs, which is pretty useful. However I really don’t like her instructions, so I just look at the diagram and work it out!
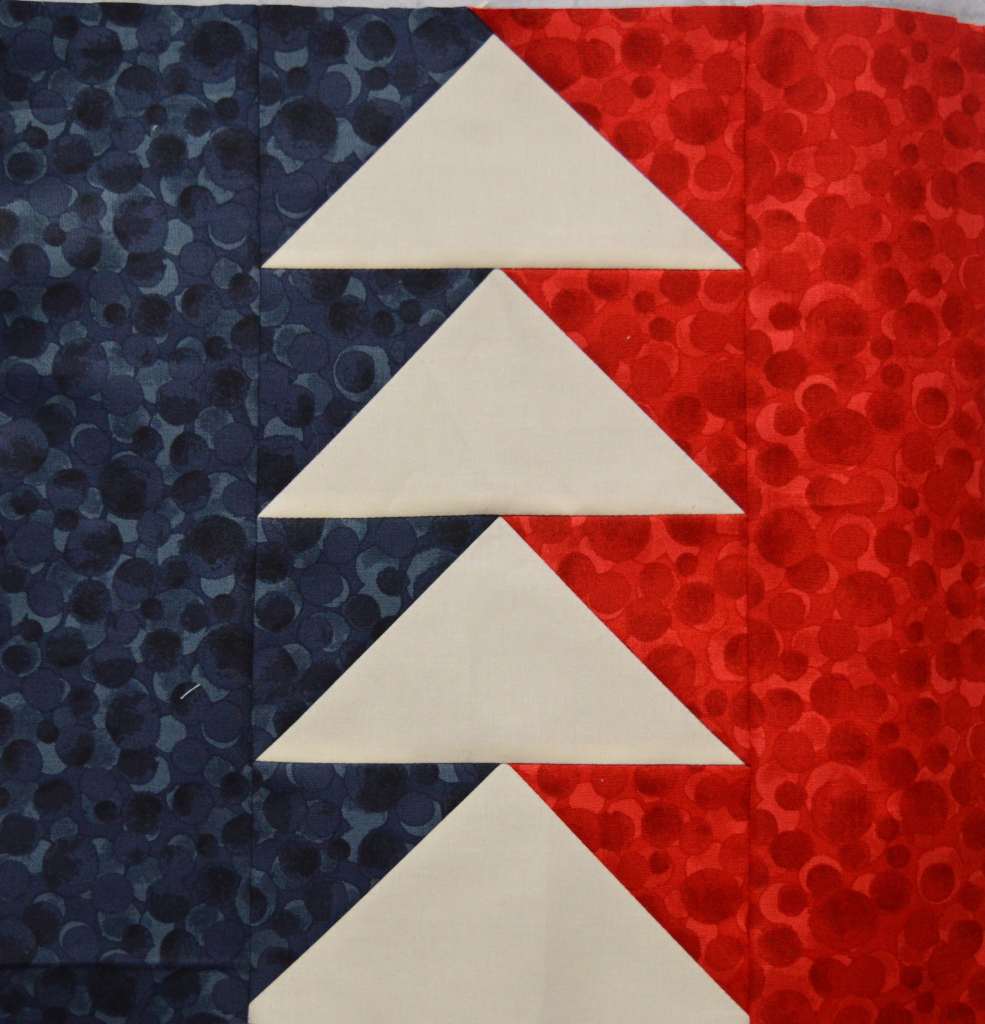
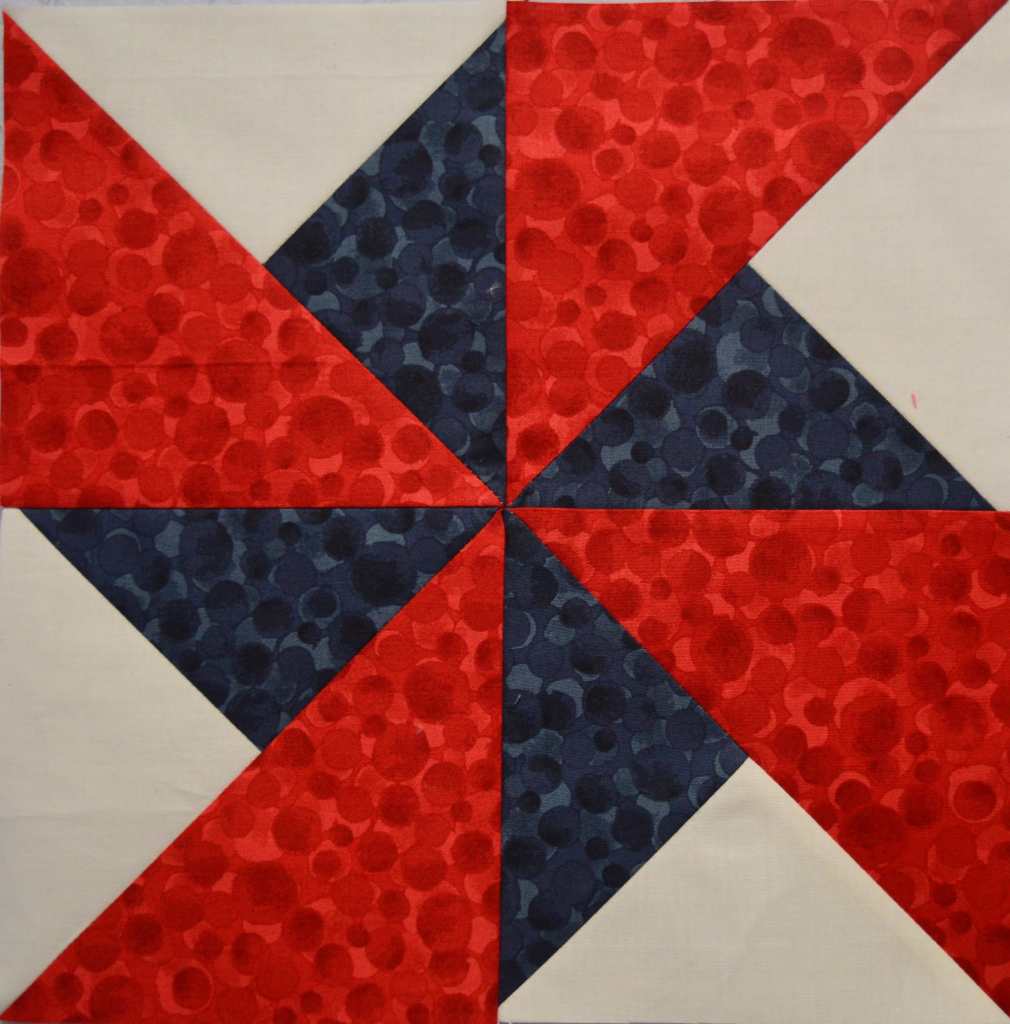
In May we were making the blocks for Susan, she’s chosen red, white and blue. I looked in my stash and realised I didn’t have much true red and blue, so I ordered some Lewis and Irene fabric from their Thumbleberry range. I did have a bit of a panic when it took nearly three weeks to arrive!
My first block is called Faceted Diamond. I’m pretty pleased with how this went together.
Next up was ‘A Row of Geese’….
My final block is called watermill, I do like making pinwheels!
I must admit I was really happy with how these came out. I’ve not done much with a limited colour scheme and strong colours too, but they turned out really crisp and striking. They certainly suit the simpler blocks.
Do follow the link at the beginning to see everyone else blocks.
I need to start making this months now, then hopefully I won’t be last one in again! This time we’re making them for Monike in indigo, gold and hot pink.
Last night I finished stitching the wordplay for my Anthea Calendar textile book. This is the SAL by Faby Reilly which gives us a very pretty flower design each month. I’m making mine into a book and making a wordplay to face each page with basically what that month means to me.
I stitched May earlier in the month, it’s very pretty…
I usually wait until nearer the end of the month before I design my wordplay, it sometimes takes that long to think of words to stitch.
We have a birthday in May, we were meant to have a wedding too but that has sadly been postponed for a year. I checked my diary (rather empty at the moment!) but I remembered sitting outside for Dawn Chorus day, listening to the birdsong in the garden…
We also had a socially distanced street party for VE Day, it’s 75 years since VE Day and there were meant to be lots of commemorations planned, but obviously everything got cancelled. Instead it was suggested that we stood by our front doors for a two minute silence at 11am, it was actually quite moving, just stood alone with my thoughts. We then had an afternoon tea with everyone at the bottom of their drive. We wandered round, chatting to neighbours, kept our distance, but had a lovely afternoon. I was a bit short of supplies for an afternoon tea, so I defrosted some puff pastry and made some sausage rolls. I had a large rectangle of pastry left, I looked in the cupboard and found an old jar of mincemeat, I spread it on the pastry, rolled it up and sliced it, it came out a bit like a Danish pastry! A few home made fairy cakes and cheese on toast slices and we were sorted! I set a pretty table with a vintage embroidered cloth, a tiered cake plate and a beaded net fly cover which was my grandmothers. The Australian flag made my OH very happy when he came home from work to join in.
I was a bit stuck trying to think of some suitable poem or prose to stitch for May, I couldn’t think of a month specific one I wanted to stitch. I then remembered a French poem I’m rather partial to. It’s all about true friendship, as I’ve used my time at home to chat to distant friends, I decided this was rather apt. The full poem is as follows;
L’amitie vrai c’est comme la mer, elle s’en va, elle s’en rentre, mais elle est toujours la.
Apologies to the French speakers amongst you, I never have worked out how to put the acccent over the e on a computer!! Anyway, it translates roughly as ‘True friendship is like the sea, it goes away and comes back, but it’s always there.’ I only had room for the first half, one day I shall stitch it all on an embroidery.
In Otley we still have a Maypole, usually around Mayday, the local primary schools set it up and dance round the Maypole, I have happy memories of watching Helen in a pretty dress, skipping round holding her ribbon.
Hanami is the lovely Japanese tradition of visiting the cherry trees in blossom. I’ve added sewing and gardening at the bottom as that is pretty much what I did for a month!! Flower of the month had to be the beautiful bearded irises.
We have blackbirds visit the garden regularly. One of them sits on the tree opposite my sewing room on an evening and sings his heart out, it’s beautiful. We’ve also really enjoyed seeing the fledglings being brought into the garden for feeding. The robins were first, today the blue tit family came to visit.
June’s design has just arrived, it’s lovely, full of very pretty cornflowers.
I’m sitting writing this in my sewing room watching the rain clouds gathering, hopefully we have some decent rain coming as there’s lots of deep cracks appearing in our clay soil, it’s so dry. It’s over two months since we had any rain worth writing home about!
I’ve just picked all my pink peonies, they were flopping anyway so there is no way they would survive a downpour, I may as well enjoy them inside. These are big and blousy, all frills. They smell lovely.
If last week was bearded iris week, this week is the turn of the peony. I love peonies, I have several round the garden, some old established clumps, others only planted in the last twelve months. These deep pink ones are a lovely goblet shape and an amazing deep colour, I would have picked these too but I don’t think they would like being picked either, they open to a simple petalled affair, perfect landing stage for bees!
They’re quite striking too, there’s not many flowers but they certainly make an impact. On the fence behind the clematis is still in flower, climbing up by the philadelphus. This is the remains of a huge shrub which our neighbour tried to remove when the fence was built. It was far too big, but I’m rather pleased a bit has survived as I love the scent, it fills the garden in the evening.
The self-seeded foxgloves are all starting to flower around the rose obelisk. I’m pleased with how that is covered too, last year it was a bit uneven, but I spent a bit of time a few weeks ago tying stems down, wrapping them round. It seems to have worked.
Down by the patio the Dutch irises are coming into flower. These are beautiful, they’re a deep Wedgewood blue with a silver outline round the petals. It was a clump my mum gave me years ago and despite the awful soil they’re in, it spreads more and more each year.
The irises are right round the birdbath now, obscuring it for most of the summer. You can just see the frost damage on the purple acer, we had quite a hard late frost in May and I’ve a few shrubs affected. The funny looking bulbs near the back are nectaroscordum.
Up by the pond the yellow iris are starting to flower, the rhododendron is also in full bloom, this is one of the few original plants from when I moved to the house twenty years ago, it doesn’t seem to have got any bigger in that time! The hostas are looking good, the Solomon’s seal is still in flower and there’s just a sprinkling of blue brunnera flowers left. Hubert the heron has all but disappeared!
From a distance he garden is looking pretty good, close up the bindweed and the mares tail are starting to appear, so I’ve started applying weedkiller. I don’t like using it but it seems to be the only way to get on top of these particularly pernicious weeds. I carefully unwind the bindweed, pop as much of it as I can inside a purple nappy bag (cheaper than black poo bags!!), spray inside the bag and then knot it! The weedkiller is contained and I know which ones I’ve treated! The downer is the sprinkling of purple bags round the garden!
Taking photos for these posts does help me stay positive when the weeds seem to be winning, it helps me to appreciate the pretty bits of the garden, not just see the work that needs doing. It’s been too hot to garden recently, so we’ve just enjoyed sitting outside with a cup of tea, enjoying our surroundings.
Three weeks ago when I finished Harry the Hare, I was all set to finish my other workshop WIP, my Bethlehem embroidery…
…however, I got distracted when I was looking through my kit box! I decided what I actually needed after a few long projects, both in quilting and embroidery projects, I needed a quickie! Something I didn’t have to concentrate on too much, especially in this hot weather!
I spotted a kit by the Nutmeg Company, It was an impulse buy a few weeks ago when I clicked onto the site to find a link for a question from one of my readers. Nutmeg Company are a little cross-stitch company based up in the picturesque village of Reeth in Swaledale, one of the higher valleys in the Yorkshire Dales. Anyone who follows the Tour de Yorkshire will have seen the cyclists whizz through the village. Anyway, Nutmeg designs do some rather pretty 3D designs, such as boxes, houses, Christmas trees, all in cross-stitch, I’ve made a couple myself….
I fell for a postcard kit. It’s a pretty view of a typical Swaledale scene. Swaledale is particularly known for it’s flower meadows, I think they get a grant now if they leave their hay meadows a little longer before cutting, just long enough for the flowers to set seed for next year. The meadows are beautiful at this time of year. This particular kit, however, is to raise money for the flood relief fund. Twice over the last couple of winters Reeth has been badly hit by floods. The profits from this kit go to the fund. I felt it was a good cause and I liked the picture.
It was quick and easy to stitch, it’s stitched on cross-stitch paper, which is like a firm, perforated paper, it’s 14 count, just cross-stitch, half cross-stitch and back stitch. I had to get into the habit of putting my needle into my scissor fob at the end of a stitching session as it would bend the paper to leave the needle in it.
It’s designd to be a handmade postcard, glued onto paper or card, I’m tempted to mount it on felt and add a little hanging loop. I think it’s rather pretty and it reminds me of holidays we used to have in my mum’s cottage in Wensleydale, we used to visit an open farm up in Swaledale several times a year, watching lambing, collecting eggs etc, the children loved it.
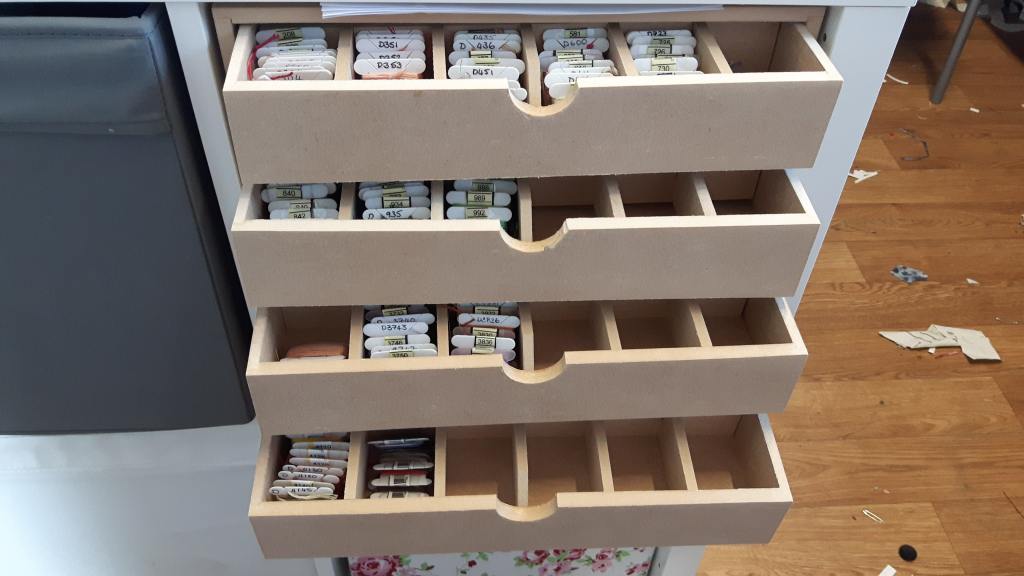
Just as an aside, I’m trying to organise my sewing room a bit better at the moment – I’ve almost managed to get all my fabric in my sewing room!! I was also having problems with an overflowing floss box. I have a lot of DMC threads, all on bobbins, they were in a lovely wooden box my mum had given to me, but it just wasn’t big enough. I spotted Creations by Rod on facebook and then found his website. He makes to order inserts for Ikea cube storage units for craft things, including one for embroidery bobbins or skeins, I ordered the bobbin one. It came pretty quickly considering everything that’s going on at the moment. I love it! Five drawers with dividers in, just the right size for my plastic bobbins. I’m now planning to use my mums box for all my other embroidery thread stash, I just need to bobinate it all!
This SAL is organised by Avis, we share our progress on a project every three weeks, please follow the links to see lots more stitching inspiration…
I just made myself a pair of slippers, I bought a kit at a show last year and they’ve been sitting on my to do pile ever since with my fluffy pair getting more and more shabby – not helped by me nipping up the garden in them!
The kit includes the soles and the pattern, together with the instructions. They’re designed by Gertie Lau of Mushroom Village Crafts and are called Wrap Slippers.
The instructions include how to make a pair from little hexagons too, they look really pretty but as you know I haven’t really got the patience for mini hexagons, so I chose some pretty quilting cottons instead. The first job was to quilt the fabrics, I did a sort of check pattern with the butterflies in the squares for the top and some swirls or wiggles for the soles, I managed to fussy-cut the soles so I had a butterfly on each one.
Each slipper is made from two pieces which then overlap to give the shape. The edges were bound with bias, I happened to have some really pretty bias binding in my stash which was an impulse buy at a show, the colours don’t match perfectly but it does have purple flowers on it which was good enough for me during lockdown!
The instructions were well written and straight forward, the only bit I changed slightly was the size of the bias binding which goes round the sole, once the 1/4″ bias was stitched round the top it was flipped over and hand-stitched underneath, I found it easier with a slightly wider bias, still the same size on top but more to stitch underneath.
When it came to the last stage, stitching the slipper onto the sole I realised I had a bit of an issue, my kit had two left feet!! I couldn’t remember which company I’d bought the kit from so I found the kits on line and messaged the maker. Gertie was very apologetic and popped a right foot in the post straight away. I was a bit concerned as it was an American site I’d found her on, so I wasn’t sure how long it would take, especially at the moment. Luckily they were actually coming from the Midlands here in the UK! My replacement came within days.
To stitch on the sole you first have to make a row of holes round the rim with an awl. The instructions then say glue the slipper on first, I admit I missed that bit off as wanted a bit of leeway if it wasn’t right. At first I really struggled with the stitching. I used a big chenille needle with some top-stitching thread, the slippers are stitched on using a stab-stitch, so you go up and down the same hole of the sole. This is where the difficulty was, trying to get back down the hole, as my needle kept trying to start another one. I then had the idea of using the blunt end of the needle to go through the sole, it worked brilliantly, I just kept flicking between the sharp end to go through the fabric and the blunt end to go through the sole.
I was really chuffed with my slippers, they fit well, they’re comfortable. I showed them to my OH and he said ‘Shouldn’t the flap be the other way round, with the buttons on the outside?”
Oops!
I still really like my slippers, I’ll certainly make another pair when I’ve worn these out.
We’ve had some pretty gusty winds over the last few days – strong enough to bring down some fair size branches on the back lane. I put an extra support next to my standard rose one evening as it was bending alarmingly and I didn’t want to wake up to a stick instead of a lollipop!Luckily everything seems to have survived…
The irises are gorgeous at the moment, the lavender ones are some special ones my mum ordered from France a few years back, they’ve have put on a great display this year. The flowers are huge…
The dark purple iris is one of my favourites, this one is from Thornton Hall gardens, it’s just beautiful. When the sunlight is behind it, it’s violet.
The dark purple iris is in my Amber & Amethyst garden, it’s working out well at the moment as it is right nextdoor to these wonderful lupins with a pretty tangerine orange geum behind.
The pond area is looking very verdant, the hostas are filling out nicely. The big variegated one by the path seems to avoid the attention of the slugs, touch wood it usually still looks great in the autumn. In fact most of the hostas here get little slug damage, the occasional toad we have by the pond must be doing his job. Hubert the heron is rapidly disappearing behind the Solomon’s seal.
At last years Harrogate show I bought a few clematis, I think I might have mixed up the pruning as some are very short, others are tall and just flowering at the top. I think I need a book to note which ones need pruning when! The big white blooms look quite startling against the dark fence.
I’m still plodding my way through the weeds in the front garden, but the big rose bush has come into flower, it’s glorious! It’s about 5′ tall and wide now and it’s covered in creamy white flowers, it smells wonderful as you walk up the drive. I’m going to be brave and try and prune it a little after flowering. I have to confess I’ve never pruned this one as it’s a different habit to my other roses, one flush of flowers early summer, I think it’s called a Scottish rose – rosa spinosissima .
We’ve got a bumble bee nest under our eaves, usually this wouldn’t be a problem, however we need our bargeboards and soffits replacing, the gentleman who came to give us a quote didn’t look too convinced when I said I’m not getting rid of it as they don’t stay for long anyway. From what I could see (a white bum!) they are tree bumblebees, their nests usually only survive two to three months. We need all the bumble bees we can get!
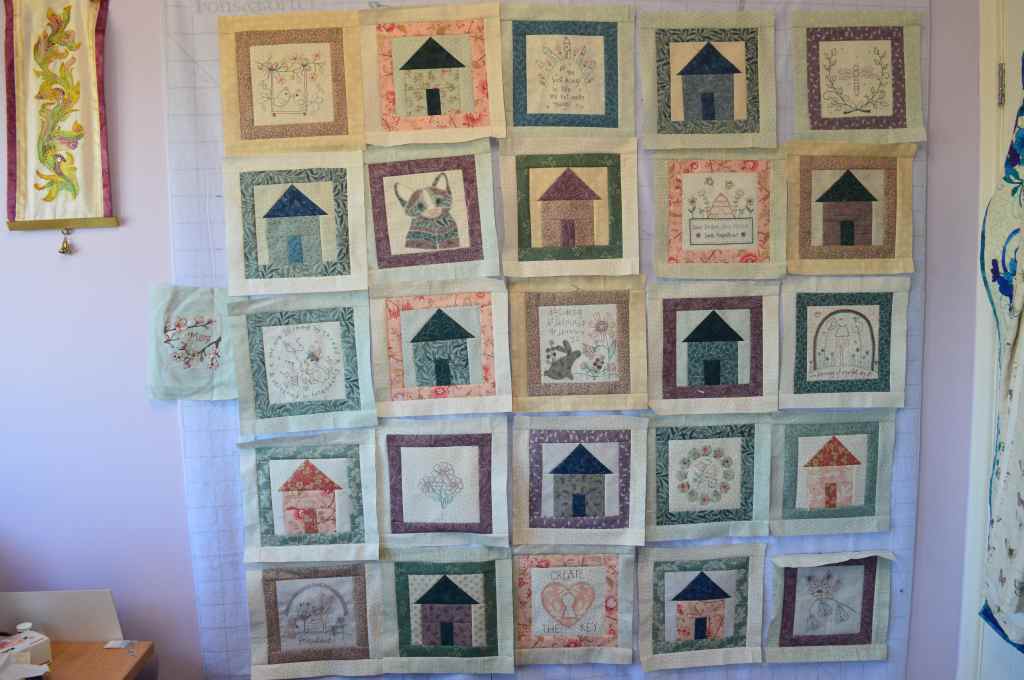
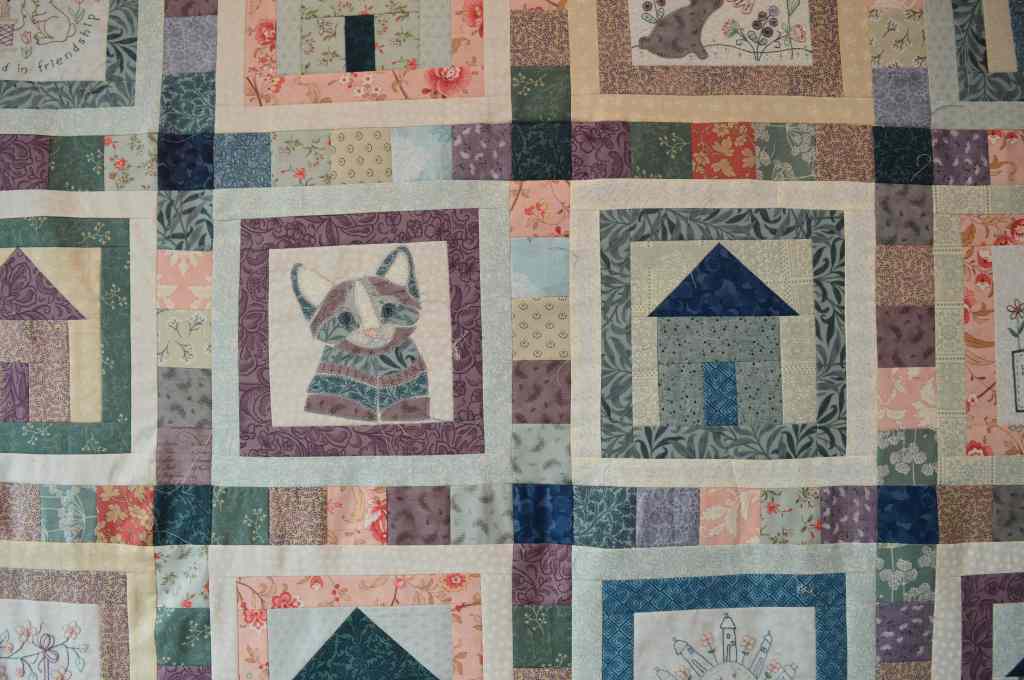
I’m feeling well chuffed, I’ve just finished the top of my Staying Home quilt and it’s turned out better than I ever hoped for! This is the quilt which started with the free quilt block designs organised by Natalie of the Birdhouse.Sixteen quilters in Australia each gave a free design to help us through the lockdown, they were mainly embroidered, I made thirteen of them. Here’s some of my favourite ones…
I had decided at the start to use fabrics left over from my Coming Home quilt to make it, a scrappy quilt of sorts! I had rather over-bought for the Coming Home quilt so I was pretty sure I would have enough. In the end I just added a couple of fat quarters of a dark green and a dark blue, just to help keep the colours balanced-ish. I chose colours to embroider with which would co-ordinate with the fabric.
I followed Natalie’s idea for sashing the blocks with a 1″ coloured border followed by a 1″ neutral border with 2″ scrappy squares in between. However, I wanted more of a throw size quilt so I also made twelve little house blocks too (as I said, I had rather a lot of fabric left!!). These would then alternate with the embroidered blocks to make a 5×5 block quilt. Once I had everything sashed I had a play on my design wall, trying to space colours fairly evenly without getting too het up about it. Even at this point I wasn’t sure if the idea of the house blocks was going to work…
I then started making all the 2″ square sashing. I needed sixty lengths of five squares plus the cornerstones. I cut 2.5″ strips and sewed them together in twos and threes, cutting them thern into the required width. I could then mix and match a bit so I didn’t have too many strips the same. I used the very dark fabrics for the cornerstones, arranging them in a pattern to give a little bit of order.
As soon as I started stitching the sashing onto the blocks, I knew it was going to work, I loved the effect of the scrappy sashing…
Once I got organised, it didn’t take too long to put it all together, I love it! It measures 62″ square, just a nice size for a throw and a nice size for me to quilt at home. I just need to check if I have enough batting and then I can finish it, I even have enough fabric left for the backing!
It’s taken about six weeks to make, not bad considering a lot of that was hand embroidering the blocks. Natalie and all the designers involved deserve a huge thank you, as I said at the beginning, I’m well chuffed with it, I keep looking at it on my design wall and smiling to myself!
If you fancy stitching these blocks, have a look on facebook for the Love & Hugs from Australia SAL page, all the patterns and links are still there.