The Cottage Garden Quilt HQAL

Happy dance time 🙂

Sometimes the nearer I get to a finish, the more I stitch. I’ve worked a fair bit on my cottage garden quilt over the last three weeks. When I last shared my progress I was half way through the middle row with another block to embroider and the ivy leaves to finish, together with all the fill in squares…

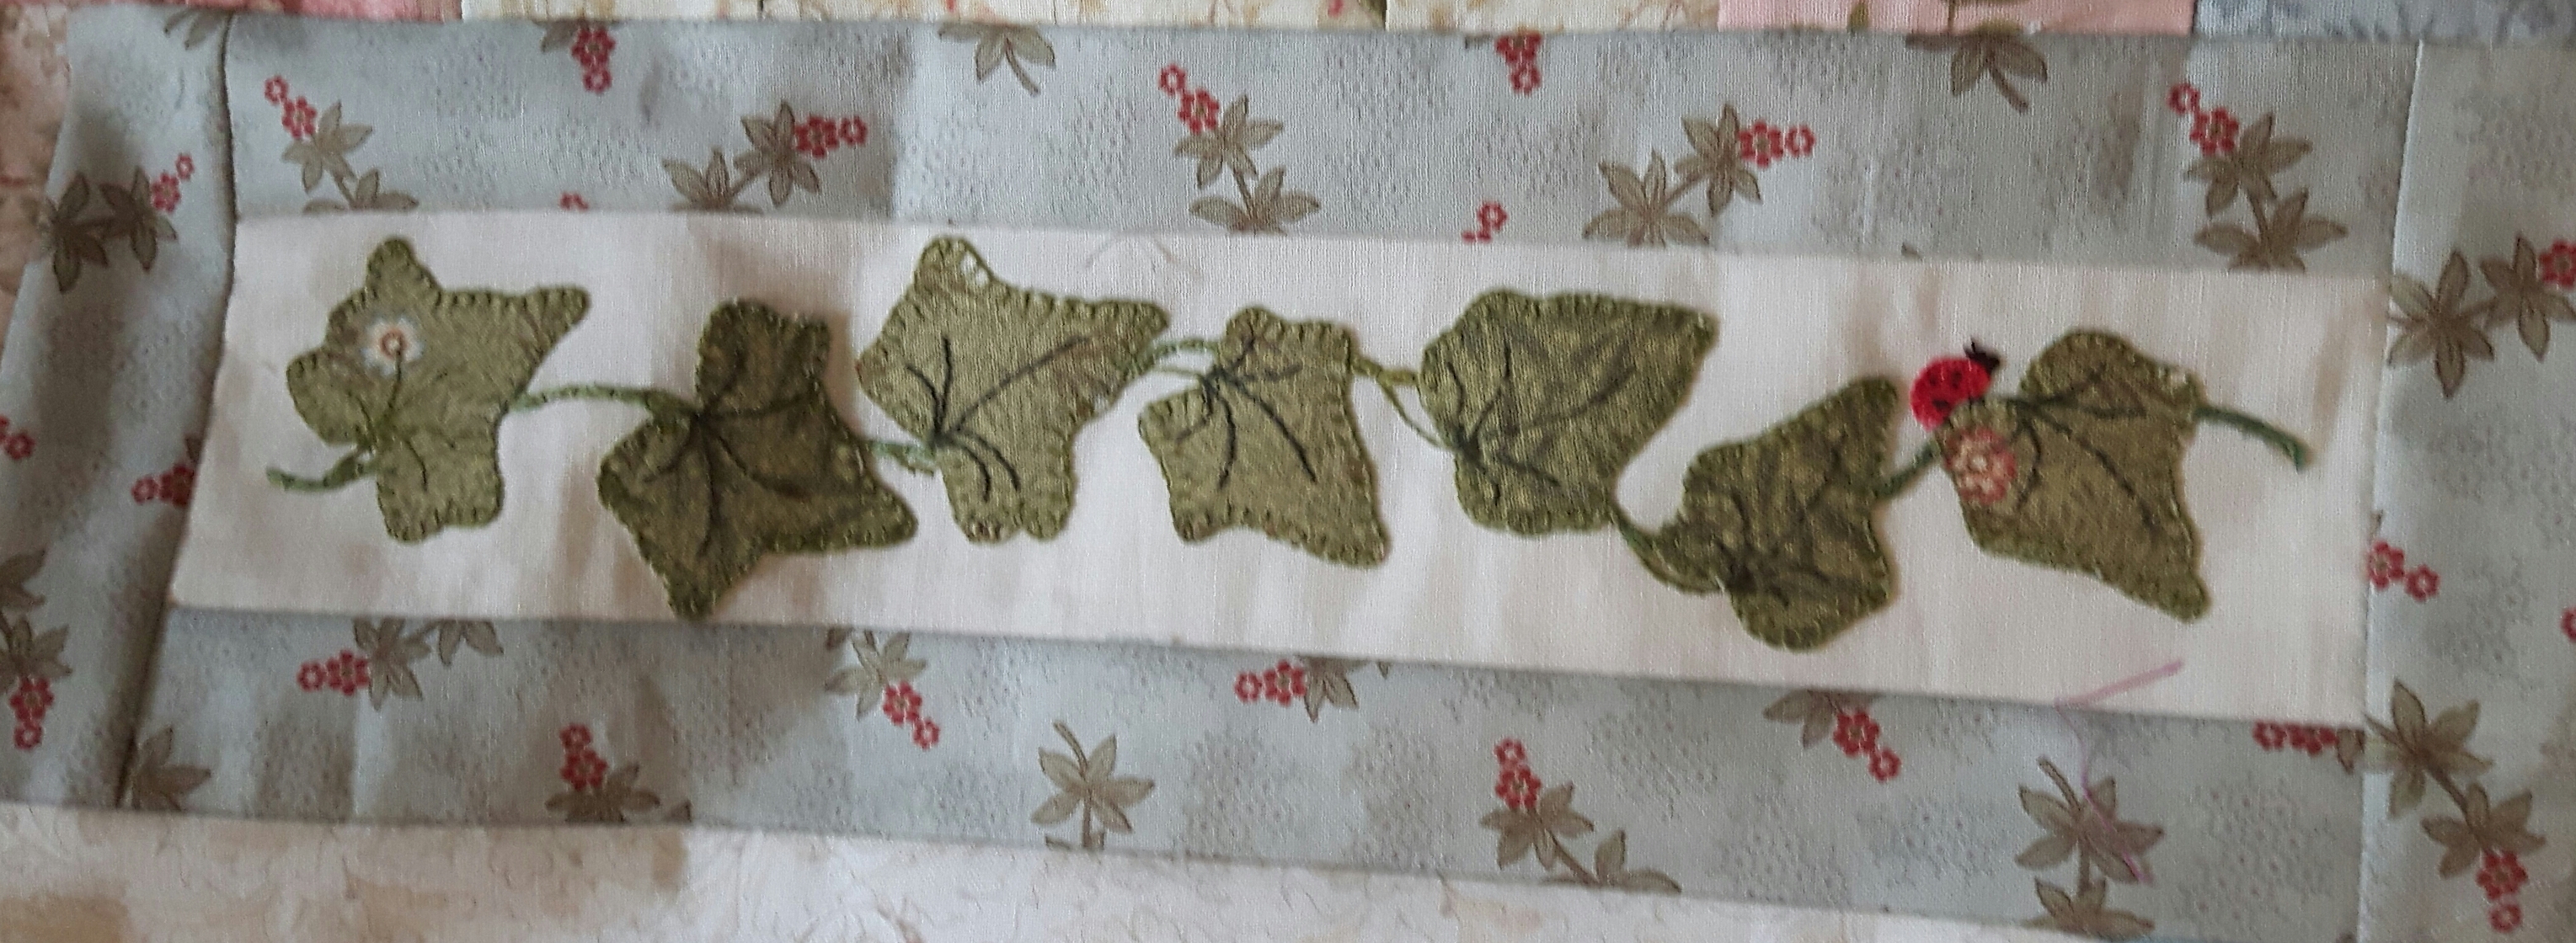
The ivy block didn’t take long to finish at all, just a bit more backstitching to make the veins. In case you’re wondering, the main stem of the ivy is done with a long couched thread first, the ivy leaves are then bondawebbed along it. I love the little ladybird!

It’s partner block is a sweet one with daisy like flowers and bumble bees. I spent ages auditioning various fabrics for the flowers – I’ve more than another set cut out! I finally decided on the dark red with a slightly lighter red, two shades amongst seven flowers. The bees are made with yellow fabric and the stripes embroidered on. I was trying to work out for a while which bit didn’t look quite right and I think it’s that bees have black heads, and probably wider stipes, but they look cute, it’s called artistic license!

I sashed both blocks in a green fabric to help with the general mix of fabrics, I’ve found this fabric very useful in this quilt as it includes both sage green and olive green, together with a bit of red. I also swopped the two blocks round from the original layout as I felt I needed the red flowers on the right side to balance the quilt.

With these two blocks made I could crack on and piece the row together. It all went together beautifully and I was pleased to see the little squares helped to tone down the red churn square blocks.

The next big job was to join the rows together. I started pinning the top to the middle and then had a major panic…it was way out, the top and the bottom were considerably narrower than the middle, not just a fudgeable smidge out!

I double checked all my measurements on the middle row, well that was the odd one out wasn’t it! They were all correct and the finished width was right from my calculations…I then started looking at the top and bottom rows. I eventually realised I had missed off a whole row of squares on the other side of the pinwheels and thus they were over 2″ narrower! I had made the same mistake top and bottom!

I could have just added them somewhere else but that would have unbalanced the whole quilt. It was time to get acquainted with my seam ripper! I also realised the heart log cabin blocks and block of eight squares were the wrong way round too and to leave it would have meant lots of squares on one side and few on the other. That wasn’t as big a job as it sounds as I unpicked the heart and squares as one unit and swopped top to bottom.

I finally stitched it together and the extra work was worth it…

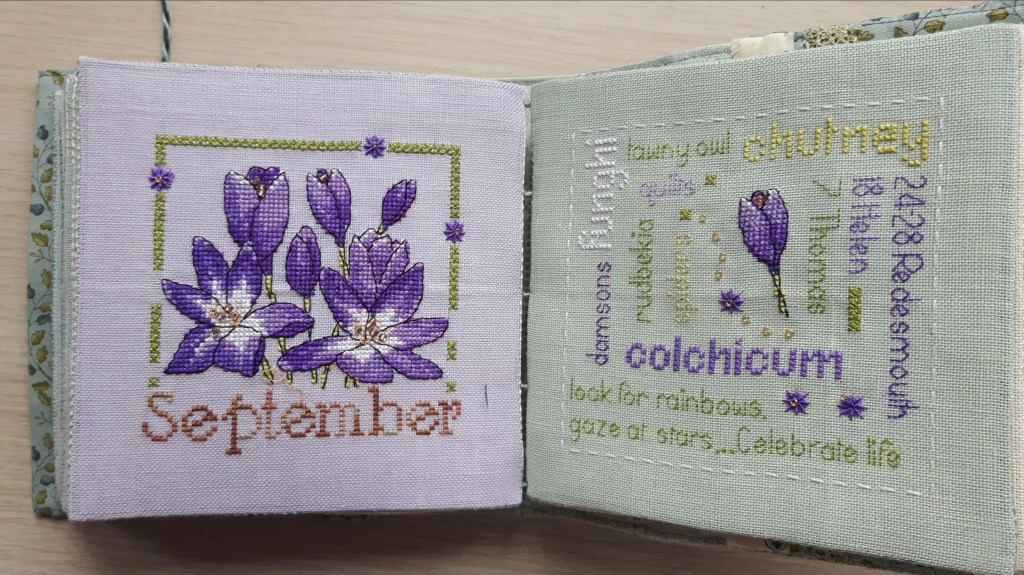
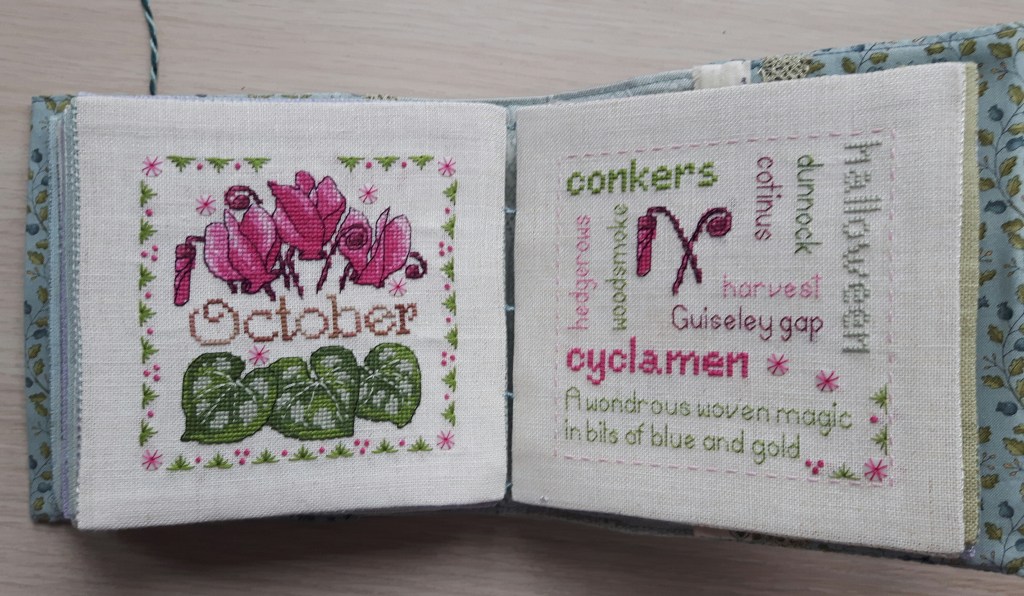
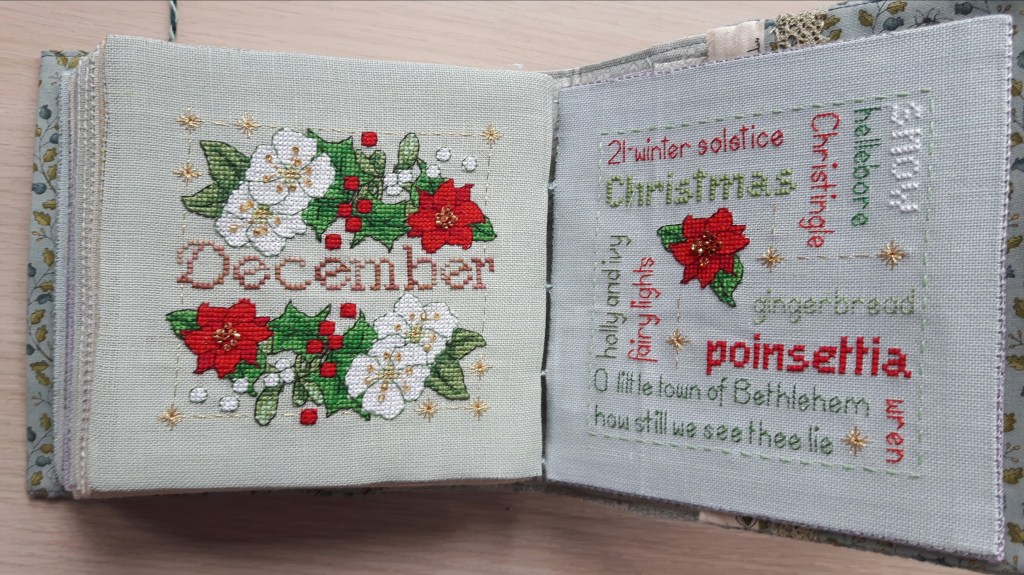
Next task was to embroider four little cornerstones for the border. I puzzled for a while which fabric to base these on as all the other embroidered blocks have been on creamy whites, but I could see with the light fabric I was using for my inner border, these would just merge in. I tried various ones which had a fair bit of plain in, but nothing worked. In the end I introduced a new fabric to the quilt, not ideal at this late stage but I think it works. I used a pale pink Kona solid which is just the right shade of pink. These are 2 1/2″ squares so you can imagine how small the cherry on the cake was! I love the detail on these blocks, though if your wondering, the red splodge of french knots on the label is meant to be a strawberry!

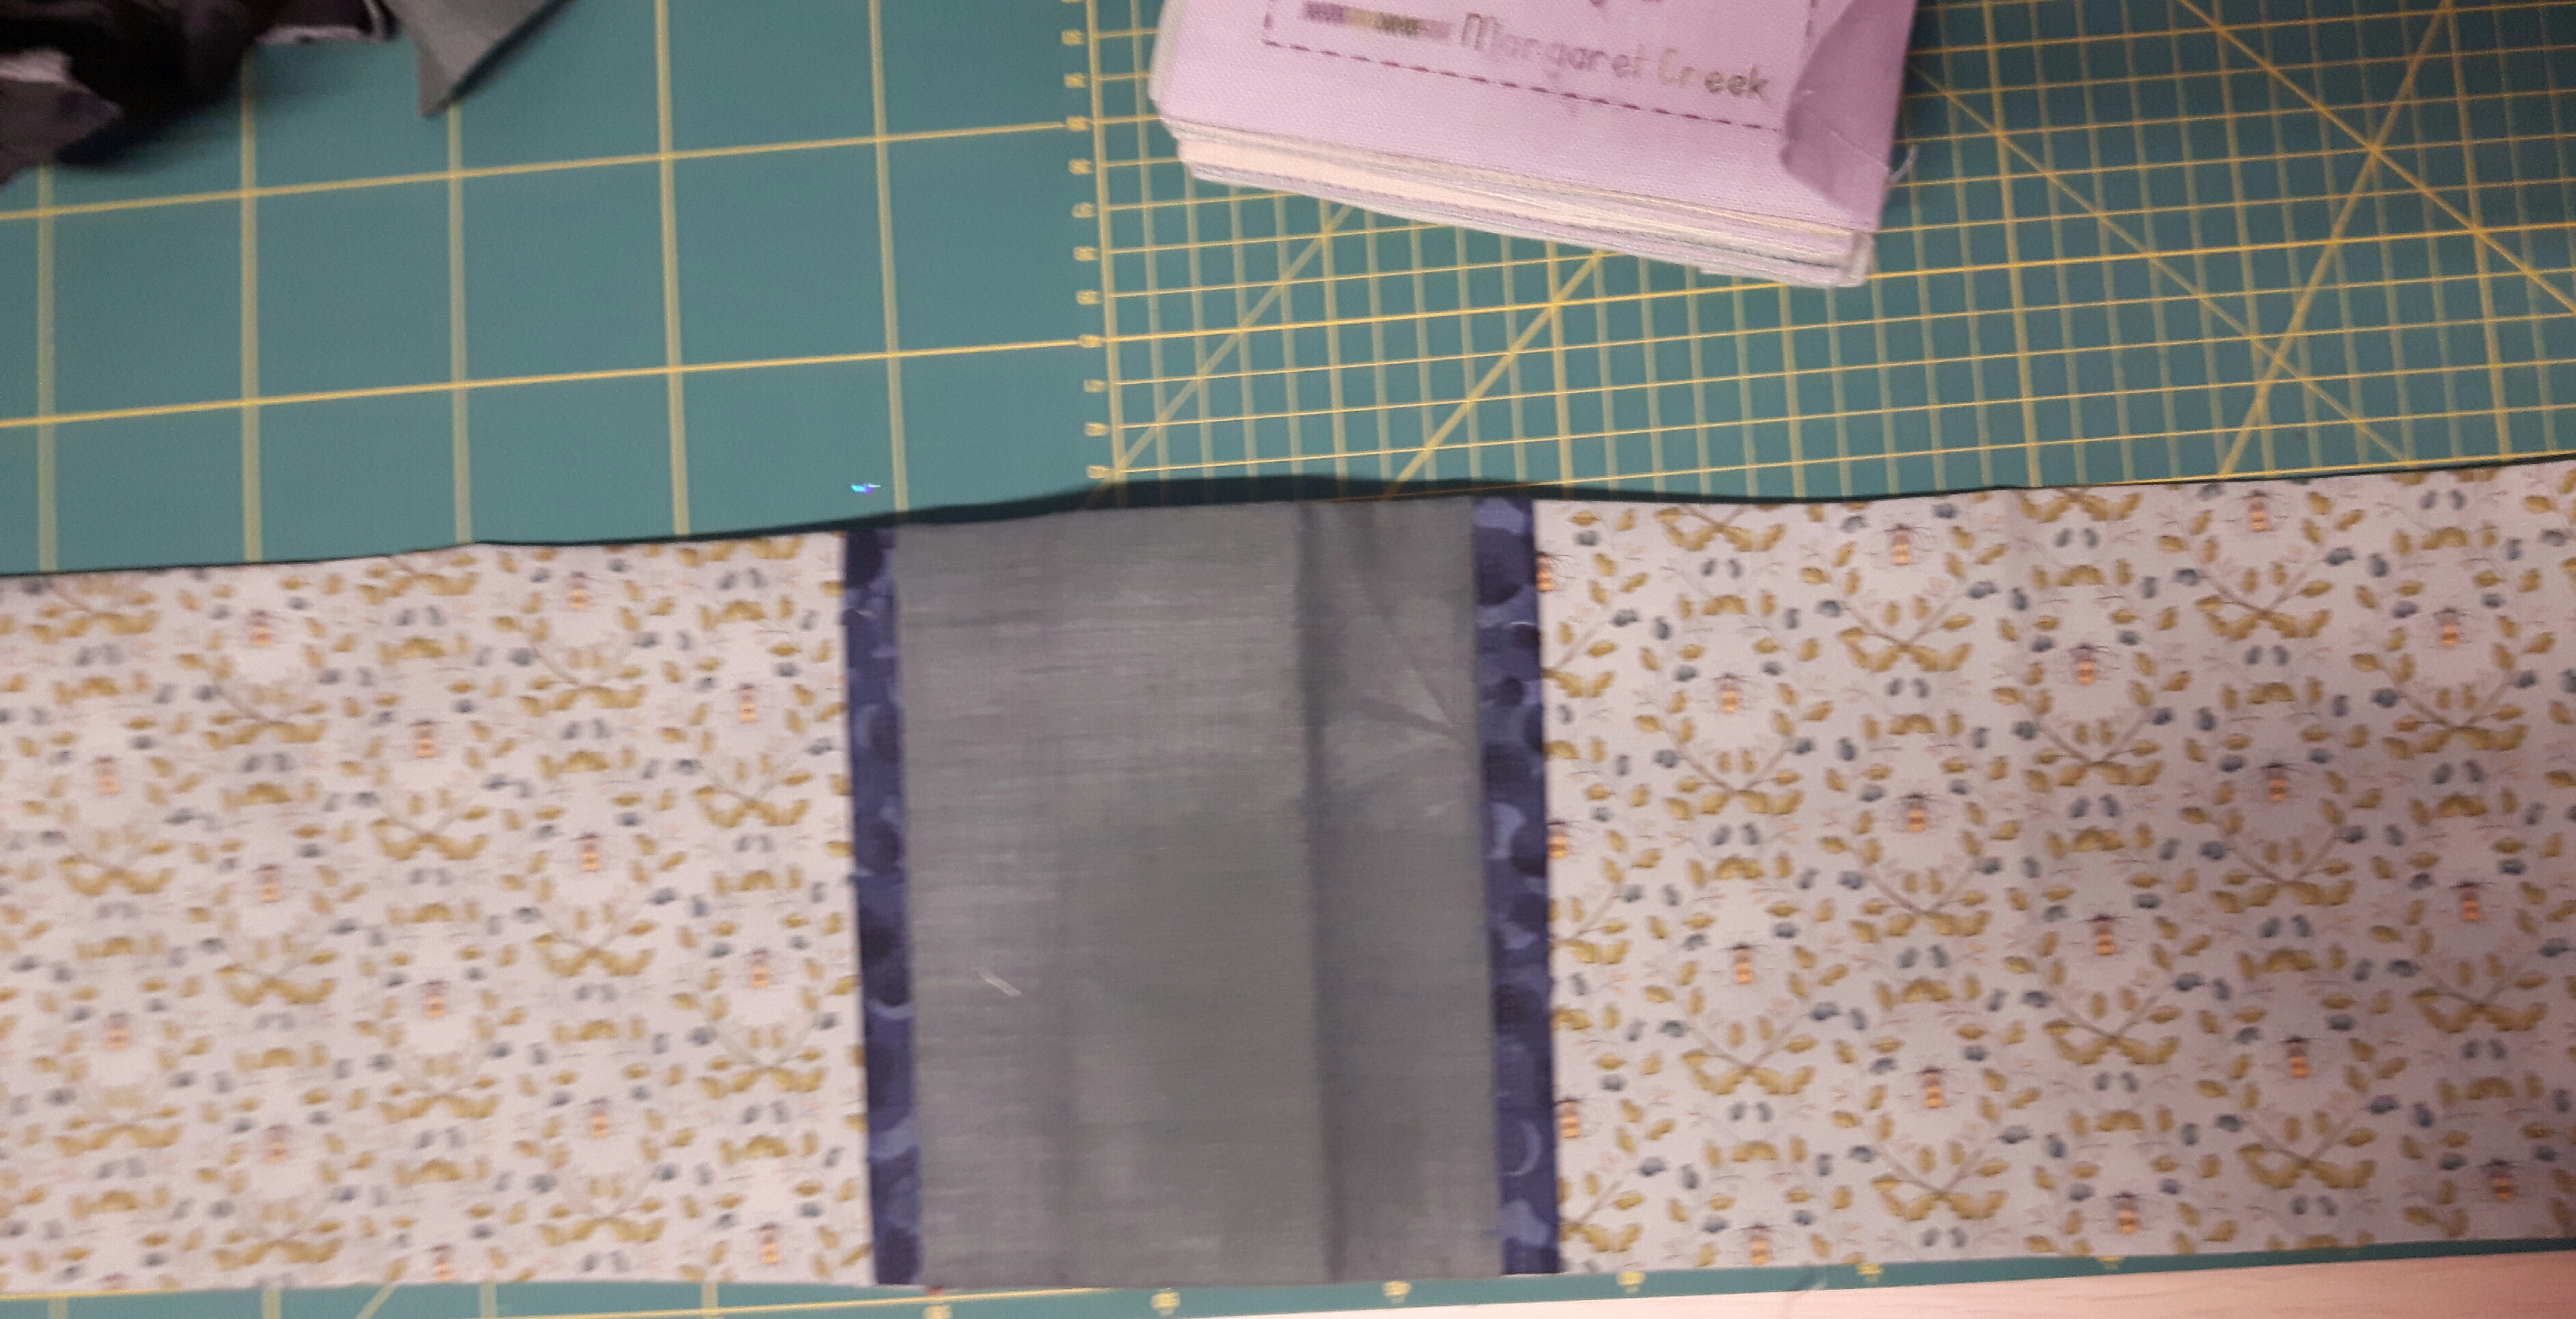
Having stitched these I could sew the inner border with these on the corners and then start cutting out 100 rectangles for the piano key border! I was a bit limited by what fabrics I had left, the only one I didn’t include was the dark red as I felt it would stand out too much, though I am thinking of including it in a scrappy binding with the two darker olive greens. I divided the fabric rectangles into four piles so I had a similar mix on each side then laid them out on my cutting table.

By chance the first strip of 26 worked perfectly when I put it next to a side, none of then were opposite the same fabric square in the quilt. The second side I unpicked and swopped a couple of areas. The third and four sides I arranged on my table, sewed into lengths of four and then played with them til I was happy.

So my quilt top was complete…

I love it, I keep looking at it and grinning! I have enjoyed making this quilt all the way along, from the embroidery to the pieced blocks. The design is by Kathryn Whittingham, it’s in a gorgeous book called The Cottage Garden Quilt which is available from her website, Patchwork Katy, she ships overseas now too. I’ve got her Seaside Quilt to do next but first I need to quilt this beauty!

Having rashly said I’m never going to hand quilt a quilt again after finishing my huge Down the Rabbit Hole quilt, I clearly have a short memory as I’ve decided this quilt deserves to be hand-quilted. It’s only about 60″ square too so a much more manageable size. I’ve already made a backing (with a piano key strip down the middle) and it’s all sandwiched. I’m just waiting for some threads to arrive, mulling over different ways of quilting it.

Hand Quilt Along Links

This Hand Quilt Along is an opportunity for hand quilters and piecers to share and motivate one another. We post every three weeks, to show our progress and encourage one another.  If you have a hand quilting project and would like to join our group contact Kathy at the link below.

KathyMargaretDebNanetteSharonKarrinGretchenDaisyConnieMonica and Sherrie

I’ll also be linking up with Kathy’s Quilts for Slow Stitching Sunday, please follow the link for more hand-stitched inspiration.

.

Posted in embroidery, Quilt-a-long, Quilting, Stitch-a-long | Tagged , , , | 28 Comments

Catbells coming into view

I’ve just caught up with the free Peppermint Purple SAL, it’s a blackwork one and a new pattern is released every Wednesday via facebook for either a square or a rectangle in the design. This is where I was last time I showed you…

Rather than following the designers colours, I’m hoping mine will turn into a blackwork picture of Catbells in the Lake District. It’s interesting seeing how the density of the pattern changes the colour. I’ve stitched another two blocks,giving Catbells a bit more shape…

The top blue square is actually a very similar shade to the one next to it, but being a lot more dense it looks considerably darker. The bottom one is more of an olive green, I’m doing the main body of Catbells in purples, olive greens and brown/amber. Along the bottom will be fresher greens where Manesty Woods is. Then I have to decide how to stitch the reflection in Derwentwater, but I’ve a few months to ponder that conundrum. This is where I am now…

Hopefully with a few more greens and browns that square won’t stick out like a sore thumb as much!

The squares are only 14 stitches each way, designed to be one inch square on 14 count aida, mine are slightly smaller as I’m using 32 count linen. Being little they don’t take long, but I do have to concentrate!

Posted in embroidery, Stitch-a-long | Tagged , , | 8 Comments

Quilted jacket

A couple of years ago I went to one of the Dewsbury sewing meetups organised by Ali (of GBSB fame!) These are basically one big fabric shopping spree, Dewsbury is pretty good for fabric shops, I usually go saying I really don’t need any more fabric…mmm

In Lucky Fashions I spotted this quilted, embroidered cotton, it feels so soft and I loved the embroidery on it. No idea what I was going to make with it, I just couldn’t leave it behind!

Quilted fabric takes up quite a bit of space and as I’m trying to organise my stash better it made sense to sew the bulky items first. I decided to make a quilted jacket, more cardigan style than going out in the cold style.

I looked through my patterns and chose Simplicity 8265, a simply styled jacket. I didn’t have enough fabric to be too fussy about pattern placement, so I was pretty lucky that the front and back patterns look good. I missed off the centre back seam, it was only very slightly shaped anyway.

It went together pretty easily, I liked the darts coming down the front from the neckline, it just gives a gentle bit of shaping. The pattern had a round neckline but at first try on it irritated my neck too much so I cut it into a V instead, with hindsight a lower V would have been better but I was limited by the size of the facing which was already cut out.

I made it pretty simply, over-locking the seams and raw edges and the using herringbone stitch to catch things like the facings and the hems down. It was meant to be a longer line jacket, but having tried it on I prefered more my usual length – it was in danger of looking like a dressing gown otherwise!

It has side pockets, always a bonus and one useful tip from the pattern – to save the pockets from hanging down they recommend stitching a short piece of tape from the edge of the pocket to the front facing. I didn’t need to as with my shorter length the pockets were caught inn the hem, but I thought it was worth remembering.

Apologies but all my photos are going to be on Florence until I get my hair done!! With various lockdowns I haven’t had it cut since August!! I’m hoping my daughter will do a homemade cut shortly!

I think this will be more of a going round to friends house for dinner sort of cardigan, when we’re finally allowed to do that again!

Posted in Dressmaking, Serendipity | Tagged , , | 15 Comments

Stitch Wheel SAL

Yesterday I caught up with my Stitch Wheel SAL. This is the stitch-a-long by Cathy Reavy from Threads, she’s releasing videos of different stitches every Thursday. This week there were three new stitches, this was my wheel before…

This second circle is all different ways of stitching leaves, so the first two were open and closed fly stitch. This time we stitched raised fishbone, raised close herringbone and cretan stitch…

It was interesting stitching these three, cretan stitch on the right, to me seems to be the same as feather stitch, just with uneven arms! I used a variegated perle thread for that one, I’ve only got two skeins of this type of thread, I think it was an impulse buy at Delicate Stitches in London which has a huge range of fancy embroidery threads. I think next time I go I’ll be buying a lot more! The other two were stitched with DMC variegated threads. These are raised because there’s so much thread in them!! The two leaves of fishbone in particular took more thread than all those little purple/green ones!

We’ve three more stitches to go to complete this circle.

I’m enjoying this SAL and learning new stitches along the way. Her videos are nice and clear, her hand only occasionally gets in the way of our view and she shows the left-hand way too. I also like the way we are stitching something, not just a row of stitches, stitching a leaf puts it in context of how we can use it.

I’m planning to hang this in a hoop in my sewing room, I’m pleased with how the colours are working out so far, I’ve just selected a bag of purples, greens and ambers. I just need to work out a way of easily identifying which stitch is which, maybe a map on the back will work.

Posted in embroidery, Serendipity, Stitch-a-long | Tagged , , | 9 Comments

February Faby Fest

I try and have a seasonal display of my cross-stitch smalls, changing them each month. The obvious theme for February is Valentines Day, but we have our wedding anniversary in March, so I tend to have the lovey-dovie ones out then. Last year I decided to display all my Faby Reilly smalls and have a Faby Fest for February instead. I’m doing the same this year, so here’s just a few of my Faby Reilly makes…

…and then of course there’s my Anthea book of Days, here’s February’s entry…

So I’ve put together a little display, missing out the ones which were too Christmassy and also my lovely Lizzie stitching wallet as I’ve clearly put it somewhere very safe…so safe I can’t find it! The only one that isn’t one of Faby’s designs is the February one with ducks on.

Faby has a large range of beautiful cross-stitch designs, mainly flowers but other themes too, if you like her style just follow the link above to her website.

Posted in cross-stitch, embroidery, Serendipity, Smalls of the Month | Tagged , | 4 Comments

Stitching 4 the Soul SAL

I was late to the party with this SAL, it was organised by Anne Brooke during the first lock down, she’s now doing a 52 week one of little embroideries to go on a luggage tag. I managed to resist that one! Last time I showed this project I’d just done the complicated one with circles…

Since then I’ve finished the penultimate pages and I’ve just started the last pair…

There was quite a lot of stitching for these two pages, there’s probably a day and a half’s work here. Anne sets it out (on YouTube) in two stages, I actually stitched them the opposite way round as I found it easier. She’s more prescriptive with these pages than usual, though obviously you can do your own thing if you want. The first stage required three fabrics and three threads to make a background and two pockets. I made my pockets second when I knew how big they needed to be…

The first pocket was for a mini book, made by concertinaing a length of calico 10cm by 30cm into 6 pages, room for a mini piece of work on each one. The first one was three rectangles and three squares, then five buttons and so on. Many are a reflection of previous pages. This is my finished book…

I’m pretty pleased with my mini book, there’s even a mini pocket with an even smaller tag! I’m particularly pleased with the couched one in the middle, I went all wavy 🙂

The second pocket was for a heart, I’ve kept mine pretty simple as I liked the fabric too much to cover it up.

For the pockets I used the fabric patterns more than adding embroidery. The monograms are from the sample book I’ve used throughout the book, I used the piece with the M on as background and covered up the other three letters on the fabric with the pocket and patches. I did a bit of embroidery, with fly stitch, french knots and blanket stitch.

The second pocket needed to be a good size as it was for the heart. I decided to use this beautiful embroidered silk from the sample book, again I liked the fabric too much to embellish it so I just stitched a length of lace along the top of the pocket. I was a bit stuck what to do on the top half, I did the running stitch which Anne had used all over her pages to add texture. I was happy with the lace flower but puzzled for a while what to put on the left hand side. I tried three buttons, different sizes and colours, but nothing jumped out. I looked in my ‘labels’ drawer to see if I had anything suitable, no labels but I did find a Suffolk puff left over from an earlier page, no idea why it was in there but it worked perfectly!

With these two pages stitched I watched the video for the final pages. This includes an ‘index’ page and a page with a few words embroidered on. Anne used the quote ‘My soul is fed with needle and thread’ She keeps that page pretty simple with words embroidered onto the corner of an old white linen cloth.

I chose a phrase which I already have a version of in my sewing room. I decided to use evenweave linen which has been hand dyed in subtle shades of grey together with a variegated embroidery thread. I found a few different alphabets on pinterest and started stitching…

I’ll probably titivate this with buttons and bits of lace, but it’s a start. Just have to do my index and then the covers and another project is complete!

This stitch-a-long is organised by Avis from Stitching by the Sea. We post our progress on our chosen project every three weeks, just long enough to keep us motivated. Please follow the links to see what everyone else is stitching.

AvisClaireGunCaroleSueConstanzeChristinaKathyMargaretCindyHeidiJackieSunny,  MeganDeborahMary MargaretReneeCarmelaSharonDaisyAnneConnieAJJennyLauraCathieLindaHelen

Posted in cross-stitch, embroidery, Stitch-a-long, Textile Books | Tagged , , | 18 Comments

Anthea Book of Days

It’s happy dance time! Yesterday I finished my Anthea Book of Days and I’m very happy with it!

I started this project last January when Faby Reilly started her Anthea Calendar stitch-a-long, each month she released a beautiful cross-stitch of a seasonal flower. I decided to make mine into a book rather than a big picture or twelve little ones.

A book of twelve designs would be a bit thin I thought, so I decided to make a wordplay for each month. The idea was that it would include events that happened in the month – we had a wedding and a big holiday to include – flowers and birds in my garden, a suitable poem or piece of prose…then covid struck!

Events went out of the window and we stayed at home…and I sewed! I tried hard not to make it a covid diary, but when I was short of things to embroider as we weren’t ‘doing’ anything, I started to stitch what the month meant to me instead. Quotes became more poignant as my mother died and then my mother-in-law. A visit to the hairdressers became an event! I have just written in a notebook to tuck in the back sleeve about each month and what I included, in 20 years time will we remember who Captain Tom was? He became a national treasure after raising £34 million for the NHS by walking 100 laps round his garden for his 100th birthday, buoying up the countries spirits in a difficult time. He sadly died this week, he was an inspiration to us all.

Having stitched all my pages, I stitched them altogether and created a front and back page. I decided on a name for my book, Anthea means flower or blossom in Greek, a book of days journal is a record of the minutiae of life…

I learned a way of binding pages together…

…and I made a cover for my book…

So it is finished, fourteen months work, I hope you like it as much as I do…

I’m linking up with Kathy’s Quilts on Sunday for Slow Stitching Sunday, please follow the link for lots of stitched inspiration.

Posted in cross-stitch, embroidery, Serendipity, Stitch-a-long, Textile Books | Tagged , , , , | 35 Comments

Covering my Book of Days

After working out how to bind my fabric book, the next stage was to make a cover. Having found how attractive the binding can be, another time I might make the covers the same way and just bind the whole book together, but that will wait for another project.

Please note that this is a description of how I made this one, mistakes and all, it’s not instructions of how to do it as such!!

Making the covers is basically a measuring job, working out just how long it needs to be. I’ve included my measurements to just to try and illustrate it.

I measured the book by wrapping the tape measure round it, allowing a little extra at the edges, including front, back and spine, plus of course, a bit for seam allowances. (for this book, that was 15″) I then added extra on for a fold over on each side, I added 9″ in total, so 4.5″ each side as I wanted it to cover the flange I had left myself which was a bit on the skimpy side!!) Width is obviously top to bottom with a bit extra and the seam allowance. (Piece needed was therefore 24″ x 7″)

I chose to make the outside from three different fabrics, a plain one around the spine, a narrow fold in dark blue and a bee fabric for the rest. As soon as I saw this fabric was called ‘The Earth Laughs in Flowers’ I had to use it! The maths again was a matter of working out how big I wanted the spine, adding seam allowances again. (My spine fabric was cut at 5.5″ and the bee fabric was cut with a bit extra at 10.5″ twice) The tuck was just a strip cut at 1.5″, folded in half and stitched in the seam.

I stitched the outer cover together then cut a piece of fabric the same size for the lining. I stitched these together leaving one short side unstitched. I turned it and pressed it.

I used Bosal as a stiffener. This is like a super thick vilene which is either adhesive on one or both sides. I like it for textile books as it’s very firm but does have that flexibility which I think blends well with fabric pages. It also takes a fold reasonably well. I cut the bosal to the finished size of the cover (14.25 x 6.5″) I could then slide it inside my cover, checking the spine was in the right place before ironing it to activate the adhesive. I then slip-stitched the end closed and edge stitched right round the cover on my machine.

I had left myself a fairly small flange front and back to stitch the pages to the cover, not through choice, but my fabric stash of 32 count linen was pretty depleted! You may also remember that I had a slip up with the scissors when trimming the front page. Of course this ended up in a crucial place!

Having bound the book so it would lie flat beautifully, I also realised that if I stitched right next to the page, the pages would lose this feature as the spine of the cover wasn’t flexible. I decided to leave a centimetre for movement, which of course ended up right where the accidental snip was! I did some fudging! I used a strip of bondaweb which stopped 1cm from the pages! It gave me the support in the middle which I couldn’t easily stitch. I stitched down the flap over the edge of the flange and slip-stitched the top and bottom edges of the flap to the front.

The snip was still concerning me as it was clearly going to be a weak spot. Another fudge required! I cut a little square of linen, used bondaweb to stick it over the offending snip a bit like a sticky plaster…then stitched a strip of lace over the top!!

The back page was a bit simpler. I decided to extend the flange with a strip of the lining fabric as I wanted to use the pocket formed by the flap at the back. Lesson learned here, if you’re using this method, make your flanges big enough! I used bondaweb again to give me that 1cm gap then I could just stitch the extended flange down and slip stitch the flap at the sides.

I blame Anne Brooke of the Stitching 4 the Soul Book for the next bit!!

I noticed the selvedge on the bee fabric with the name of the fabric and the colour spots, I decided to include it, so I stitched it onto the inside of the back cover with another strip of lace to cover the raw edge!

All that was left was the finishing touches. I do like tied books, so I found a pretty button, stitched it to the front with a length of braid I made from two DMC threads. I felt it needed a title on the front, so I embroidered Anthea on a scrap of linen, frayed the edges and used bondaweb to stick it on.

All these posts explaining how I’ve made my book have been linked together on the page above called Textile Books. If anything doesn’t make sense, please ask!

Now I’m sure many of you are hoping for the big reveal, the happy dance photos, well I think this post is long enough so I promise I will post my finished Book of Days tomorrow!

Posted in embroidery, Stitch-a-long, Textile Books | Tagged , , , | 8 Comments

Stitch Wheel SAL

Over the weekend I’ve managed to catch up with the Stitch Wheel SAL. This is a stitch-a-long on YouTube organised by Cathy Reavy of Threads. Every Thursday she is releasing a video or two of a different stitch to stitch on our wheel. By the end there will be over fifty stitches. This was my wheel when I last shared it…

I’d stitched the outlines of the wheel, together with the first two stitches, french knots and pistil stitch.

The first ring was concentrating on knots, so there’s colonial knots, which are very similar to french knots, bullion knots and a rose made from bullion knots. Some stitches I already knew, but it was nice to get some practise and see different uses for them, others are new to me.

Cast-on stitch was sort of both really in that I had done something similar when dress-making, making a thread bar for a hook, Cathy made the knots on the needle and then pulled the thread through. Drizzle stitch was completely new and fun, it makes like an upright bullion bar! The two lines are palestrina stitch and coral knot.

The next circle is different ways to stitch a leaf. So far we’ve used closed fly stitch and open fly stitch. I like the way Cathy is teaching us new stitches in context of what you can use them for, rather than just samples of stitches. I used a variegated DMC thread for the closed fly stitch on the left and a variegated perle thread for the open fly stitch.

Cathy starts each video showing us samples of where she has used the stitch in her own embroideries, the demonstrations are clear and she also shows them stitched left-handed.

I’m stitching mine in mainly shades of green and purple as it’s going to hang on my sewing room wall when I’ve finished.

Posted in embroidery, Stitch-a-long | Tagged , , | 9 Comments

Binding the Book of Days

Having finally stitched all my pages for my Book of days, the next task was to bind them together.

I’ve been pondering for a few days how to bind my Book of Days. I’ve never done bookbinding, when I made my Stitchbook a couple of years ago I had embroidered the pages as double page spreads, so it was fairly straight forward to just whip-stitch the pages together.

This time the pages were individual squares, so it wasn’t so easy. I was also concerned that due to the folding at the corners, the pages were thinner in the middle than at the corners, I didn’t want the spine to have an hourglass figure!

I searched on pinterest for binding textile books, but most images were of paper pages with a fabric cover. I did however come across the term coptic stitching. I did a bit more searching on my computer for information on coptic stitching. It seems to be a traditional stitch for binding paper books, creating a sort of twisted chain stitch on the spine, which can be pretty decorative. The problem was that all the instructions involved a long stitch down the centre of a fold of paper, I didn’t have the equivalent of a centre fold.

I decided to do my version of the coptic stitch, I’m calling it the Coptic Creek stitch!!! I took photos at the various stages of the stitch so if anyone is in a similar predicament, this is how I did it…

I divided the spine into 4 and marked the 5 points with a pin. I used a perle thread, I wanted something stronger than DMC and I had the perfect colour on a reel of Anchor perle. I used a double thread for extra strength. Having secured at the back, the first pair of pages stitching was a bit of a fudge but I then got a pattern;

I stitched through the edge of the next page, trying to catch a couple of threads of linen on each side, not just the whip-stitch…

I then looped the thread under the stitch TWO pages before…

Before pulling it all the way through I took the needle through the loop of thread, making something a bit like a twisted chain, I tried to always loop the same way…

I then pulled the ‘knot’ neatly into place and carried on to the next stitch…

I did five rows in total, I found it easier in the middle rows to have a marker pin at the other side too to aim for. I didn’t pull the middle ones as firmly as the end rows either so it would sit flat. At one point I was considering putting beads as spacers in the three middle rows, but I decided I was over-complicating things!

The book feels quite fluid at the moment, which I quite like, the pages are not tightly stitched together. It also lies open flat with a neat row of knots just visible…

True Coptic stitch is designed to be visible, if I’d made my front and back cover as separate squares I could have bound it altogether like this. However I’m planning to make a wrap around cover, so watch this space!

I’ve linked all the posts about the making of this book on the page above called Fabric Books.

Posted in cross-stitch, embroidery, Serendipity, Textile Books | Tagged , , , , | 12 Comments