Pretty in Pink

A couple of months back my two ready made granddaughters asked me to make them each a dress. Of course I was delighted to but as it was the first item of clothing I’d made for them I did want it to be right. They recently reminded me and asked when they would be ready, I rashly promised them for Easter, not realising at the time that Easter was only two weeks off!

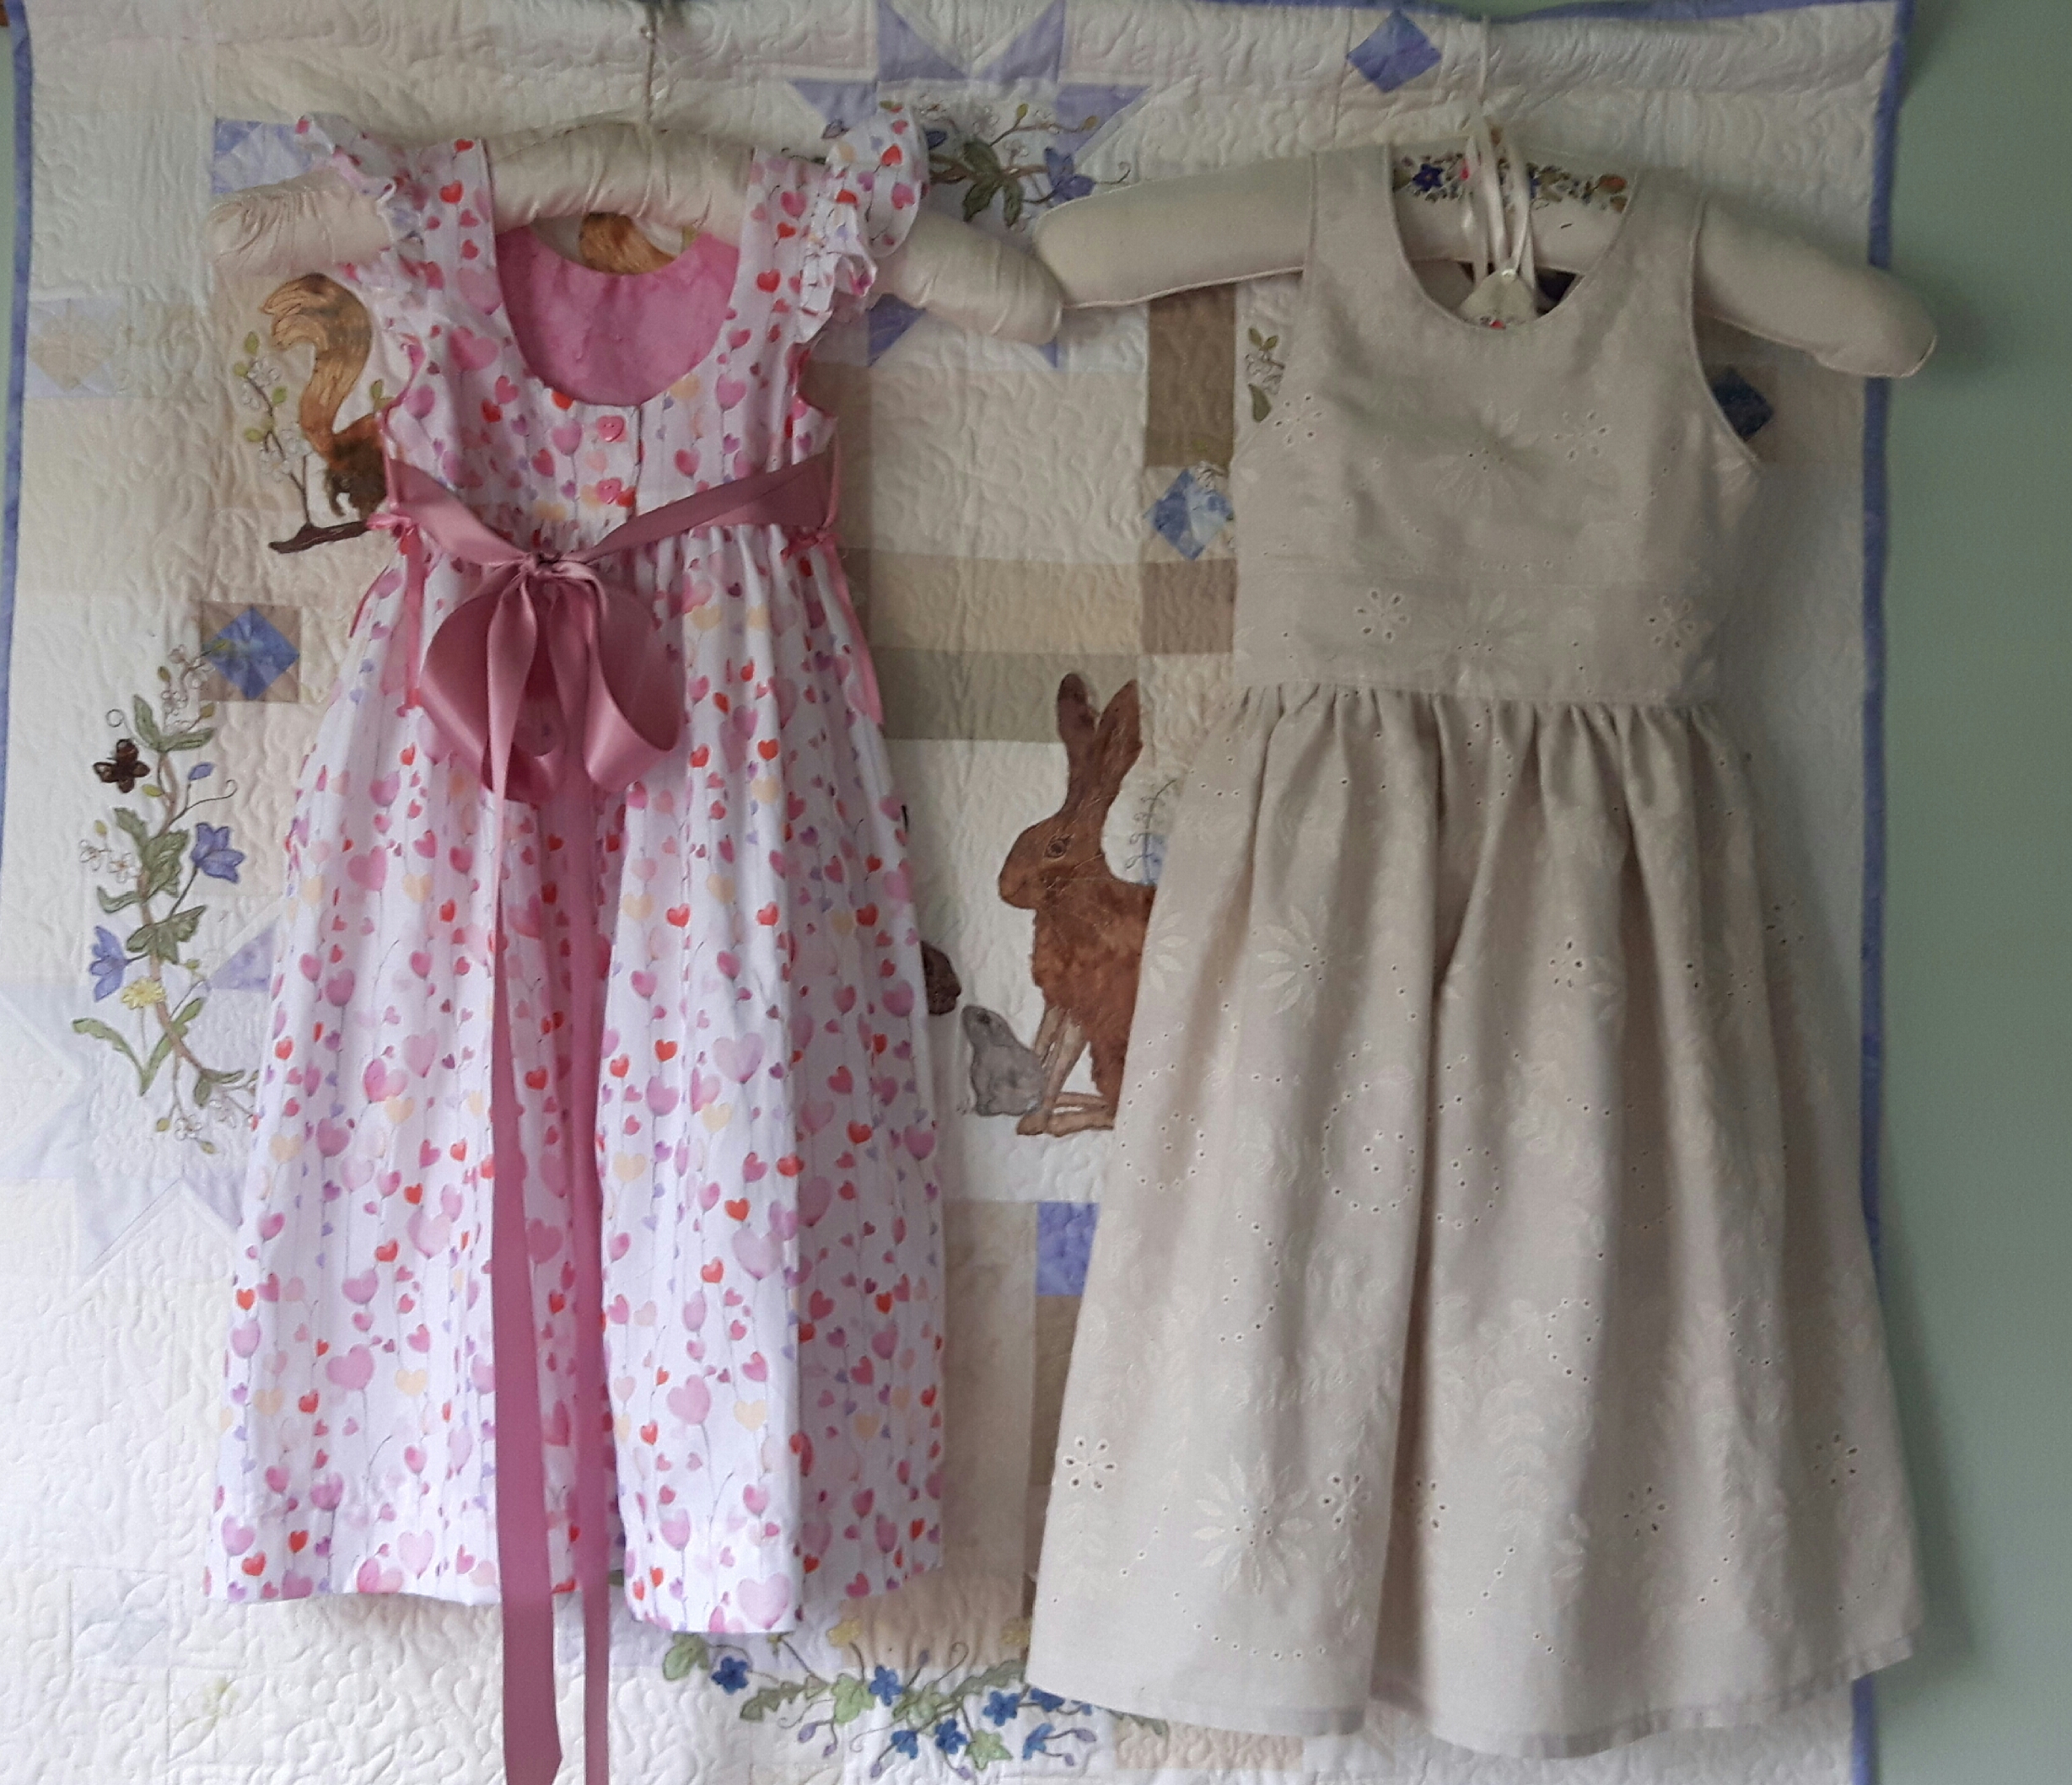
The youngest one is 6 and just requested something pretty and pink. I spotted the perfect fabric in B&M Fabrics in Leeds. It’s cotton with lots of hearts in varying shades of pink, very pretty.

I had looked in the pattern books and not seen anything that jumped out, so I had a look on line, as at least with a child’s pdf pattern you’re not going to have dozens of pages to print out. I remembered seeing Little Lizard King mentioned on facebook a few times so I had a look and they have some lovely designs. I chose the Albany for H as it was a basic pinafore dress with flutter sleeves.

It went together very easily, the instructions and the pattern were great. I lined the dress with a pink batik from my stash. I bought some smartie buttons in the palest of pinks but they were just too big when I got them home…so I looked in my stash! Why did I not look there first! I had some ideal pink and white heart shaped buttons.

Initially I stitched the white buttons on the back, however I then added some pretty pockets which needed a button on to finish them off, the pink ones were just a bit too big so I swapped them for the white ones. The pocket pattern is from Tie Dye Diva, it’s free and it’s so cute!

I’d decided not to add the sewn in sash as per pattern as it looked like it would be quite bulky and structured, fine when it’s say a party dress or a bridesmaid, but I wanted this more as a pretty summer dress so I bought some satin ribbon and stitched a belt loop on the side seams so she can wear it with or without the sash.

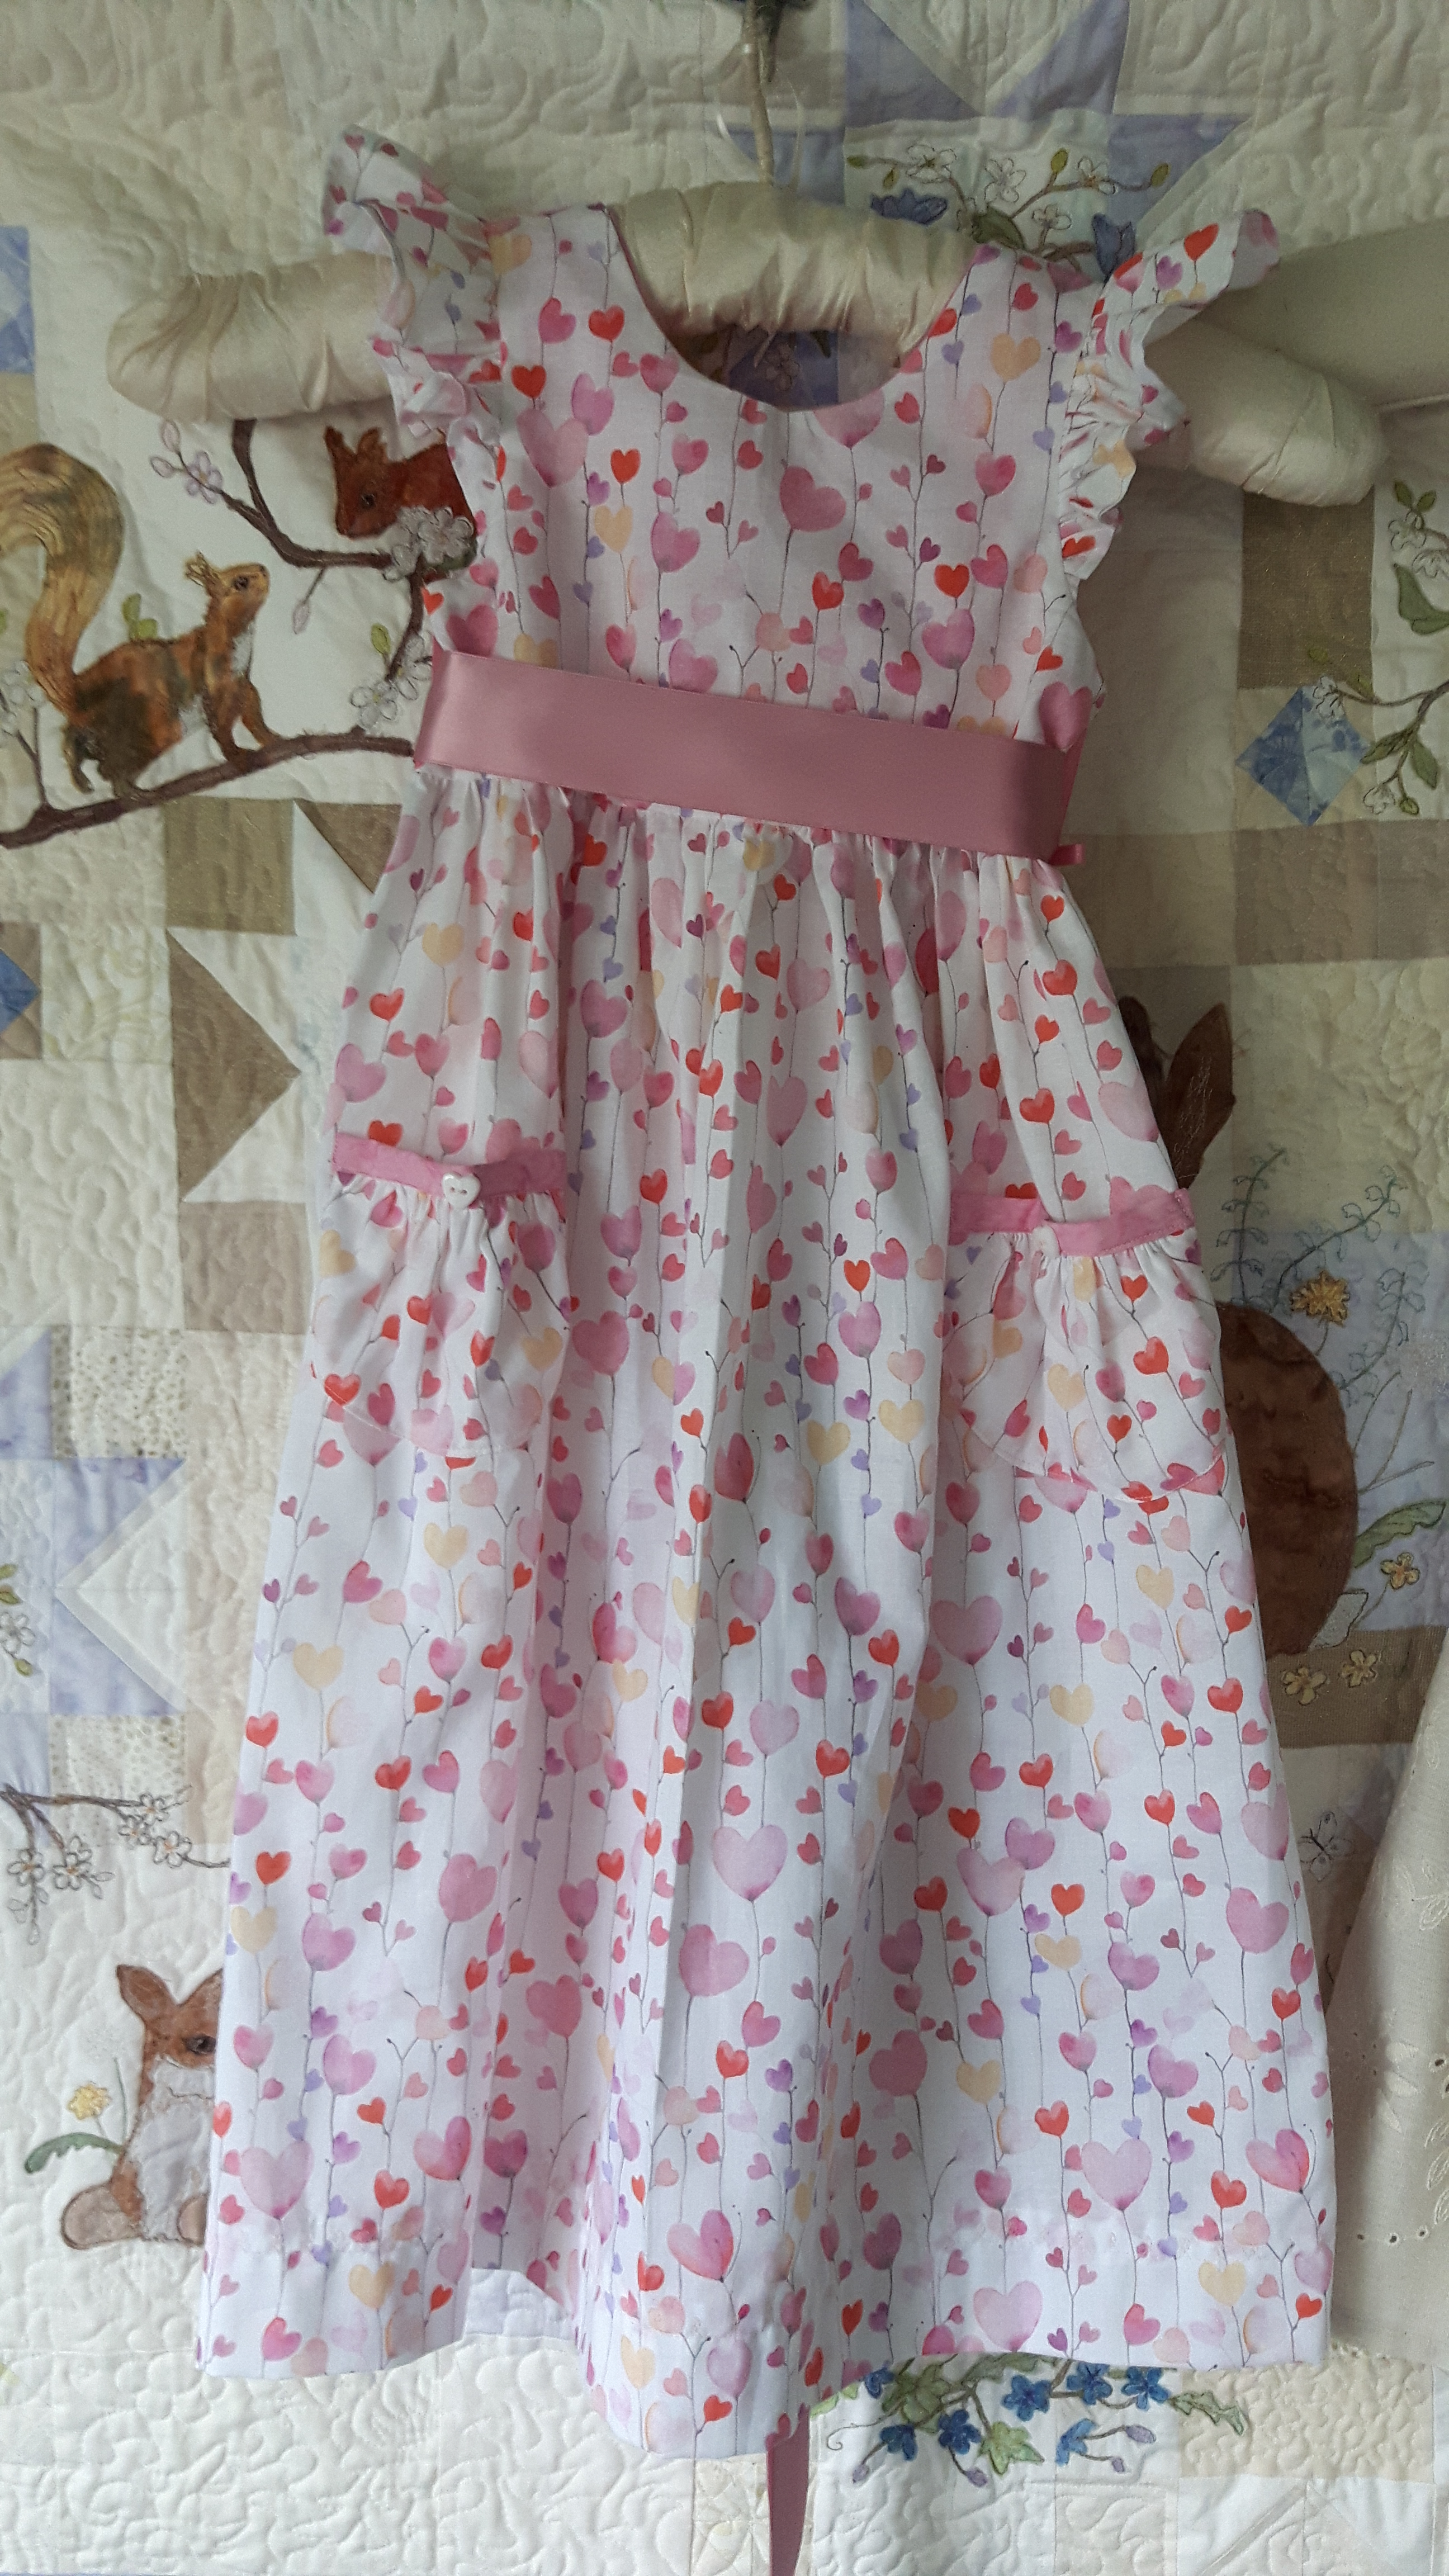
I think that definitely covers pretty and pink! We visited them yesterday and she loves it.

Posted in Dressmaking, Fabric shops | Tagged , , , , | 10 Comments

Sewing Room Cross-stitch

Over the last couple of months I’ve been stitching a sign for my sewing room. It’s a pattern from Stoney Creek, it’s a little dated in style, it’s typical of the 80’s and 90’s, but it appealed and it seems to include all aspects of sewing I enjoy, patchwork, embroidery and dress-making. I changed the colours from pink to purple to match my sewing room.

Last time I showed you my progress I’d just made myself stitch the metallic bits on the sewing machine…

Well I cracked on and I’ve just finished it…I think!

At the top is writing in deepening shades of purple. With hindsight I would have been better with a slightly darker shade at the bottom as it doesn’t show up much. Now I’m not going to start unpicking all that, but I could outline the bottom rows with a little back-stitch in a slightly darker thread.

The last bit to stitch was the thread on the sewing machine in long stitches of purple, I think it gives a lovely finishing touch.

Once I’ve decided whether or not it’s finished I need to put some fabric borders on to make it a little wider as I have a sewing machine shaped hanger for it which is a little too wide. I have some sewing themed fabric which I think will go nicely.

I’m pretty pleased with it, I love the cotton reel border in particular! I do think the spacing of the different elements is a bit off, so like the patchwork blocks are pushed into the lower corners rather than spacing them more evenly. There was actually meant to be another 6 empty rows above my name which I missed off. All in all though, I’m happy with it.

Mini happy dance time!

Posted in cross-stitch, sewing room | Tagged , , | 11 Comments

Four Season Skirt Pattern

Last month I made myself another skirt. It was one of those projects that seemed to take a lot longer than it should!

I decided to make Vogue 9090 in a Abraham Moon wool. We’re lucky in that the Abraham Moon mill is in the next town and they have a mill shop, their wool fabric is gorgeous, it feels lovely. Last time we popped in they had a table full of 2-3m lengths at £5 a metre, a huge bargain – even in the mill shop it’s usually £20 a metre! I now have rather a large stash of Moon fabrics!

This is the third time I’ve used this pattern, the image on the front of the pattern isn’t particularly inspiring but it’s actually a lovely skirt to wear. I made it in cotton last summer and baby cord a couple of months back…

This was one of those makes that took a lot longer than it should! It’s a very simple make, I could probably make it in an afternoon if I concentrated and didn’t faff about. I used a coordinating cotton to line the pockets and also for the waistband lining, it all went together very easily.

I wore it a couple of times and decided it was a touch big, sitting on my hips rather than round my waist. I decided the easiest fix would be to simply take it in down the centre back seam. I carefully unpicked the zip and a bit of the hem and stitched a new back seam…

It didn’t take long, just long enough to lose the zip!! I hunted high and low for that darn zip, couldn’t find it anywhere. Eventually I gave up and bought another zip. It fit’s much better now and I’ve worn it several times.

My daughter was home for a few days over Mothers Day weekend. We visited the RHS garden in Harrogate, Harlow Carr, a perfect spot for a photo…

…and a selfie…

Of course the zip appeared as soon as I had stitched the other one in…it was in the dog bed!

Posted in Dressmaking | Tagged , , | 4 Comments

Bee Happy

A few months back I decided to make a fabric book of bees, my plan is to have various small embroideries of bees, interspersed with words about bees, such as poems, facts.

I have a lovely cross-stitch bumble bee which I’ve stitched three times now, and as I gave one to my mum a couple of years before she died, it’s now back in my possession. I’m thinking of changing this one from a pin cushion to an entry in my book.

I’ve quite a few bee themed fabrics to use and over the last few months I’ve been keeping my eye open for bee embroideries. I spotted a pretty kit on Etsy of a bee on clover and ordered it.

It’s not taken me long to stitch it, it was small enough to be a handbag project, though most of it was probably stitched at home during coffee breaks. I was a tad disappointed when the kit arrived as the picture on the front is computer generated, not stitched. This suggests to me that the designer hasn’t actually stitched it. It also means that the effect on the image may not be reproduced with thread.

I used a subtly coloured evenweave linen instead of the white aida provided. I started stitching in the centre as usual, but it was one of those designs with lots of scattered colours which make it difficult to remember where you are. I used my usual tactic in this situation, I made a bee-line ( ‘scuse the pun!)for the edge and then worked my way back inwards.

I like how the designer has used half cross-stitch in different directions on the clover and the bee, my only issue was that only one thread was used which really didn’t show up much. The photo shows the single thread stitches on the bee and the top of the clover as well as the trial of two threads on the leaves…

I decided to use two threads for everything apart from the wings. Once all the cross-stitching was complete I just had to add the back-stitched detail. The pattern uses black for most of it, I decided to use a very dark maroon for the lighter areas of the clover so it wouldn’t be quite so contrasting.

I finished the bee last night, I’m pretty pleased with it and happy with the changes I made. It’s definitely one of those that look better from a distance though! I’ve just got to decide how to make it into a page for my book.

Posted in cross-stitch, embroidery, kits, Textile Books | Tagged , | 8 Comments

The Seaside Quilt HQAL

I’ve made good progress with my seaside quilt over the last three weeks, I have everything I need on the side table in the lounge so when I’m watching TV with my OH I can sit and quilt.

This lovely quilt design is from the book The Seaside Quilt by Kathryn Whittingham, it’s hand embroidered, raw edge applique and now being hand quilted. The book instructions are for hand piecing too but that’s a step too far for me, mine is machine pieced.

Three weeks ago I think I was about a third of the way round and still undecided how to quilt the little star blocks…

Well I’m pleased to say I’m now about three-quarters of the way round the main design, though I’ll still have the borders to quilt once the blocks are quilted.

For the little star blocks in the top left and bottom right of the quilt I decided to stitch in the ditch, for non-quilters this means I stitched right on the seam line. I found this much easier by hand than when I’ve previously tried on the machine! I couldn’t use the clam shell pattern here as the stars are based on 1.5″ squares, whereas the rest of the quilt is in 2″ squares.

Last night I reached the top edge on the right hand side, so I’m getting there. For the wide border I’m going to follow Kate Chiconi’s suggestion of wavy lines, they can represent the patterns on the sand left by the sea.

I tried taking a photo of the whole quilt, standing on tiptoe with my arms stretched out, not my best position with my lack of balance! Hence it’s a bit out of focus and I still didn’t manage to get it all in the picture…

…when I’ve finished the quilting I’ll hang it on the washing line for a better photo!

Hand-quilting these two quilts (the cottage garden quilt and this one, both by the same designer) has really swung me over to the hand-quilting camp. When I hand quilted the Down the Rabbit Hole quilt I thought never again. With hindsight it was too big for me for a first time hand-quilting. But I think my hand embroidered quilts deserve to be hand-quilted, and now I’ve found a pattern I find easy to stitch I enjoy the stitching. The finished quilts do have a different feel to machine quilted ones, much softer and cuddlier. I’ve even got my next hand-quilting project lined up! Having said that, machine quilting definitely has it’s place and can be an art on it’s own, I’ve two quilts to make before the summer and they’re definitely going to be machine quilted!

Hand Quilt Along Links

This Hand Quilt Along is an opportunity for hand quilters and piecers to share and motivate one another. We post every three weeks, to show our progress and encourage one another.  If you have a hand quilting project and would like to join our group contact Kathy at the link below.

KathyMargaretDebNanetteSharonKarrin, Daisy and Theresa

I’ll also be linking up with Kathy’s Quilts for Slow Stitching Sunday, please follow the links to see everyone’s progress.

Posted in Quilt-a-long, Quilting | Tagged , | 10 Comments

A Seaside Cushion

A work colleague of mine has just made the big move to an island in the Outer Hebrides, an enormous change from the busy city life in Leeds. A friend suggested as a leaving present it would be nice if we could give her something more personal, such as a seaside quilt…I gently pointed out how much I would want to sell my seaside quilt…maybe a cushion instead!

I decided to enlarge the cottages block from my seaside quilt and machine embroider it. The seaside quilt design is in a book of the same name by Kathryn Whittington of Patchwork Katy This is the original hand embroidered one on my quilt….

It wasn’t as easy as it looks to enlarge it, especially the cliffs bit. I drew it out and then traced it onto the bondaweb. To fix them onto the background, the ones at the top of the hill need to be attached first as they all overlap slightly. It was only when I got to the last house, the one at the bottom, I realised that my cliff wasn’t too steep! In order to lower it slightly I added some steps to the bottom house!!

I’m quite pleased with my set of steps! The cliffs aren’t so great, but I added some waves with a shiny rayon thread.

With the basic panel made to about 10″ square, I needed to add some borders to make it a useable cushion size. I added a 1″ red border and then a 2″ dark blue border. I found some dark blue batik which worked well for the backing, I made a button closure with some wooden buttons and the cushion was finished.

It was her leaving do last Friday and she loved it, it will hopefully remind her of happy times and friends in Yorkshire.

Posted in Machine embroidery, Quilting | Tagged , , | 10 Comments

Leatherwork

I do like a good workshop that gives me the opportunity to try a new craft, I’ve never worked with leather, so when a workshop by Diamond Awl was announced at my Skipton Stitchers meeting, I was interested to try it. Jason Young-Stocks and his wife Louise have a leather workshop in Saddleworth on the very southerly edge of Yorkshire, they teach people how to make a range of leather goods from purses to handbags using traditional methods. One of our members had already attended one of his two or three day courses and made a beautiful handbag.

At our meeting we were making a coin purse. Jason had previously cut out the basic leather shape with the needle holes already made, this is the thick and firm weight of leather, not the pliable leather you can stitch on a domestic sewing machine. There was a choice of colours but as purple wasn’t there I kept it simple and chose a brown leather.

Jason was a great tutor, explaining and demonstrating each process in turn. Our first task was to gently sand the edges with a nail file, removing any residue from the cutting process. We then used a very sharp tool a bit like a chisel to bevel the edges, we had some scrap leather to practise on, getting used to the angle needed to bevel the edge. Here’s a photo of my friend cutting her bevel…

We could then colour the raw edge with a special pen a bit like a wide felt tip, the colours were pretty subtle, especially if the leather was dark like mine. The raw edges were then polished with a Japanese traditional product whose name I did write down but now can’t find! It does make a gorgeous finish to the purse.

Now came the tricky part, learning saddle stitch. I must admit when Jason first showed us I thought I’d never get the hang of it as there are about six stages to each stitch! We started with a long length of thread which was quite thick and very strong, we threaded a needle at each end and put our purse in the wooden clamp.

Having practised in small groups we could then stitch our purse together. Once I got the hang of the different steps of the stitch I did get into quite a rhythm, the saddle stitch needed quite a lot of tension to pull the stitches tight and three weeks later I still have the scar from a blister on the crease of my little finger where I held the thread!

Having stitched across the opening edge we then had to stitch the sides together, which was pretty fiddly at first as we tried to line the holes up. Our purses were complete, we also then had the option of embossing our name or initals on the purse. I decided to put my initials and found it’s definitely harder than it looks, mine is distinctly wobbly, though that probably suits me really 🙂

It was a great workshop, everyone went home very satisfied with their lovely coin purse. Jason was a great teacher, very patient, we also discovered that we attended the same three schools just four years apart, so we had a great chat reminiscing about all the different teachers we could remember.

If you are within striking distance of Saddleworth and interested in learning a new skill, I would certainly recommend a Diamond Awl workshop.

Posted in Serendipity, Skipton Stitchers, Workshops | Tagged , | 5 Comments

Wednesday’s Wander Round the Garden

The British weather is well known as variable, over the last couple of weeks we seem to have had most types so the poor plants don’t know whether they’re coming or going! Mother’s Day weekend (26th and 27th March here in the UK) was beautiful, warm and sunny, we even ventured out with bare legs and summer dresses on! The blossom on the cherry trees around Otley was looking very pretty, my magnolia stellata was just starting to open it’s delicate flowers…

I have a gorgeous white camellia by the side of the drive and that was looking beautiful too…

Then on Thursday morning we woke up to this…

By the afternoon most of the snow had gone but I really thought the delicate blossoms would be a brown and soggy mess. Some of the camellia blooms have been lost but to my surprise the magnolia is still looking beautiful. You can see it in the last photo of this post, still brightening up the garden. This is one of my favourite trees in my garden, I tried to reproduce it in embroidery recently for my embroidered garden book…

I’ve lots of rose bushes in the garden so one of my first tasks in the garden this year was to prune them all. At the top of the garden along the back fence I planted a rosa rugosa hedge many years ago, it hasn’t been the success I’d hoped as the trees on the old railway line behind have grown and block too much light out. I’ve got two types of rose there, what I call hedgehog rose, which has lots of softer prickles on it’s stems, I can cope with those! The others are more of a traditional wild rose, they have evil thorns!! They are really hooked and sharp so they catch on everything and hook together! Well I decided I’d had enough! The evil ones are going!! I’ve started digging out the roots and sorting out the bed on the left of the path. I’ve replanted some shrubs and perennials which had outgrown their space such as my magenta flowered geranium. I’ve still plenty of room to fit the occasional purchase I might make at the Harrogate Flower Show at the end of the month!

Elsewhere in the garden early flowers are giving some welcome colour, the trees are just starting to show a hint of new leaves and lots of perennials are starting to push their shoots up. This camellia by the conservatory seems to have survived the snow reasonably well, the lovely silvery leaves underneath are brunnera Jack Frost, together with a greener one which appeared a couple of years back, that one is even starting to flower already. They look a bit like forget-me-not flowers.

Another favourite at this time of year is the Pasque flower, or pulsatilla vulgaris. I’ve got purple ones and maroon ones, the buds are pretty, all sort of fluffy, the flowers are beautiful and then the seed heads are really pretty too. I used to have a semi-circle of them around the patio but I seem to have lost a few over the years so I really need to plant a few more.

There’s lots to do in the garden at this time of year, I’m still tidying up and weeding at the moment as well as trying to sort out the back hedge area. It keeps me out of mischief! The garden is just starting to green up and fill out a bit after the winter’s rest. This is the view from upstairs today, as you can see, the magnolia is still shining brightly…

Posted in Garden | Tagged , , , | 8 Comments

Dancing Round Catbells SAL

I can’t quite believe it’s been two whole weeks since I last posted, I’ve been doing a lot of stitching but issues at home have meant I’ve had little time for posting, so I’ve a few posts to write over the next few days! First off is of course my Peppermint Purple blackwork sampler which I’ve turned into an image of Catbells, a fell by Derwentwater in the Lake District which I’ve climbed many times and has a special corner of my heart.

Three weeks ago I had started the border…

What I hadn’t realised as I merrily stitched the first border is that in the centre of the border there was meant to be a block which has one stitch less…so when I reached the first corner I was one stitch out! I can imagine quite a few people made the same mistake! There was no way I was going to undo half a side so I fudged it with an extra short block at the corner, I don’t think it’s noticeable.

I wanted to incorporate the name of Catbells in the border and I decided to do it within the width of the main border, I then stitched my initials and the year at the bottom.

After fifteen months of stitching it was finally complete… definitely time for a happy dance!

I’m pretty pleased with it, it was my first try at blackwork and the free annual sampler SAL from Peppermint Purple was a great way to try it. I learnt a lot how pattern influences the effect of the colour, there are blocks I would change another time. I did a little more outlining round the reflection and I think it shows up just enough now. If you fancy trying blackwork I would certainly recommend Peppermint Purple, the 2022 SAL is now in progress but with just one block released each week there’s not too much to catch up on.

If anyone is wondering, the fabric I used is overdyed so it’s soft blues and green’s in a sort of linear wash which worked well for the landscape scene, I have no idea where I got it from which is a shame as it’s worked really well for this. The threads I used for the filler patterns in the corners were Weeks overdyed threads which have a subtle variegation, the rest were all standard DMC threads.

Last Saturday I took it to my regular framers, Artworks in Otley, They always do a great job, they helped me choose a couple of mounts and a surround and I collected it yesterday. The mounts are a very light soft green and a narrow outline from the mount underneath of dark grey/green.

I love the finished piece, the frame and mounts compliment it beautifully. I just need to find somewhere to hang it.

Catbells has been the muse for several of my embroideries over the years, here’s just a few…

This SAL is organised by Avis from Sewing Beside the Sea, we post our progress on a chosen piece every three weeks, it certainly helps to keep me focussed on longer term pieces! Please follow the links to see everyone else’s progress…

AvisClaireGunConstanzeChristinaKathyMargaretCindyHeidiJackieSunnyMeganDeborahSharonDaisyAJCathieLindaHelen

Posted in embroidery, Peppermint Purple 2021 SAL, Stitch-a-long | Tagged , , , | 16 Comments

Seaside Quilt HQAL

I’ve not managed as much as I had hoped on my seaside quilt, I’ve been concentrating more on my Peppermint Purple blackwork, trying to get that finished. Both of these are perfect for sitting in front of the TV on an evening with my OH.

The seaside quilt is a design from the book of the same name by Kathryn Whittingham, it’s hand embroidered on raw edge applique. The book is available from Kathryn’s website, Patchwork Katy, (together with her Cottage Garden quilt book, my favourite quilt ever!) I’m quilting it with the clam shell shape, which started off as waves in the sea, but really shells are just as apt. It’s a nice rhythmic shape to quilt, I mark the semi-circles with small dots from a silver gel pen, I like using that as it shows just as well on dark as well as light fabrics. The picture blocks are quilted just under 1/4″ round the inside, hopefully that will be enough.

Three weeks ago I’d quilted about a quarter of the quilt…

I’m probably now just about a third quilted, so not much further, but not bad for a couple of evenings work. Last night I was quilting up by the lighthouse again. I started here as it’s in the middle and originally I was quilting round each rectangular border. I soon decided to just continue the clamshells across the border so last night I pulled out the first bit of quilting I did round the light house border and replaced it with clam shells.

I’m using a quilting hoop that’s mounted on a base, I think it’s called a lap hoop or a table hoop, I find it works best for me as the base makes an open working area underneath which I find helpful for the hand that’s working from the back, and the risk of catching the wrong bit of fabric is reduced!

I haven’t quite decided how to quilt the pair of stars at the bottom right (and the top left) The clam shell won’t work there as the triangles are a different size. I might just go round the inside of the picture block and stitch in the ditch round the stars. Last time I was also pondering how to quilt the border, I was quite taken with Kate Chiconi’s idea of wavy lines to look like the ripples on the beach, so I think that’s another decision made, thanks Kate 🙂

Hopefully next time I share this quilt I’ll have made a bit more progress. I’m enjoying the hand quilting and it’s such a happy quilt to work on!

Hand Quilt Along Links

This Hand Quilt Along is an opportunity for hand quilters and piecers to share and motivate one another. We post every three weeks, to show our progress and encourage one another.  If you have a hand quilting project and would like to join our group contact Kathy at the link below.

KathyMargaretDebNanetteSharonKarrin, Daisy and Theresa

I’m also linking up with Kathy’s Quilts for Slow Stitching Sunday.

Posted in Quilt-a-long, Quilting, Stitch-a-long | Tagged , , | 13 Comments