Well my stitch-a-garden project has had to take a back seat over the last three weeks, what with trying to finish the cot quilt before Hugo was born, trying to sell the house and the worry since the little one was born, I haven’t managed to do any more stitching towards my garden fabric book.
I have managed to do a little stitching though which was started for a fabric book on bees, but I’m now having second thoughts…
I’ve a few little cross-stitches of bees and some crazy quilting with bees on so I had this idea to use them all in a fabric book about bees. I spotted this pattern ages ago on one of the destash sites and thought it was rather pretty. It’s a design by Country Cottage Crafts and it’s been my handbag project for the last couple of months. With my new job I get an hour for lunch, so that’s 20 minutes eating and 40 minutes stitching! My original plan was to stitch it in two haves for facing pages in my bee book…
I’m using some lovely dyed linen with DMC threads, the pattern uses different threads but does give DMC equivalents for all but the variegated ones so I’ve chosen ones I think will work.
I stitched to the approximate half way mark, adapting it slightly to level it off at the bottom of the words…and then decided it was going to be too long for a page, top to bottom there it was 6.5 inches and a border would be needed. The bottom half would be shorter too. So I’m currently stitching it in one piece, I’ll then decide what to do, thoughts at the moment include making it into a concertina book so that can be a double page spread, though that would mean folding it, or I might abandon the fabric book plan and use a nicely bound book to stick work in, or I could make it a bigger book, possibly using it as a cover…or I could just get it framed as a pretty picture, but I have run out of wall space!
It’s still looking decidedly crumpled despite a good press, I think it’s going to need a bit of Best Press when it’s finally finished!
This stitch-a-long is organised by Avis, we post our (supposed) progress on our chosen project every three weeks. Please follow the links to see what everyone else has been stitching.
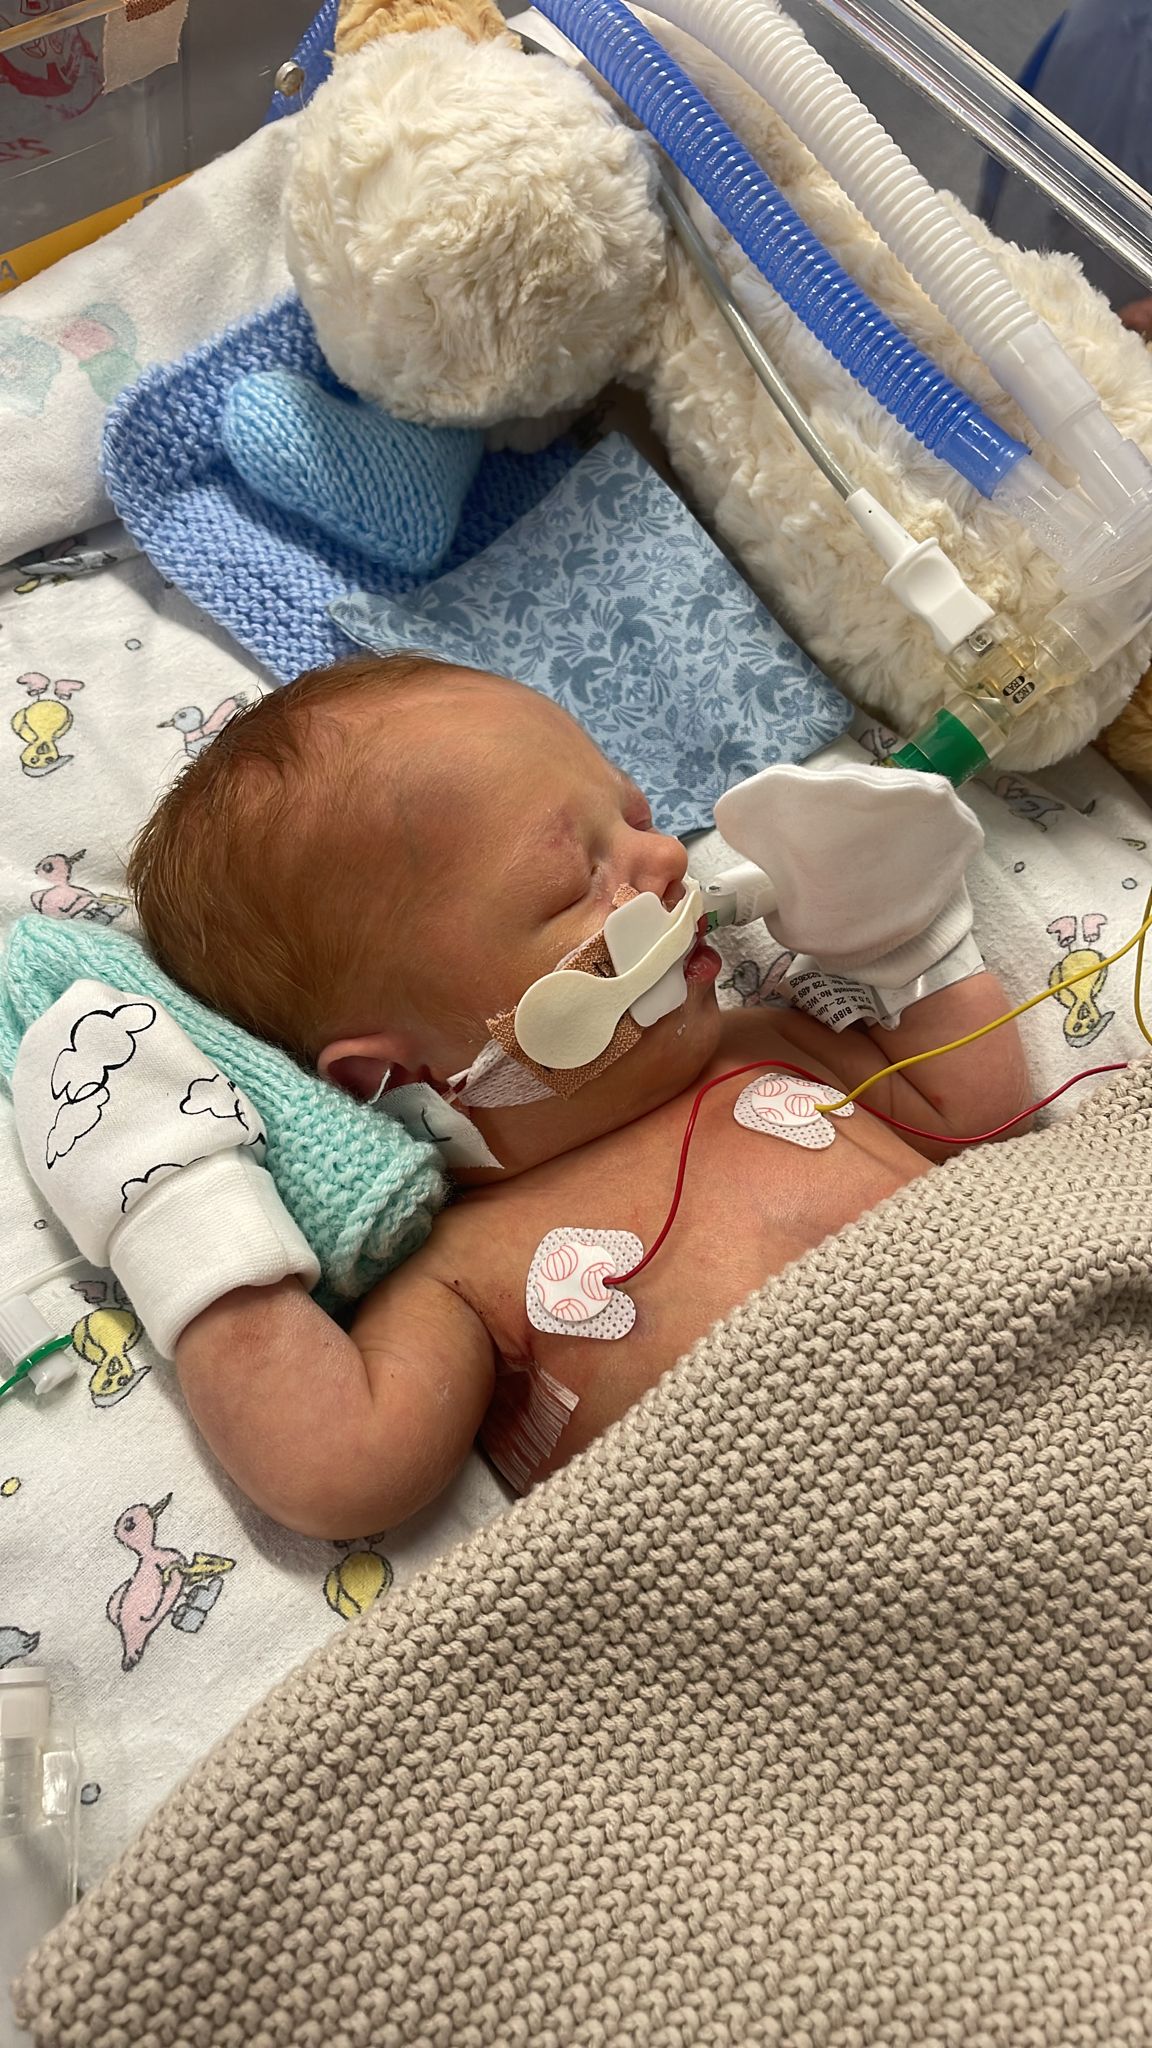
Little Hugo was born on Wednesday afternoon, my first grandchild (I do have two ready-made ones as well) He’s gorgeous, though I’m probably somewhat biased! I’ve not yet had a cuddle as unfortunately the midwives realised within minutes of him being born that there was an issue with his oesophagus. He was whisked off to intensive care and yesterday had a 7 hour operation. As you can imagine it’s all been very stressful, trying to support mum and dad whilst coping with all our own worries.
As soon as I heard I dashed up to my sewing room and grabbed the first two blue fat quarters that came to hand. I cut two 5.5″ squares from each one, stitched two together round the edges, leaving a gap for turning. I could then turn and press them and hand-stitch the opening closed.
I gave these two squares to mum, the idea being that she tucks one in her bra to get the scent of her skin on it, the other goes next to Hugo, every day they are swapped so he always has her smell around him and she has something positive to do. It’s meant to help with bonding when they are separated like this. She loved them and yesterday they sent me a photo with one of the blue cotton squares next to him, together with a cuddly duck I bought to go with the quilt.
I found it helpful to have something practical but simple to stitch when my mind was on overdrive with worry, hopefully it will help them bond as a family too. I think most of the hospitals here in the UK have something similar to my blue squares, sometines they’re heart shaped, some crocheted, all made by volunteers. Mum had been given a pair by the hospital but felt mine were softer.
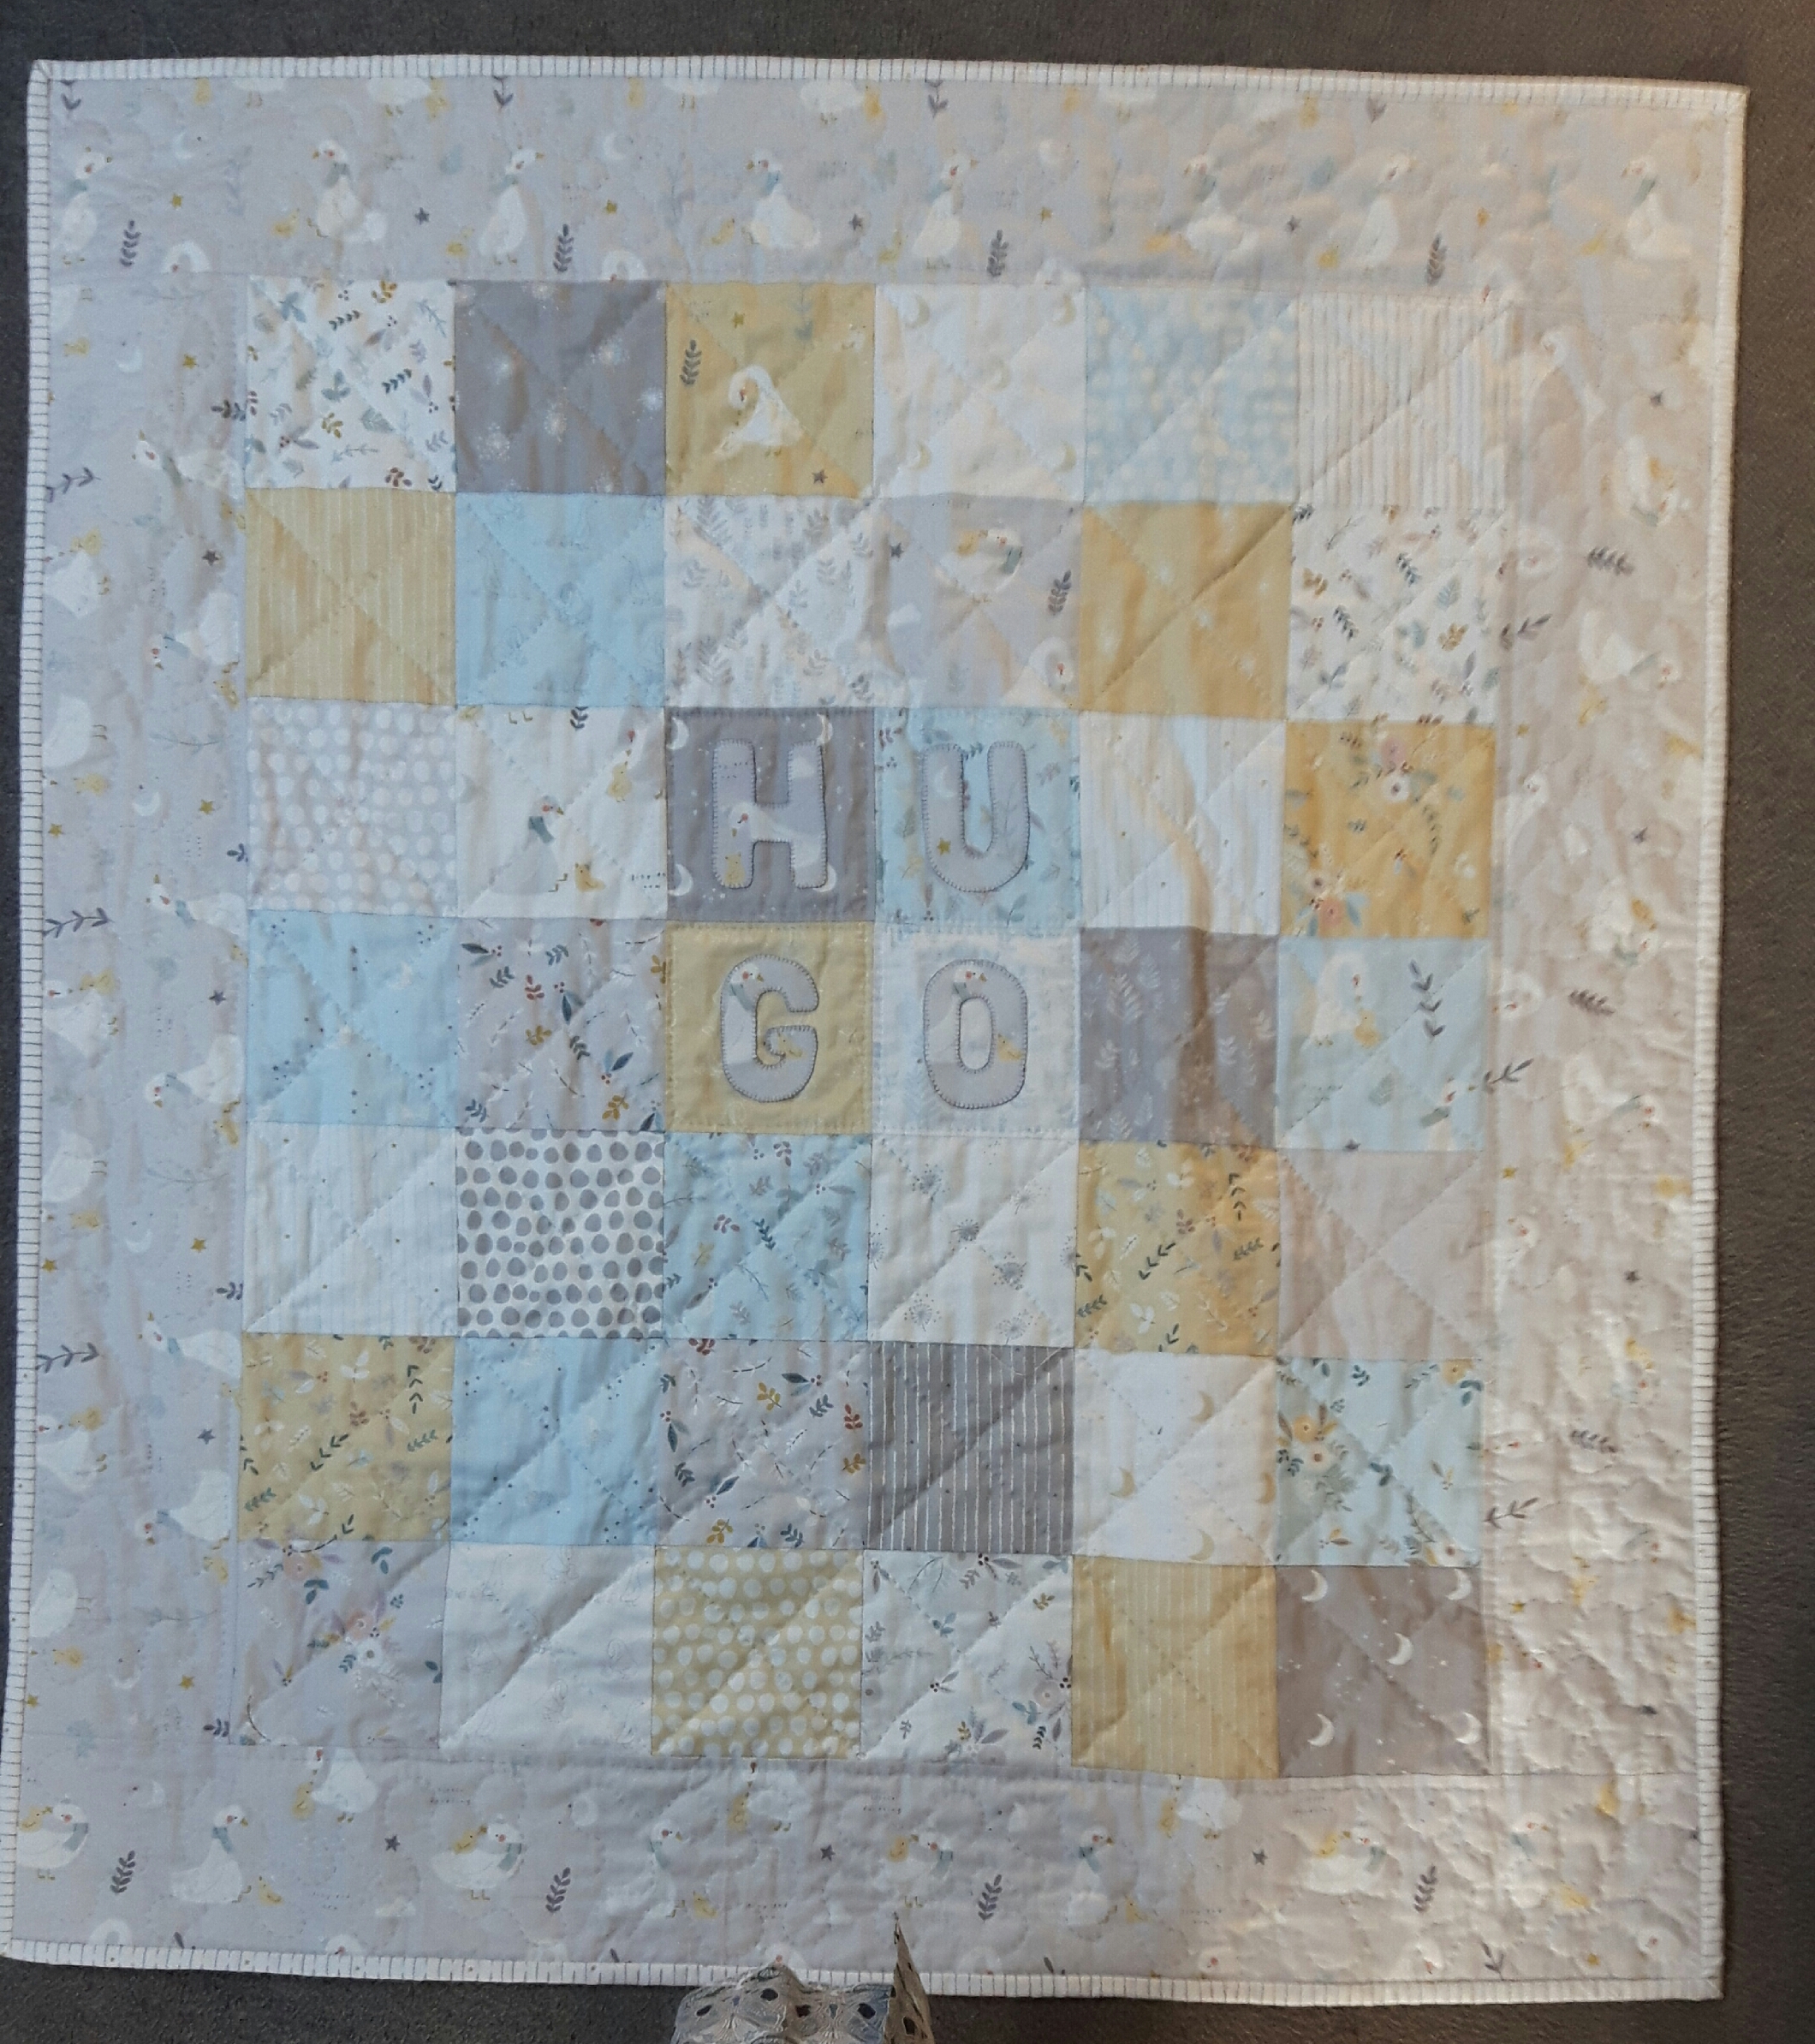
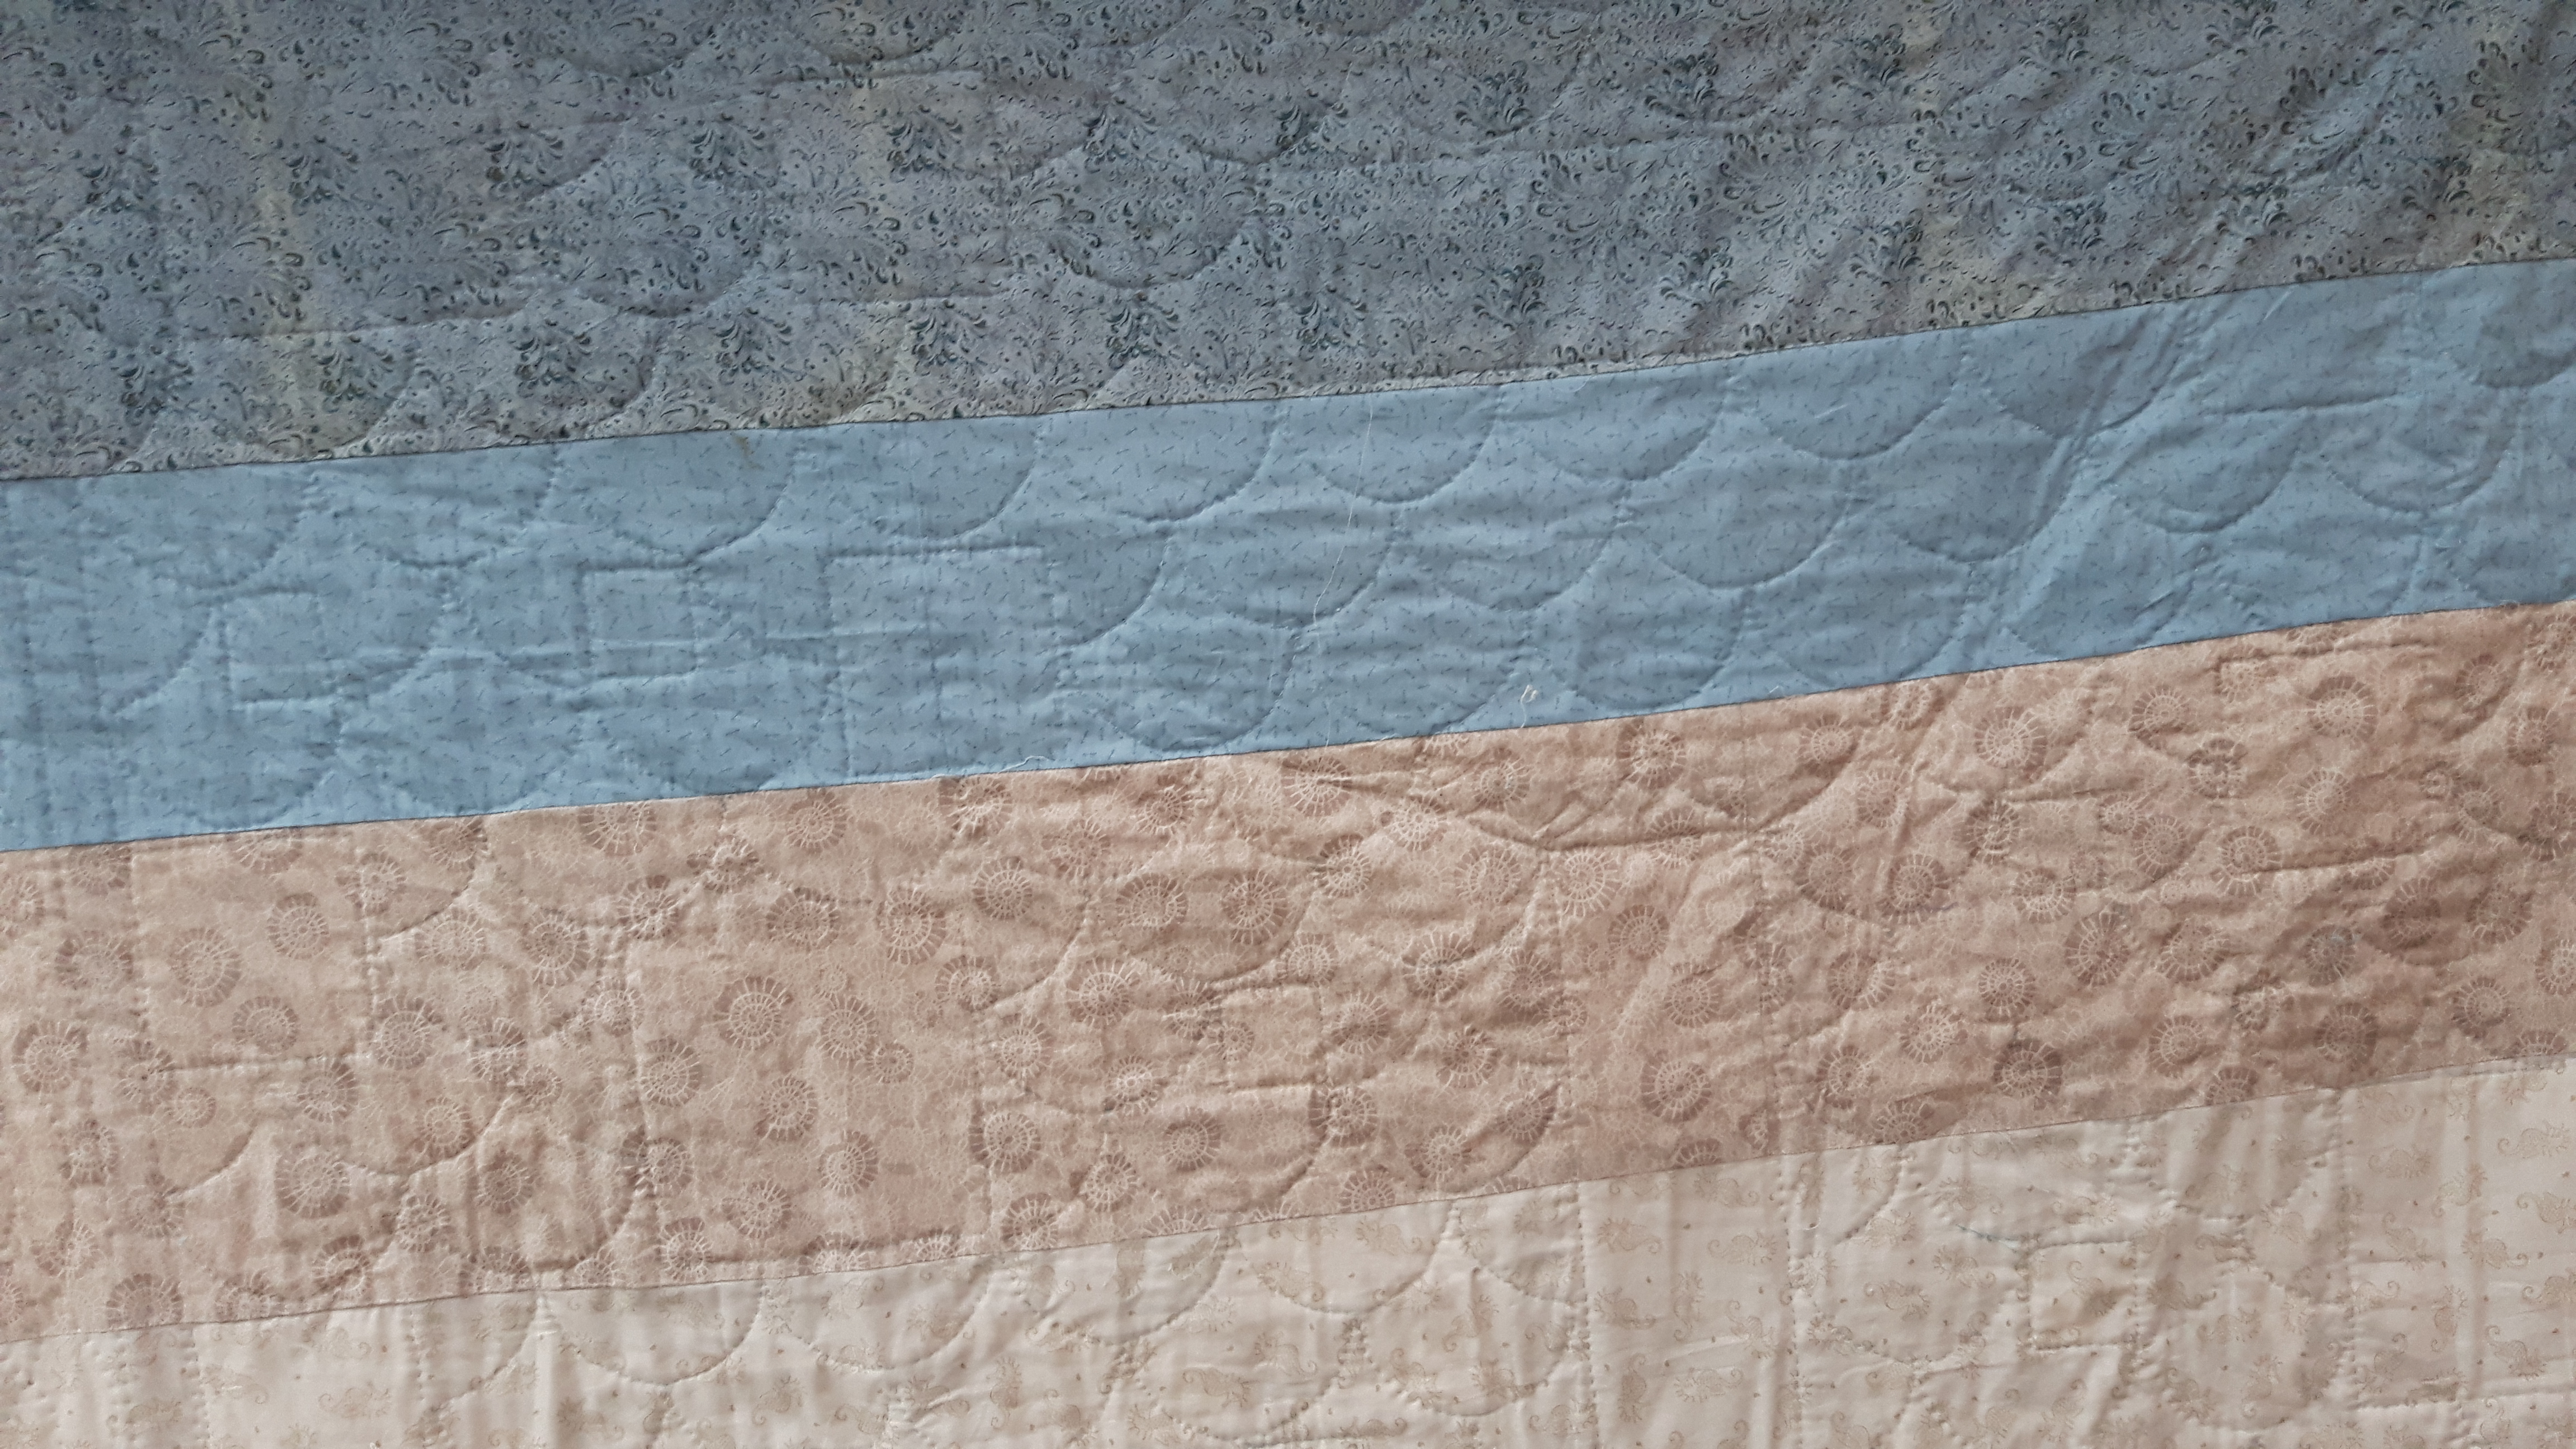
Over the last few weeks I’ve been busy making a cot quilt for my new grandson who was born on Wednesday. When I asked re colour schemes and themes a while back mum said she liked neutral colours and maybe some lemon. At the spring quilt show I spotted this quilt kit which was the perfect colour scheme together with gorgeous little ducks and ducklings. It was £40 for the kit which seemed quite a lot but it did include all the precut squares, the border fabric and the binding.
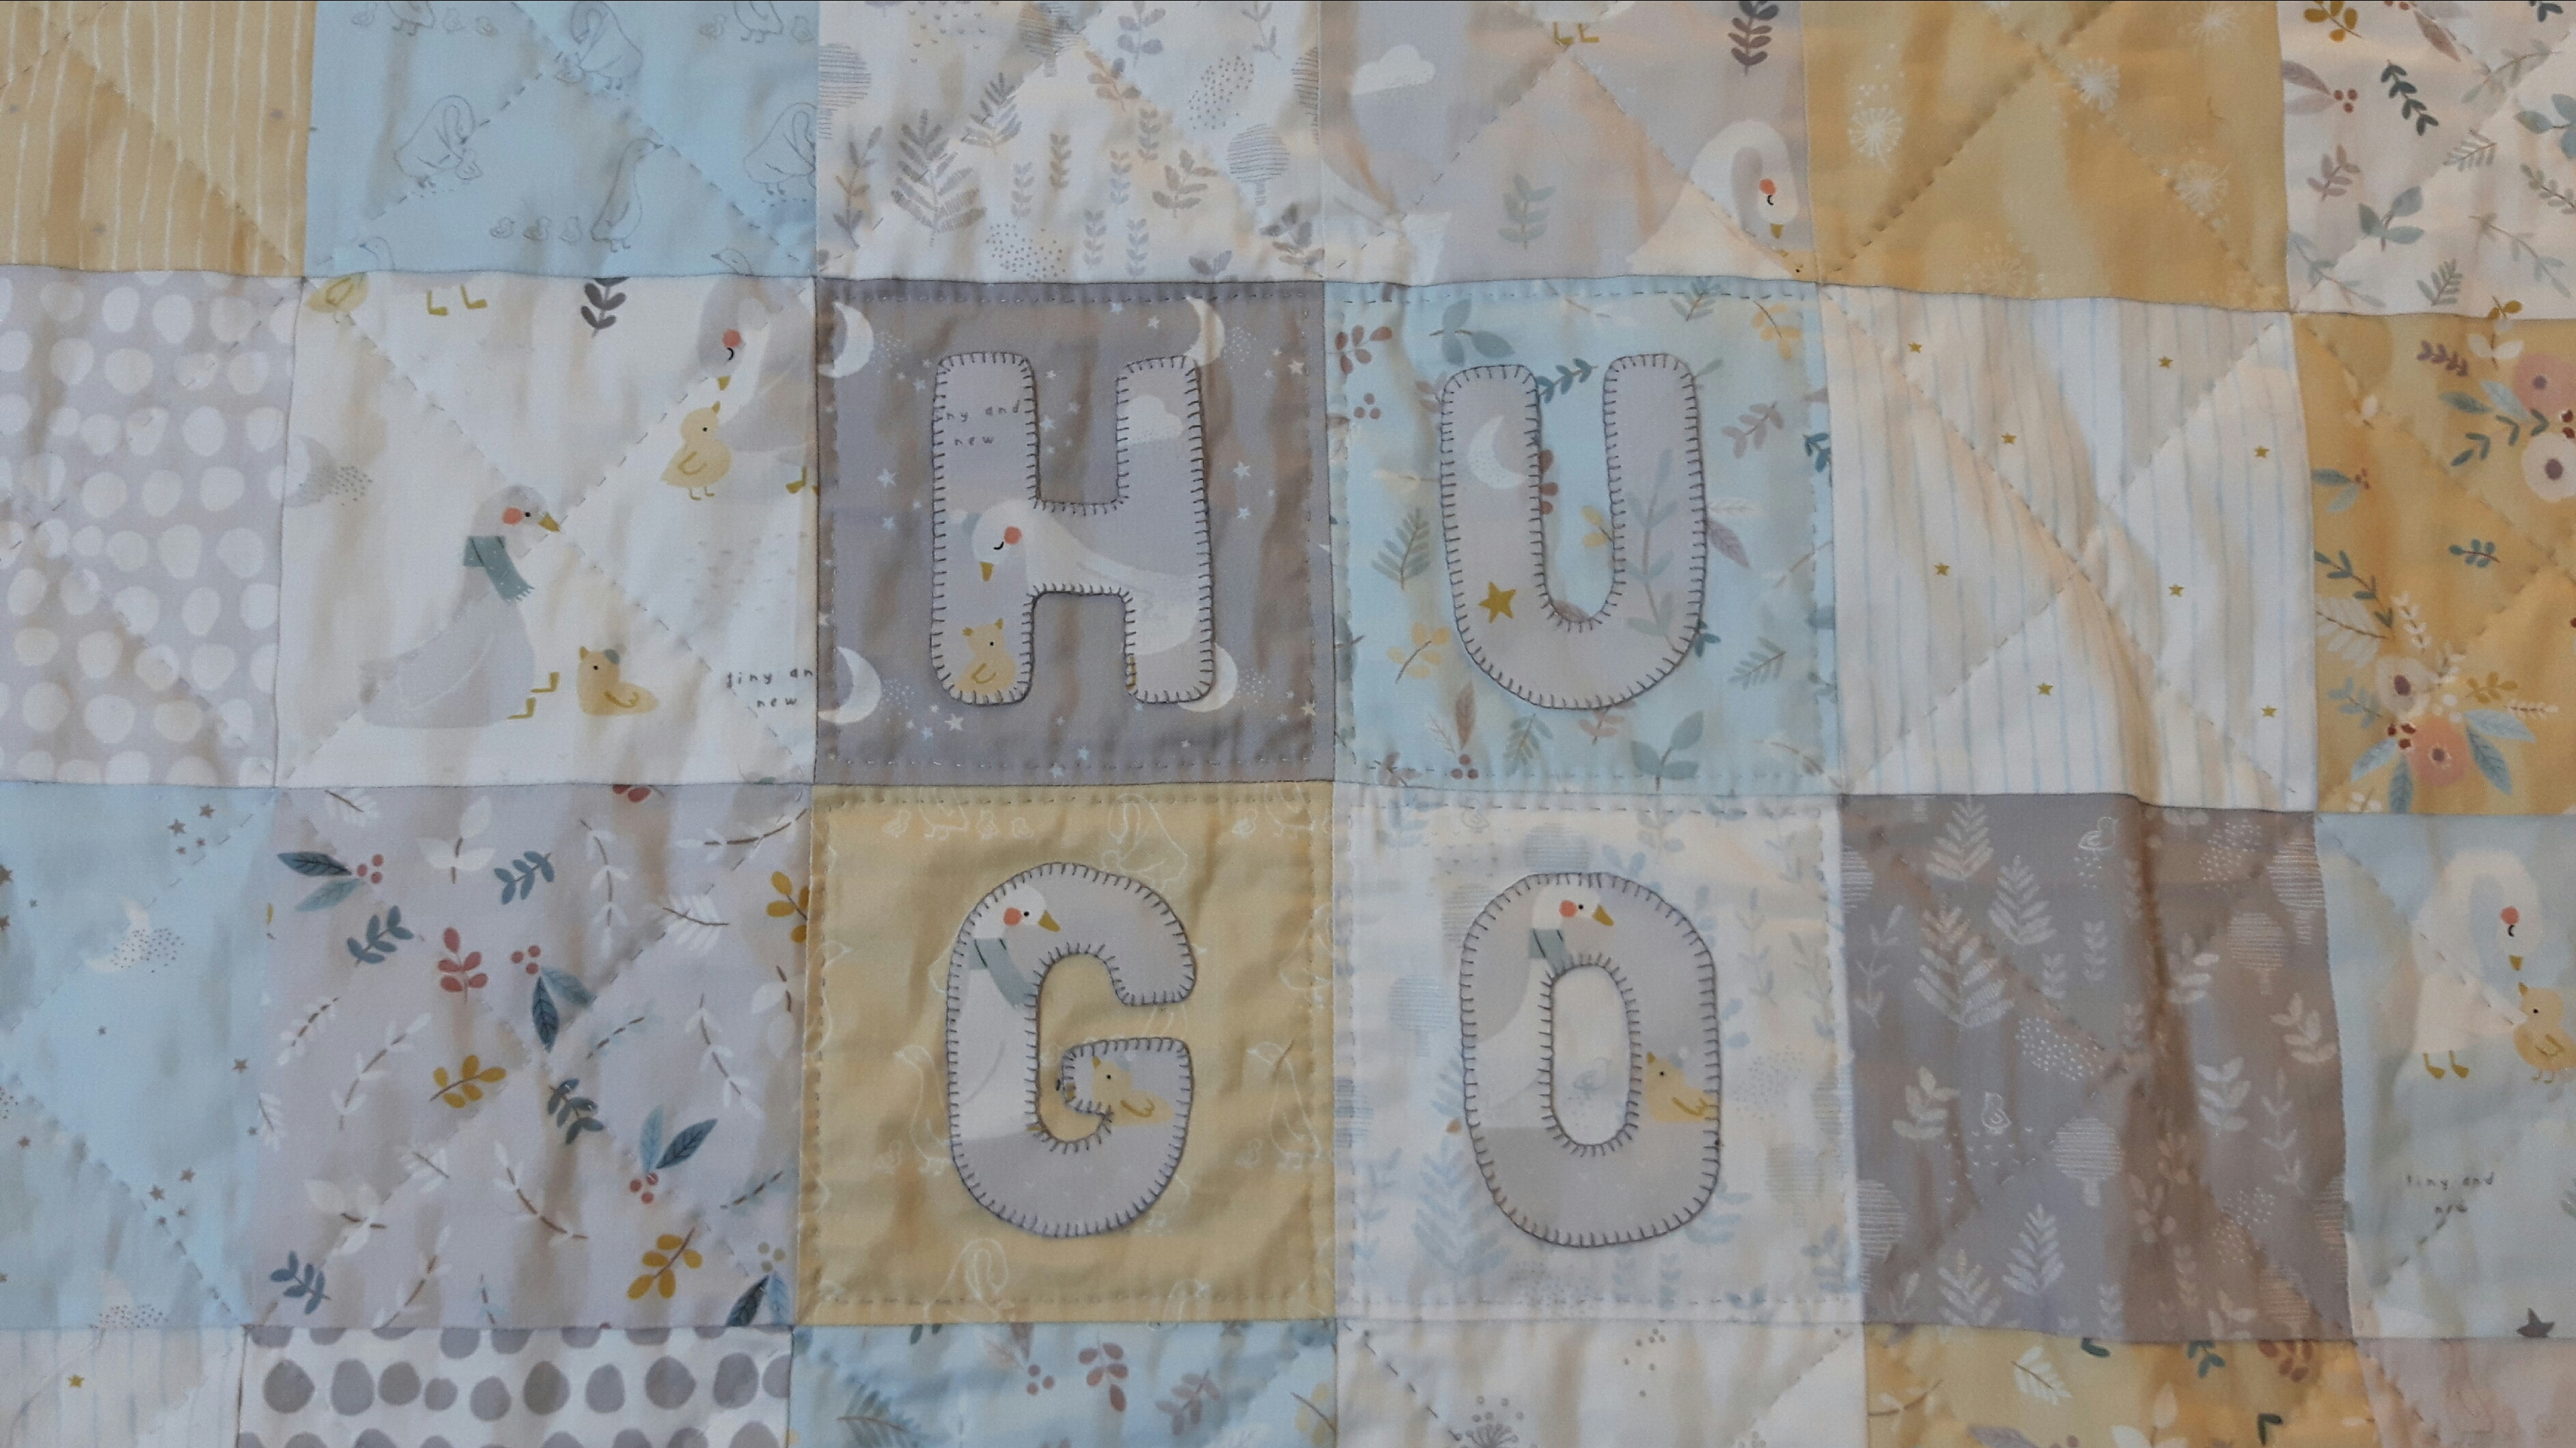
Having made the basic top I realised I could quite nicely include his name on the front of the quilt, having checked first there was no chance of them changing their mind! After trying different fabrics I plumped for the border fabric. I drew the letters by hand and bondawebbed them on, hand-stitched round with dark grey blanket stitch which brought the letters out nicely.
It made up beautifully, here’s the quilt top waiting to be quilted…
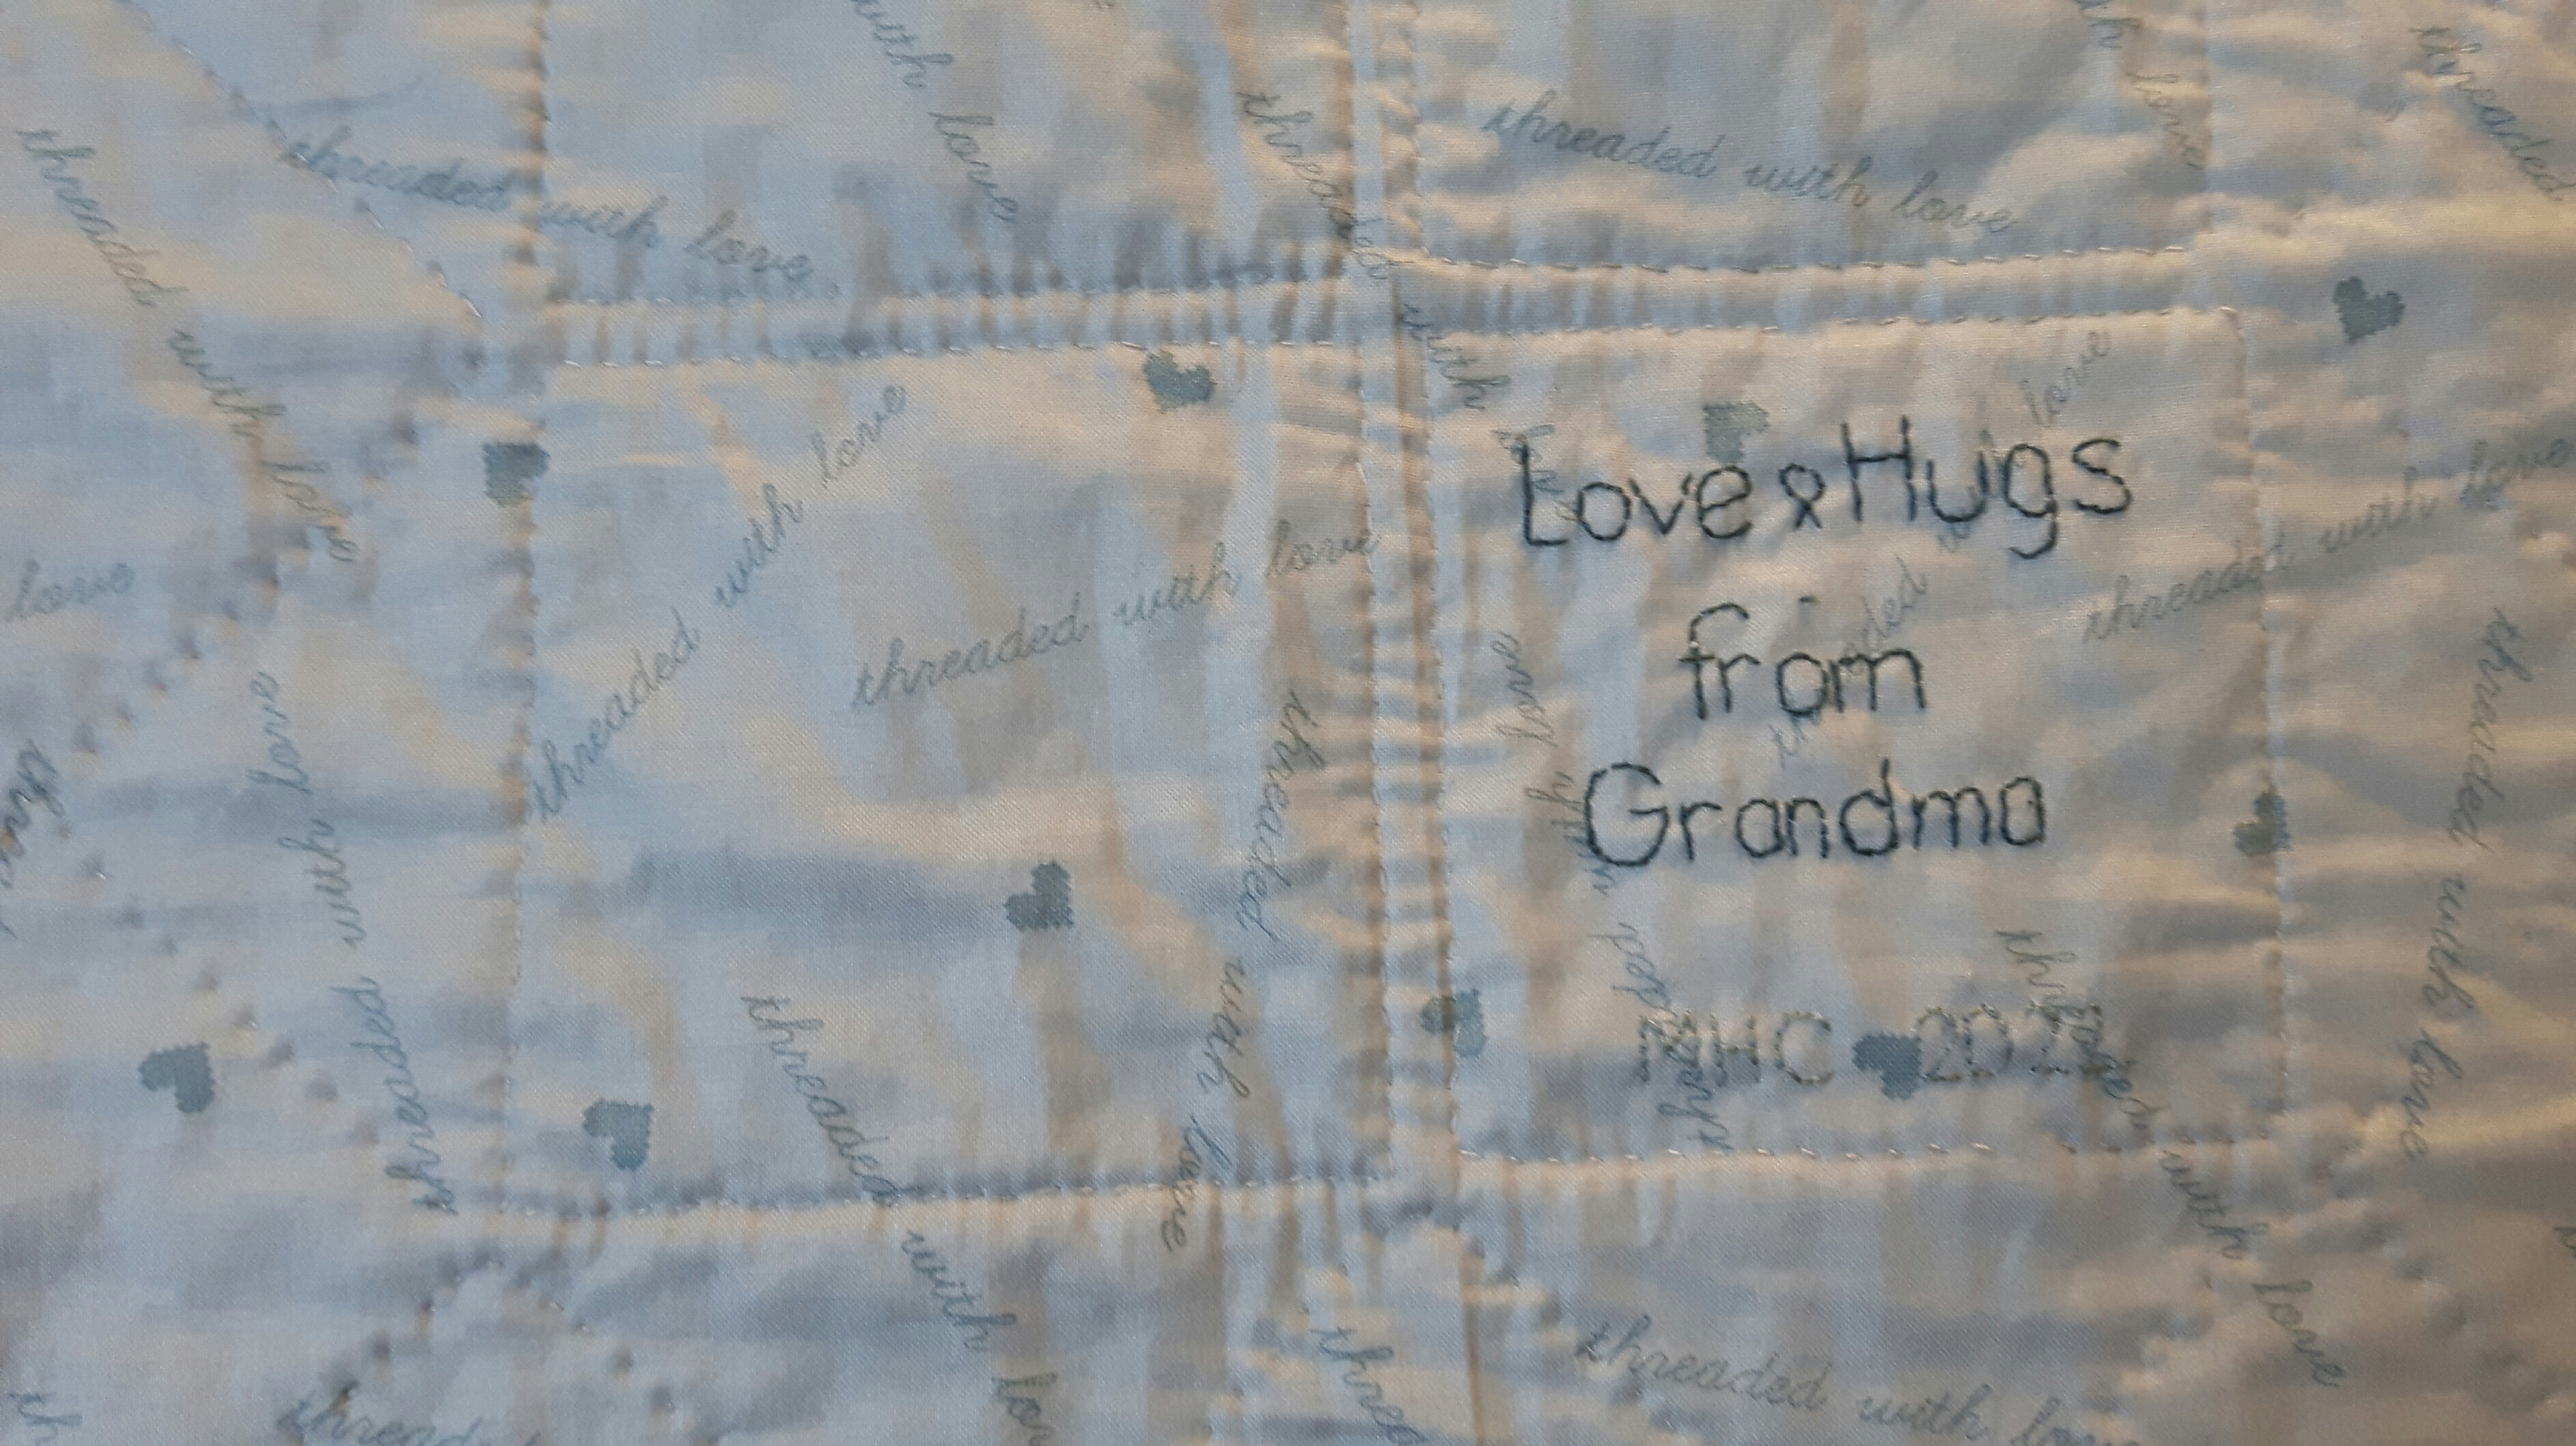
I’d given myself sufficient time to make the quilt, until I decided to hand quilt it about three weeks ago!! I made the quilt sandwich with some lovely soft blue for the backing with the words ‘threaded with love’ all over it, I used 505 spray to baste the three layers together, then it was ready to quilt.
I used a variegated grey gutermann thread and started with the name squares. I just went round about 1/4″ in for these.
For the rest of the squares I did a simple cross-hatch which is fairly quick and easy to stitch but effective.
It took me a while to decide how to quilt the border, hearts, lines…I decided in the end to do a meander and to my surprise it’s so much easier to meander by hand rather than on the machine, I think with the slower pace you can plan a bit better. I finished quilting it last night, talk about eleventh hour!
I wasn’t sure about the stripy binding when I first bought the quilt, but it is perfect. The only thing I id have to watch is that I usually stitch my binding strips together on a 45′ angle as it spreads the thicker seam a bit. With stripes there was no way I could match the pattern, so I straight seamed all the joins. machine stitched it to the front and then hand-stitched it to the back.
All I had to do then was to embroider a label. I started this last night and finished it this morning before I went to work after I happened to wake up at 5am!
I gave it to his mum and dad today and they love it 🙂
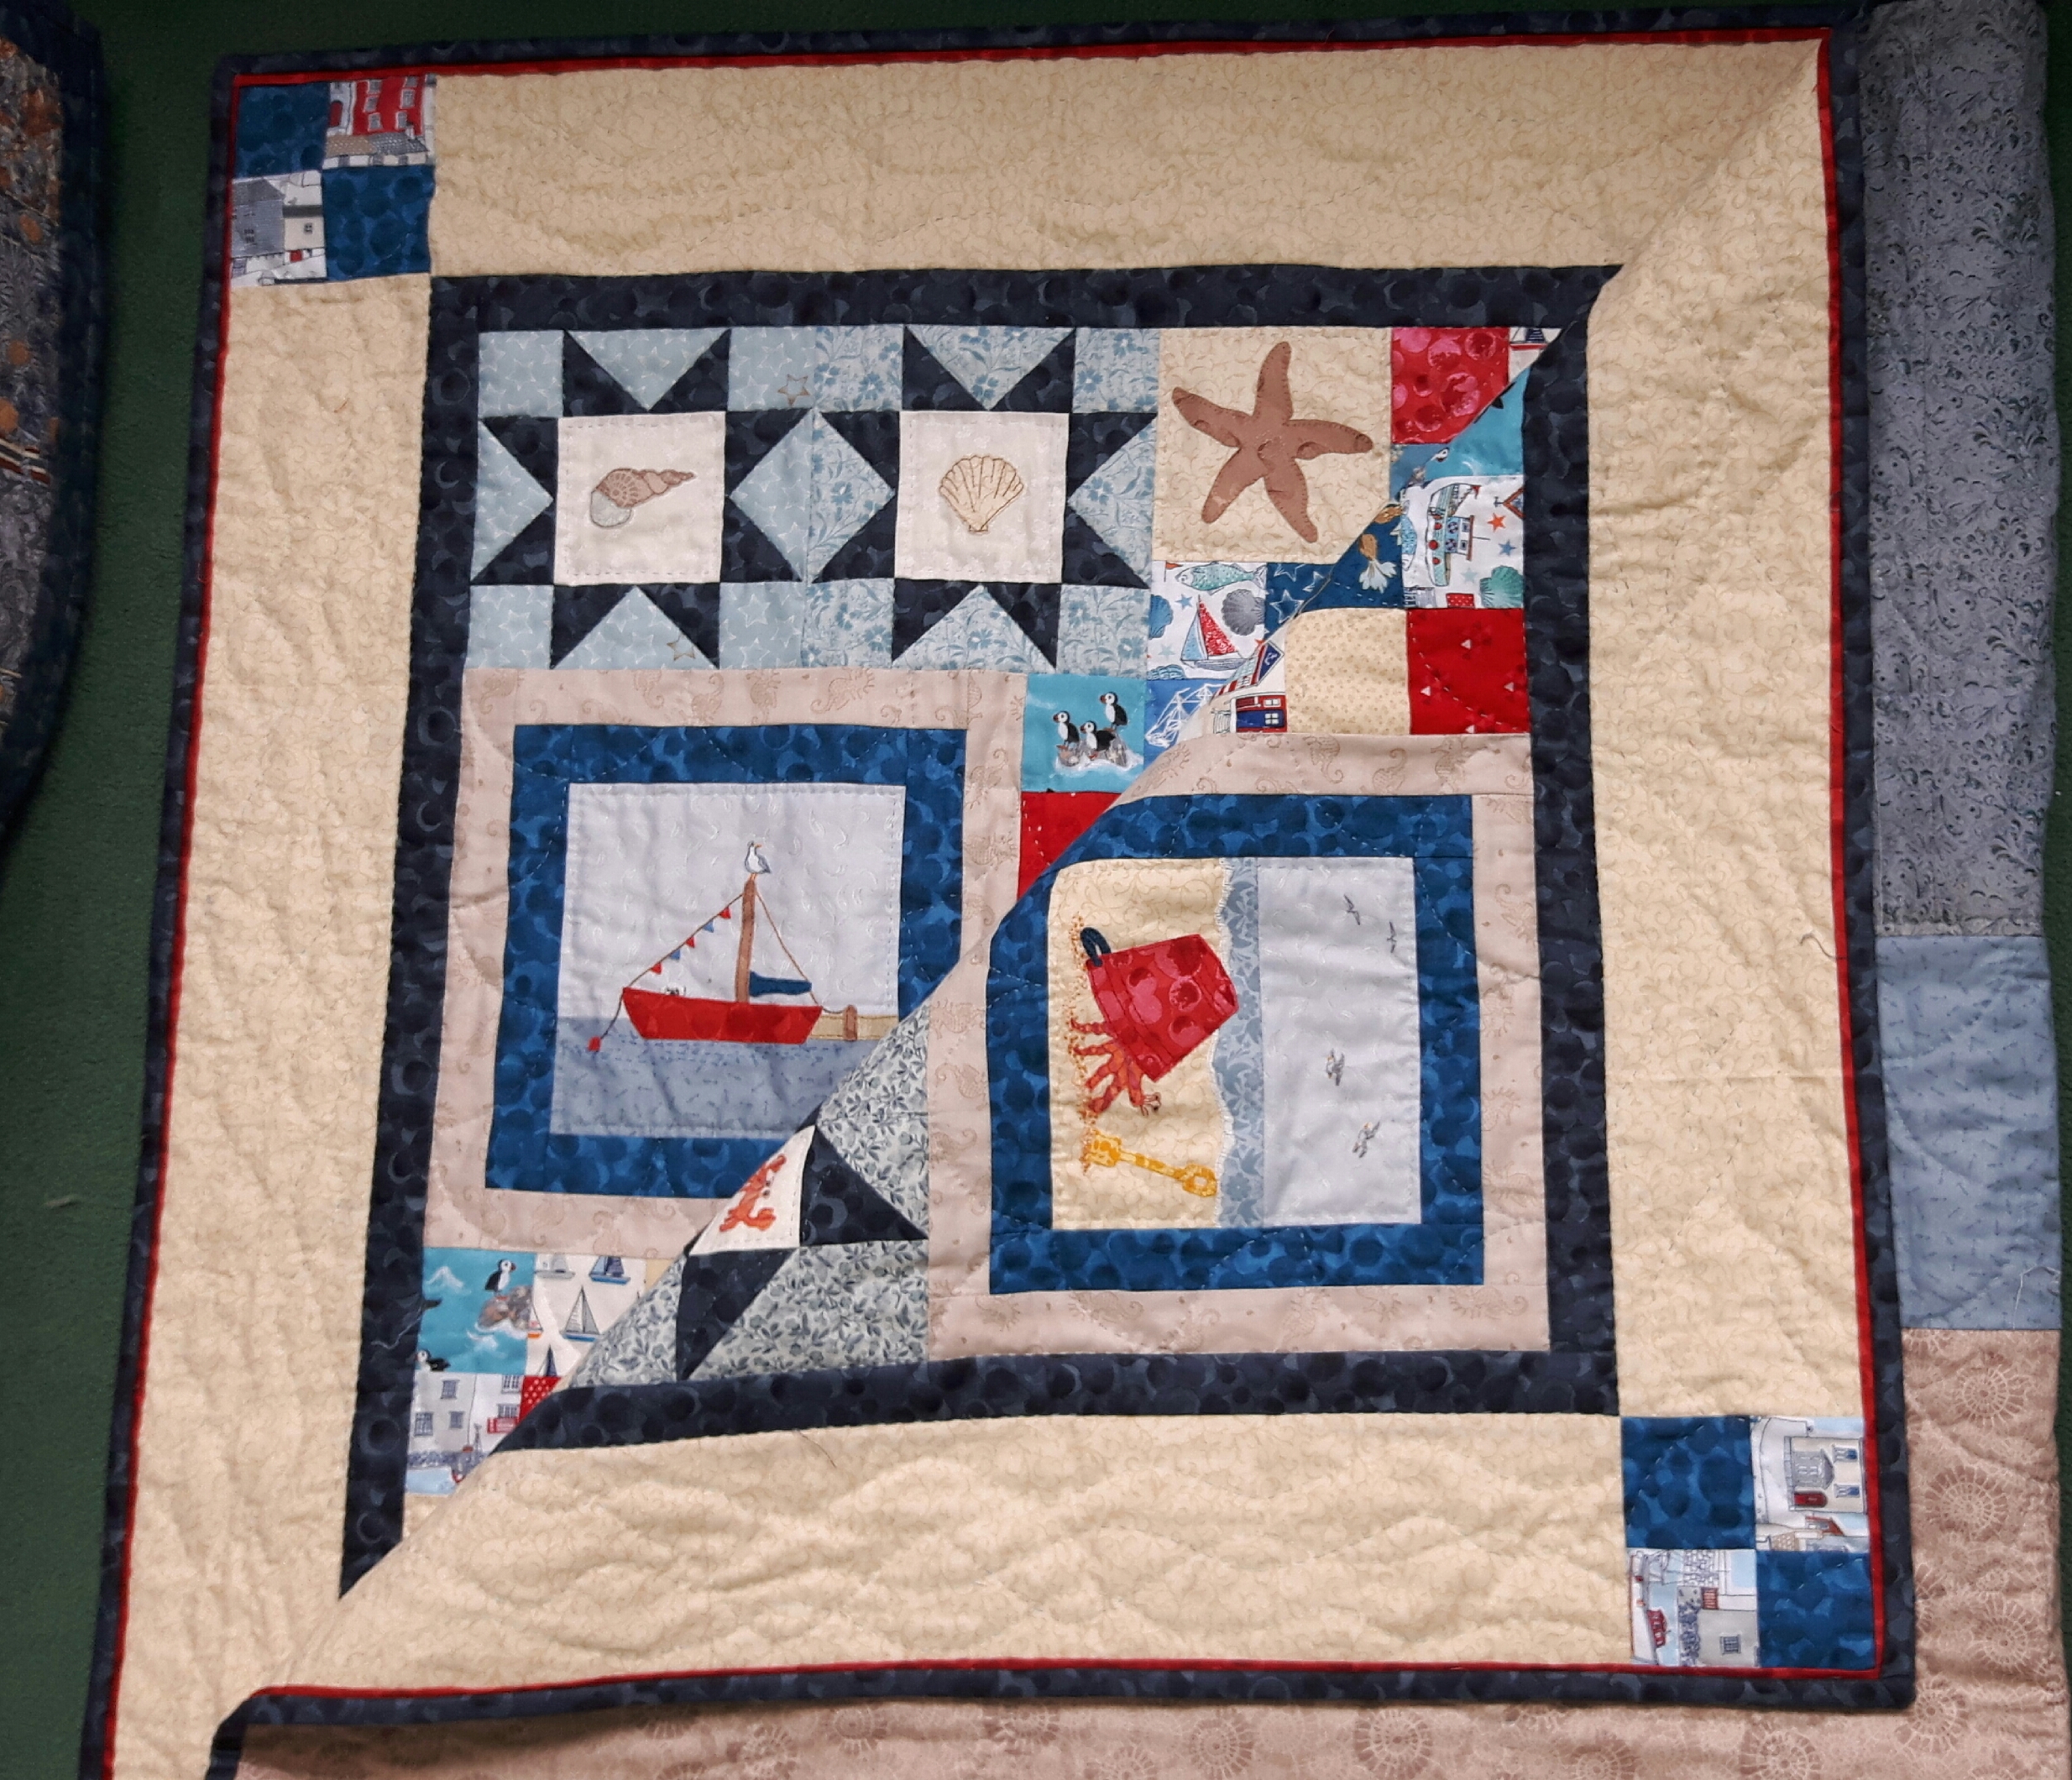
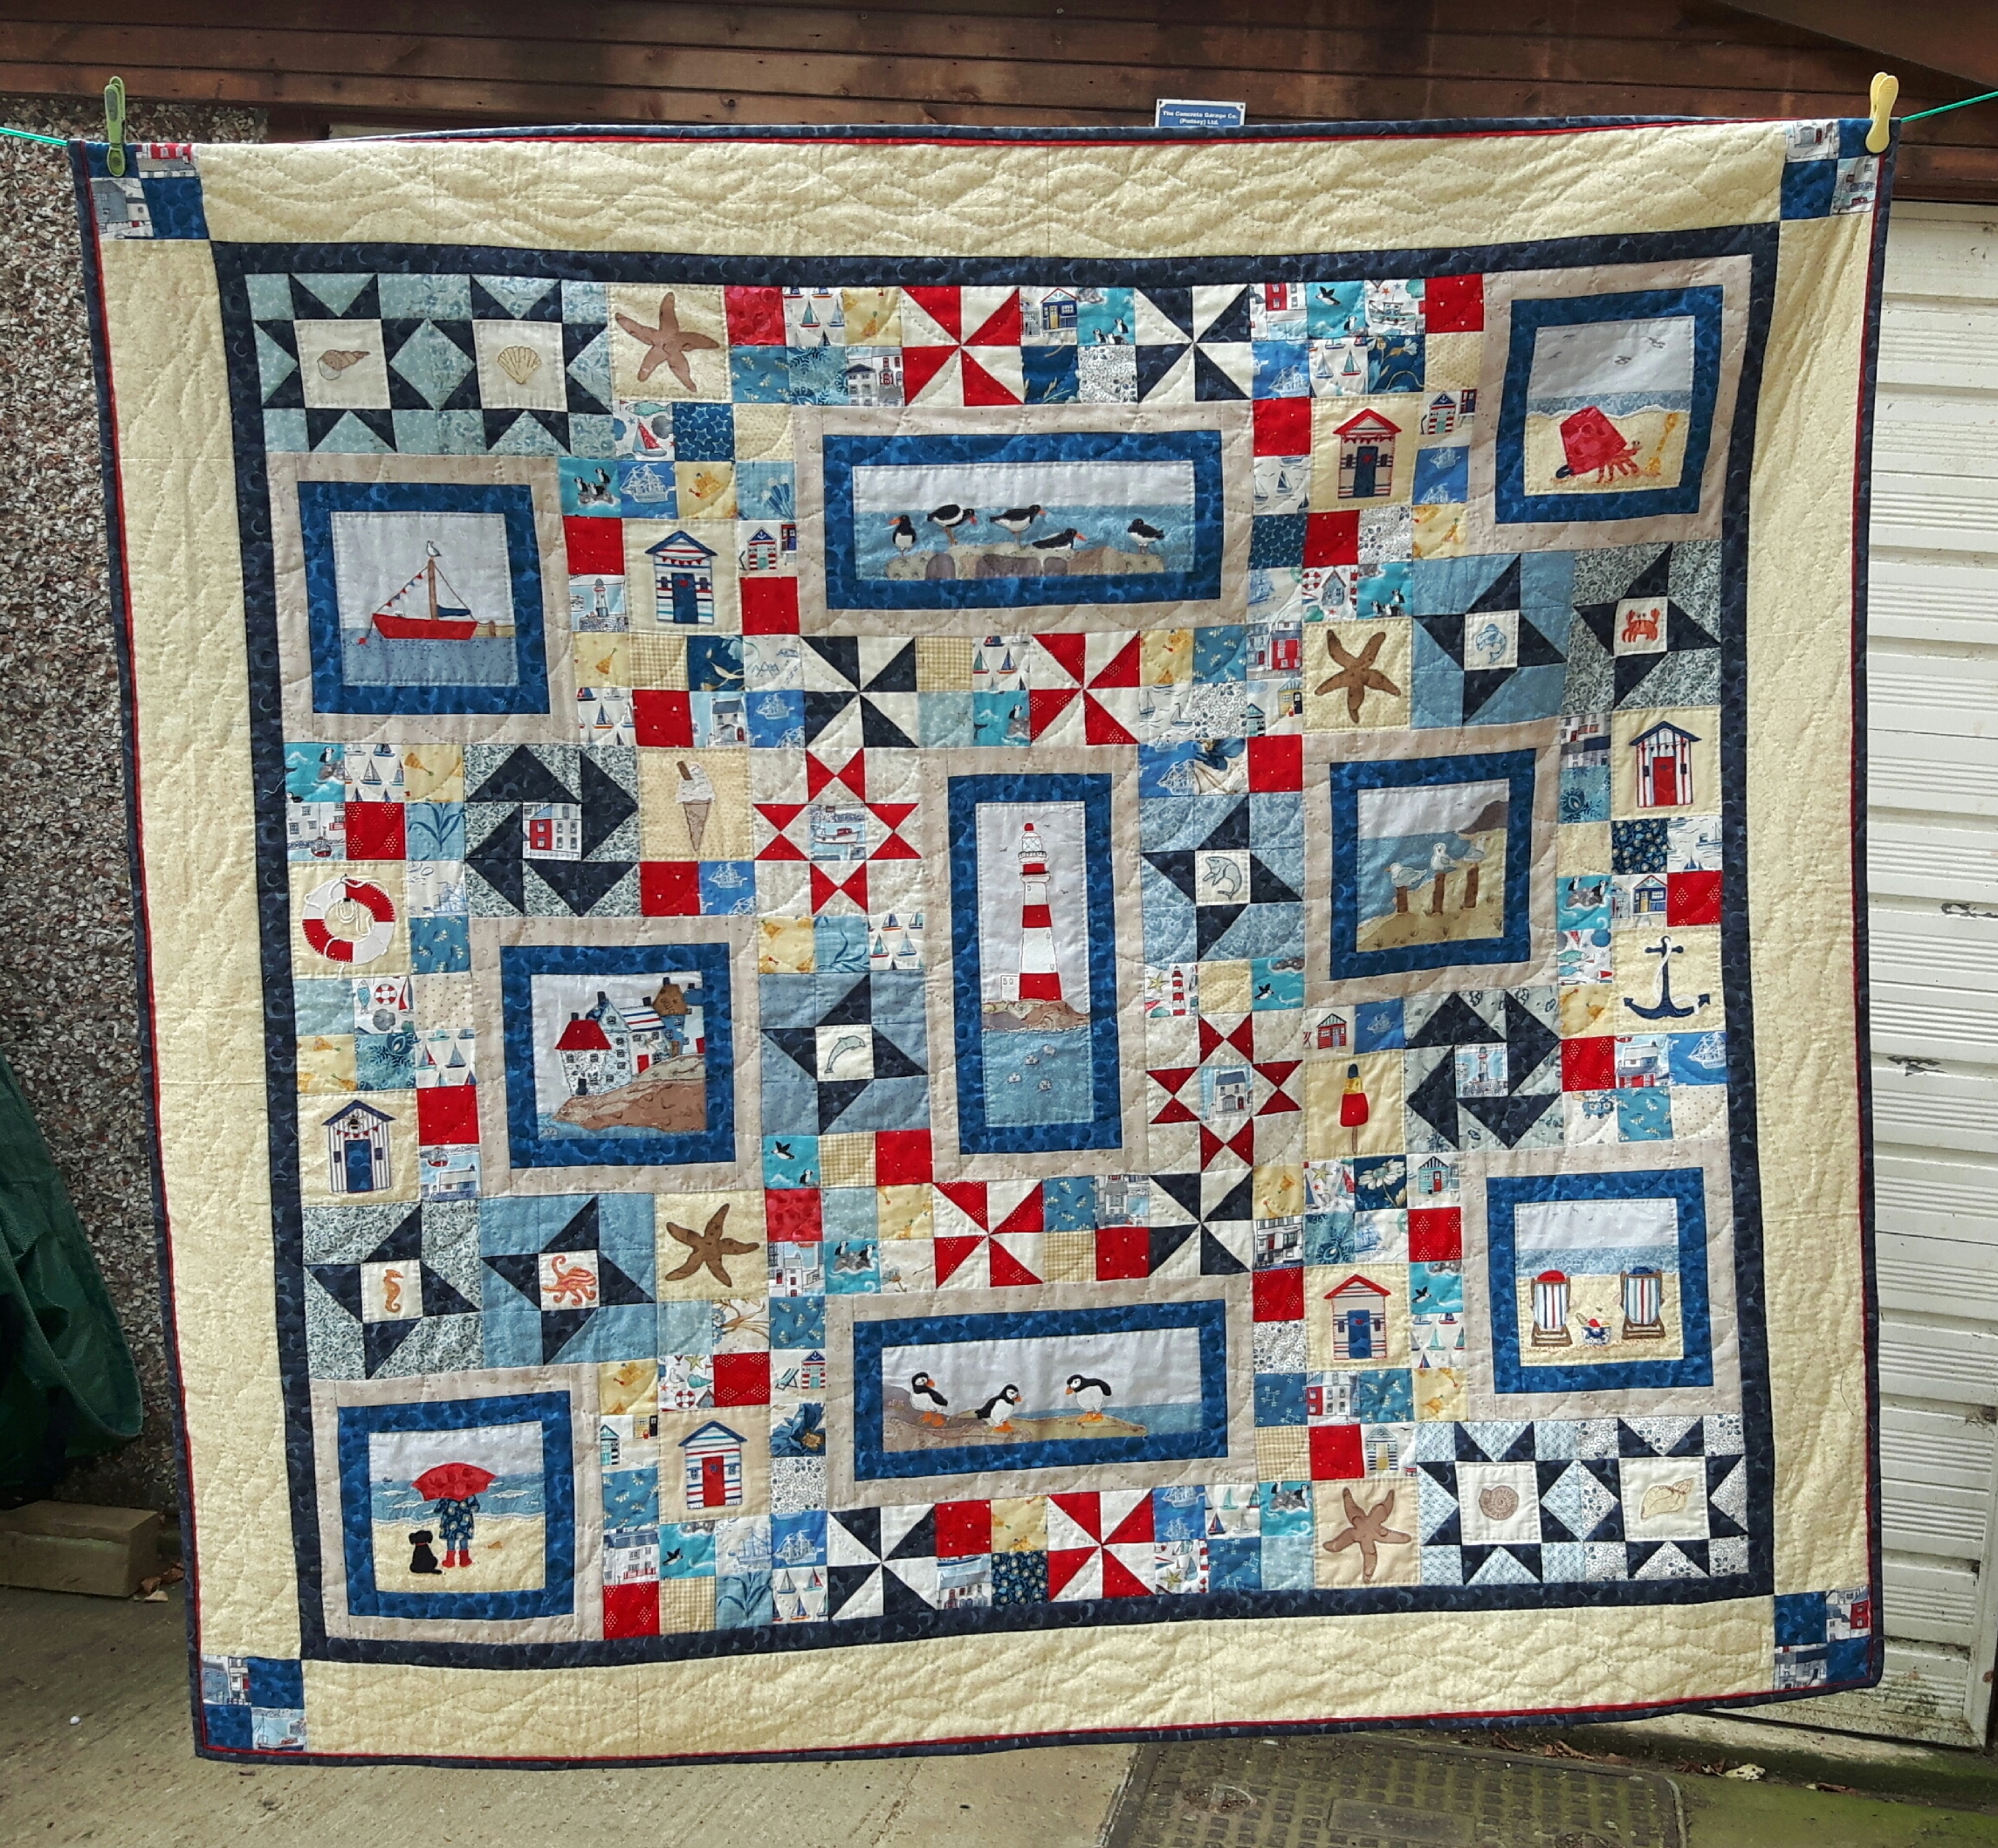
It’s finally time for a happy dance with my seaside quilt. Three weeks ago I had finally finished the hand quilting and just had the binding to stitch on, but first had to find the right fabric as I’d used up what I saved making a cushion…
After an unsuccessful trip to Leeds I ordered some of the Lewis and Irene bumbleberry fabric on line. I do like this range of fabrics, they do it in lots of colourways and it’s a great blender. I had decided on a narrow flange of red to give a little pop of colour followed by a dark blue binding, I usually do a 2.25″ strip folded over for binding, this time I wanted it slightly wider so I went for 2.5″ instead! I know it’s only 1/4″ but it just helped to balance it.
I machine stitched the flange and the binding on the front and then hand-stitched the binding to the back. Some people hate the binding part but I enjoy just sitting and stitching without having to think too much! I’m pleased with the red flange, it does give a nice pop of colour.
I’ve really enjoyed making this quilt, it is such a happy quilt, I’m not usually into seaside themed stuff but this brings back so many happy memories of both my childhood holidays with my grandparents in Prestatyn and then holidays with my own children in Whitby on the Yorkshire coastline. Of course my walking buddy and I have walked from Saltburn at the top to Filey which is probably about 2/3rds of the way down the coast. So lots of happy memories. The author and designer of the quilt also had many holidays around Whitby so the embroidered applique pictures are very reminiscent of the area. The quilt is by Kathryn Whittingham of Patchwork Katy, she kindly gave me the book after I loved her Cottage Garden quilt so much. If you fancy making the quilt, I’d happily recommend the book, the instructions are nice and clear, it’s written for hand sewing but you can machine piece and hand embroider too like I did.
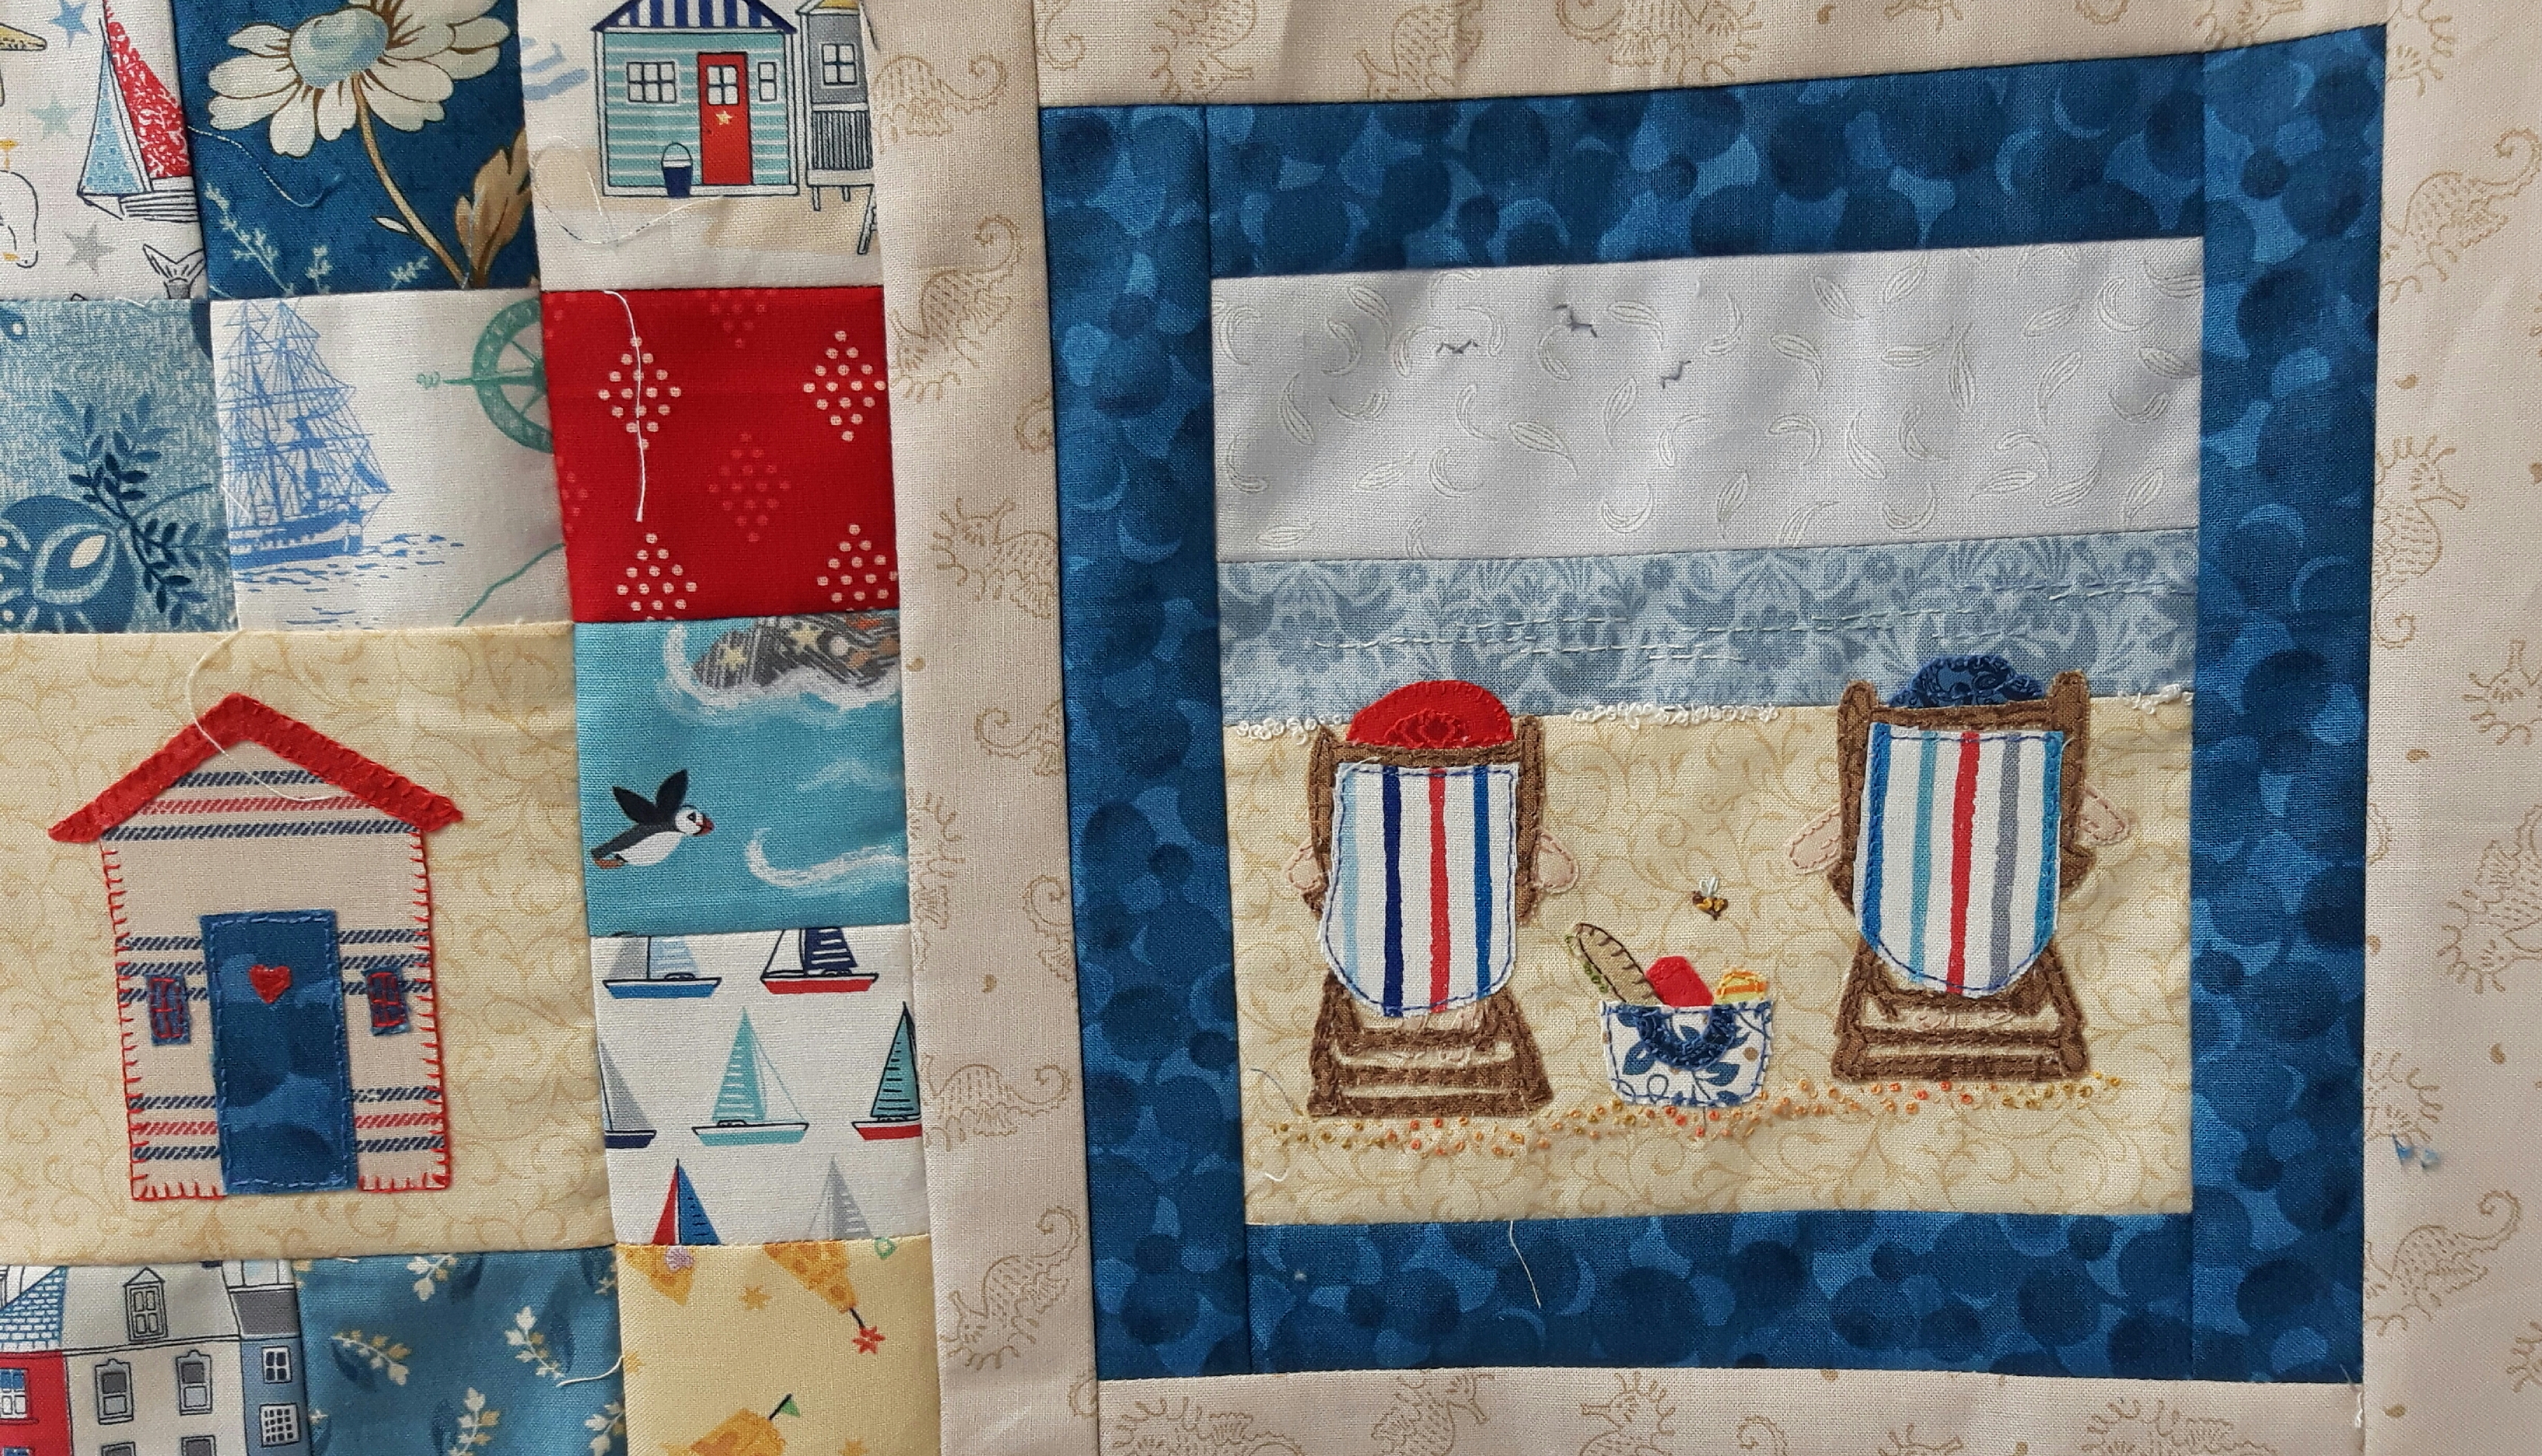
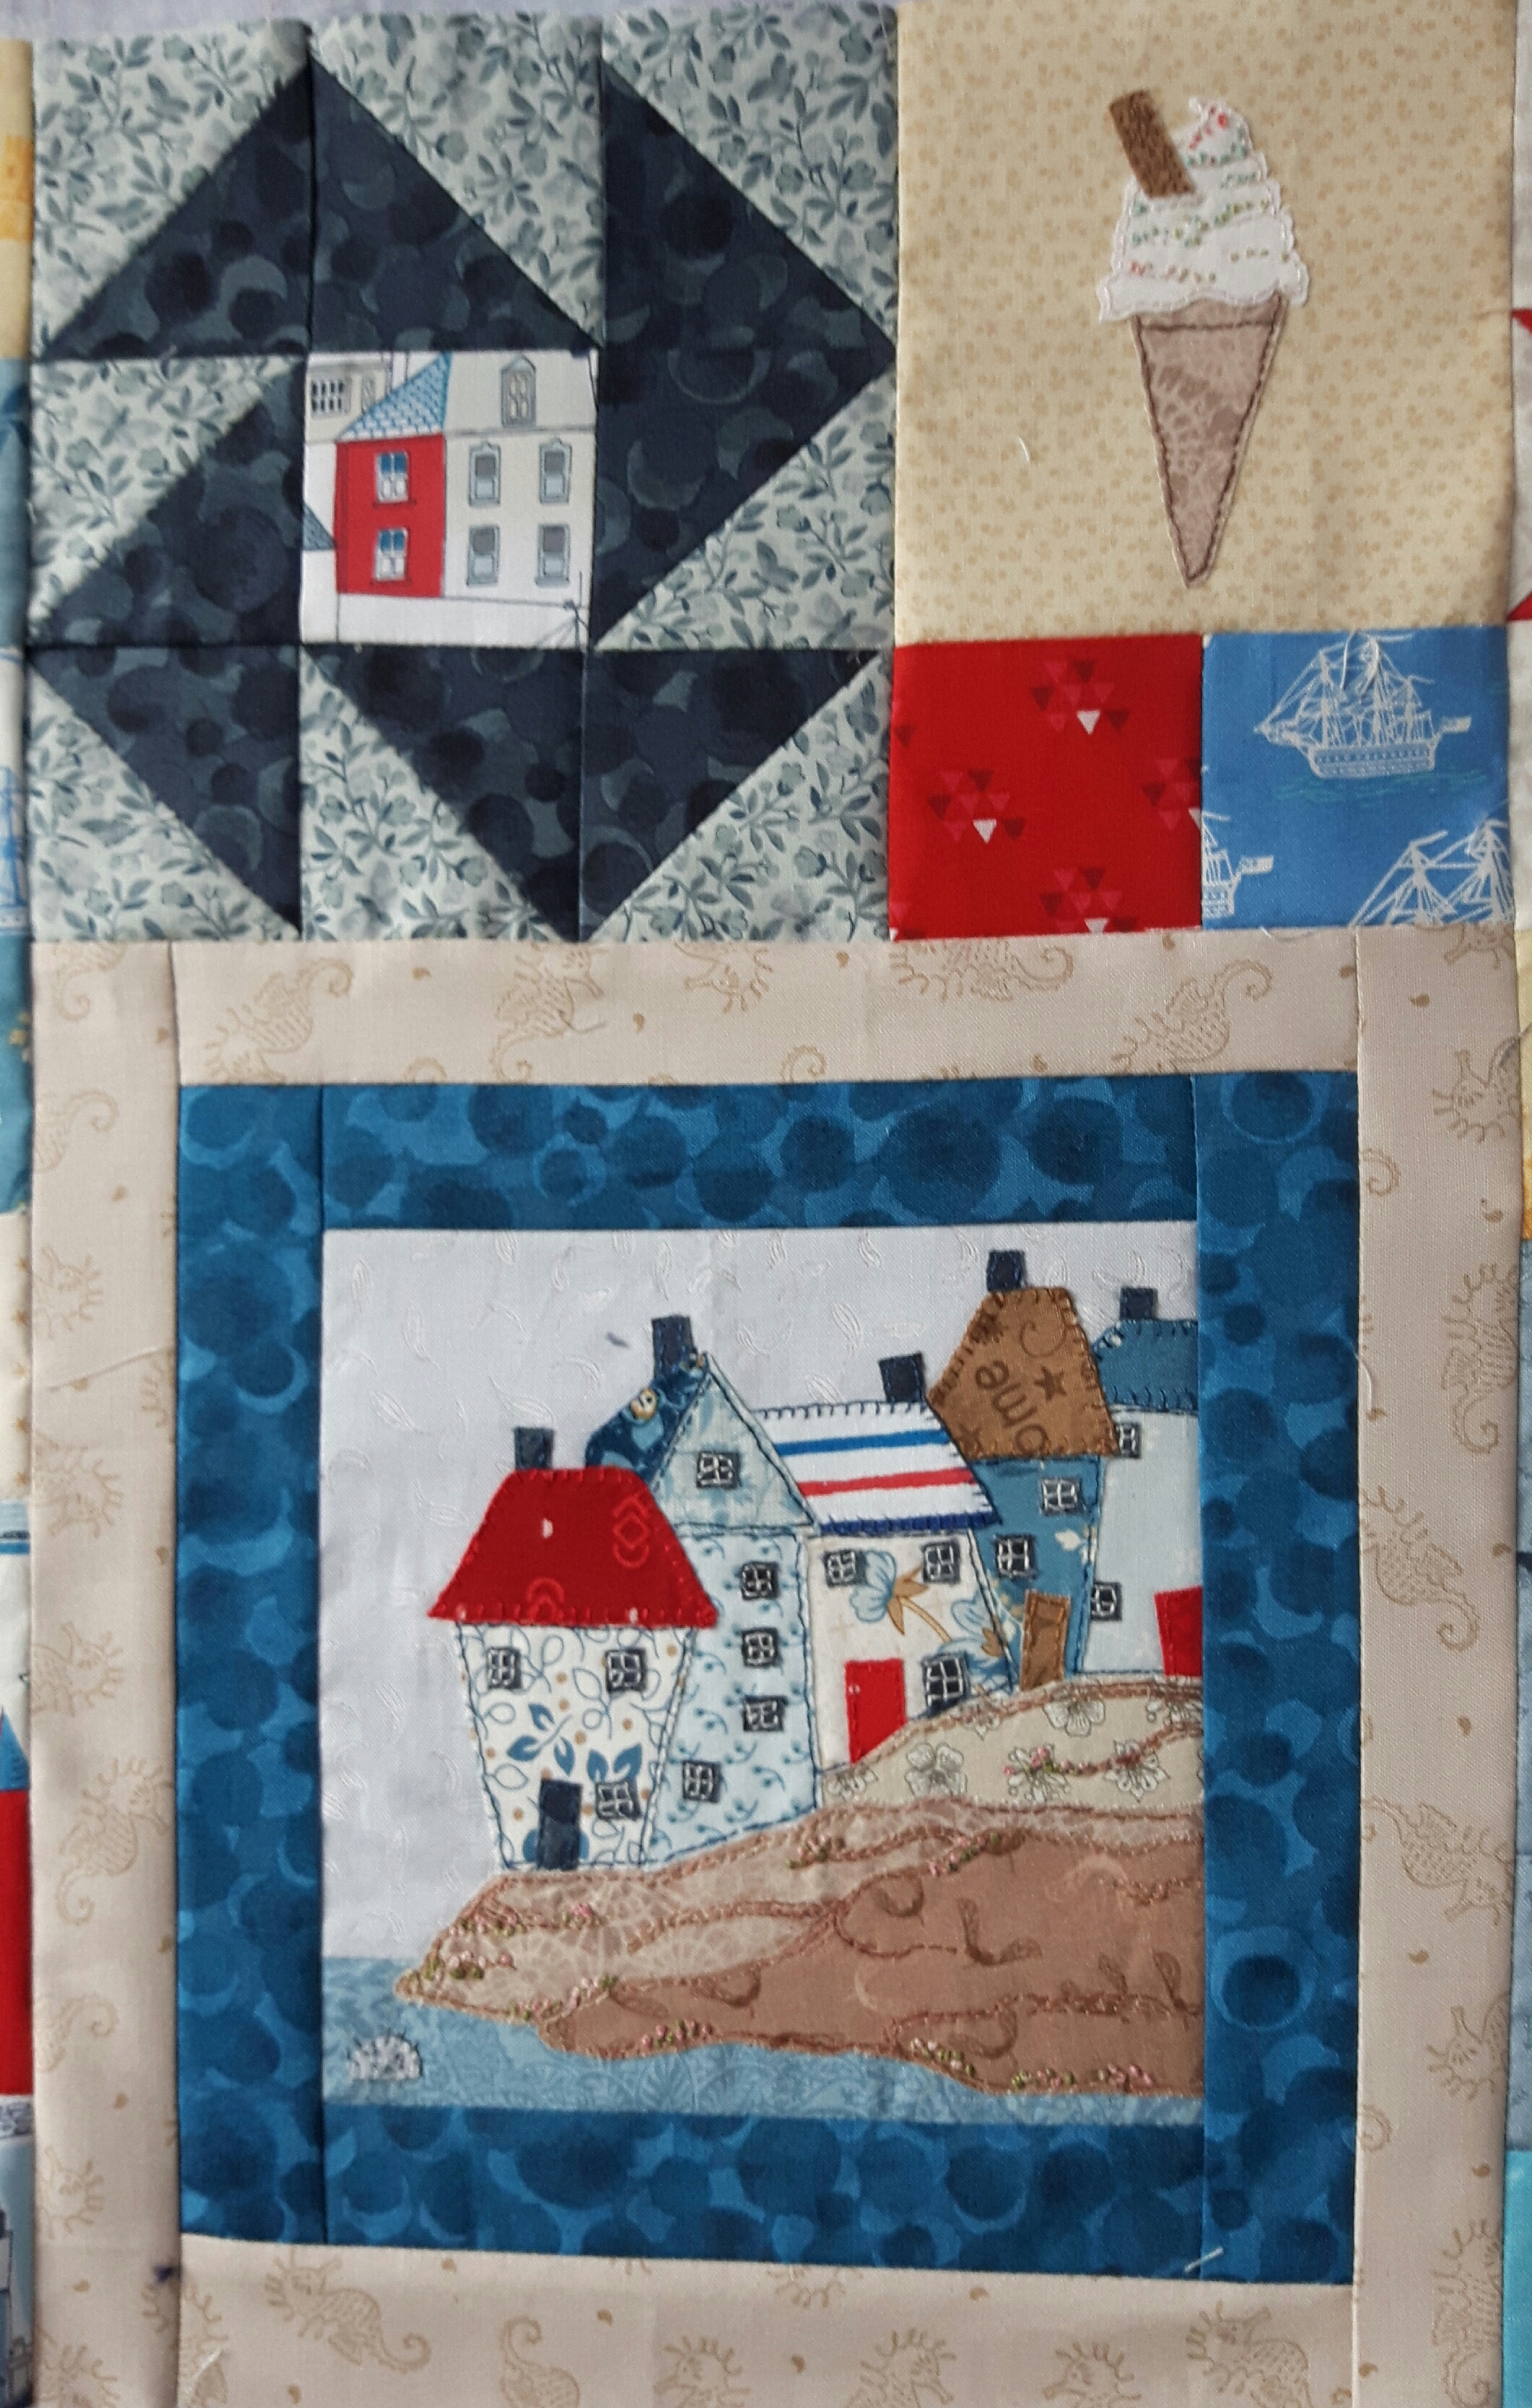
Here’s some closeups of the blocks;
I’m still trying to decide on a name for the quilt, every quilt traditionally has a name. Ideas so far include Happy Memories, God’s Own Coastline (Yorkshire is known as God’s Own County!) at the moment I’m leaning towards Cockles and Candyfloss. Any suggestions welcome!!
So here’s the finished quilt, I tried photographing it on the floor but despite standing on an old pine chest, my arms just aren’t long enough, so you have the lovely backdrop of the garage instead!!
Hand Quilt Along Links
This Hand Quilt Along is an opportunity for hand quilters and piecers to share and motivate one another. We post every three weeks, to show our progress and encourage one another. If you have a hand quilting project and would like to join our group contact Kathy at the link below.
Affiliate Link; Although the book was gifted to me by the author the views and opinions expressed are my own and I don’t receive any commission for sales linked to clicks from my blog.
At home flower arranging tends to stretch to plonking in a vase and that’s about it, luckily I quite like the plonked in a vase look! I think I may have been on a couple of workshops on Christmas table decorations and that’s about the sum of my flower arranging education! My mum used to do the church flowers so I must have absorbed a bit, though the main thing I remember her talking about is how easy it is to ‘lose’ the balance of a big flower arrangement. Despite this I rashly agreed to help with decorating the church for the wedding of my closest friends daughter. This was what I call a covid wedding, it was meant to be in May 2020, then May 2021, and now it was actually happening!
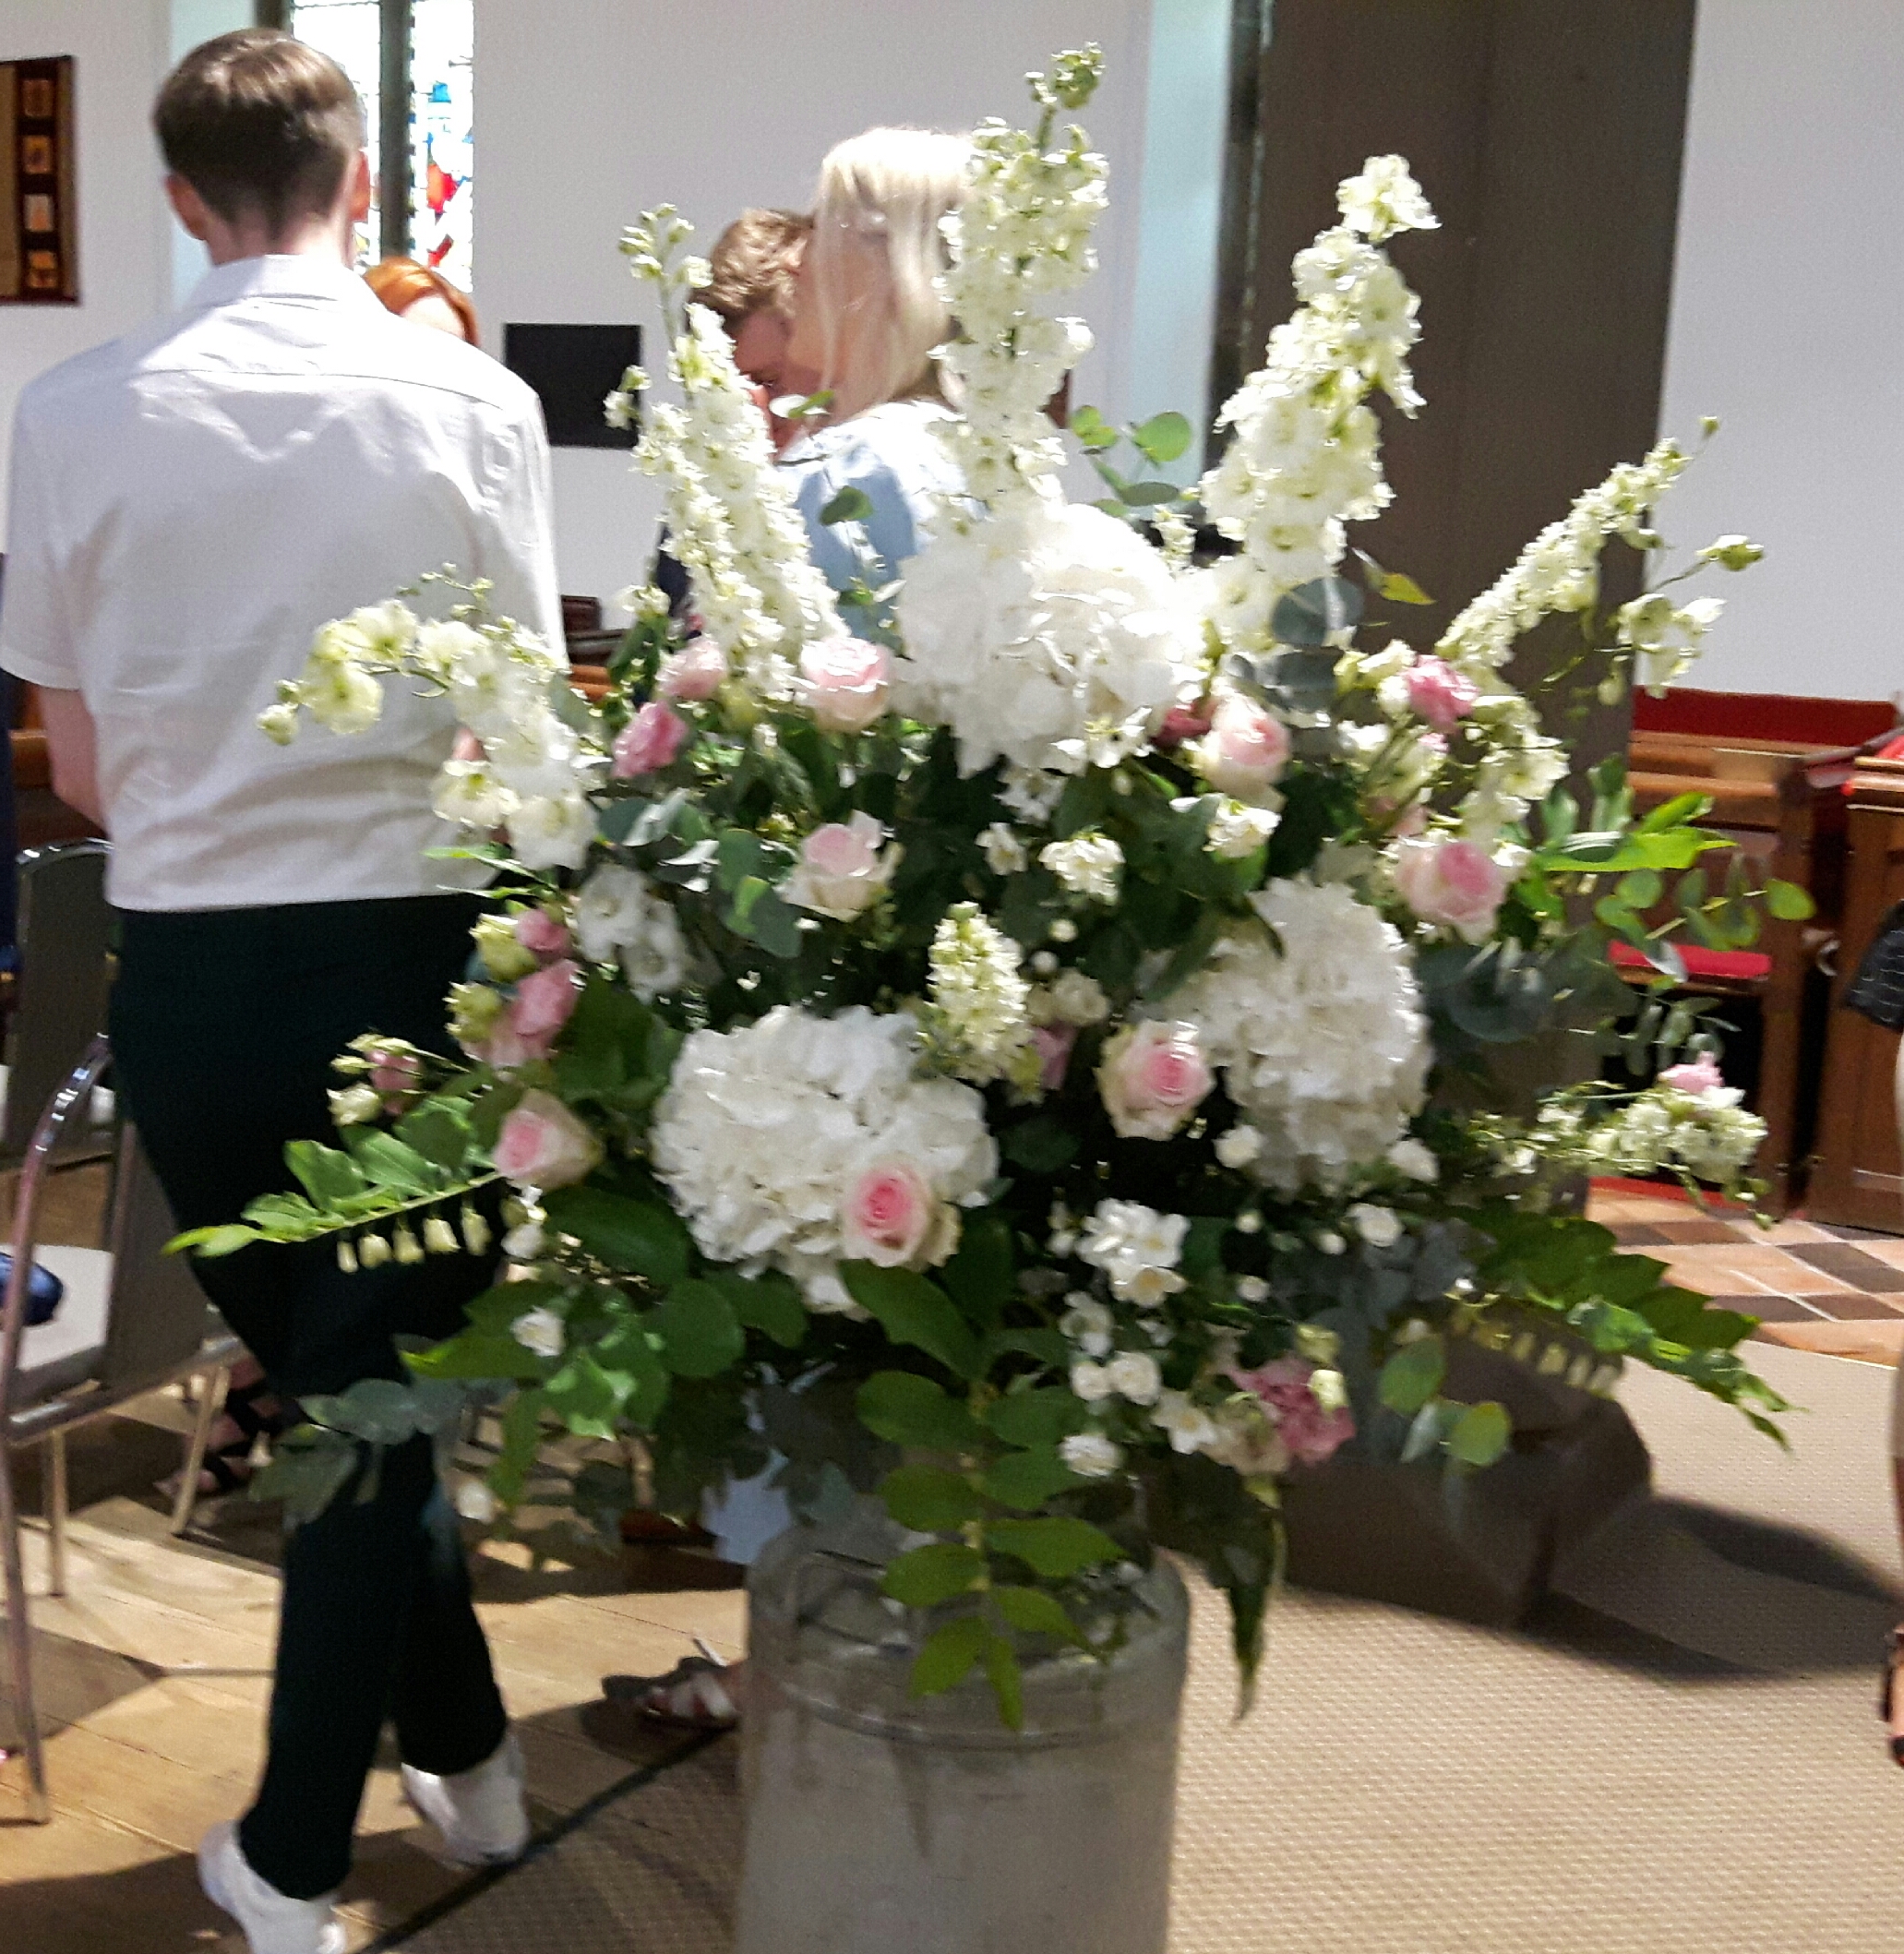
I was thinking of a few pew ends, so I did take a big gulp when she mentioned that her daughter wanted two arrangements in milk kits. They’re a farming family so they still had the old fashioned big milk churns (or kits) around the farm. Milk kits were going to be big arrangements, especially as they were to be viewed from all sides, I did warn her that it would take a lot of flowers to fill the kits! When we were at the Harrogate flower show we wandered round the floral art tent so I could get an idea of what they wanted.
The wedding was on Tuesday, so on the Sunday before we met at the family farm to make the pew ends. I’d raided my garden for foliage, especially eunonymous, osmanthus, and box. I’d wandered up the back lane too for some ivy and some cupressus and suddenly spotted the huge philadelphus bush on the back lane was in flower. Perfect! Philadelphus has creamy white good sized flowers which have a wonderful scent.
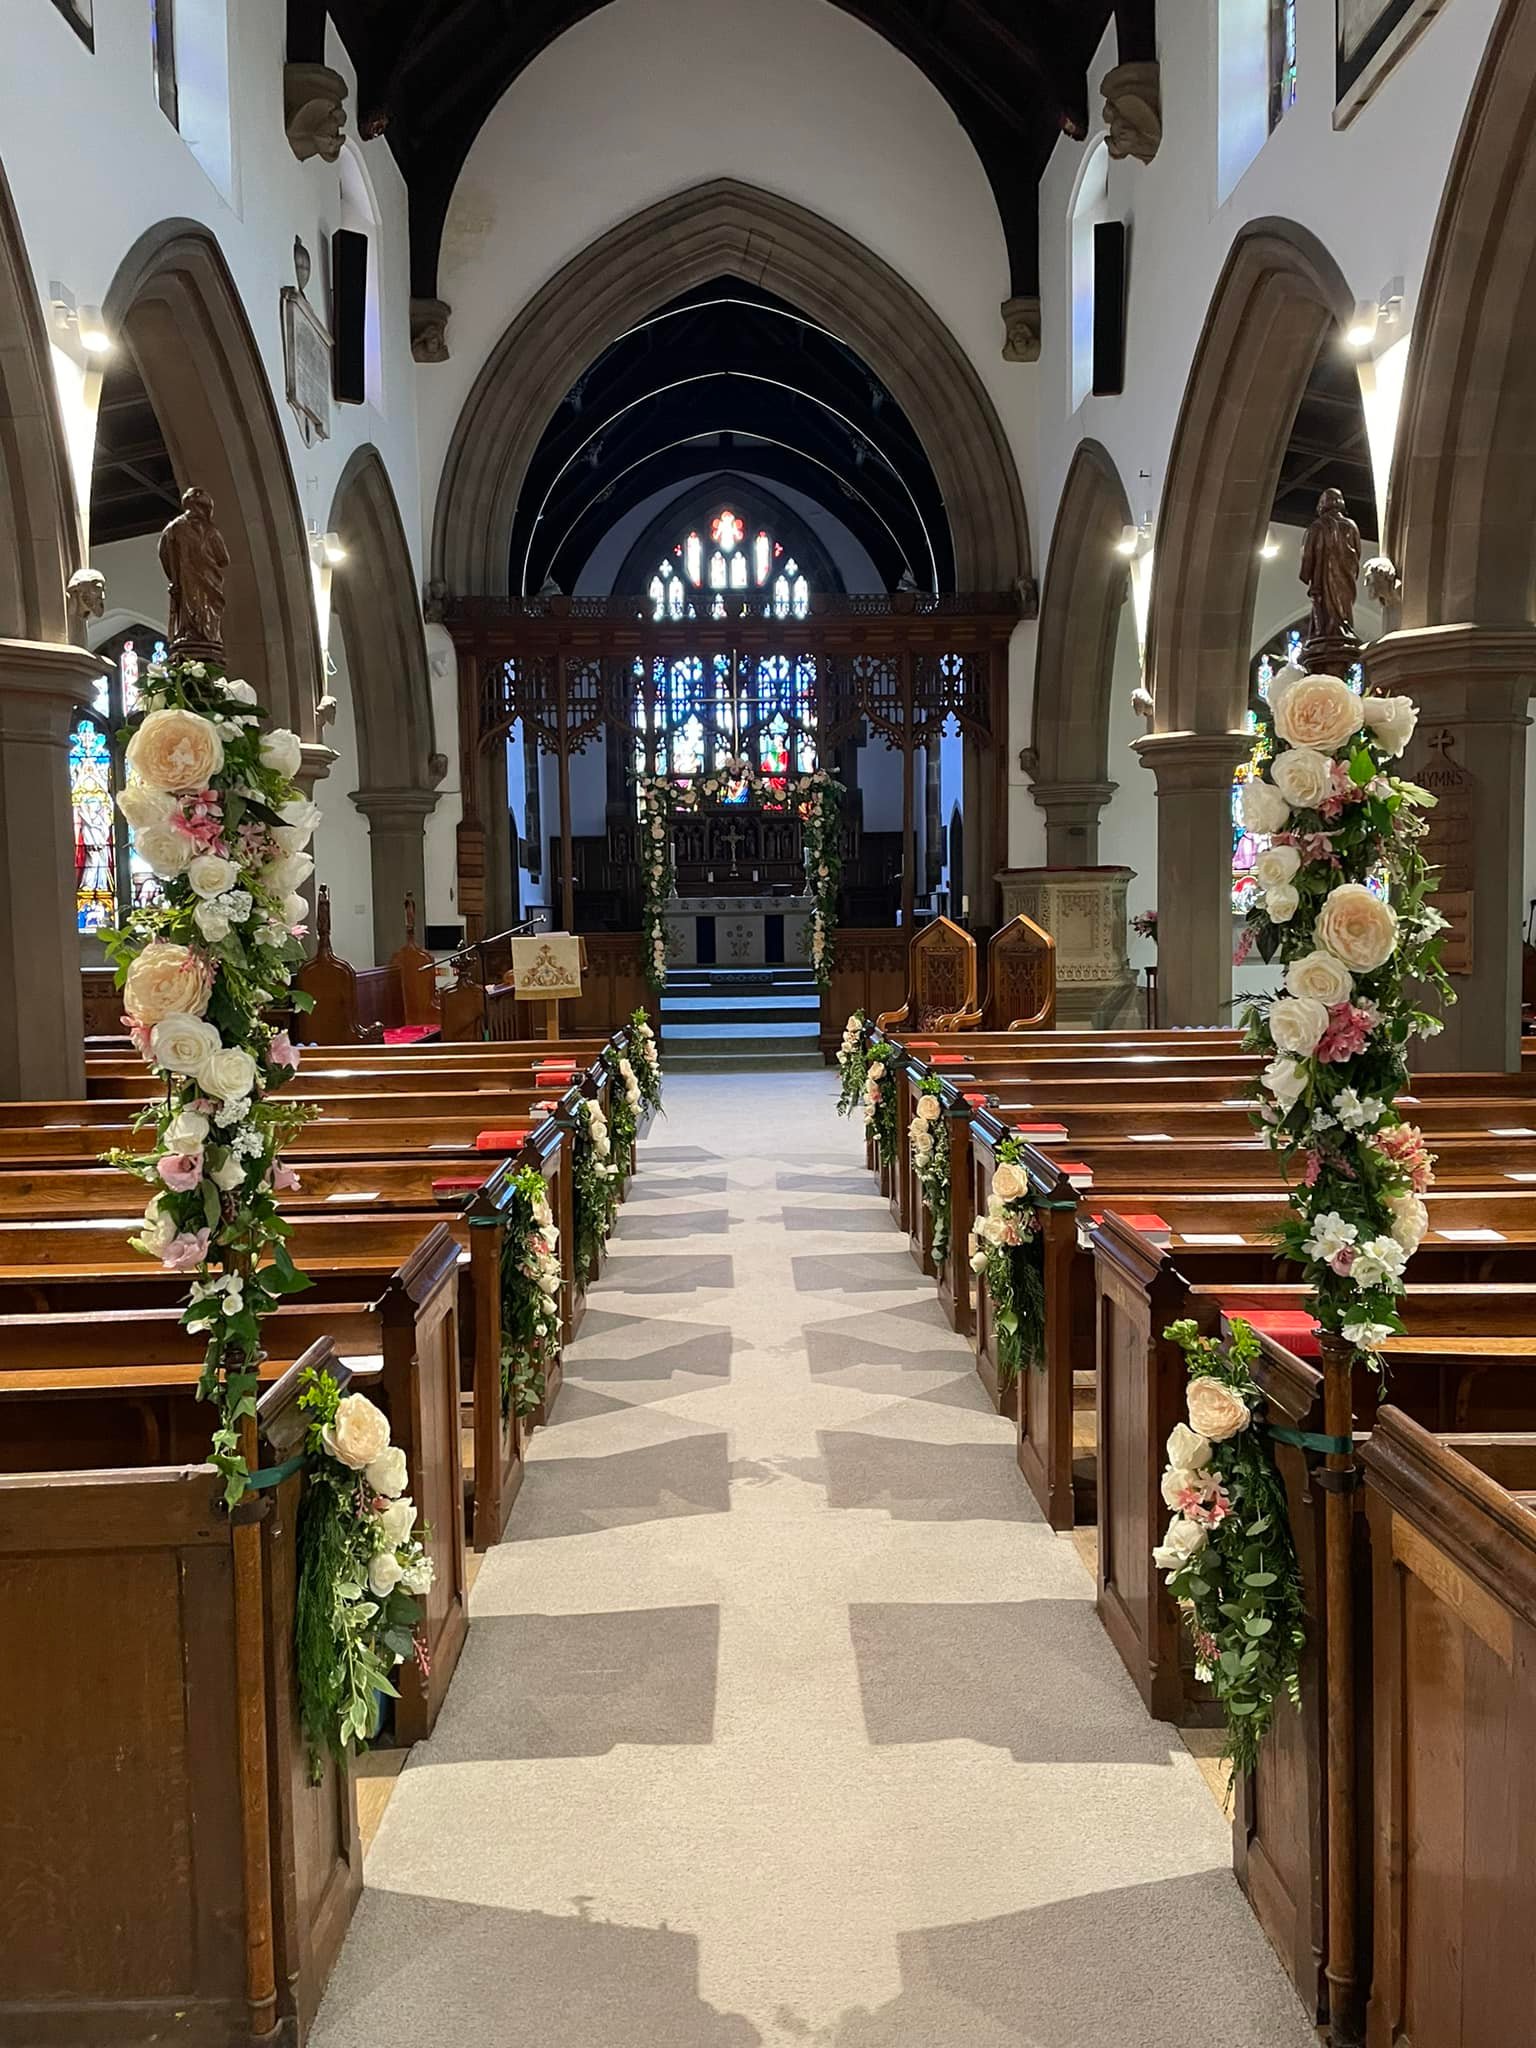
The bride had bought lots of silk roses which were wired into a spray and also some garland lengths too. Silk flowers have improved so much in the last few years, they made the job so much easier too. For the pew ends we basically made a hand tied bouquet mixing fresh foliage with the silk flowers. We also added a branch of philadelphus to each one. They were tied with a matt green ribbon as the bride didn’t want noticeable bows, she also wanted the cut ends hidden so we just added a sprig of box to cover them up. I had a team of four or five helpers, I don’t think anyone particularly had any flower arranging experience but we had a good production line going making ten pew ends plus a spare! This is one in place on the end of the oak pew on the day…
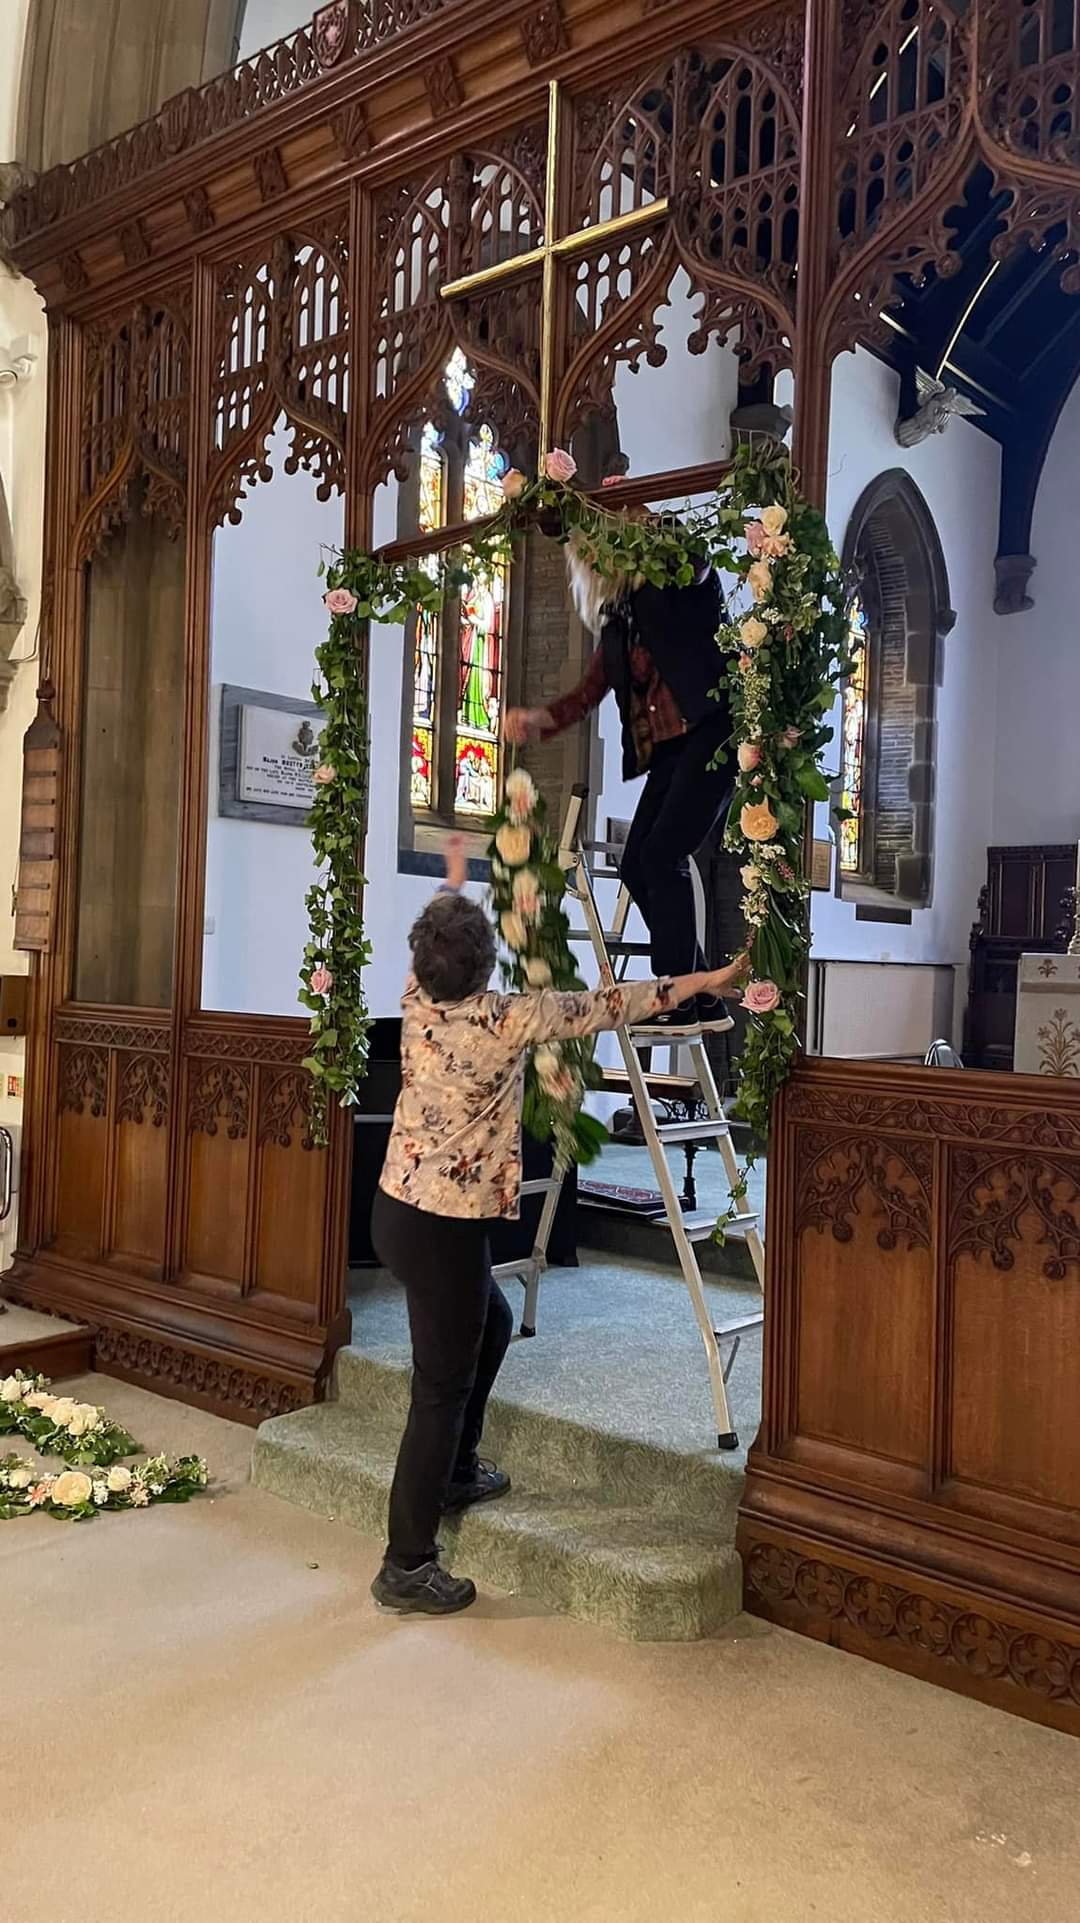
The church at Gargrave has a beautiful rood screen and the plan was to tie garlands to either side of the arch, so we tied little bunches of foliage to the silk flower garlands and added philadelphus too. We had four garlands and two double ended arrangements which we padded out with foliage the same way. After a few hours work we had everything prepared. My only concern was that I wasn’t sure how philadelphus was as a cut flower, would it last or would I find all the petals in a heap on the floor…
Monday morning I picked some more philadelphus for good measure, a phone call from the farm confirmed that the philadelphus from Sunday was still looking good! I also picked some solomons seal flowers from the garden as they are a nicely arching shape. In reality the flowers were well past their best but they are so tiny it wasn’t noticeable, it was the shape I wanted. We took everything down to the church and started decorating. We tied all the pew ends on, we had an arrangement for every other pew which looked lovely.
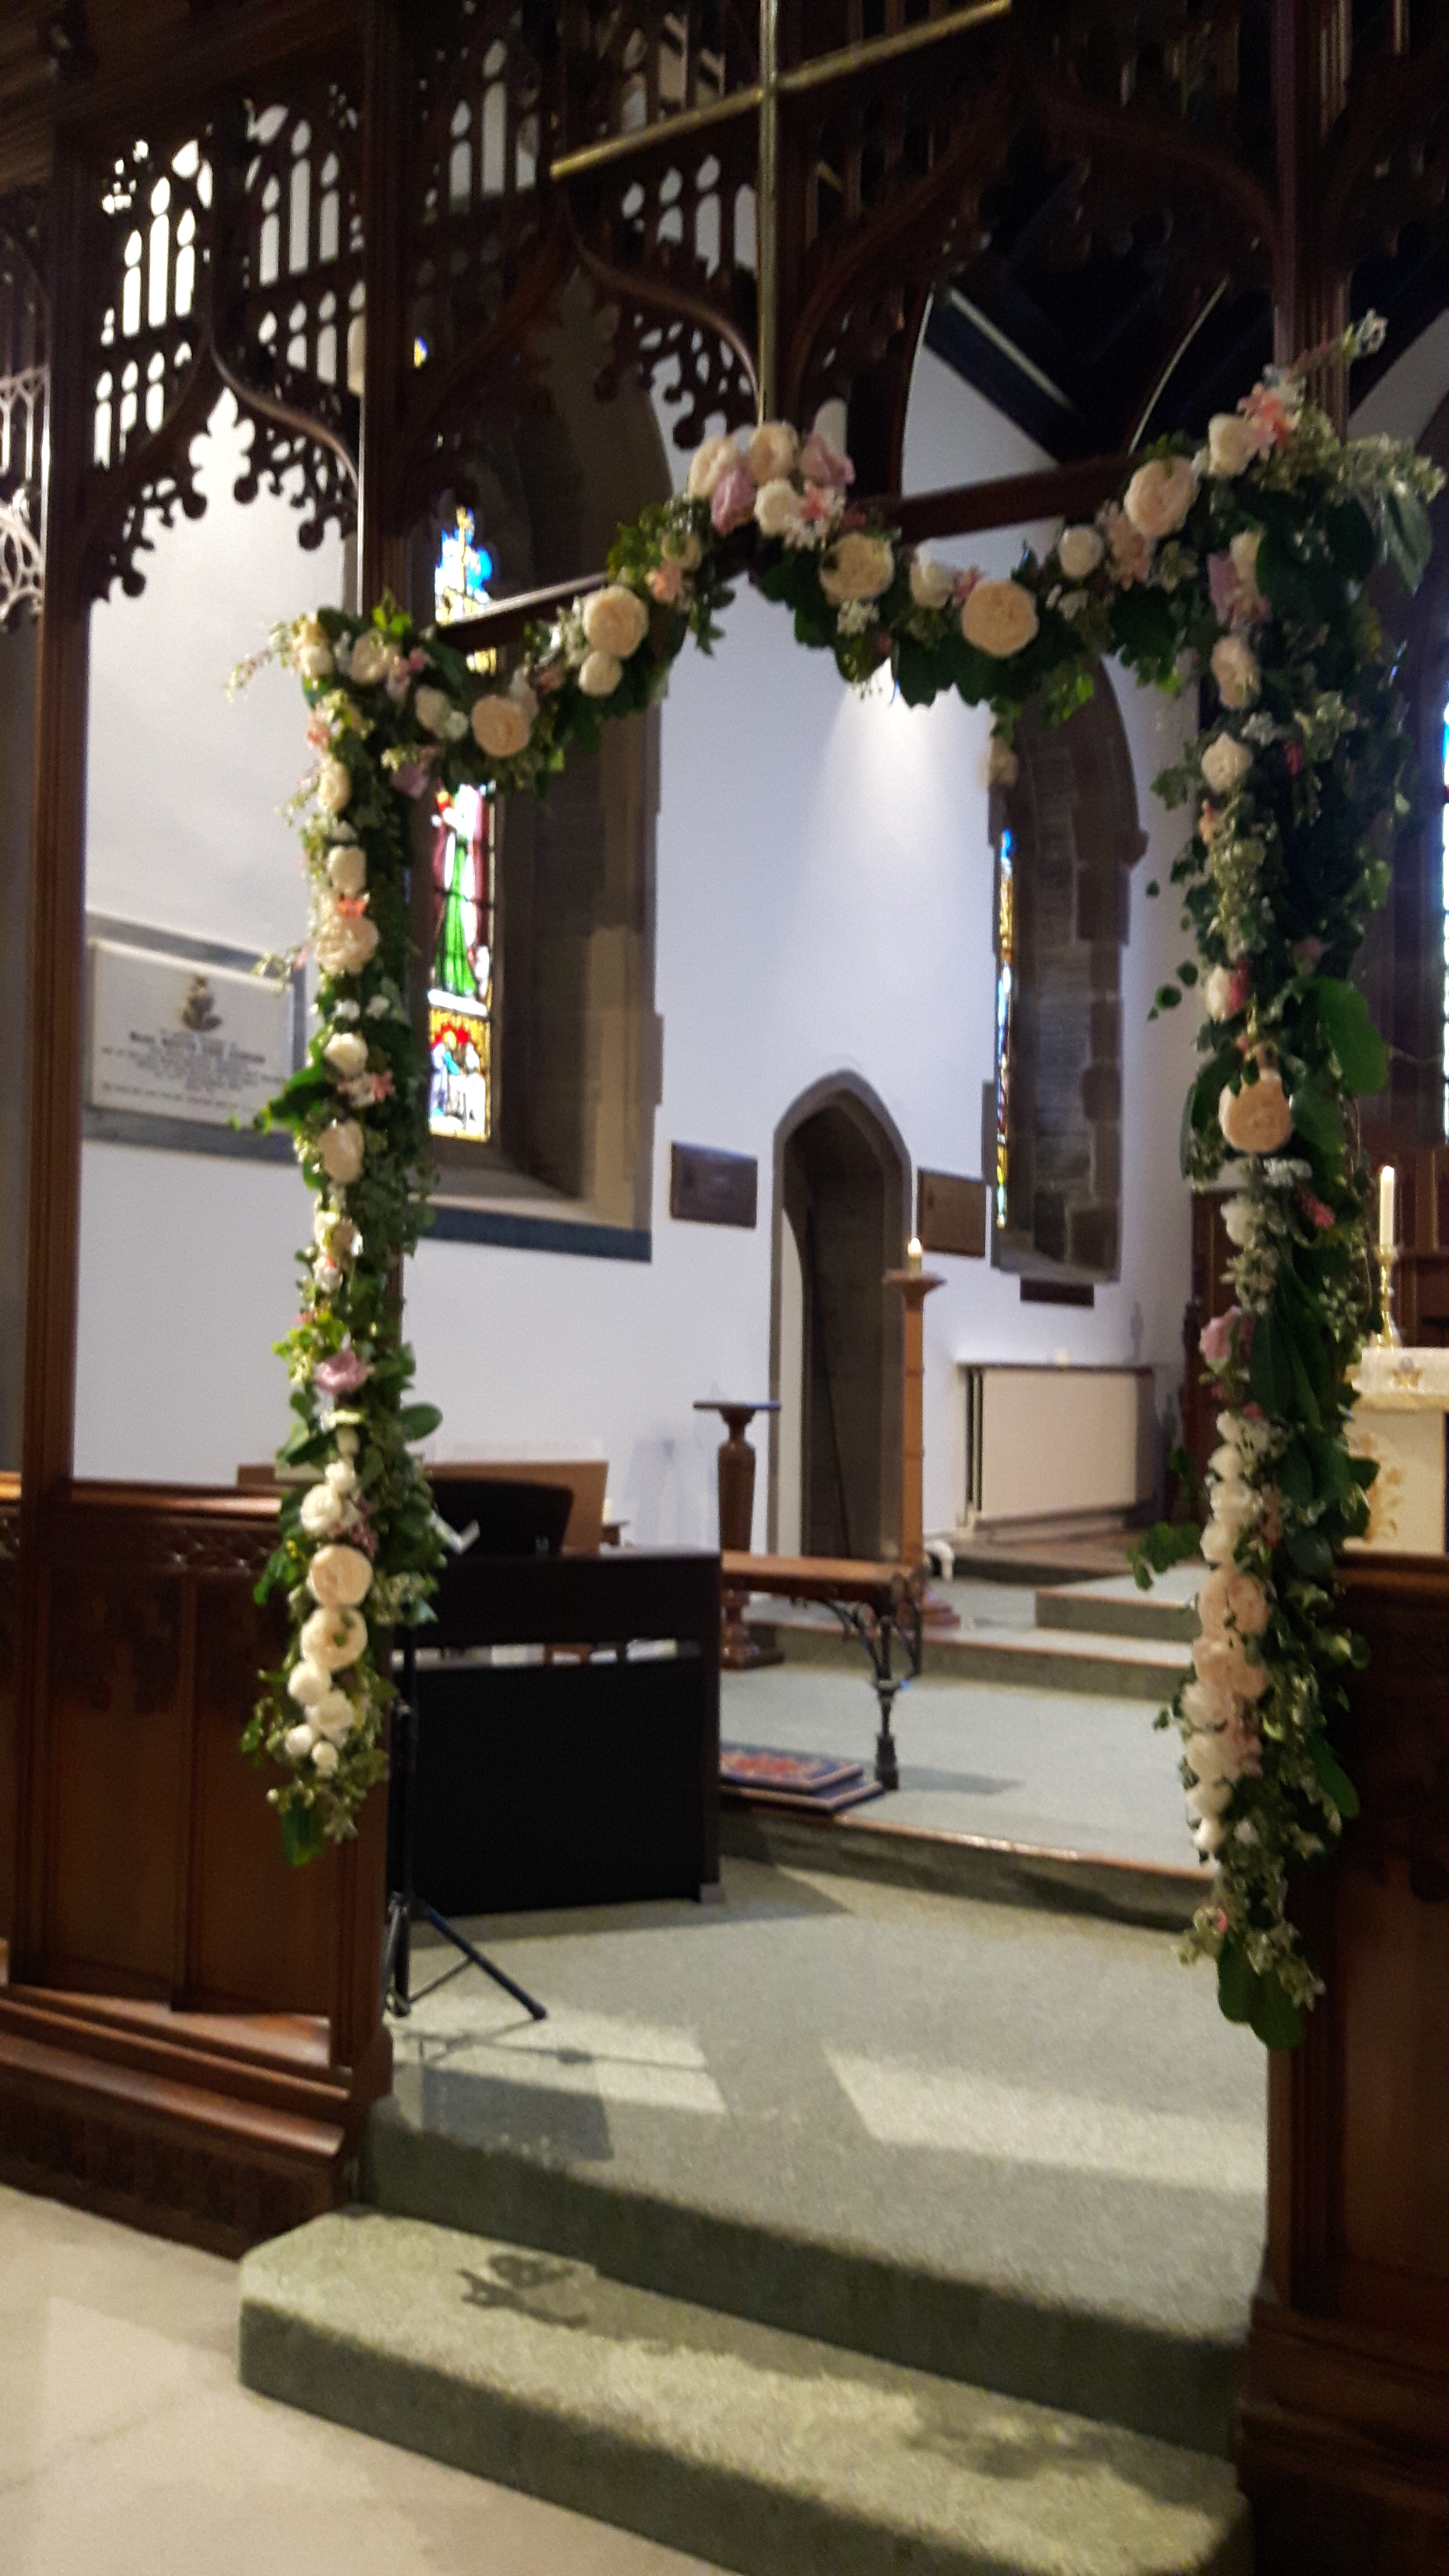
There had been a wedding at the church earlier in the week and some of their flowers were still in place, including an arch of ivy and a few roses over the rood screen. I realised that an arch would actually be easier to attach then the original plan of swags either side as we were already pondering how to attach them at the outer edge where the screen meets a stone pillar. After a brief discussion with the mother of the bride we went for a full floral arch, we left the original ivy up and just hung ours over it. It turned out the bride wanted an arch initially so we knew she would be delighted.
Here’s a photo of me and another helper starting to put the garlands up, the ivy and the odd roses on the left were the ones from the wedding before.
Having worked out how to arrange them I left the team to it and they did a wonderful job, here’s the finished arch…
All that was left was the two big arrangements, I deliberately left them till last as there was a coffee morning on in church, including one of the ladies who did the church flowers usually…I didn’t want an audience, especially someone who knew all about flower arranging!!
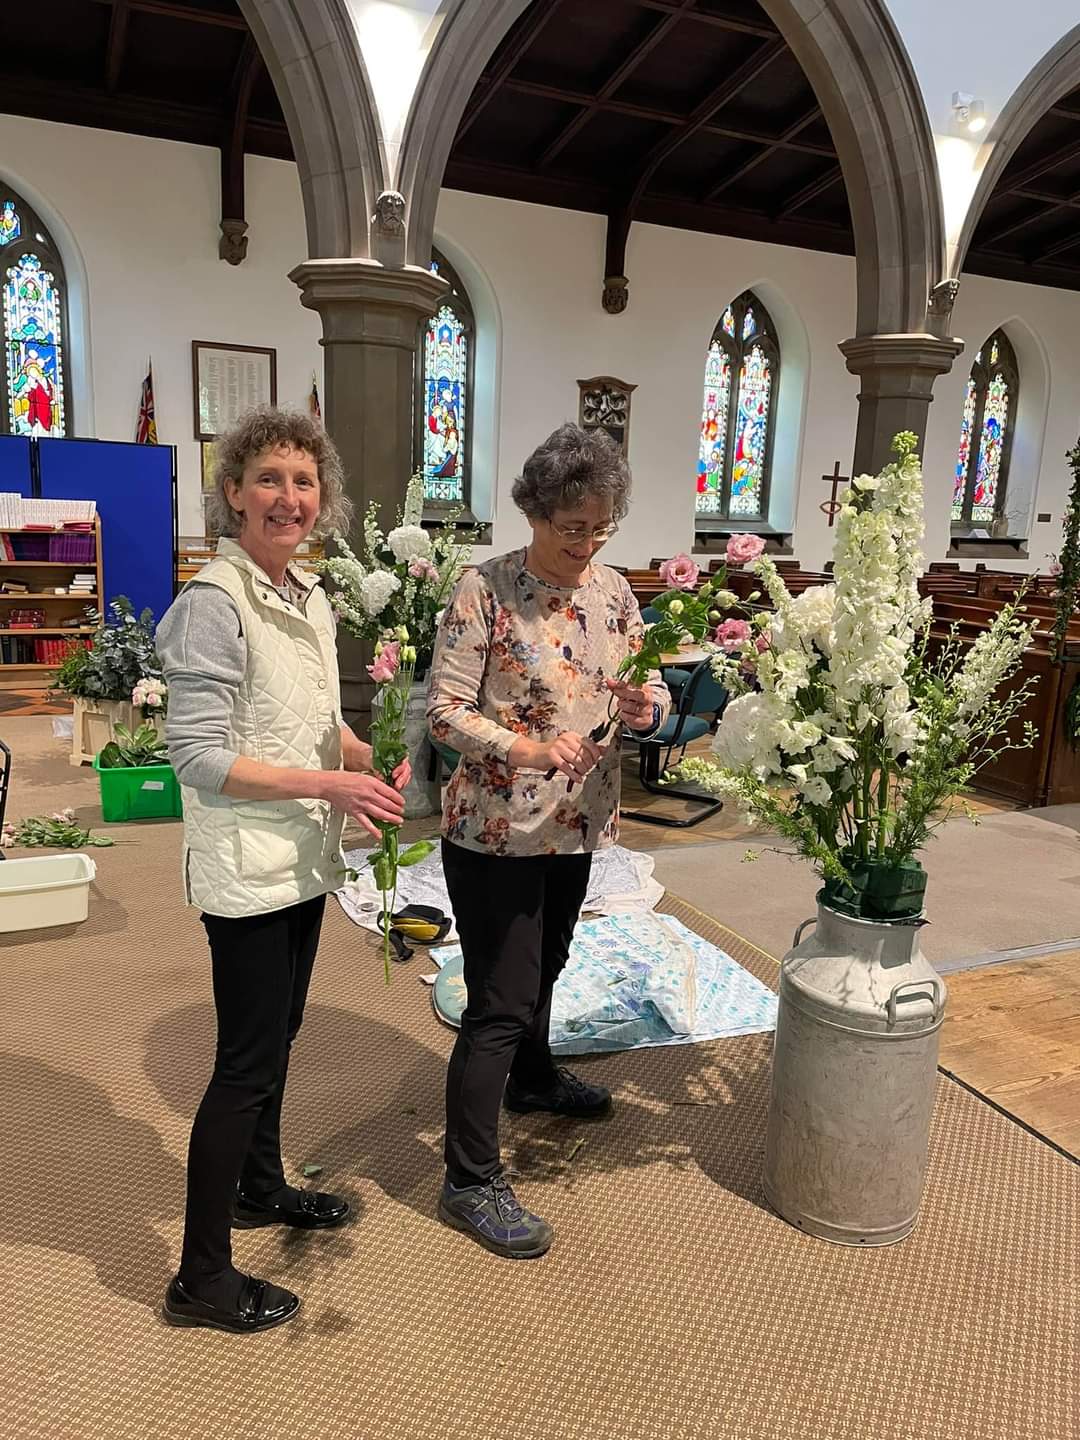
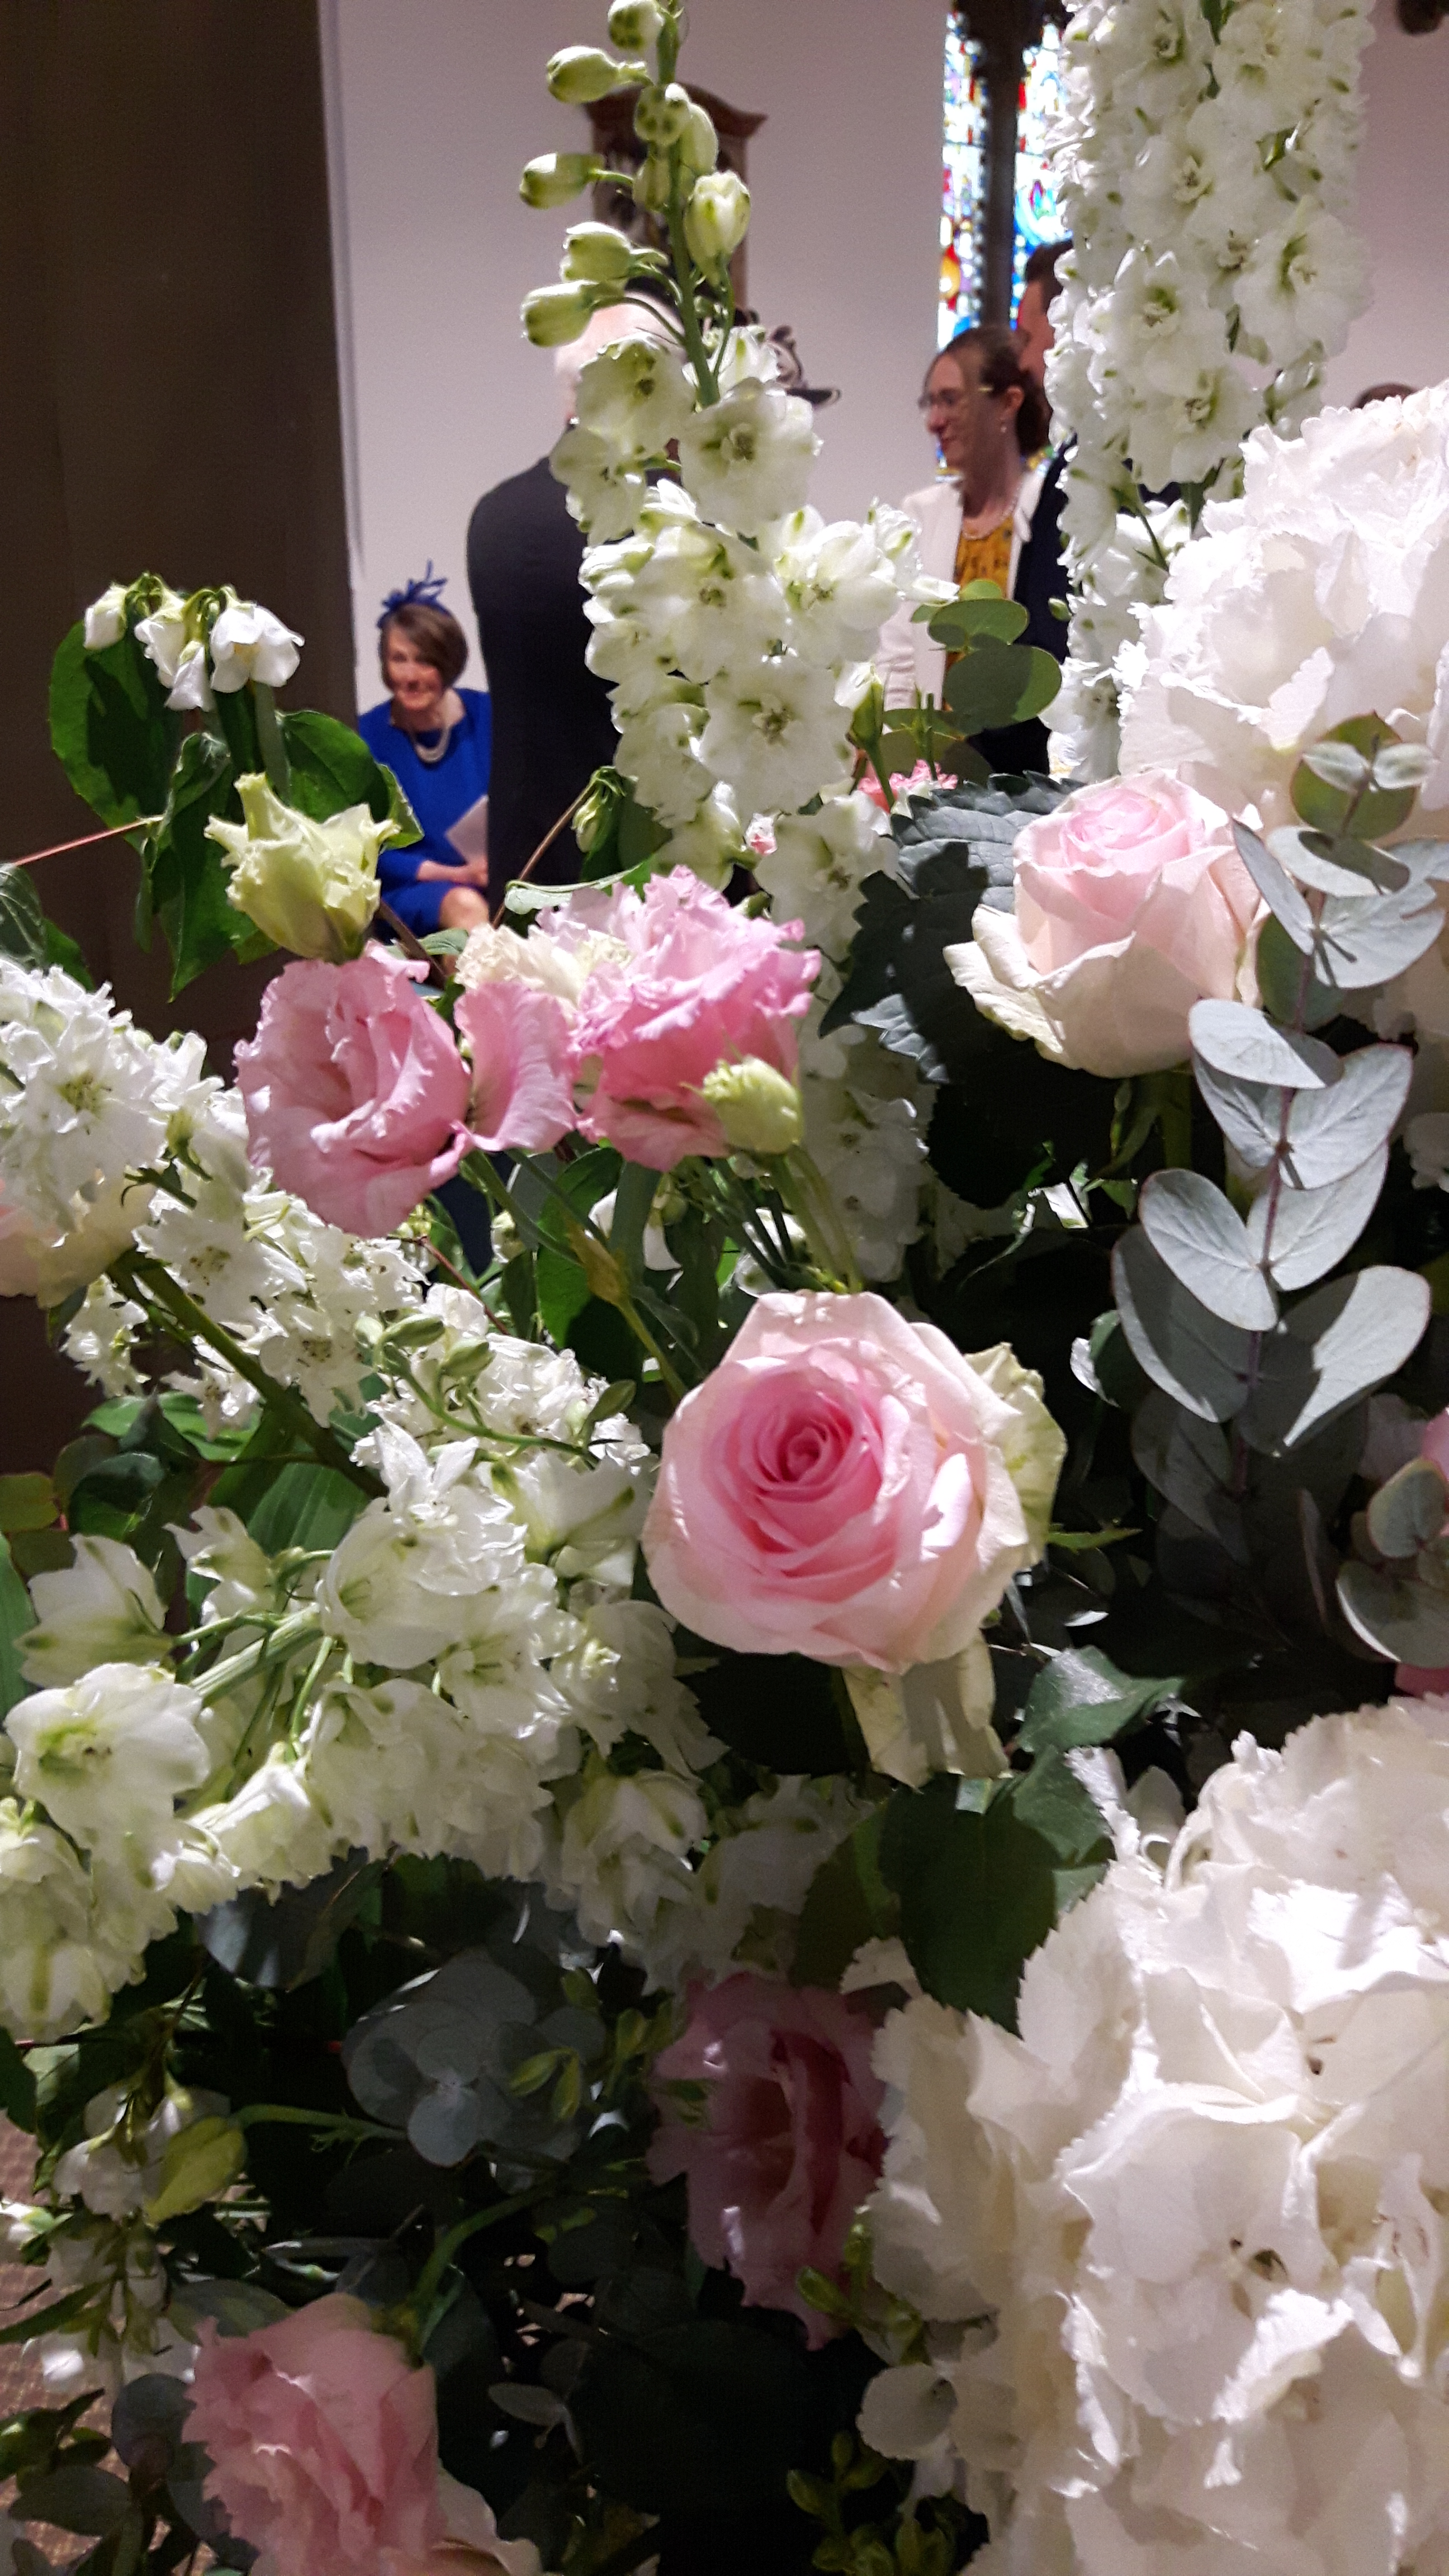
At the suggestion of the florist who supplied the flowers I did both arrangements at the same time, that was good advice as it meant they were balanced together. I did it flower by flower, dephiniums first, then the huge hydrangea heads, which were gorgeous but so big they almost didn’t look real! Next was the lisianthus, larkspur and the roses, some carnations and the solomon seal around the lower edge. I added the philadelphus branches to fill any gaps, especially at the back, although the flowers were to be viewed all the way round, in reality there was a front where the hydrangeas were.
Here’s me and the brides aunt as we started, it does show nicely how big these arrangements were! The arrangements were also to be transported to the reception venue where another two milk churns would be waiting, the brides father had attached some tape handles to the oasis container so they could be lifted out so I did have the foresight to position these handles directly above the milk kit handles so they could be easily located, you can just see them in the photo….
The flowers were a beautiful shade of creamy white and pale pink, very pretty. We added lots of foliage such as eucalyptus, I covered the back of the oasis with hosta leaves.
I think with big arrangements like this it’s hard to know when to stop, you can titivate and add stems for ever but you can end up losing the shape or the balance of the arrangement. Eventually I decided they were done. Here’s one of them on the day..
I was well chuffed with them, proud as punch! They were positioned either side of the aisle at the back of the pews so it made a nice entrance. The scent from the philadelphus was beautiful too. We suggested the bride came down that afternoon to see the flowers as on the day they become a blur, she loved them…
They still looked good on Tuesday morning when we arrived for the wedding and they received lots of compliments, they even survived being transported in the back of a van to the reception! We had a wonderful day, the church service was lovely, and the fifteenth century Tithe Barn at Bolton Abbey was a stunning venue for the reception…and of course the bride looked beautiful 🙂
I’m way behind with both reading and writing posts as there’s a lot going on at home at the moment, I’ve had a few medical tests which although they were all as out-patient, it still takes up a lot of time, though thankfully everything has come back fine so far. We’ve also made the difficult decision to put our house on the market, I love my garden but it is too much for me to manage and I’ve also had more falls this year from my lack of balance, whilst I’ve only ended up with bruises, we do have areas which could result with a five foot drop onto concrete… With a big garden like ours I think it’s also better to try and sell whilst the garden is still looking good, rather than waiting till it’s run away without me!! The house is also bigger than we need with five bedrooms and three reception rooms, we’re now trying blitz it as the photographer is coming tomorrow!
All this has made my garden book a little more poignant, it’s going to be my record of our garden in stitches. Three weeks ago I’d finished a Soukie Soo design…
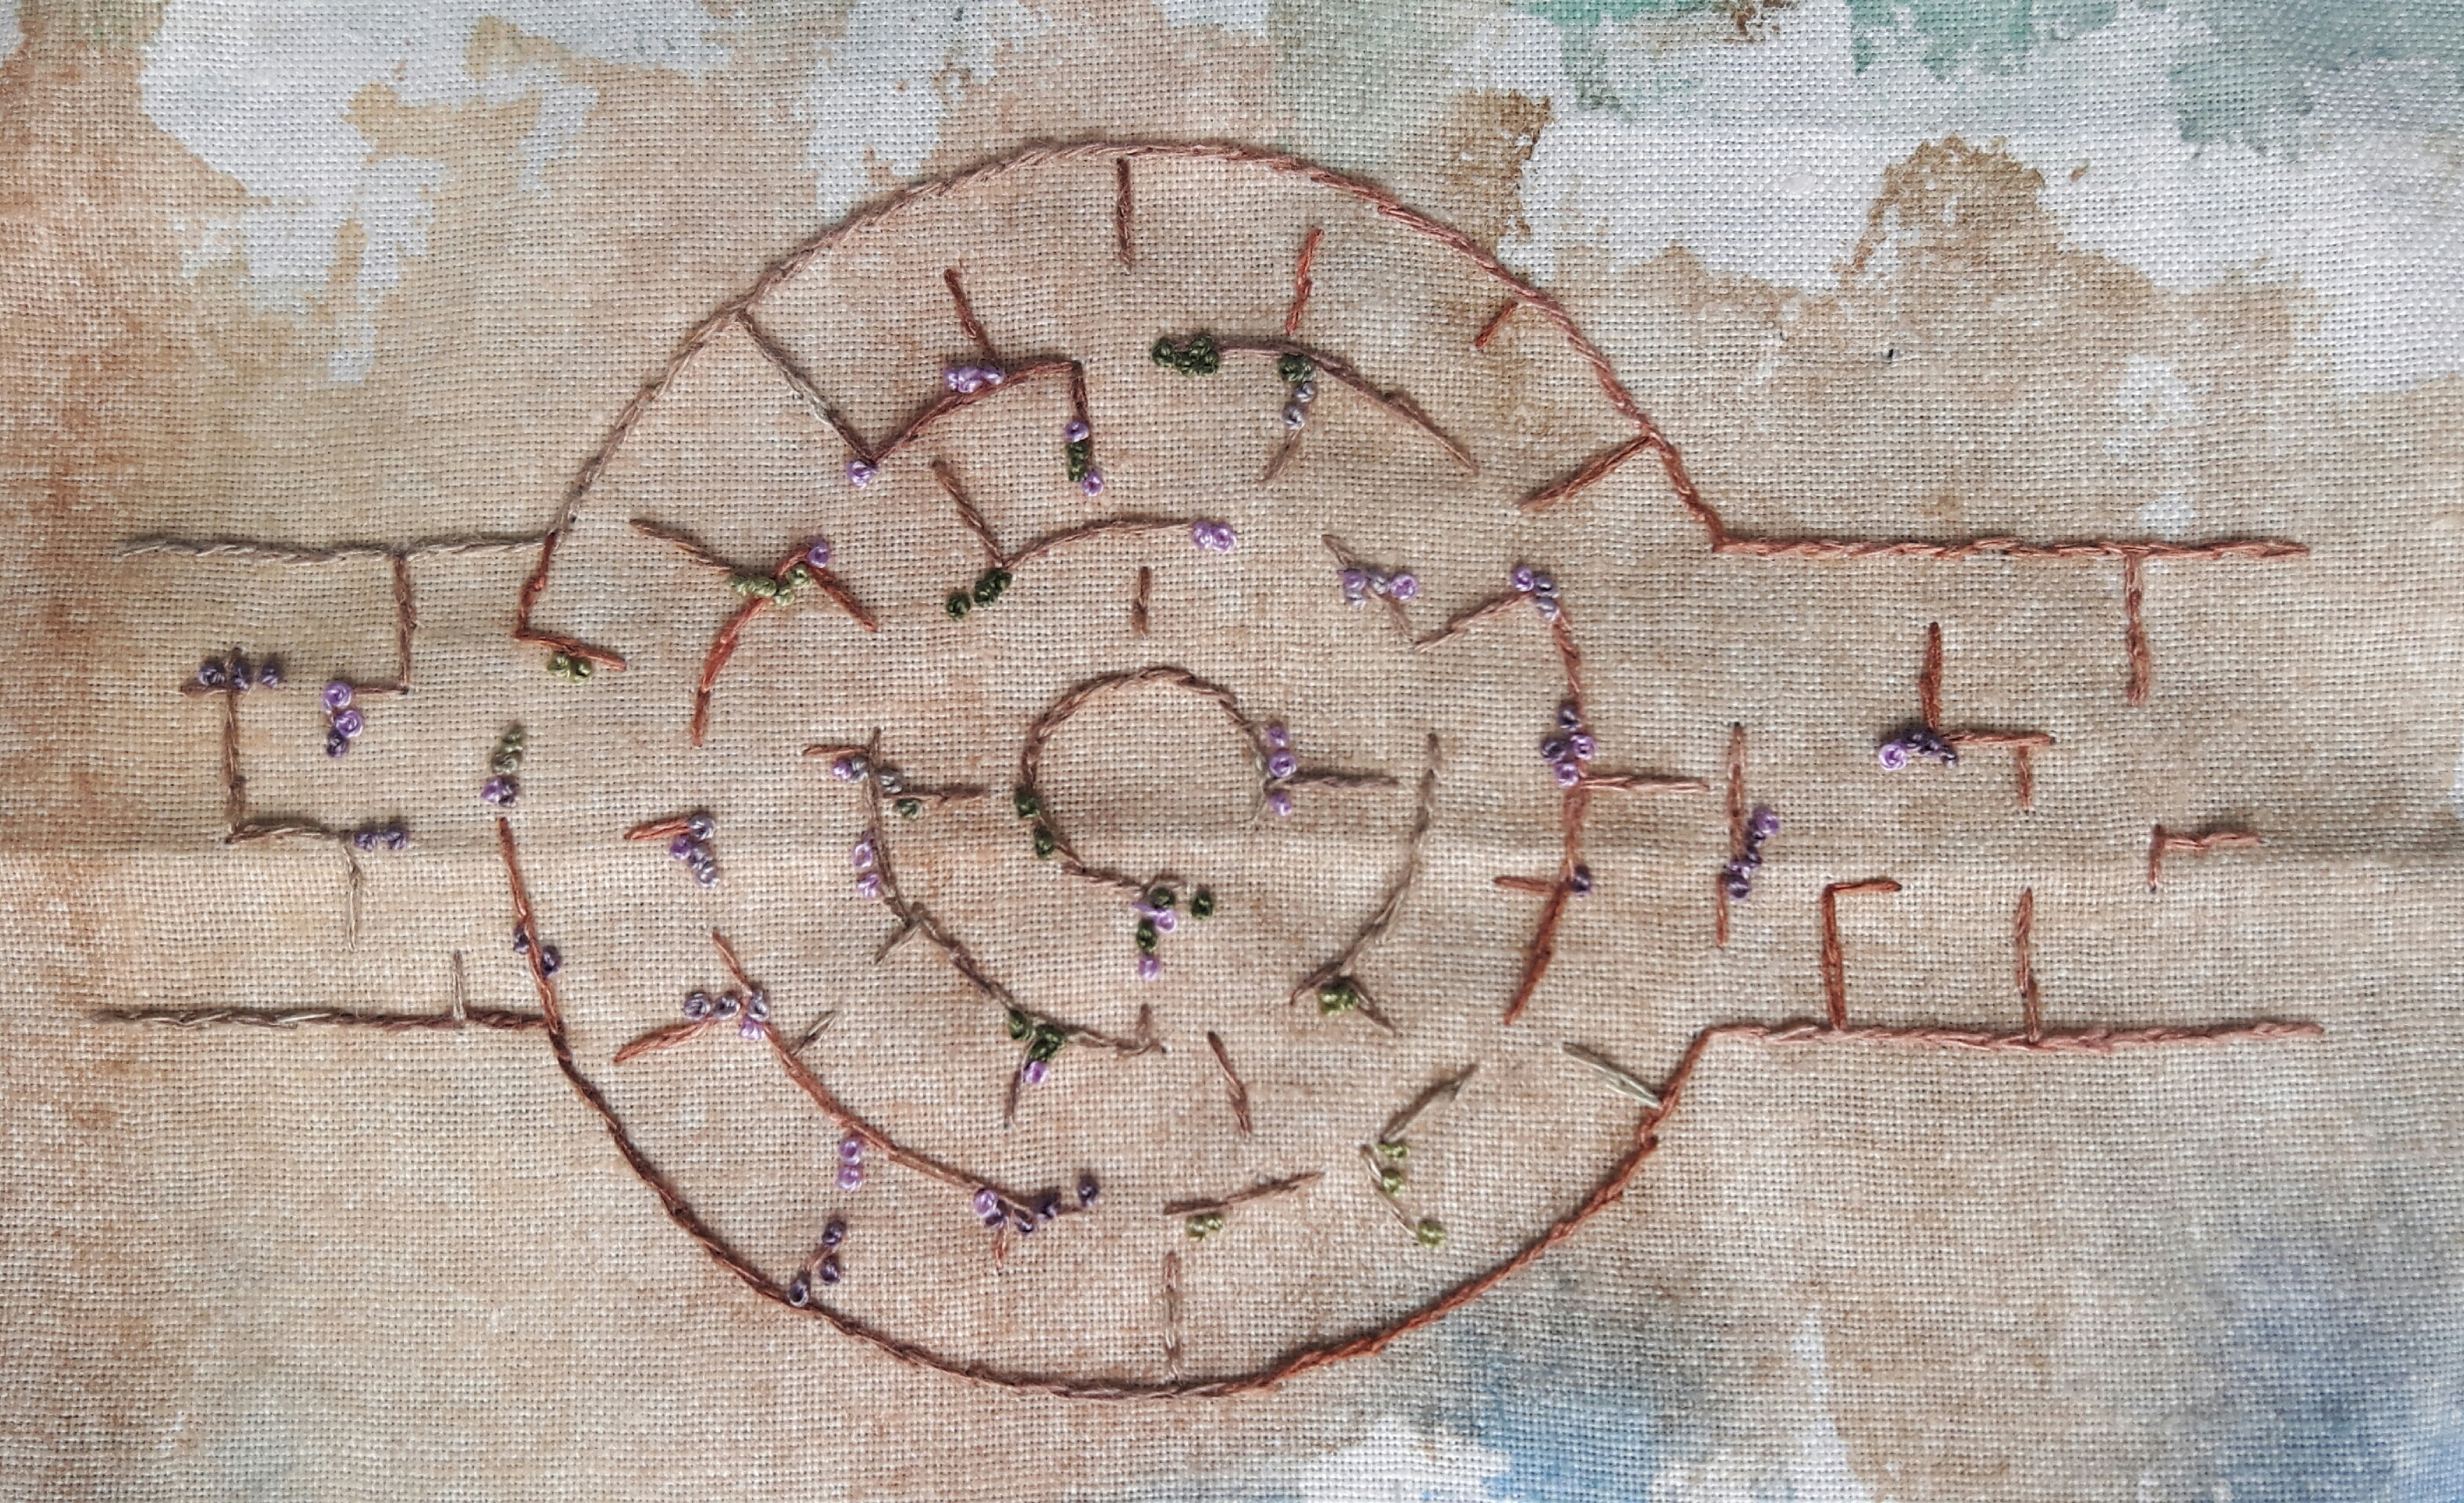
I’ve now started one of the ‘map’ pages for my book, I’m starting with the patio area. I’m planning on three separate maps for the three main areas in the back garden, the patio, the Amber and Amethyst garden (AKA the beer garden!) and the top lawn with the summerhouse and pond. A while ago I painted some calico with background garden colours which could then be used as raw edge applique…
I drew a patio shape onto the brown area and started to stitch it. I used whipped split stitch round the outside and then just split stitch for the intermittent stitching to show the flags with a variegated thread which I found in my stash, it’s single ply and matt and not as smooth as DMC, it worked well for the patio. I was stitching from memory when I started it in the middle and only realised later that the there are actually eight segments on the first ring, with each row doubling the numbers. I think making so many to be true to life would actually have been too busy so I’m happy that my memory simplified it! I added a few French knots with a variegated DMC thread for the little self seeders we have.
I now need to mount it on bondaweb and stick it to the main page. I’m hoping there’ll be enough plants and structures overlapping the edge that it will be secure enough. I stitched it separate to the background as I wanted it to look slightly raised as it is in real life. It should only be getting light handling in a book anyway. I’ve just got to sort out the background now!
I got a lovely squishy parcel in the post this week too, I follow Soukie Soo on instagram as I do like her designs, she draws them onto linen with a heat erasable pen so all I have to do is stitch them. The page above was one of her designs. A couple of weeks ago she had a sale on for a mixed bundle of goodies for £25, I ordered one and I was really pleased with my bundle, there’s stamped fabric, drawn designs, flowers, butterflies, bees, thread, lots of things I’ll be able to use in my book.
Hopefully next time I’ll have started the patio page properly, I think once I start I’ll be OK, at the moment I’m prevaricating as to how to portray structures such as the arch or the arbour, never mind the mass of plants!
This SAL is organised by Avis, we post our progress every three weeks on our chosen project, please follow the links to see everyone else’s progress…
I was hoping to have my dancing shoes on today with a finished quilt, but I’m not quite there! This is the seaside quilt designed by Kathryn Whittingham , it’s in the book called The Seaside Quilt. Three weeks ago I was on the homeward stretch of quilting the outer border…
Well I cracked on and finished hand quilting the wavy lines on the border. On the four patch cornerstones I quilted a clam shell, this brought it in nicely with the rest of the quilt which is lines of clamshells making a wave effect…
So all I have to do now is bind it. I had put on one side the dark blue and reds, planning a blue binding with a narrow red flange. Unfortunately I can’t find enough of the dark blue, I fear I may have used it when I made the seaside cushion for a work colleague! I was hoping to call into Fabadashery tomorrow as I’m on a WI trip to Halifax but they are closed on Mondays so I think it will be Leeds on Thursday now!
The Seaside Quilt
I’m really pleased with how the quilting has come out, when I look at the photo above, I do see the pattern as little waves rather than clam shells, and waves is what I was aiming for, so that’s good! I also love the way the back has worked, considering I pieced it like that because I didn’t have a big enough piece in my stash to back it in one fabric, I just used some of the left over pieces instead and arranged them to make another seascape…
…I’m also amazed that I managed to get the lines on the backing straight with the lines of the quilt!
Hopefully in three weeks time I will be skipping round my sewing room with glee 🙂
Hand Quilt Along Links
This Hand Quilt Along is an opportunity for hand quilters and piecers to share and motivate one another. We post every three weeks, to show our progress and encourage one another. If you have a hand quilting project and would like to join our group contact Kathy at the link below.
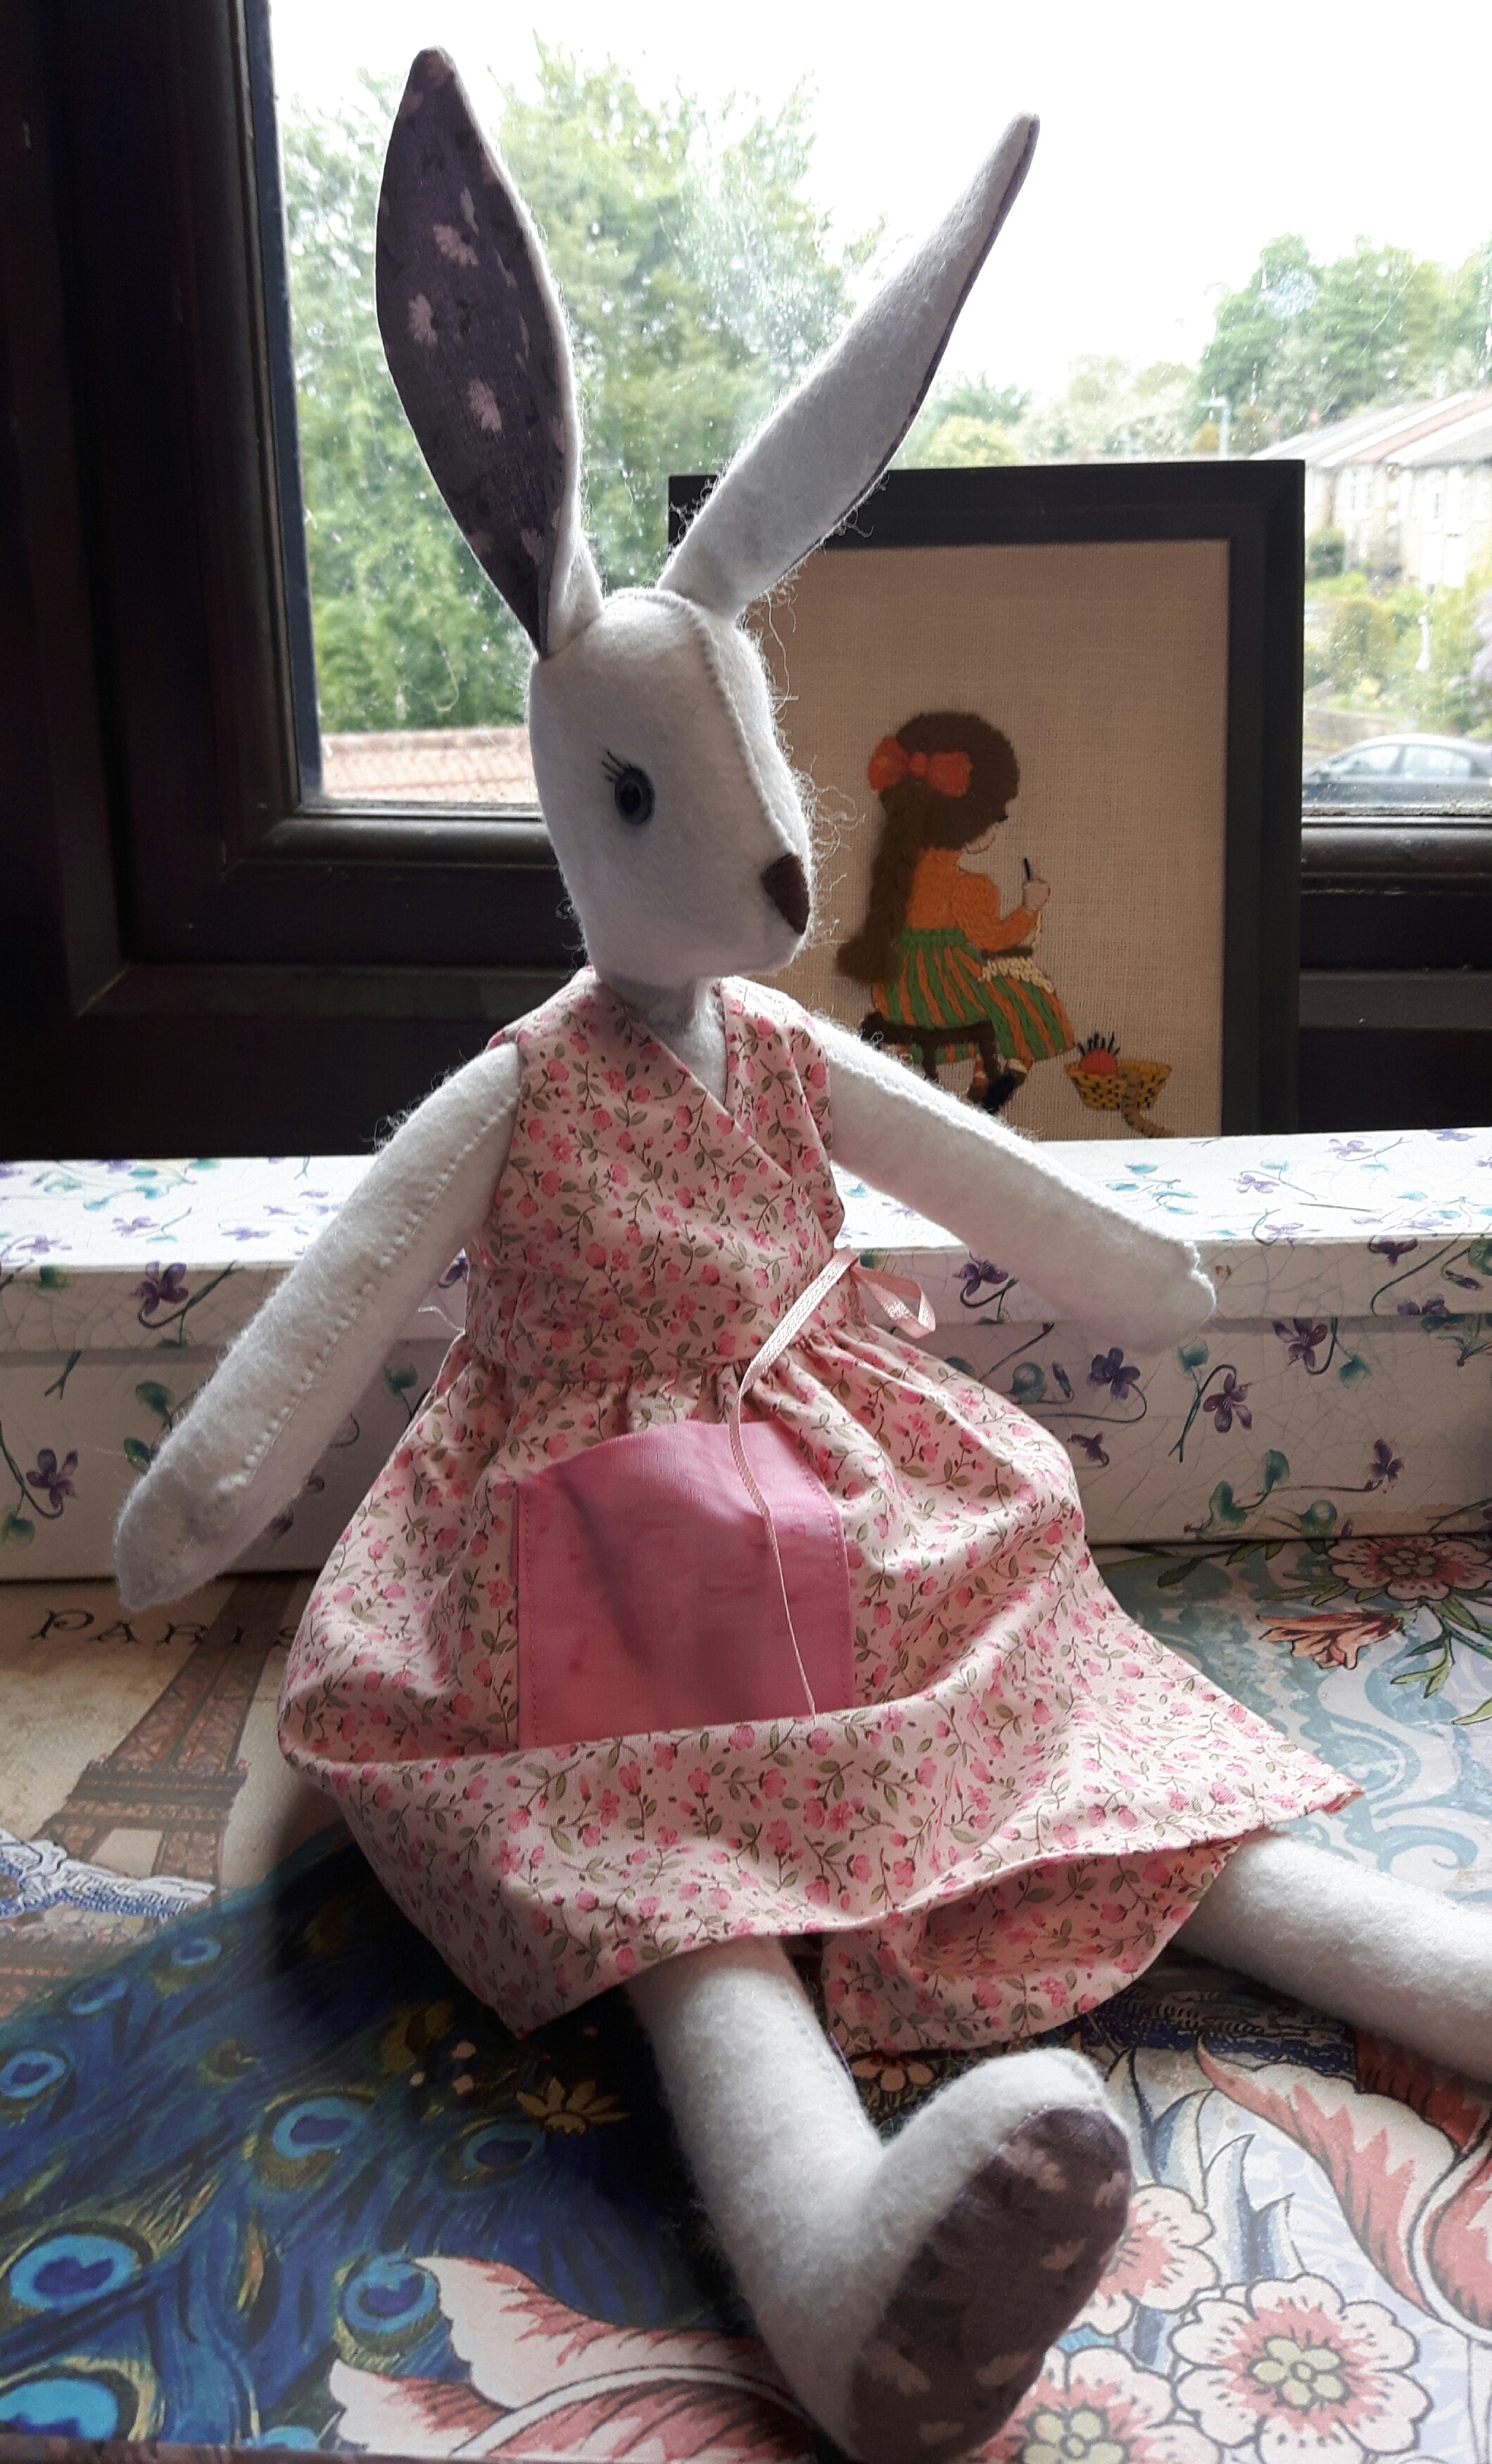
For Christmas I gave my granddaughter a mouse from the Luna Lapin books, she wore a pinafore dress and blouse together with a coat…
It was her birthday last week so I made a few more clothes for Miss Mouse as I called her. My granddaughter is into the pink phase, so I raided my stash for pink fabrics and lace. The first dress I made is called Clementine’s Dreamy Dress, it’s meant to be made with three layers of tulle but I had some pretty lace to use instead. The organza ribbon tied at the back finishes it off beautifully. Violet Speedwell was called in to pose for photos!
I found a very pretty pink floral cotton to make a wrap dress…I’ve only just realised it’s the same fabric as her original dress!
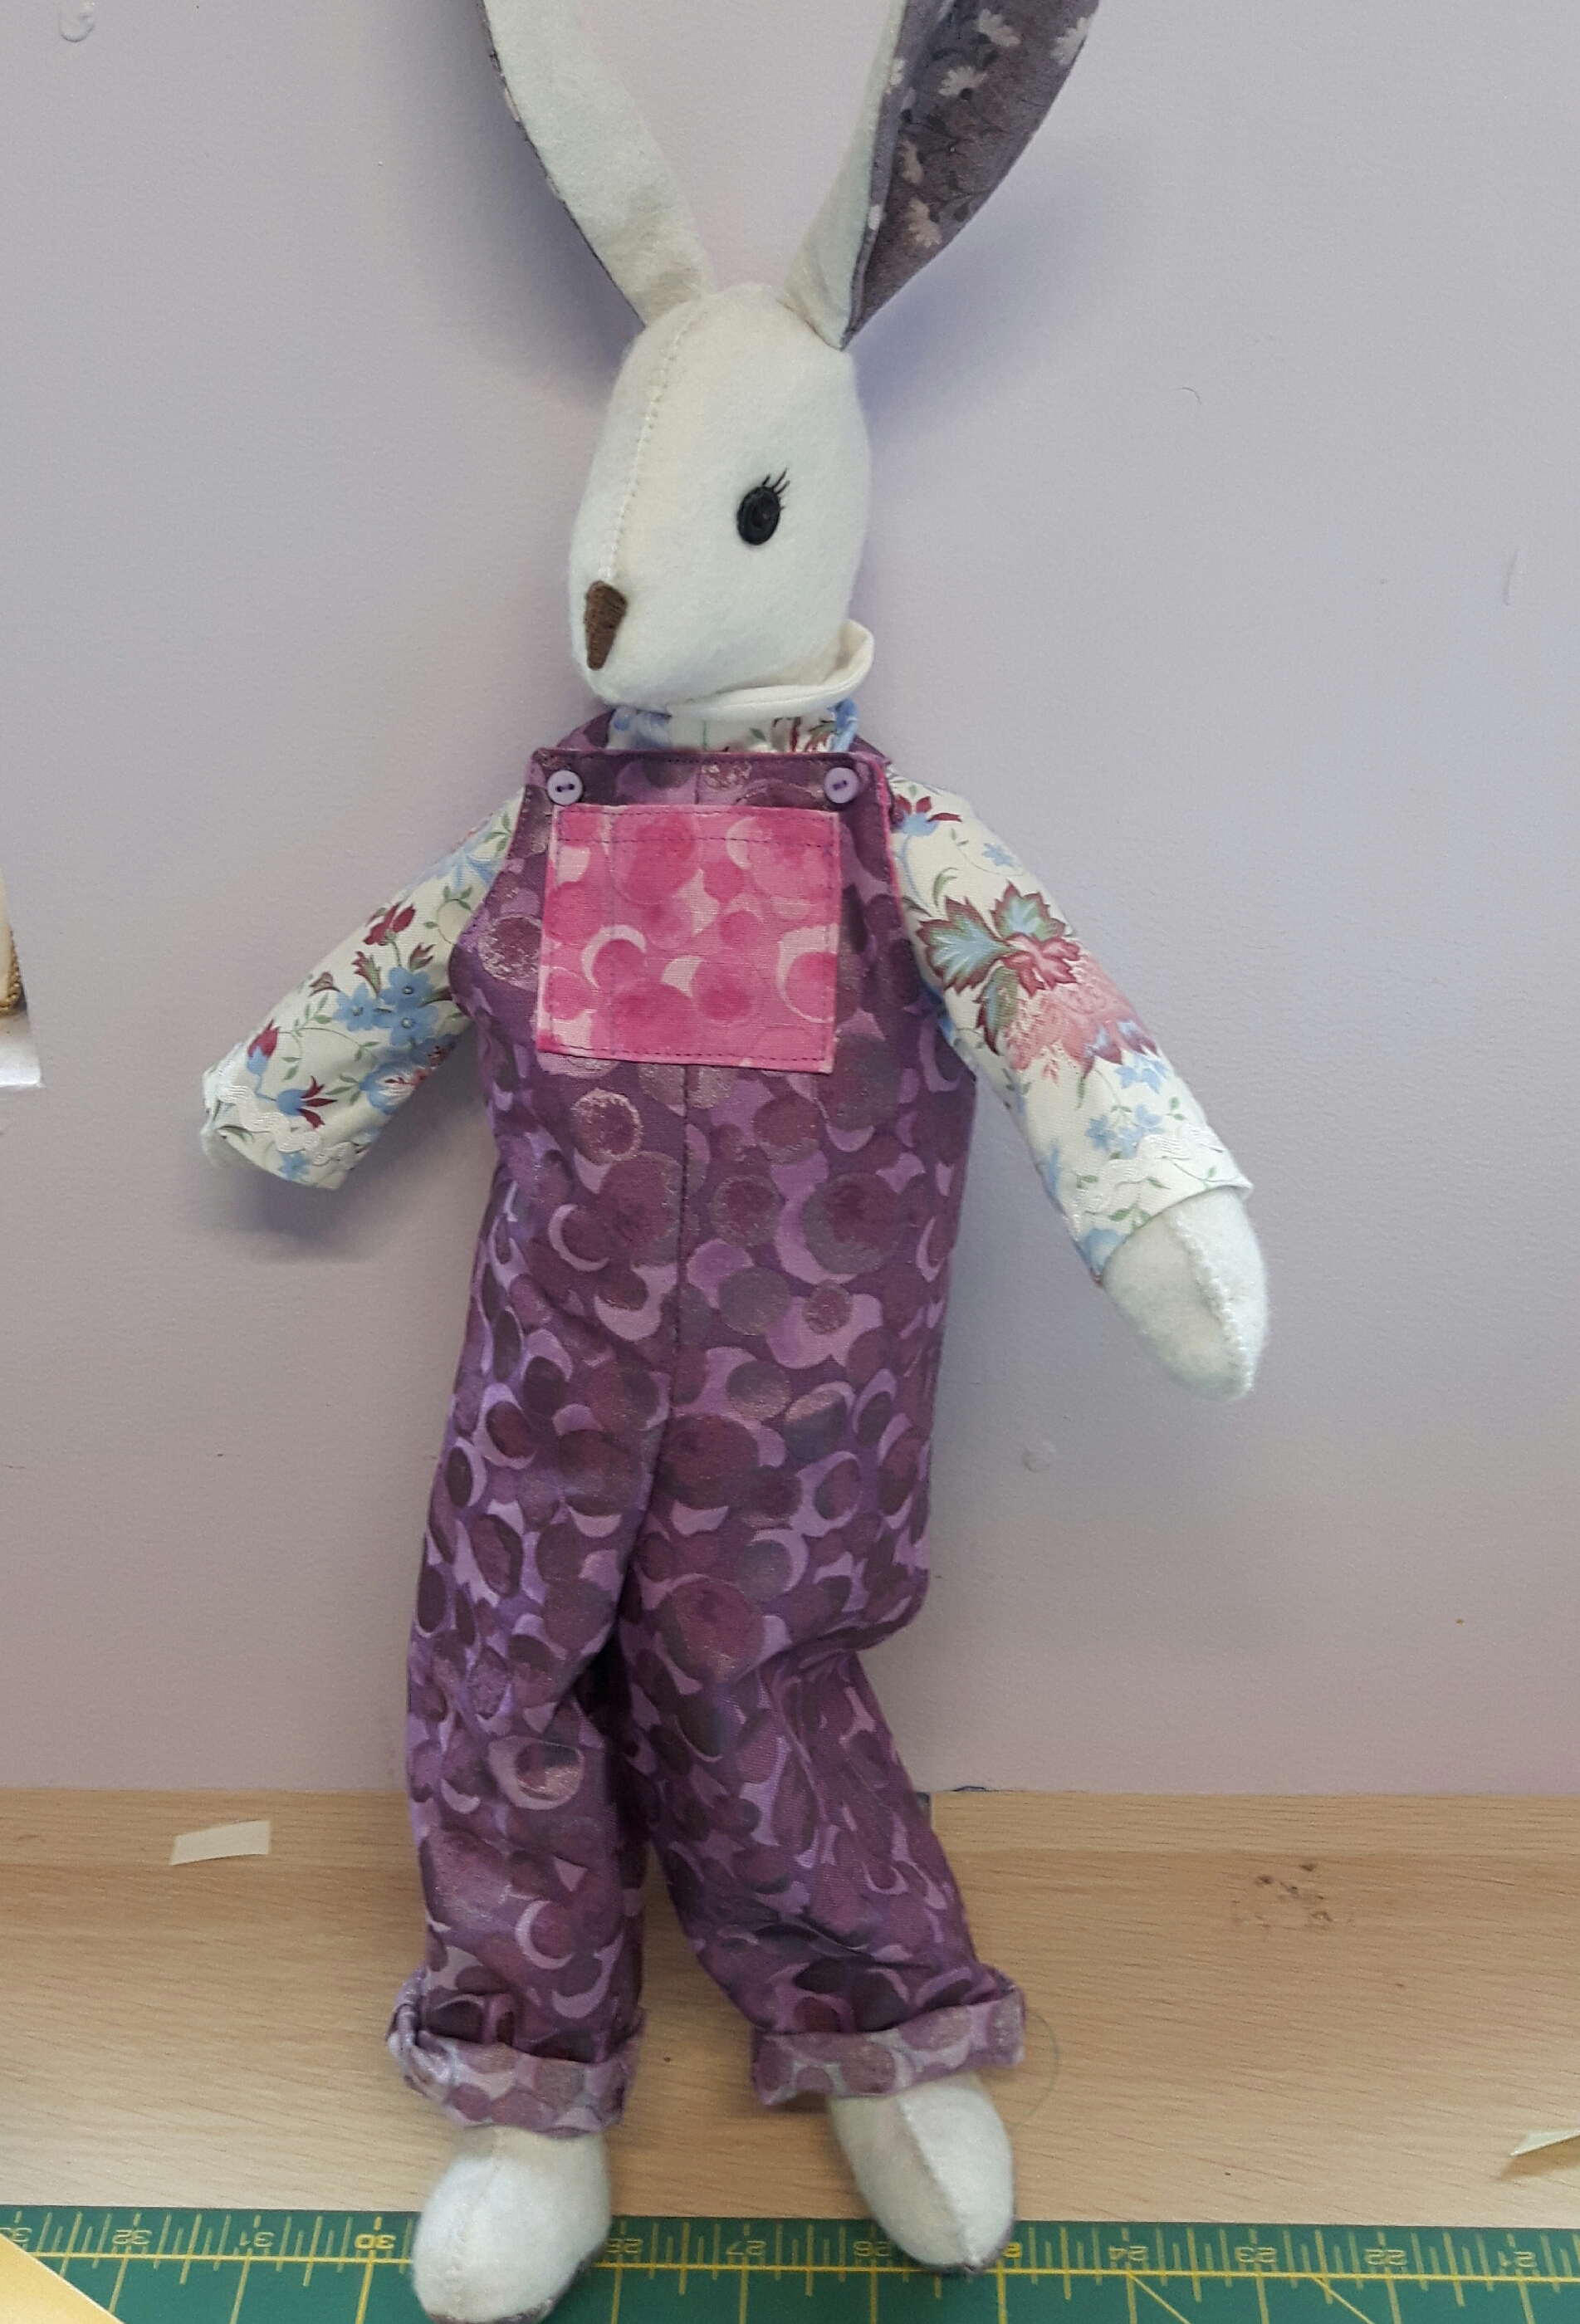
It then crossed my mind that maybe she would like something else apart from dresses, so I made a pair of purple dungarees (I didn’t have enough pink!) and gave them pink patch pockets. I love the details on the Luna Lapin clothes – the dungarees even have a false flat-felled seam down the outside leg and patterns on the back patch pockets.
I added a pink and purple dress I had originally made for Violet to the pile…
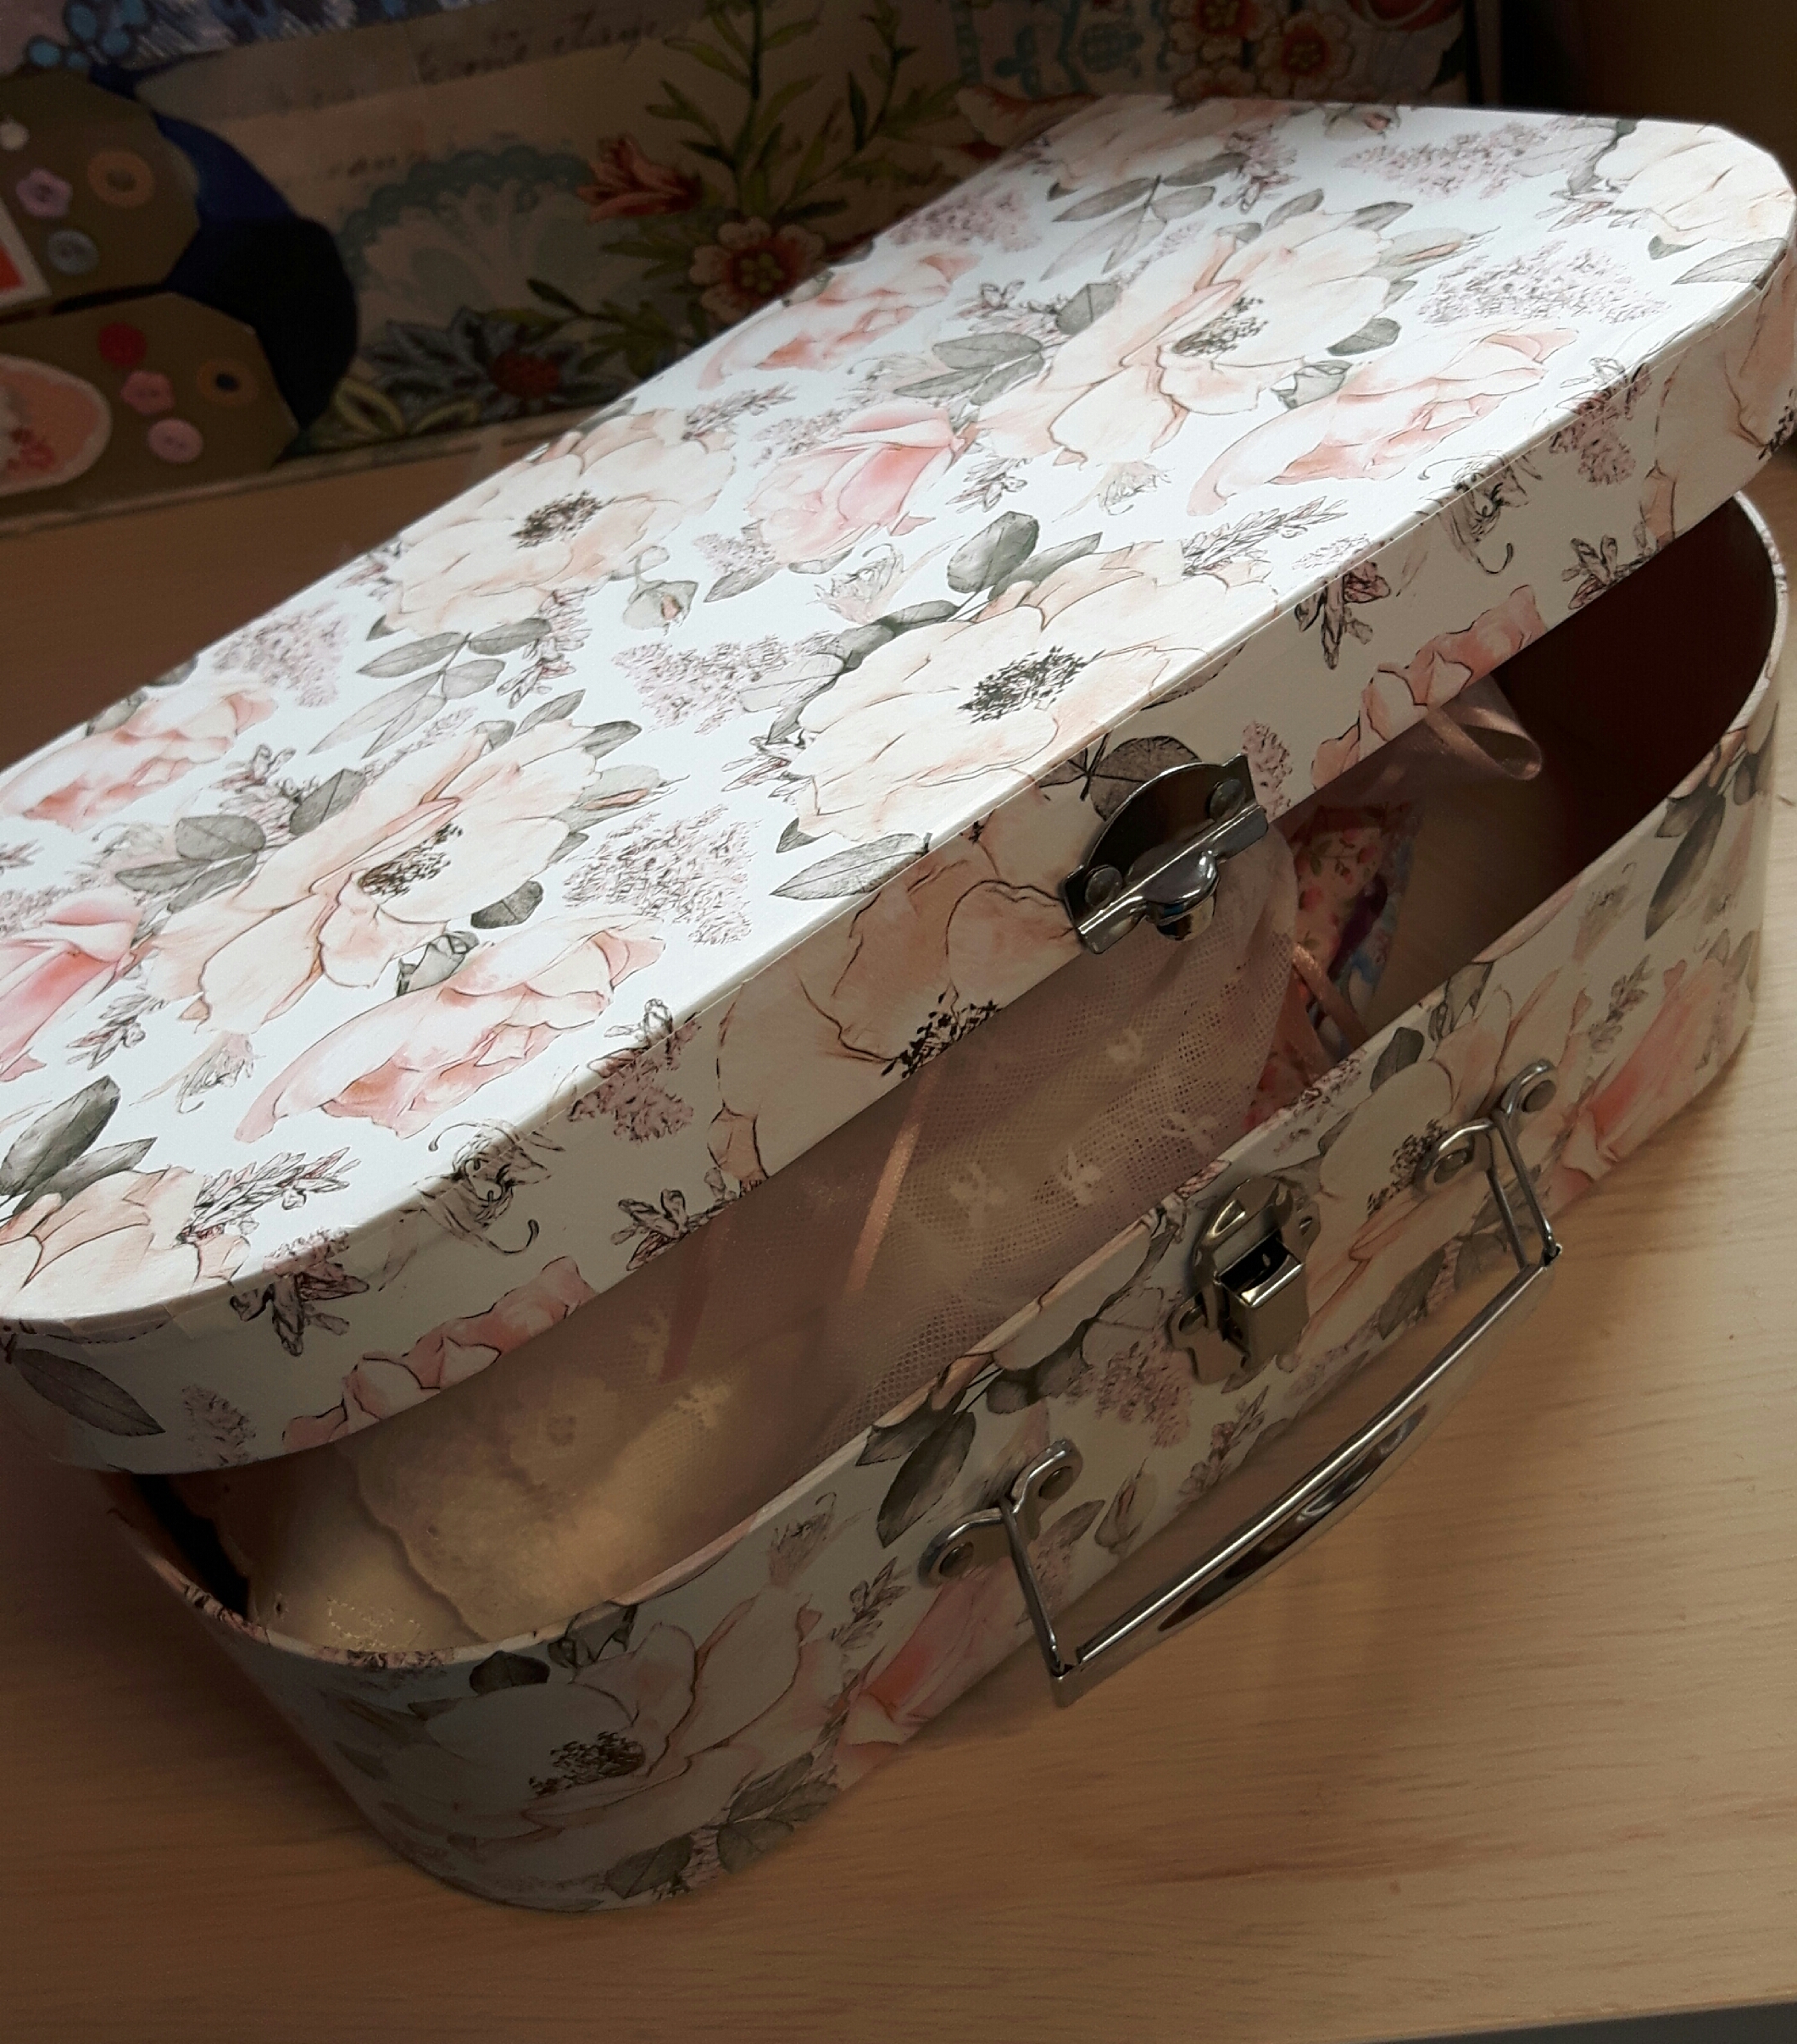
…and packed them into a pretty pink storage suitcase. I bought a set of three from the works for £7 and they’re perfect for gifting.
All the patterns are from the Luna Lapin books – I’ve got the first and second one. Sarah from Cool Crafting in Kendal is the designer, please follow the link if you fancy making one. There’s lots of different animals now and even more clothes, she sells kits too, the instructions are easy to follow and they are all a delight to make.
I’ve now had a request for a boys rabbit to go in the nursey for my grandson due in June and the girls are keen for me to make them more clothes, so I think I’m going to be busy with these grandchildren!
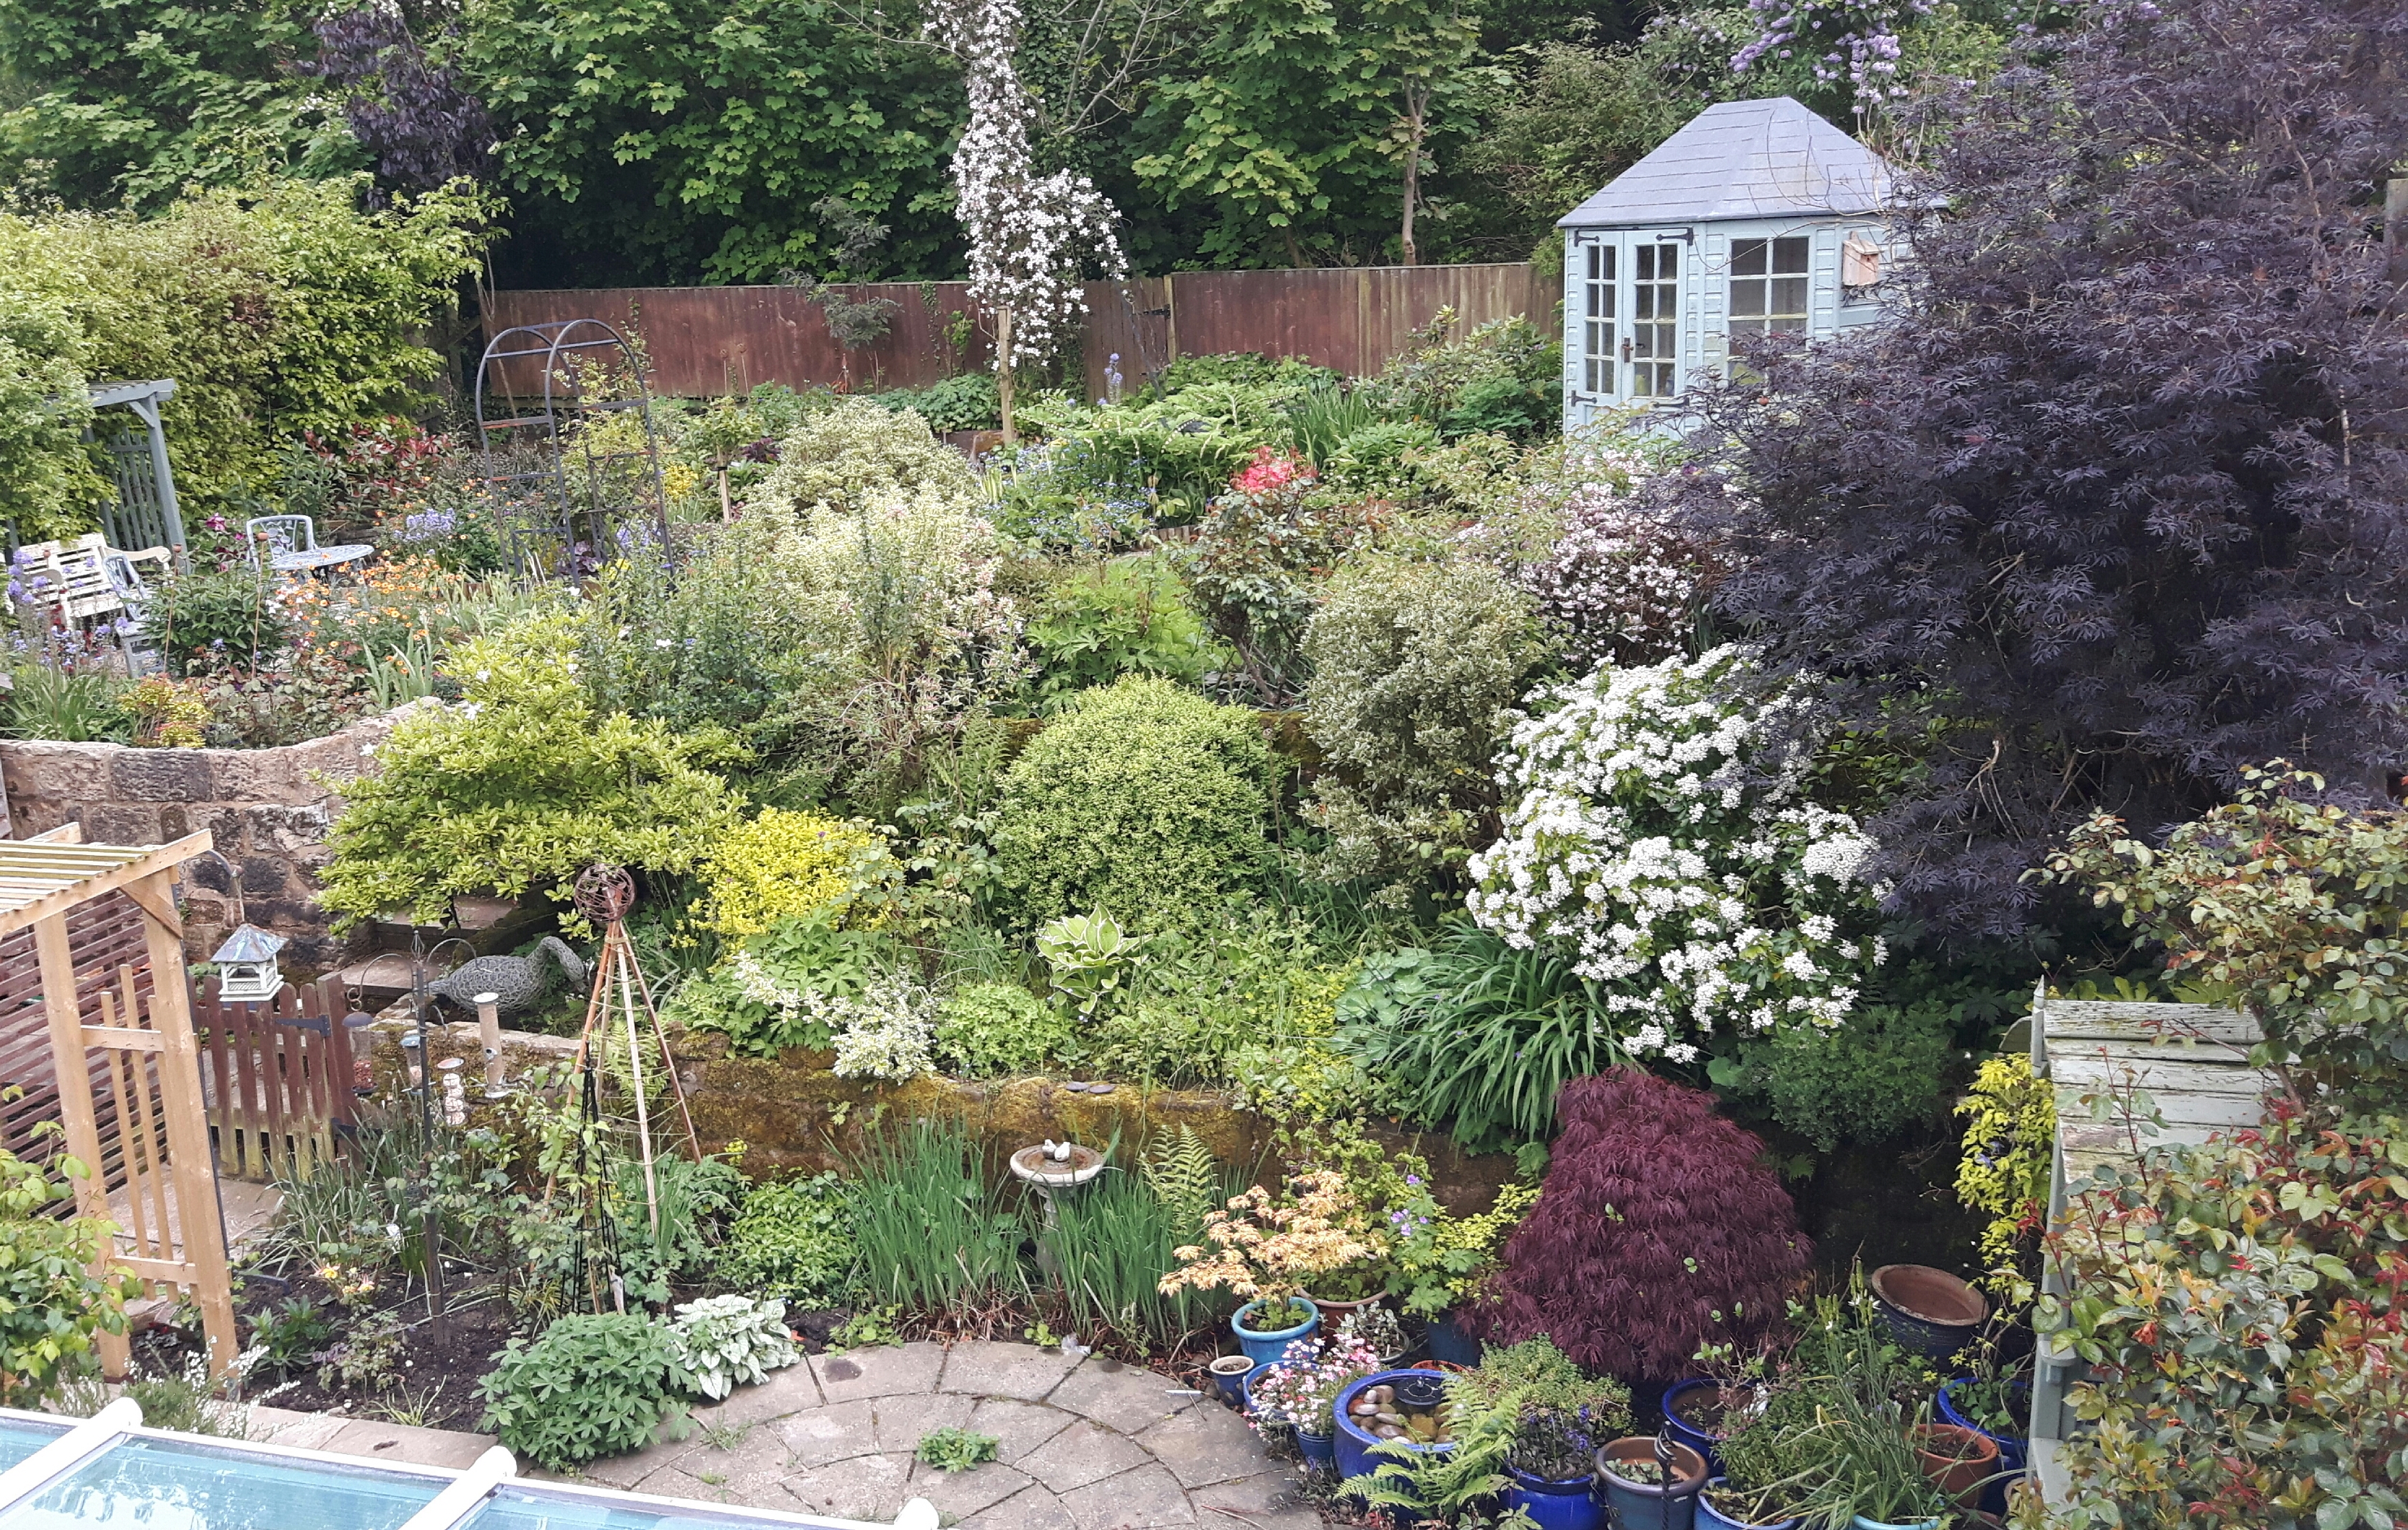
Tidying up the garden continues, we’ve had a very mixed bag of weather with gloriously warm days and days like today when it rained heavily for a lot of the day, this means everything is growing fast, weeds included!
Over an arch by the back gate is a clematis montana, otherwise known as a mile-a-minute! It’s not that long since I planted it, probably about 3 years, but it’s making a bid for freedom, or it’s reaching for the stars, either way it has set off up the ash tree behind, the arch is decidedly wonky too so that needs a bit of sorting sometime…
The azalea at the front is covered in pretty pink flowers, I think it’s the best I’ve seen since I planted it. Next to it the tall stems with creamy droplet flowers are Solomon’s Seal, I could really do with reducing it but it’s not that easy to dig up. The blue brunnera at the front has been lovely, they’re like intense blue forget-me not flowers.
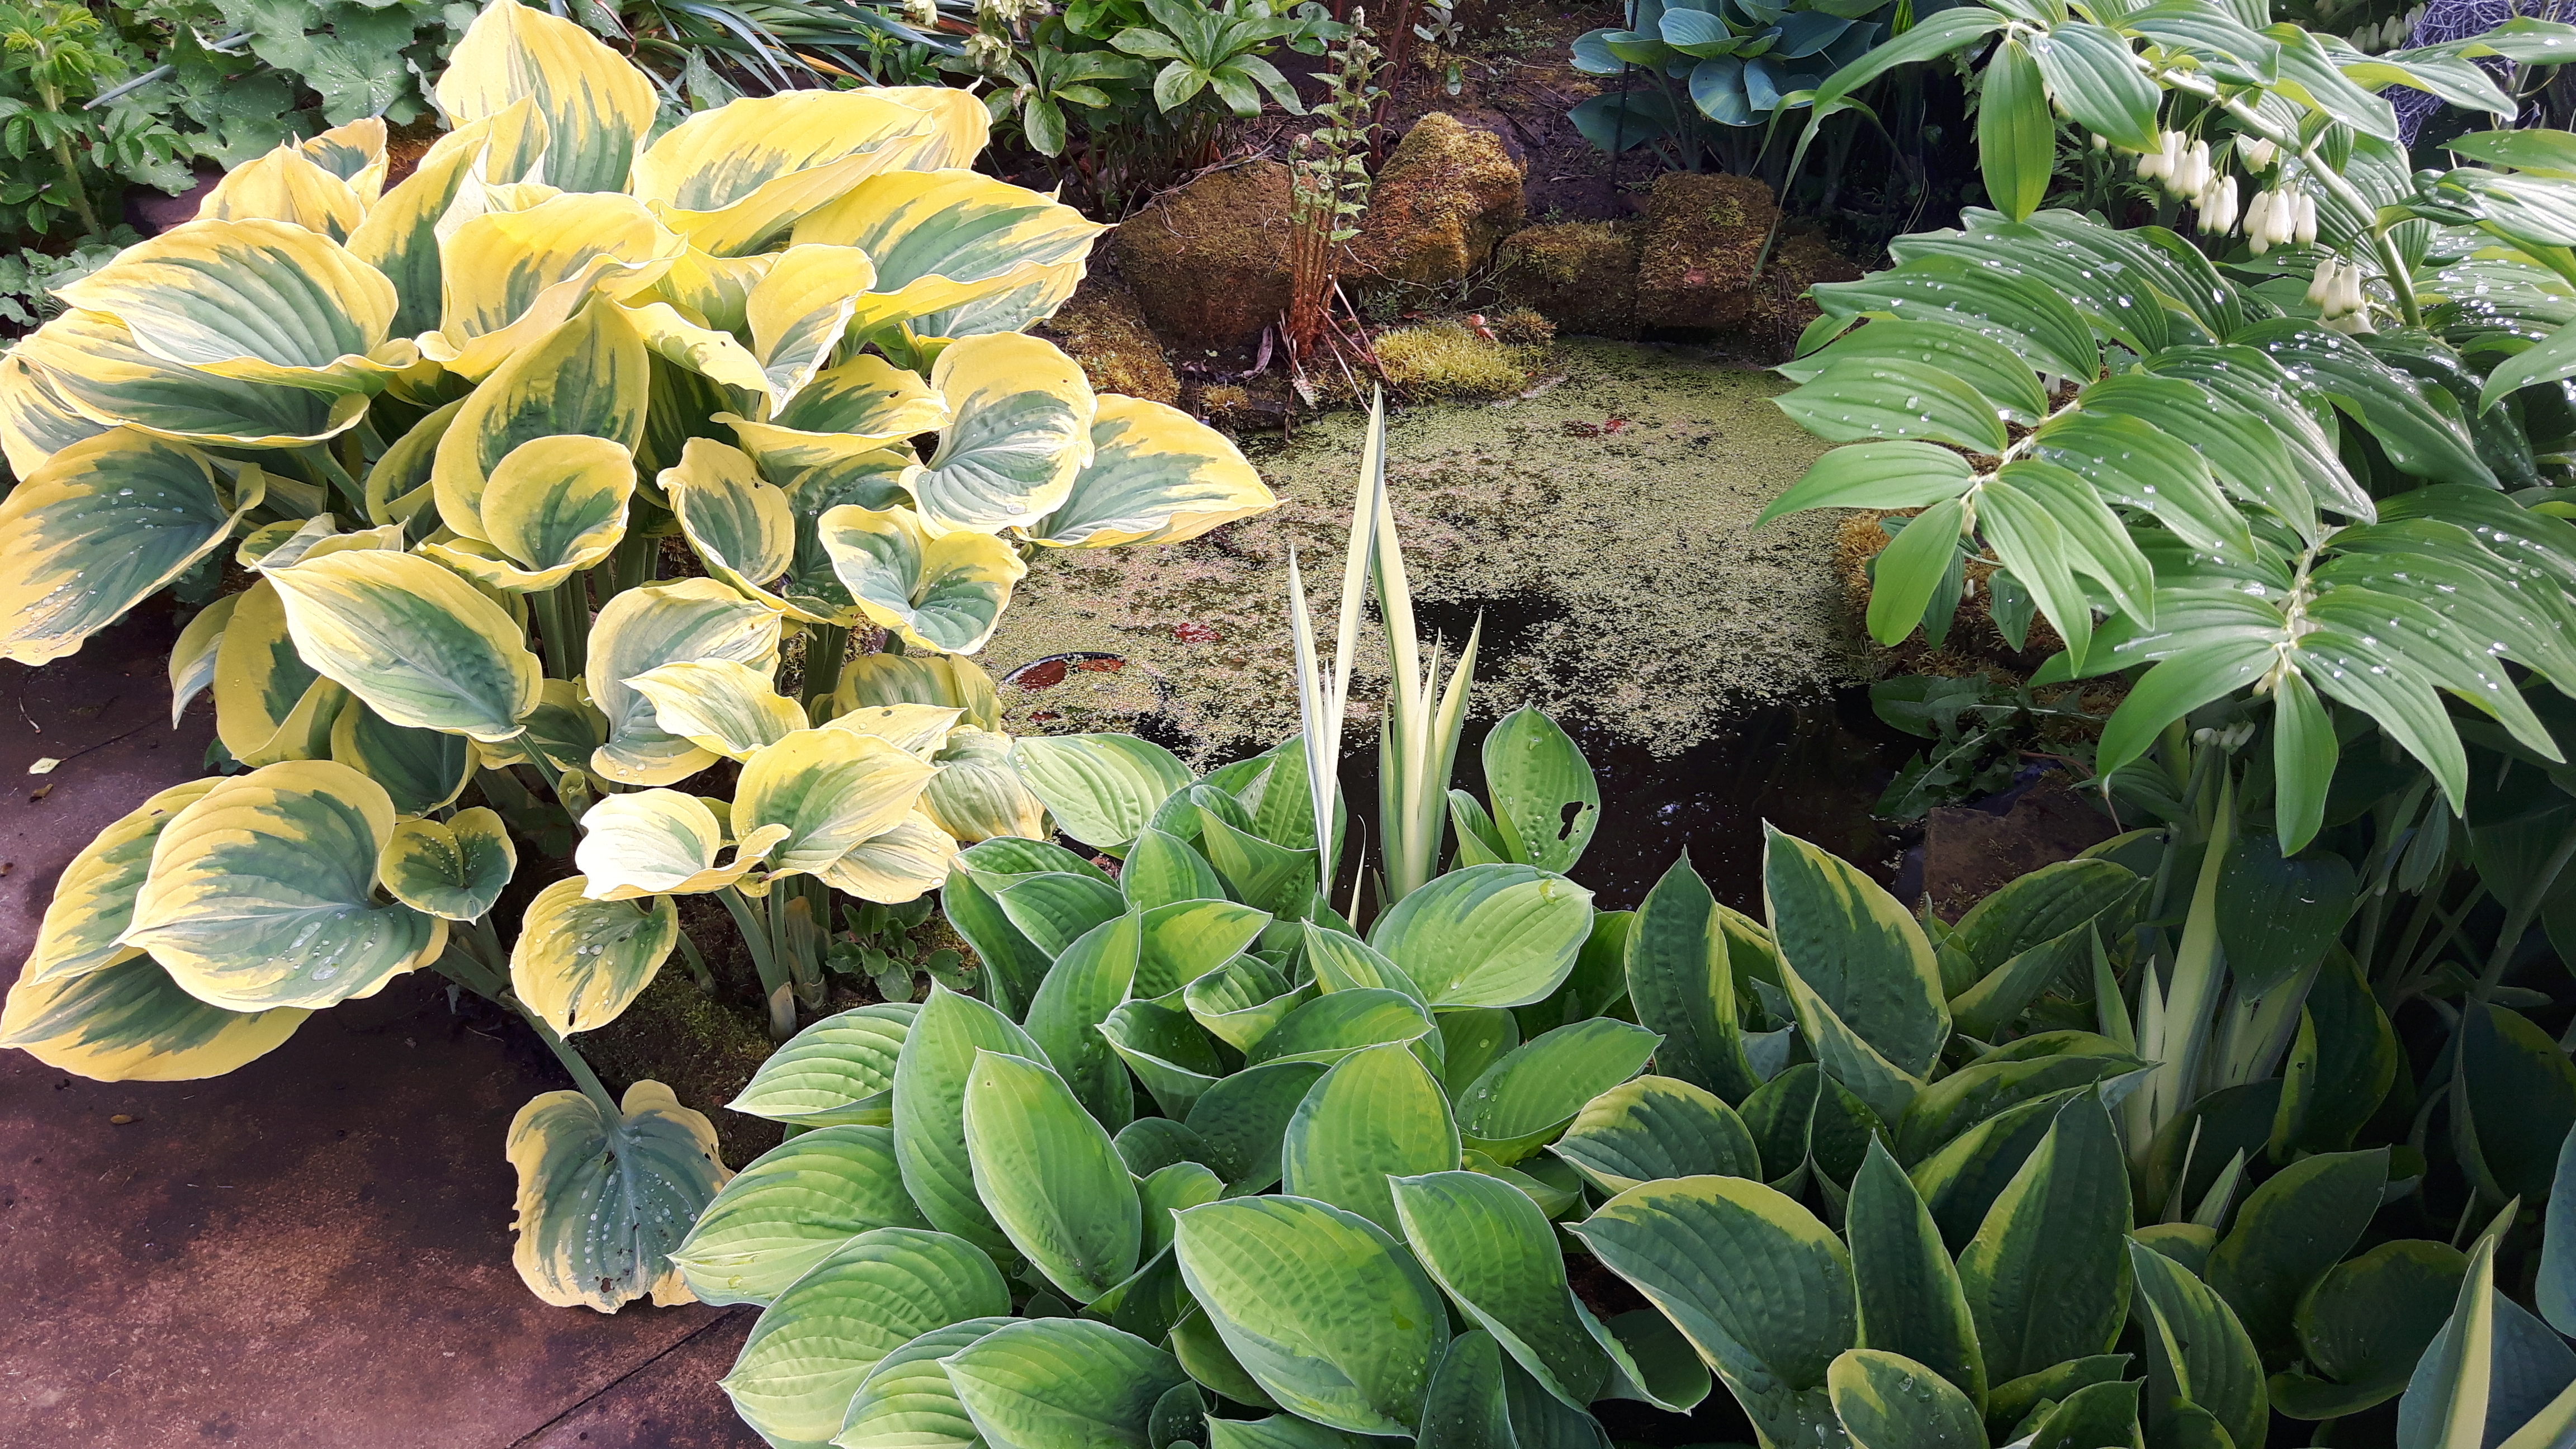
On the far side of the pond the hostas have shot up and unfurled their huge leaves, I love the big one on the left, it’s probably getting on for 2′ tall and the slugs seem to leave it alone.
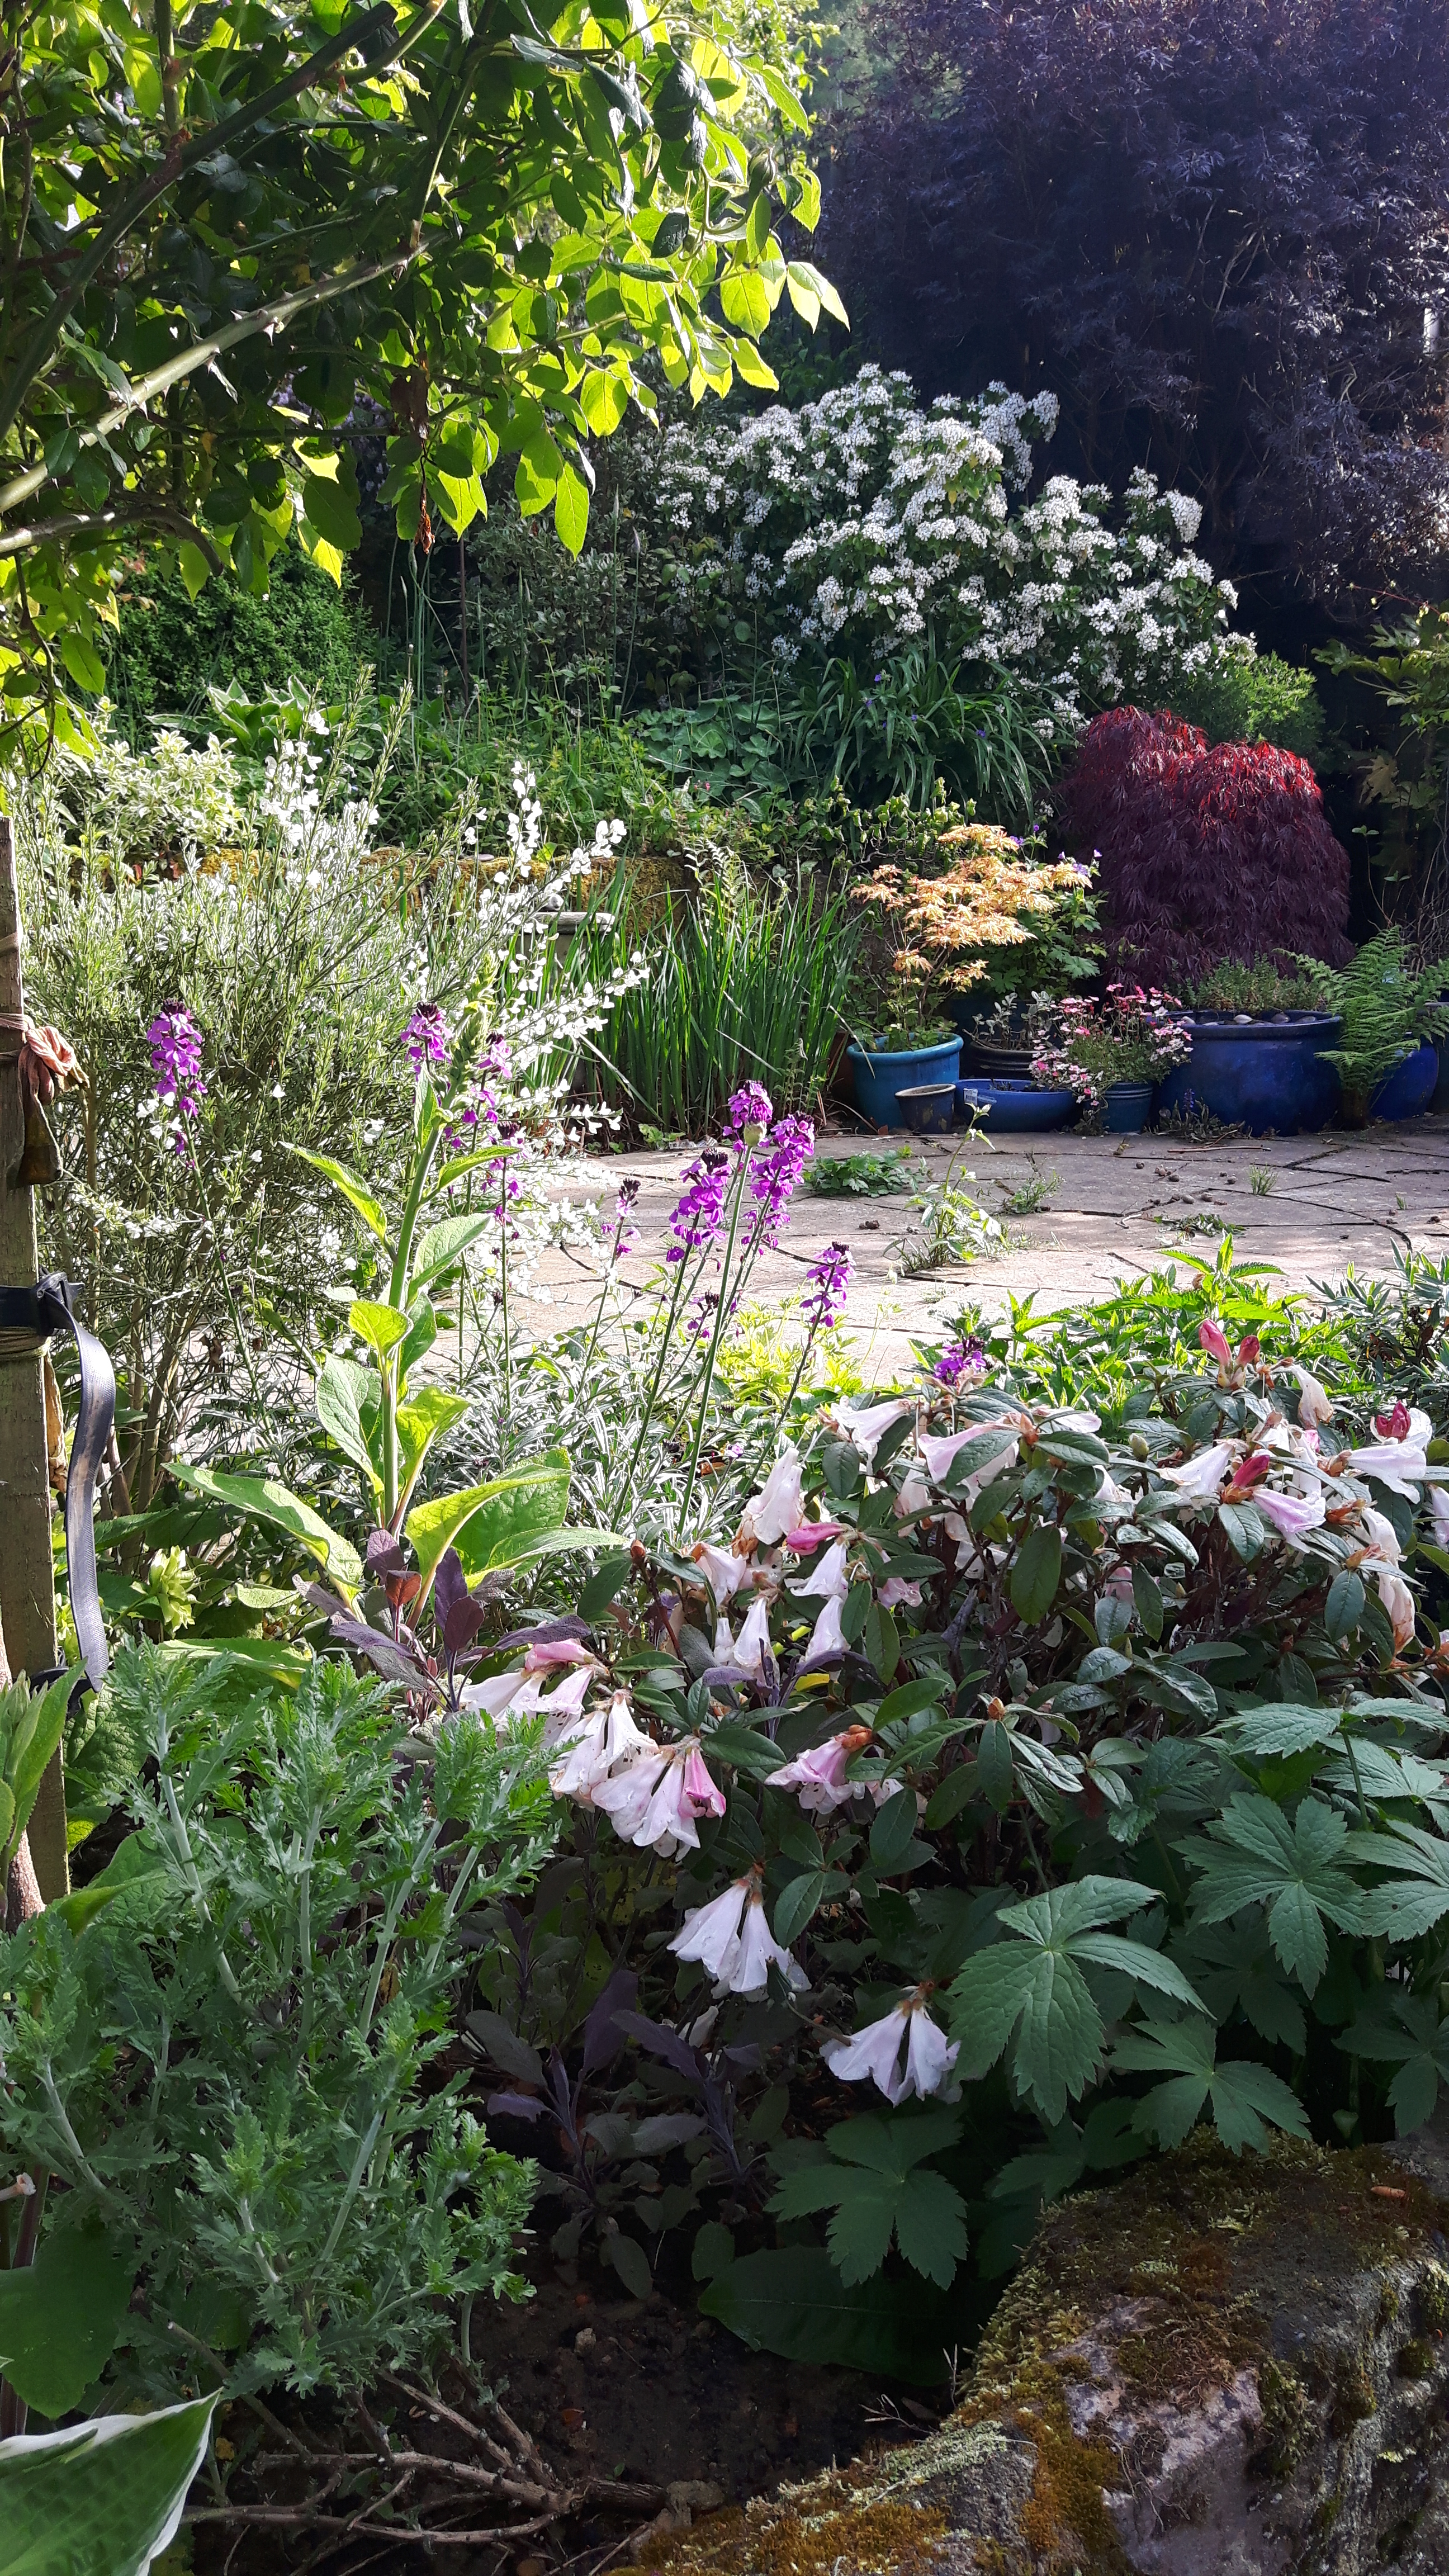
Down near the conservatory the beds have been looking very pretty. This is the area under the standard rose, which is looking huge already, I only bought it two years ago! The plants you can see are white broom, which smells lovely, purple flowered erysimum, purple sage and perovskia are in the foreground, waiting for their moment to shine.
At the back in the pots the two acers are looking gorgeous, especially the purple one. The shrub covered in blossom is choisya, looks very pretty but smells of cat pee! The huge purple shrub at the back is a black sambuscus, it’s a bit of a bully so I get pretty ruthless with pruning it every so often.
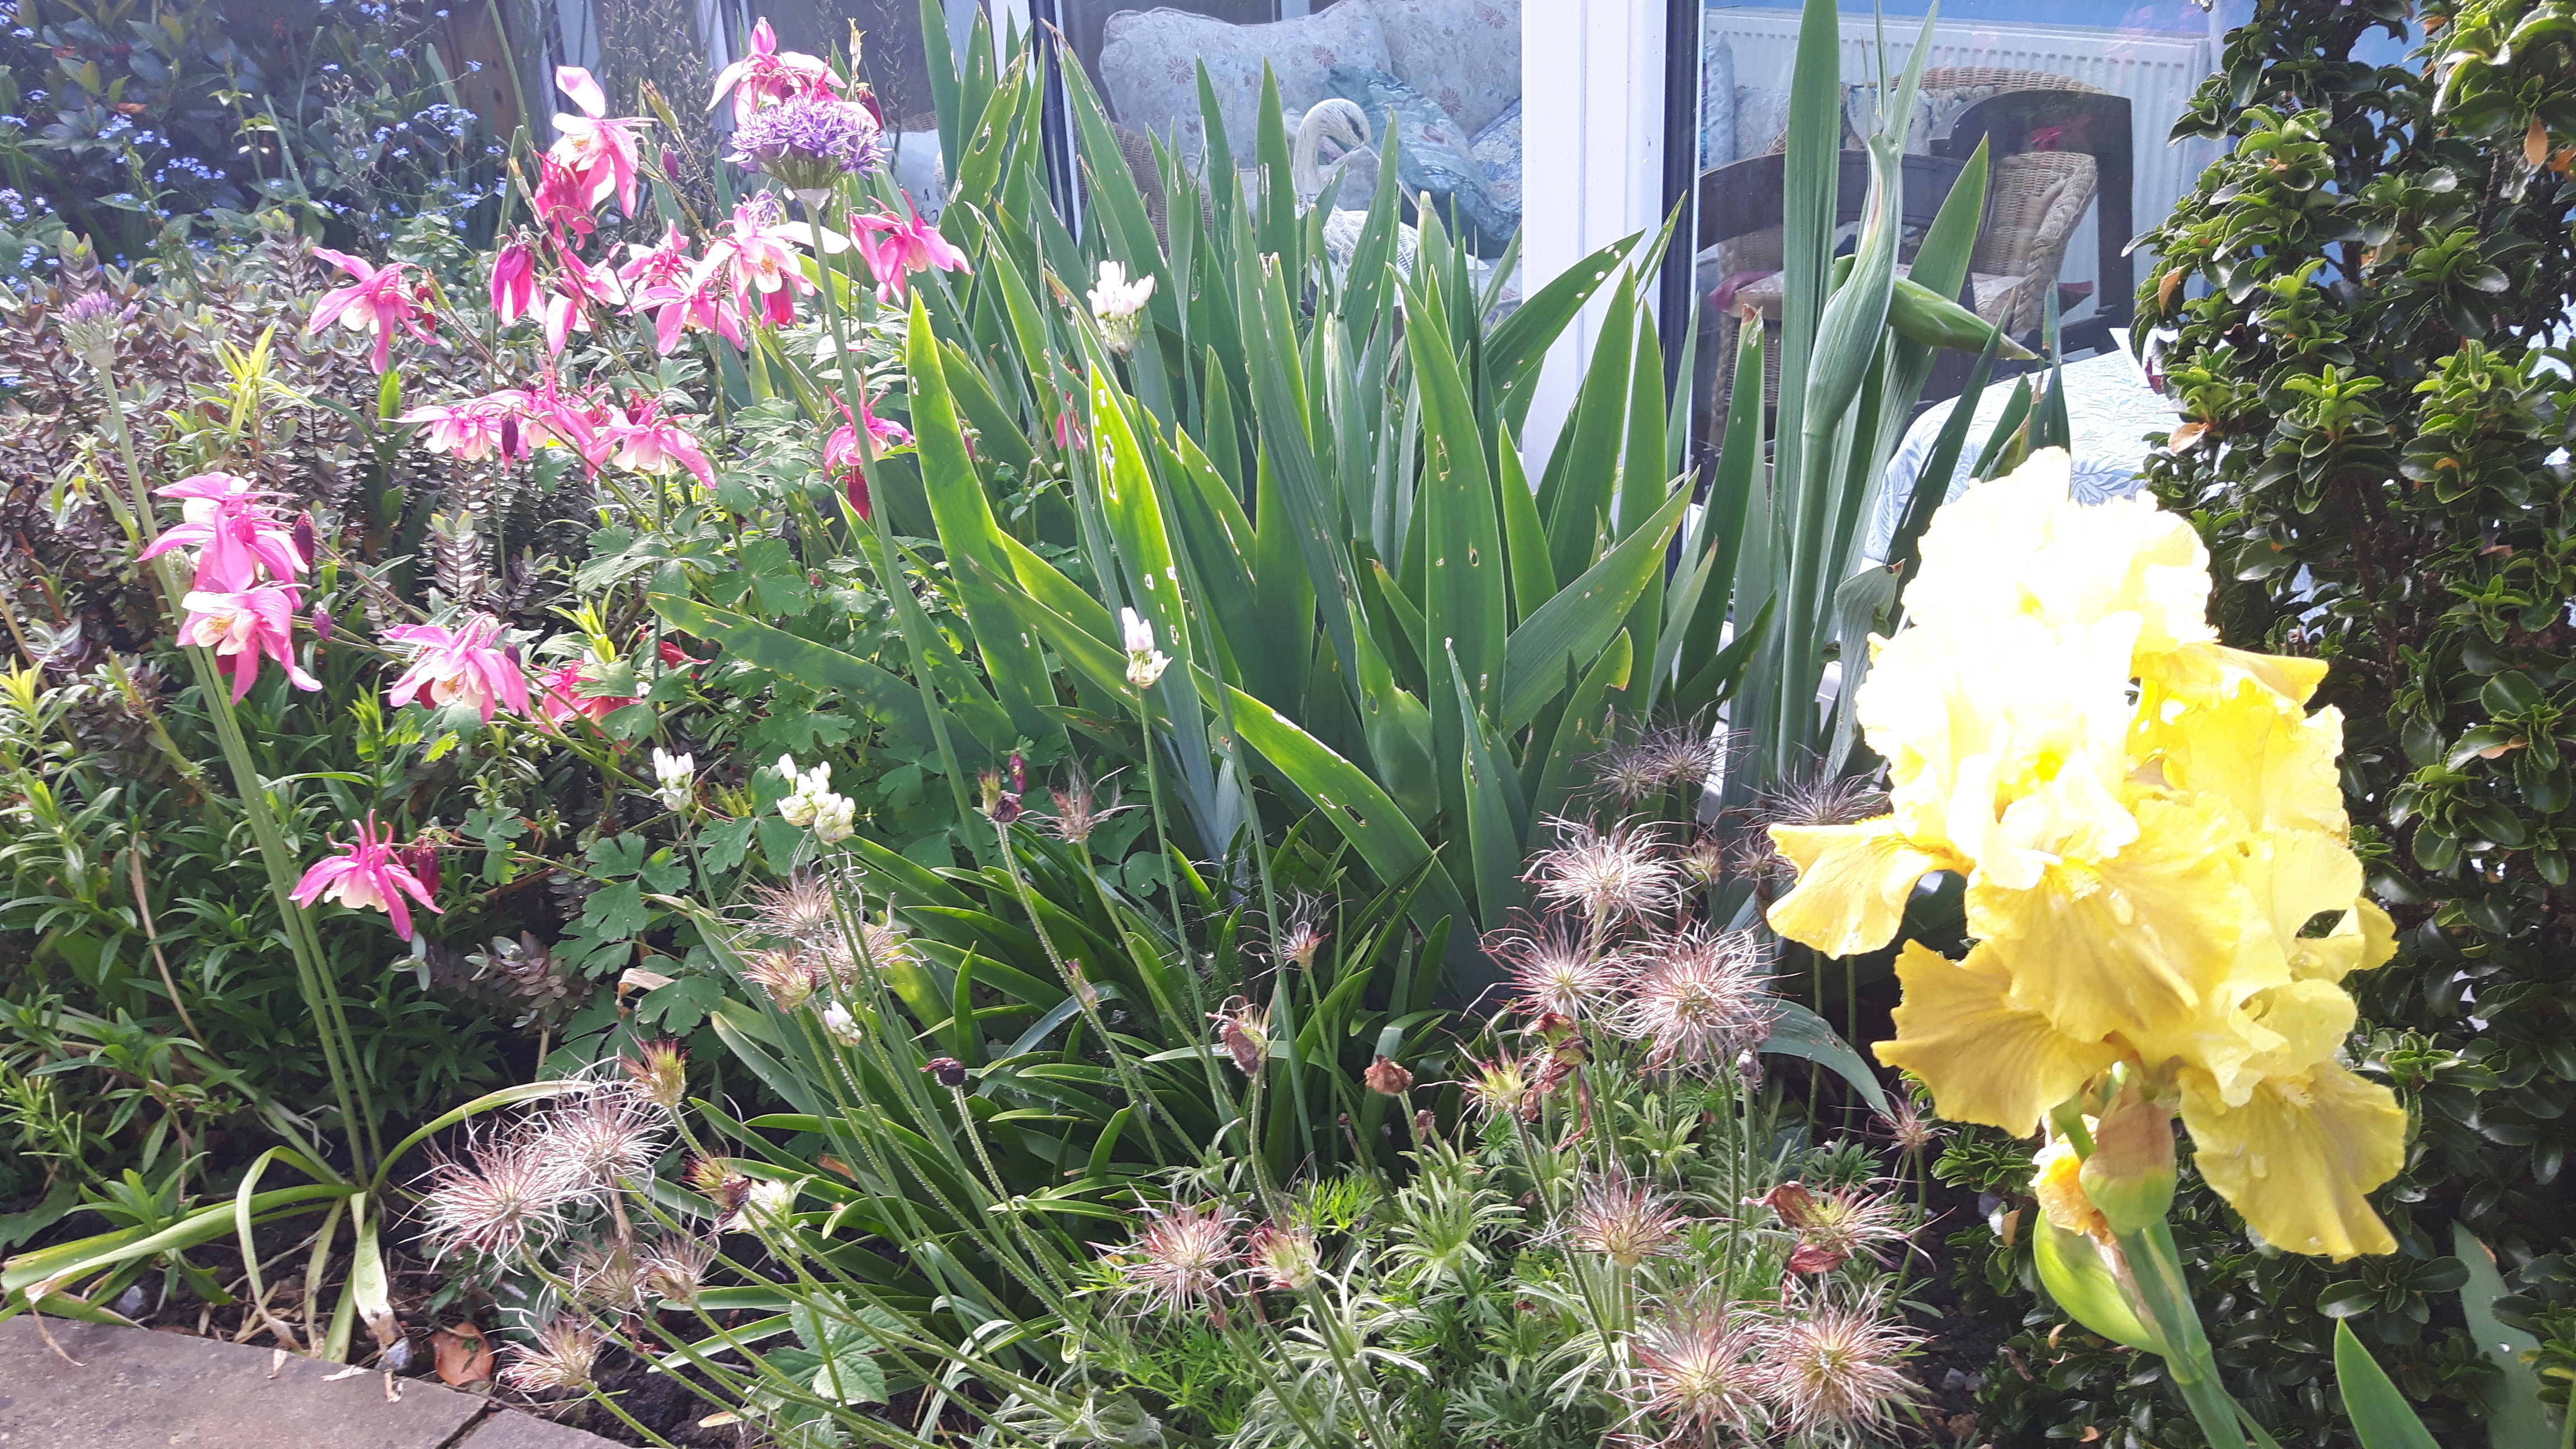
Further round the patio the first two iris have flowered, they’re a lovely buttery yellow. I have a soft spot for aquilegia, this pink one is particularly pretty. A month or so ago I posted a picture of the Pasque flower, well the seed heads on the middle plant are the pasque flower, I love the seedheads, they turn quite silver eventually and stay on the plant for a lot of the summer.
It’s a lovely time of year in the garden, everything is growing so fast and looks so fresh and verdant. Every time I go out in the garden there is something new to see.
One of my bigger projects (time wise!) is a textile book of our garden. Nicky from The Stitchery is running a SAL with videos and instructions on how to stitch a garden, it’s meant to be a picture but as our wall space is pretty full I decided to make a textile book instead. I’m hoping to do different pages for the different areas of the garden plus features.
Three weeks ago when I last shared my progress I’d just picked up a design by Soukie Soo which I started some time ago and it sort of fell by the wayside. I follow Soukie Soo on Instagram and if you like one of her designs she draws it out for you on metis in what I presume is a frixion pen as it disappears on ironing. I thought this would would fit in nicely with the garden book.
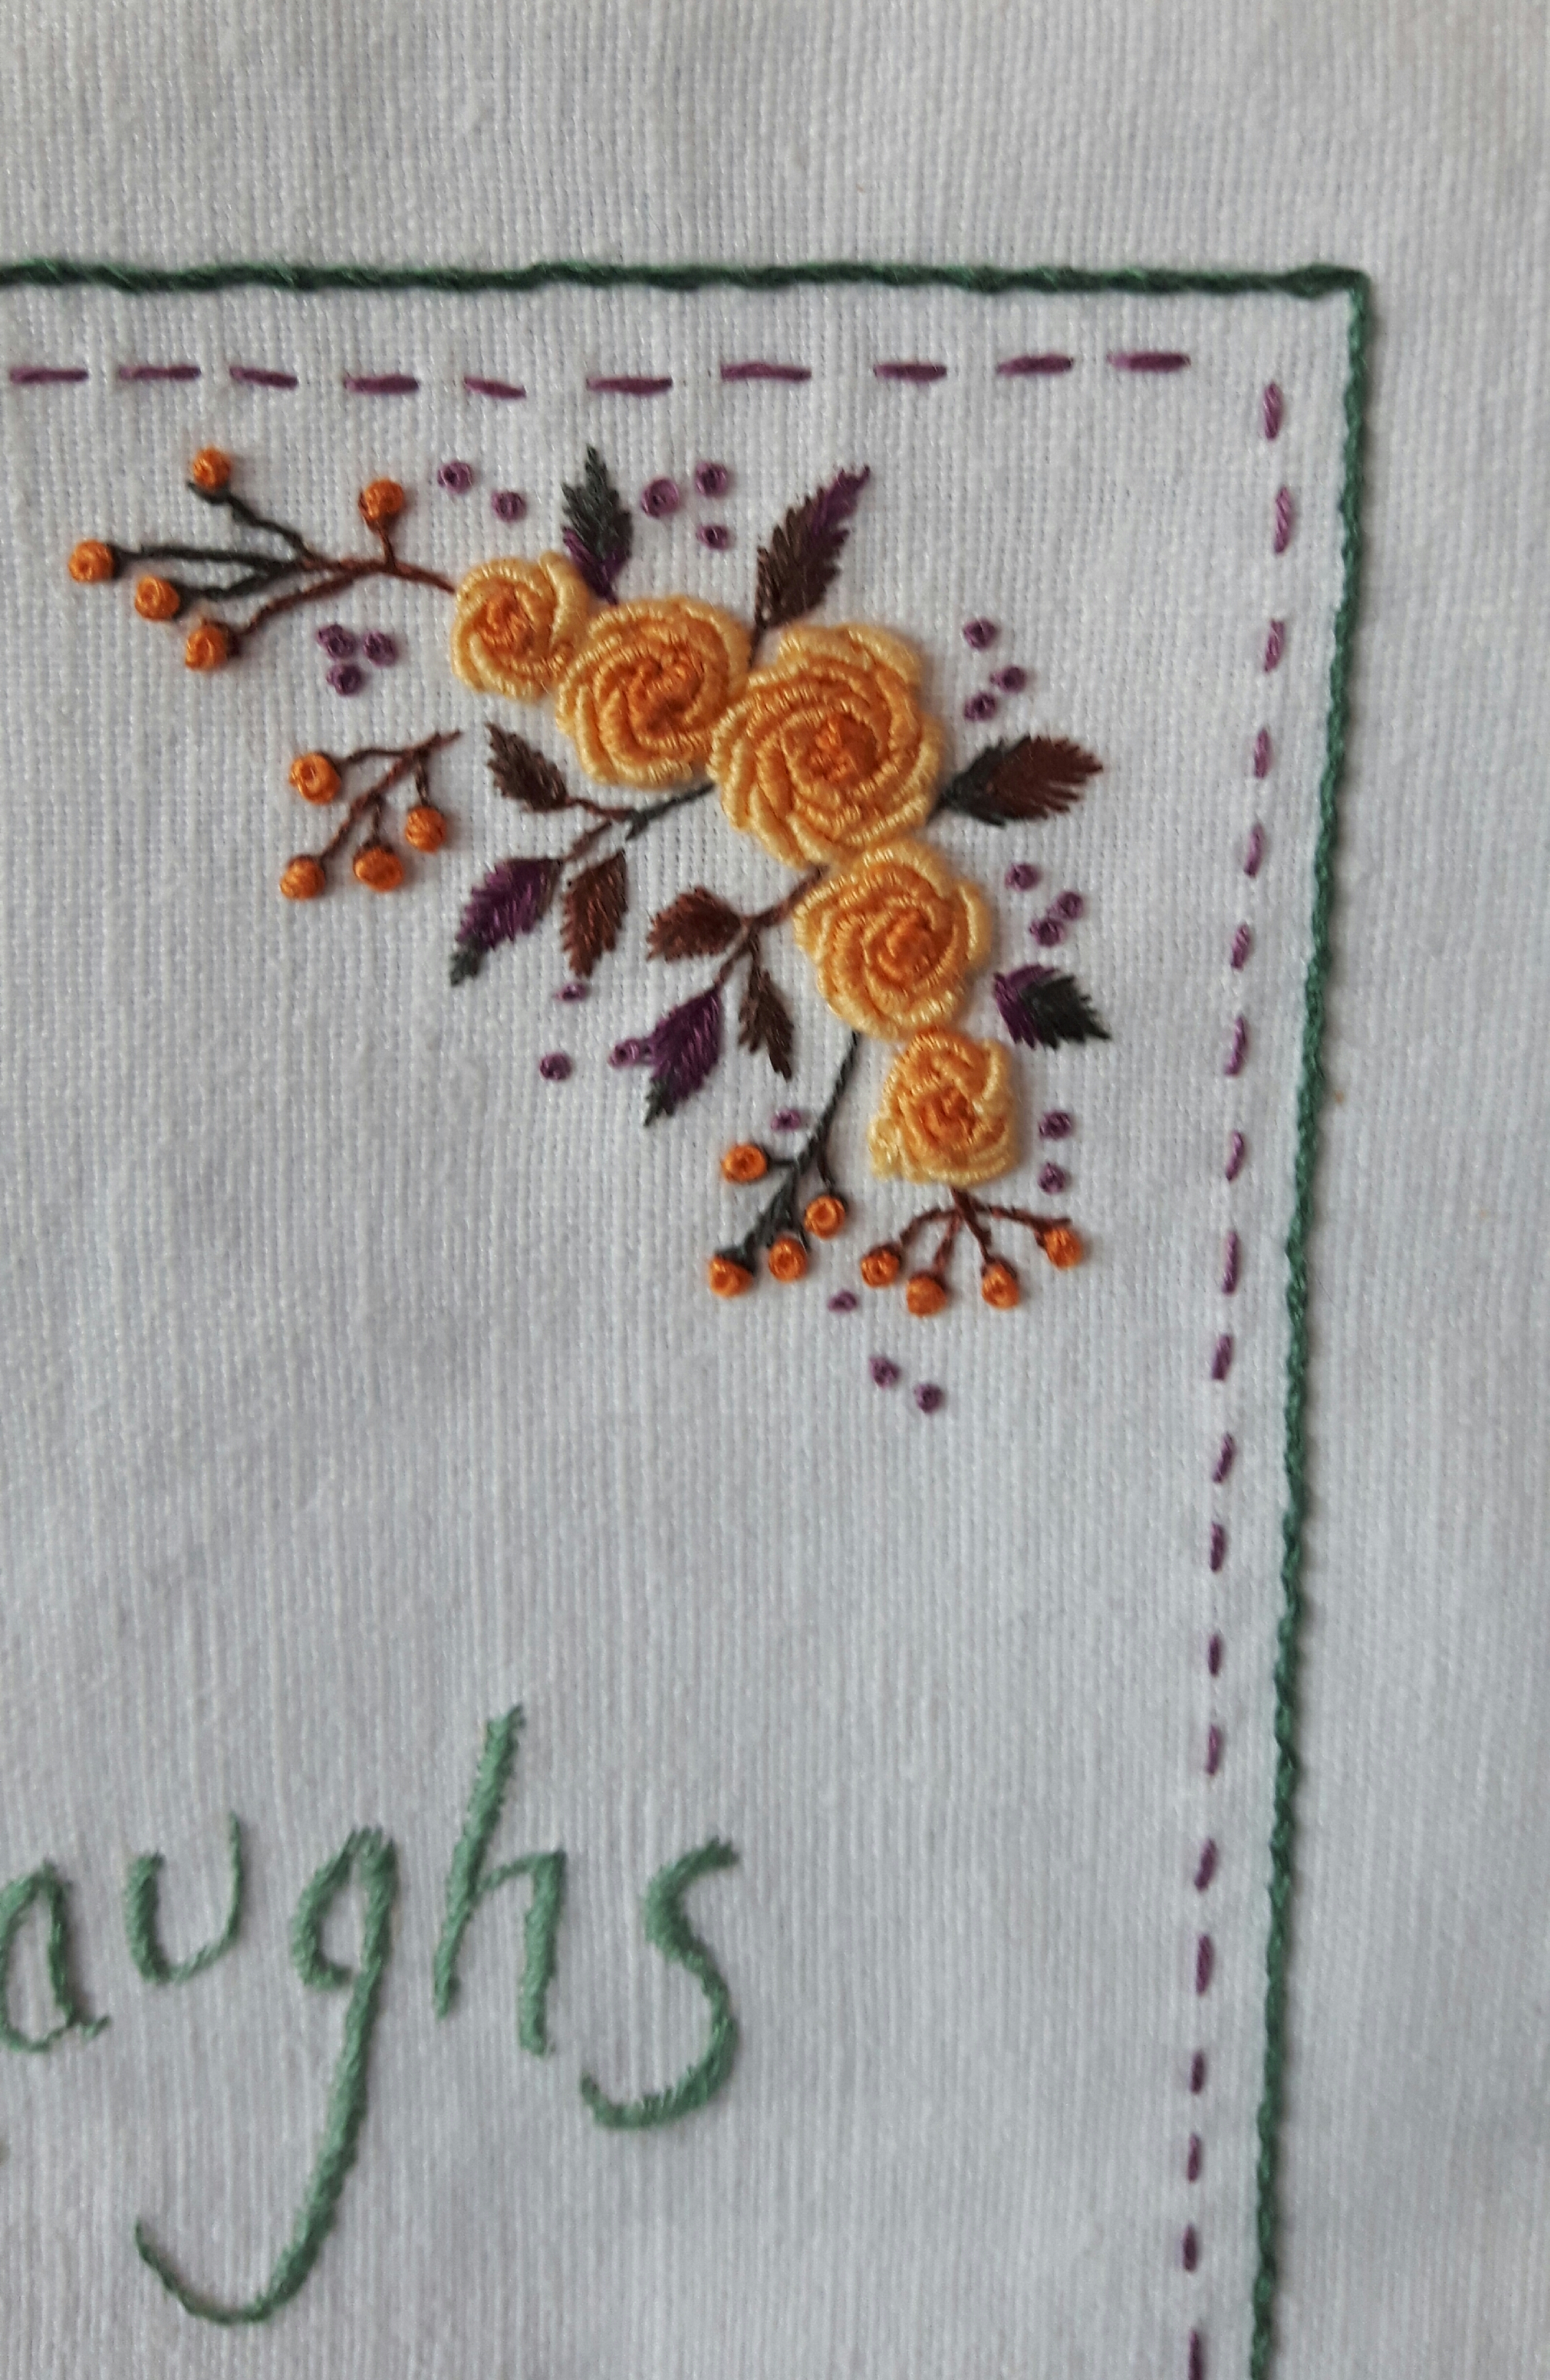
I was stitching the words with satin stitch…
The next day I took it along to my Skipton Stitchers meeting and cracked on with it. I completed the words later that week, I’m pretty pleased with the letters although I think another time I’d try split stitch or stem stitch instead to try and make the edges neater.
With the words stitched I started embroidering the flowers. I decided on orange roses and purple filler flowers, just like I have in my Amber & Amethyst garden. I used three shades of orange thread to make the bullion knots of the roses. I decided roses are a bit like buttonholes, there’s always one that’s a bit iffy! The leaves are stitched with fishtail stitch which is now my favourite for leaves. The buds are stitched with French knots and fly stitch.
With the main embroidery complete I just had the border of split stitch and a simple running stitch to do. Once it was pressed any visible design lines disappeared. I’m pleased with this piece and it’s a nice size at 6″ by 7″ plus a border to aim for the finished size of the book pages.
This SAL is organised by Avis, we post our progress on a project every three weeks, just often enough to keep the motivation going. Please follow the links to see what everyone else has been stitching.