It’s three weeks since I shared my progress on the Owl and Hare Hollow, a bi-monthly QAL by Natalie Bird. I’ve not made as much progress as other times as I’ve been concentrating on my garden embroidery, but I have done some. Three weeks ago I’d just started another embroidered block…
I’ve now finished the embroidery for this one, I just need to add an applique circle in the middle and the nineteen 1/2″ hexies round the edge.
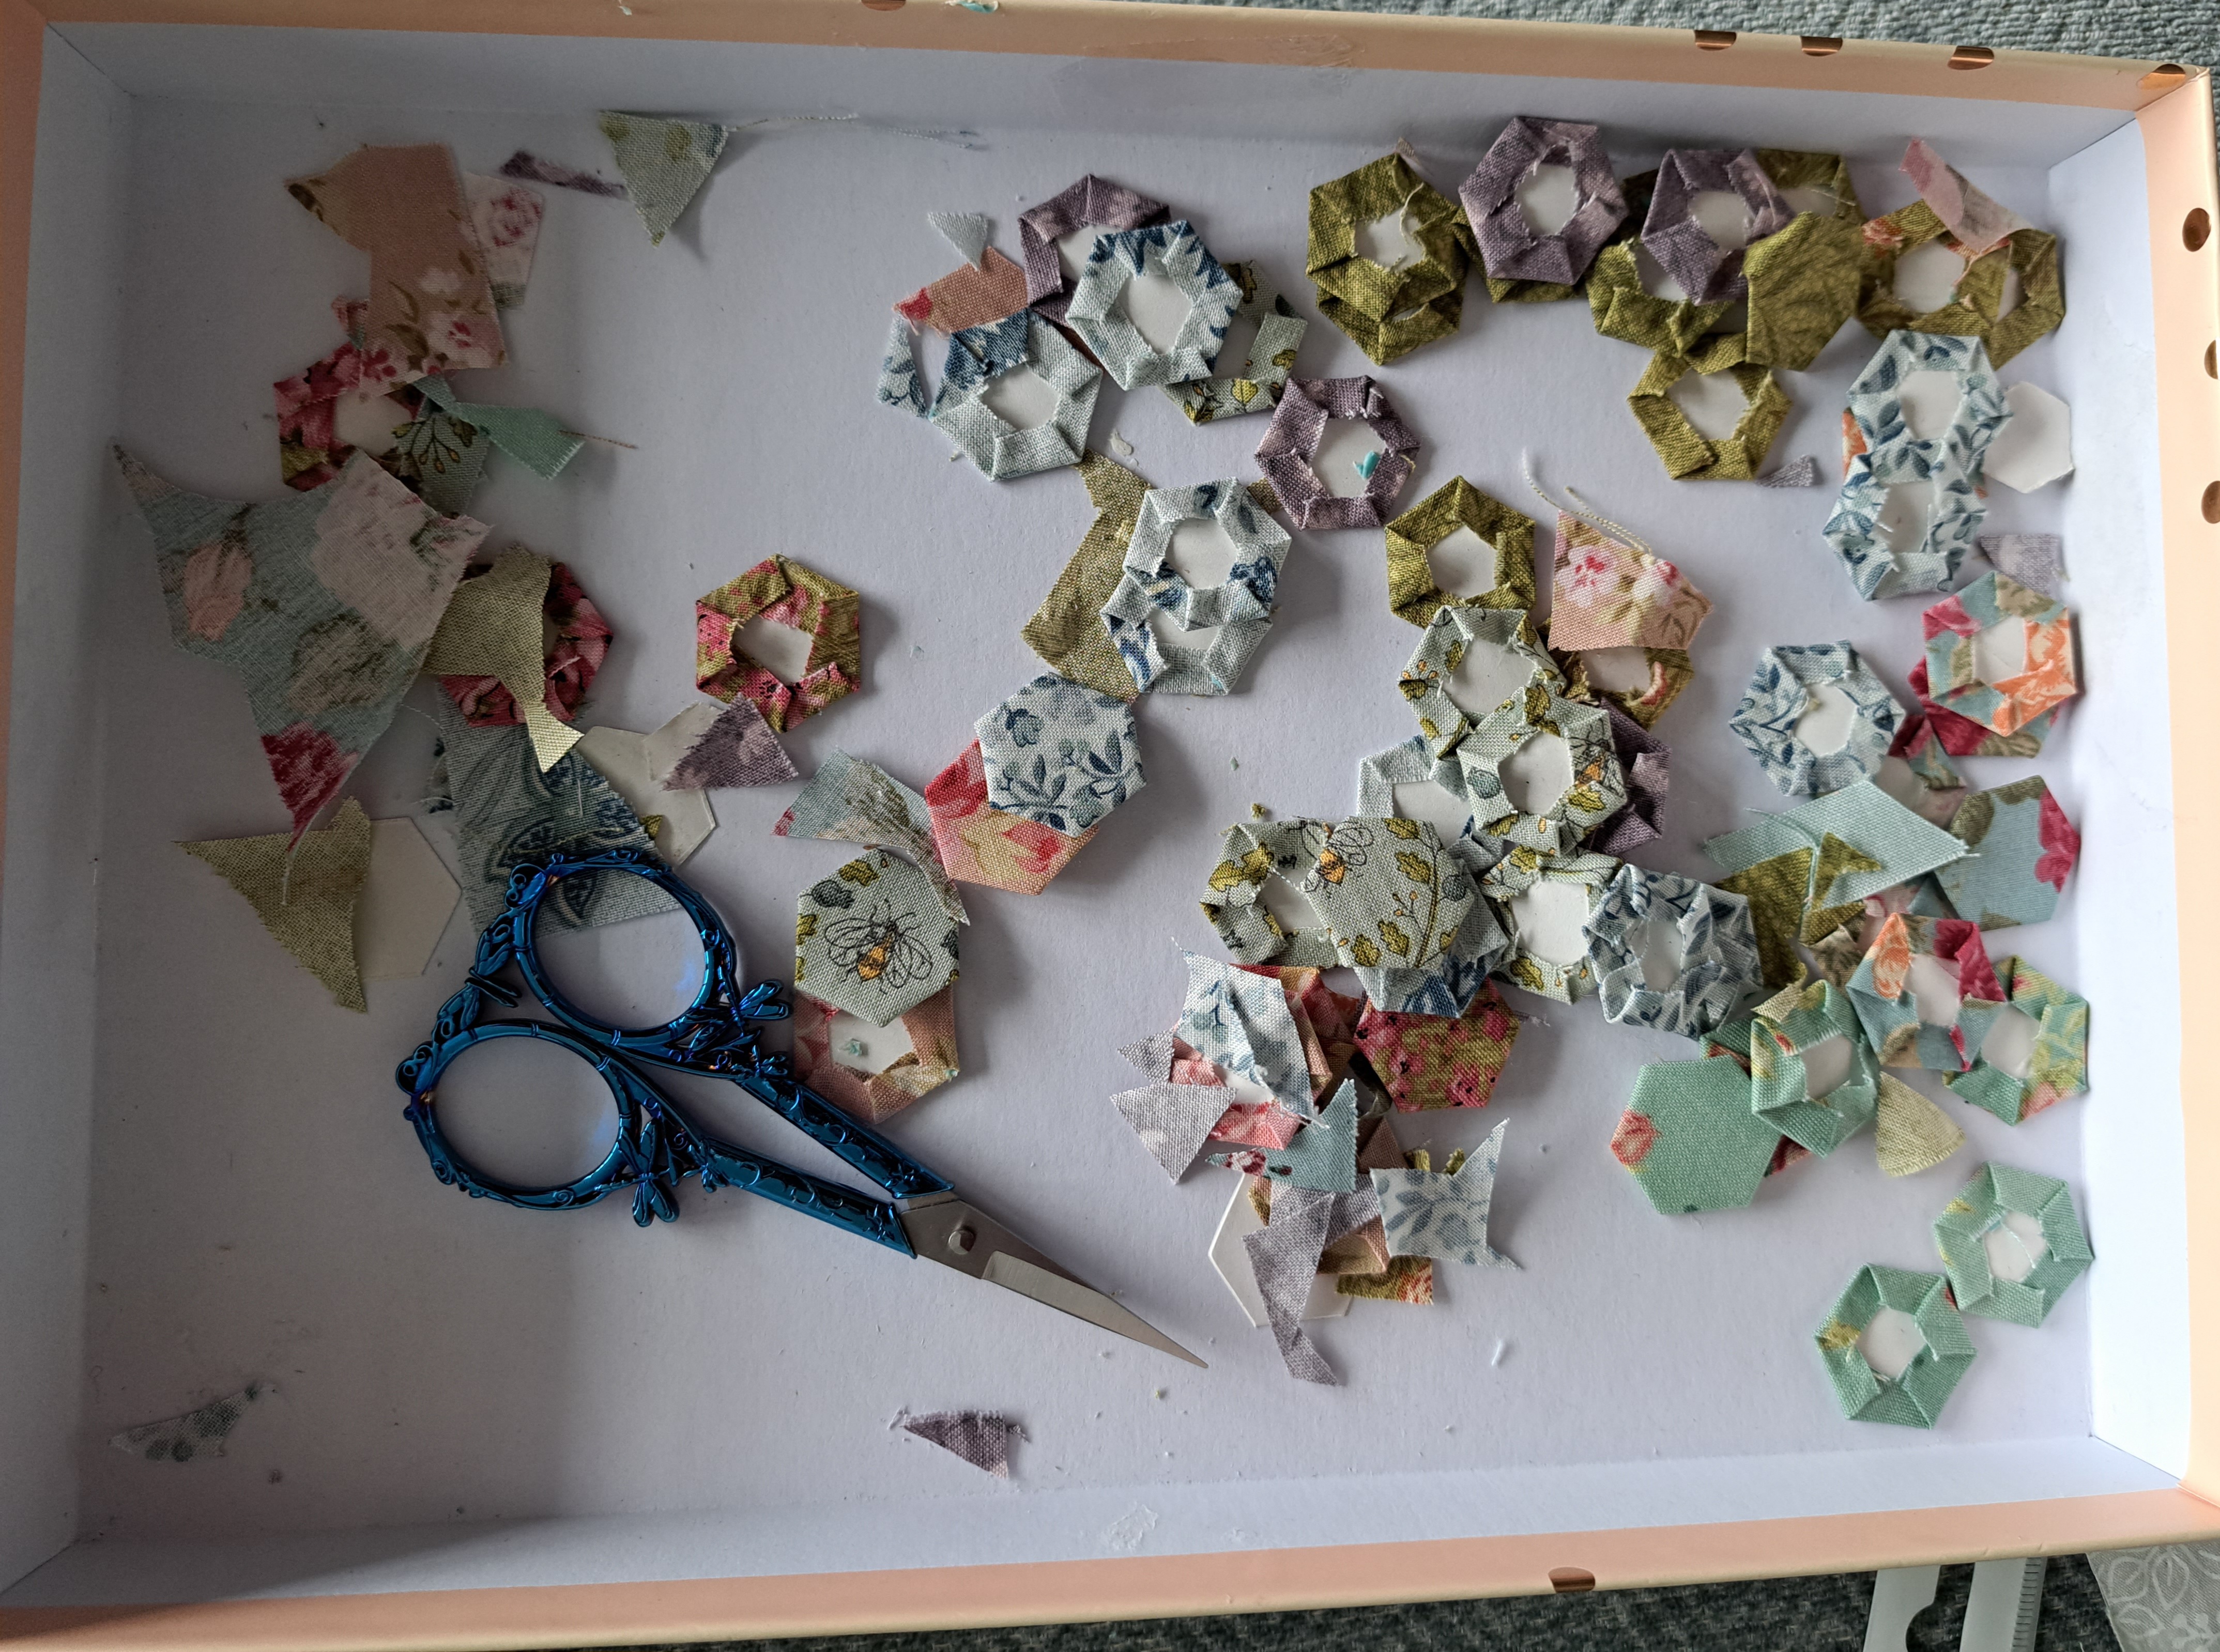
I’ve spent a couple of hours making lots of hexies, rather than making what I need for each block I’ve made half a dozen of each fabric, so they’ll last me a few blocks. There doesn’t look so many in my box lid but that’s about ten different fabrics, so about sixty hexies…
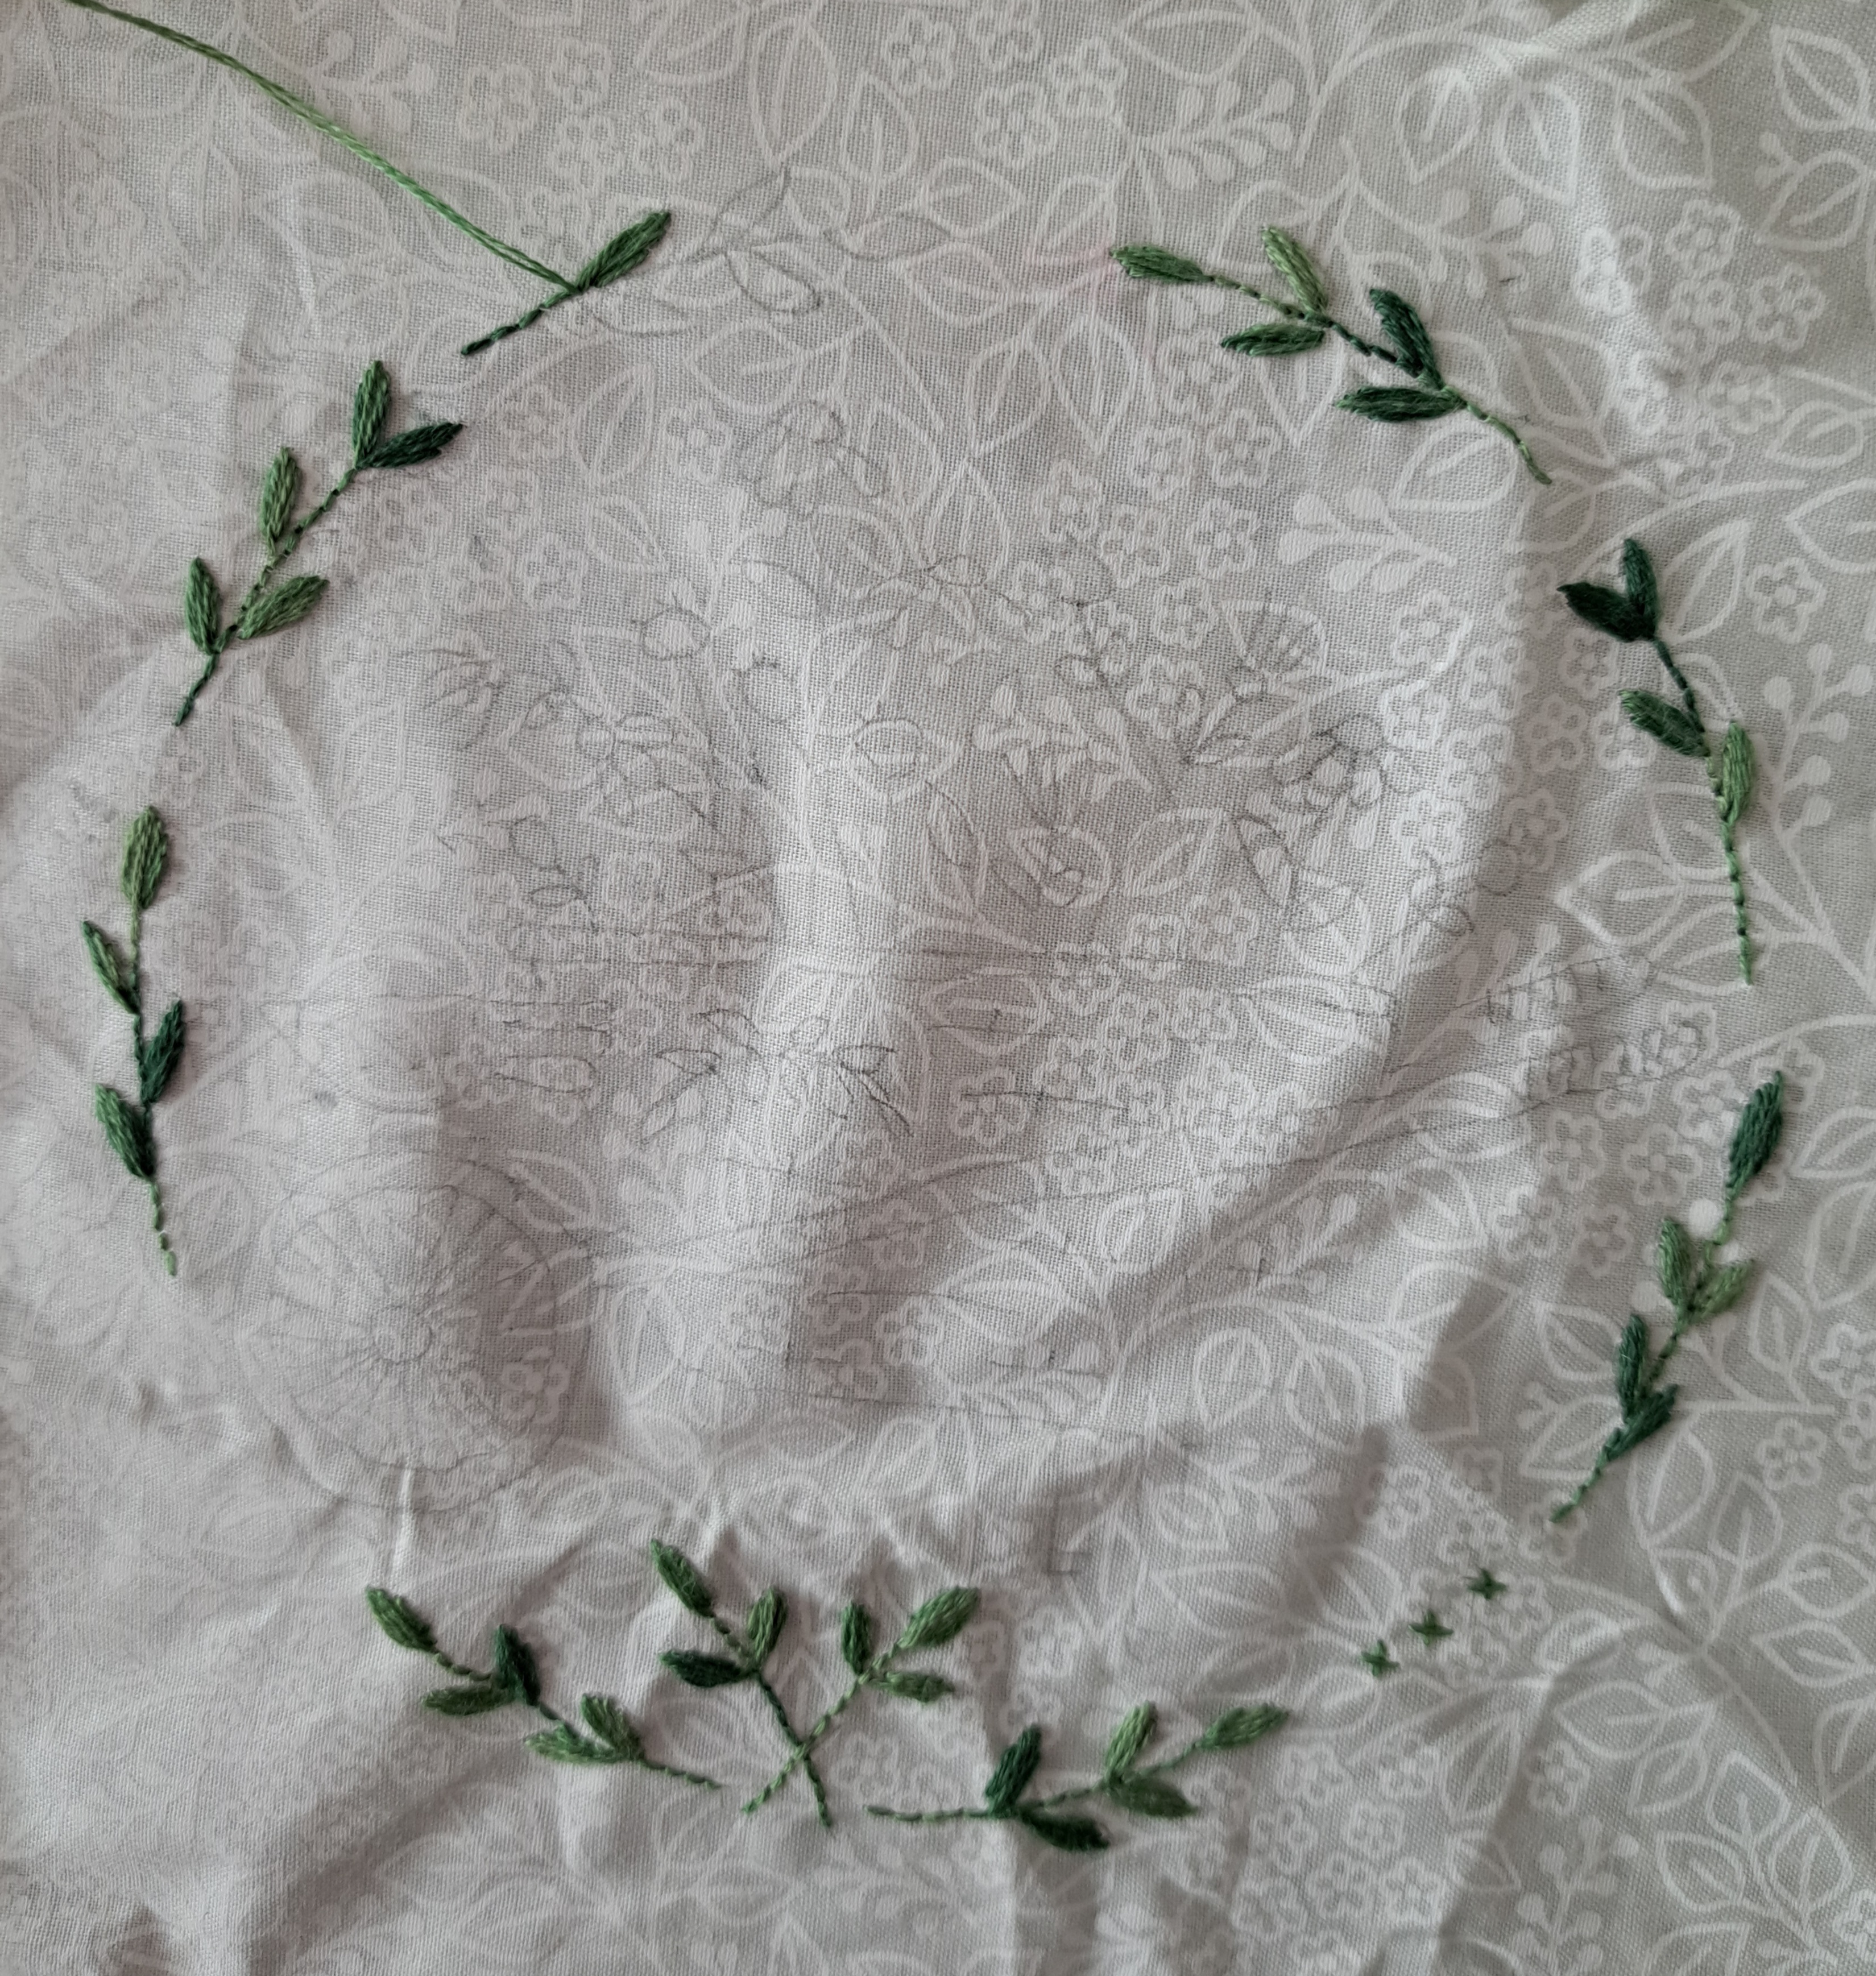
I’ve also started another embroidered block, this is my handbag sewing, so it’ll take a little while. I’ve almost stitched the leafy border, then there’s a wheelbarrow full of flowers in the middle.
Hand Quilt Along Links
This Hand Quilt Along is an opportunity for hand quilters and piecers to share and motivate one another. We post every three weeks, to show our progress and encourage one another. If you have a hand quilting project and would like to join our group contact Kathy at the link below.
Some of you may remember the Coming Home quilt top I made, it was my second Sarah Fielke QAL and I was really pleased with how it came out. I finished it in May 2020, mid pandemic!
It’s a pretty big quilt, about 100″ square, I had hand quilted the first Sarah Fielke quilt I made (Down the Rabbit Hole) which is a similar size and it nearly put me off hand-quilting for life!!I decided to send this one to a long arm quilter as it was too big to manage on my domestic sewing machine. For the non-quilters among you a long arm quilting is done on a huge frame with a special sewing machine that moves over the quilt.
Whilst I wanted it machine quilted, I didn’t particularly want an all over design, called a pantograph, I wanted it more custom quilted where the quilting fits with the design. Whilst there are quite a few long arm quilters here in the UK, very few do custom quilting, they just do pantographs which the newer computerised machines do automatically. I rang or messaged quite a few with no success.
I then messaged Harrogate Quilting Studio where the lovely Althea hesitated and then said bring it along and we’ll have a chat. Her quilting studio is in the pretty village of Summerbridge, in Nidderdale, so a nice drive out from Otley.
Of course I made sure I had both the quilt top and some backing fabric when I went a long. Talking of backing fabric, that wasn’t easy either as of course we were in the middle of the pandemic with all the shopping restrictions so I had to buy on line, I needed extra wide fabric too which both limited my choice and meant it was a major purchase, so I didn’t really have the option that if it wasn’t quite right I could stash it and buy some more. I chose some dark blue digitally printed cotton which has like a filigree pattern on the back. It does actually match the darker blue fabric in the front pretty well but on mass looks a bit brighter, I’m sure it’ll settle down in time!
It was fascinating to see how the long arm machine worked, I could see why Althea hesitated! I thought that all the custom quilting was effectively done by moving the machine by hand. However, from what I can see most are now done on computerised machines, a laser is used to draw round the shape, a pattern is selected and the machine automatically fills the shape in with that pattern. I could see the issues my design would have with this.
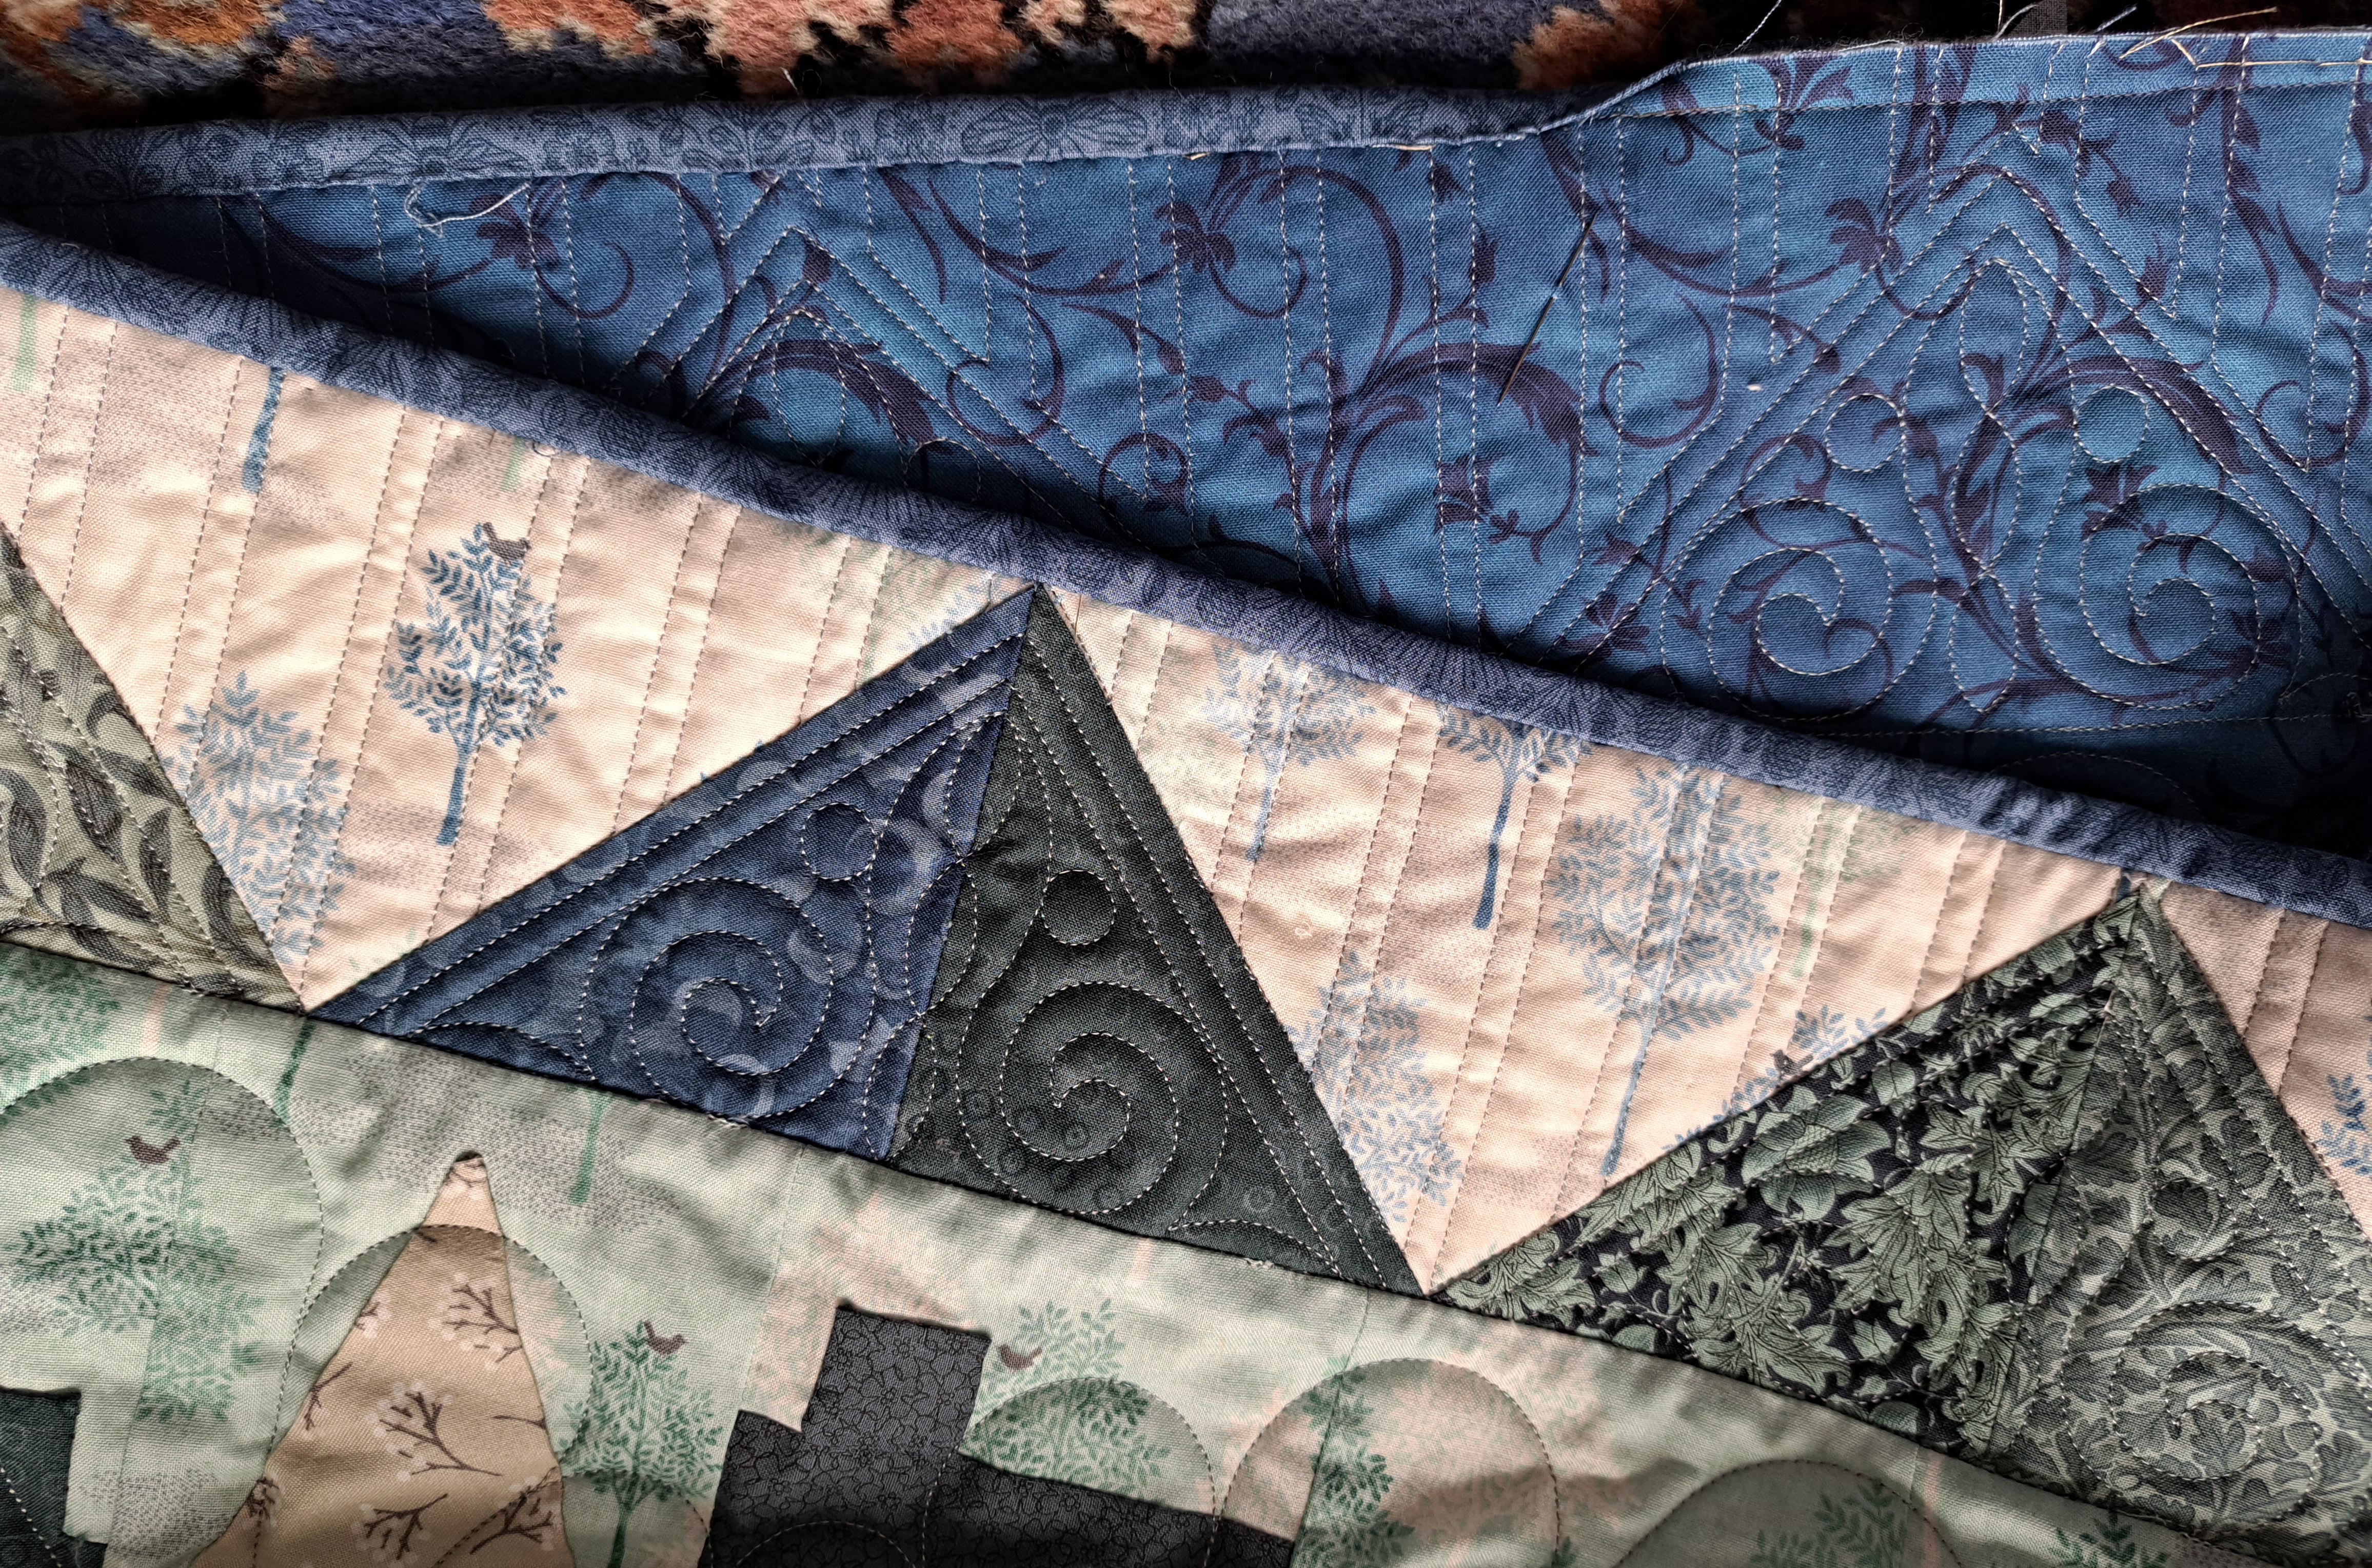
I decided I would be more than happy with what I would call a partial custom quilting, using different patterns around the medallion borders. I chose one for the triangles in the outer border with piano key quilting at the very edge. The wider border with the houses on has a feather border and then the central design has a lovely swirly pantograph.
Having seen the quality of Altheas work I had no hesitation about leaving my quilt with her. She did ask if it was OK if she left it a few months to get a few more quilt tops under her belt, no problem with me.
And the months went by…I did see her and have a chat when ever it was the Harrogate Quilt show and she was obviously just trying to pluck up the courage to do it. I never doubted her ability to do a wonderful job but last month it crossed my mind that she might be a bit like me, much better with a deadline, particularly with something that you’re a little anxious about and therefore putting off. So I messaged her asking if there was any chance I could have the quilt by the end of August.
It was ready for collection a week later, she admitted that I was right, she needed that gentle push to crack on and do it.
It’s stunning, I’m so pleased with it. Here’s the two outer borders…
This shows the design in the central panel…
If anyone lives within striking distance of Harrogate, I would certainly recommend Althea for long arm quilting.
I’m now just hand stitching the binding down. I found a lovely soft dark blue quilting cotton which I think works beautifully, you can see it in the first photo.
Once I get it all finished, I’ll do some photos of the whole quilt.
I always work better with a deadline, even a self imposed one. Having decided to give my two granddaughters a quilt each for Christmas and having already promised a quilt as a christening present I decided that making one each month in the Autumn sounded a reasonable plan. To add to my workload however, I also want to make a birth sampler for my grandson, I’ve already got the pattern, it’s a traditional Beatrix Potter one. This is where my deadline comes in! I want to finish this piece by the end of this month, so I can then concentrate on the sampler. I’ll put the Stitch-my-Garden project on hold just until after Christmas and hopefully come back to it with fresh enthusiasm. I’ve a couple of small pages left to do which I’ll probably do in the meantime but otherwise I’ll probably spend my time planning how I’m going to make it into a book.
So…I’ve made good progress over the last three weeks, I was just pootling up one side when I last shared it with you…
I finished the Port Sunlight rose in the middle of the right hand border, added a purple heuchera, some purple foxgloves, bluebells and a veronica.
It still looked a bit empty up the righthand border until I remembered the clematis! I have three obelisks which border on this bed and this year one of them has wandered over to the rosebush, making a lovely late display, so I decided to embroider a trail of clematis up the side of the bed and it fills the space nicely.
I stitched the seat after drawing the shape onto tracing paper and then bondaweb. I kept the stitching simple and I think it works pretty well. However I’m not sure how much longer the seat will be there as I sat on it yesterday with a cup of coffee and there was a bit of an ominous crack! Here’s a photo of the seat from last month, the arch isn’t as wonky as the photo looks!
Last night I started stitching the lefthand border with the Lady Emma Hamilton rose bush. I’ve another rose, a large peony and then lots of filler plants to do on this side. Hopefully it will be finished in three weeks time when I next share my progress.
This SAL is organised by Avis from Stitching by the Sea, we share our progress on our projects every three weeks, so please follow the links to see what everyone else has been stitching.
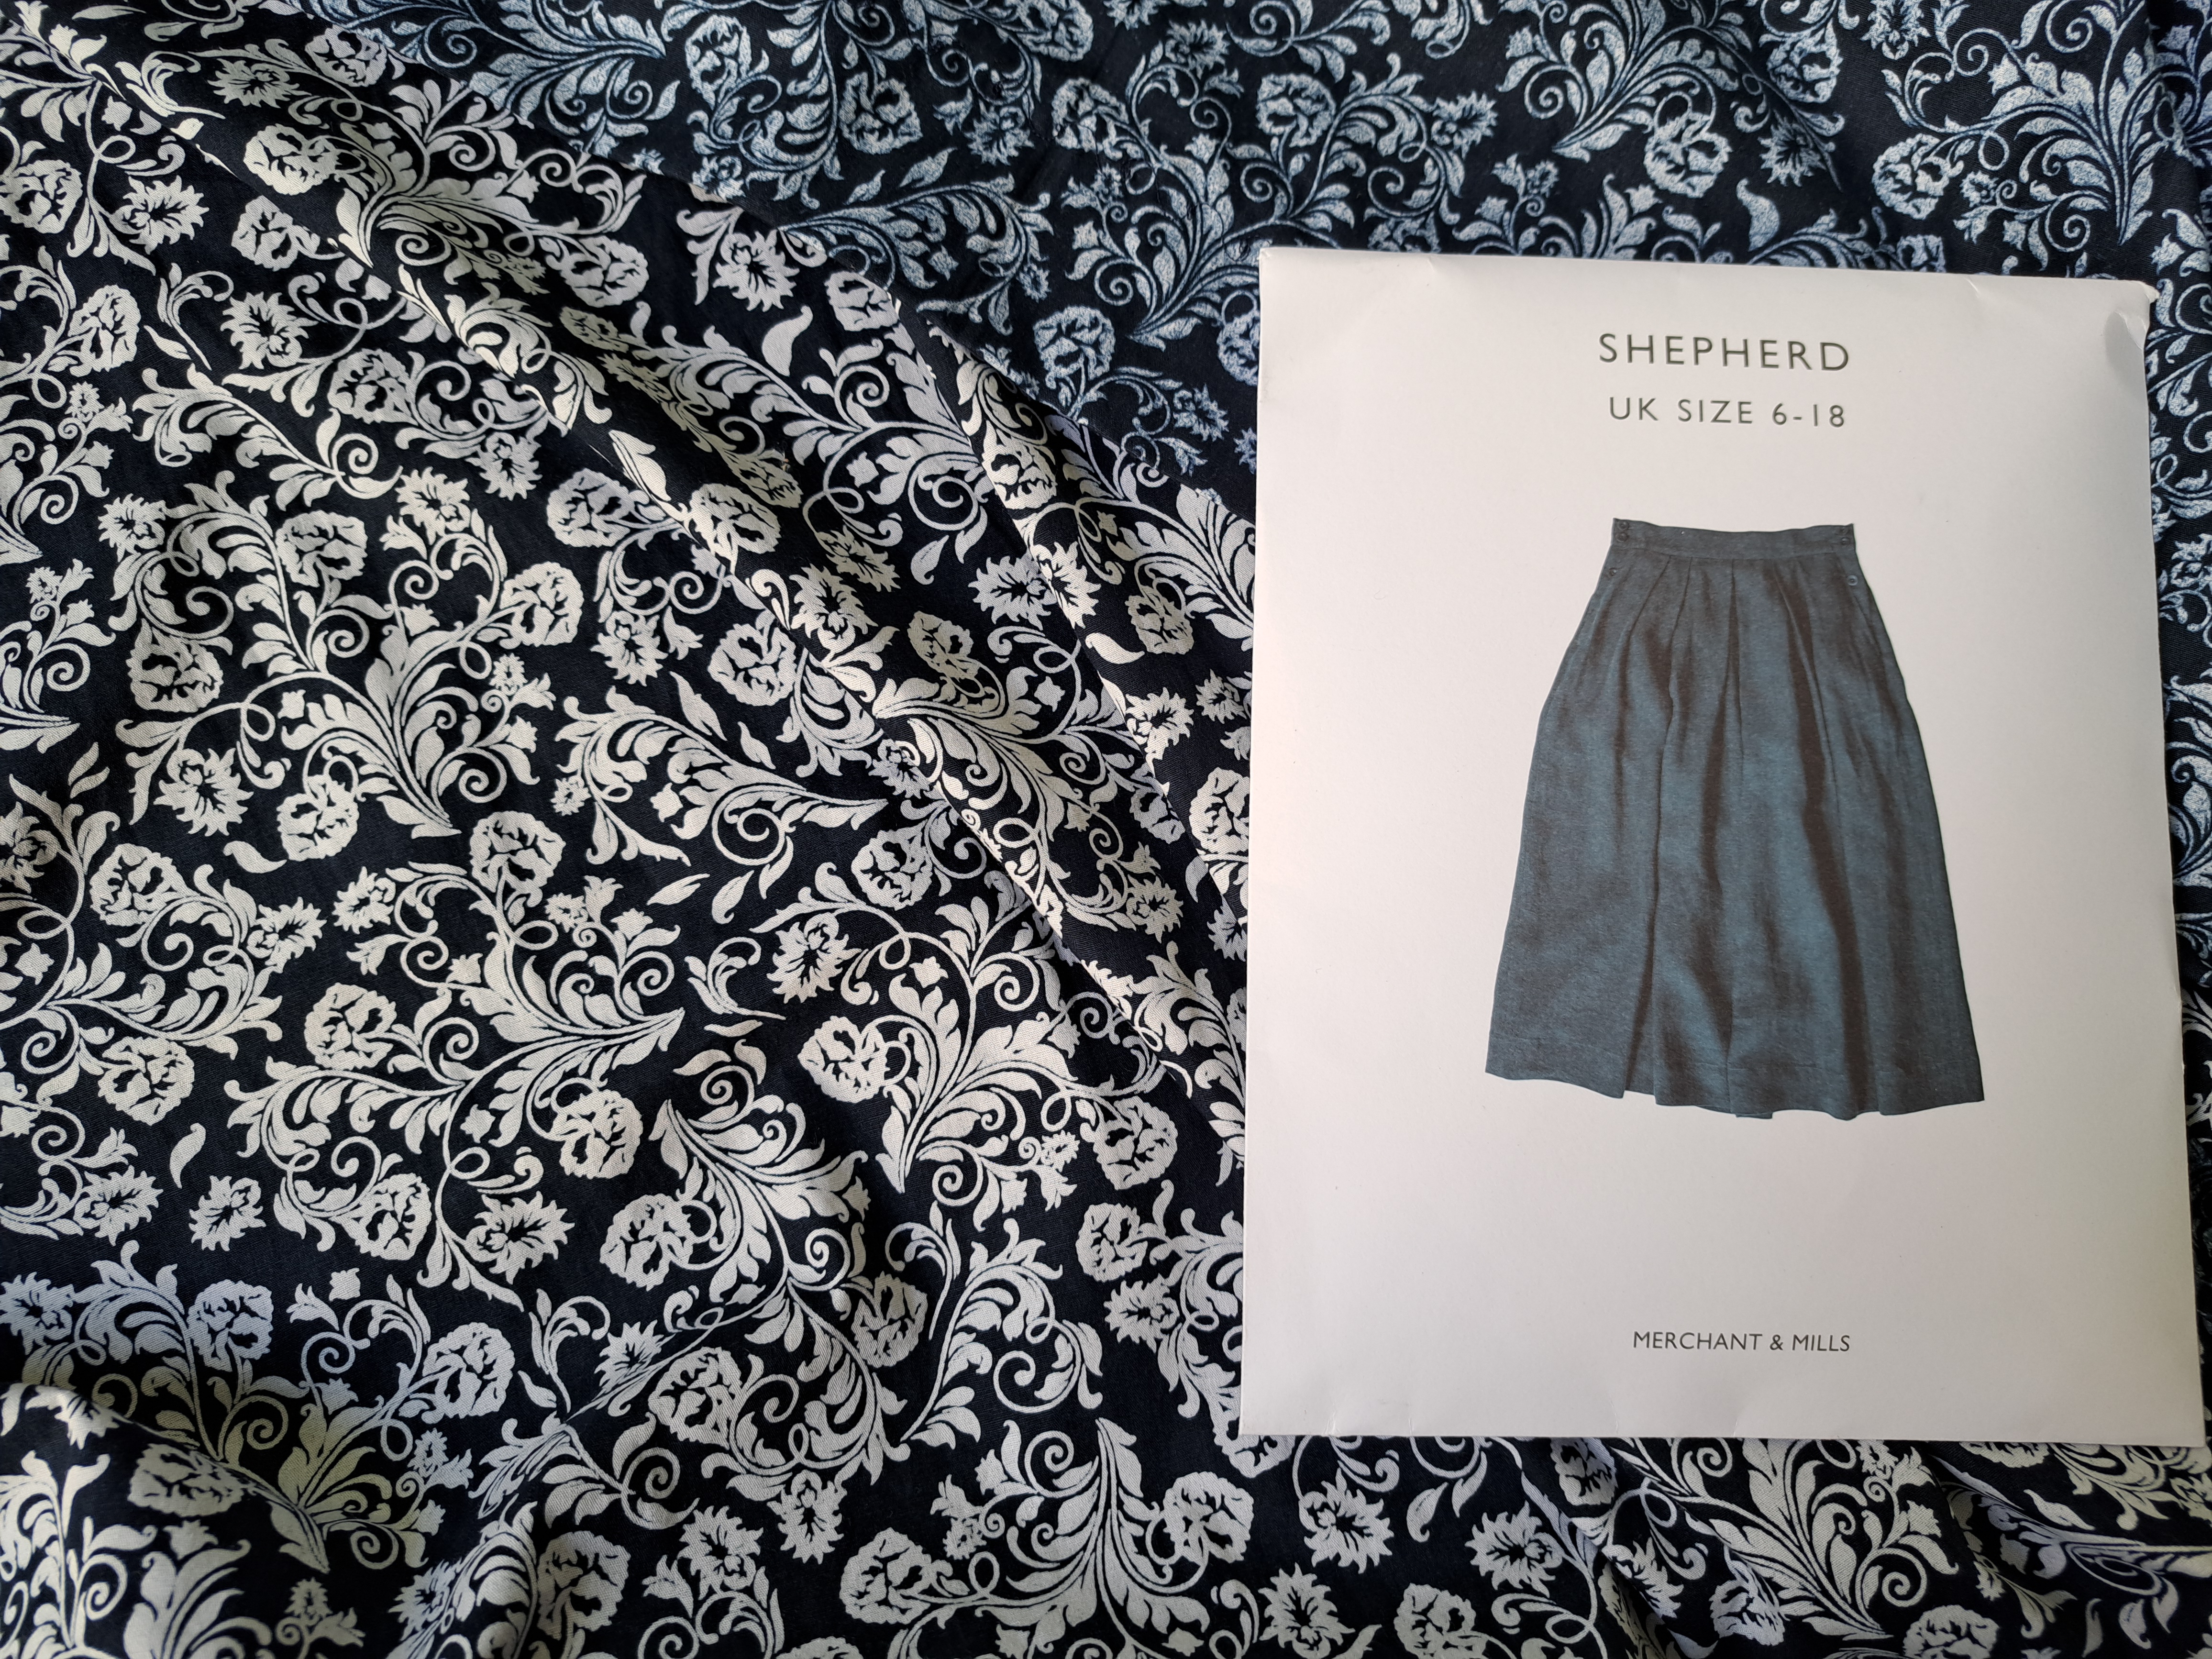
I can’t remember where this fabric came from, I wonder if I picked it up on a swap table. It’s a fairly firm cotton, the label on the selvedge says Indigo Wax Katagami, Japan. It’s been in my stash for a while. I pulled it out of the cupboard a few months ago, thinking it was nice…and then realised I was looking at the back!! The front of the fabric is quite a stark white on navy print, quite busy too for such a contrast. It went back in the cupboard!
I chatted about it to my daughter and showed her it when she was home one weekend. We decided I had three choices, charity shop it, sell it, or make something using the reverse.
Last week I pulled it out again, I wanted a skirt length to try out a new pattern. I decided this would be perfect as a wearable toile, it was a firm enough cotton to hold the pleats well. I had nothing to lose if it didn’t work out well as I wouldn’t use it the other way round.
The pattern I wanted to try was the Shepherd Skirt by Merchant and Mills. It has pleats front and back and a buttoned pocket opening both sides. I checked the measurements and my new 28.5″ waist should have been a 12, luckily I checked the finished measurements – who wants 3″ of ease on a waistband!! I cut out a 10 instead which gave me a comfortable 1.5″ ease instead.
I ran into issues from the beginning. Personally I think it is a badly designed pattern when the two main pieces are 46″ wide. For the non-sewers amongst you, 45″ is a standard width of fabric, especially for cottons. I decided with the pleats I should be able to lose an inch. The instructions include an optional lining which I wasn’t doing, therefore I didn’t twig that the pocket bags were meant to be in lining fabric, it didn’t cause an issue per se, but it probably does make them a bit bulkier.
The pockets took some concentrating, I’ve done pocket openings before, albeit a long time ago, but these are buttoned pocket openings with a button placket on each edge. If I say there are five pattern pieces for the pockets and you need six button plackets cutting then I’m sure you get the gist! I stitched them and I like them, though I seem to have missed instructions for finishing a couple of edges and I ended up hand stitching the bottom end below the opening as I couldn’t work out what I was meant to do.
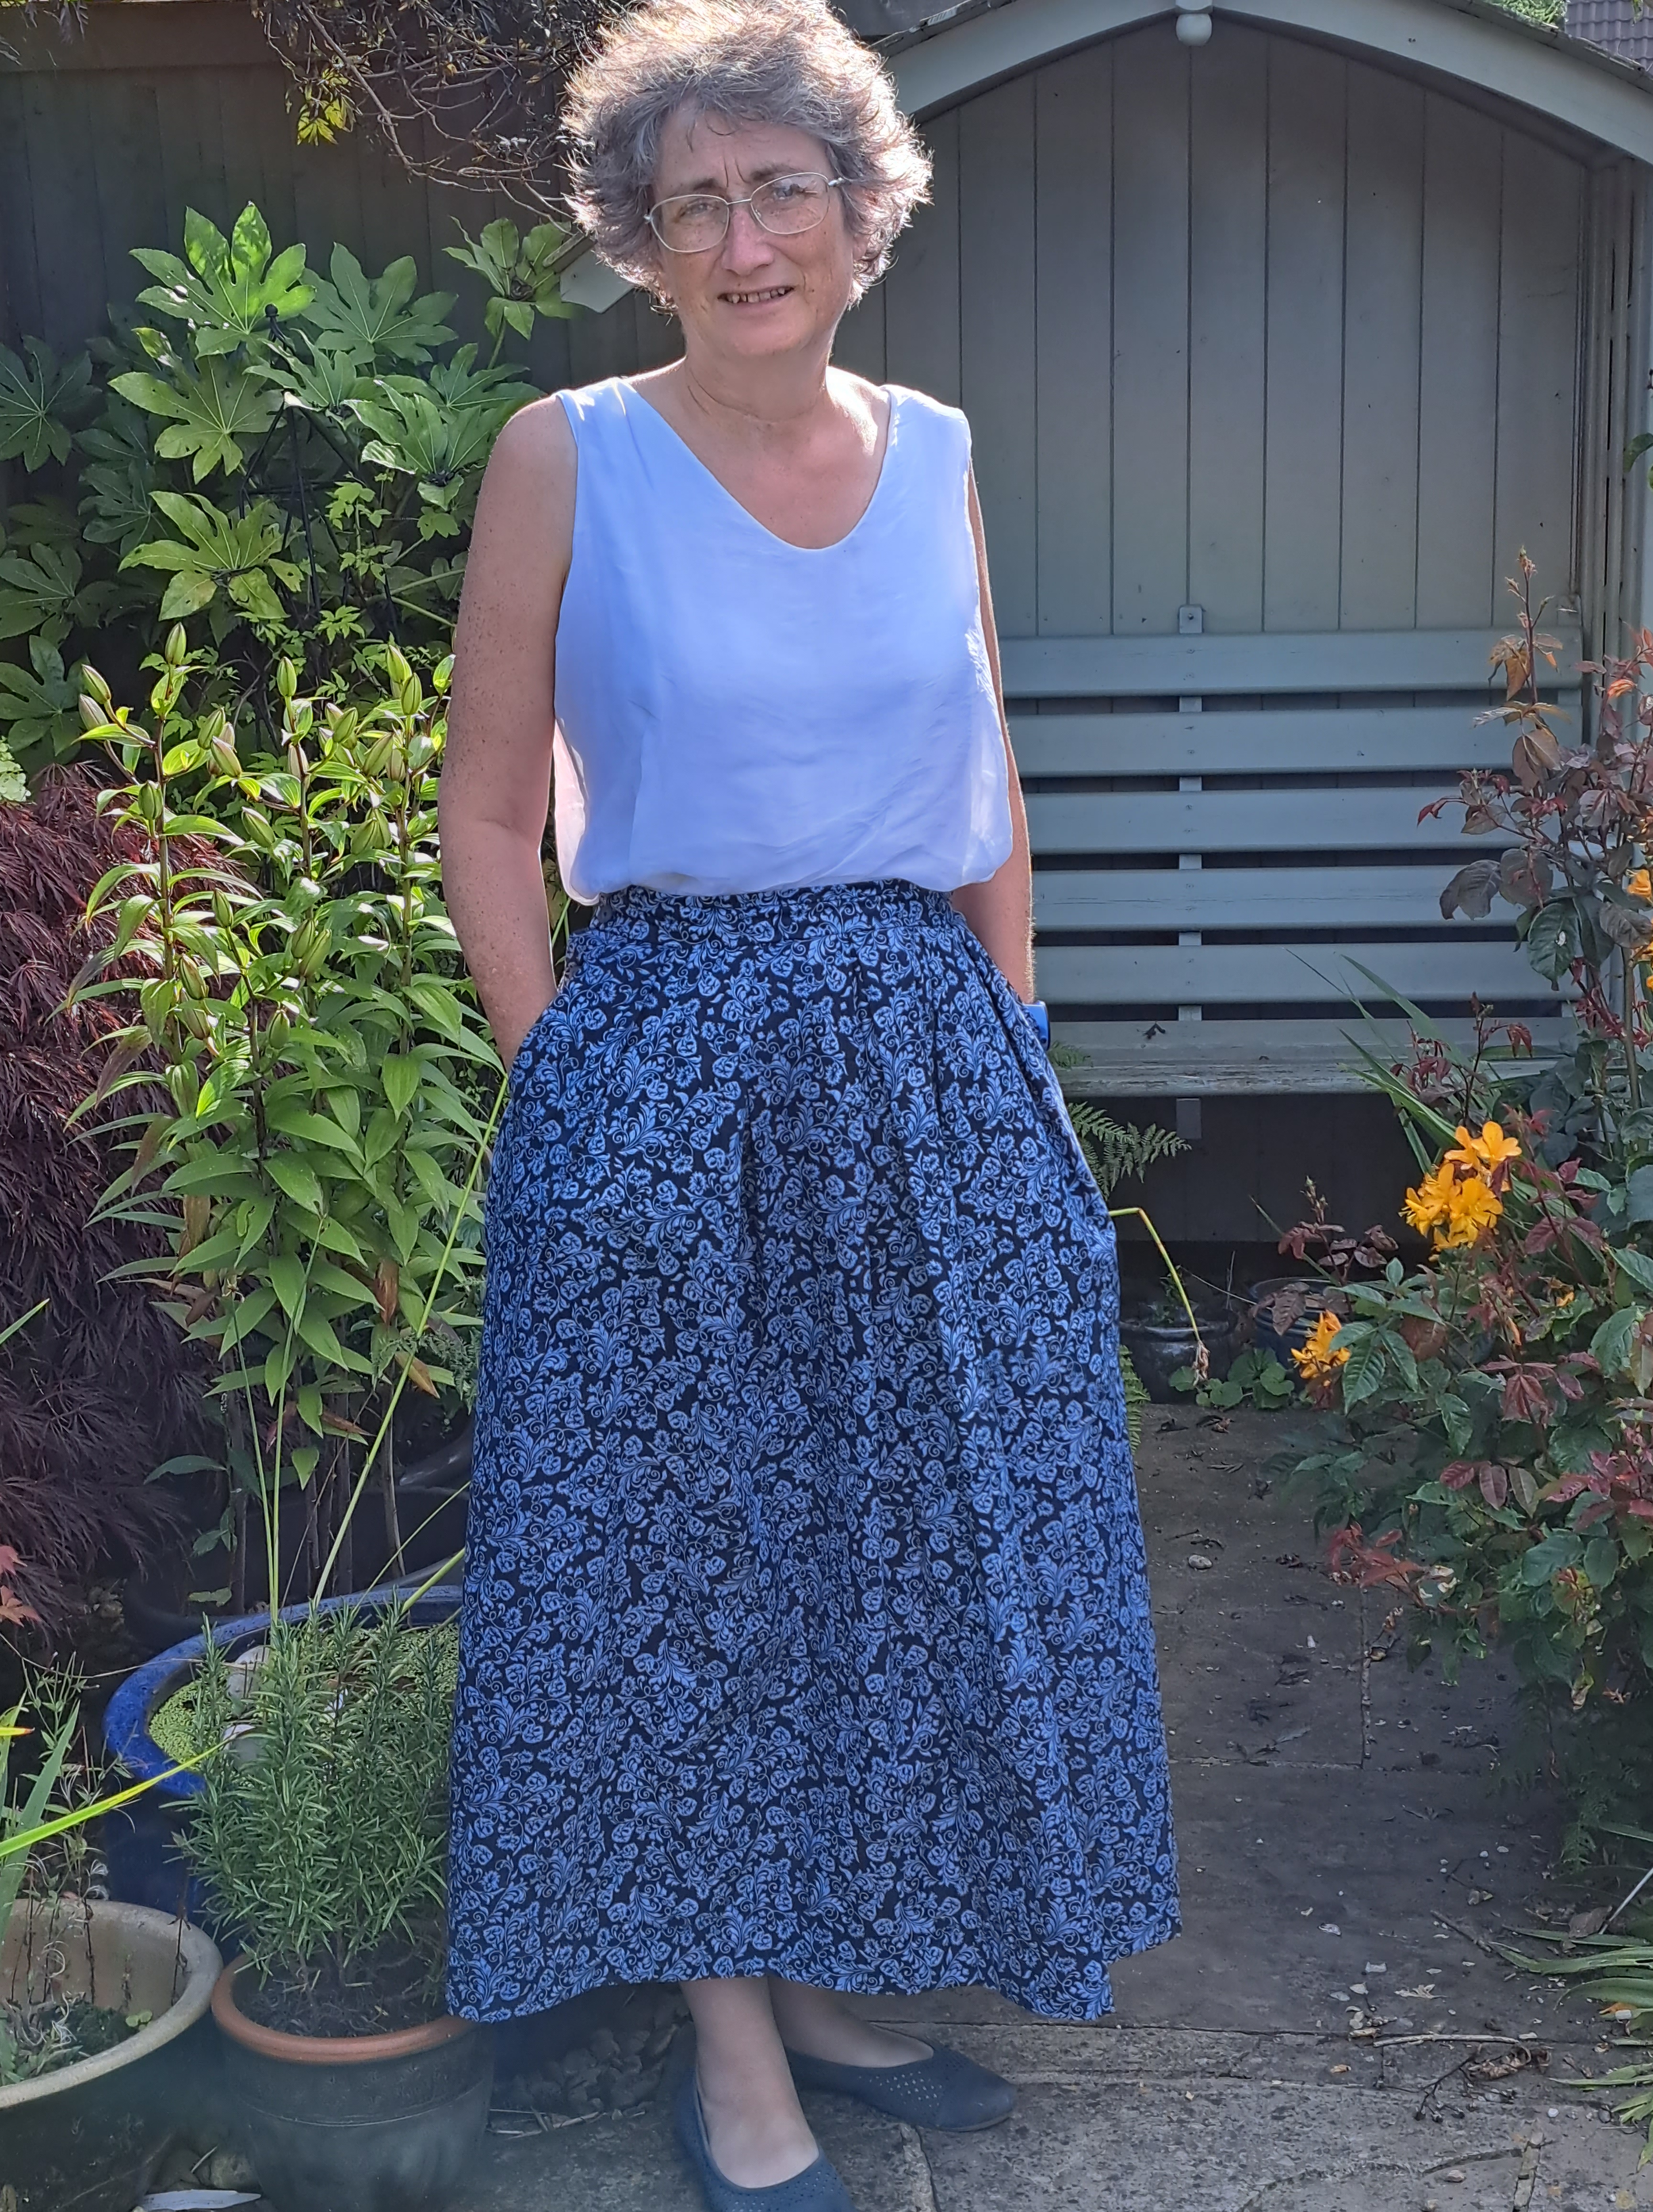
You can just about make out the pocket opening on the photo below, there’s one more button hidden in the pocket.
Next major task was the pleats. Now these are not just standard pleats, there are actually four pleats on each side disguised as three, hidden underneath the middle pleat on each side is a second little one going the other way. This was the obvious place to gain the 1″ to compensate for the fact that my fabric was too narrow. Unfortunately it wasn’t that simple for my brain! The order of making the pleats in the pattern was centre front, mini pleat, large pleat over it and then pleat by the pocket. Somehow it just wouldn’t alter neatly. I fiddled and faddled for a whole afternoon and eventually gave up and just made three even pleats and ran a basting thread over the top…and that was just the front!
Next day I reluctantly started looking at the back, planning to just do the same, but I couldn’t get my pleats even, I even resorted to maths to work it out. In the end I decided to have one last try with the pattern pleats, this time I left the mini pleat to last. I fiddled with the big pleat to get a little extra width and then just folded in a little excess to make the mini pleat. It finally worked, so well in fact that I undid the front and refolded the pleats the same way. It probably took me over six hours to work those darn pleats out, it was worth it in the end though!
With the pleats done I could attach the waistband, hem it and make the buttonholes. These were also quite a fiddle as the lower two are on the edge of the pocket, so the machine buttonhole foot (which is about 3″ long, has to go inside the pocket. I’ve made a note on the pattern to see if I could make these buttonholes before the waistband is attached so the pocket will open further.
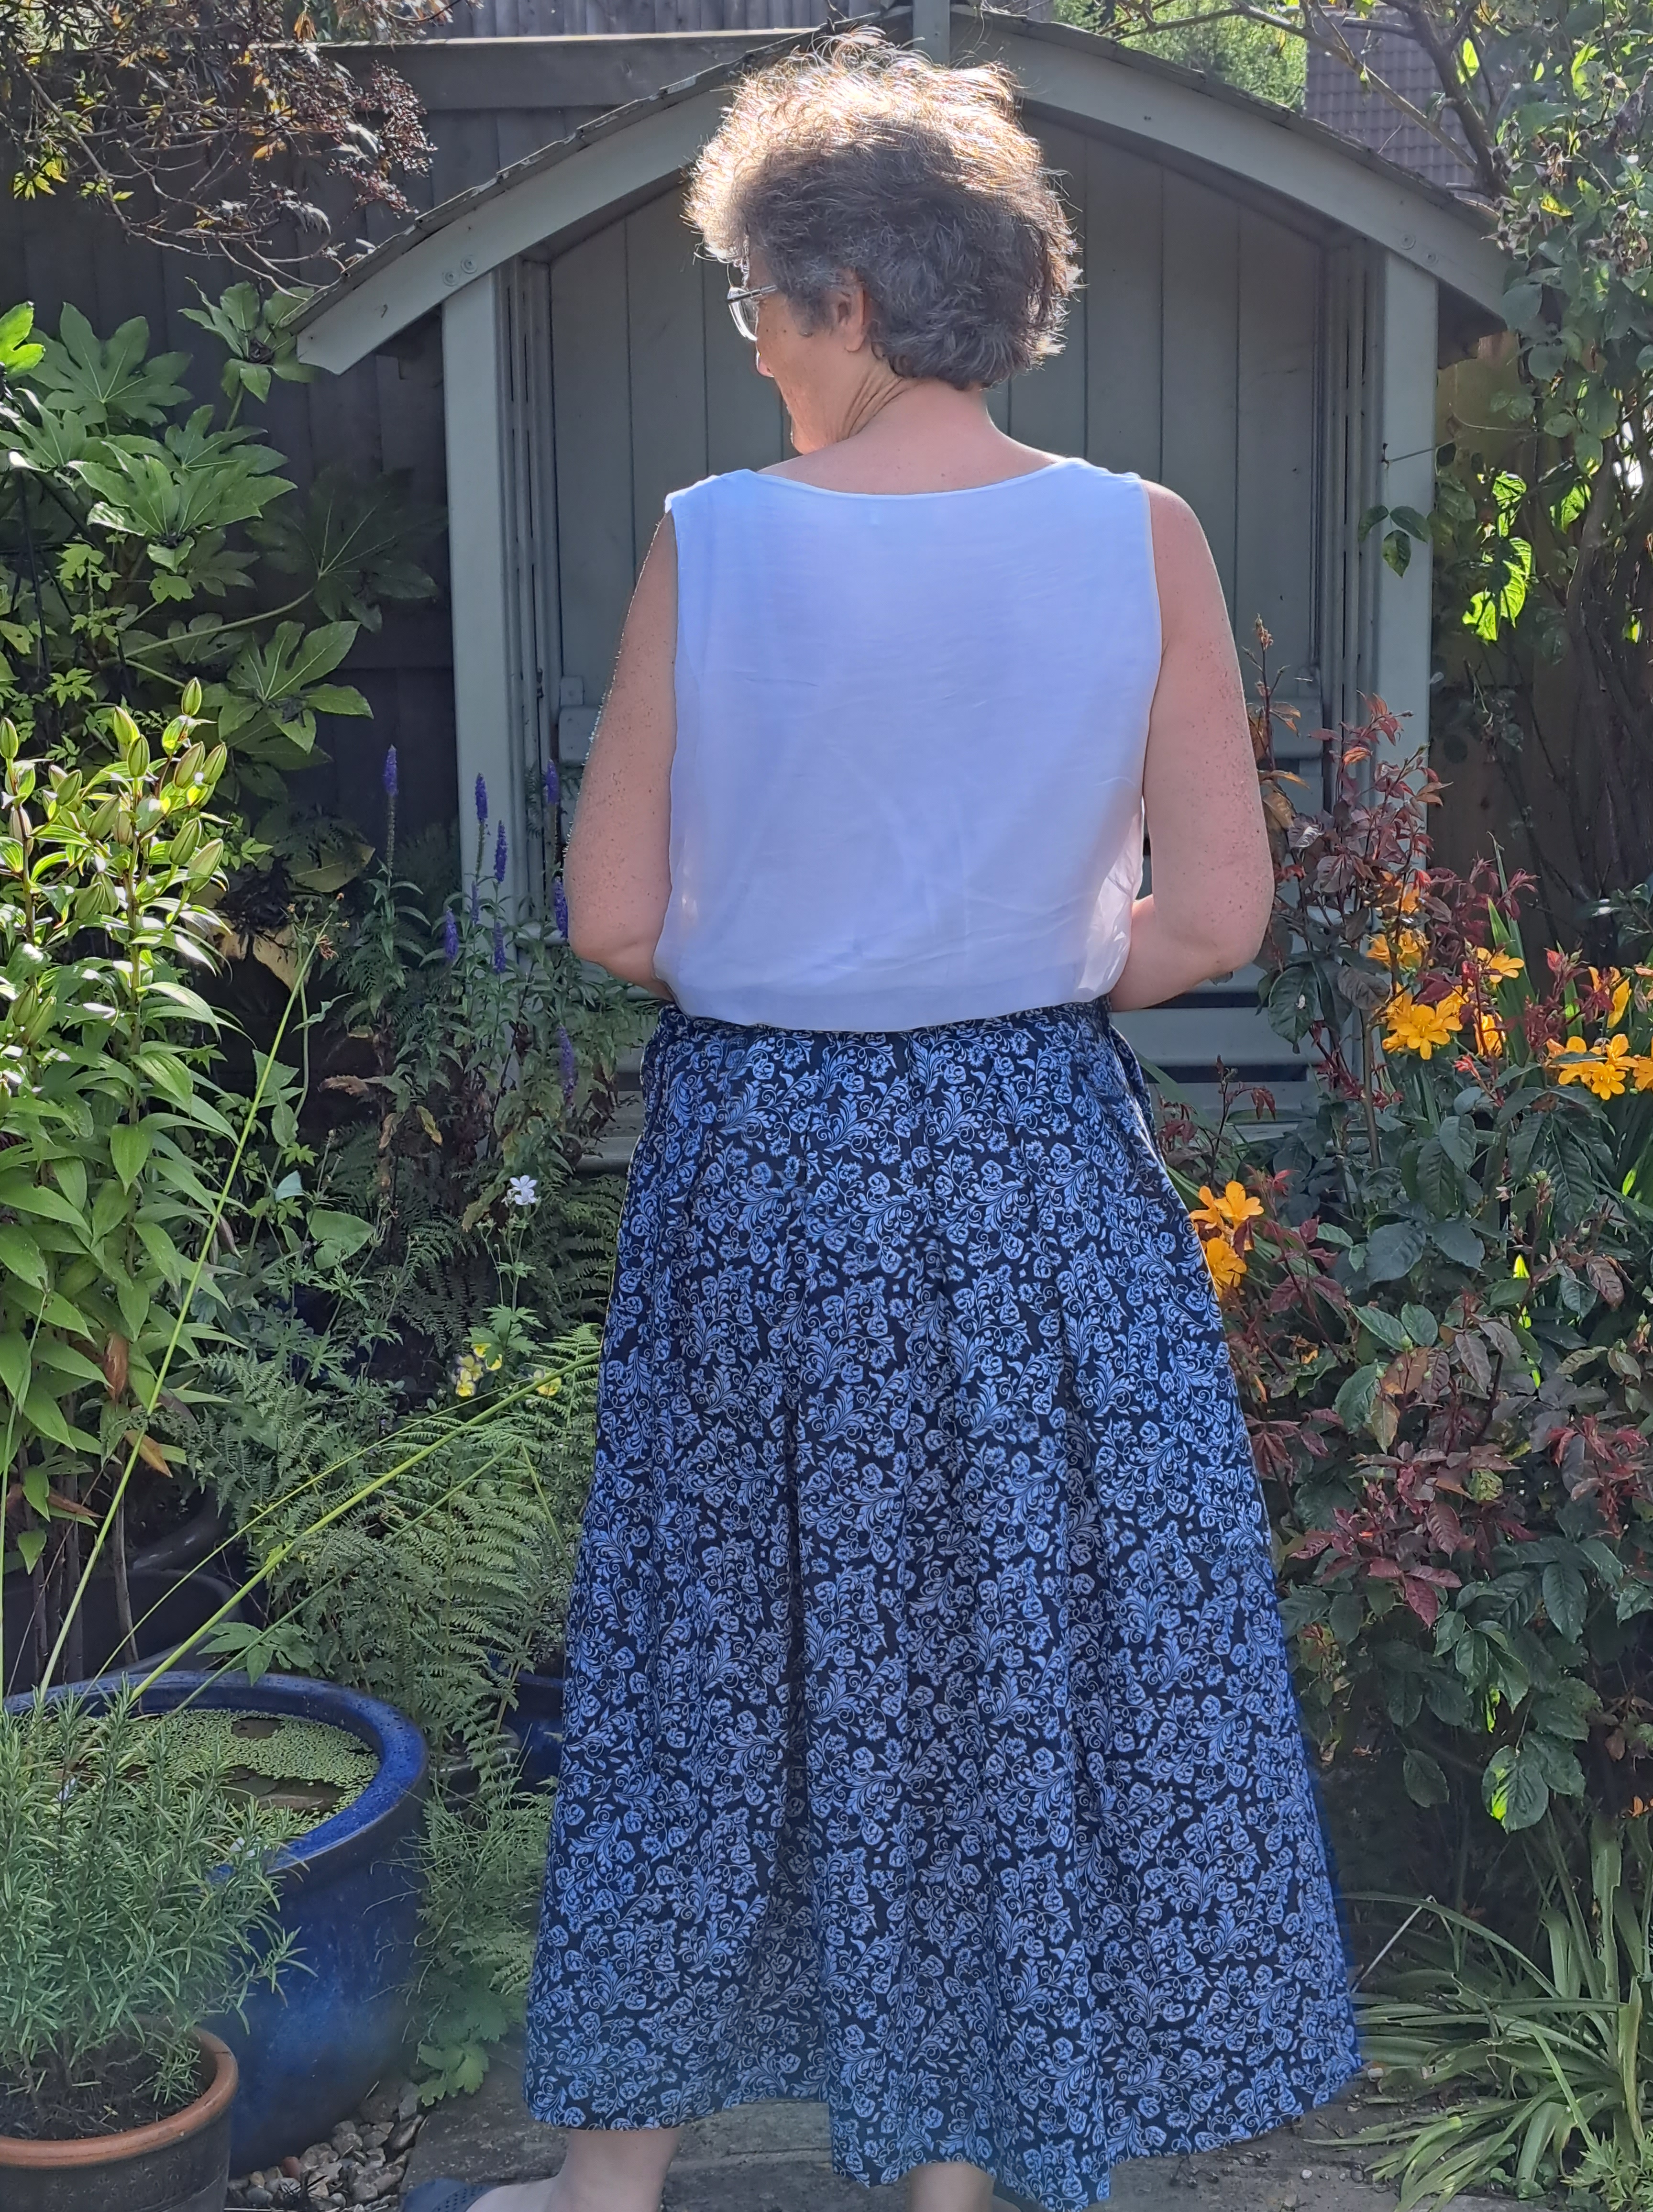
All in all it ended up being a bit of a challenge, some of it my own doing with my fabric choice. However, now it’s made, I really like it. It fits well, I like the pocket opening although it does bulge slightly at the top of the button placket. I love the wrong side of the fabric, there is a slight discrepancy in the depth of the colour which is noticeable on the side seams, it will be interesting to see what happens on washing! I will make this pattern again, though maybe with slightly wider fabric!
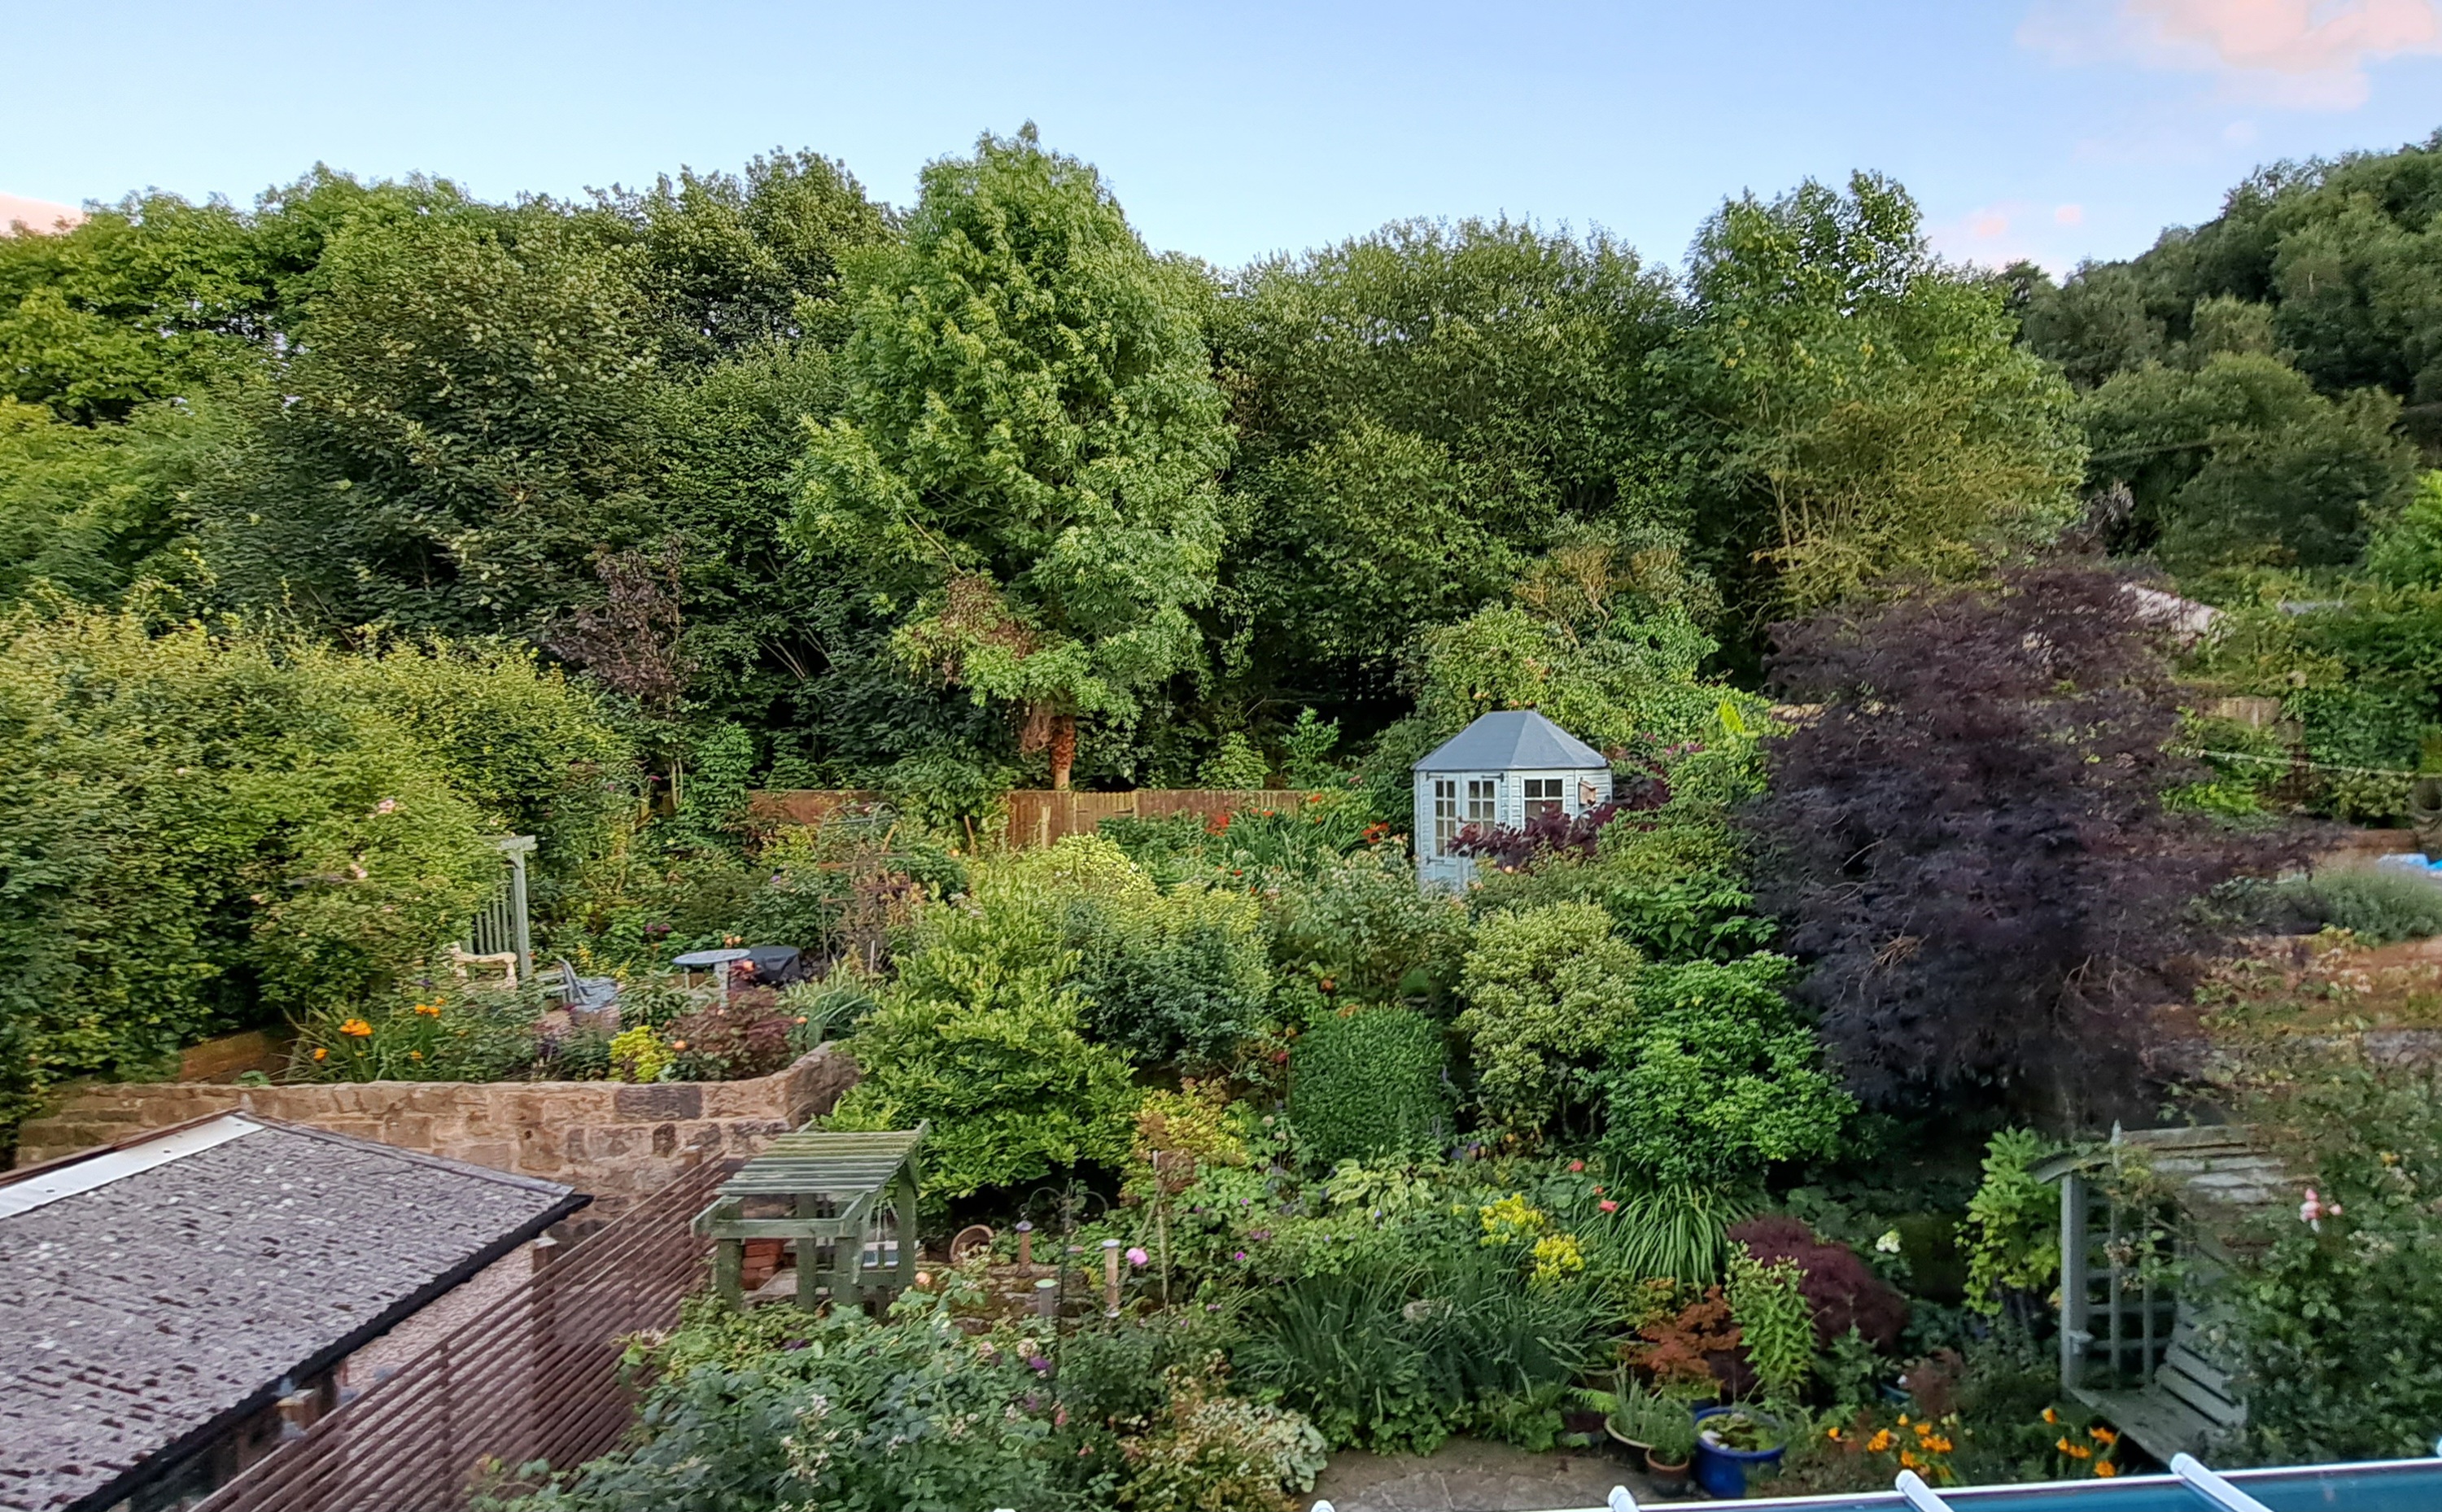
The Garden is looking very green at the moment, and very bushy too! August is often a ‘quiet’ time in English gardens as the main summer stalwarts like roses are past their best and the autumn flowers haven’t yet come into their own. This year hasn’t been helped by a very wet July and August (so far) and not a lot of sunshine. I really need to get out and do lots of dead-heading but whenever I’m free or feel up to it, it’s raining…and I’m a fair weather gardener! So it is what it is!!
Somehow having fewer flowers does make you appreciate the ones you have…
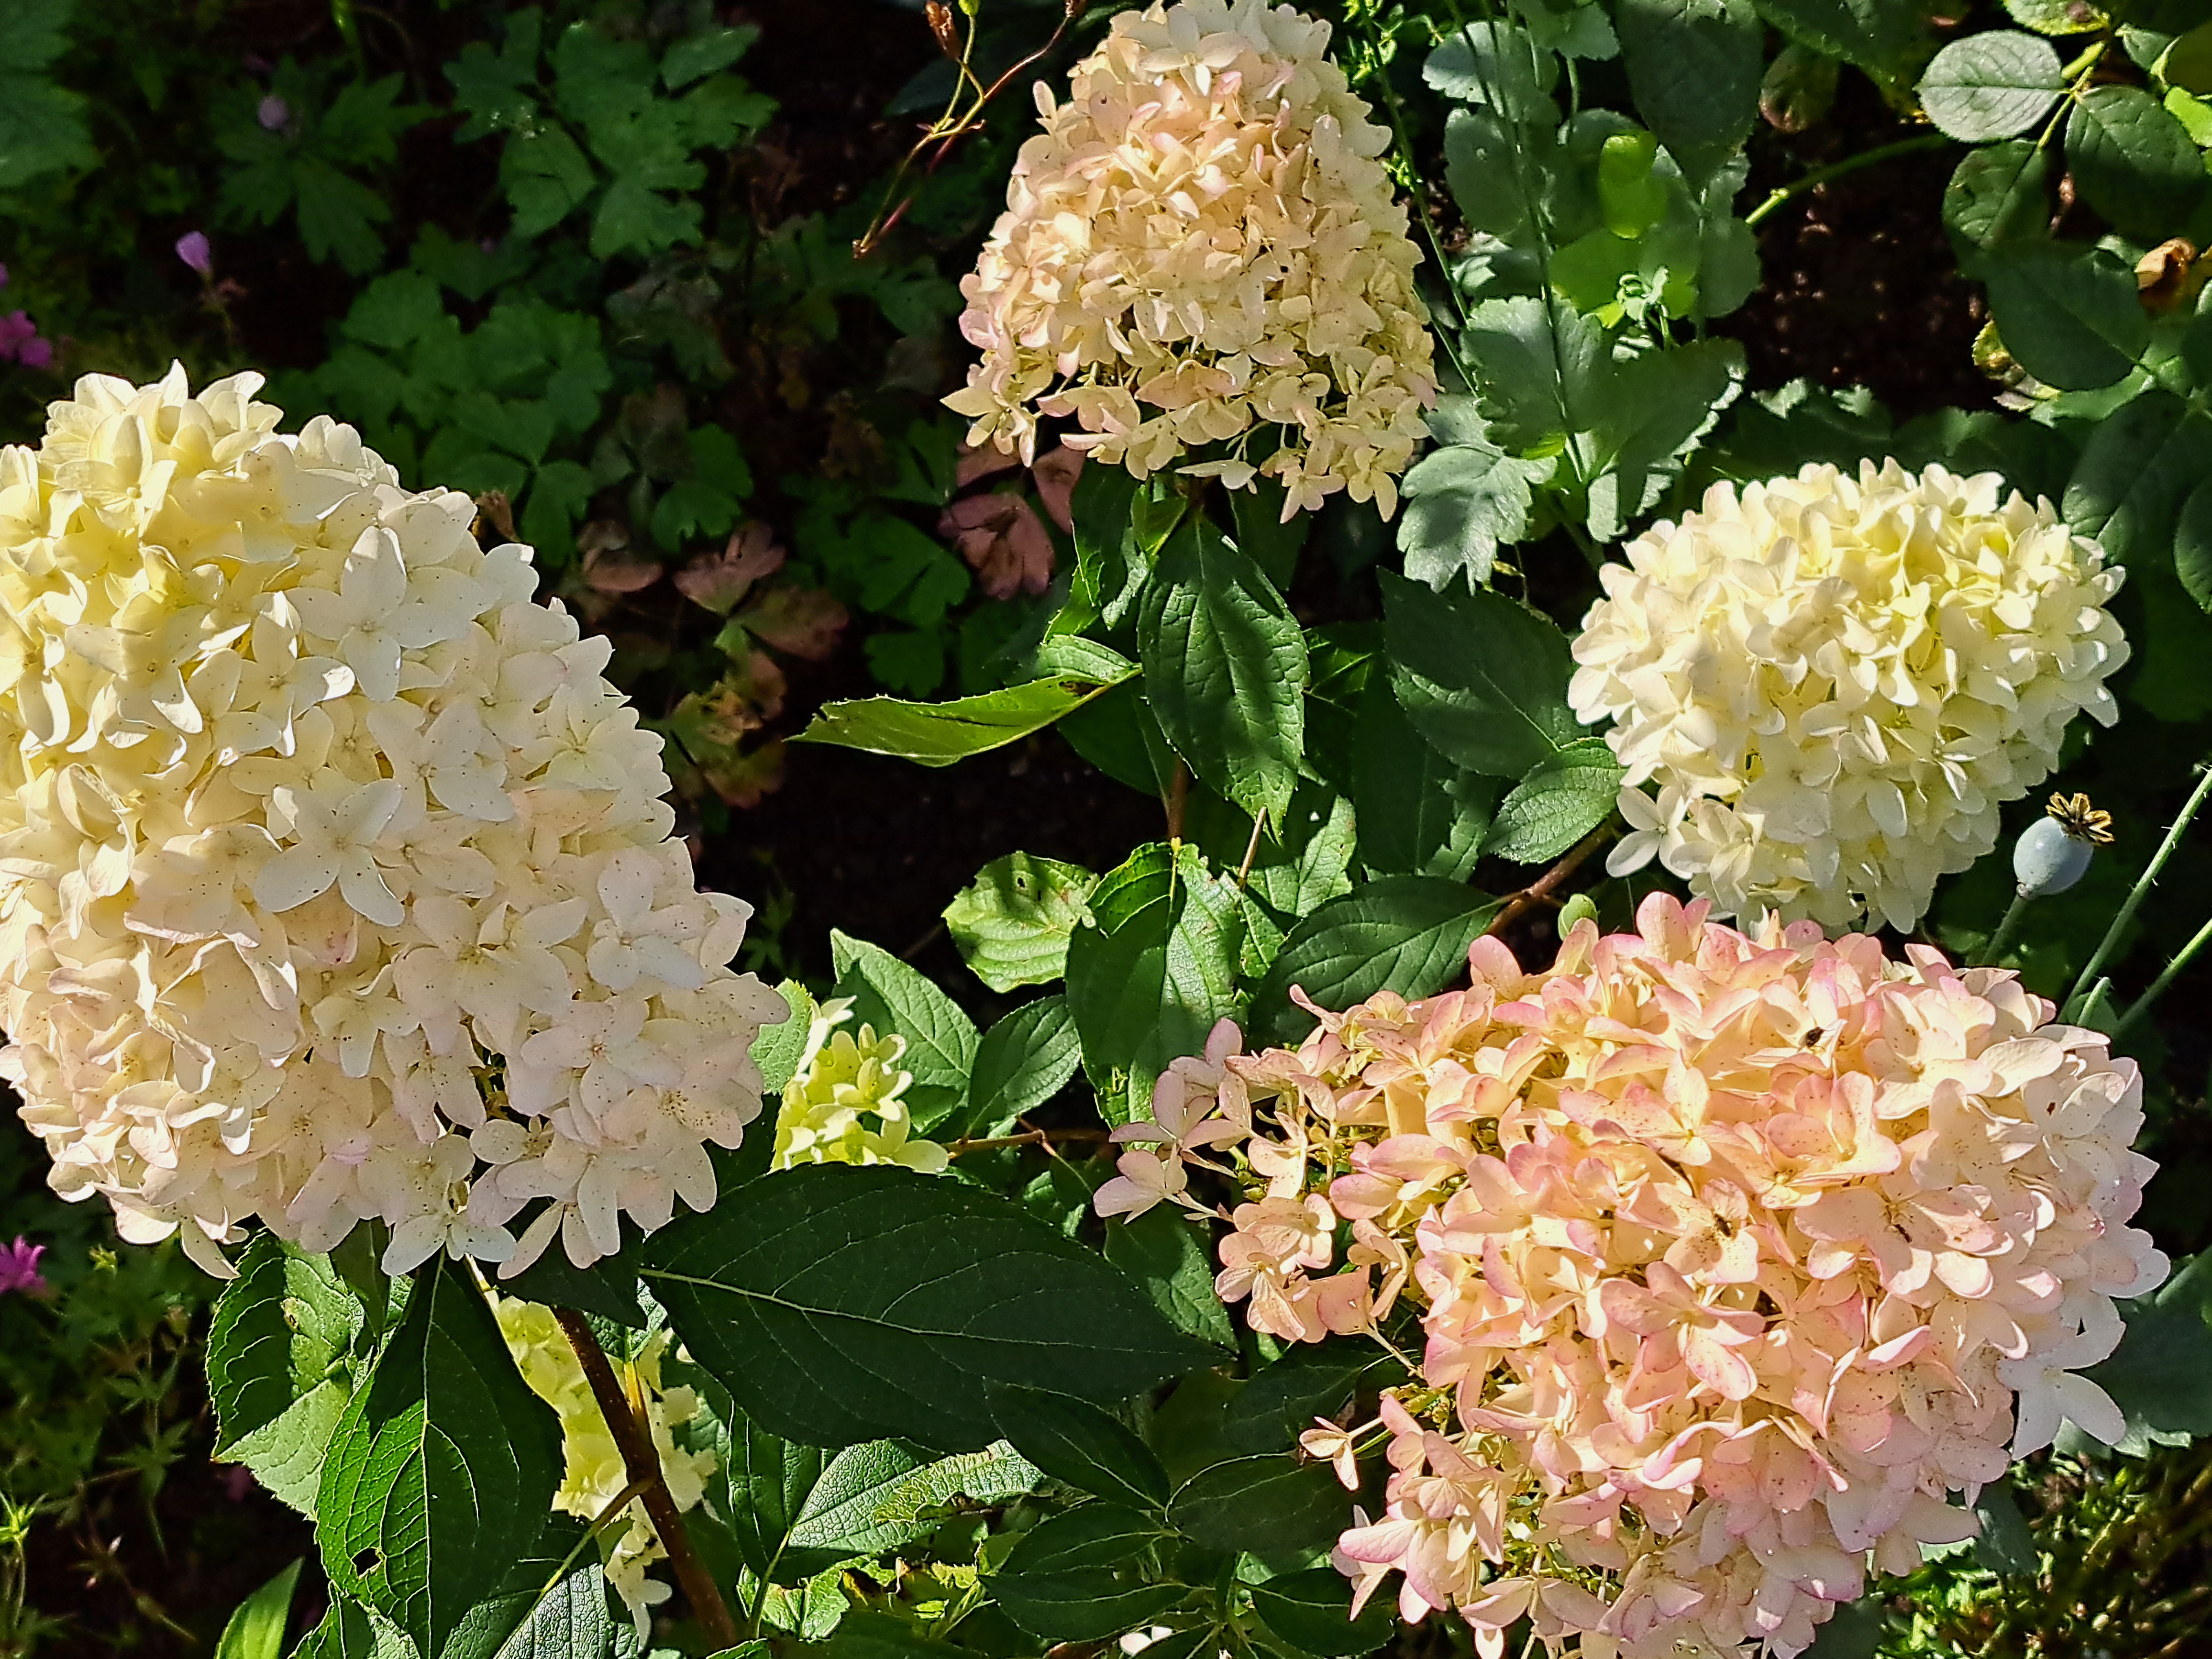
This hydrangea is by the bird feeders on the patio, the blooms have lasted for weeks, despite the inclement weather, it’s still looking beautiful.
This clematis is up by the Amber and Amethyst garden, it put on a good show of flowers in June, so I was surprised to see this stem had twined itself through the Port Sunlight rose bush below and had several beautiful flowers.
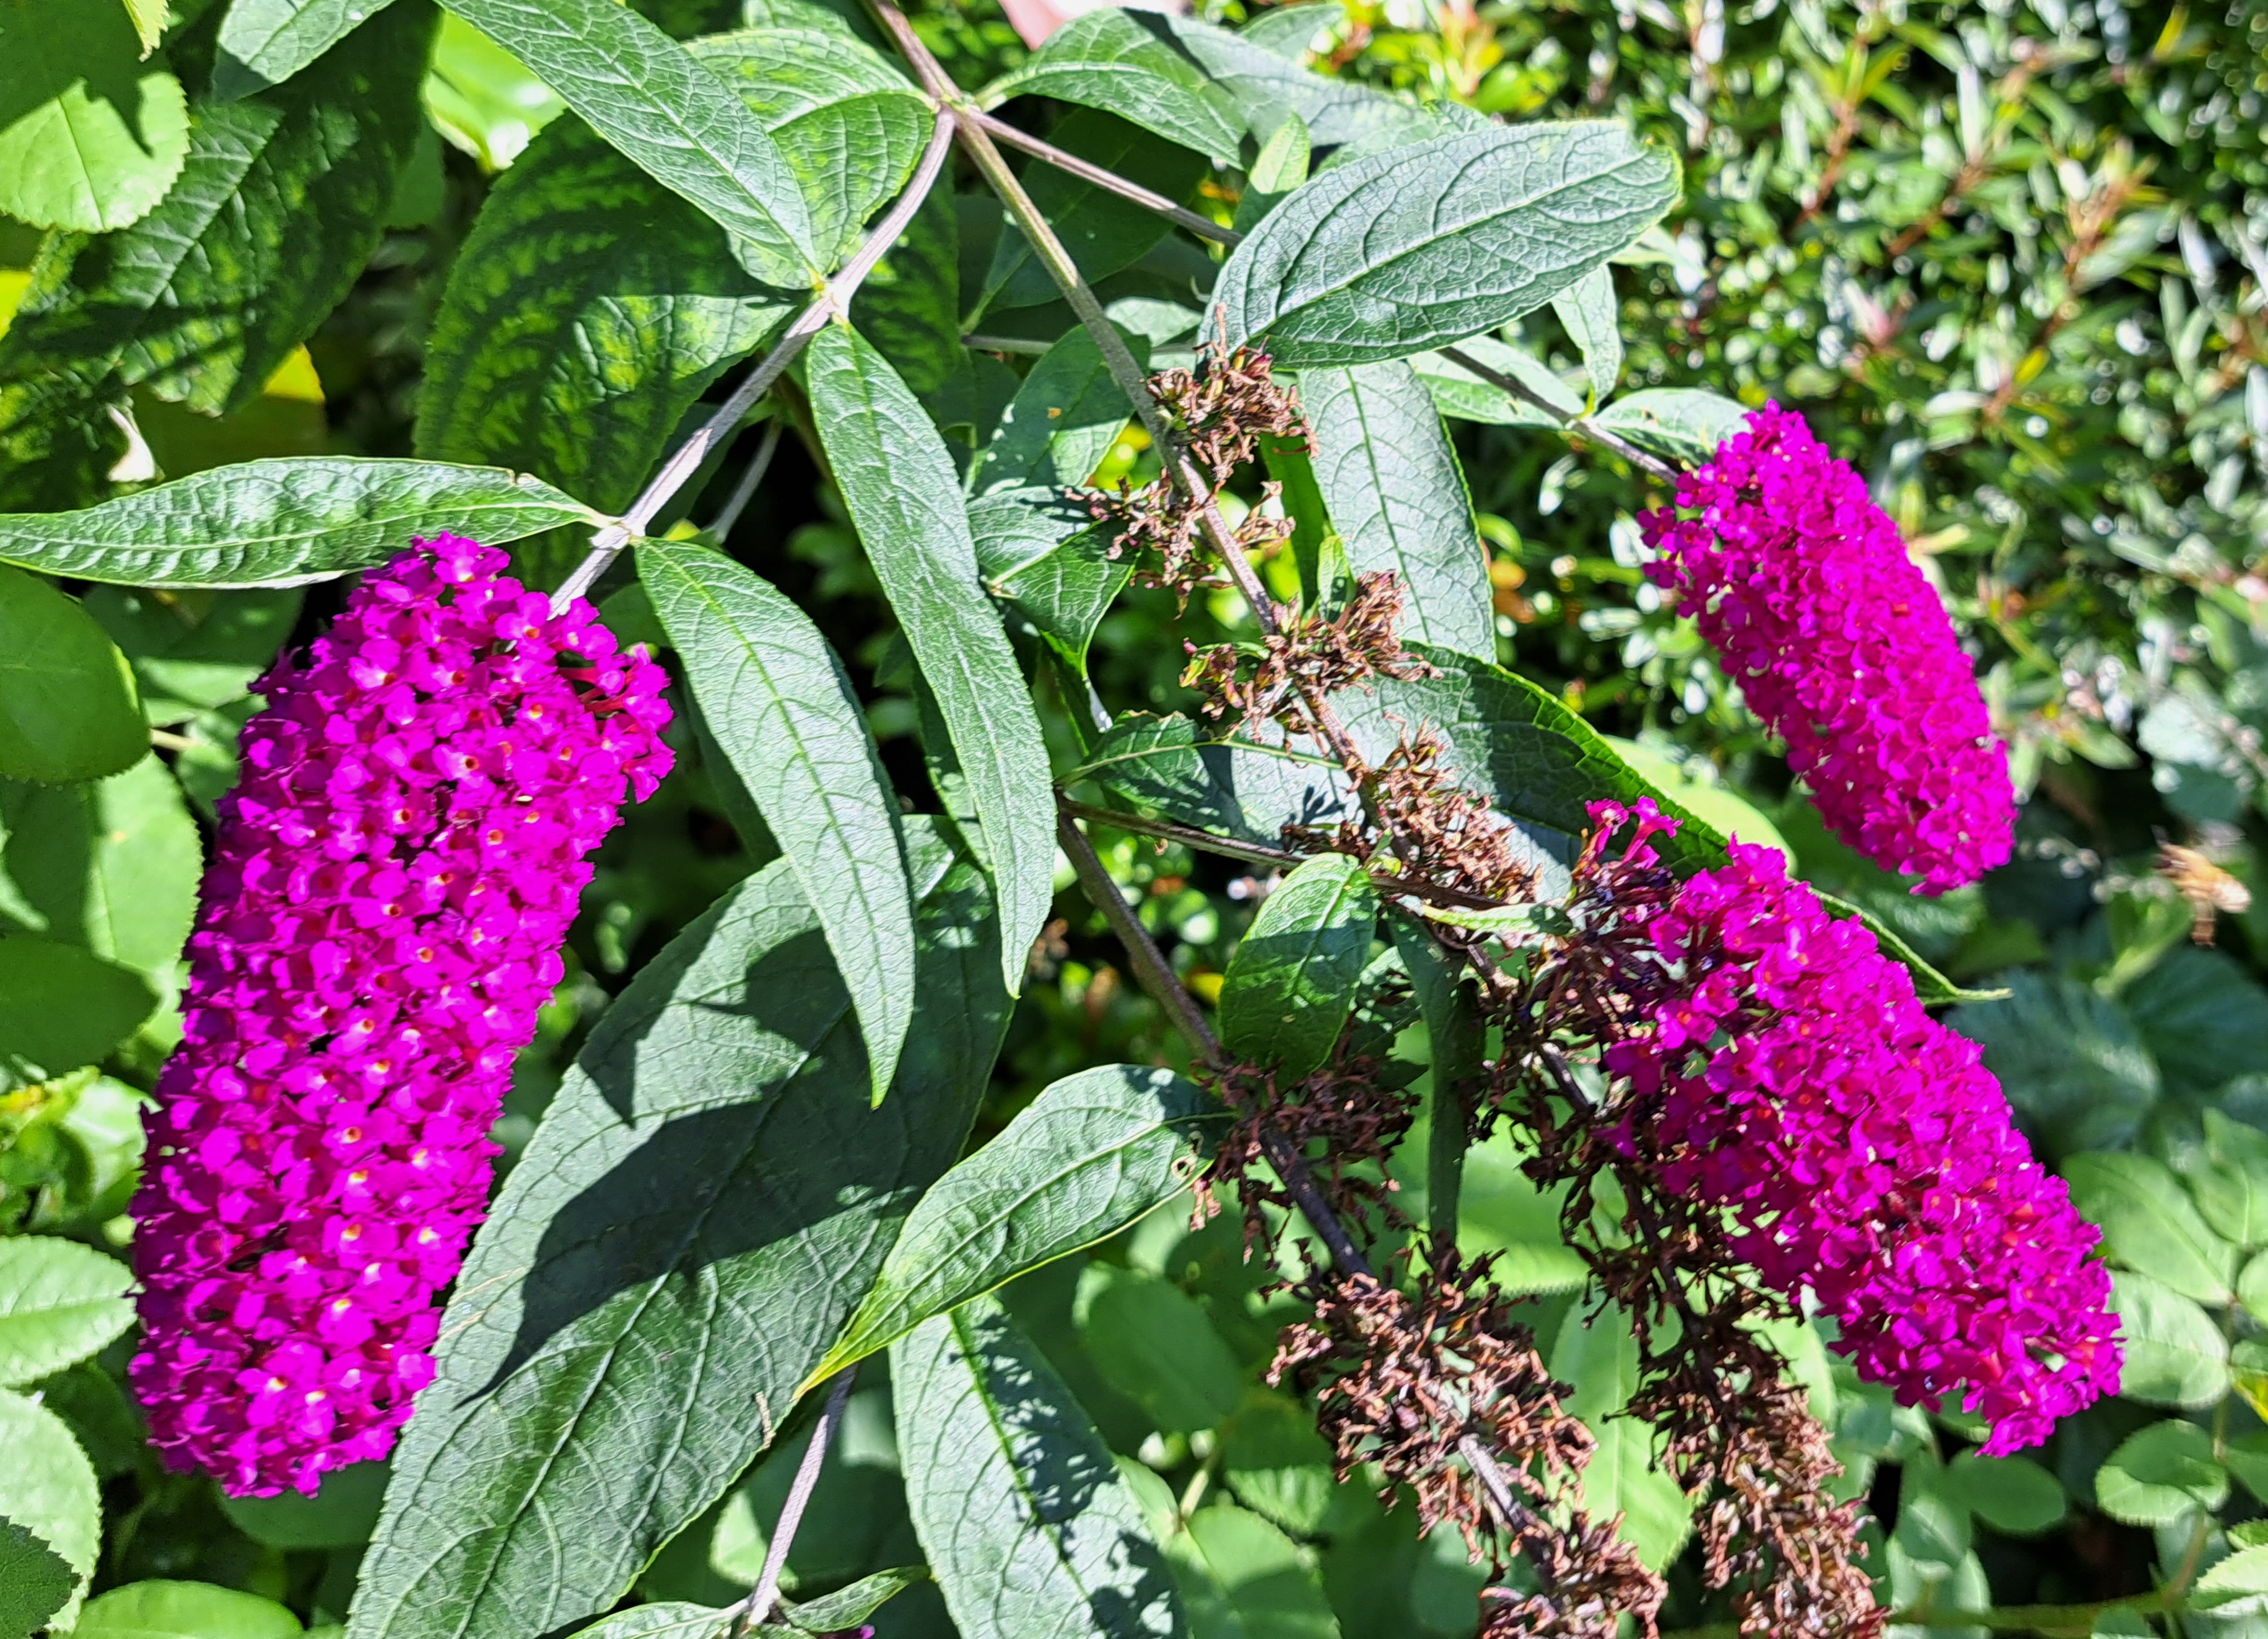
The buddleia nearby is one of the more pinky ones, it’s coming to the end of the flowers but the bees and the butterflies still love it.
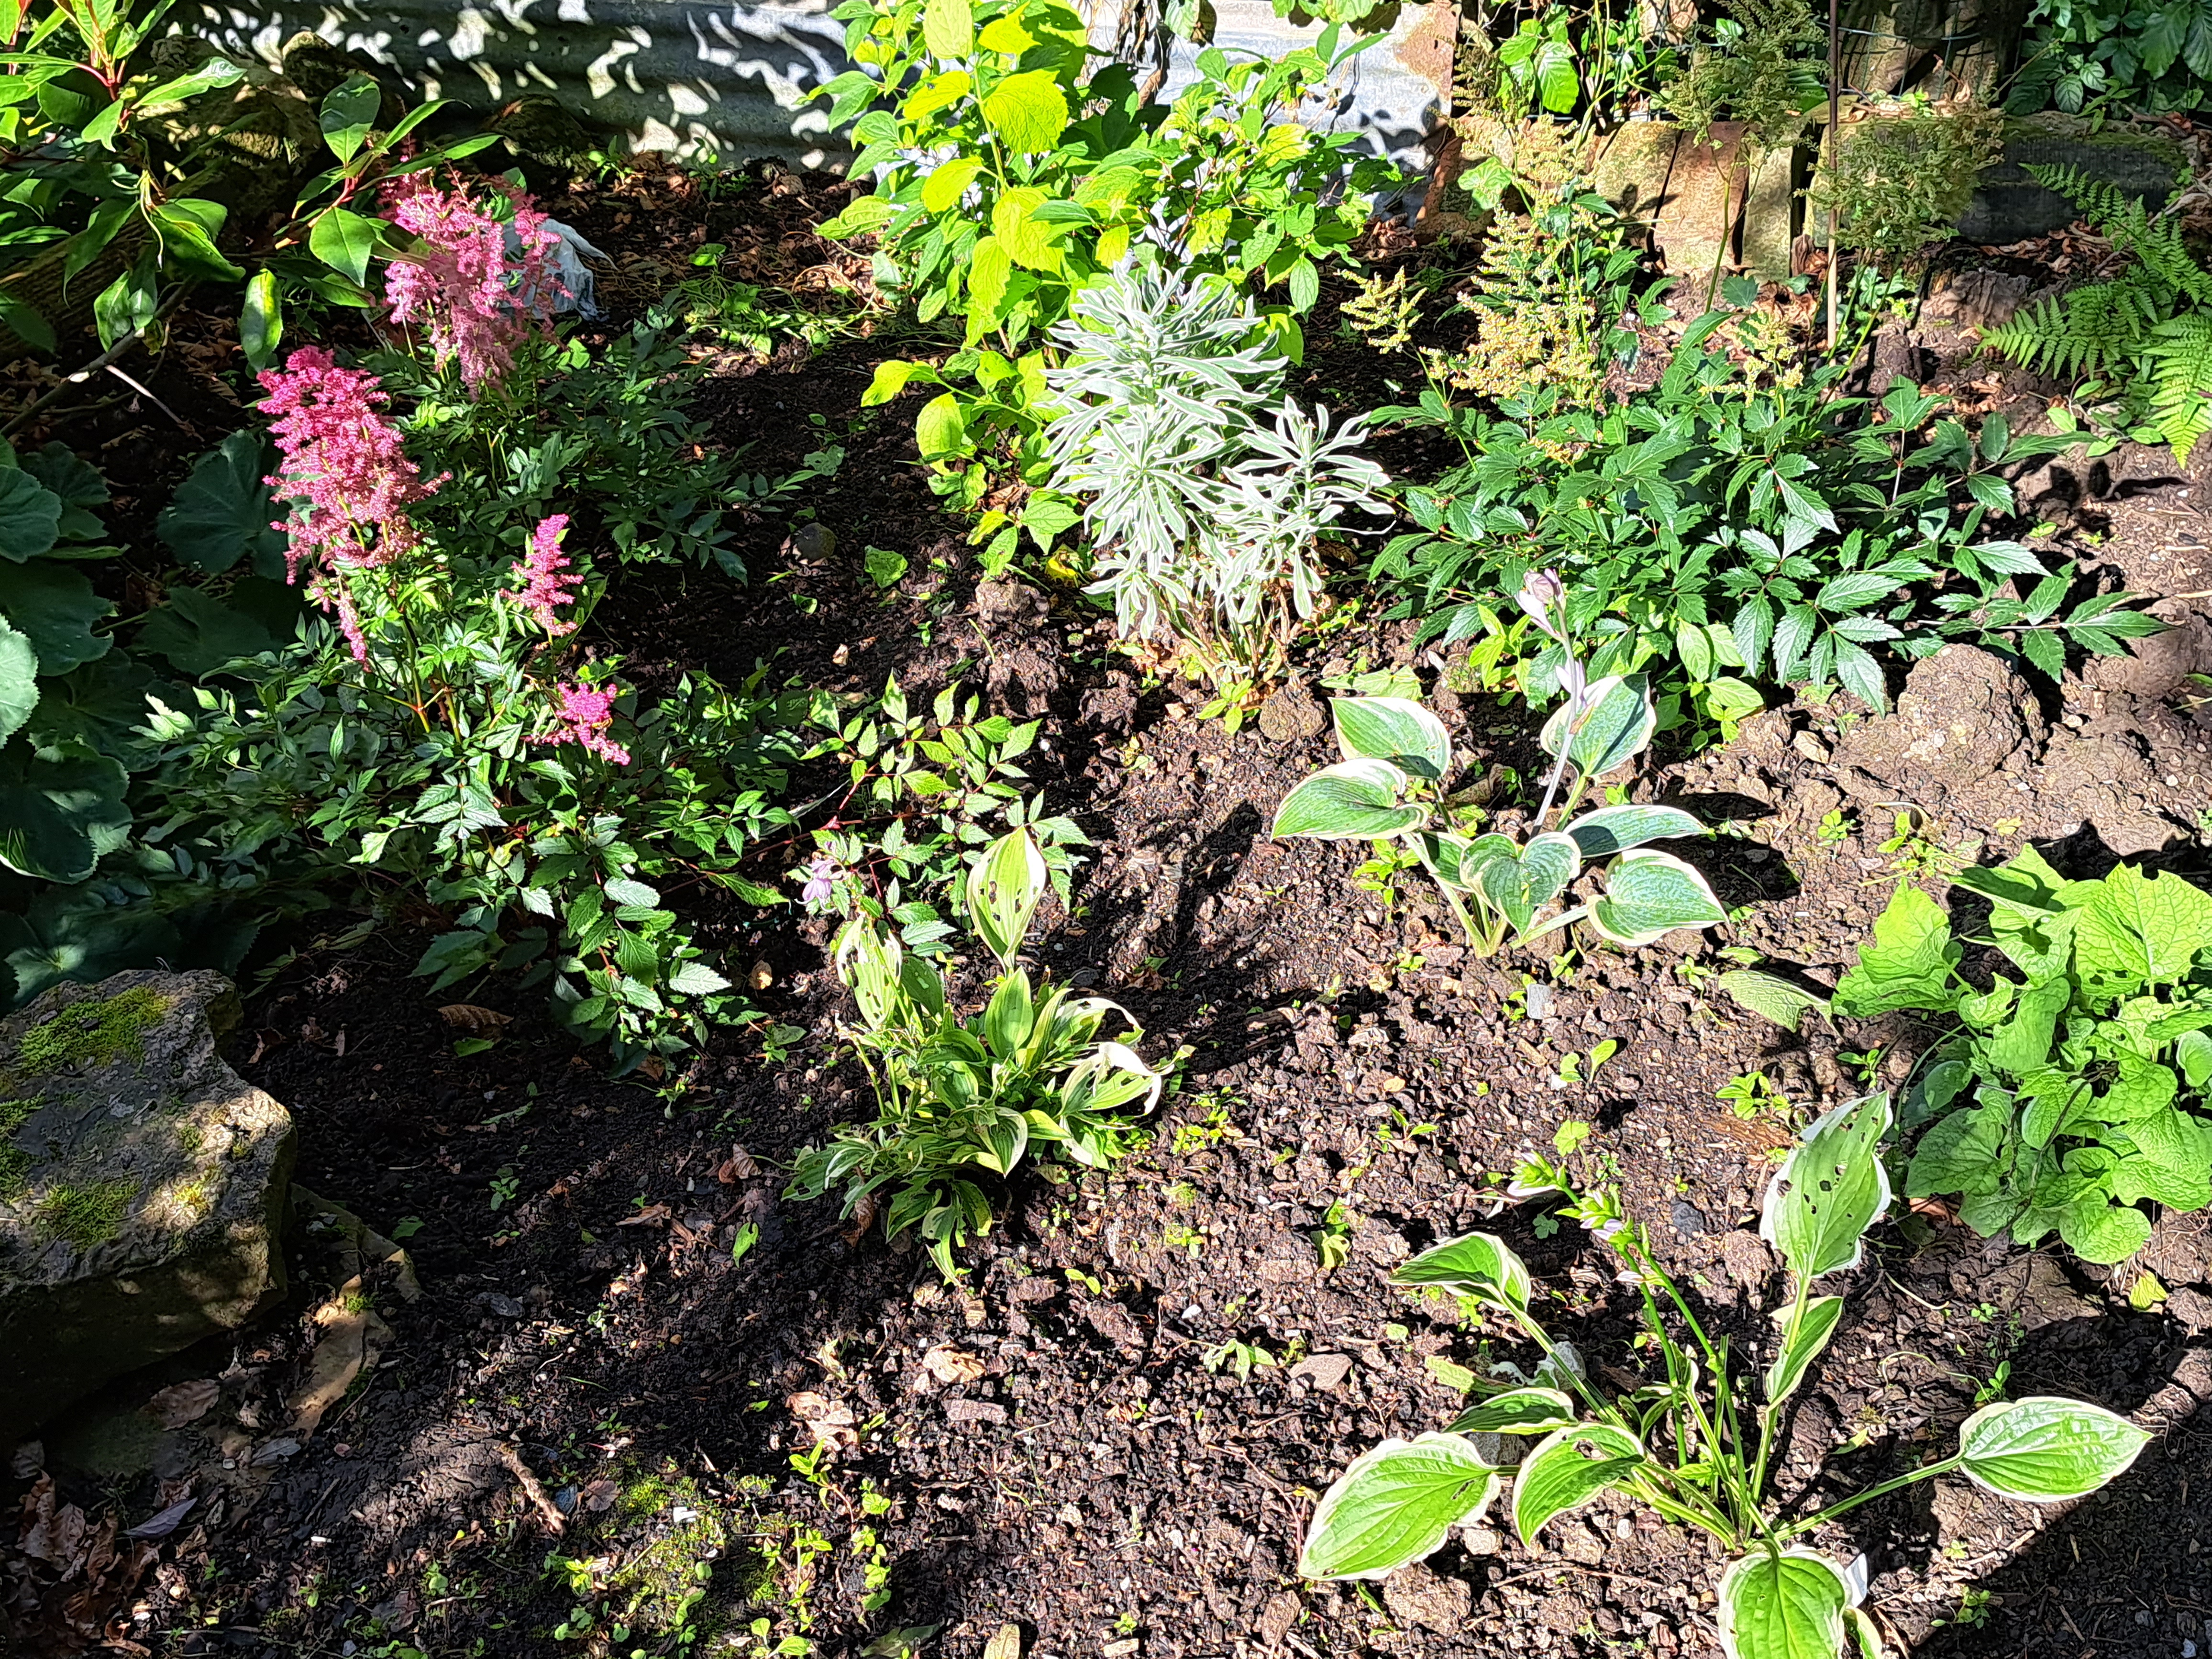
I did manage to spend a whole day out in the garden, mainly sorting out this bed. This is where the old compost heap used to be within the chicken run. It’s been quite a battle trying to get on top of the weeds, not helped by the fact that it is such gorgeous compost! When I reached the bed that morning it was literally knee high in weeds! Luckily I managed to pull up most of the annual weeds before they had set seed. The bindweed had taken hold again big time, so I unwound what I could and shoved it in a carrier bag so I could safely spray it. I then leave it in the bag for a couple of weeks so I know the poison will have got down to the roots. There was also a large clump climbing the beech hedge so that got sprayed too.
Round the pond the hostas are starting to get a bit nibbled but they’re not bad considering how far we are into the season and how damp it is (good slug weather!) The alchemilla mollis needs tidying up before that seeds all over the place too.
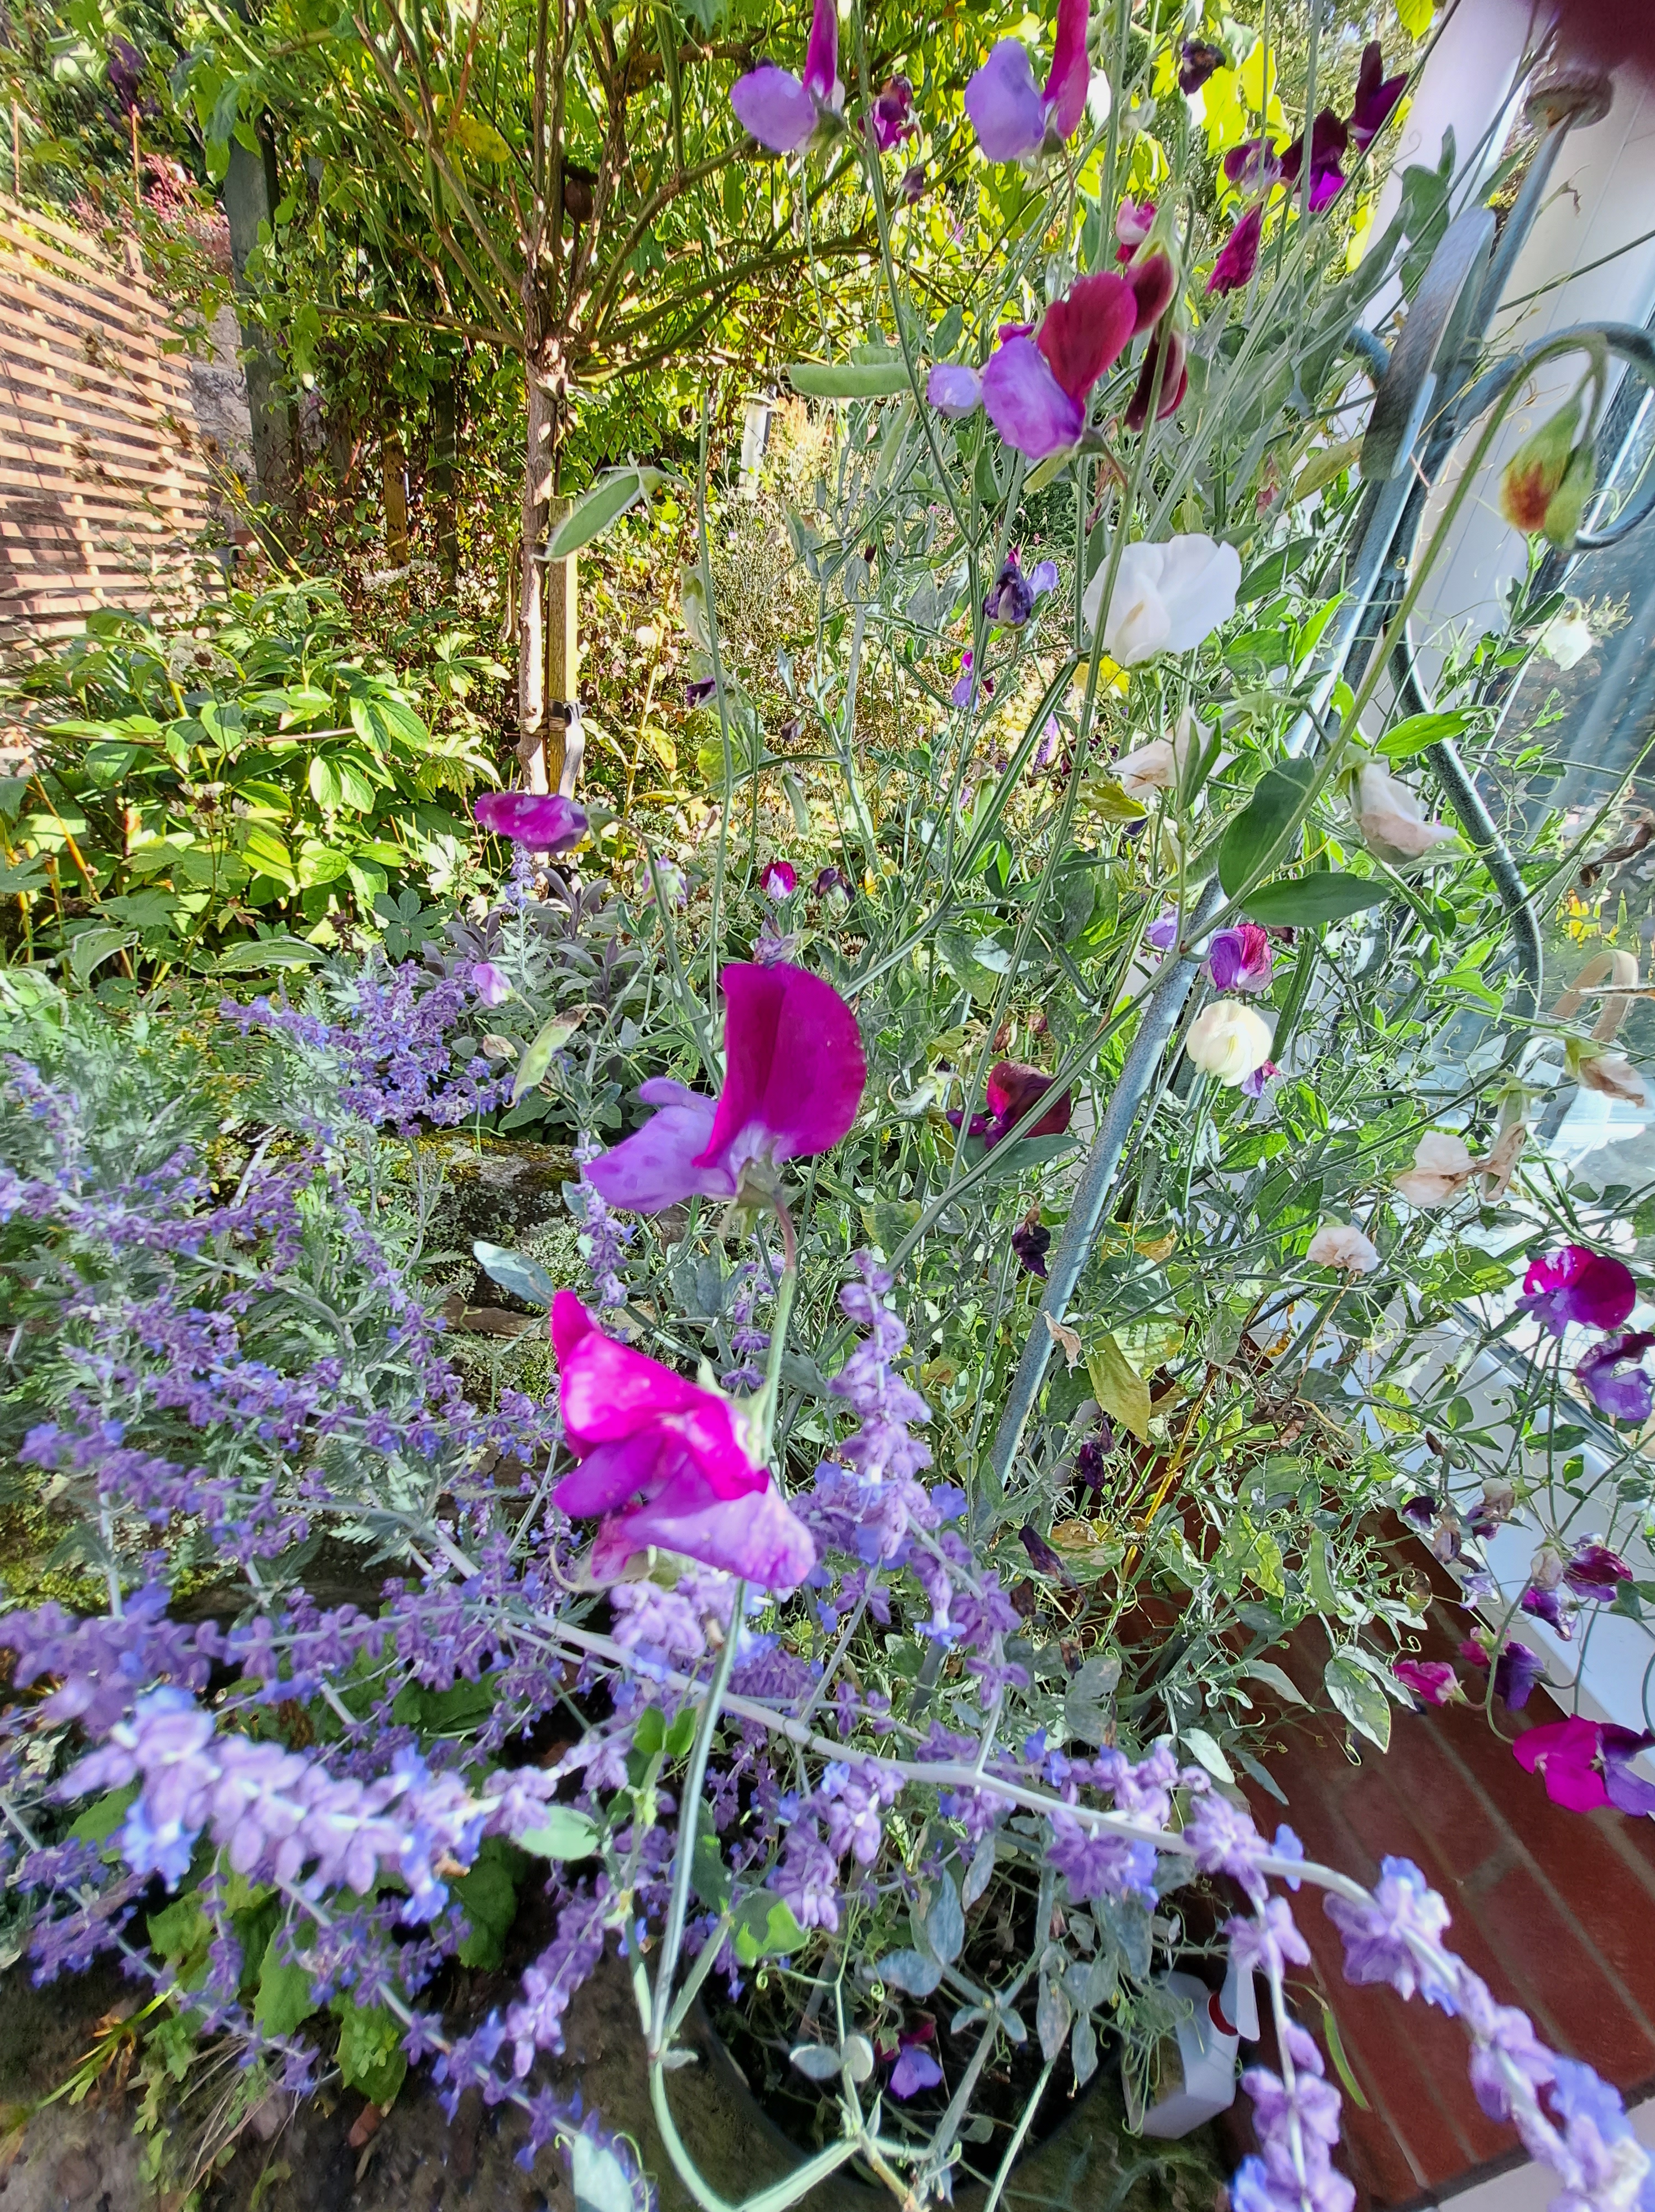
This year I’ve finally had some success with sweet peas. I started them off inside and transplanted them into their final big planter whilst they were still living in the conservatory. I found a really pretty and well designed stand for them which stores flat but folds out into three sides for them to climb up. They look particularly pretty next to the perovskia which for some reason is insisting on growing sideways instead of up! I really need to cut off those pea pods or they will stop flowering.
From the upstairs window it’s looking very green and somewhat overgrown! I think I need a good session with my gardening friend. It will soon be time to start the autumn tidyup!
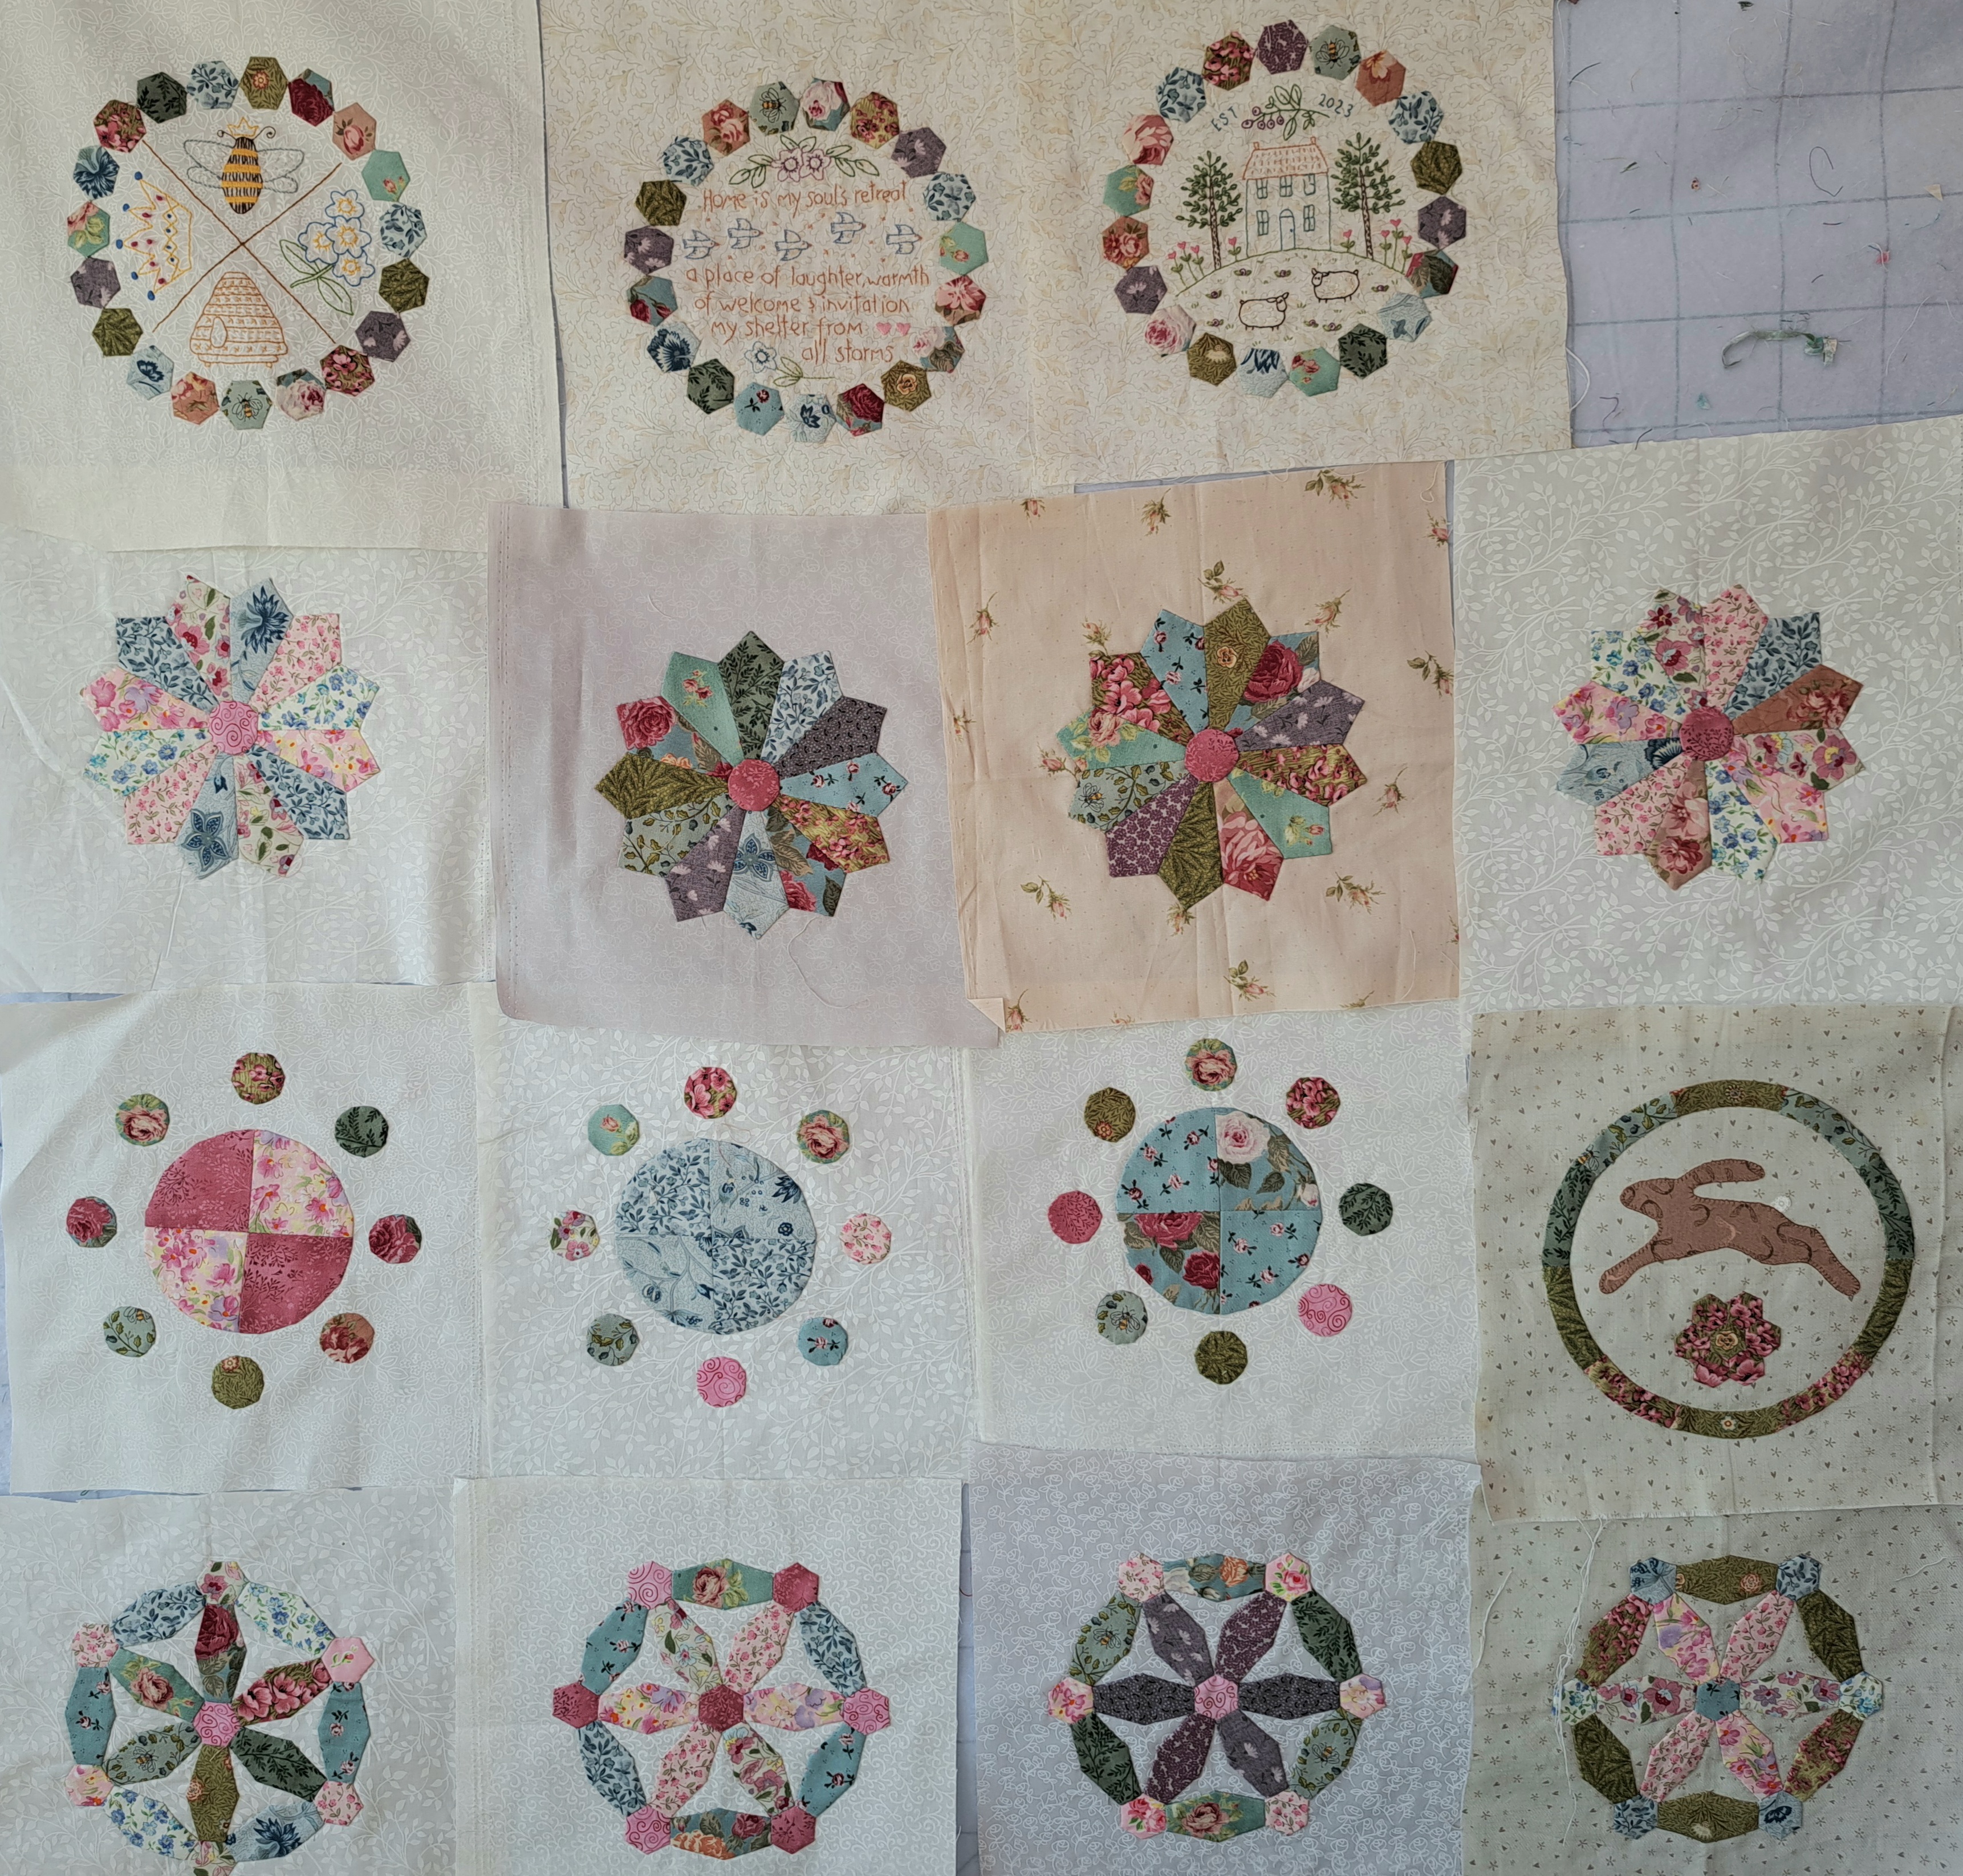
I feel I’m making reasonable progress now with my Owl and Hare Hollow quilt, it’s the embroidered blocks which are taking the time, so rather than trying to do those first, they have become my ‘handbag’ stitching, so I stitch these at work in my lunchbreak, waiting for appointments or buses, sitting in cafes, they are getting done slowly. At home I have a box for all the EPP blocks stuff which I can do in front of the TV.
Last time I shared my progress I was half way through a couple of blocks…
I stitched all the wedges together for the Dresden plate and added a pink circle in the middle before stitching it onto the background.This is the fourth and final Dresden plate square I need for the quilt…
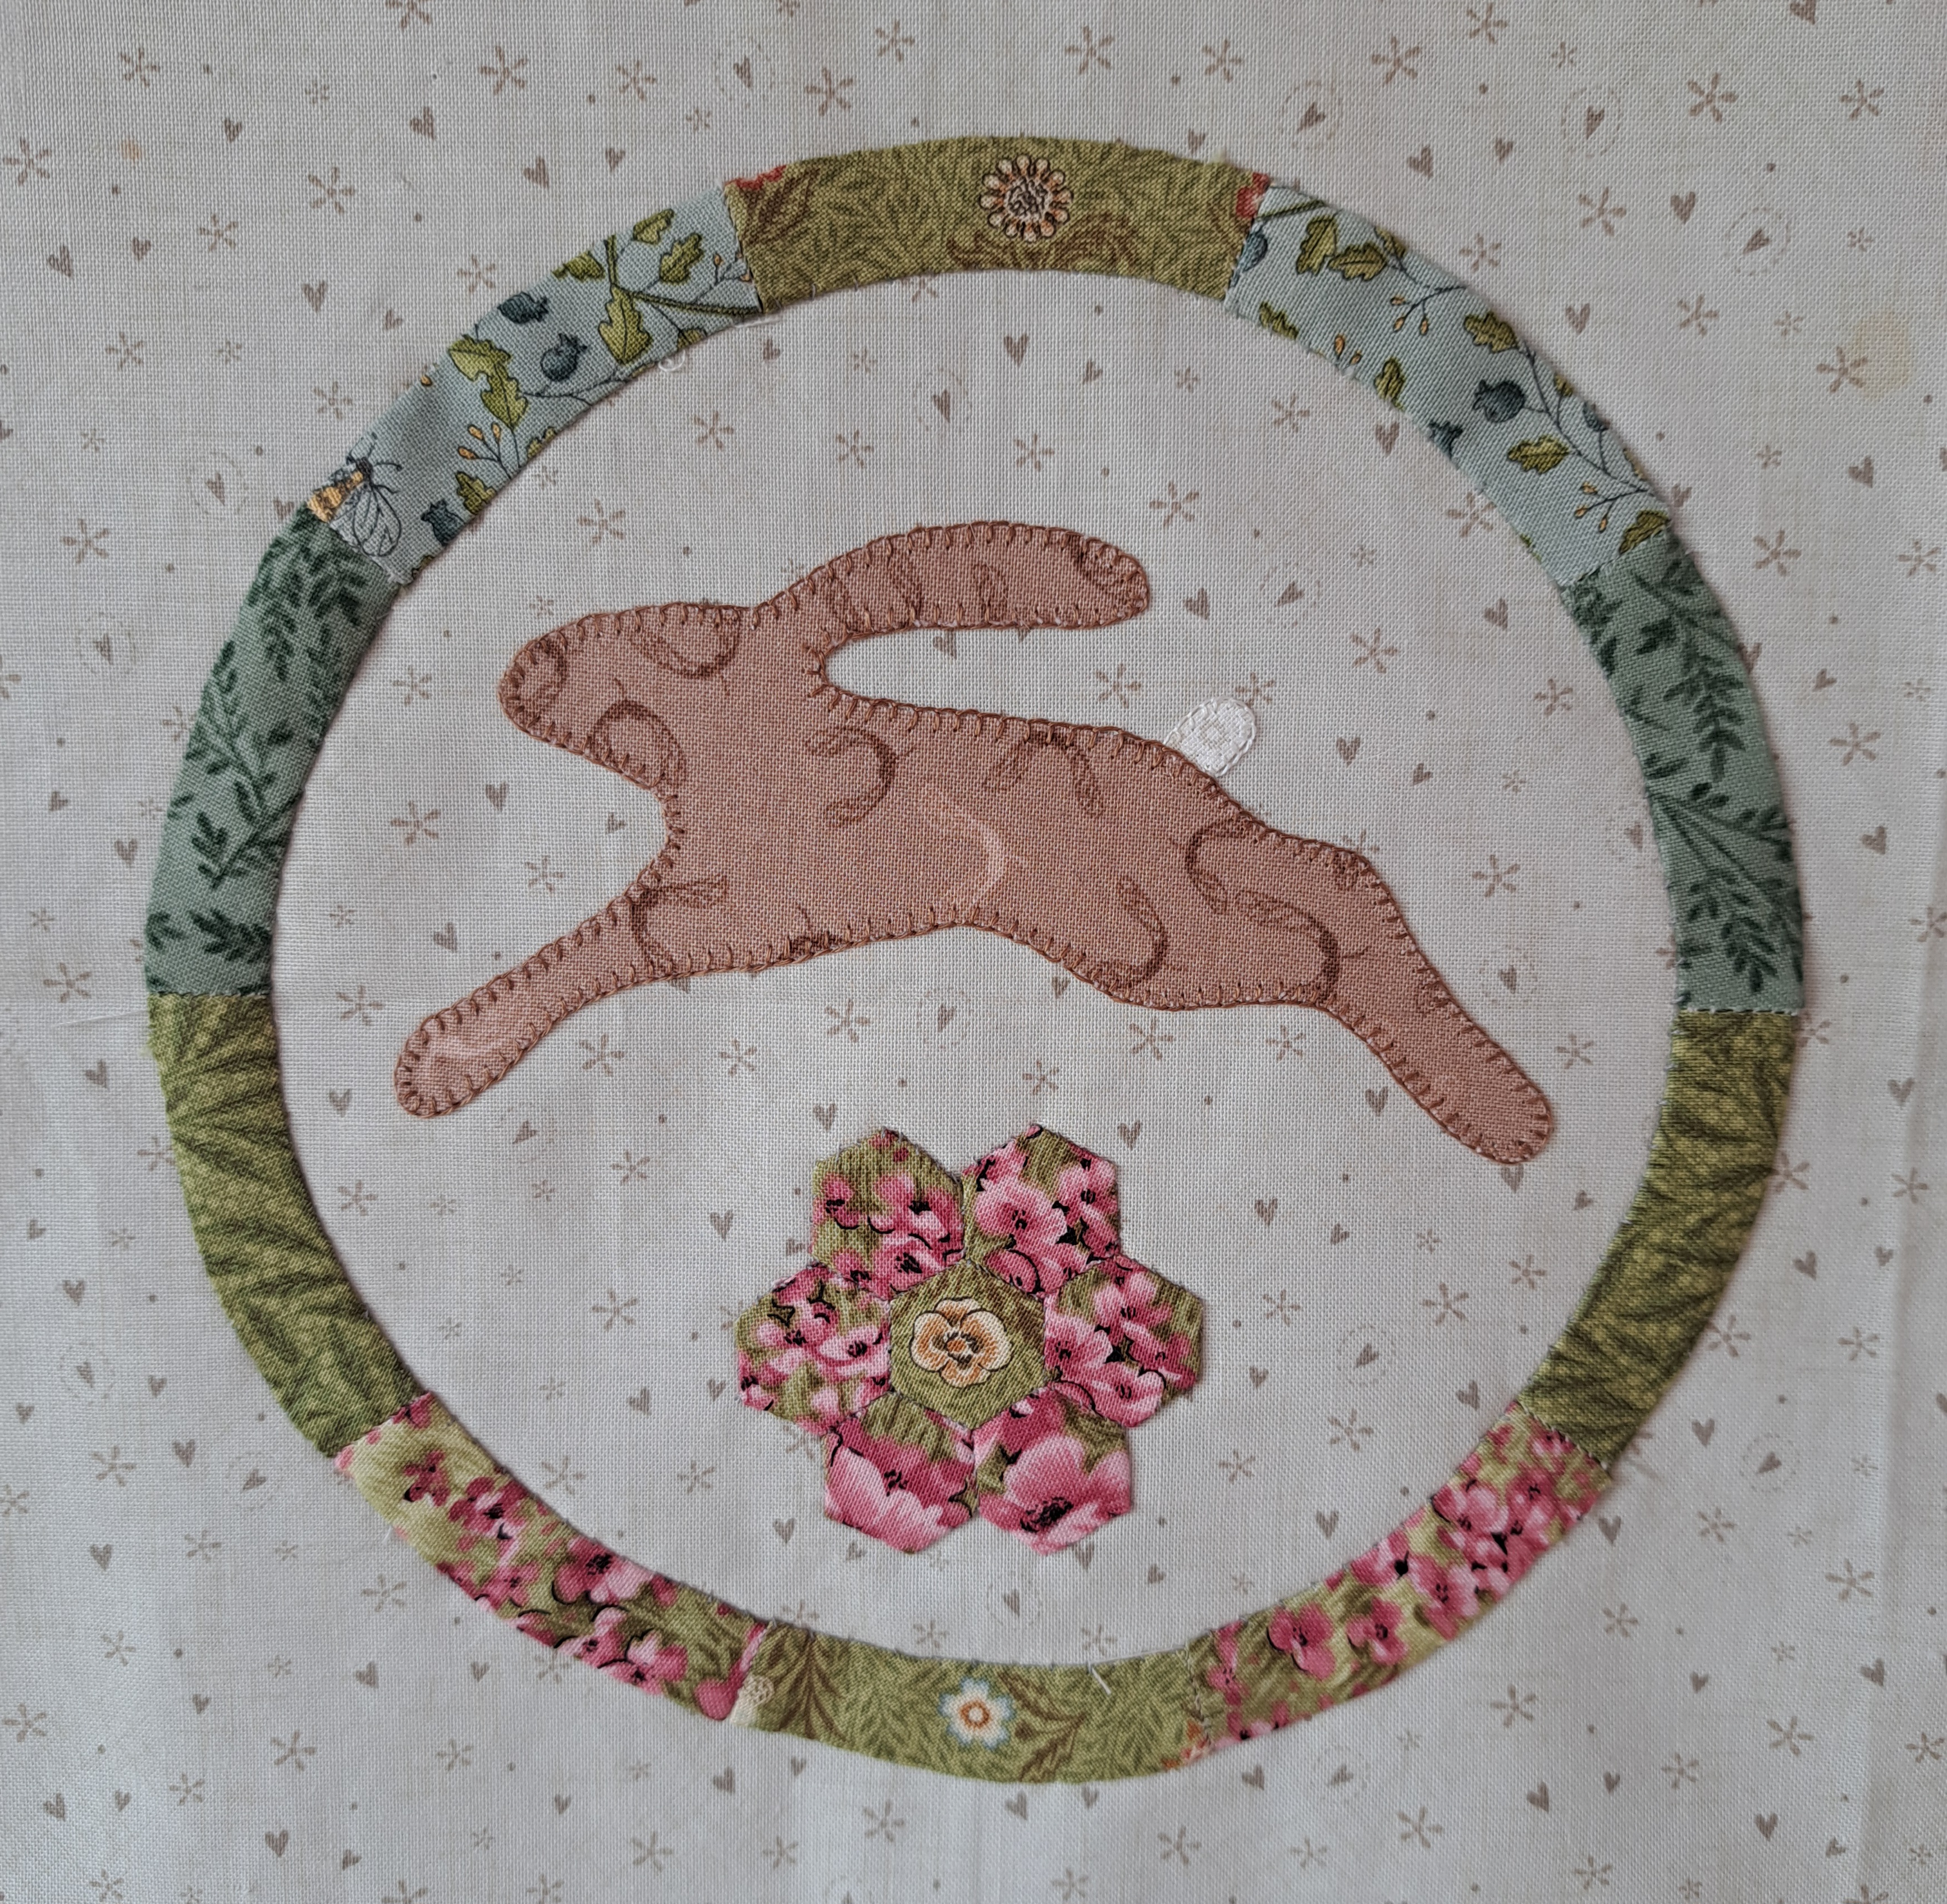
I made the EPP border round the hare together with the mini hexagon blocks. I was a bit concerned about the arcs making the circle becoming distorted, but I took Kate chiconi’s advice and starched it to death before I took the papers out and it held it’s shape on the whole. Thanks Kate 🙂
The mini hexies were pretty fiddly as they’re 3/8″ hexies, that’s the measurement of each side, so they’re fairly small! I decided when choosing the fabrics for this block to have green folliage ones towards the top of the circle and pink flowers at the bottom, so it’s like the hare is running across the flowers, hence the very pink hexie choice.
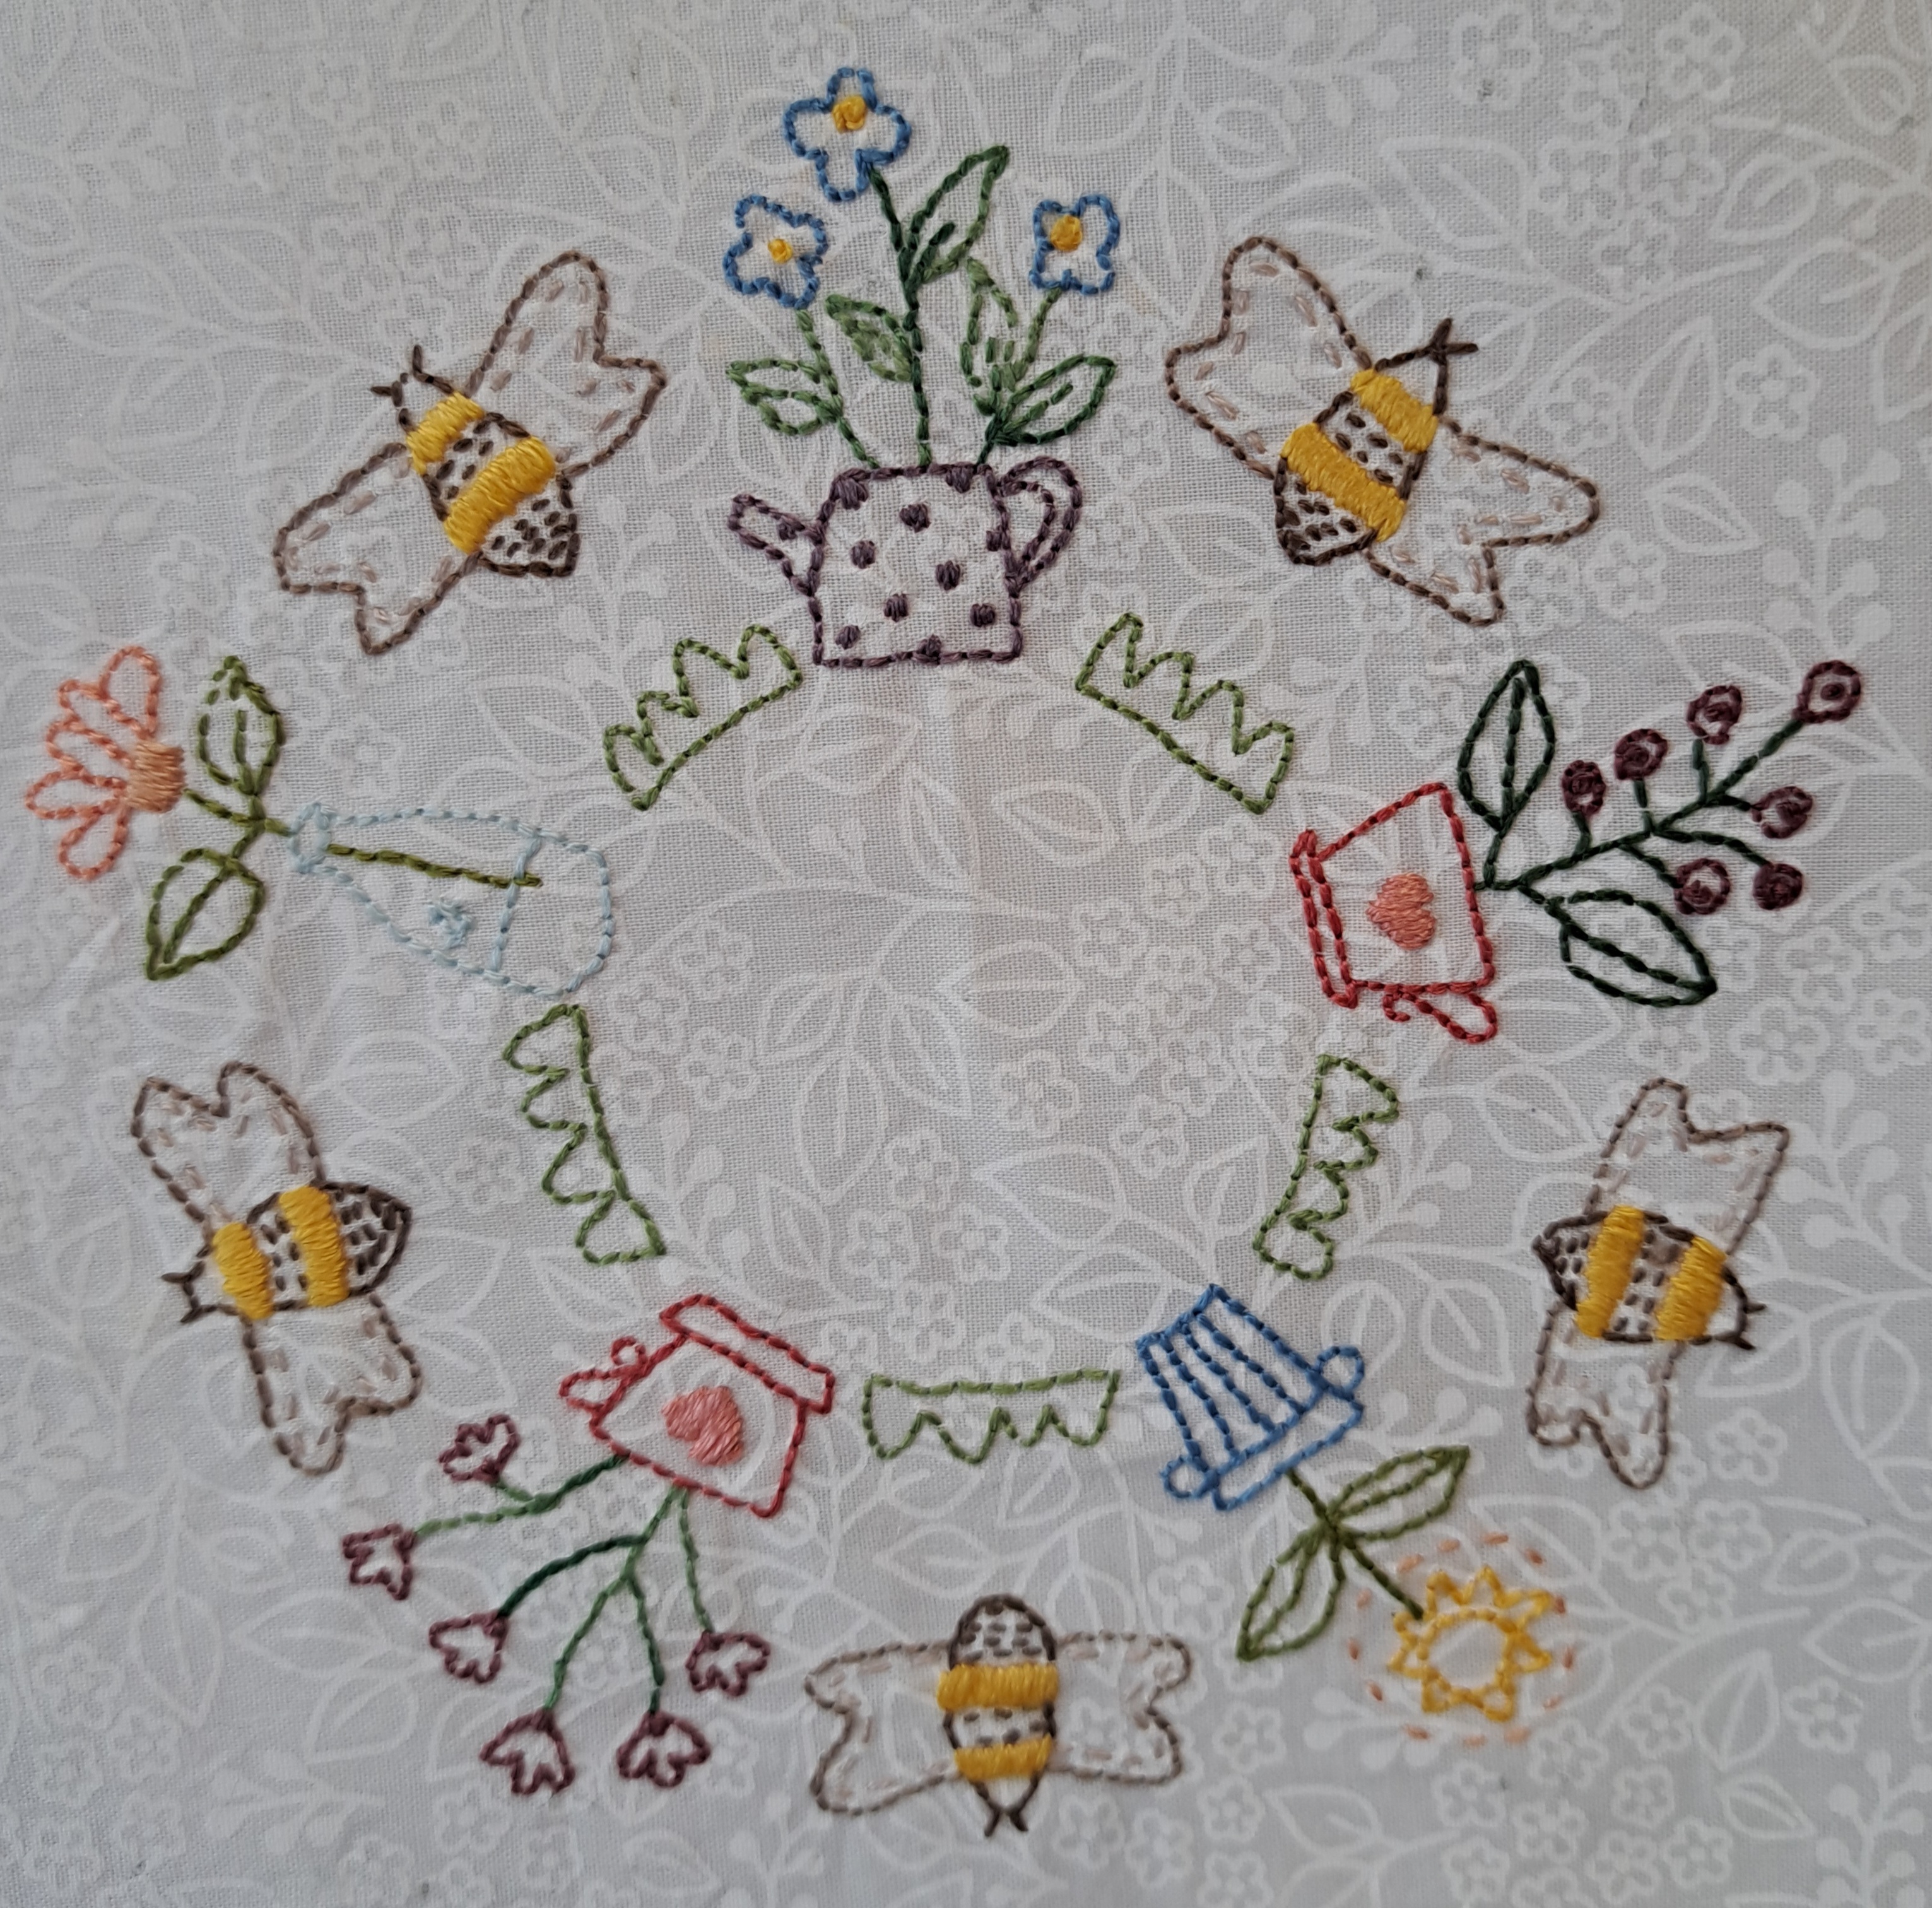
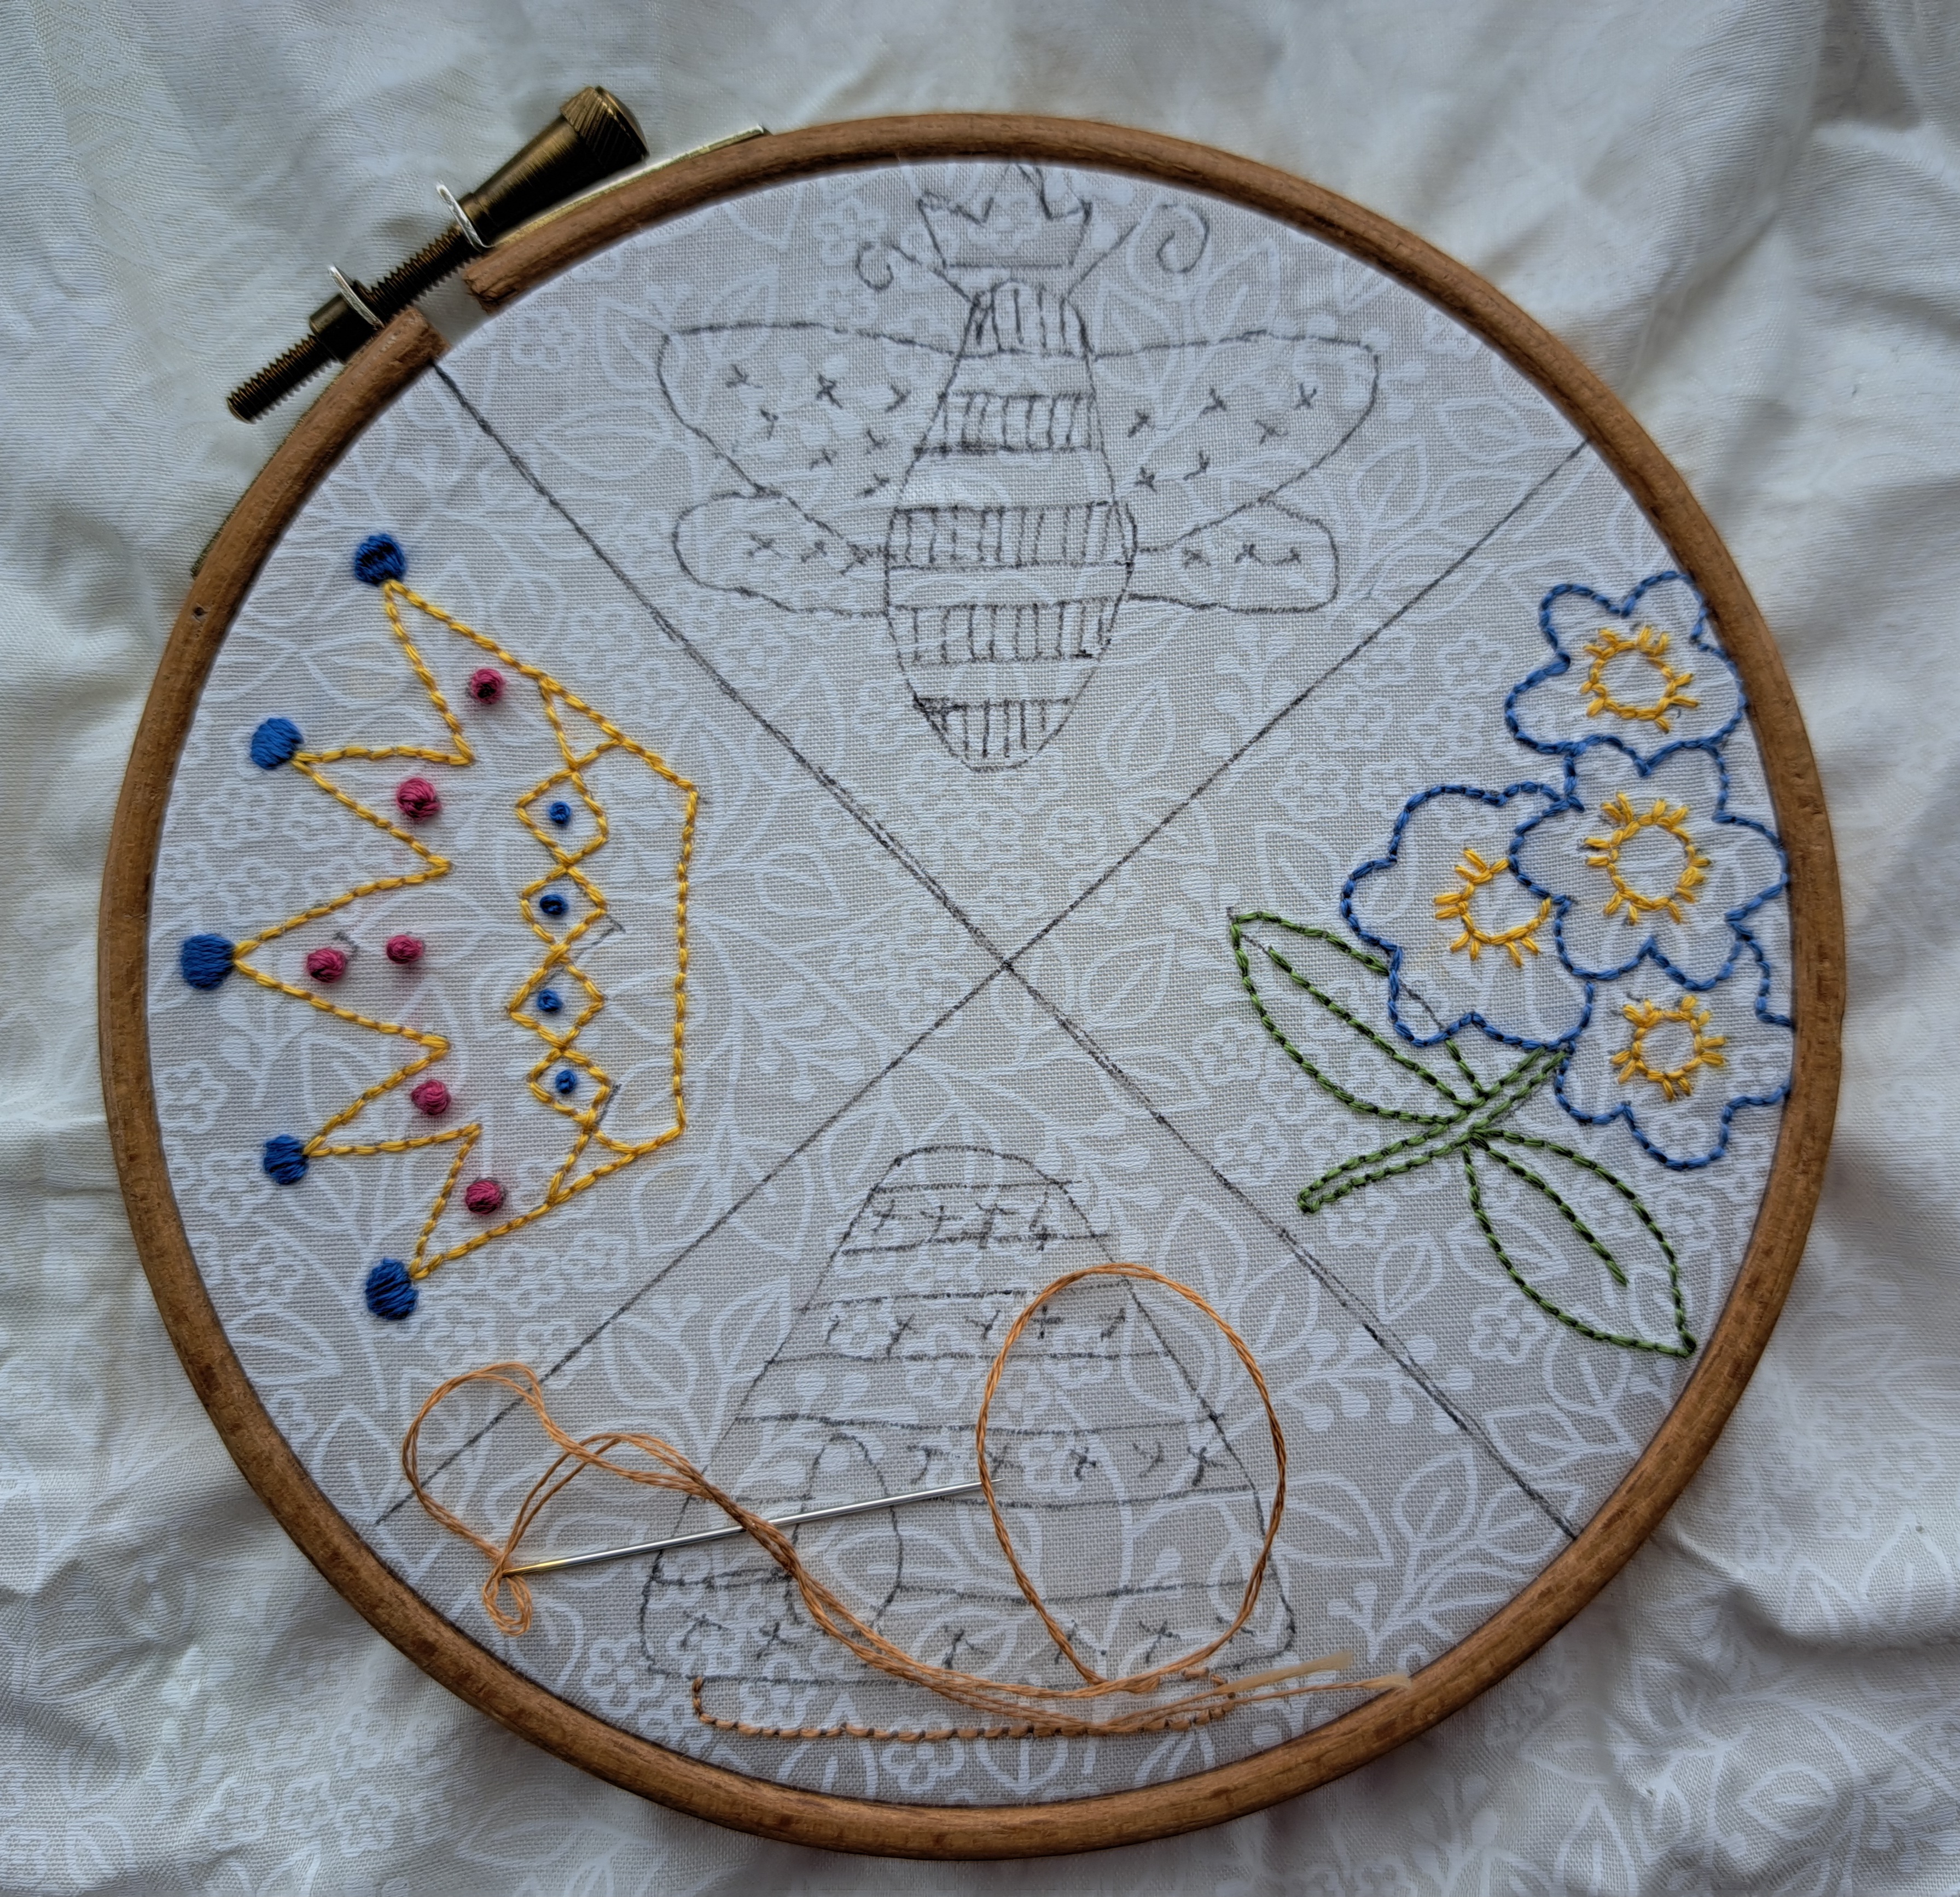
I finished the Queen Bee embroidered block and added the circle of hexies round it, these are 1/2″ hexies, so not quite so fiddly! I positioned them so there’s a bee block at the bottom centre, I’m meant to have 20 hexies round each block but so far I’ve only managed 19. The instructions say they should all fit within the 7″ circle, but a comment on facebook suggested that the photos look like hers are a fraction outside the circle, which might explain why she can get them all in!
I’ve also made a start on the next embroidered block which has more bees and flowers…
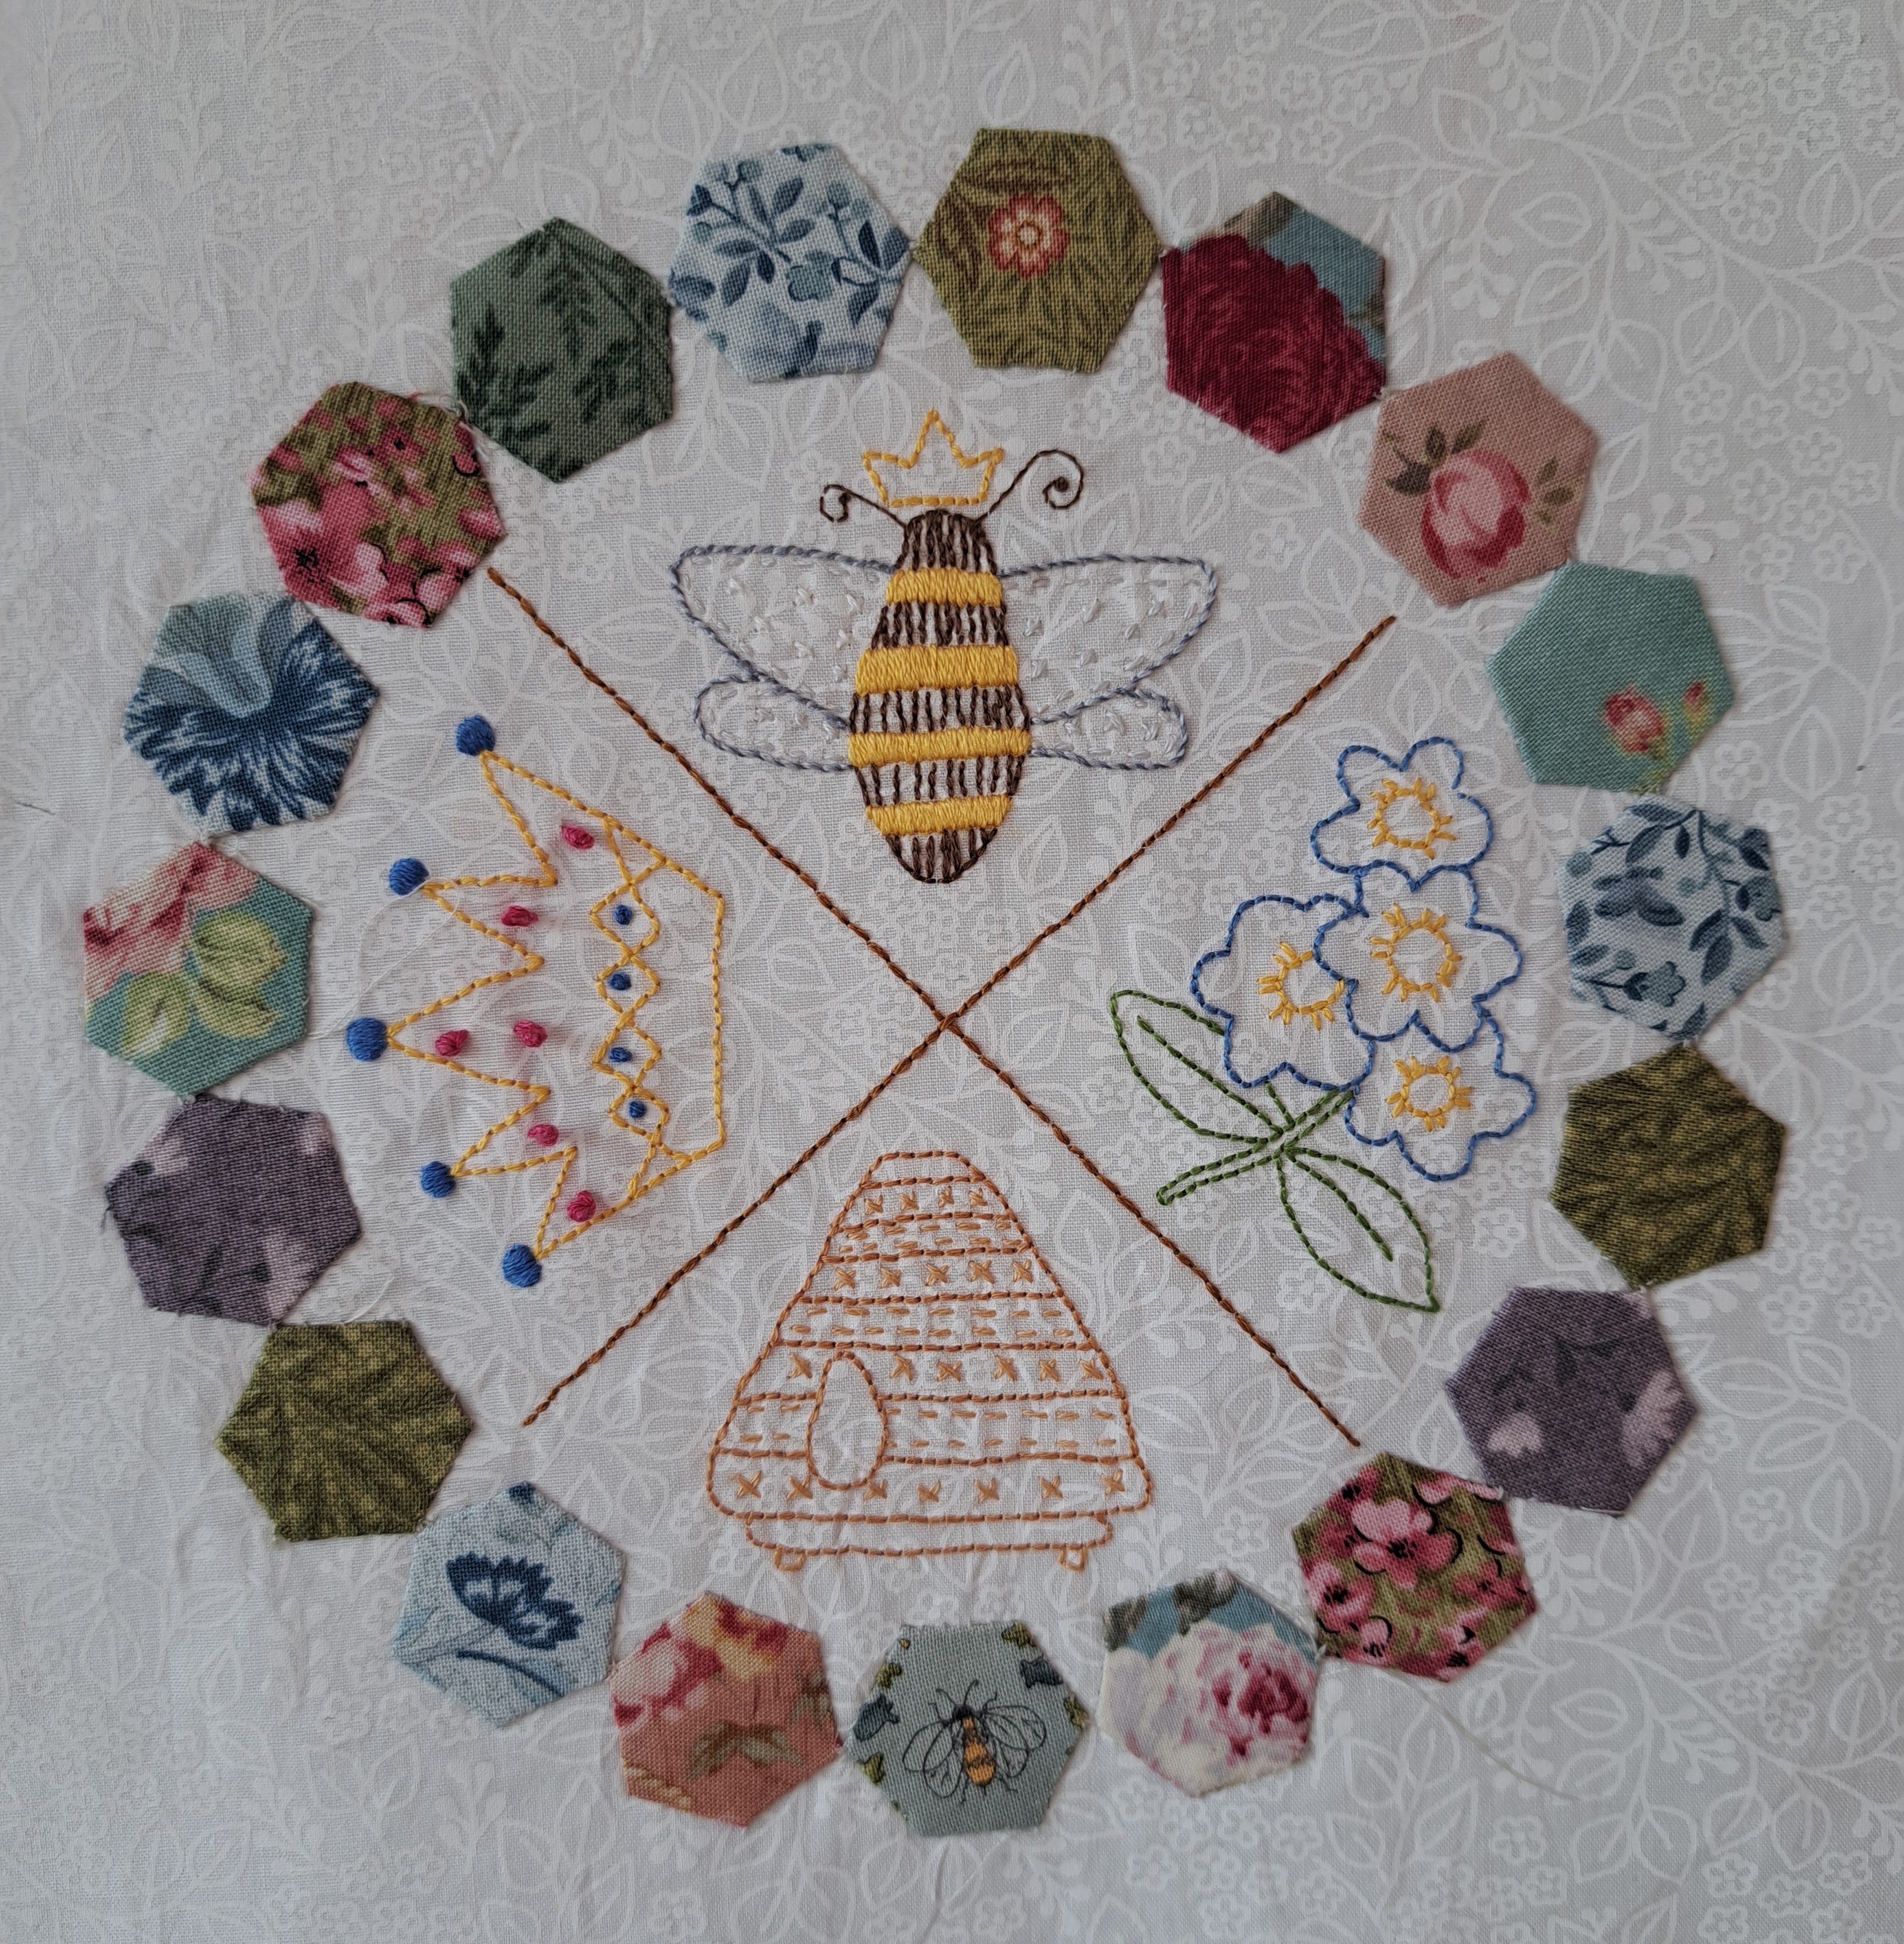
I’ve now made eleven blocks so I put them all on my design wall to see what they look like and I’m pretty pleased with them all! I like the way the colours are working too, especially since this is a scrap quilt, I’ve bought some background fabrics and a couple of fat quarters, but it is mainly otherwise fabric from my stash. There’s 48 blocks altogether in the quilt, so I’m nearly a quarter of the way through.
Hand Quilt Along Links
This Hand Quilt Along is an opportunity for hand quilters and piecers to share and motivate one another. We post every three weeks, to show our progress and encourage one another. If you have a hand quilting project and would like to join our group contact Kathy at the link below.
I’ll also be linking up with Kathy’s Quilts for Slow Stitching Sunday, please follow the link for more hand stitching and quilting.
By the way, complete change of topic…did you see the final of the Great British Sewing Bee, the finalists had to make a dress that transformed into another, like the stars do on the red carpet. Asmaa’s dress was absolutely amazing, stunning! You knew she would win as soon as you saw it, the way it unfurls is just beautiful! The video clip of it has now gone viral, here’s a link on YouTube. Watch and enjoy!
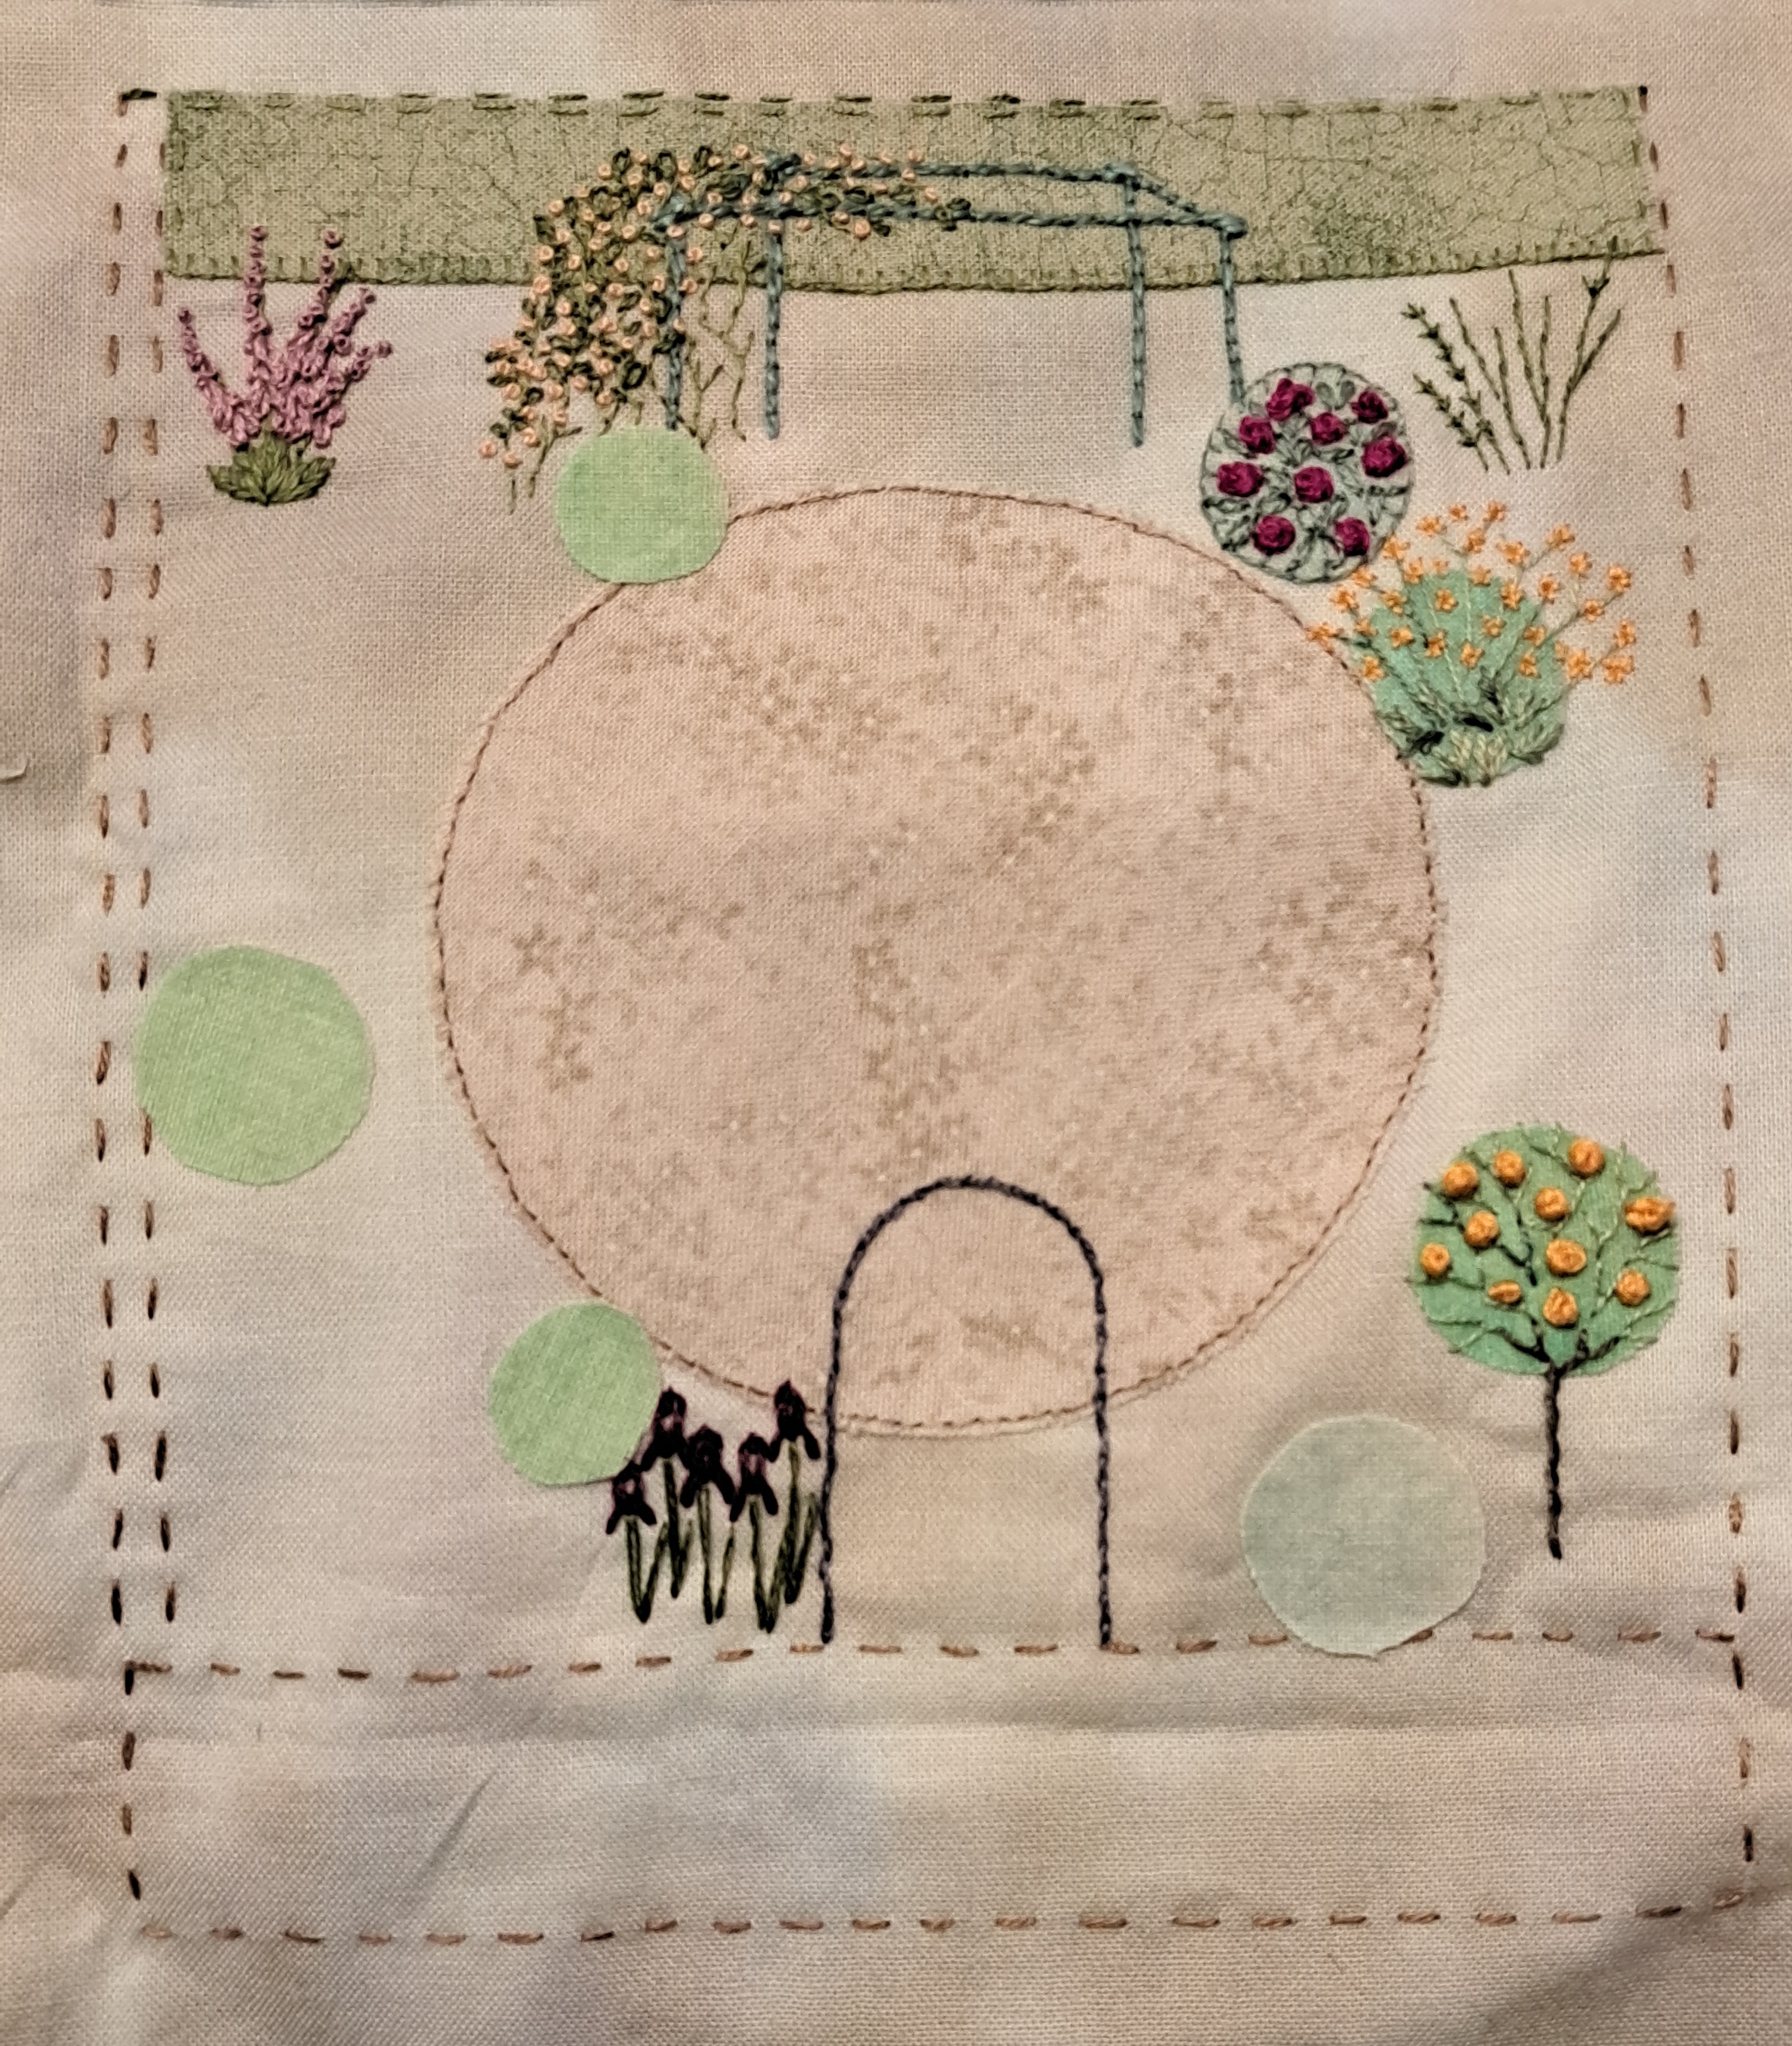
It’s three weeks since I last shared my garden embroidery, progress has been slower than I would have liked on this one, possibly because its the last big one and I want to get my garden book finished, it’s one of those projects that has grown somewhat since the original idea, rather apt for a garden book really!
Anyway, three weeks ago I was just starting the buddleia in the corner of my Amber and Amethyst garden…
I finished the buddleia using lots of French knots for the flowers. I then thought I’d better stitch down some of the circles as a couple were looking a little loose. The one by the rose arbour is meant to be a skimmia, the one down by the standard rose which looks like it has an attack of green measles, is meant to be a hebe. I think I might put a few more French knots in a lighter green and maybe a few light mauve ones for the flowers.
I then decided to be a bit more methodical and just work my way round the beds, rather than jumping from one side to the other, hoping it will spur me on more…
So, I’ve stitched a purple geranium under the standard rose and a hellebore next to the hebe, this is the deep purple one which is one of my favourites;
…only I’ve just realised I’ve stitched it on the wrong side of the hebe and maybe a bit too dark! Artistic license! I’ve stitched the honeysuckle up the arch with split stitch for the stems and open chain stitch for the flowers. This is wishful thinking as although it did have some nice flowers this year it’s pretty weedy really!
I’ve also started stitching one of the big rosebushes, this one is called Port Sunlight and it’s a lovely warm tangerine colour. I’ve used three strands of DMC for a French knot in the middle and surrounded it with stem stitch.
Hopefully by the time it’s due for the next update I will have finished the right hand side.
This Stitch-a-long is organised by Avis from Stitching by the Sea, we share our progress on our chose piece every three weeks, just enough to keep us motivated. There’s some amazing embroidery, so please follow the links and see what everyone else has been stitching.
I’ve just made a pair of baby shoes for my grandson and they are so cute! Fiddly to make but worth it!
I spotted the pattern on Etsy in a store called Happy Baby Patterns and pressed the ‘buy now’ button immediately as they are just so cute. The bunnies would also fit with the Peter Rabbit rompers I’ve made for Hugo.
I haven’t got many progress photos as I was concentrating so much on the instructions, well actually I only have one! The pattern went together well and the instructions were actually very clear, it just took a while to understand how some of the techniques were going to work, but they did!
I used a batik cotton for the rabbit, Peter Rabbit fabric for the rest of the outer and the upper lining, the sole is a thick brown felt lined with fleece, I meant to put the fleece fluffy side up but I managed to insert it the wrong way up, it still feels soft though. Another time I’ll use a thinner felt as it has made the edges quite bulky.
As you can see clips came in very useful, the photo shows the sole lining ready to be stitched, the whole shoe was then turned through a gap in the lining stitching, this could then be hand-stitched closed before turning the shoe the right way….you see why I had to concentrate!
The baby shoes didn’t actually take that long, I made them in an afternoon.
Aren’t they just the cutest!!
I love the little tail at the back. I just need to see how they fit and whether they stay on before I make any more.
At Easter my daughter-in-law spotted a romper pattern she liked and asked if I could make it. I ran out of time to make it for Easter and this is part of a belated birthday present! Luckily at 12 months he doesn’t know any different!!
The pattern is by Brindelle and Twig, it’s called Summer Romper and it’s a traditional romper style with a gathered waist around the bottom. What my DIL didn’t realised is that it’s for stretch fabrics and really she was thinking of wovens. I decided that with the elasticated bits, I could just make it one size bigger and make it in cotton. He’s still in 9-12 month clothes so I made the 12 to 18 months instead. It’s a pdf pattern which I like for children’s clothes as I can reprint them in a larger size as they grow.
I had some Peter Rabbit cotton left from a previous romper as well as some fat quarters from the same range, it is lovely and soft to touch, I decided to use it to line the romper fully and use a plain cotton for the outside. I used a white background to line the front and a blue/green one for the bottom. Fully lining it did mean I had a few head scratching moments with areas like elastic casing round the legs, it’s not perfectly neat round there but I’m sure Hugo won’t complain.
It went together surprisingly quickly – I’d have cut out and sewn it in an afternoon if I had enough of the right size of elastic! The pattern went together easily and the instructions were nice and clear. I also checked with mum about buttons or poppers as the pattern calls for poppers for safety reasons. Mum wanted buttons so they would stay fastened when he was moving round…so they are very securely stitched on!! I’m particularly pleased with the buttons, I fussy-cut a Peter Rabbit head and covered the buttons, I think they look very cute.
It’s lovely having little ones to sew for again, they’re quick makes, don’t take much fabric and so cute too!
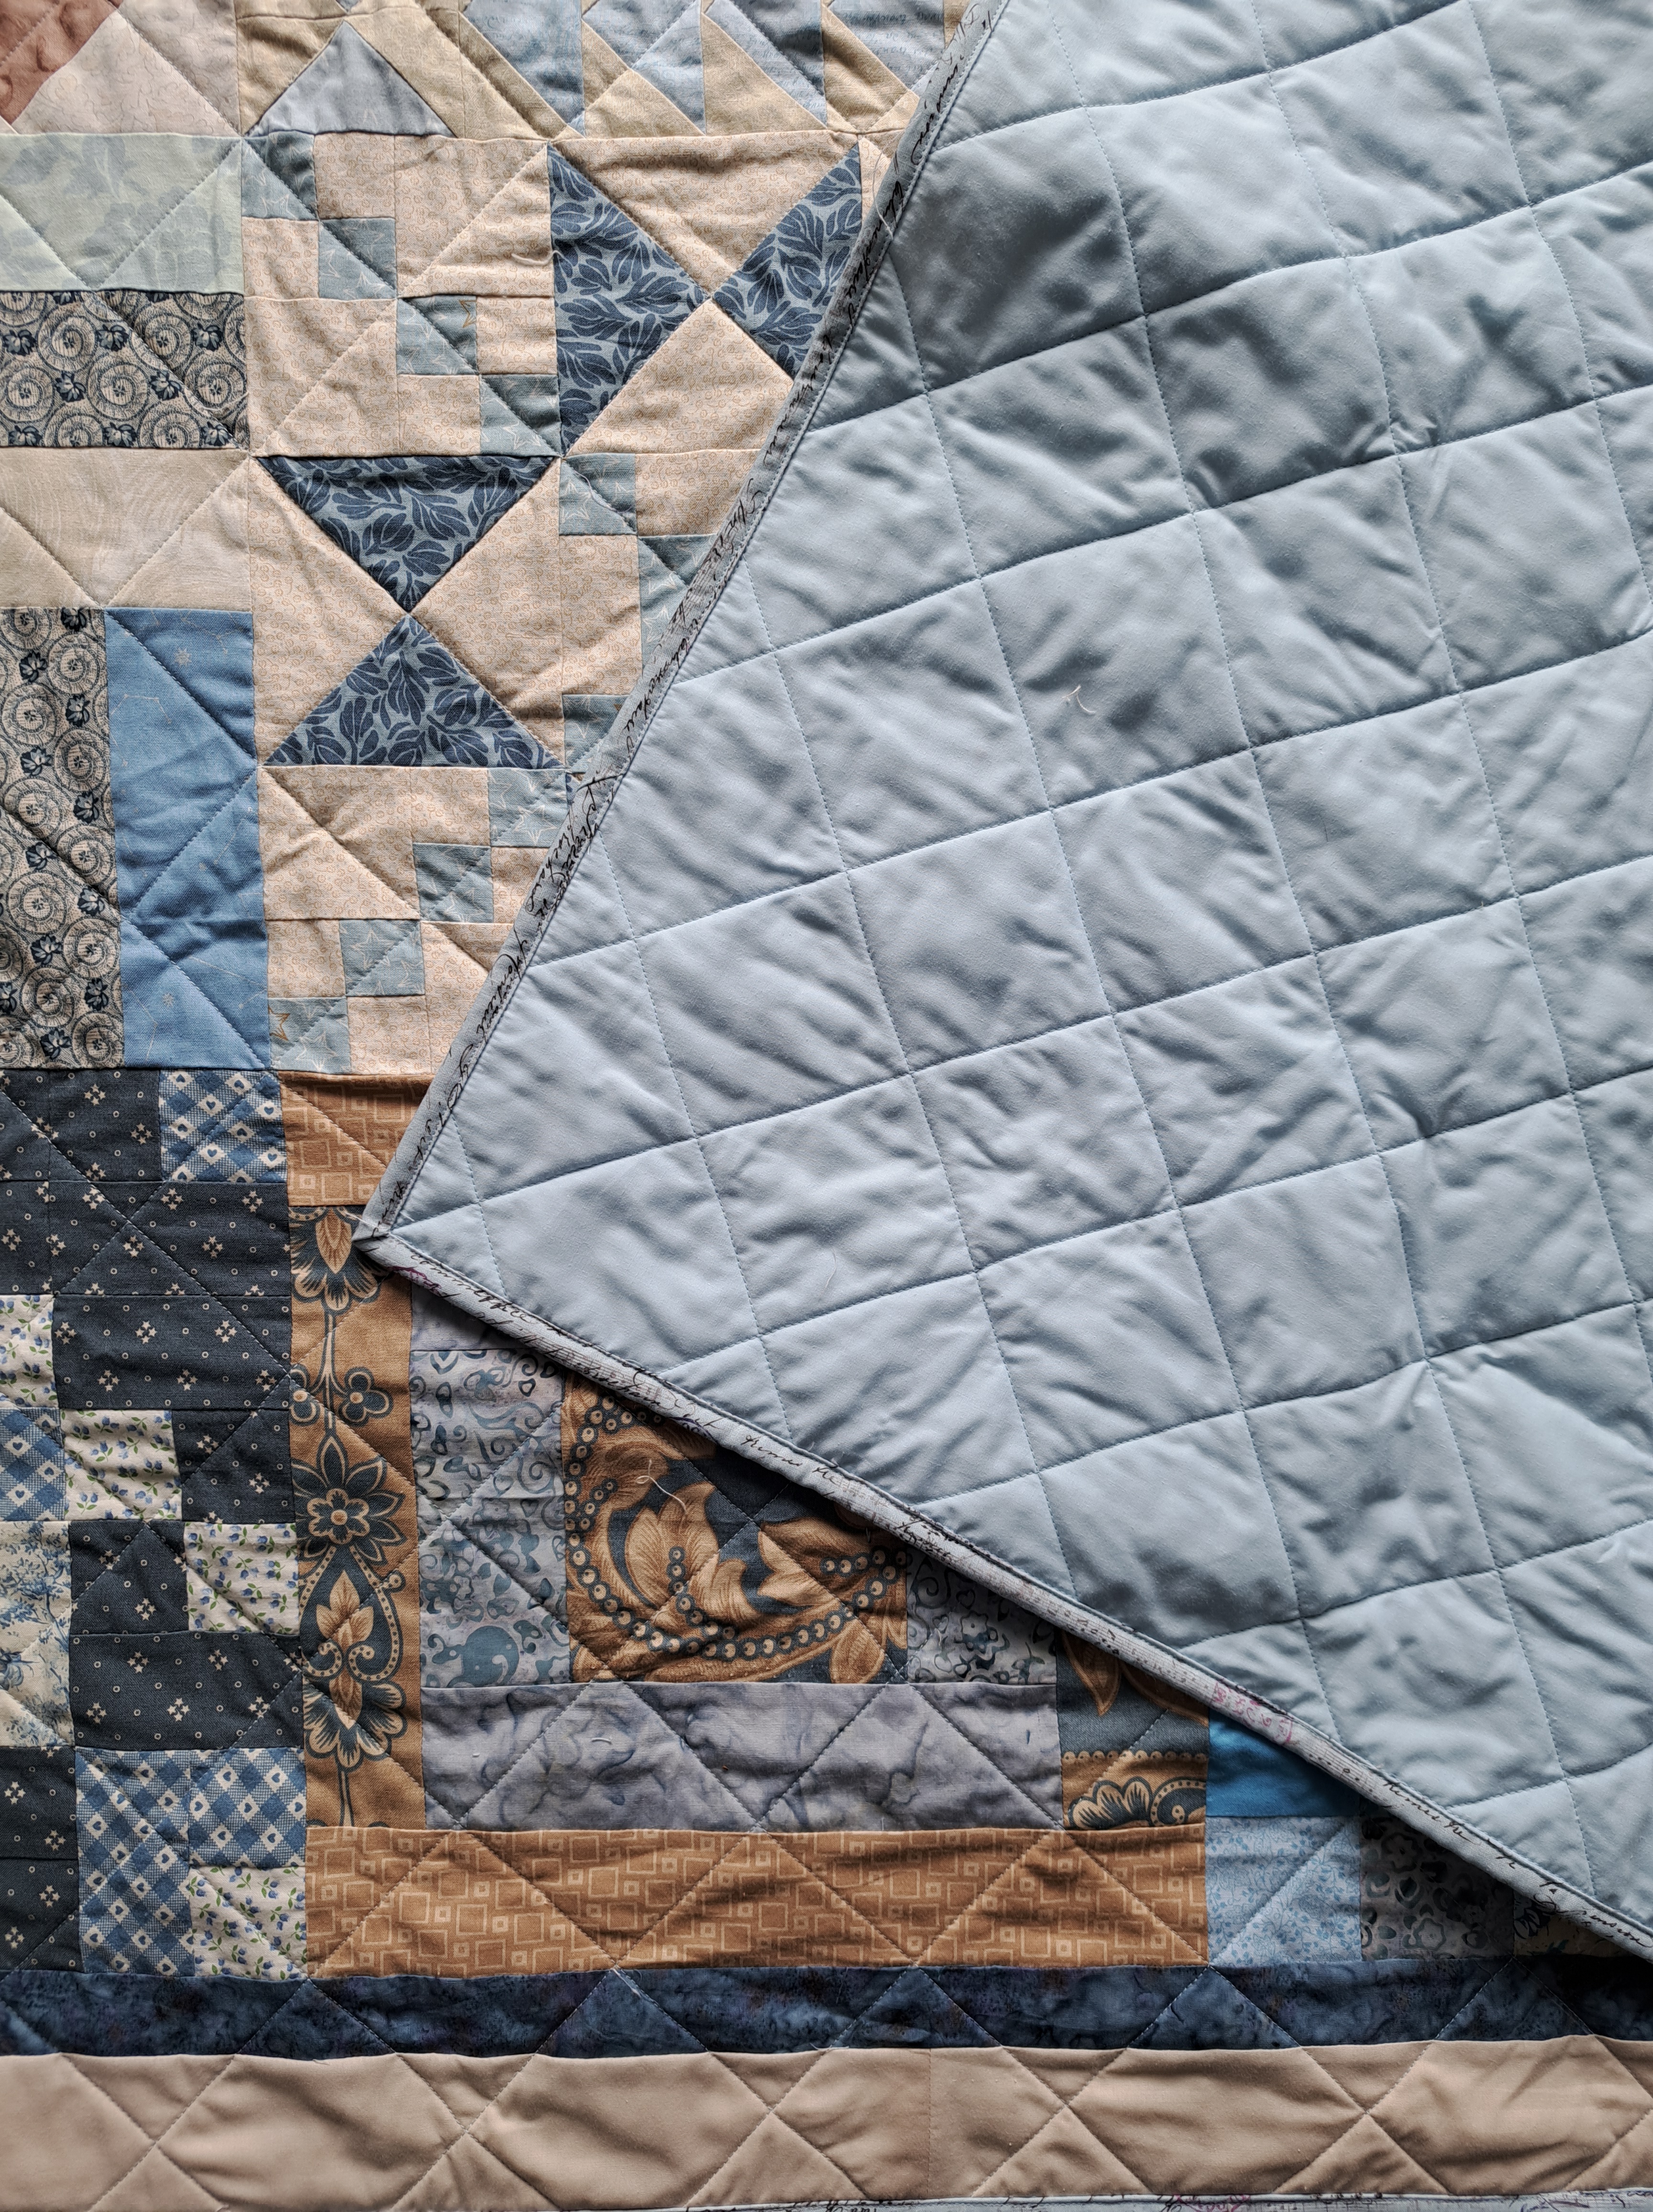
Yesterday I finished my blue quilt, I think that’s the quickest I’ve ever made a quilt, helped of course by the 12″ blocks being already made, even so a few days round working is pretty quick for me!
I wanted to make a quilt for my aunt, she’s just had to go into a care home at the grand age of 101 (or it may even be 102!) so using ready prepared blocks was perfect. These are blocks made for me by quilters around the world taking part in the Footsquare Freestyle swap back in 2020, organised for several years by Kate from Tall Tales from Chiconia.
I used 25 of the blocks to make a square quilt, put a couple of borders around it so its about 66″ square. Here it is as a flimsy last week…
I decided to cross-hatch it to keep it simple. I drew the lines on with a Frixion pen as I knew otherwise my lines would be no where near straight! I checked on the UK quilters facebook page for advice on the direction to stitch in and the consensus was to stitch the lines in the same direction in order to avoid the herringbone effect. I quilted in a pale blue which has worked well and matched the backing too. I was pleased to see even on the back I’d not got any tucks in the cross-hatching, concentrating on holding the quilt smooth round the needle clearly did the trick.
I bound it with a pale blue cotton with a script and music design, it’s subtle enough to blend in nicely.
I had a bit of a lightbulb moment when I was stitching the binding on…one of those lightbulbs which you think really shouldn’t have take so long to work out!!! I thought I’d share it here in case anyone is as dim as me :-D…
I’ve mainly hand-stitched bindings down after a couple of early attempts to machine stitch it as I could never get it neat. I was stitching in the ditch at the front so it would catch down the back, invariably bits missed or the line was no where near straight on the back…and that’s where I was going wrong, I was stitching from the front, thinking I wanted that neat. This time I stitched from the back. I realised that if I lined up the fold with the stitching line and stitched just inside, then on the front it would be just inside too. And it worked!! It’s not 100% perfect, but for a quick finish or a quilt that needs to be particularly durable, like a kids quilt, I would certainly do it again.
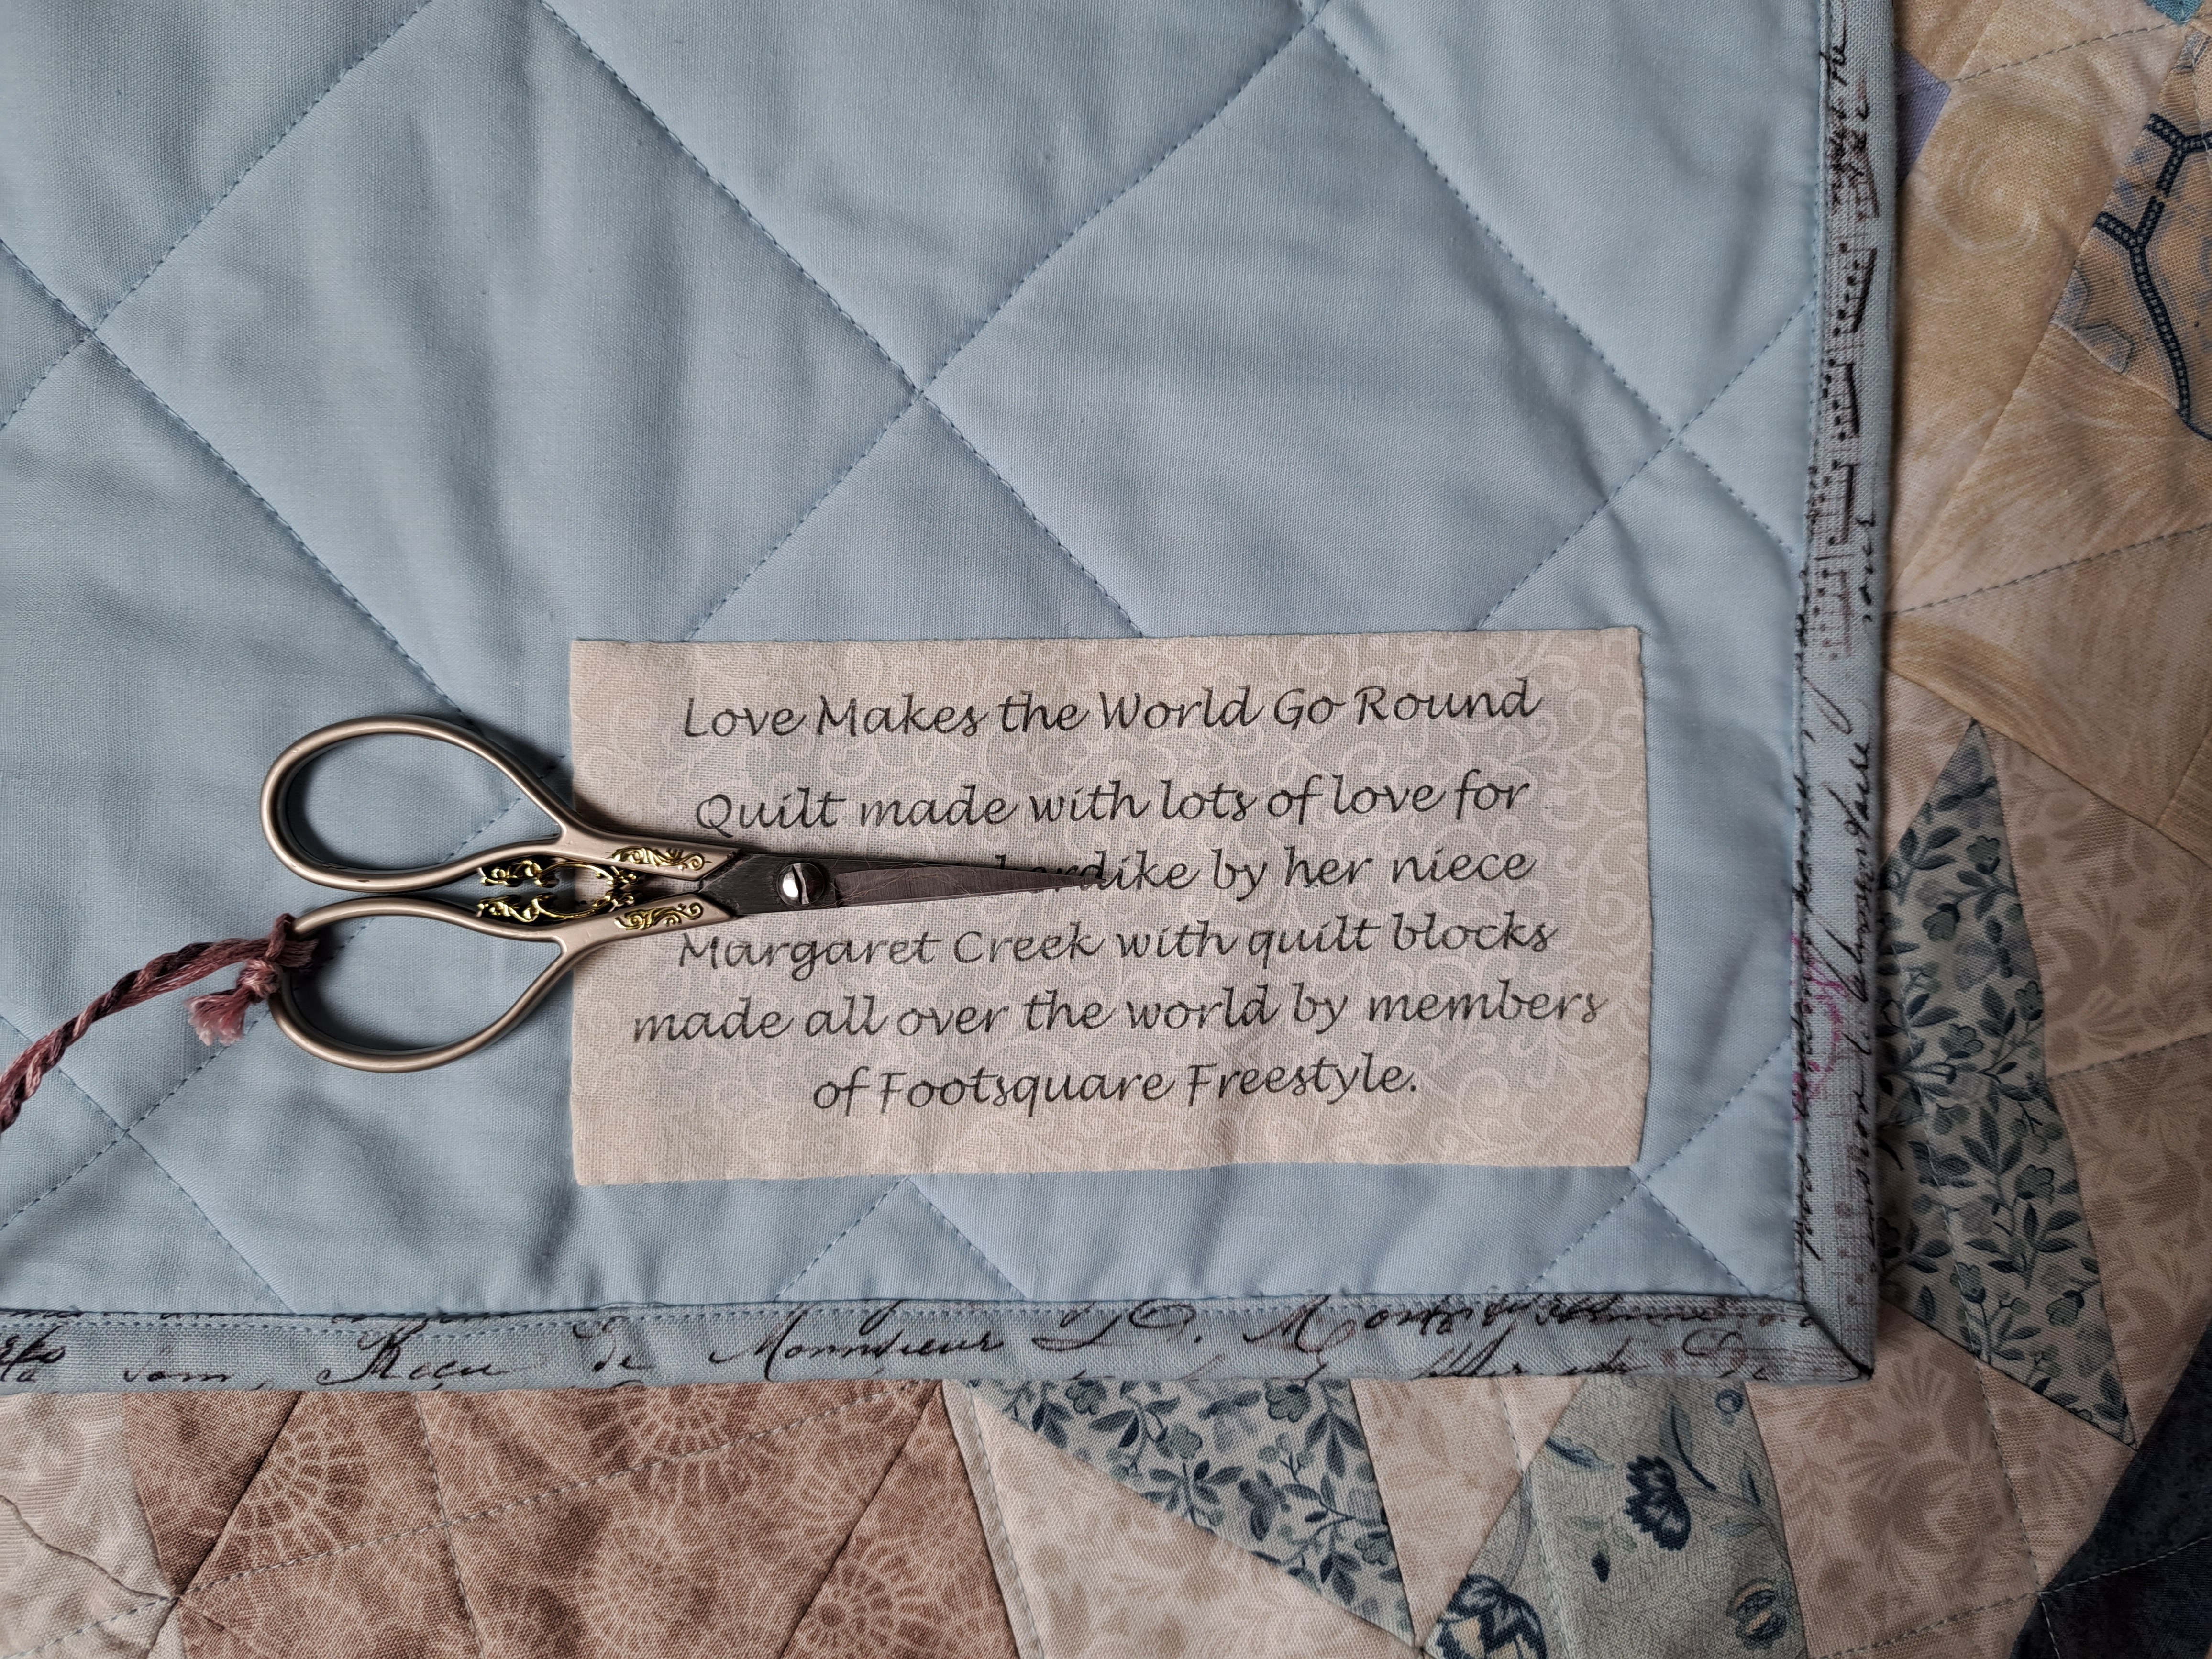
All that was left was a label. I usually embroider a label straight onto the back of a quilt, but I knew with this one that would take too long. I decided to pluck up courage to print one using freezer paper to stiffen the fabric so it would go through (my husbands!!) inkjet printer. It worked fine, though my OH tried to put it through a second time (other way up) to see if it would print a little straighter but it then got lost somewhere in the depths of the printer. Luckily it was still OK. I stitched it on the back and the quilt is complete.
I’ll pop it in the post on Wednesday, hoping it fits in nicely in her room.