Travelling Sketchbook


This month at my Embroiderers Guild meeting Travelling Sketchbooks were launched. I only became aware of the concept of a Travelling Sketchbook a few months ago when I (rather rashly!!) volunteered to take part in  one organised by artist Anne Lawson. The idea is that the sketchbook is passed around and each person puts an entry in. Anne’s is an international one starting in Australia and New Zealand, travelling to America before reaching Europe, I think it’s in Greece at the moment, I think there’s another three or four people before I get it, quite scary as they all look such talented people!

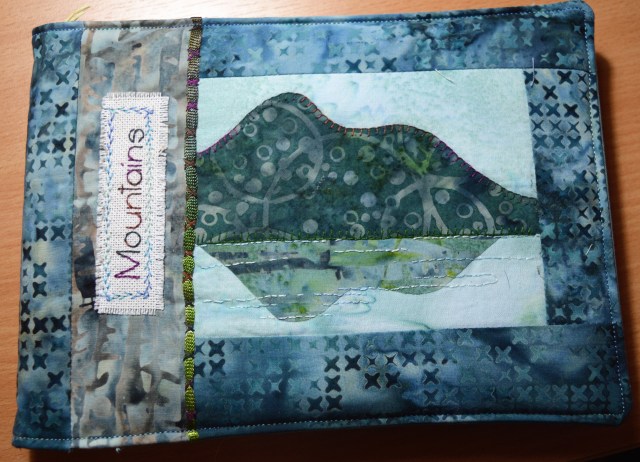
Our Guild one is only slightly less intimidating! We are in groups of six and we could all choose our own theme, mine is mountains, so everyone will embroider something about mountains when it’s their turn to have my book. We have each book for one month before it’s time to pass it on.

We’ve all started with the same A5 sketchbook from Pink Pig, our homework this month was to make a cover for it, however we wanted, do a title page and a bit of an introduction about why we chose our theme, our inspiration. I think the idea then is to put the first piece of work in.

dsc_0106

I decided to make an applique of Catbells, my favourite fell. I played about with some batik quilting fabrics and eventually chose three, a background which could be sky or water, a darker tonal fabric for Catbells and a lighter one for the reflection. I used bondaweb and blanket-stitched round the mountain.

With the reflection I didn’t want to make such a definite edge as blanket-stitch so I used rows of intermittent back-stitch to look like ripples on the water. Hopefully it will be treated gently and this will suffice! I’m really pleased how Catbells has come out.

I used a gorgeous teal batik for my main fabric, it’s got lots of crosses on it which I thought was apt for an embroidery sketchbook! When I was playing about with the fabrics I rather liked the silvery grey strip on the left of Catbells. Once I had stitched it all together I wasn’t so sure… I added a length of silk ribbon and stitched it on with cross-stitches in variegated thread, it did improve the balance of the fabrics.

dsc_0107

It still needed something extra so I embroidered the title on some evenweave linen, trimmed and frayed it and spray basted it on with 505.I decided to stitch it on with an embroidery stitch on my machine, it’s a bit like feather stitch. I used a blue and green quilting thread which would have looked better if I’d managed to space it properly…it’s the rustic look!!!

dsc_0109

I lined the bookcover with a plain, soft green cotton, it went together really well, top-stitched round the edge, I’ve just got to put something inside now, I found some photographs to include as inspirations…just the words and the stitches to add now!

dsc_0108


Posted in Crafts, embroidery, Serendipity, The Travelling Sketchbook | Tagged , , , | 6 Comments

A Rolling Landscape.

At Embroiderers Guild this month we had a workshop on Textile Rolling Landscapes. I must admit when I put my name down for it I had absolutely no idea what to expect, I just thought anything to do with landscapes could be useful for a piece of embroidery I’ve to do soon.

A textile rolling landscape is a long thin piece of embroidery, usually with a landscape on, which is attached to and wraps around an old fashioned wooden bobbin. A bit like having a story wrapped around a bobbin, or a fold out book…it’s something different to do instead of just producing pictures!

We were given a length of calico about 50cm x 8cm. I’ve not embroidered on calico before but I’ll certainly get some again as it was lovely to work with. We then had to think of a landscape. I immediately thought of my favourite part of the Lakes, namely Catbells. I drew from memory the outline of the fells (so if there are any aficionados of Derwentwater, please note this was all from memory!!!) and back-stitched along in a variegated DMC thread.

I remember an embroidery I’d seen on line and stitched french knots for the rocky summit. I was then a bit stuck for ideas…someone had some ink pads and some patterned pads, I used them to print leaves around the base and lines up the hillside. This is a section of where I was when I left in the afternoon…

Rolling Landscapes

I dug out my box of ‘textile embroidery’ stuff, I bought it at Knitting and Stitching show last year for an embroidery I want to do of Catbells, there’s dyed organza, ribbon, chenille thread, bark (!!!). I looked at it and thought, it’s all very tactile and beautiful, but I haven’t got a clue what to do with it!!!

Textiles

I decided 50cm was too long a piece to do anything complex. I decided to experiment with my silk paints. I’ve done a fair bit of silk painting but it’s always been on a frame with silk ponge, I know what I’m doing with that, an outline with gutta and let the paint fill the the spaces. This would have to be a bit different. I experimented with two lengths of fabric, one is the calico strip, the other is a piece of silk noil which I use for ribbon embroidery.

Rolling Landscapes

I painted them very differently, to see how different techniques would work. I painted the calico first and to my surprise it didn’t spread at all, it behaved like ‘normal’ paint, I added lots of water to help it blend, but I was pleased to see it didn’t bleed past my back-stitch outline at all. I’m really pleased how this has come out.

The silk noil I decided to soak first, so the whole piece was wet, I then painted the shape of catbells in various hues and left it to dry, the result is a very useable piece of hand-dyed silk, but it bears no resemblance to Catbells! If I want to use wet on wet, I need to use some gutta! I think it will still work for my next piece though.

Silk Paint

The printed shapes I put on at Embroiderers Guild seem to have either dissolved or been swamped by the paint, I was hoping  they would be visible through the silk paint. The silk paint I use is fixed with the iron, very simple!

I was still a bit stumped on how to embellish it, all my threads seemed really dark on it. I  decided to embroider the names of the places portrayed along the bottom. I used a variegated thread again and just stitched it free hand in backstitch. High Spy, Maiden Moor and Catbells are one end of the Newlands Horseshoe, a magnificent ridge walk. Hawse End is the landing stage for Catbells for the Derwentwater launch and Causey Pike and Grisedale Pike are the next fells along.

Rolling Landscapes

My favourite walk of all time is Catbells, so I embroidered the path we take in a fine silver thread. I just need to find a bobbin the right size now, I’m just in discussions with a wood turner which will hopefully work out perfectly. I rather like the idea of embroidering my favourite fells and walks in this way. I showed a friend the embroidery today and explained the bobbin plan and she said why not frame it, it’s a waste to have it hidden away on a bobbin. I like the idea of a rolling landscape on a bobbin…and I’m also running out of wall space (I’ve just counted up and I’ve got 37 pictures of mine on the walls at home!!!)

I’ll show you my Rolling Landscape again when I finish it with the bobbin.

Rolling Landscapes

Posted in embroidery, Serendipity | Tagged , , | 4 Comments

A Cosy Coatigan

Over the weekend I managed to get lots of sewing done, mainly because I was Billy no mates with the house to myself for the whole weekend and it was certainly too cold and miserable to venture into the garden! I had a lovely time in my sewing room 🙂

schnittmuster-coatigan-silvia-680x700I decided to make a coatigan. It’s a pattern by Schnittchen, called Coatigan Sylvia, it’s like a cardigan styled coat, warm and cosy and easy to wear. I had the perfect fabric for it, a gorgeous tweed which I won from Minerva Fabrics at the Sew Up North meet up. It looks like a Linton Tweed type of fabric, it’s that sort of loose woven with lots of colours. The background in chocolatey brown with amber highlights, which wouldn’t usually be my colour choice, but interwoven is lots of blues, greens, teals…it’s gorgeous!

As it’s such a loose weave I decided to apply a light-weight fusible woven interfacing to all the pieces before I started sewing. I was glad I did as I’m sure otherwise I would have had problems. It was a very light weight so it didn’t add any structure, just stopped it from stretching in the wrong places. I did a flying visit into Leeds on Saturday morning (I was back in Otley by 10.30!) and chose some lining fabric at Fletchers in Leeds market, they have a good selection of patterned linings which I was very tempted by, until I saw some teal polyester mock silk! I put it next to the fabric and it just popped! (I know, I’m sounding like a quilter!!) I just love the colour peeping out from inside 🙂

Coatigan

The design has integral pockets in the cross-seam of the jacket front. I decided to do the bottom half of the front with the fabric direction the other way. It doesn’t stand out quite as much as I hoped but I like the effect.

The jacket went together really easily. I’ve not used Schnittchen patterns before, they are printed on lovely heavy paper and I did appreciate the fact that separate pattern pieces were given for all the lining pieces, rather than using the same piece with ‘cut here for lining’. It was a bit like using a Vogue pattern in that way!! Seam allowances are 1cm, it seems pretty usually with indie patterns but I must admit I do prefer a 1.5cm seam, apart from the fact that with the big 4 all using 1.5cm it’s what I naturally stitch, but also with a friable fabric such as this it doesn’t give much leeway for fraying.

The instructions are adequate but minimalist, there are no diagrams or pictures although they do mention on line tutorials for all their patterns. I think to make it up from just the instructions you do need to basically know what you are doing. The only thing I  deviated from the instructions on was stitching in the lining and the hemming. The sleeves and the main coat were hemmed as you went a long, so sleeves were actually hemmed before they were stitched into the coat. I prefer to hem everything at the end just to make sure it’s the length I want. I let it hang overnight and stitched it up by hand with a herringbone stitch.

The lining should have been attached by ‘bagging it’, so the coat is stitched to the lining all the way round and then turned through a gap left in a sleeve, I’ve never tried this method, you do have to be confident that your lining is exactly the right length for the coat, otherwise it won’t hang right. I chickened out, I stitched the lining in on the machine apart from the hems, I could then check it hung ok and hand stitch along. For those who like to see the inside, here it is…

Coatigan

Size wise, I decided to go mainly on my hip size as that’s usually the bigger size, (classic English Pear shape!!) I cut out a size 42 and it’s a good fit, it is a loose fitting coat but it feels right. I love my new coat, it’s very cosy to wear, the pattern calls for one big feature button on the front, I did buy one on Saturday but it doesn’t look right so I think a trip to Duttons for Buttons is in order. I’m tempted to get three smaller buttons instead.

dsc_0111

My sewing this weekend covers two challenges in one make; it was one of the patterns I chose for #2017 make nine, a challenge by Rochelle New to make nine items . I’ve also recently discovered the Dressmakers Bloggers Network on facebook and their challenge this month was ‘Keep it Cosy’, this is definitely cosy!

Coatigan

Posted in Dressmaking, Serendipity, Sewing | Tagged , , | 12 Comments

Gran’s Button Jar

91-splendid-sampler-lynette-block-multiGran’s Button Jar is block 91 of My Splendid Sampler quilt, it’s designed by Lynette Anderson. I really like her work, it was Lynette that designed the other BOM I stitched last year, Anderson’s Farm, so I was looking forward to seeing her design. I wasn’t disappointed!

Isn’t it cute! Her instructions called for needleturn applique, I must admit I looked at the size of the button jar lid and chickened out, I embroidered it all instead. I chose a variegated DMC thread in shades of light blue, purple and ivory on a creamy background, I thought the swirly ivory pattern would echo the loops in the thread…or am I getting too arty-farty!! I’m not sure if it’s the wrong choice of thread or the wrong background, either way I don’t think it stands out enough. Having said that, it’s very pretty, it’s done and it’s not getting done again! To give you an idea of size, this centre square of embroidery is 4″ square, it is then surrounded by 1/2″ strips to make the 6″ finished block.

The Splendid Sampler

I’m adding buttons to the design, at the moment they are just laid on, I’ll stitch them on once I’ve quilted the block. The cotton reel buttons are a fraction too big for the bird, so he is sitting on my reel rather than standing on it! I’m not sure where the tiny buttons came from but they are seriously minuscule, I found them in the bottom of my button box, they are just over 1/4″ across!

As you can see I’ve already sashed my block, just nine left to make, three are already published so I’m hoping to catch up this week.

I’m linking up with Kathy’s Quilts for Slow Stitching Sunday, a celebration of all things hand-stitched, why not have a look what everyone else has been creating.

My Splendid Sampler


Posted in embroidery, Quilting, Serendipity, Splendid Sampler Quilt | Tagged , | 11 Comments

The Great Getaway Bag

2017_01_badge1Last night over on Sugar Lane Designs it was Friday Night Sew In, a virtual sewing party. As I’m Billy-n0-mates this weekend I can sew to my hearts content and I finished my first make of 2017, it also nicely links in with The Monthly Stitch challenge this month; to make something from fabric you’ve only just got, rather than putting it in your stash!


dsc_0343In my Stitching Santa parcel this year I received a length of Ikea home fabric, it’s a lovely heavy weight print and I immediately thought of a bag pattern in Lisa Lam’s Bag-Making Bible. It’s a roomy holdall, with a large pocket at the front. I decided to really go with the colours and I ordered a pink chunky zip and a set of blue leather handles. I was planning to use the green bias binding for piping round the edge but in the end caution got the better of me, I felt adding piping would be two extra layers of fabric too far!

The Great Getaway Bag

Good bag patterns always seem to take forever to cut out, there are so many pieces, linings, interlinings, interfacings…I counted up at the end and there are over 50 pieces to make this bag!!!!! All the outer fabric pieces were interfaced with a heavy weight vilene. I used a cute rabbit print to line it, it’s from my stash as it was left over from backing a quilt, it’s slightly heavier than quilting cotton. The lining pieces were all interlined with batting, the instructions called for iron-on fleece but here in the UK it’s pretty expensive so I’ve started using batting and spray adhesive! The little white  rabbits on the pocket flap turn the right way up once it’s open, I’d like to say it was planned but it was actually a fortuitous mistake 🙂

The Great Getaway Bag

The bag went together fairly easily, though there were a couple of hiccups! I was undecided at the beginning whether to have a long strap as well as the leather ones, my experience of  carrying a heavy bag like that is that it leads to a very stiff neck! When I realised I had bought the necessary rectangular rings for the strap I decided to make one anyway. First step was to make the handle loops and attach them to  the zip sides. Everything looked great until I stitched the  whole bag together, both loops are at the same end!!

The Great Getaway Bag

If I make the bag again I would also stitch little bits on straight away. One of the first things made is the zip pulls, they are less than 1″ square once finished, they could have been stitched straight onto the zip bottom panels but this wasn’t done until much later in the proceedings, by which time one had disappeared completely!!

Making this bag taught me some new techniques and methods of making bags. The base has a bag liner, a stiff sheet of plastic which is slotted into a double layer of fabric at the base. The lining was also stitched to the outershell at the main seams inside, so the base and the top and sides are all attached at the seams, this helps  the bag lining to hold it’s shape.

The Great Getaway Bag

I used a walking foot throughout, but even so my trusty sewing machine struggled sometimes with the sheer thickness and number of layers, at times I could barely get the wadge under the foot!

It’s a great bag, roomy, but not too big. I love the blue handles and the pink chunky zip! I think it will be ideal for taking my stuff to Embroiderers Guild…and perfect for stash building trips such as  next months Yorkshire Spoolettes meet up in Dewsbury 🙂

The Great Getaway Bag

Posted in Crafts, My Monthly Challenge, Serendipity, Sewing | 15 Comments

2017 Challenges

I’ve been hesitating this year about posting any New Year resolutions and challenges, let’s face it, my main aim last year was to reduce my stash…well I failed miserably at that one 🙂

However over the last couple of weeks I’ve seen a few challenges which look workable. There’s no point taking on a challenge which will add pressure, take the enjoyment out of creating and set you up to fail. I want a challenge to push me out of my comfort zone, encourage me to make things I might otherwise not get round to…but I do want to like the end product!

So, what do I hope to create over the next twelve months;

Down the Rabbit Hole BOMDown the Rabbit Hole quilt; I’ve posted about this a couple of weeks ago, we’re due to start 31st January so I’ve been getting my fabrics together. It’s a beautiful medallion quilt (I’ve wanted to do a medallion quilt for a while) and it’s got quite a lot of applique, so I’m hoping to master needle-turn applique this year. The Splendid Sampler finishes in February so after that this will be my only BOM.

30999306984_32c4333a8f_o-e1482860601467#2017 Make Nine; This was started last year by Rochelle New, the idea is to choose nine new projects you want to make over the year. Nine seems a doable number, not too overwhelming! My nine projects are;

  1. Coatigan Silvia by Schnittmuster. I’ve already got the fabric lined up to make this next, a lovely loose tweed I won from Minerva at the Leeds meet-up.
  2. McCalls 6696. I fancy the sleeveless, straight skirted shirtwaister for the summer, or maybe longsleeved full skirt in boiled wool for the winter…
  3. Sew Over It Ultimate Trousers. I’m determined to master trousers this year and I think I’ll start with these.
  4. Morgan Jeans by Closet Case Patterns…and jeans are next on my list. I’ve got the denim, I’ve got the hardware, just need to buckle down and make them!
  5. Ginger Jeans By Closet Case  Patterns…I’ve had this pattern for even longer!
  6. Aster blouse by Colette patterns. I love the simple V neck of this shirt. I’ve some perfect fine cotton I treated myself to last year at Guthrie and Ghani.
  7. Threadcount 1502. A pattern I picked up at a swop, originally a freebie from Love Sewing magasine. It’s a cross-over top, I’ve a couple of jersey fabrics to try it in.
  8. Dakota Duster by Serendipity Studio. I made this last year in needlecord, I fancy a wool one now.
  9. Great Blue Heron Quilt by Toni Whitney. I bought the kit for this stunning wall hanging last year, I just need to pluck up the courage to make it!

Monthly Stitch Challenge; this was on my list last year too but it fell by the wayside. This year I’m determined! I’m already half way through January’s challenge, to make something from fabric received for Christmas.

Dressmaking Bloggers Network; This is a facebook group, every month they have a challenge, this month’s is ‘Keep it Cosy’ so I’m planning to get the coatigan made, so it will cover two challenges!

15825954_10155558004285329_5840079639228496270_n

…so I’ve a few things planned to keep me out of mischief 🙂


Posted in Down The Rabbit Hole, My Monthly Challenge, Serendipity, Sewing | Tagged , | 7 Comments

Making a Buttonhole

I’m writing this tutorial mainly for Helen, having left home to go to uni she has now decided she wants to learn to sew, she’s borrowed my spare sewing machine to make some pyjamas but I didn’t have a spare automatic buttonhole foot. She sent me a photo on facebook of her first handmade buttonhole…and her last, she said!! I was pretty impressed with it but pointed out that you could do buttonholes on the machine without a special foot, just like we used to do!! As she won’t be home again for a few weeks I decided the easiest way to explain was to write a tutorial on here. It’s my first so any suggestions gratefully received!

  1. Mark your buttonholes; this can either be with a disappearing pen or with tacking threads. The bars across the top and bottom are important markers, so don’t be tempted to just do a straight line. The buttonhole needs to be a millimetre or two bigger than the button. Also consider the depth of a button, a fat, chunky button will need a longer buttonhole than a slim, delicate button.Making buttonholes
  2. On a scrap of fabric test out your zigzag stitch settings, this is a plain zigzag stitch.
    1. The stitch length dictates how close the zigzags are, mine is set at 0.3. It will vary with fabrics but you need a nice close stitch. This setting doesn’t change during the button hole.
    2. The stitch width dictates how wide the buttonholes stitches are. Two widths are needed, a narrow one for the long edges and a wide one (double the width) for the ends. I set mine at 2mm and 4mm.
  3. Leg 1; Narrow zigzag setting. Starting at the far end, check needle enters fabric for left zigzag stitch right next to the central marking, like 1 thread away.Following central marking stitch zigzag to end of buttonhole. Finish with needle down in centre of buttonhole.Making buttonholes
  4. Bar 1; Without lifting needle, lift foot and turn fabric 180′. Lower foot and raise needle. Change stitch width to wider setting. Check where the stitch centres, you may need to move the fabric a fraction to ensure the wide stitch covers both sides of the buttonhole. Stitch approximately 6 stitches.Making buttonholes
  5. Leg 2; Change width setting back to narrow width. Check central needle position, it wants to be just a thread width or two away from the first leg. Stitch narrow zigzag alongside 1st leg to end. Finish with needle down in centre of buttonhole.Making buttonholes
  6. Bar 2; Without lifting needle, lift foot and turn fabric 180′. Lower foot and raise needle. Change stitch width to wider setting. Check where the stitch centres again, you may need to move the fabric a fraction to ensure the wide stitch covers both sides of the buttonhole. Stitch approximately 6 stitches. Making buttonholes
  7. Your button hole is complete!

Tips for cutting buttonholes; I’ve learnt the hard way with stitch rippers going straight through the end of my beautiful buttonhole! I always place a pin across the end of the buttonhole, then if it slips, it will stop before it’s a disaster! Nowadays I also tend to cut it in two movements, I stab in at one end, cut to the centre, then stab in at the opposite end, the end of the stitch ripper can be pointed out through the slit before slitting the last section.

Making buttonholes

Good luck!


Posted in Serendipity, Sewing, Tutorials | Tagged , , | 4 Comments

Little School Sampler

school-2016-09-27-jane-greenoff110121_650_90_3337-1Two weeks in and I’ve got my first finish of 2017! One of my Christmas presents from my in-laws this year was a beautiful embroidery kit from the Cross-Stitch Guild. I started it on Boxing Day when we were staying at their house and I’ve just finished it this week.

I love the colours of this sampler, they’re sort of rich but muted. I also like the way it’s not just cross-stitch, there are buttonhole bars and french knots in the main design and the border includes couching and double cross-stitch, as well as the outer border of a red running stitch woven with a soft gold embroidery thread. The last border made me smile as it did remind me of the binca mats I used to stitch as a child!

The Little School SamplerBy New Years Day I had stitched the top half of the sampler, it looked like this;

It was only when I started to stitch the border I realised the two leaves furthest to the left were going to have to come out as they were in the way of the couched gold thread!Little School Sampler


The design has an optional hardanger square in the middle, I chickened out and stitched my initials and the year instead. This was partly because I do like samplers to have the date on them somewhere but also because the instructions for the sampler were somewhat lacking so I didn’t fancy trying something I wasn’t confident with in the first place. I think a lot of people like cross-stitch because you are told exactly where to stitch, what colour, there’s even holes provided in the fabric! So long as you follow the pattern you will end up with a picture like the one on the front of the packet. The chart included all the cross-stitch and the border stitches, but not where to place the maroon buttonhole bars or the french knots in the trees, or indeed the colours for the french knots for either the trees or the little butterflies.

Having said that, I think it’s a gorgeous design and I wouldn’t hesitate buying another of their kits, I’ll just go in with my eyes open! It’s currently down at my picture framers being mounted and framed, ready to hang on a wall.

Little School Sampler

I’m linking up with Kathy’s Quilts as it’s Slow Stitching Sunday, a weekly celebration of all things hand-stitched. Why not have a look what everyone else has been creating this week.

Posted in embroidery, Serendipity | Tagged , | 14 Comments

Nearly there!

splendid_button_TMOver the last few weeks I’ve been beavering away on my Splendid Sampler quilt blocks. We had a couple of weeks off from the twice weekly schedule over Christmas which did give us a bit of breathing space, but also gave me chance to catch up a bit on the sashing and quilting.

I’ve just stitched blocks 89 and 90, so just ten to go! I’ve really enjoyed this quilt-a-long and I’ve learnt loads, but I must admit I’m ready to get it finished, it has been a challenge keeping up with all the blocks and at  times it does seem to have taken over! I’m itching to do a bit of dressmaking again and of course there are other quilts I want to do too!!!

Block 89 was designed by Ebony Love, it’s called ‘Colorado to the Midwest.’ It’s made with lots of triangles, as opposed to squares stitched together diagonally to make half square triangle blocks. I’ve decided I prefer the latter method, even with lots of starch the triangles move too much! Having said that, it’s a very pretty block.

My Splendid Sampler

Block 90 was one that made me hesitate for a while! It did look complicated! It’s designed by Lorena Uriarte and it’s called ‘Juggling’, I love the story behind the block, I so know where she is coming from, life is a bit calmer now my children have grown up, but I’ve certainly had my loopy days!!

‘My most splendid days are spent doing a little of everything I love. Often that means juggling my family, work and hobbies so everything gets done. Ideally this would look like a little calm gardening in the morning, some stitching with friends and cooking wholesome meals for my family in the evening. Sometimes there is frantic lunch box packing, ferrying instruments around town and scrambling to meet class times and deadlines, at the end of those days I can feel a bit loopy. That’s when I really enjoy some appliqué or handwork, it soothes my busy brain and I feel like I’ve reclaimed the day. It’s amazing that a little bit of fabric and thread can do that, how splendid!’

Once I sat down and read the instructions it actually wasn’t that hard, I think the hardest bit was choosing the fabrics, especially the crosses on the balls, not convinced I got the balance right but it’s turned out OK.

My Splendid Sampler


I’ve not only got pretty much up to date with the blocks, I’ve also managed to sash them all, even the ones I’ve just made! I’ve decided I really don’t like sashing! I’ve read alot on blogs about quilters who dislike binding so much that a quilt will remain unfinished for months or years just waiting to be bound. I love binding a quilt, I sit down on a comfy chair and hand stitch it down whilst my mind wanders onto other projects! Sashing on the other hand…excuse the pun, but it’s a bit of a bind!

As well as sashing ninety blocks, I’ve also quilted over thirty of them, ready to put together using the quilt as you go technique. Some of them are just quilted in the ditch but most of them I’ve tried to do a little extra stitching. The embroidered blocks and a few others have been quilted with free motion quilting, trying to pick a design that suits the block, such as leaves on a flowery block, or hearts on the Love and Kisses block. I’m surprised how quick they are to stitch, once I get the sandwiching done, I can finish quite a few in an evening.

This is my pile of quilted blocks, and my box of blocks waiting to be quilted!  I’ll quilt a few more before I trim them to the same size and then start stitching them together…the final few steps!

My Splendid Sampler


Posted in Quilting, Serendipity, Splendid Sampler Quilt | Tagged , | 5 Comments

Mother and Daughter Time

Having had one week at university Helen has decided she needs some crafts to keep her occupied, so while she was at home for Christmas she took herself off to Hobbycraft to make herself a ‘craftbox’. She came back with two cross-stitch kits, a decoupage elephant and a desire to learn crochet.

I suggested she borrowed my spare sewing machine and did some sewing and she has gradually come round to the idea, though we are going to have to get it serviced first so it will have to wait til her next visit home.

Initial CushionsI made her an initial cushion for Christmas like the one I made for James and Tillie and it gave her the idea that maybe she could make a cushion.

I introduced her to pinterest and craftsy and she is now discovering how fast time goes when you’re on Pinterest!

I still had fabric left from the cushions so she decided on an elephant cushion. We spent a lovely afternoon in the sewing room together. I have a pattern for an elephant quilt which I’ll be making for her shortly so she traced the pattern from that. I showed her how to use Bondaweb and a tracing wheel, and she quickly had the elephant stuck on waiting to be stitched.

She had a practice at stitching in a straight line and then a practice at using blanket stitch round a shape, she was brilliant at it! She carefully went round the elephant in a pretty much perfect line, it’s not exactly a simple shape either!

Elephant cushion

Of course she wanted pom-poms round the edge, Helen doesn’t believe in making things simple! She stitched it in place before pinning all around and then stitching with a zipper foot to get as near to the bobbles as possible.

Superman Cushion

Helen’s cushion came out beautifully and by the time I came back from work the next day she’d made a Superman one for her boyfriend’s birthday!

She’s now looking into sewing classes in Birmingham!

dsc_0106

Posted in Crafts, Home, Serendipity | Tagged , | 9 Comments