I’m making slow but steady progress with hand quilting my Owl and Hare Hollow quilt, but I’m enjoying the process and that’s what’s important!
Three weeks ago I had done sixteen blocks…
Well I’ve now almost quilted twenty-one blocks, I say almost as I found one that’s only got half a sashing circle and I’m half way round the sashing circle next to it.
As you can see, all the blocks have an outer sashing circle and a main circle which all match (ish!!) they then have a variety of sized circles inside the block, depending on the design. At the moment I’m quilting one of the embroidered blocks, I find these more tricky as I don’t necessarily want to quilt straight across the stitching. On this block I felt that an inner circle would work as it echoes the line of the hare and the branch. I did however try to avoid a stitch actually crossing the embroidery.
This Hand Quilt Along is an opportunity for hand quilters and piecers to share and motivate one another. We post every three weeks, to show our progress and encourage one another. If you have a hand quilting project and would like to join our group contact Kathy at the link below.
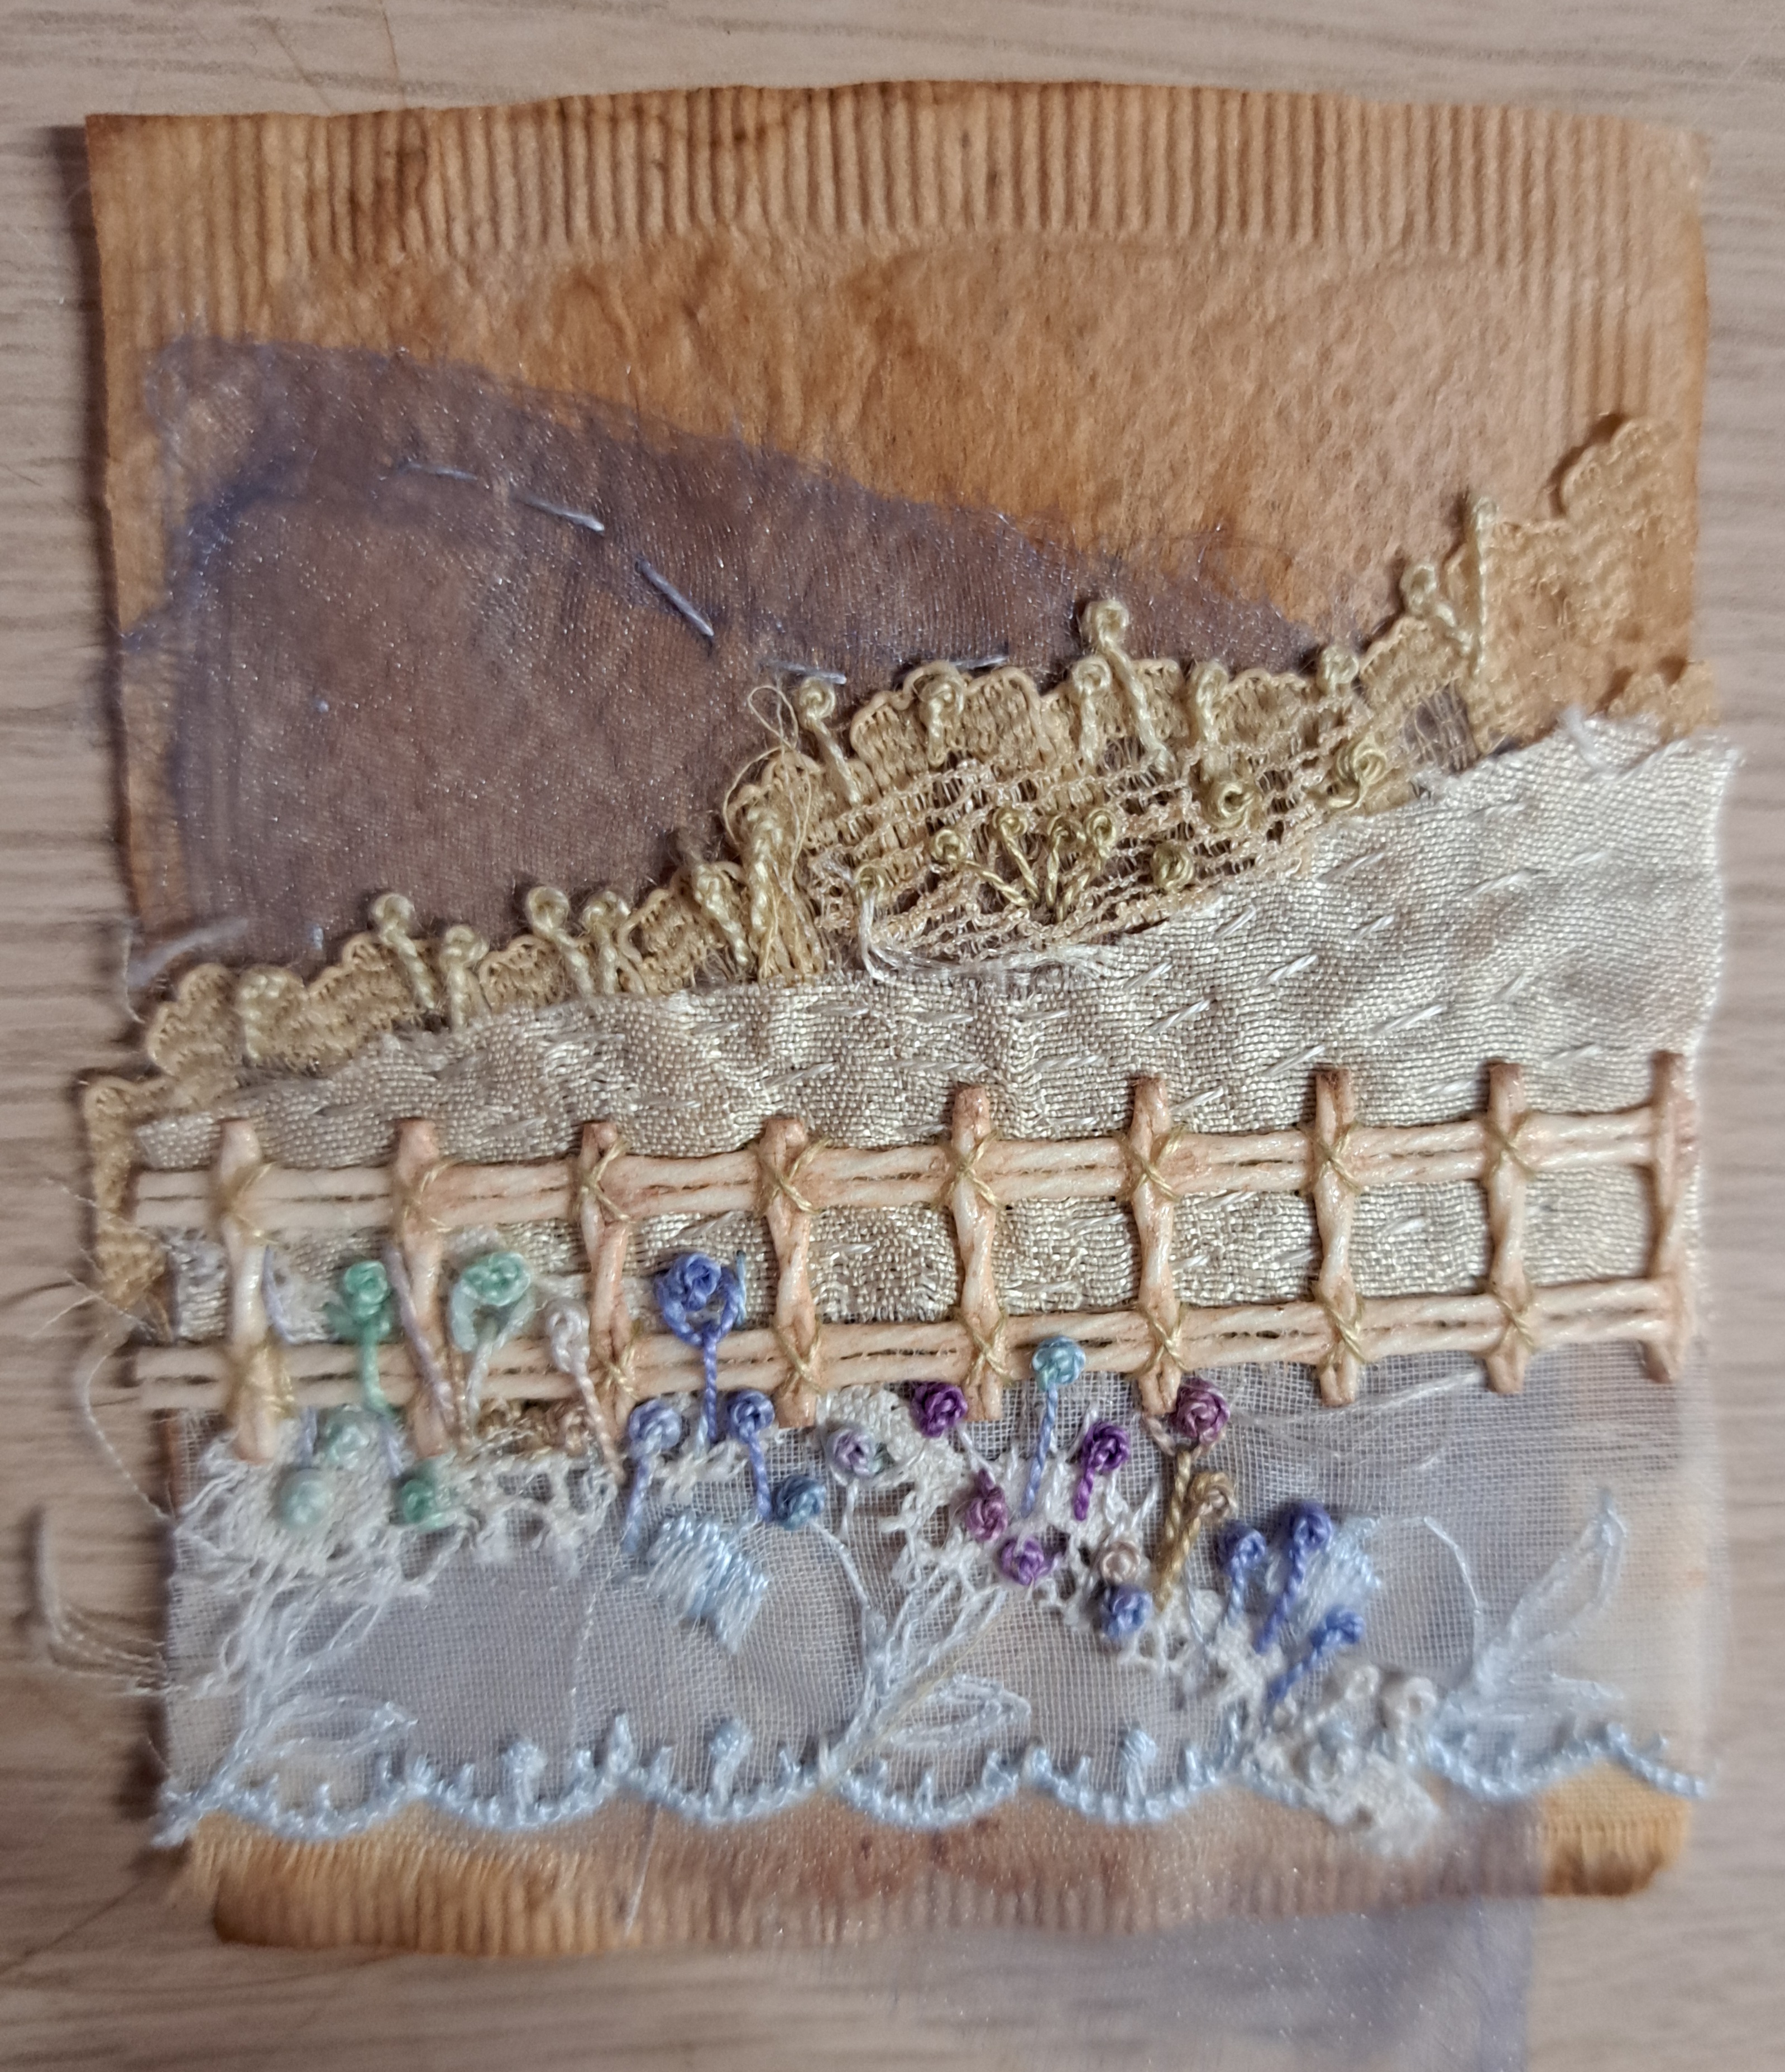
Last week it was my Skipton Stitchers meeting, one of our members ran a workshop on stitching teabags! Now I have a roll of teabag paper that I found at a scrap store, but this was actual used teabags, Yorkshire Tea of course!
She’d prepared them all for us by drying them out thoroughly, making a little slit in the back so she could empty all the tea out, pressed them and then added a square of vilene on the back to give a little support.
She showed us various examples she had made using little scraps of lace and fabric. She also introduced us to the idea of an Ort jar, I’ve heard of them before, I’ve no idea where the word comes from but it’s basically a jar for all those tiny scraps that would otherwise be thrown away. When you’re working on such a small piece, you only need a tiny scrap…I now have an Ort jar!
We layered up various textiles and then added a few simple stitches. Here’s my first attempt…
….not sure where that green thread sneaked on from! I’ve not trimmed the edge as I’m thinking of making a few more and putting them into a mini book, I might extend the scene past the teabag.
I decided to do a second one using some stiff canvas to make a fence.
I finished this one at home. I’m really pleased with them, there’s lots more to see on the Skipton Stitchers website if you fancy some inspiration. I now have a collection of teabags drying on my radiator in the sewing room…it’s probably a good job my OH hasn’t spotted them yet or he would think I’ve completely lost the plot 🙂
Apologies for not posting this yesterday, we had a bit of a family crisis last week when someone was blue-lighted into hospital, luckily it’s not as serious as thought at first but several days hospital visiting certainly keeps one busy!
Anyway, up to this last week, I’ve been a busy bee with my book. I decided it was time to start putting pages together, the three bee one was the deciding factor on size as that was the biggest piece, I’m aiming for a finished size of 7.5″. Several embroideries were big enough to just leave as is…
The other ones I had to start being creative. Some worked really well, others were harder and possibly a little ‘boring! This writing page will be opposite the three bees so I decided to keep it simple on some of my favourite bee fabric. I stitched it on with little cross-stitches.
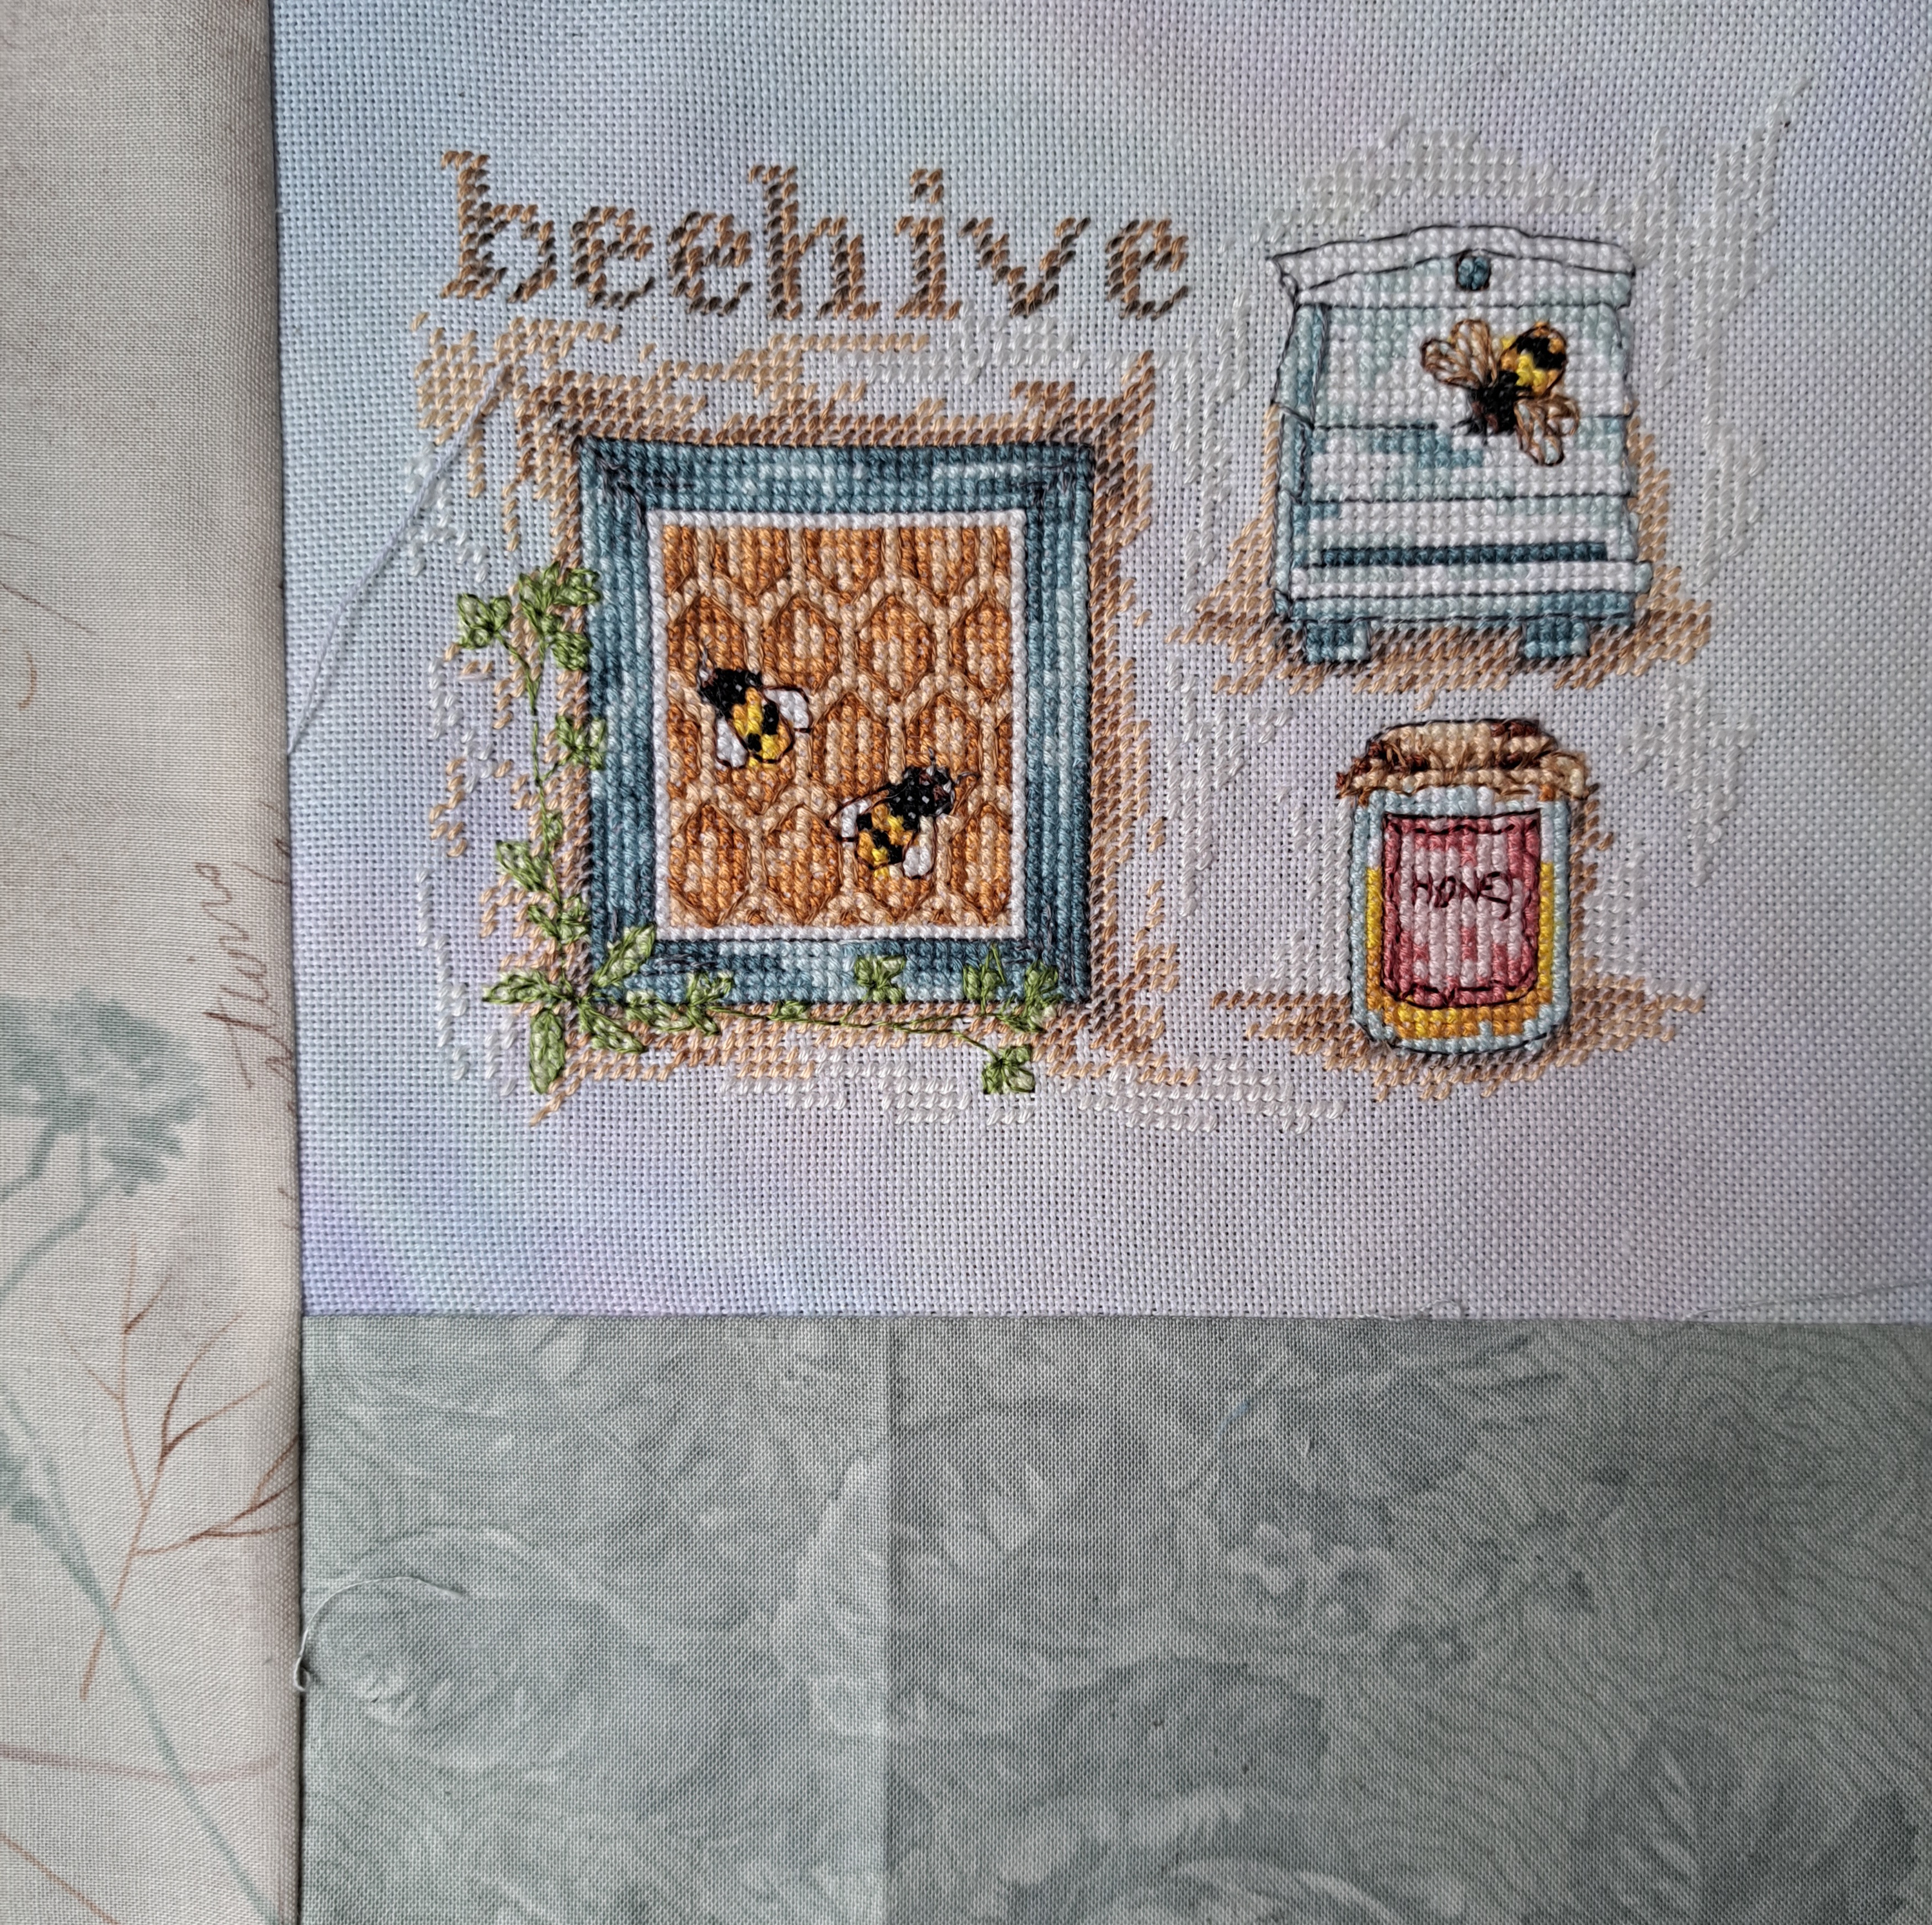
I found some of the simple rectangular cross-stitch designs harder to make interesting. They were rarely big enough to use two, but not quite enough on their own. I’m fairly happy with the beehive one on the left, having pieced it with two coordinating fabrics I added the stitched quote, a length of bee tape and a line of feather stitch down the side. I’m still undecided about the humble honey one as to whether it needs a little something else.
One of my favourite ones is the blackwork bee. I played about with it for a while until suddenly having a bit of inspiration when rummaging through my lace box. I had an old lace doily which I’d picked up for about 50p in a vintage shop in Otley. The bee fit in it perfectly. I very carefully cut the lace off the linen and laid it over the linen, stitched round and then trimmed the linen at the back. I laid the piece over the honey coloured fabric which nicely brings it all together.
The Dumbledore one is another that took a while to get an idea. I’d made the four patch block but just adding the two cross-stitch looked very boring. I played with a few ideas before settling on bee hexagons in a wiggle across the page….and who knew that little fact about Dumbledore!
This lace one was inspired by the success of the blackwork bee. I’m still not sure it’s finished though…the lace was another 50p doilie as it had rips in it. The gold bee at the bottom is from some machine embroidered tulle I’ve had for years. I made the circles by gathering the pieces over a card template and then ironing them. They’re not quite as neat as I would like, I’m wondering about embroidering a circle round each one to cover the edge.
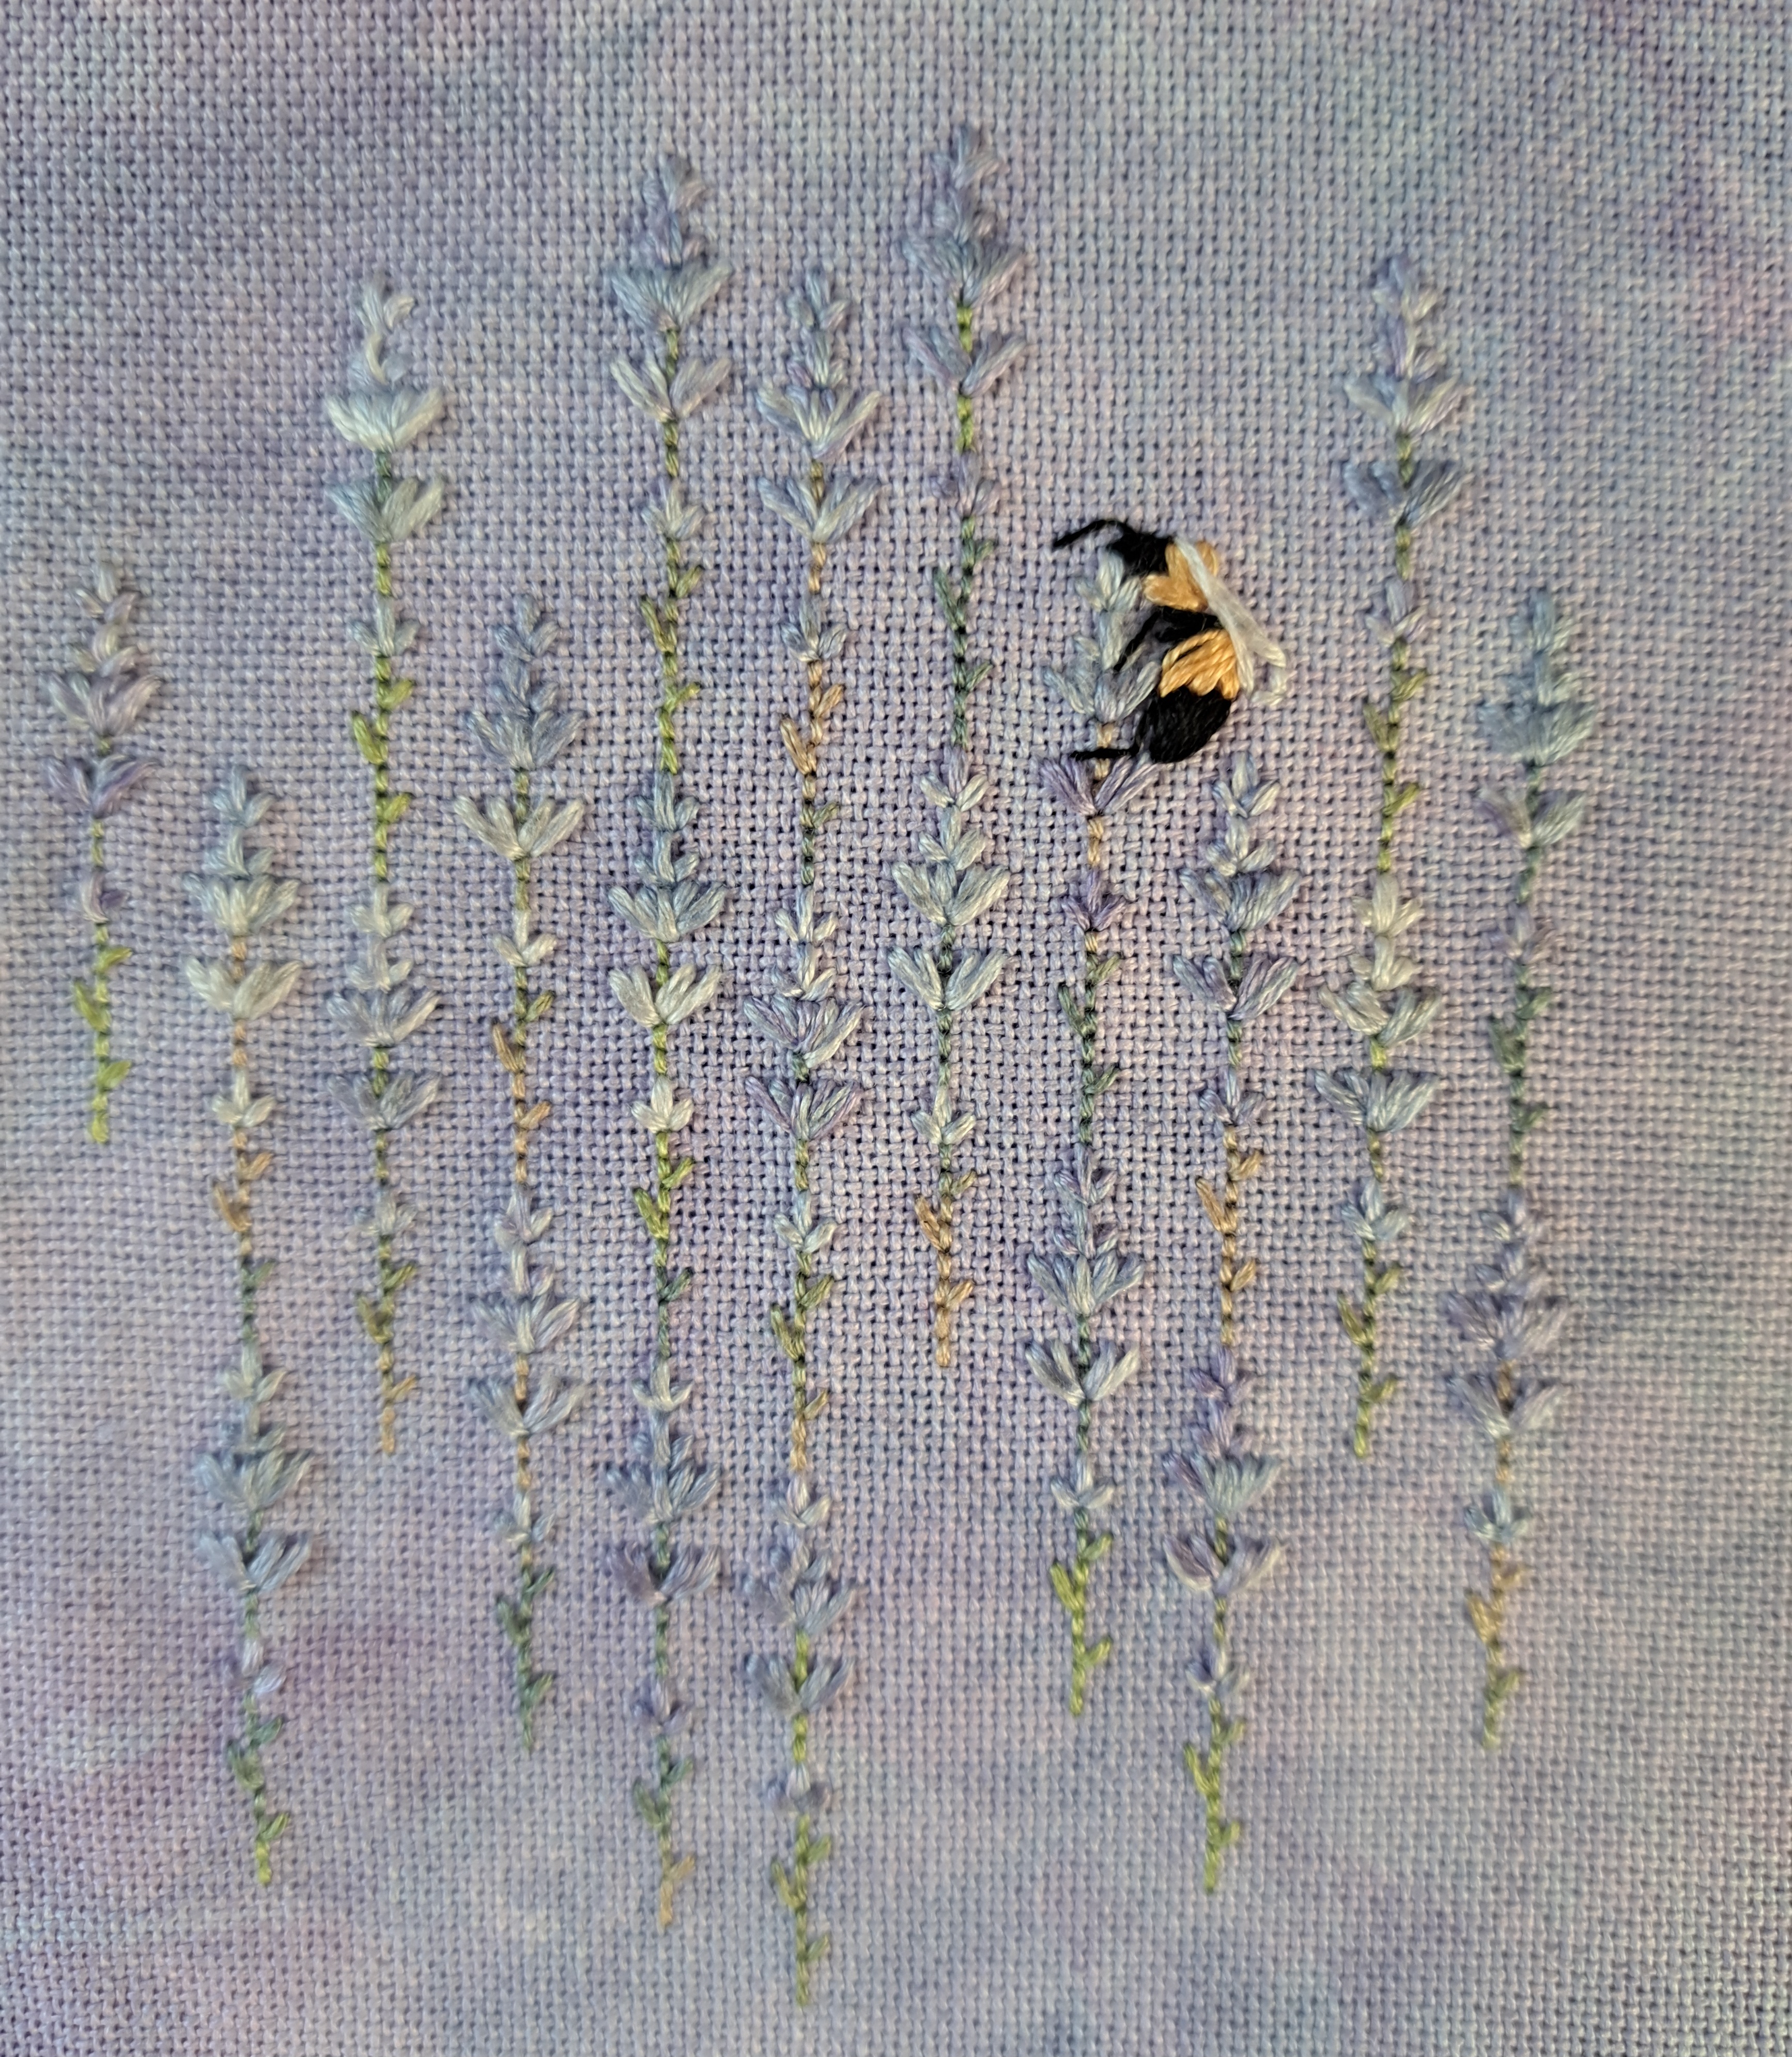
Another pair that were tricky were the two purple ones. The pot of lavender was a mini cushion with the ricrac and the mini pompom trim. I added the three surrounding fabrics and the lavender trim. It still needed a little more so I embroidered little bees on the flowers to the left. I might still add a little line of embroidery along the top.
The bee on the thistle took several tries to get an interesting look. At first I just had the cross-stitch stitched on the background with the words underneath. I then had the idea to off-set it with a length of lace. It still needed something in the bottom corner, so I cut out a coneflower from felt and appliqued it on. I bought the buttons at Yarndale last month, not realising what bulky shafts they had. I decided to try and cut it off, expecting it to shatter, but it was actually softish plastic, cutting off neatly, so I could glue them on, one big one and three little ones.
So good progress with the pages, I’ve started a goldwork bee, thinking that would be the last major one to stitch…then I went to the Knitting and Stitching show yesterday…and I fell for another four!! One of them I was planning to get, the others just sort of said ‘Buy me!!’
This SAL is organised by Avis from Stitching by the Sea, please follow the links to see what everyone else has been stitching.
I feel I’m making slow but steady progress on my Owl and Hare Hollow quilt, mainly because I’ve been busy with my bees, but also because if I hand quilt for too long it does seem to aggravate my neck, it doesn’t cause a lot of pain, just a niggle, but enough of a niggle to stop me sleeping…then I get grumpy!
Three weeks ago I had quilted fourteen squares and the sashing rings on nearly eleven…
Well I’ve now quilted sixteen blocks, including all the big sashing circles. That’s actually better progress than I thought! I’m almost a third of the way round too which is encouraging.
I’m rather enjoying quilting all these different sized circles, thinking up how I can incorporate one within the design. For example, on the embroidered block with a wheelbarrow of flowers, I’ve quilted round the wheel.
Hand Quilt Along Links
This Hand Quilt Along is an opportunity for hand quilters and piecers to share and motivate one another. We post every three weeks, to show our progress and encourage one another. If you have a hand quilting project and would like to join our group contact Kathy at the link below.
I’ve stitched two more bees over the last week, they were handbag projects and didn’t take long at all.
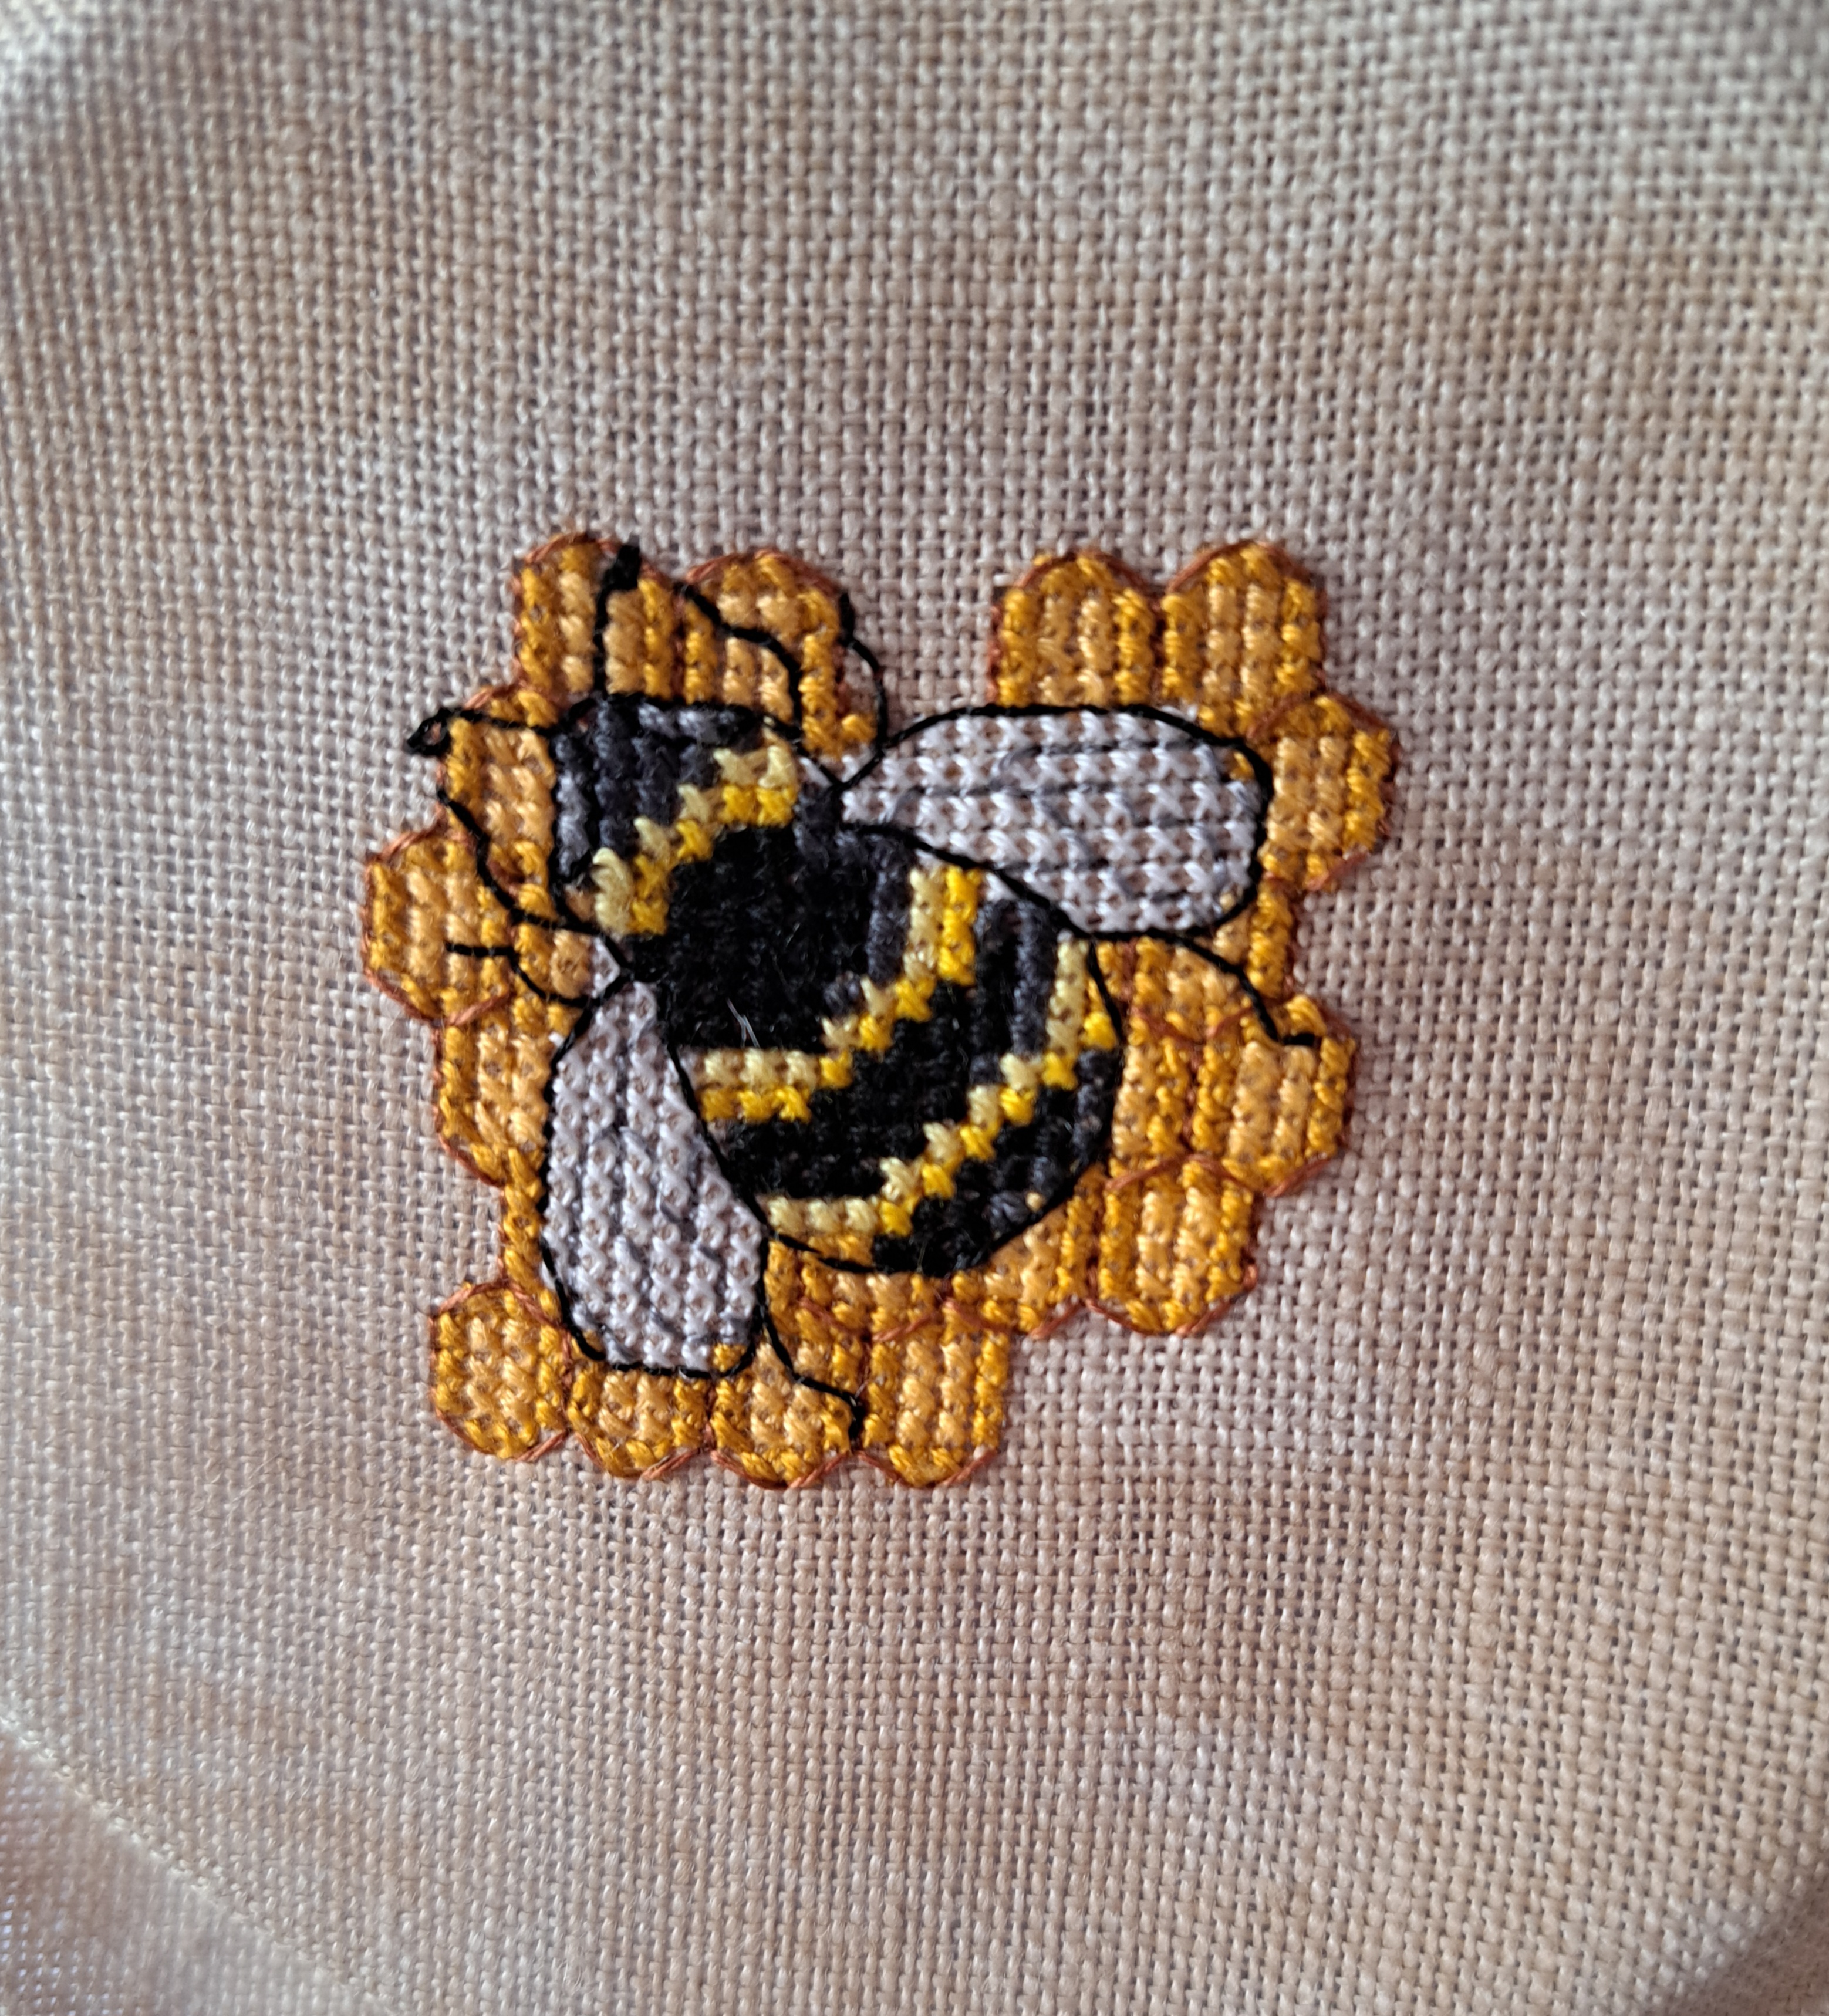
First to stitch was another cross-stitch one, I wasn’t planning to do anymore cross-stitch ones but a friend from Skipton Stitchers gave me this one…and it’s only little!
I changed the darker thread on the honey comb as the one provided was very orange. It’s a cute little bee!
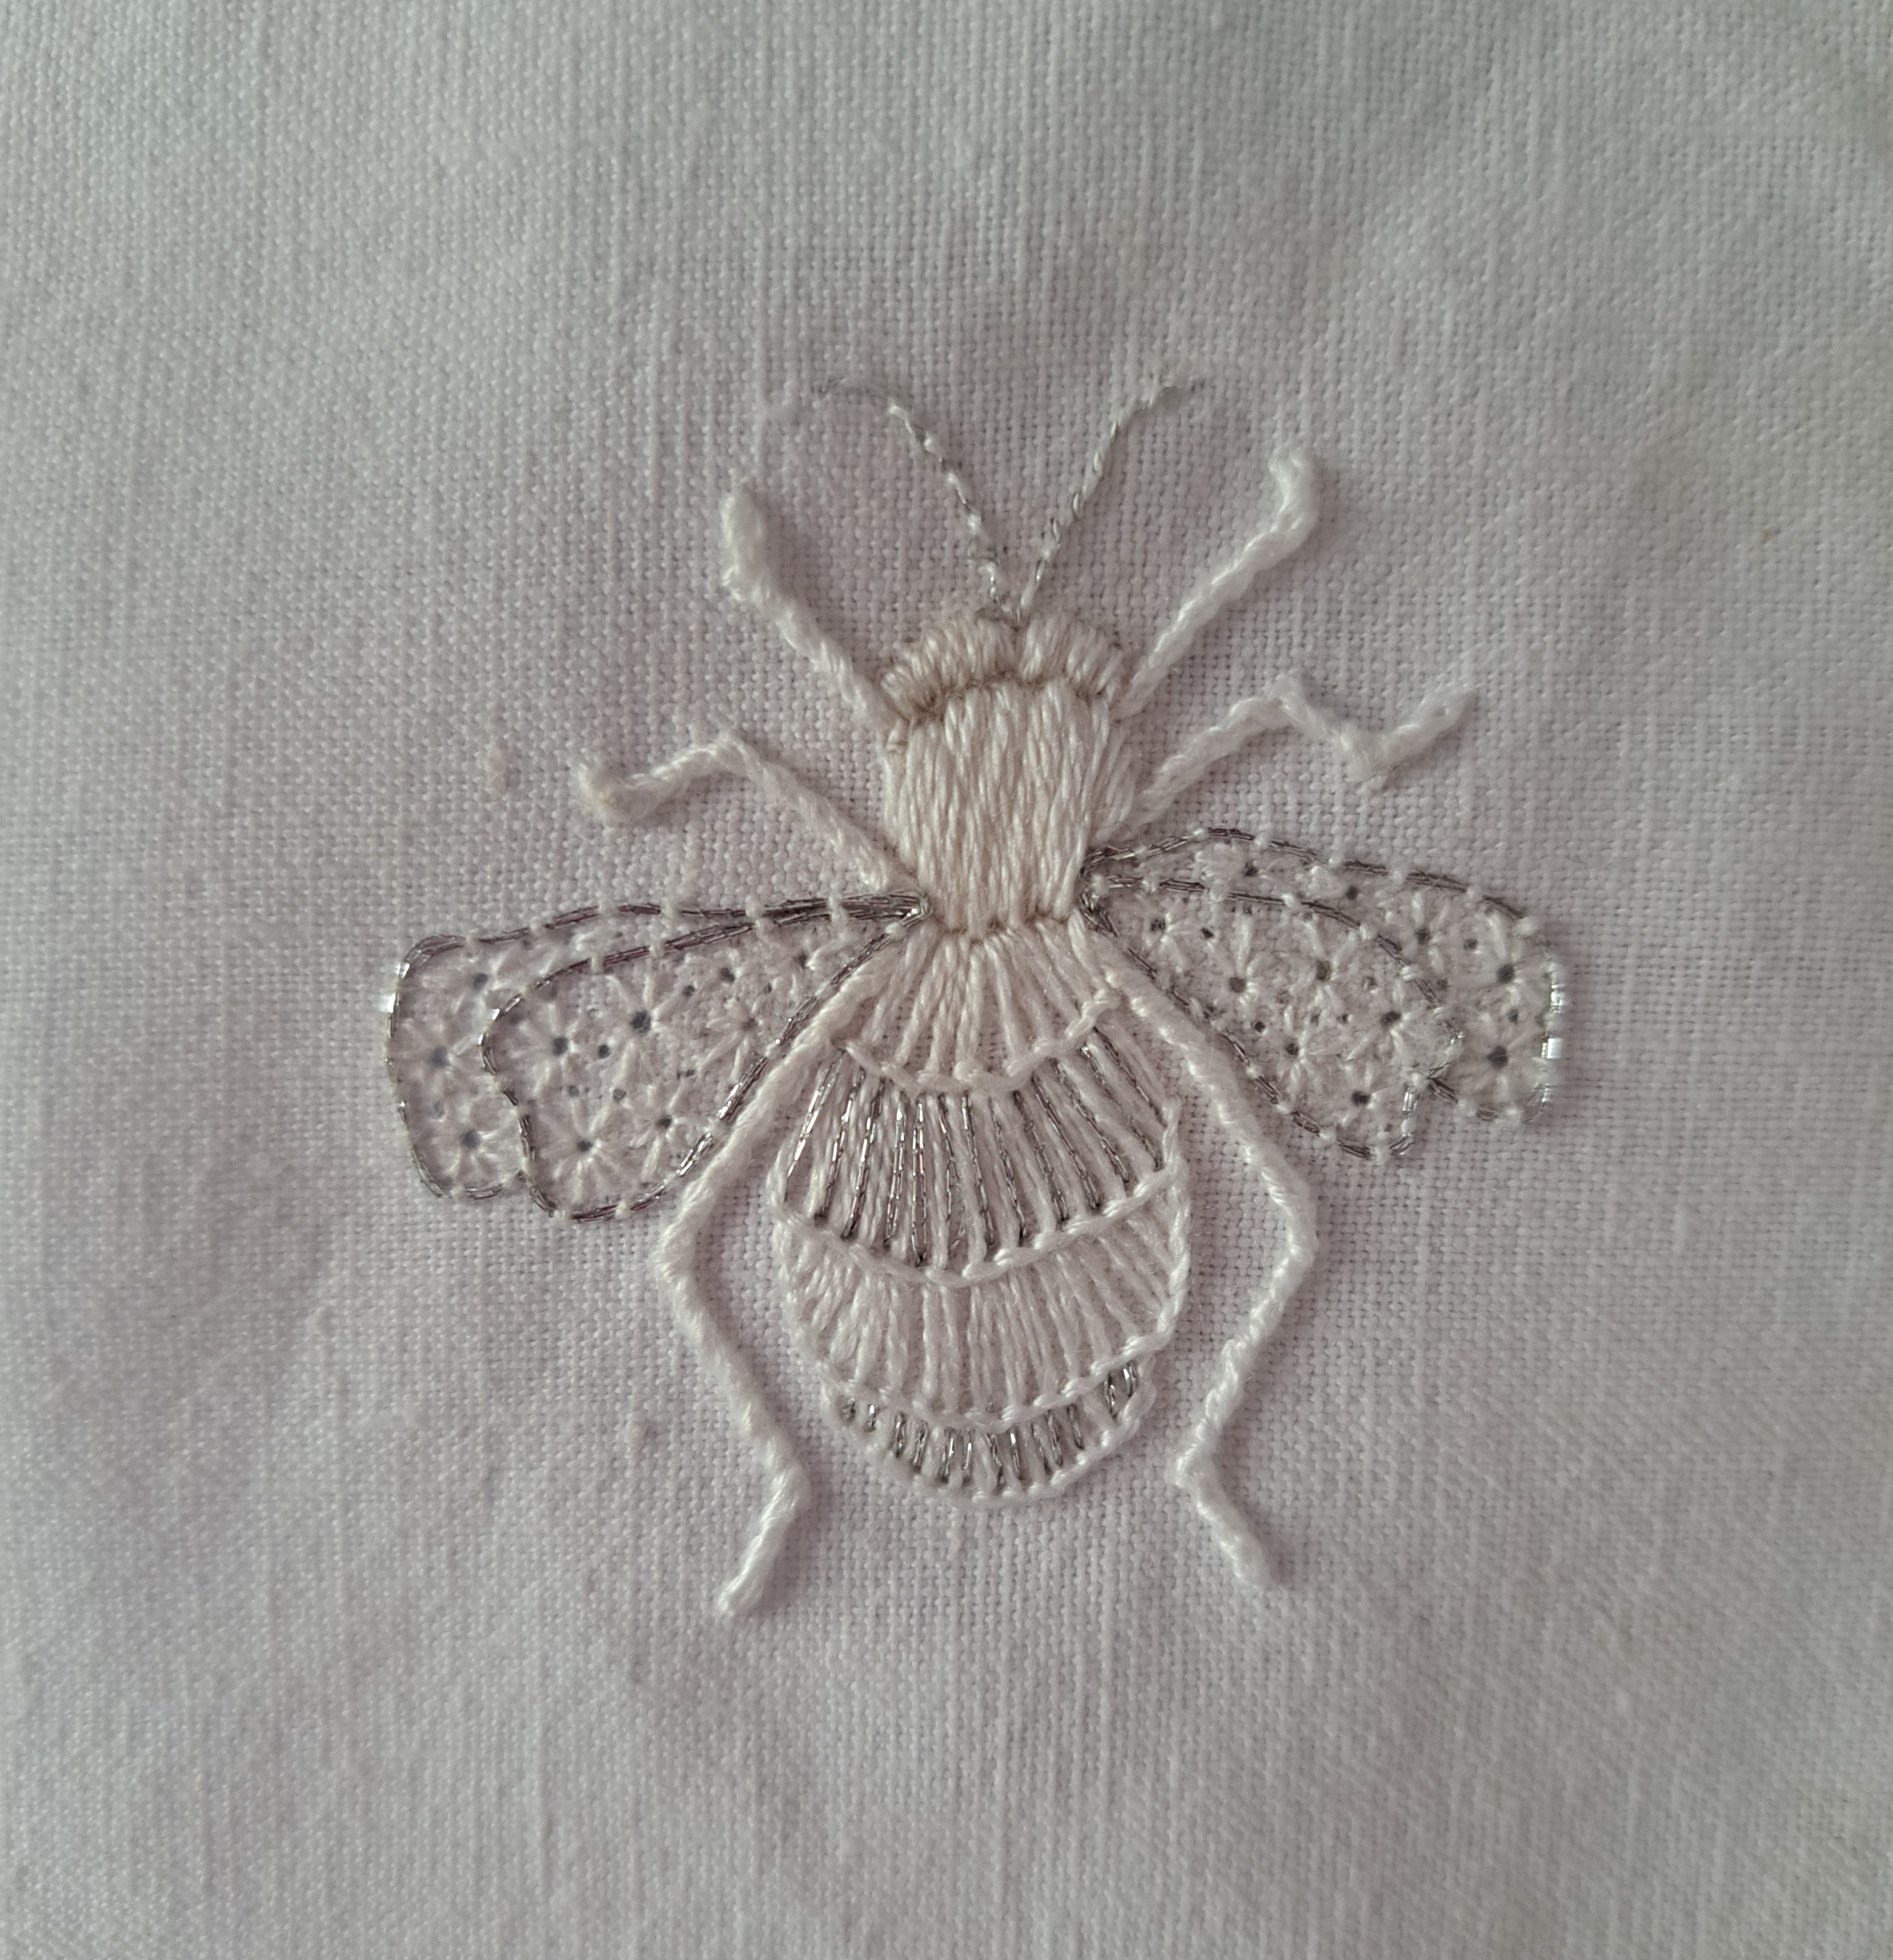
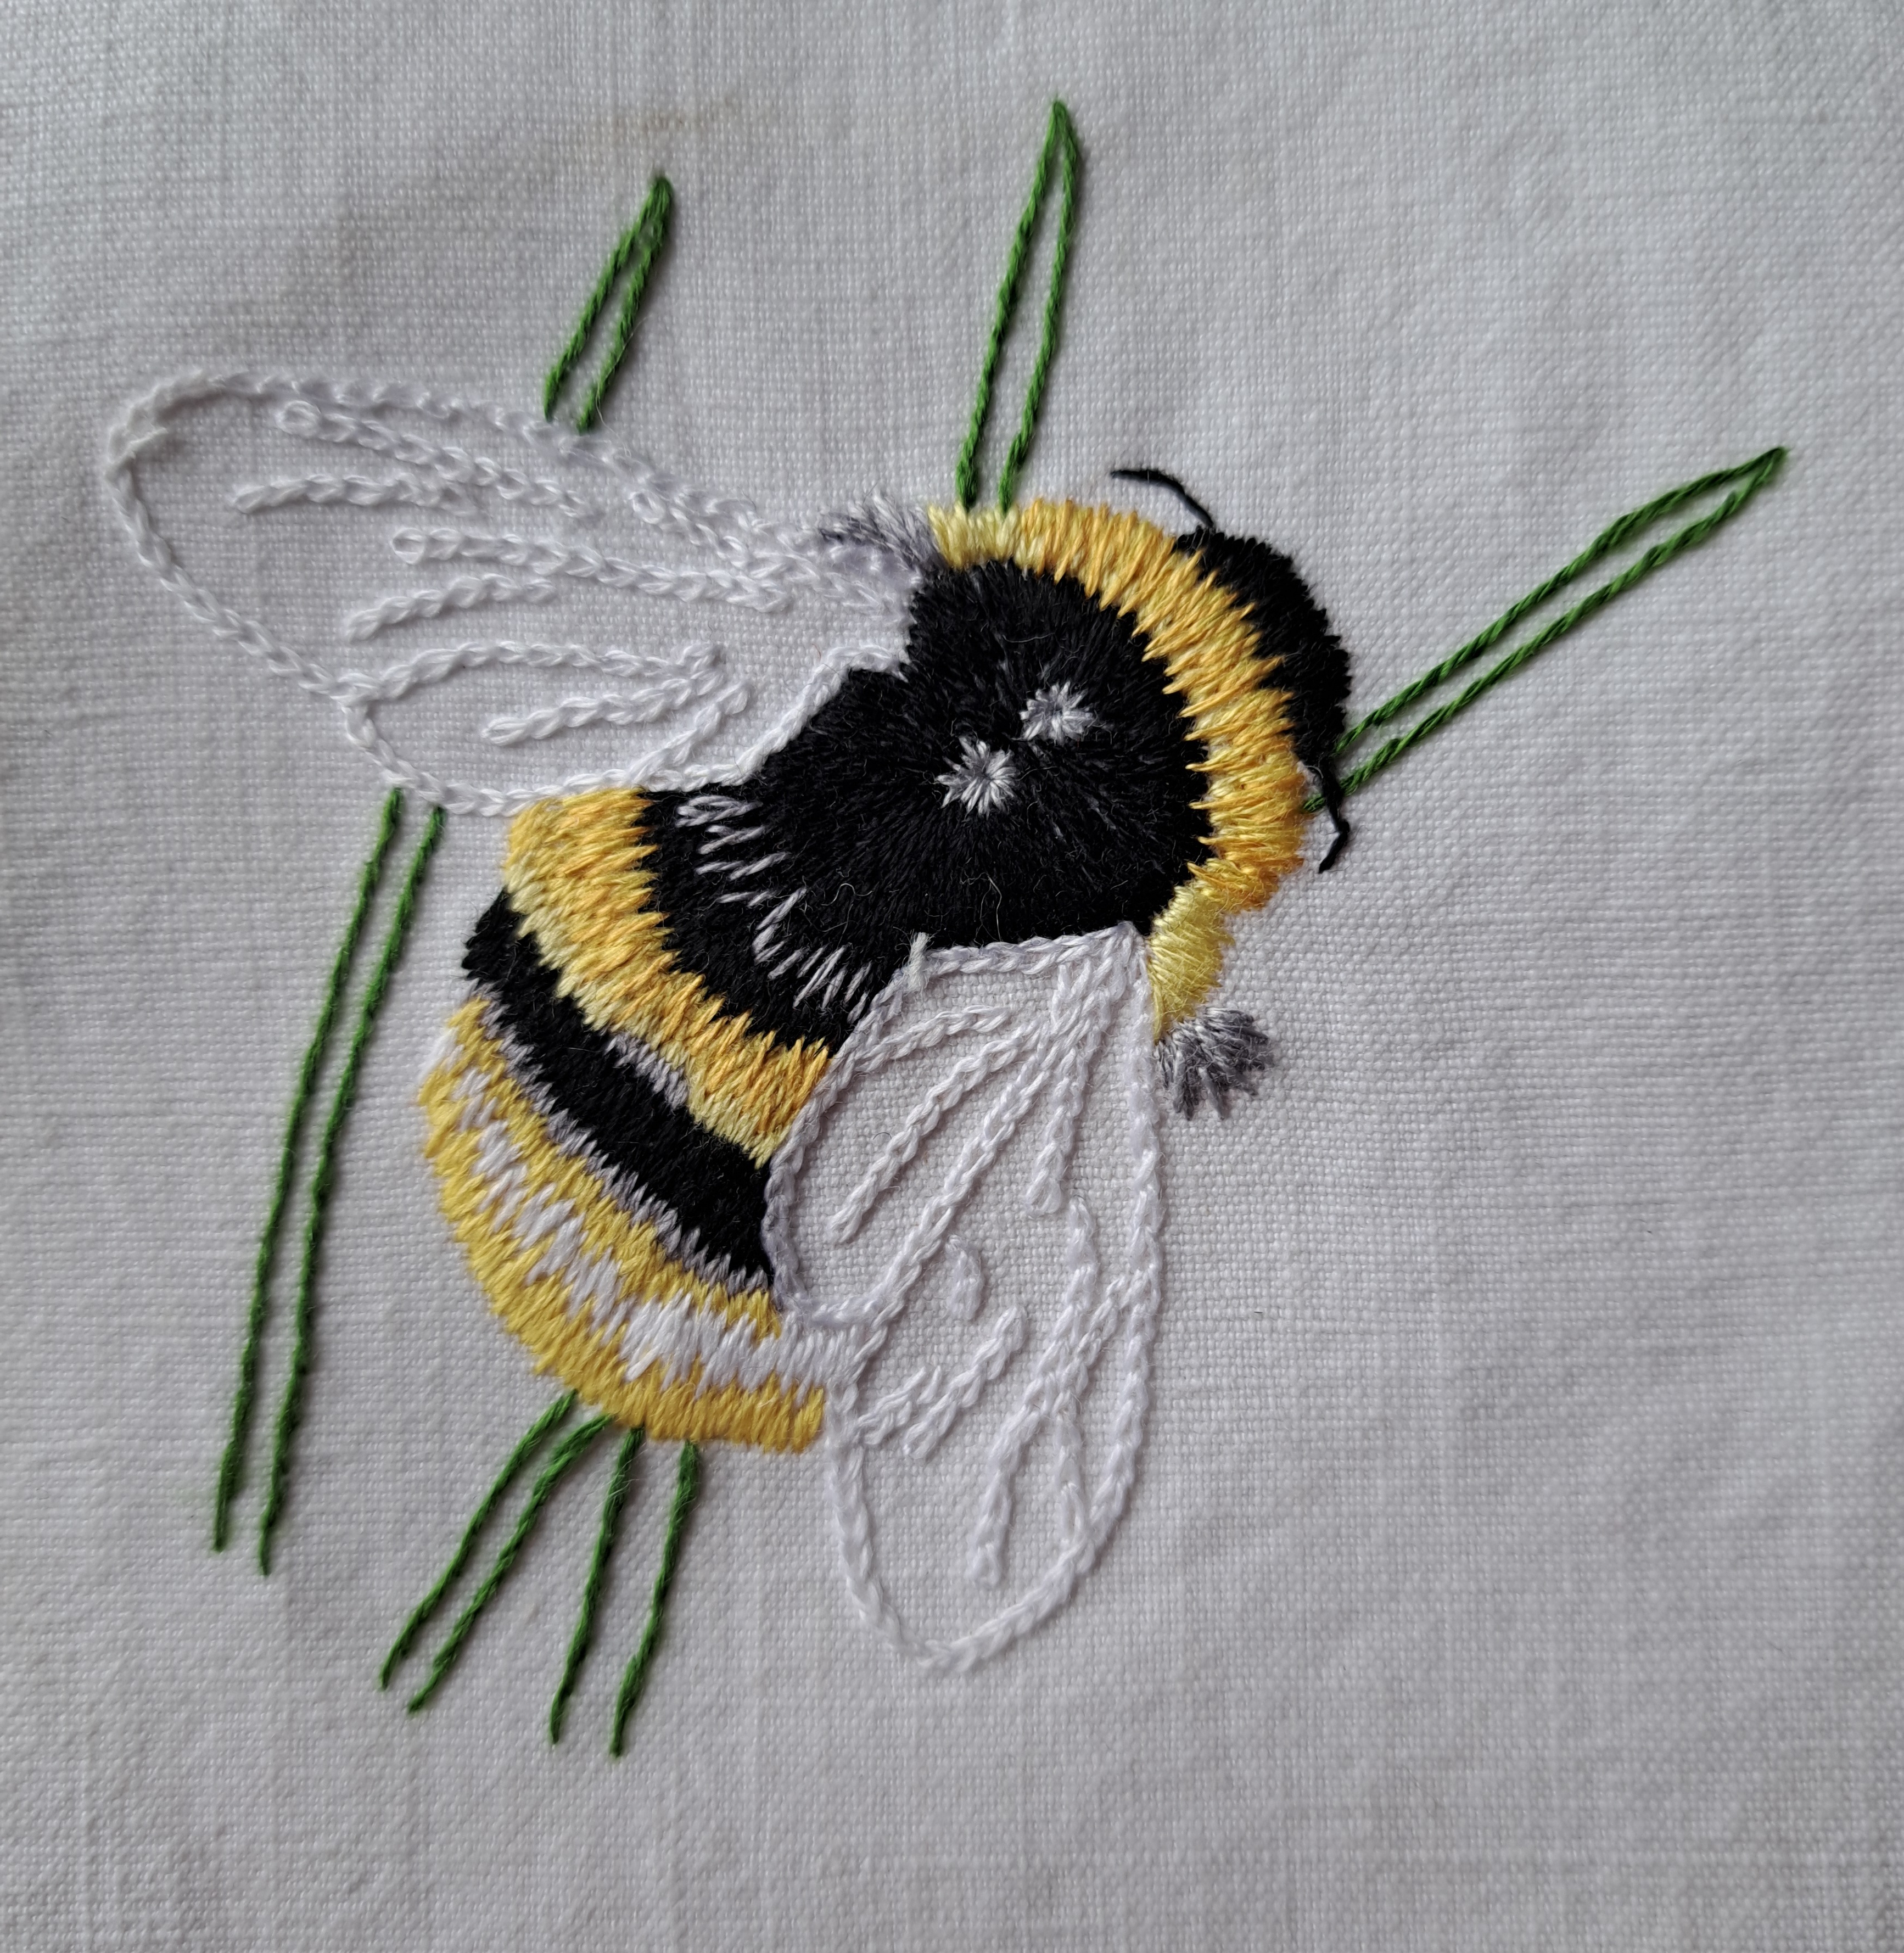
The second bee is a whitework one. It’s another design by Sarah Homfrey I stitched her blackwork one a couple of months ago and this is basically the same design but stitched in whitework. I’ve just seen she does a crewelwork version too…
I’ve not done any whitework before, so I was interested to try it. I traced the design onto linen with a fine frixion pen. The first part to be stitched was the legs, they’re done with a fine chain stitch which is then whipped. The wings were couched in silver thread and then filled with eyeley stitch. I really like the wings, they’re nice and delicate, though my couching isn’t as perfect as I would like.
The stripes on the body are buttonhole stitch with some silver straight stitches in between. The head and the thorax are satin stitch and long and short stitch, the antenna are back-stitch whipped with silver thread.
It was surprising quick to do…it is only little though! I really like this bee, I’m thinking of putting these little bees on a double page in hexagons, I’ll have to see how size pans out.
Over the weekend I fancied sewing something different, I just needed something fairly straight forward and a quick finish. I decided to make up a kit I’d bought at the Knitting and Stitching Show a couple of years ago.
It’s a cute pincushion in the shape of a sewing machine…only I’ve got two big pin-cushions I made years ago, so mine is going to be for needles..
The kit is by Debbie Harris, it included fabric and embellishments. I changed the fabric for the base as I happened to have a sewing themed fabric that coordinated really well.
It was pretty straight forward to make, if a little fiddly. The base is made from heavy duty cardboard, I used the back off a paper pad. It has wadding on the top surface and then the fabric is glued round it.
The sewing machine is just two basic pieces, a gusset and a bottom. The gusset was the fiddly bit as it’s a small curvy shape to sew a 1/4″ seam round. This is doable on the first side, but the second side has to match perfectly or you get a twist. I decide to tack the second side on first, I was still about 0.5cm out, but I could cope with that!
After stuffing it firmly, a circle of card is squeezed into the base, once its stitched in this gives a firm base to glue the sewing machine to the base. I pinned it in place and left it overnight for the glue to really dry. All that was left then was the top cotton reel and the ribbons.
Things are starting to come together with my bee book, well maybe ‘coming together’ is a tad optimistic, but it’s heading in the right direction!
Three weeks ago I had just started my thread-painted bee, called Betty…
This is a pattern from Purple Rose Embroidery on Etsy, it’s available either as a pattern or a kit. I just bought the pattern, how much you pay for the pattern depends on whether you get instructions with it! I paid the extra to get the instructions too. Initially the instructions seemed really confusing, but once I e-mailed the designed she was very quick to apologise and rectify the issue, I’d been sent the old version! The new instructions were much better.
I enjoyed stitching this one and I’m pleased with ‘Betty’, I pretty much stuck to the instructions, I think I just added a few stitches in a darker yellow over the yellow stripes. She’s only little, about 3″ across.
I’ve just a couple more bees to start stitching, a goldwork one and another thread-painted one, then that is it, I really must stop browsing on Etsy! I’ve almost finished a whitework one which I’ll hopefully share this week and I’ve stitched a mini cross-stitch one from a kit someone gave me. Once they’re all finished I’ll have a good variety of embroidery styles and techniques.
I’ve started putting pages together, well I’ve started the first one! My biggest embroidery is the three bumble bees, so that one has set the size at about 8″ square for each page.
I’ve started collating suitable fabrics together, I’ve quite a few bee fabrics in my stash and then I needed others to coordinate with them. I tackled one of my bigger pieces first, I’ve just added two borders so far, then I’ll either add some trims, a little embroidery and maybe some writing…
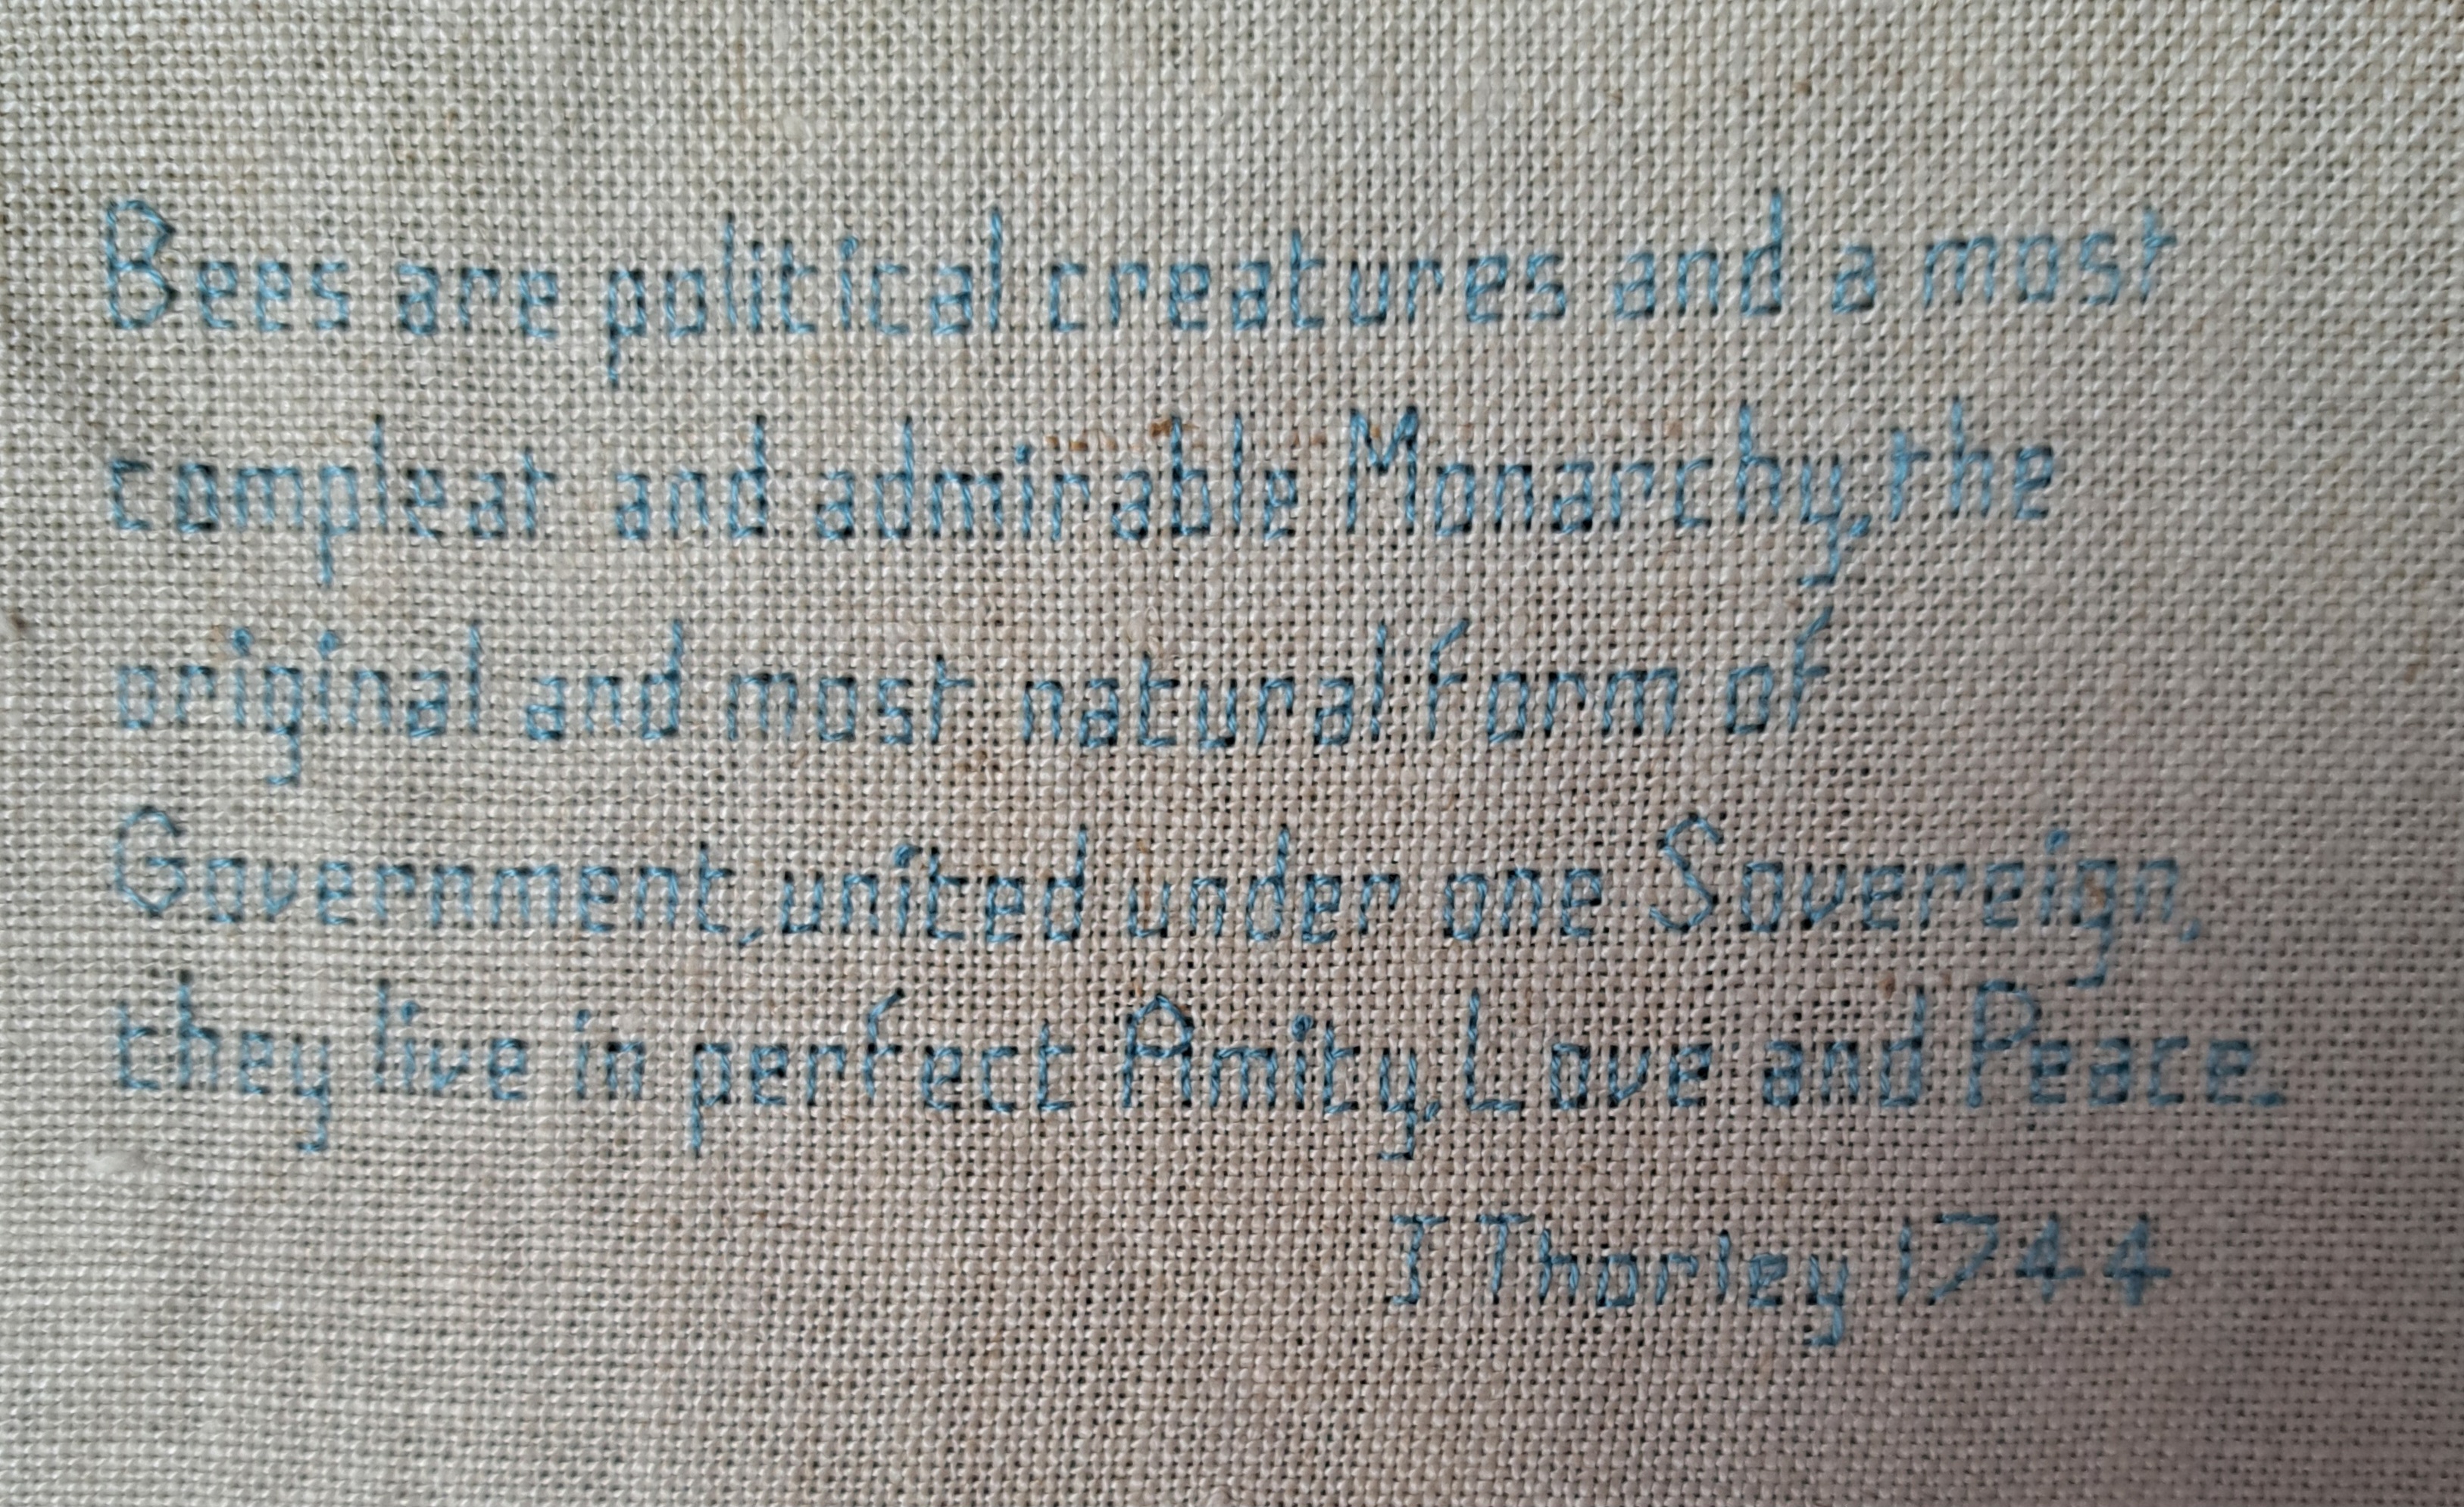
I’ve started stitching some bee quotes and poems to scatter amongst the bees. I had earmarked this quote from 1744 to go on the above page, but I think it’s probably ended up a little too big, so I might put it with a smaller embroidery on the page opposite. Of course I have made one mistake in the counting as the bottom line is one stitch too close, I didn’t realise until I was at the other end and I wasn’t going to undo the whole line! The spelling is the 1744 version.
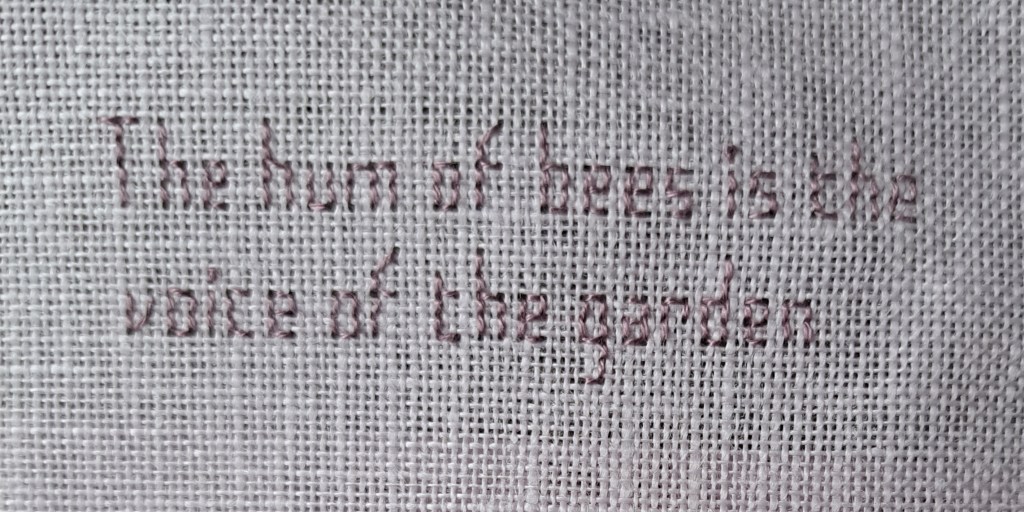
I’ve stitched a little quote on some purple linen, thinking of the lavender bees but that might change…
I’ve just started a list of common bumble bees and their Latin names, which will hopefully go opposite the three bees above.
Hopefully in three weeks time I’ll be well on with my final embroideries and starting to put pages together.
Here are links to other SAL members . . .please follow the links to see what everyone else has been stitching.
I’m trying to stitch bees using lots of different styles. This one was inspired by Laura Edgar’s bumblebee which I saw when I did a wonderful workshop with her. She uses all sorts of textiles, usually distressed in some way, and makes amazing scenes with what I would call free embroidery.
I cut the main shape from a dark grey grungy sort of cotton then overlaid yellow batik. I then found various textiles in my stash to titivate it. This is what it looked like last time I shared it.
I tore some narrow strips of batik and then gathered them up to add texture to the yellow stripes, I then stitched some loose French knots along the gathers.
For the top of the head I used some yarn I’d picked up at Yarndale in a sale box, ten different black threads, 3m each for £1, I do like a bargain! I just couched some bobbly thread along the top.
I used thinner versions for the legs and antenna, again I just couched them down and then embroidered a little v at the tips of his feet.
Wings were just stitched with a soft grey variegated DMC thread using feather stitch.
I’m pretty pleased with this one, it’s not my usual style at all so it is well out of my comfort zone, but I like the effect of the different textures. My favourite bit has to be the black feathers for the body! I’m not sure how the feathers will fare when they are on a page in a book…oh well 🙂
It’s three weeks since I last posted my progress on my Owl and Hare Hollow quilt and I have to admit there’s not been too much progress, what with two weekends away and lots of bees to keep me busy, never mind presents to make…
Three weeks ago I had quilted thirteen blocks, but wider sashing circles on only eight…
Last night I was working on the circle of flowers at the bottom, I’ve quilted three circles for the block and I’ve almost finished the sashing circle too. You can just see the dots of Frixion pen I use for marking the circles…
I’ve now quilted fourteen circles and nearly eleven sashing circles. I need to remember to got back to those three sashing circles once I’ve finished this one.
I’ve done more than I thought!! There’s 49 blocks altogether though, so still a way to go. It’ll keep me busy and warm working on it over the winter 🙂
Hand Quilt Along
This Hand Quilt Along is an opportunity for hand quilters and piecers to share and motivate one another. We post every three weeks, to show our progress and encourage one another. If you have a hand quilting project and would like to join our group contact Kathy at the link below.
It is one of my old school friend’s 60th birthday next week, she’s having a party but as she lives down on the south coast (about six plus hours drive) I suggested going to visit a different weekend as we wouldn’t have much time to chat at a party. Four of us went through secondary school together and we’ve kept in touch, so I contacted the other two and we all went down together last weekend.
We had a fab time, talked and laughed all weekend, we worked out the last time we were all together was in 1991 at one of our weddings!
I wanted to make a little something and had the idea of making a decorated cotton reel, like the Christmas one I made earlier in the year…
At first I was going to embroider a scene, representing the different places she lived, maybe putting major milestones on it. I was chatting to one of my friends at Skipton Stitchers and she suggested Aida bands. The idea grew on me…I found some in my stash and started writing out words to stitch. I got some inside help from her willing spouse and eventually had a good collection of places she’s lived, things she liked and major dates. I managed to arrange them in rough chronological order as a wordplay.
I stitched them in different colours depending on their relevance – teal for roles, blue for places, one soft variegated for people and a brighter variegated for things she likes to do. I filled in the spaces with flowers and butterflies to reflect her love of nature, a Yorkshire rose and pink flowers as pink is her favourite colour.
It took a few evenings but it was finally done. I called it 0-60 in 15″…
I backed it with a pretty floral cotton and stitched it to a wooden reel I had ordered from Etsy. I attached some narrow organza ribbon and a button to secure it. All I had to do was decorate the top.
I tried to buy a little silk flower, I couldn’t find one locally so I made one out of wider organza ribbon. I rummaged in my button box for a variety of pink buttons, I found a mini cotton reel and I basically dabbed a generous layer of PVA glue on the top and arranged them all. The little bird button was the finishing touch which I think works perfectly. Once dry it seems to have held everything on nicely…
I’m really pleased with how it came out, it didn’t take too long to make but it’s a very personal present. I gave it to my friend and she was delighted with it.