A Trio of Smalls

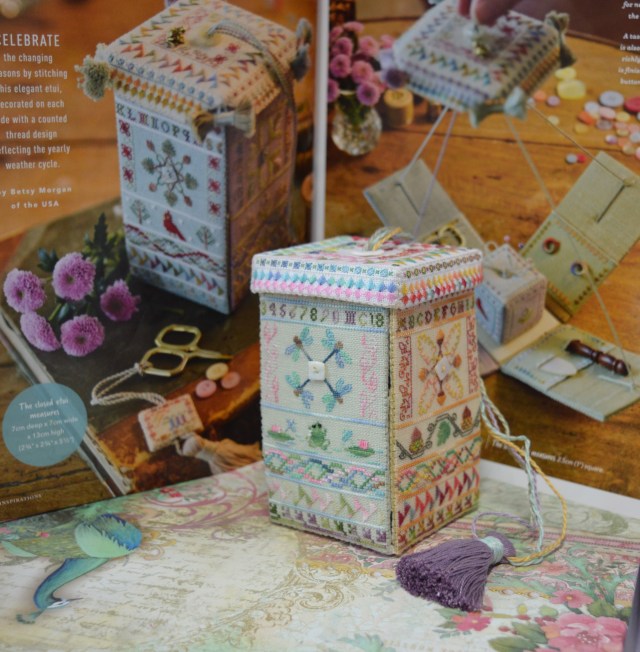
I was going to call this post a Trio of Love, but I thought that sounded a little smutty, then again a Trio of Smalls could be minimalistic packing for a weekend away!

Anyway, titles apart, I’ve just finished three little cross-stitch smalls. I got inspired by the cross-stitch smalls group on facebook, they are having a valentine special, so all these cute hearts kept appearing. I decided to do some simple, quick to stitch smalls for next month.

The first one to stitch was by Hands On Design, it’s a free pattern designed to celebrate her wedding anniversary. The photo shows it stitched on a beautiful fairly dark blue/grey colour with the central design in an ivory colour. I sometimes wish the linen companies would do like a layer cake of 10″ squares of different colours to try, they would be perfect for little cross-stitch projects. Instead I rummaged through my linen box and chose a soft duck-egg blue sort of colour, very pretty. I decided to use a variegated cream for the letters and two shades of teal for the border.

www.thecraftycreek.com

I really wasn’t sure about the cream whilst I was stitching it. I think it depended on the light I was stitching in. I loved the subtlty of the cream on duck-egg, but sometimes it just didn’t show up enough. With hind-sight I think the problem is more the two shades of teal, the inner one is too much of a contrast, but I’m not one for frogging unless provoked, so instead I outlined the cream in a single thread of teal which just gives it a bit more definition without losing it’s delicateness. I still felt it needed something else, so I stitched some tiny pearl beads round the border and then echoed them on the outer edge of the small. I like it, it’s pretty without being too frilly.

The second small was also by Hands on Design, a freebie from last year to celebrated another wedding anniversary. This one is called I am Home, I changed the thread choices again to fit the linen colour. This time I used a lovely dyed linen by Sparklies, I picked up a couple to try at the Festival Of Quilts, I’m tempted to try a few more as they are lovely to stitch and I love the effect of the spacedying. This one is in soft shades of blue and green. I decided to use one of my favourite DMC threads for the main lettering, 4030, it’s a wonderful blend of blues and turquoise / green. It worked really well with the linen.

www.thecraftycreek.com

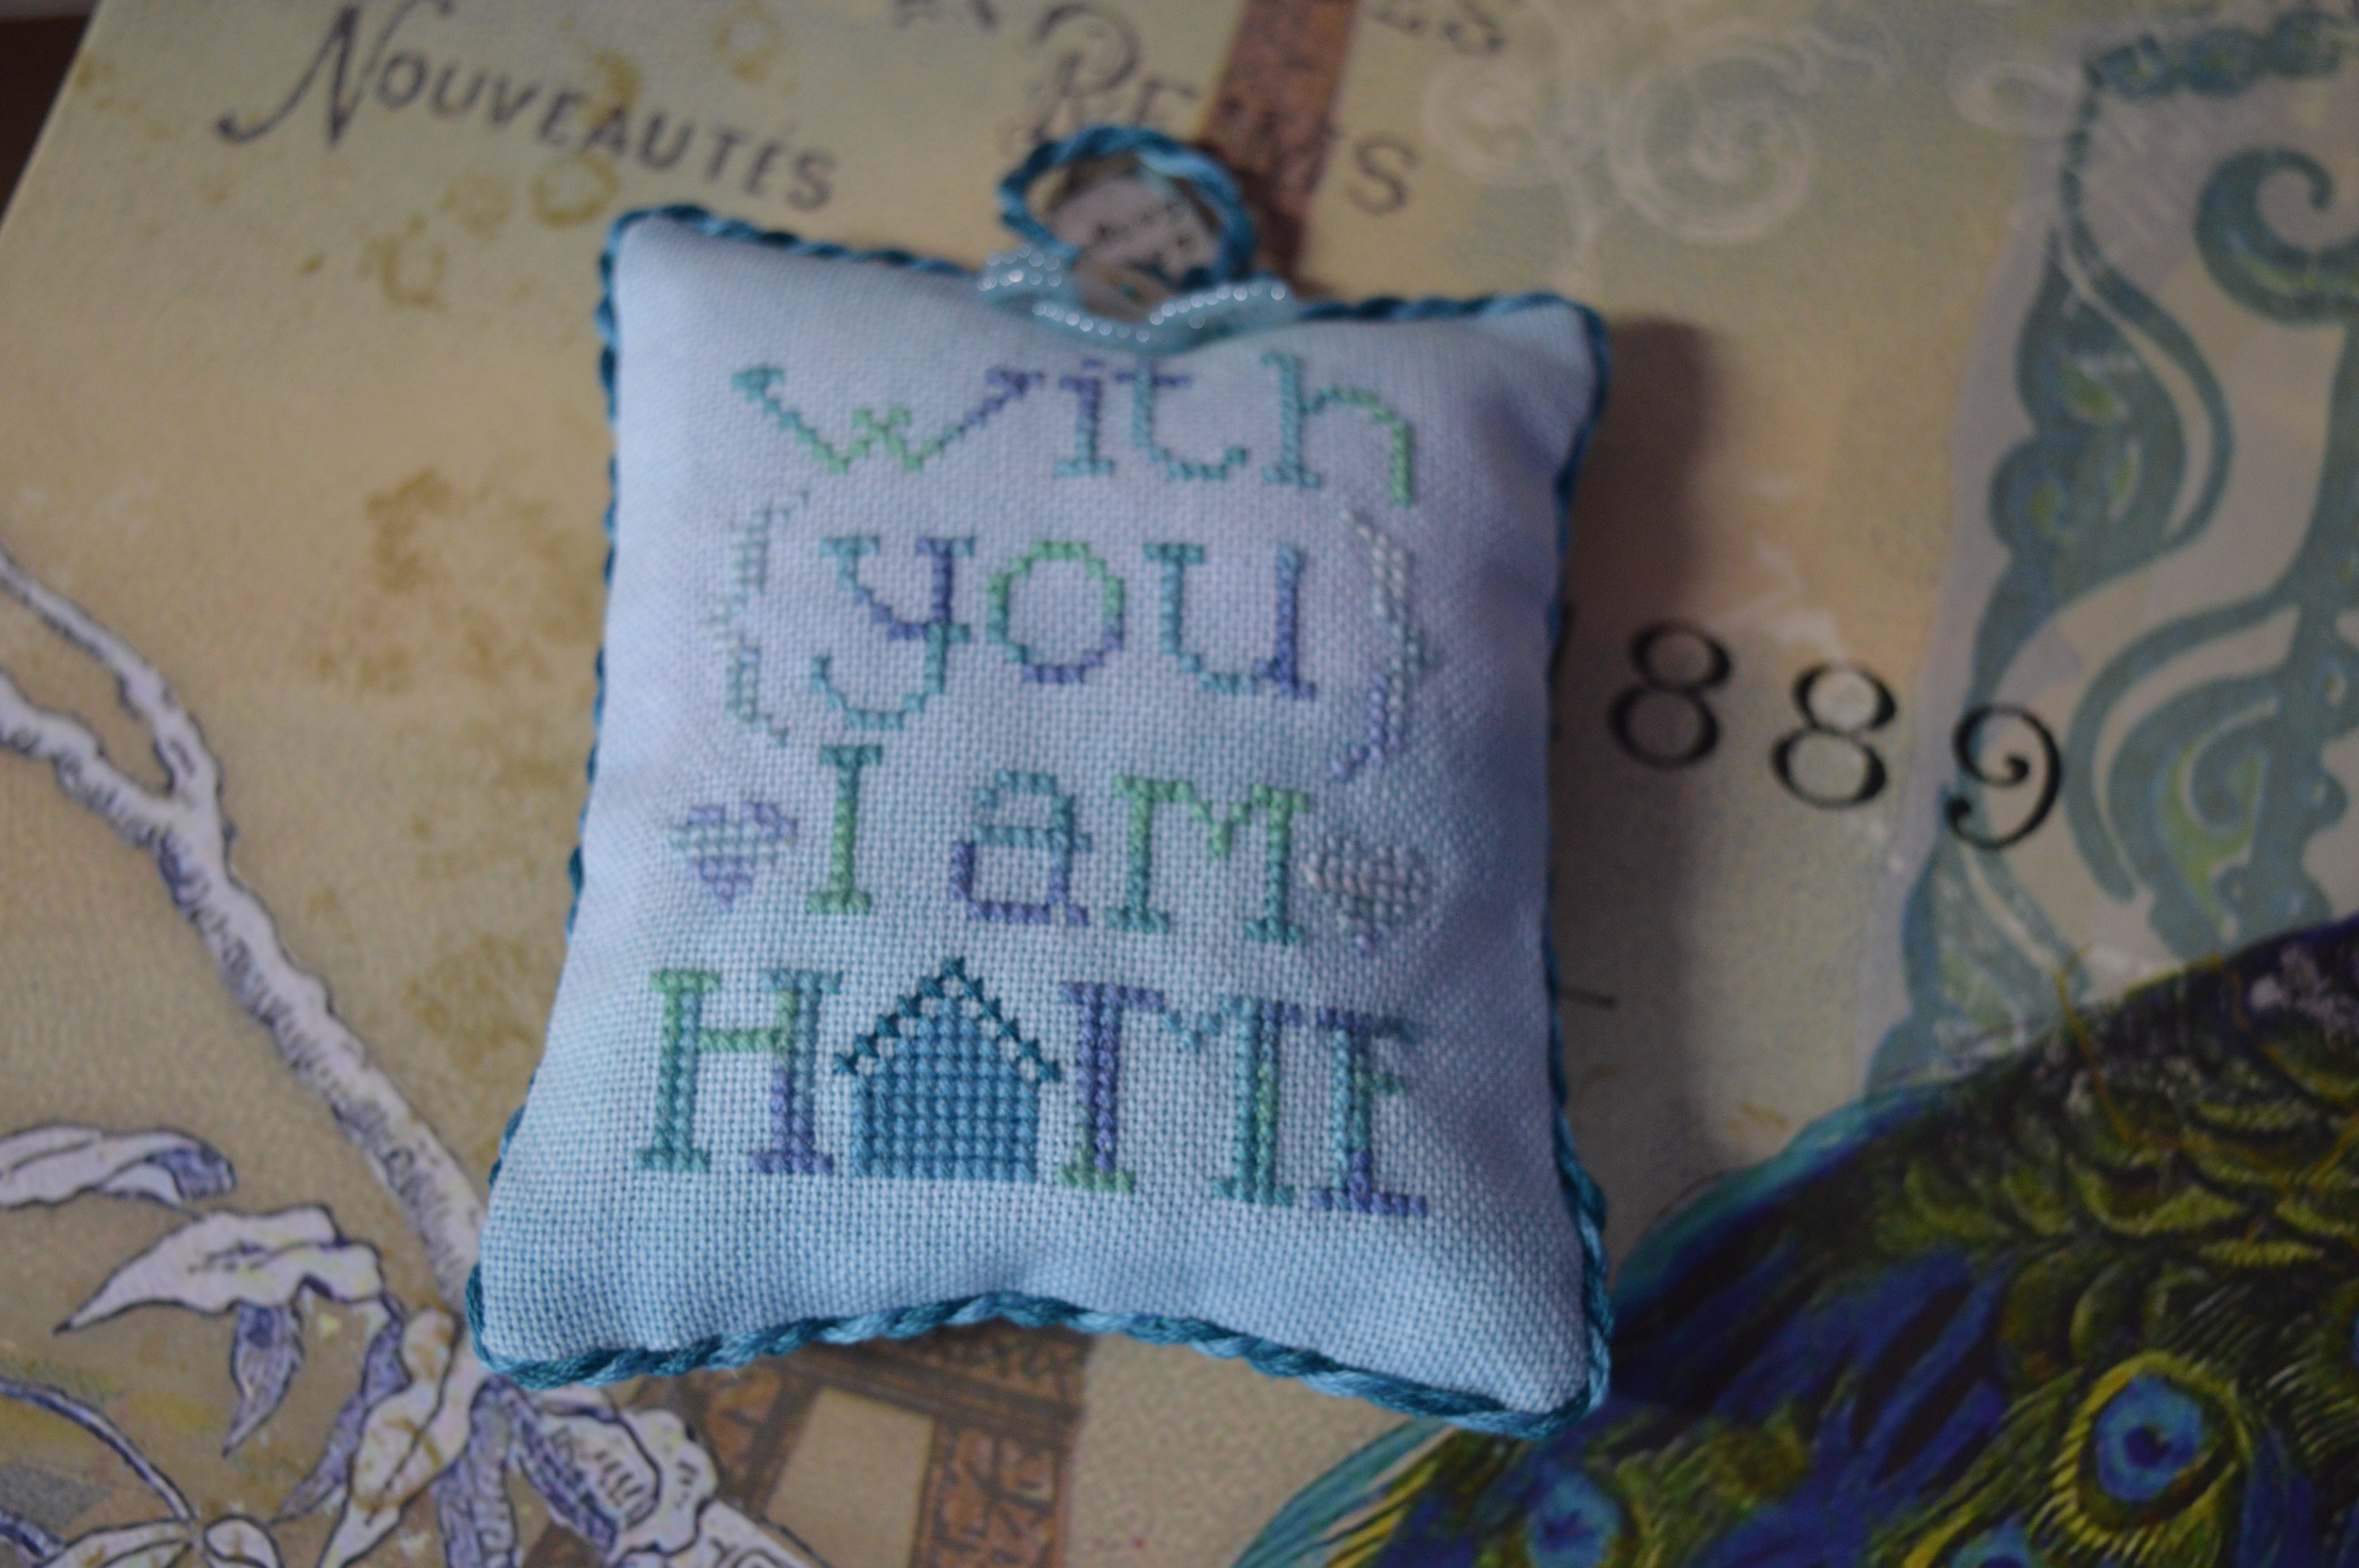
I made one small change to the design. I must admit when I first saw the pattern I did wonder why there were bracket signs on it and arrows like signposts. I could live with the brackets, but I changed the arrows to hearts. It was only later that I realised it was probably a modern take on bows and arrows…it went straight over my head! The pattern also gave instructions to make it into a house shape with a fabric roof, I decided to keep it to my usual oblong. I made a cord to go round, added a button to cover the join and then felt it needed a bit more! I added a charm which says Love, Live, Laugh which I thought was quite apt, on the grounds that things look more balanced in an odd number I added some loops of beads…it was one of those times when I wasn’t quite sure when to stop!

www.thecraftycreek.com

My third cross-stitch small is a design by Sandra Longan, it’s a free pattern from 2014 which I found on pinterest but managed to trace back to her website. I stitched it in one of the original DMC variegated threads inrich dark reds. The shading worked really well with Valentine all being in a lighter shade. I was stitching this when I visited my mum this week, she looked at the pattern and said “It doesn’t make sense, Be My Dentine”!!! It’s one of those comments that sticks in your head, now all I can see is dentine!

www.thecraftycreek.com

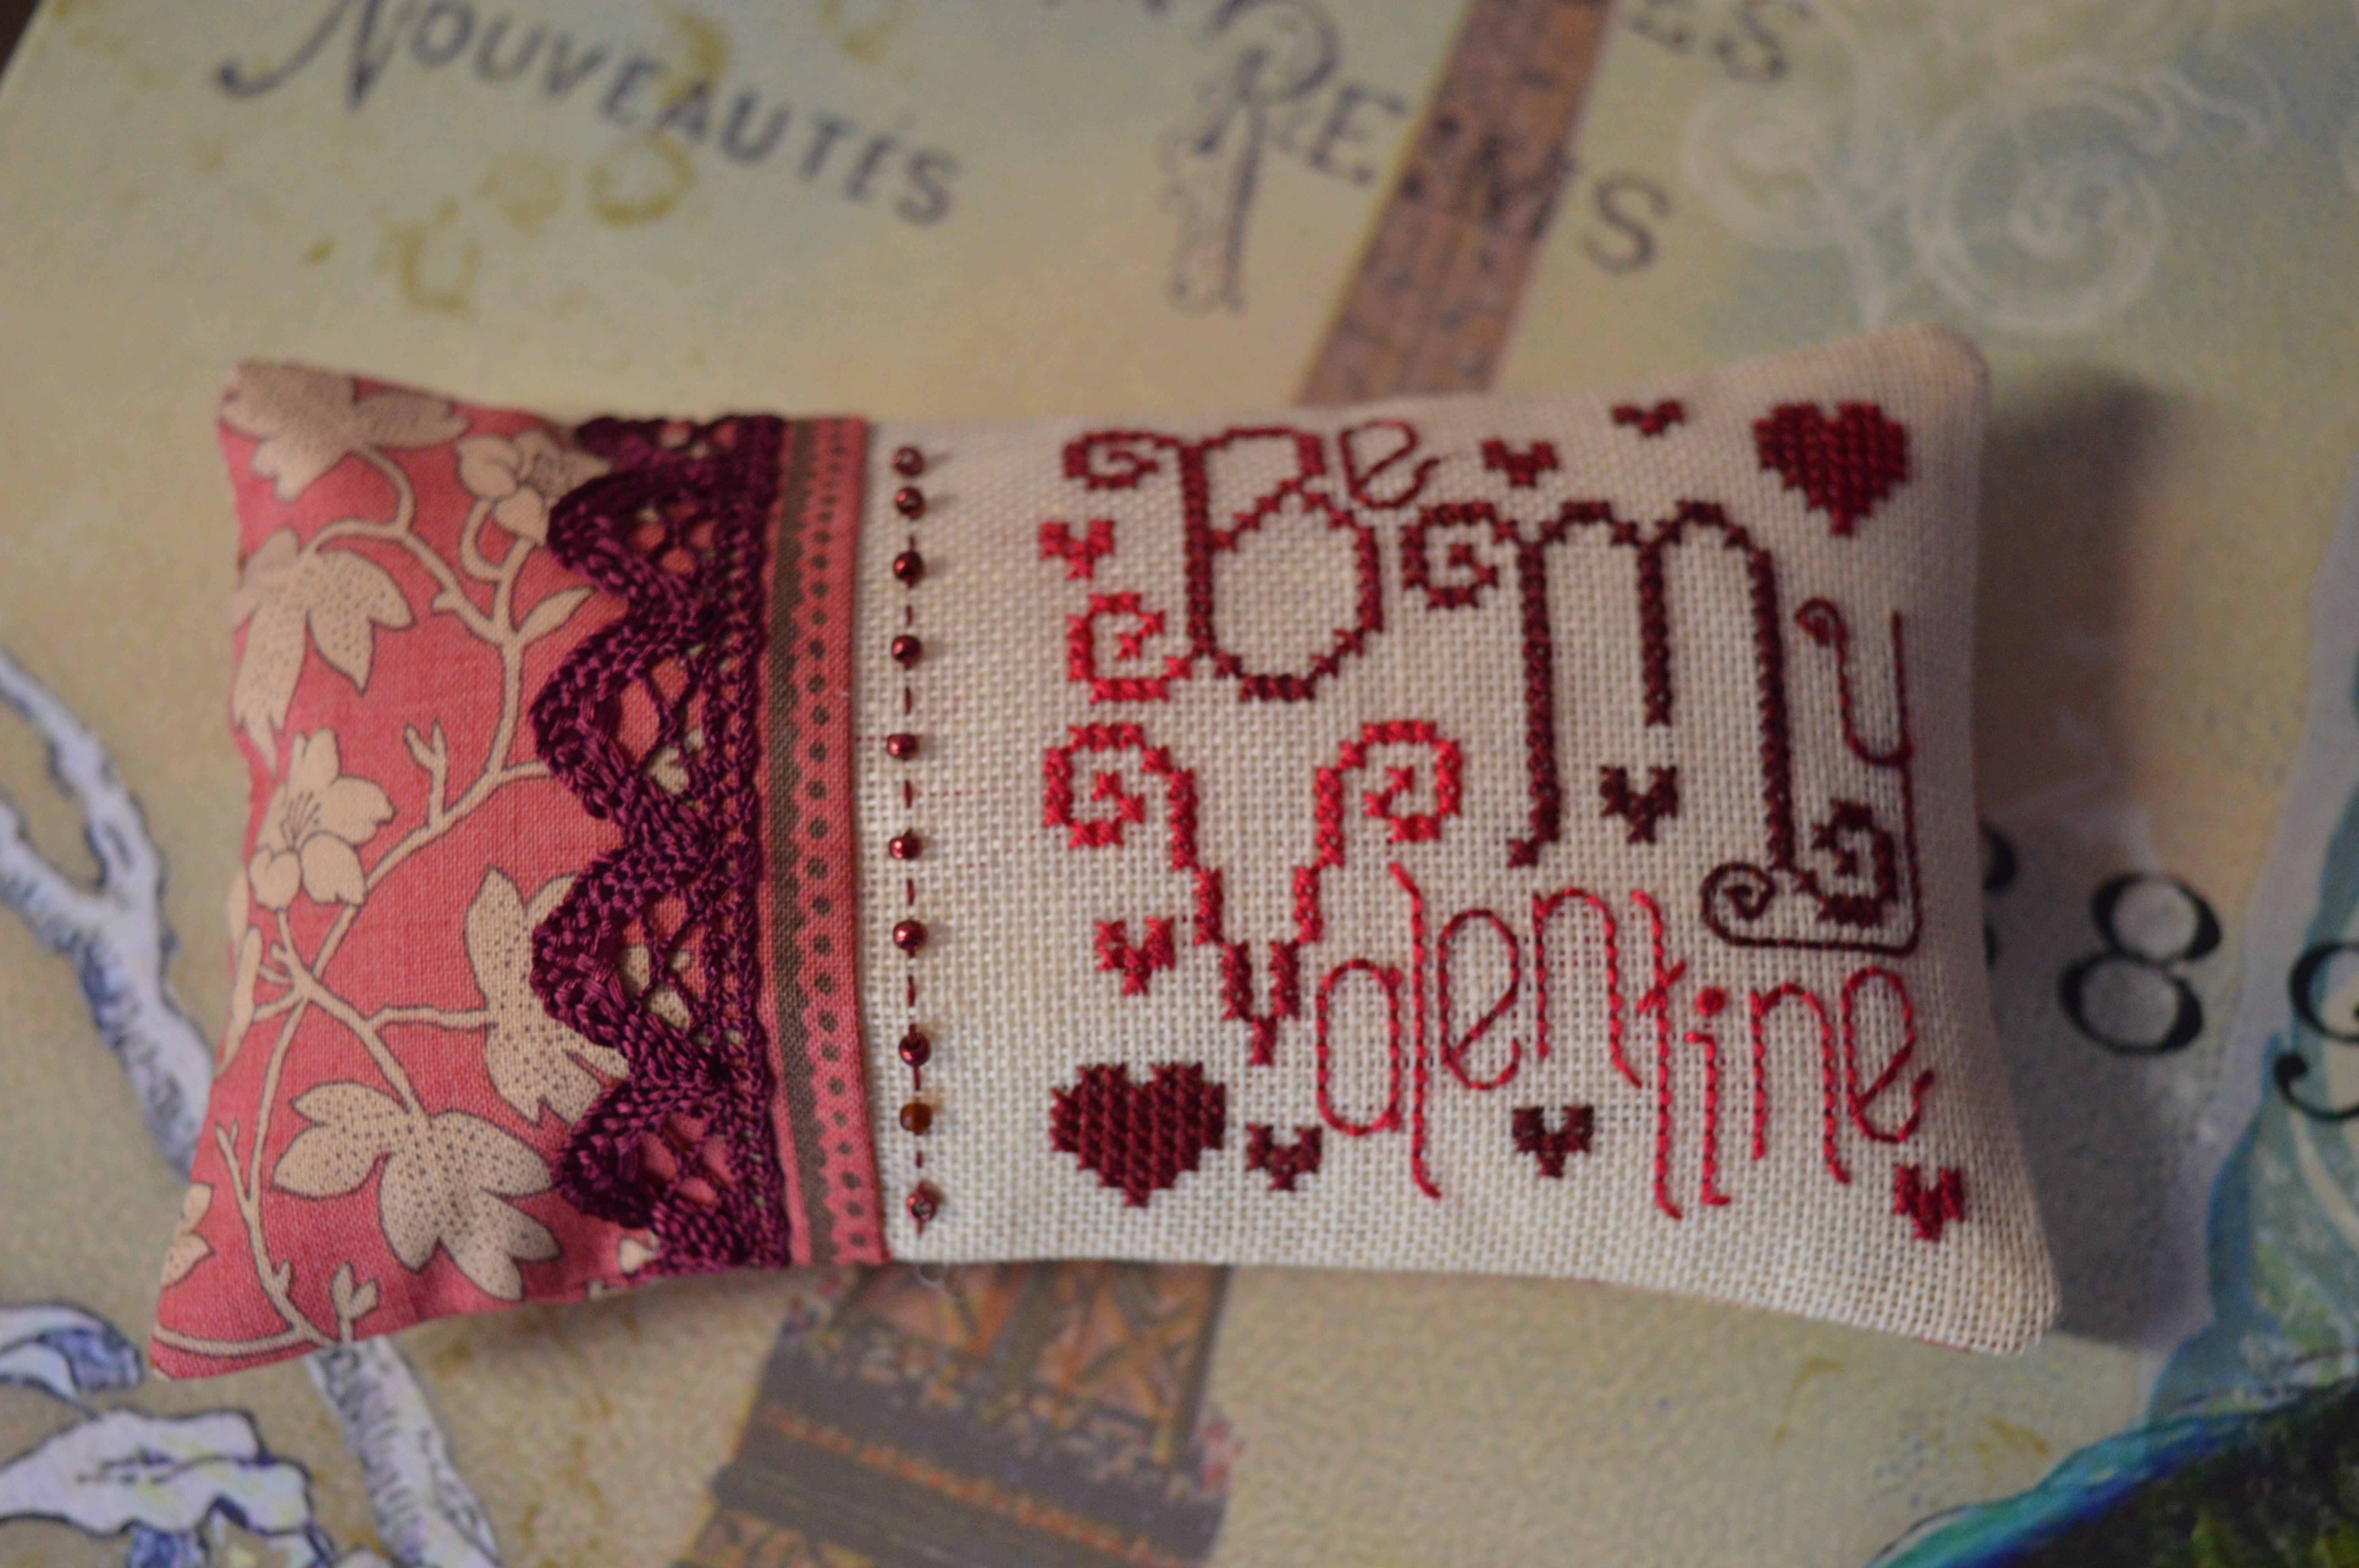
I decided to make this one rectangular with a piece of co-ordinating cotton. I tried about six possible fabrics, a couple matched beautifully colour-wise, but they were just too busy and dominated the design. Eventually I decided on this more muted one. I added a line of running stitches and beads and a length of pretty lace. I decided this one had enough and didn’t need an edging.

www.thecraftycreek.com

I’m really pleased with my little cross-stitch smalls, they’re quite addictive!

Linking up with Kathy’s Quilts for Slow Stitching Sunday, a celebration of all things hand stitched. Follow the link for more hand-stitching inspiration.

Posted in embroidery, Serendipity | Tagged , , | 20 Comments

A Fluffle of Love

I’ve just finished my first quilt of the year and I’ve called it A Fluffle of Love…

Guess How Much I love You Quilt

I’m going to become a Great Aunt in the next few weeks, it makes me feel very old as I had a Great Aunt Margaret when I was little and she seemed ancient and quite formidable! Besides making me feel old, it of course gave me the opportunity to make a baby quilt.

One of my favourite children’s books when my two were little was Guess How Much I Love You, the story of two nut-brown hares which finishes with the wonderful line of “I love you to the moon and back”. It had only just been published when my two were little, in fact I think mine is a first edition! This is a fabric range based on the illustrations of the book.

Guess How Much I love You Quilt

I used a very simple free quilt pattern by Lo, Ray & Me as it meant I didn’t have to cut the hares up too much! I also fussy cut some of the 6″ squares to get the hares in a good place. The quilt went together pretty easily, my only hiccup came when I tried to get away without measuring a border properly, I got the seam ripper out and stitched it properly second time round!

When it came to quilting I decided I wanted to quilt a word down the vertical strip. I had some lovely suggestions from you all of possible words but I decided to stick with my original plan of LOVE as it fitted in with the books title.

Guess How Much I love You Quilt

I carefully drew the letters on some paper, trying to work out the size and the width of the lettering. Once I was happy I then had to transfer them onto the actual quilt. I had a little bit of a brainwave and used freezer paper, tracing round, cutting out and ironing on, all I had to do was stitch round the shapes. It sort of three-quarters worked as I found the freezer paper didn’t like the fabric bending at all, so I did have to re-iron some of the letters, but it did give me a neat outline to stitch round. I stitched a close meander round the letters, adding a heart top and bottom. I felt it needed a border of some kind between this strip and the rest of the quilt, so I stitched a wavy line of hearts down each side. The rest of the quilt is in a bigger meander.

Guess How Much I love You Quilt

I was pretty pleased with the quilting, I love how the lettering shows up on the back and more subtly on the front. All I had to do then was binding the edge and a label.

Guess How Much I love You Quilt

I spent a pleasant evening hand-stitching the binding down, I rather enjoy this part of a quilt, I can get into quite a relaxing stitching rhythm, my mind can wander all over the place whilst I’m stitching the binding!

Guess How Much I love You Quilt

I pondered for a while about the name of the quilt, then I recalled a comment someone made on the Down the Rabbit Hole quilt page, a collective noun for rabbits is a fluffle. Isn’t that a gorgeous word! I checked on Google and it also applies to hares, I had found a name for my quilt, A Fluffle of Love, I embroidered it on the back in one of the hearts using a DMC variegated thread and then just added my initials and the year.

Guess How Much I love You Quilt

I think I’ll buy a copy of the book and a matching cuddly toy to complete the present, just got to be patient and wait for baby to arrive!

Guess How Much I love You Quilt
Posted in Crafts, Nineteen for 19, Quilting, Serendipity | Tagged , , , | 25 Comments

The Golden Thread

I’m trying to read more this year, it’s one of my Nineteen for 19 challenges, so when I saw an interesting book just before Christmas I dropped a big hint that it was on my wish list! As it’s all about textiles I thought it may be of interest.

The book in question is called The Golden Thread, it’s by Kassia St Clair and it is fascinating! It’s all about the history of thread and textiles and how they have impacted on our lives over the centuries. As it says on the cover “When we talk of lives hanging by a thread, being interwoven, or part of the social fabric, we are part of a tradition that stretches back many thousands of years. Fabric has allowed us to achieve extraordinary things and survive in unlikely places and this book shows you how and why.” 

This image has an empty alt attribute; its file name is dsc_0201-2-2.jpg

Each chapter tells the story of a different thread and she goes right back to the beginning – 30,000 years ago!!!! Thread has been found which dates back 30,000 years! There’s a chapter on the Vikings and their woollen sail cloths, the linen used to wrap Egyptian mummies, the story of silk and the connection with the Great Wall of China, cotton, lace…

Kassia also tells the dark history of man-made fibres such as rayon and viscose. To be honest I never really knew the difference between the various man-made fabrics and I certainly didn’t really consider how they were made, but I can also now see where bamboo fabric fits in.

The book goes right up to date with sporting fabrics, mountaineering and space exploration. She also covers the ecological and political issues and events such as the Bhopal factory disaster.

It’s a wide ranging book, full of fascinating insights into something many people take for granted, textiles. For those of you in the UK, The Book People have it at a very good price!

I’m tempted to read her book on colour now…

Posted in Serendipity | Tagged , | 14 Comments

Monday’s Meander Round the Garden

We seem to be having a dry but chilly winter, so as long as I’m wrapped up with scarf, hat, gloves etc I’m OK for a while in the garden. I’ve been concentrating on the raised bed by the patio. It’s about 6′ deep and about 20′ long, so it’s taking a while! It’s also 2.5 to 3′ high, so far I’ve been tidying up and weeding the area I can reach without having to climb up. It’s looking better already…

Winter garden

My deep wine hellebores have finally started flowering, aren’t they a beautiful colour! I bought them last year on Otley market, they’re just by the path in the Amethyst and Amber garden, so I can admire them whenever I walk the dogs!

hellebores

I was checking the other hellebores near the pond and there’s lots of buds just appearing so hopefully in a few weeks it should look pretty good. I’ve just discovered this one is called Helleborus argutifolius, otherwise known as the holly leaved hellebore – that will be why it’s so prickly!!!

The mahonia down the drive is still putting on a good show, I have a love hate relationship with this one as it regularly prickles me as I walk down the drive. This one is getting rather large and straggly so I’ll be checking in my pruning book when and how to tackle it – apart from with gloves on!

mahonia

In the front garden I’ve got a very pretty erysimum, the perennial wall flower. It’s a beautiful amber / rusty pink sort of colour and it’s been flowering for most of the winter, it’s definitely earning it’s keep.

This image has an empty alt attribute; its file name is dsc_0209-1.jpg

Down the drive by the house I’ve also got a euphorbia wolfenii, it is a particularly dry bed as it’s under the shelter of the eaves but it seems happy there. The new fronds are looking quite statuesque.

This image has an empty alt attribute; its file name is dsc_0211.jpg

All over the garden bulbs are starting to push their shoots up, daffodils, alliums, unidentified bulbs in pots from my mums and of course snowdrops. These are tiny ones and they are just starting to open their dainty white petals. They’re up by the pond so I keep having a peep when I walk past with the dogs.

This image has an empty alt attribute; its file name is dsc_0205-2.jpg

The cold but dry weather looks set to continue next week, so hopefully I’ll get a few sessions tidying up in the garden.

Posted in Garden | Tagged , , | 6 Comments

The End of the Road!

It doesn’t seem three weeks since I last showed you my Down the Rabbit Hole quilt, I was nearly three quarters of the way round the rows of houses…

I’ve not done as much as I hoped as I was concentrating on my other long term project, my Tall Year Square etui. Now that is finished I’m hoping to spend more time getting this rather large quilt finished too.

Excuses over, I have managed to finish the rows of houses, I’ve stitched quarter of an inch around the skyline and also run a stitch zig-zagging across the middle of the little houses. I’ve learnt that paper piecing does not make for easy quilting! My quilting isn’t perfect but it’s quilted. The backing fabric is quite a busy but subtle soft purple which has the big advantage that my quilting doesn’t particularly show up on it. I have checked however, and I think most stitches are getting through to the back!

I’m thinking of stitching some nice straight lines like rays from the sunflowers in the corners and then this border is complete. It’s quite a nice feeling when it’s a struggle to fit the area you’ve quilted on a photo easily!

Hand Quilt Along Links

This Hand Quilt Along is an opportunity for hand quilters and piecers to share and motivate one another. We post every three weeks, to show our progress and encourage one another.  If you have a hand quilting project and would like to join our group contact Kathy at the link below.

KathyLoriMargaretKerryEmmaTracyDebConnieSusan,  Nanette,  EdithSharonKarrin, and Gretchen

I’m also linking up with Kathy’s Quilts for Slow Stitching Sunday, follow the link for more hand-stitching inspiration

Posted in Down The Rabbit Hole, Quilt-a-long, Quilting | Tagged , , | 20 Comments

My Bobbin Garden

I’ve just finished stitching Le Jardin de Bobines by Nathalie Cichon of Jardin Privee, I bought the pattern at the Festival of Quilts last year, I loved the colours and it brings together two of my loves, gardening and sewing! I think it’s the fourth design of Nathalie’s I’ve stitched over the years.

Sewing Room Cushion
www.thecraftycreek.com

It’s been fairly quick to stitch, of course I did make a bit of a variation on the left hand plant. I managed to stitch a wiggle in where it was meant to be a gentle curve, I was stitching in the coffee room at work before my shift started so I was obviously concentrating more on the banter than I was on my pattern! I undid the worse line and make it at least look OK, even if it wasn’t correct! However it did mean that everything above that point is two stitches to the right. It’s the sort of pattern where that doesn’t really matter, though my butterfly is fluttering through a bit of a narrower gap than he would like, and the pink flower has a slightly smaller petal. It’s unique!!

Sewing Room Cushion
www.thecraftycreek.com

The finished design is about 6″ square, a bit too big for a small so I decided to make it into a cushion for my sewing room. I had a good rifle through my stash looking at various colours and combinations, nothing jumped out until I saw a batik which Helen gave me for Christmas, it seems to include most of the colours in the design and looks vaguely garden-like, it’s got the pinks and purples, turquoise and green. I had found my fabric!

Sewing room cushion; www.thecraftycreek.com

I stitched a 4″ border round the design, thinking I’d trim it to size. I thought I’d bought a 12″ cushion pad, but when I tried it I discovered it was actually 14″, so my 4″ border made it just the right size. I did have a play with some ric-rac round the cross-stitch, but it didn’t seem to add anything, so I went with a simple border. I backed it with the same fabric and just slip-stitched the pad inside.

I have a little bentwood chair in my sewing room which I recovered a few years ago so my cushion looks perfect sat on there, next to my sewing shelves.

Sewing Room Cushion
www.thecraftycreek.com

I’m linking up with Kathy’s Quilts for Slow Stitching Sunday, please follow the link for lots of hand-stitching inspiration.

Posted in embroidery, Sewing | Tagged , , , | 20 Comments

Splendid Sampler 2

I’ve got a bit behind with my Splendid Sampler blocks, this is one reason why they are listed on my Nineteen for 19 challenge. I just looked and it was October when I last posted any photos! I’d made sixteen at that point.

The Splendid Sampler 2 is a quilt-a-long organised by Pat Sloan and Jane Davison. I did the first SS quilt and loved it, two blocks a week and lots of camaraderie on facebook. This time only the first twenty blocks were free, then you had to buy the book for the other 80 blocks. I bought the book in the autumn and it’s pretty much sat there since! Somehow there isn’t the same camaraderie which keeps you going on a big project like this.

When I read the introduction Pat did come up with a very good suggestion. Make it a personal quilt with blocks that mean something to you. I was never planning to do all 100 blocks, I want a throw size this time, maybe 49 or 64. I’ve looked through the patterns and chosen ones that relate to me, so all the sewing ones are in! There’s also a music one, mountains, countryside, flowers and books all feature in different blocks. After that I’ll do the ‘general’ blocks I like!

Just before Christmas I did manage to embroider one of the blocks, but I didn’t quite get it sashed and quilted to show you. Over the weekend I had a good session in the sewing room and managed to complete another four blocks;

Splendid Sampler 2

The sewing one is a design by Pat herself, I embroidered it in a soft blue variegated thread, it’s just back-stitch and french knots. I was a bit wary of quilting it, I’m always a bit more apprehensive on blocks I really like! In the end I quilted round the flowers, stitched a wavy line round to the next flower and quilted the word sew across the centre. I deliberately didn’t try and match the embroidery as I didn’t want to stitch over the embroidery too much.

This image has an empty alt attribute; its file name is dsc_0201-2-1.jpg

I also finished the fruit bowl block by Jo Avery. This hasn’t come out as well as I hoped, the applique circles are a bit cornered! However the advantage of this is that I was a bit more adventurous with my quilting! I made a sort of figure of 8 pattern along the edge of the basket (I think mine looks more like a fruit basket!) and then quilted a petal shape on the sides of the basket. The fruit was all stitched in the ditch and then a swirl added in each circle.

This image has an empty alt attribute; its file name is dsc_0203-2.jpg

The First Aid block by Jane Davidson is about wear and tear of quilts and mending these treasures. As a nurse for me it’s more about emergency first aid and the work I do each week. I quilted this one fairly simply with some extra crosses.

This image has an empty alt attribute; its file name is dsc_0199-2.jpg

The last block I tackled was called Nancy’s Spool, it was designed by the late Nancy Zieman. It’s a lovely simple block of a spool of thread. I quilted it in the ditch but I also added a pattern down the centre, in calligraphy I would call it a flourish! I thought it would look a bit like the criss-cross pattern you get on a spool of thread.

This image has an empty alt attribute; its file name is dsc_0202-2.jpg

I’ve made twenty blocks now, I arranged them on my design wall and I have to say they look pretty good!

This image has an empty alt attribute; its file name is dsc_0204-2.jpg

Twenty nine to go…

Posted in Quilting, Splendid Sampler Quilt | Tagged , , | 13 Comments

Monday’s Meander Round the Garden

I’ve managed to get my three sessions of gardening in this week, sometimes short, at least one was a couple of hours! I find that once I’m out there, all wrapped up, it’s actually quite pleasant!

I’m still waiting for my wine hellebore to bloom, there’s lots of buds now though, a couple of the other hellebores are just starting to flower too, this is a pretty double one I grew from a little plug plant a few years ago…

…I think I’ve a bit more tidying up to do round the pond! Those are old iris and crocosmia leaves which need a good trim.

Whilst I’m tidying the beds up I uncover all sorts of bulbs just starting to make an appearance, in particular daffodils and snowdrops.

I’m concentrating on the patio area at the moment, down by the conservatory. I’ve pulled up all the dead geranium and brunnera leaves, cut back all the irises, weeded and generally tidied. My next area to tackle is the raised bed, it’s about 6′ deep and about 18′ long, I’ve planted lots of shrubs but I think I need a few more smaller ones. It always looks a mess at this time of year! At one end there’s a large choisya which I think needs a good prune as it’s being a bit of a bully to nearby shrubs. The rose is getting swamped and there’s a poor artemisia just to the right of the shrub which looked like it was being pushed off the wall last year!

This image has an empty alt attribute; its file name is dsc_0202-1.jpg

The pots still need sorting a bit but I did notice an early iris reticulata, it’s been fairly mild over the last couple of weeks and I think a few plants are earlier than usual.

This image has an empty alt attribute; its file name is dsc_0106.jpg

Hopefully next week I’ll be able to show you a tidy patio and maybe some wine red hellebores!

Posted in Garden, Serendipity | 10 Comments

Tall Year Square Etui SAL

It’s three weeks since I last showed you my etui, it’s a design from the Classic Inspirations magasine by Betsy Morgan. I was still embroidering the final pieces then…

I’ve been working hard on it since then, I was ready for a finish but I also had a competition deadline to urge me on. You may recall last year I was short-listed for the Needlecrafter of the Year award with my silk ribbon embroidery. Well I didn’t think it would work for that but I noticed they also had several other competitions, including use of colour. The deadline was Friday and I finished it with hours to spare…

Yes, it’s happy dance time!!!

Once I had finished all the embroidery I had to steadily and methodically go through the construction instructions. I’m afraid I hardly took any photos during the construction – I was too busy concentrating!

I was surprised to see the etui is made with pelmet vilene, not cardboard. I bought some on line and also bought a stiffer one to try as I wasn’t convinced about just using vilene. All the pieces were backed with a medium weight iron on vilene, just big enough to fit inside the outline stitches. The embroidery was then laced over a piece of pelmet vilene. I did cut out some of the stiffer vilene but I decided it would be too bulky. Each side is lined with silk dupion, again this had a medium weight vilene ironed on and then I gently laced it round another rectangle of pelmet vilene. The pocket strips were cut right next to the nun-stitching, which was a bit terrifying! They were then laid across the silk lining and stitched across the back.

When I first saw the back-stitch outline round each piece, I presumed I would be whip-stitching sides together, however the stitching just seemed to be a way of keeping the edge sharp and neat, I had to run a thread under every backstitch and then make a tiny stitch across to the silk in-between. It does make a neat, even finish.

This image has an empty alt attribute; its file name is dsc_0203.jpg

The base was made the same way. The sides were stitched onto the prepared base using a ladder stitch. I used the thick interlining for the base as I thought it might help the structure.

This image has an empty alt attribute; its file name is dsc_0209.jpg

I had changed the design of the lid from a flat piece to a cornered shape so I had to make it up as I went a long. I used my hera marker to score the interlining along the folds. I ladder-stitched the corners together and folded and pressed the sides under along the stitch-line, I slotted the pelmet vilene in and tacked the sides to the interfacing. The lining was a bit more tricky to work out, in the end I ironed on a square of interfacing which would just fit the centre, I did a little squirt of 505 basting spray just to help it stay in place. I made some tiny stitches into the corners to hold it neatly and then trimmed and turned under the silk against the sides. Clover clips came in very useful here! At the corners I just to make it as neat as I could, I then gave it a good press using the corners on my tailors block.

This image has an empty alt attribute; its file name is dsc_0202.jpg

I made four lengths of cord from for co-ordinating DMC threads with a little mother of pearl button threaded at one end before the cording started. This then had to be threaded through the eyelet in the middle of each side using a large darning needle, passed under a buttonhole loop and then up through the corresponding eyelet in the lid and finally through a hole in a larger button on the top! The four cords were tied into two loops and then I made a tassel to go over the top of them using a purple perle thread.

This image has an empty alt attribute; its file name is dsc_0200-1.jpg

Having made the basic etui, I then turned to the pin cube. This was prepared the same way with interfacing and lacing over pelmet vilene. I then used ladder stitch to join all the sides, stuffing it firmly before the last two sides were stitched. Attaching it to the box proved tricky! I made another length of cord. I then had to find a needle which was large enough to thread the cord through, but small enough to pass through the holes in a little button, and finally long enough to pass right through the pin cube!!! It took some finding! It was a miliners straw needle that passed the test in the end! I had to pass the needle through the button and eyelet on the top, through to the eyelet on the bottom of the pincube – not as simple as it sounds with all the stuffing! It then went through the eyelet in the base, through a button, then all the way back again! It was then just tied in a bow.

This image has an empty alt attribute; its file name is dsc_0198.jpg

I’ve really enjoyed making this etui, it’s taken about 15 months, though I have made a few other things along the way! I didn’t find the pattern easy to read at all, it took me a long time to get my eye in as it’s written so you count lines, not squares, there’s quite a few miscounts in there! I’m really pleased with how the colours worked out as I used my own choice of thread rather than the ones listed for the project which were way out of my budget. Each side of the etui, the lid and the pincube represents a different season but the design flows round the edges from side to side. It is a lovely design!

Tall Year Square Etui

I’ve already chosen what I’m stitching next, I need a simpler design which I don’t need to concentrate on too much so I can spend time on my hand-quilting as well. All will be revealed in three weeks time!

This stitch-a-long is organised by Avis of Stitching by the Sea, we post every three weeks which is a great incentive and motivator to keep going on a project! If you would like to join us, just send Avis a message. In the meantime please follow the links to see what everyone else has been stitching.

Avis, Claire, Gun, Carole, LucyAnn, Kate, Jess, Sue, Constanze, Debbierose, Christina, Kathy, Margaret, Cindy, Helen, Steph, Linda, Heidi, Jackie, Sunny, Hayley, Megan, Catherine, Deborah, Connie, Clare, Mary Margaret, Renee, Jenny

I’m also linking up with Kathy’s Quilts for Slow Stitching Sunday, a celebration of all things hand-stitched.

Posted in embroidery, Stitch-a-long | Tagged , , , | 36 Comments

Guess How Much I Love You…

…All the way to the moon and back!

I think Guess How Much I Love You has to be my favourite children’s book from when my kids were little, it had only just been published then and I loved sitting on their beds, snuggled under a quilt, reading the story to them. I’m going to be a great aunt soon (makes me feel very old, I used to have a Great Aunt Margaret and she seemed positively ancient!!) so of course I’m making a baby quilt. It didn’t take long for me to decide on fabrics as soon as I saw this range. I wanted a fairly neutral palette as we don’t know whether it’s a girl or a boy, so I avoided the pink colourway.

This image has an empty alt attribute; its file name is dsc_0196.jpg

I wanted a very simple pattern which wouldn’t detract from the cute hares on the fabric. I remembered a baby quilt I’d saved on Pinterest and luckily it was a link that actually went back to the original post on Lo, Ray & Me.

The pattern is very straight forward, initially I planned to stitch a wider strip of rectangles and then cut off the 6.5″ strip for the end, but the first fabric I cut I wanted to fussy cut so that idea went out of the window. I do like the two hares in the squares! The only cutting out problem I had was with the spotty fabric going down. The dots aren’t true to the grain along the width, which is how I was cutting it. After much thought I decided to go with the dots and keep my fingers crossed that being slightly off grain wouldn’t matter…

Everything went smoothly until I stitched that dotty length on, I couldn’t get the stripes across to match. Unfortunately I didn’t take any photos at this point, but trust me, it may have only have been a good 1/4″ off but it looked really off! It took me a while to work out that somewhere along the dotty edge some stretching and waving had occurred. I spent a bit of time with my ripper and started that bit again. I decided it was a mixture of two things, the off-grain situation can’t have helped, but also I’ve got into a bit of a bad habit when stitching plain borders on of not measuring the length, just carefully feeding it in and stitching it. I’ve always got away with it, ending up with nice flat borders. I think on the whole I must be fairly even when feeding the top and bottom layers under the foot. Not this time! I then measured my quilt and cut the border strip, pinned them together and stitched. It worked! I think I’ve learnt my lesson!

This image has an empty alt attribute; its file name is dsc_0195-2-1.jpg

I thought I had enough batting in my scrap box, but the piece was about 2″ too narrow, so I’ll have to finish it next week. I’m thinking of quilting the word Love or Baby down the dotty strip,maybe with a close stipple behind to make it stand out. I haven’t quite worked the rest out so any ideas welcome!

Posted in Serendipity | Tagged , , | 12 Comments