
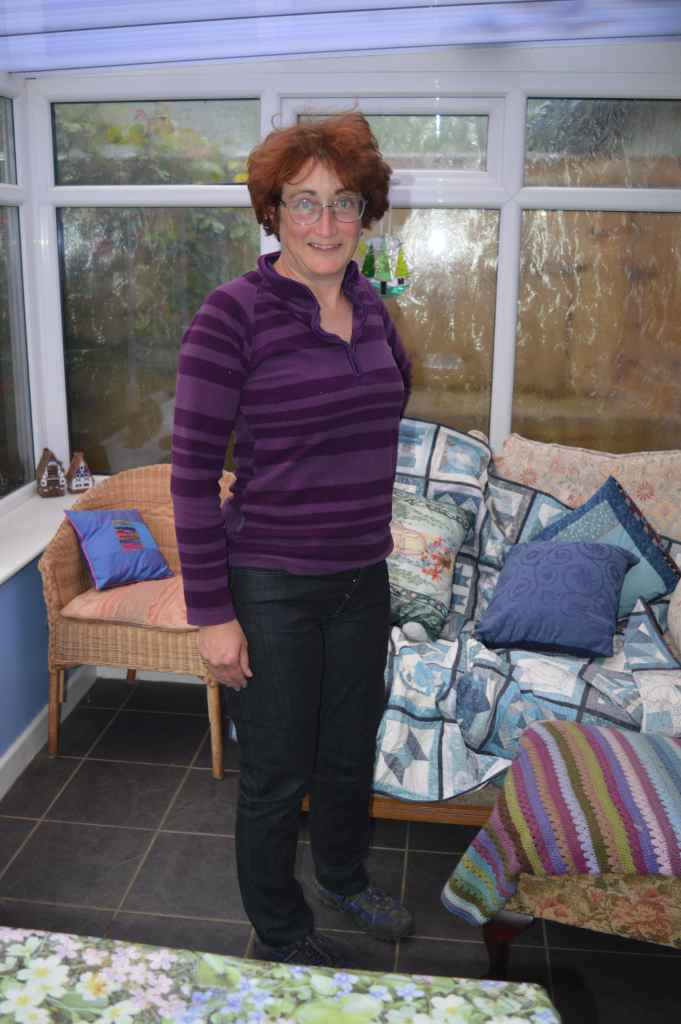
I’ve done it! I’ve finally made myself a pair of jeans!! And they fit!!!
I’ve had the Ginger Jeans pattern on pdf (always off-putting for me!) and a paper pattern of the Morgan Jeans for years, and I mean years. I just kept putting it off. When my last pair of jeans became too indecent to even wear in the house, I deccided I had to buckle under and make some, after all I had all the denim and all the hardware extras to make them, I just needed a kick…
Ginger jeans by Closet Case Patterns are well known amongst the sewing community, , their Morgan jeans pattern is less well known, in fact it’s rarely mentioned. Ginger jeans are described as skinny leg, low waisted jeans, though I think you can get an adaptation to raise the waist level. They are designed for stretch denim. Morgan jeans on the other hand are described as ‘boyfriend jeans’, they are higher waisted, a button fly, and more straight legged. This style appealed to me more. It is also designed for non-stretch denim.
I thought I had some non-stretch denim, a heavy black one, it didn’t seem to give when I tried it, however once I started to sew with it I realised it does have some stretch, but the pattern has worked great with it.
I measured myself before and came out as a 14 leg and 12 waist. Helpfully it gives finished garment measurements, including calf and thigh, I decided I would make a straight size 12 instead as there was a fair bit of ease allowed for.
My original plan was to sew the whole thing with black thread, so all the top-stitching would be black, I wanted to be able to concentrate on sewing the jeans rather than constantly having to change my top thread. The first part to be stitched with jeans is always the back pockets and their stitched design. I decided to play with my new sewing machine as it does alphabets. I tried various fonts, but in black it hardly showed up, after trying various shades I plumped for dark grey, which shows up nicely whilst being fairly subtle, and I could sew all the seams in the same thread. My overlocker was already set up with black, so I could easily change between the two.

I stitched Crafty Creek on the back pockets and added a simple decorative row below. It’s not perfectly central and I’ll probably do it differently next time, but as an idea I think it works. So if ever you see someone with Crafty Creek on their bum, it’s me!!

As with the denim skirt I made recently, with jeans you just have to steadily work your way through the instructions. They’re not actually difficult to make, it’s the fit that’s the tricky bit! The instructions were OK, though I thought the Merchant Mills instructions for the jeans skirt were clearer – I was glad I made that first. There was one instruction that I’m sure is incorrect and another which I didn’t understand until it was too late.
I made the jeans as per pattern until the stitching of the side seams, I machine basted these so I could try on and alter if needed. On the first try on the waist was huge, so I took some in at the side seams. It still gaped at the back. I was going to accept it and hope the waistband brought it in, but luckily I slept on it and this morning I undid the top-stitching and edge-stitching down the centre back seam so I could take it in there. It made all the difference. Next time I’ll make everything up to the point of stitching the main pieces together and then just baste until I’m happy with the fit.
I lined the pockets and backed the waistband with some cute quilting cotton, it’s got daisies and little mice on!

My sewing machine coped pretty well with all the layers of denim. It started skipping stitches at one point, but I just gave it a new needle and it was fine. I remember a tip I saw on facebook about the little black button on your standard sewing machine foot. I’ve been sewing for 40 years and I never knew this!! If your sewing over really lumpy seams and the needle is in danger of hitting the foot due to the angle, lift the foot, hold it level and push in the black button. It will hold it in the level position whilst you go over the hump! It works!!
Extra equipment I found useful; my wooden tailors block, I used it for all the seams, you press and steam with the iron and then quickly press hard with the block, it helps set the steam in and makes a lovely flat seam. Tailors ham, the sausage shaped one, great for pressing down trouser legs! Silver gel pen, great for marking top-stitching lines or button holes. Bernina buttonhole cutter, these are like mini chisels which cut straight through the buttonhole – they are so sharp!
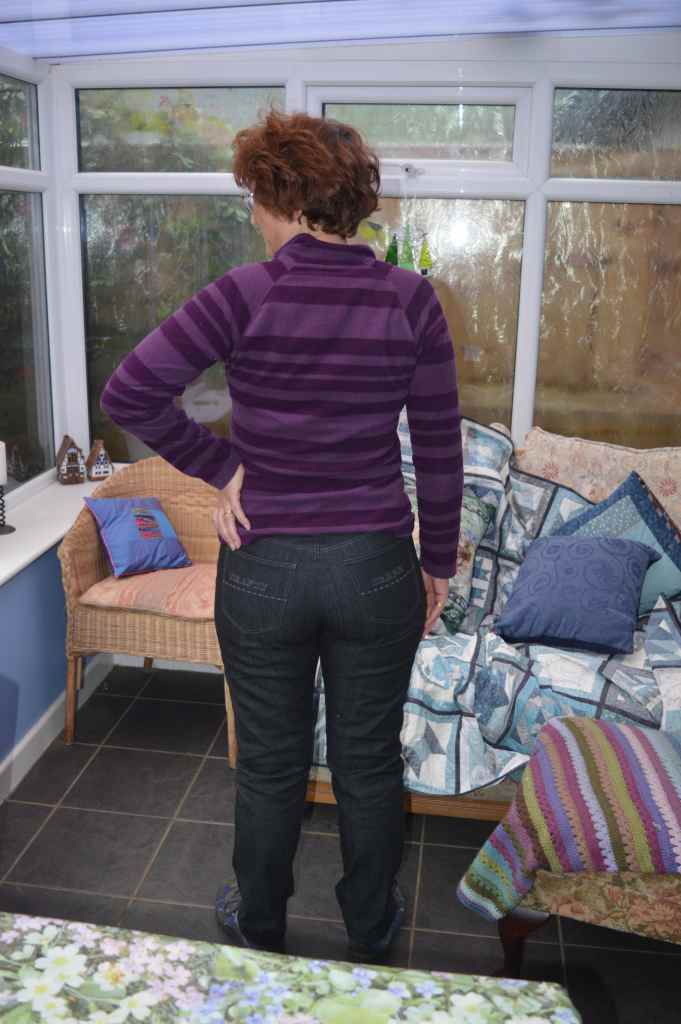
I’m really pleased with the final fit, the adjustment at the back helped, I know which bits to look at next time. I think the stretch worked really well with the pattern too.
Closet Case do an on-line ‘book’ for making Ginger jeans and obviously it’s just as relevant for the Morgan jeans, I found it really helpful, they have pictures of ‘normal’ people in jeans with fitting issues to show which bit needs altering, lots of tips of choosing denim, sewing with it etc.
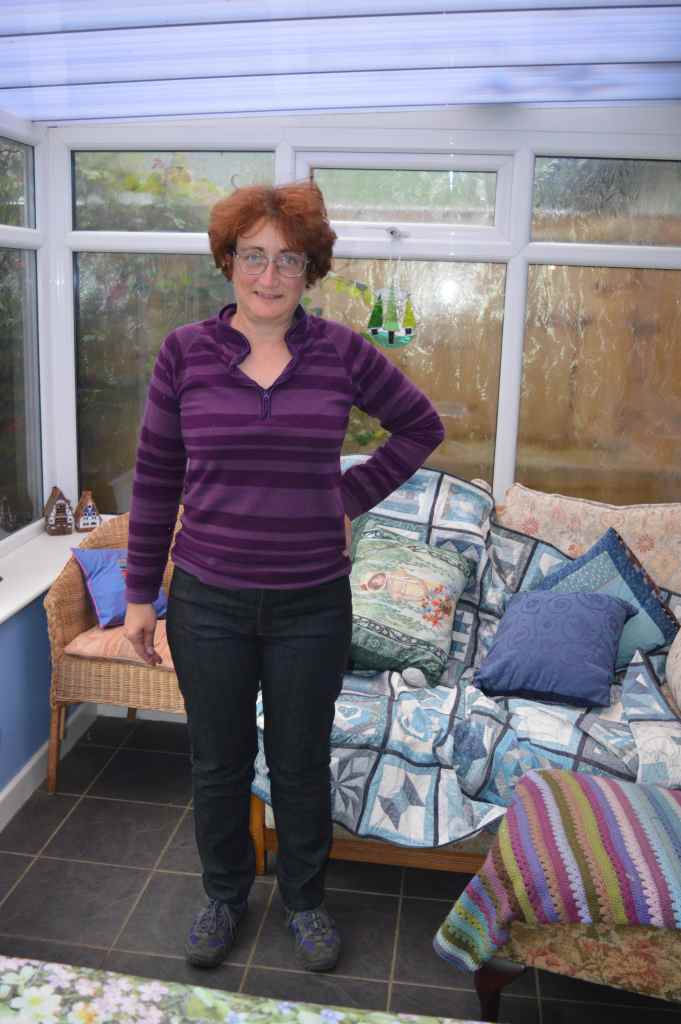
As you can probably tell, I’m well chuffed with my jeans 🙂


They look fantastic, what a perfect fit! You must be happy with how they turned out. I’ve never made clothing (other than junior high sewing class), seeing how great your jeans are makes me think about trying. Although, I’m sure I would have much different results.
LikeLiked by 1 person
Thanks Toni, I’m really pleased with them. Have a go at making some clothes – but I’d start with something a bit simpler 🙂
LikeLike
You should be well chuffed with these jeans. They fit you perfectly! Custom job!! All of those button holes, mercy, you can do anything.
LikeLiked by 1 person
Thanks Lisa, they certainly fit as well as any I’ve bought! My machine does automatic buttonholes, so they’re a doddle 🙂
LikeLike
They’re brilliant, how fab that you can customise the fit so well.
LikeLiked by 1 person
Thank you, there’s lots of help around on line on how to make them fit 🙂
LikeLike
That is the perfect pattern for you Margaret, even though you had to make alterations, you got them on the first go, and now you know what to do for the next pair! Happy day!
LikeLiked by 1 person
Thanks Kathy, happy days indeed 🙂
LikeLiked by 1 person
Love the pocket detail and the crossed belt loops at the back. I bet you’ll be turning out lots more pairs now that you’ve cracked the process!
LikeLiked by 1 person
Thanks Kate – the crossed belt loops is actually to avoid trying to stitch a belt loop on the back seam as it would be 9 layers of denim!!! I’ve several more lengths of denim, so hopefully the fears gone now 🙂
LikeLiked by 1 person
Oh wow, Margaret! You have done a fantastic job…the jeans look great! I love the details! Well done! 🙂
LikeLiked by 1 person
Thanks Laura 🙂
LikeLike
Fantastic, they look so good! This is great motivation to make some more now
LikeLiked by 2 people
Thanks Jane, I’m pretty chuffed with the fit for the first attempt 🙂
LikeLike
Well done Margaret, they look really good . I’ve made the Ginger Jeans but wanted to try some more traditional non- stretch ones next. I’ve had Megan Nielsen’s Dawn jeans pattern for a while now plus everything I need to make them it’s just that my dressmaking mojo was the mojo to go in the lockdown but I just finished a dress yesterday so I think it’s come back. You’ve given me a kick up the butt to get on with them and, talking of butts, your pockets are great!
LikeLiked by 1 person
Thank you, I’m thinking of getting the Ginger jeans ones printed off A0 size, then I’m more likely to try those too 🙂 Glad your mojo’s back 🙂
LikeLike
I’ve used Netprinter a couple of times but now husband is in lockdown with me over here the postage would probably add too much to the cost. It’s a good service though.
LikeLiked by 1 person
I’ve used Patternsy before, I think Foldline do them now as well, not sure where they are based.
LikeLike
So good!
LikeLiked by 1 person
Wow, no wonder hubby took That photo, they and you look terrific.
LikeLike
They look super – the back pocket detail is great( so is the picture!)
LikeLike
such a brilliant pair of jeans! I love the personalised stitching on back pockets!!!!
LikeLike
Well done! They look brilliant! I too found that sleeping on a problem gave me more patience to address the problem in the morning when making my ginger jeans. On with the next pair? X
LikeLike
YAY YOU! The pocket detail really makes them shine. And the fit and quality look great. Well done!
LikeLike
I LOVE the jeans. I’ve never been brave enough to make my own jeans. Perhaps I’ll give it a go, after seeing how well yours turned out.
LikeLike
Hello Margaret, your jeans look wonderful on you, the fit is great and I love the back pocket detail. Well done, deserved to be proud of these. Regards Mandy xx
LikeLike