
Last Saturday I set off early to negotiate a two bus journey over to Halifax, it took over one and a half hours, it would have been much quicker by train I think if they hadn’t been on strike! It was worth the journey though as I was attending a workshop at The Fabbadashery by Emma Frith.
The Fabbadashery is a lovely shop just up from Piece Hall in Halifax, they have a great range of quilting fabrics, trims, and generally lovely sewing stuff. Very friendly and helpful too, they have regular workshops both on embroidery and quilting.
Emma was running a workshop on embroidering a butterfly brooch. As soon as I saw a photo of the project I booked a place as I knew it would help with an embroidery project I’ve been mulling around in my head for a while. I want to make four (or more, if I get carried away!) butterflies and mount them in a frame like a traditional display.
Emma is a great tutor, she describes herself as an Artistic Hand Embroiderer on her card, her work is beautiful and she’s a very patient teacher and she also managed to create a lovely friendly ambiance in her class, there were seven or eight of us around a big old table, chatting away!
We had the choice of making a common blue butterfly or a red admiral. It was a close thing as the common blues are beautiful, but I decided on the red admiral.
The first thing we made was the body, by weaving wool around a cake-decorating wire. She had already kindly made the antenna for us to save time but she did show us how to make one with a pair of beads, a length of wire and Gutermann thread. With the antenna attached to the body, we were ready to start the wings.
The butterfly wings start off with silk painting, that’s where the background vibrant colours come from, this suits me to the ground as I have a box of silk paints at home! The silk is then bondawebbed onto some calico / cotton to do the embroidery.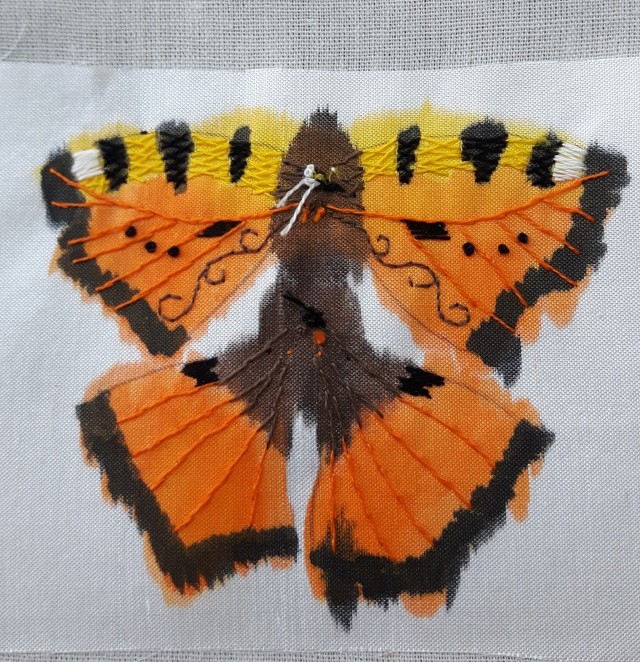
We could stitch and embellish as much or as little as we wanted, I stitched the veins in stem-stitch, made some black spots with satin stitch and french knots and added colour along the top with herringbone and straight stitches. I added a little curly doodle along the inside of the top wing and sequins along the outer edge.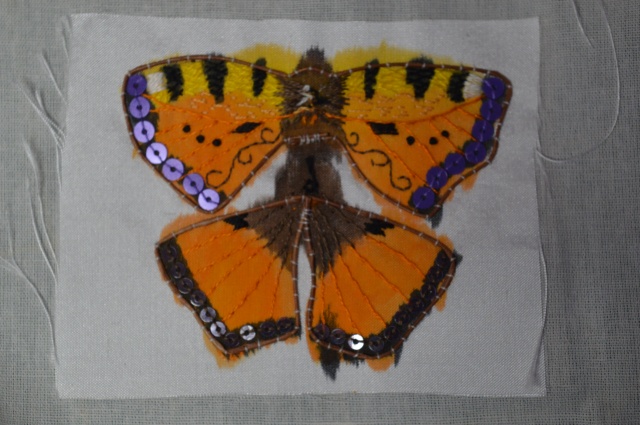
Once we were happy with our wings we used bondaweb to attach shot silk to the back. With the back in place we then had to couch a coloured length of wire around the edge of each pair of wings.This was a bit fiddly, but next came the scary bit, cutting out the wings right next to the couching stitches! Once they were cut out We could blanket-stitch around the edge, covering all the wire and couching stitches. It did take rather a long time to stitch round the two wings.
Once all the pieces were ready, all I had to do was stitch the wings together and then the body onto the wings and my butterfly was complete.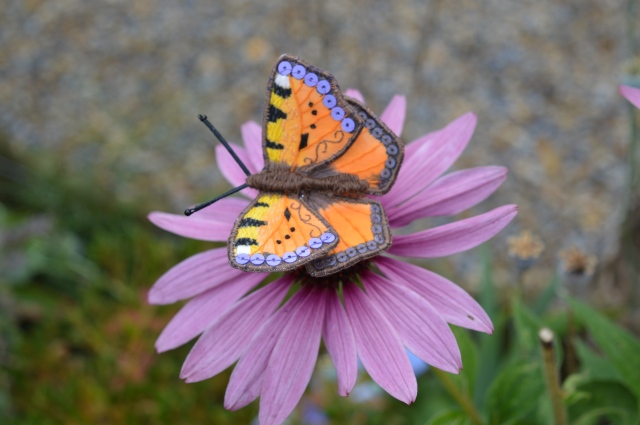
I had great fun posing him (or her??) in the garden…
I think Emma does quite a few different embroidery courses at The Fabbadashery, I shall certainly be keeping my eye on their workshops as I’d love to do another with Emma. I had to make a hasty exit to catch the buses home, so I didn’t even have chance to mooch around the shop!

Linking up with Kathy’s Quilts for Slow Stitching Sunday and entering in her photo competition for stitching in your favourite place, my garden! Why not follow the link and see where everyone else has been stitching.


Oh just lovely – what a wonderful project!
LikeLiked by 1 person
Oh wow, that is gorgeous
LikeLiked by 1 person
This is exquisite! And I love the idea of mounting them like specimens!
LikeLiked by 1 person
That is just amazing, what great work
LikeLiked by 1 person
Lovely creation, and so well “posed” for your photos!
Do get back to Fabbadashery as they have wonderful things to mooch around in. (On Ali’s report and experiences.)
LikeLike
Thanks Del, I’ve shopped there a few times, it’s a lovely shop, but I didn’t get home til about 6pm as it was!
LikeLiked by 1 person
Oh ~ and nights are probably starting to draw in, aren’t they… Well, at least you’ve been exposed to their goodness! 😉
LikeLiked by 1 person
Pretty, pretty! I wish that little butterfly would fly right over to my house! –Tracy
LikeLiked by 1 person
What a fun project!
LikeLiked by 1 person
Wow, another fabulous embroidery.
LikeLiked by 1 person
Very pretty, and just for a moment, you can believe it’s the real thing. I think you should crack on and make the blue one as well!
LikeLiked by 1 person
An old fashioned cabinet of curiosities would be fantastic! What a clever person Emma is to devise these, and you have done a great job with yours.
LikeLiked by 1 person
It seems like doing a stumpwork butterfly. It’s GORGEOUS! can’t wait to see a collection of them.
LikeLiked by 1 person
That is just so cool Margaret!
LikeLiked by 1 person
What a great workshop and, next time, maybe the trains won’t be on strike and you’ll be able to have a mooch round the shop too.
LikeLiked by 1 person
What a fun project, it looks almost real on your flowers.
LikeLiked by 1 person
What a great fun project – love it and love the idea of an old fashioned curiosity cabinet!
LikeLiked by 1 person
Hello Margaret, I had real specimen box frames when I was in South Africa that my ex took with him when we had a parting of the ways. I’ve thought about them often, they were so beautiful. Seeing your gorgeous butterfly, I think it is a brilliant idea to frame them in box frames as you said. Yours is very realistic and will look so good, I look forward to following your progress. Regards Mandy xx
LikeLiked by 1 person
Your butterfly is amazing!
LikeLiked by 1 person
That is amazing!!
LikeLiked by 1 person
Your butterfly is beautiful. Can’t wait to see any more you make!
LikeLiked by 1 person
Your butterfly is gorgeous! What a great class to take, but what a long ride. Wow! I look forward to seeing any future butterflies.
LikeLiked by 1 person
I just love this butterfly and your photos of how it was designed and made 🙂 Great job by you with Emma to teach you too ❤ Kathi
LikeLiked by 1 person
That’s an amazing stumpwork butterfly! I like that it starts with a silk painted fabric. That makes it so much less time consuming than having to put in all the color with embroidery. Having done a stumpwork dragonfly in the past, I agree that the wing edges are the most difficult part, but SO worth it.
I do have a question, though. Can you describe bondaweb? Is it the two sided fusible webbing? (I think it’s called something else here in the US.)
LikeLiked by 1 person
Hi Karla, bondaweb is a thin double sided vilene, (interfacing) it has paper on one side which is removed after it’s been stuck to the first fabric. It’s great for applique if you don’t fancy needleturning.
LikeLike
Oh how lovely! Thanks for the link to the shop… I poked around the website and enjoyed all the photographs… such a fun place! And I love Emma’s hair!!
LikeLiked by 1 person
Beautiful!
LikeLiked by 1 person
Such a lovely project your butterfly is simply stunning. Love the way you photographed in the garden
LikeLiked by 1 person
Oh wow, that’s awesome! You did a really lovely job with your butterfly!!! 🙂
LikeLiked by 1 person