On Saturday I went with a WI friend for a fabulous day at Alma House on a workshop making a stained glass nativity. Alma House is our WI federation’s office in Ripon.
We were all very different levels of experience, one lady had made a stained glass panel at Denman College before, my friend Theresa had done a workshop on stained glass birds at Alma House last year. I’d never done anything like this and really didn’t think I would manage to make a whole nativity in a day…
Our tutor for the day was Rachel Poole, she was great, she had prepared us all a box of equipment which include one piece of glass already cut out, this was either Mary or Joseph. These two shapes made the templates for all the figures, our neighbour had the other one so we could swop templates, basically it was a kneeling person and a standing person.
First lesson was how to cut glass, I didn’t find it easy scoring the glass along a wavy line, and trying to break it ‘like a kitkat’ was somewhat scary!! Luckily the next stage was grinding the edges, this neatened off all the bits I cut badly and allowed me to add curves where I’d missed them off completely!
Whilst I was waiting to use the grinder, Rachel suggested I looked for some glass to make a stable, I found a small circle in her box, but I then cut a circle shape for the back, I was particularly pleased with this one, I actually managed to cut an OK circle!! This photo from the internet shows the technique pretty well.
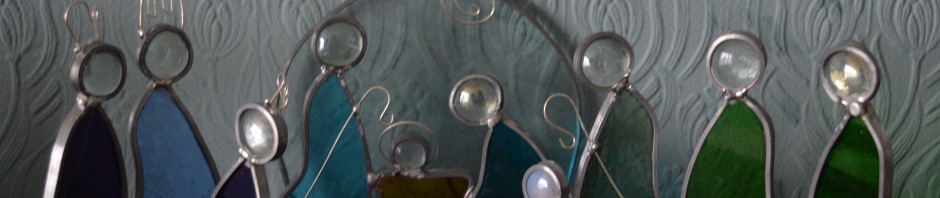
The soft lead was wrapped around each piece of glass, that was quite satisfying as you could see it starting to come together. The heads are made from glass nuggets which are rounded on one side and flat on the other, Jesus had a tiny one and the lambs head is more opaque. We arranged all the pieces on our boards so we knew we had everything the right way round before moving on to the last part, soldering…
I’ve never done any soldering before, it was quite scary to start with! We worked in pairs again, one holding and the other soldering, you certainly had to trust your partner as the heat coming off a 1000’C soldering iron an inch or too from your fingers is pretty intense! We both kept having to remind each other to add tallow, a beef wax without which the solder won’t stick. It was fascinating watching the solder move, a bit like mercury, I still don’t really understand how it doesn’t break the glass just from the heat.
Once the basic figure was soldered we could add the extras, such as shepherds crooks, crowns for the kings and a halo for Jesus, these are made from silver wire and Rachel had shaped them already, all we had to do was solder them on. I fancied a star on my stable too, Rachel gave me a length of silver wire, I decided to make it a shooting star so I would have enough contact points to secure it, so I bent a five pointed star with a long tail that curled round at the base, this gave me several points to solder.
Solder cools almost instantly, and once the sets of figures were soldered together at the front they could be bent round so the group would stand. We then filled in the back of the join with more solder.
I am well chuffed with my nativity, as well as amazed that we all completed a whole set, three kings, three shepherds and a sheep as well as Mary, Joseph and Jesus. 
I think this was one of the best workshops I’ve done at Alma House, Rachel was great, she kept it fun whilst making sure we were safe, she was patient and an excellent teacher.
My nativity is on display on my fireplace and it can stay there until after Christmas now, you don’t get the effect of light through it but it is safer up there and I can always put some Christmas lights around it!


So beautiful! Very impressive that this is your first attempt.
LikeLiked by 1 person
Thanks Mary, I’m well chuffed with it 🙂
LikeLike
I love this little nativity. I have a friend who makes stained glass panels and I’ve commissioned her to make a couple for above two doors in our house which have boring plain glass in at the moment. She says manipulating the lead is quite physically demanding but I guess it’s not so bad on the small pieces. This little scene will look lovely with some little lights around it for Christmas.
LikeLiked by 1 person
Thanks Tialys, I commissioned a stained glass window for an internal window at home over 10 years ago, we put K9 glass either side to protect it so apparently it weighs a ton! I still love it 🙂
LikeLike
oh well done! you obviously had lots of fun learning a new craft and your nativity scene is lovely!
LikeLiked by 1 person
Thanks Claire, it was a great workshop 🙂
LikeLike
They are quite lovely Catherine. The flowing, simplified shapes of the figures are very pleasing and so different to the complex embroidery you have been doing! My Dad did lead lighting too. One of my windows is a work of his, showing two blue wrens on a fence. It is a treasured possession, and coming with me if I ever move house!
LikeLiked by 1 person
Thanks Anne, your blue wren window sounds beautiful 🙂
LikeLike
What a great result from just a day’s course! Your teacher was obviously very good and careful, and the design is perfect, simple but very eloquent.
LikeLiked by 1 person
She was a great tutor, the design was simple enough for beginners but gives a lovely result
LikeLike
And it’s nice that the result is something you’d actually use rather than something that’s ‘just for pretty’.
LikeLike
I’m impressed! It’s a lovely nativity glass set. Lights added just right would give it a nice glow.
LikeLiked by 1 person
Thanks Deb, a little bit of twinkle behind will just complete it 🙂
LikeLiked by 1 person
That is a beautiful nativity! I would never have guessed it was your first time doing something like this, you did an amazing job!
LikeLiked by 1 person
Thanks Kate, I was amazed too 🙂
LikeLiked by 1 person
What a great workshop! I have always wanted to try stained glass, this is the type of project that could work. I love your nativity!!!
LikeLiked by 1 person
Thanks Kathy, I’m already looking forward to next years workshop!
LikeLiked by 1 person
Such beautiful Nativity! The glass work looks like it was so fun:). Great job!
LikeLiked by 1 person
Thanks Tracy, it was a really enjoyable day 🙂
LikeLike
This is beautiful! I tried stained glass when I was younger – it sure was tough on the hands and cutting and breaking the glass wasn’t easy – I sure was happy when it all worked out!
LikeLiked by 1 person
Thanks Linda, I ended up using pliers to break it a lot of the time!
LikeLiked by 1 person
Oh I had trouble even with some special pliers. I think I needed more practice!
LikeLike
Beautiful.
LikeLiked by 1 person
Thank you 🙂
LikeLike
That’s the best crafty thing I’ve seen in a long time, and you came home with it all finished!
LikeLiked by 1 person
Better than a bought one and so neatly made. It will give pleasure to all who see it.
LikeLiked by 1 person
Wow, this is fabulous! You did an amazing job!
LikeLiked by 1 person
How fabulous! I love it!
You are so talented… you can do anything 🙂
LikeLiked by 1 person
Wow! I am really impressed with your project. 🙂 Very daring to try such a different craft, too.
On of my nieces did stained glass in the past – she made me a large window to display in my (now closed) quilt shop with the shop’s logo design on it. I had to choose all the glass she used and was surprised and excited to see the vast array of glass colors and designs. Much like fabric. 🙂
Thanks for sharing your experience.
🙂 Linda
LikeLike
Thanks Linda, WI workshops are great for trying new crafts, or dabbling in ones you don’t want to get all the kit for 🙂
LikeLike
Pingback: Stained Glass Christmas Decorations | thecraftycreek