
Last winter I went on a two day course organised by the Women’s Institute up at Alma House in Ripon, it was called something like Textile Pictures. The tutor was Janet Browne from Addingham, she suggested that we went on her website before the course to get some ideas…Wow…I booked my place that day!
Janet does amazing collages of routes, such as the walk from Addingham to Bolton Abbey, or Skipton to Cornwall. The one’s I fell for were the garden pictures, you can see them here the detail in them is phenomenal, a robin sits on a garden fork, there are rows of vegetables…
We started with a little practise piece to get the hang of her method. The design is drawn on tissue paper, wadding is placed under calico, the design is then tacked to the back. Each piece of fabric to be appliqued on was then pinned to the front in turn. We then machine stitched the outline of the shape from the back, following the lines on the tissue paper before cutting round the stitching with little, sharp scissors.
It took some getting used to, ensuring that pieces went on in the right order, I had a fair bit of undoing when the fabric ‘missed’ the design, or creased underneath, but we got there! She was a very patient teacher!!
We were then free to draw our own design. I wanted to do a collage of our garden, I drew a design of the main part of our garden as it nicely fitted into a neat shape and didn’t have paths running straight up the middle to spoil the aesthetics!

It took a while to get the hang of the order areas had to be stitched in, for example with the summer house the fabric for the windows was stitched first, main fabric on top, then each window was cut out to show the fabric underneath, roof went on last. By the end of the second day I had almost done the pond area.

A lady sat next to me happened to mention Bondaweb, a new invention to me! I confess that the first thing I did after the course was to buy some Bondaweb! I don’t think I would have finished the collage without it! I could then cut out each individual piece, arrange it correctly, iron it on and then stitch round to secure it. I was also able to add a lot more detail then I would have managed with the other method. I would never have managed my golden retriever without Bondaweb!
It took an awful lot of different green fabrics, I tried to make the plants and shrubs identifiable if you know the garden, so there is a cottinius cogghria next to the summerhouse, hostas and crocosmia round the pond, clematis and roses on the obelisk…
Once the basic applique was done I then enhanced it with embroidery using French knots for the veronica and the perovskia, tiny lazy daisy stitch for geraniums…
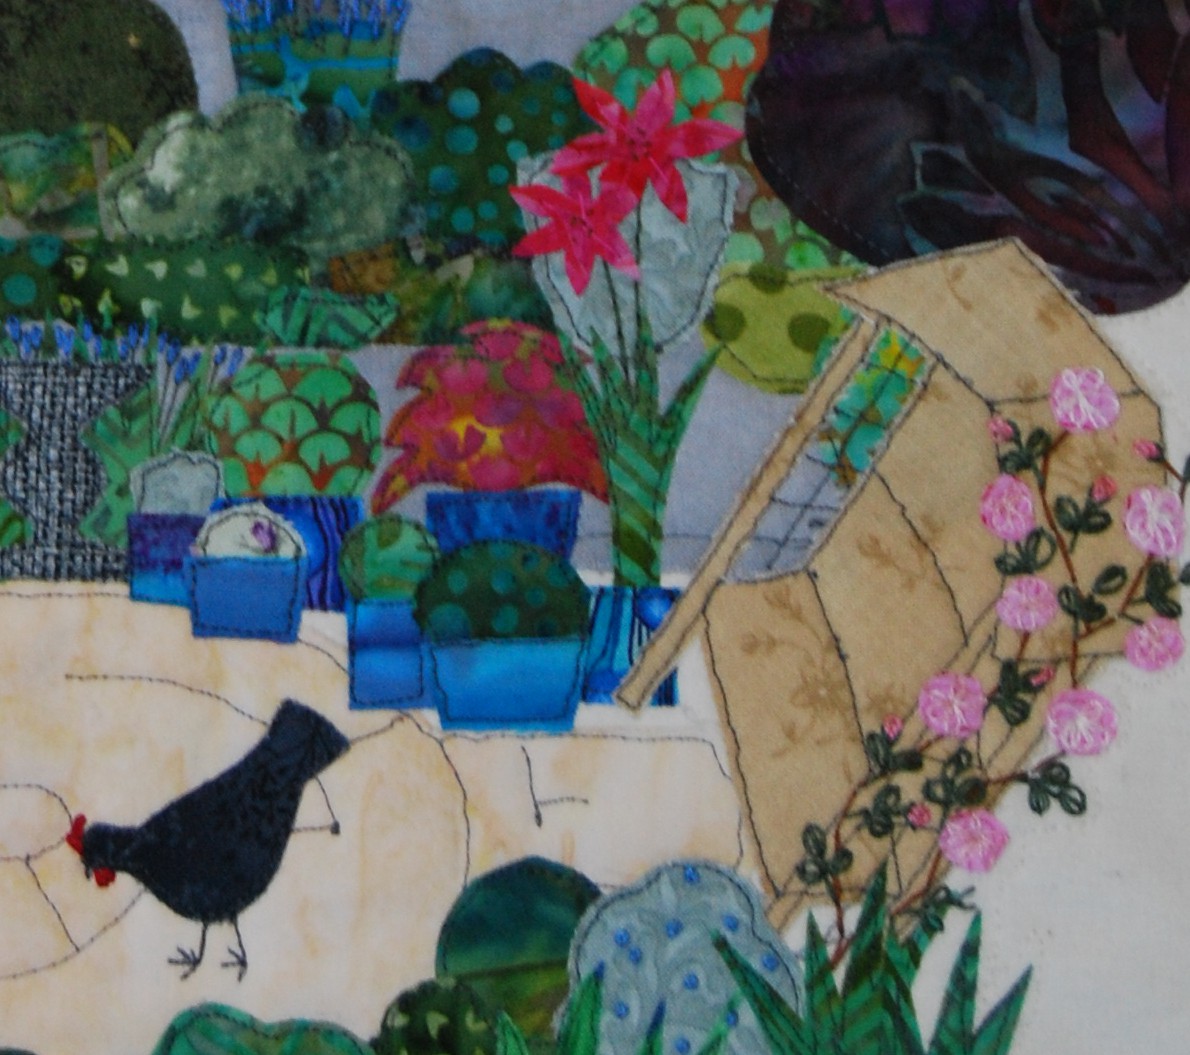
I added the dogs and chickens to give it a sense of time, Florence, Clementine, Dottie, Gracie and Ginger were the chickens we had at that time, Zac is our patterdale cross, he isn’t usually let in the garden as he digs holes, hence he is pictured with just his bottom sticking up, Rosie our golden retriever is in her usual floosie position!
Once I was happy with it I stitched round the edge with a close zigzag in cream thread and then trimmed it close to the stitching. The picture framers then attached it to a backing board for framing.

I’m really pleased with it, it gives a record of our garden at that point.


amazing! thankyou for explaining the process.
LikeLike
Thank you, sorry for the delay in replying but I’ve been on holiday!
LikeLike
Pingback: Inspirations | thecraftycreek