Every time I go out in the garden there seems to be something new appearing, the mixture of sunshine and rain has brought lots of growth.
The first iris flower has opened. I’ve quite a few irises, both the bearded ones that grow from corms ( and the dutch ones which grow from bulbs. This one is right next to the conservatory window. You can see some of the big iris leaves on the photo below.In the background is a camelia and a large clump of camassia.
In the forefront the spiky heads are from pasque flowers. They have gorgeous bright flowers but I also really like their seed heads, these stay for quite a few weeks, depending on the weather. You can just see an allium coming into flower, a couple of aquilegia and the brunnera Jack Frost is still flowering.
Up in the Amber & amethyst garden the perennial cornflower is starting to flower. It can be a bit of a thug in borders, but I try and keep it in check with a bit of pruning once it has flowered. The geum is just starting to flower and the bright pink you can just see further back is a tulip! The peony in the middle has beautiful bronze leaves. The rose on the obelisk is covering nicely.
Over by the pond the brunnera at the front is a mass of flowers. The iris and hostas are starting to push their spikes up. The foliage from the snowdrops is starting to look a bit past it but it will soon be covered by the geranium leaves.
Hopefully over the week-end I’ll manage a bit of time in the garden – weather permitting of course!!
I’m trying to work my way through my stash of quilting patterns at the moment, in particular my kits from Andrea Walpole of Raggedy Ruff Designs. I’m posting my progress on them every three weeks, so I keep at it! Three weeks ago I had just stitched a pheasant…
This time I decided to stitch a lampshade with two blackbirds on it. This was interesting as it’s the first one of these I’ve done that has been just the pattern and not a kit. Luckily I’ve made a point when I’ve stitched any of these kits previously I’ve kept every little scarp, some of the pieces are so little that a scrap is enough!
My first task was to make the background. Andrea has lovely interesting backgrounds with low volume batiks and a little pop of colour. I had a rummage in my batik scrap box and found quite a few suitable ones, mainly leftovers from the Humming bird quilt which I stitched a couple of years ago as it had a light background.
Anyway, I stitched the background, rearranging the order slightly so the colours would work…
What I didn’t realise was that the consequence of swopping two blocks was that the female blackbird’s head (with the eye and beak densely stitched) was right over the purple diamond with it’s thick seam junctions. I knew my machine wouldn’t manage it so I repositioned the design just a little further down.
The birds and flowers are all traced onto freezer paper, ironed on the fabric and then cut out. It took several attempts at laying it out before I was happy. Only the blackbird wasn’t from my scrap box, that is the only one that isn’t a batik, it’s one of the smudgy ones in almost black, it will be interesting to see how it fairs with machine embroidery as it’s not as close a weave as batik.
Once I was happy with the positions I had to start stitching…that’s the scary bit! Andrea does’t use any adhesive, just holds the piece in place. I’ve always used a spot of glue to keep things in place but this time I decided to try Andrea’s method and it did work, I only came a bit unstuck with the very tiny pieces. All the pieces are outlined in a soft brown to start with. This bit tends to look a bit messy (if you’re not a very neat free motion stitcher like me!) but I know from the other pieces I’ve done, once the embroidery is finished it won’t be noticeable.
So this is as far as I’ve got so far. I’ve all the embroidery left now. I ordered a lampshade kit the other day so then I’ll just need an assistant to help me make it into a lamp! I’m pretty pleased with it so far.
If you fancy trying one of Andreas patterns please follow the link in the first paragraph to the Raggedy Ruff website. They’re not as difficult as they look, the machine embroidery is actually quite forgiving.
I trained as a nurse back in the 1980’s at Barts, otherwise known as St Bartholomews in London. I have to admit that one reason I chose to train there was that I liked the uniform!! When many hospitals were going over to a shapeless dress with a cardboard hat, Barts was still starched aprons and hats. Lesson one in nursing school was how to make your hat out of a square of starched linen. They taught us to make it on a head but in practice everyone made them on a shortbread tin! We still had the black wool capes with a red lining to keep us warm in winter, I loved my cape!
The theme of the Great British Sewing Bunny ( run by Cool Crafting) round 2 was heroes. I decided to make a Barts nurse outfit as a tribute to all my nursing friends (and family) who have worked so hard over the last twelve months. I managed to miss both waves due to self isolation and post-op recuperation so I have a huge respect for those who worked throughout. Some even came out of retirement to work!
I made the dress first, I needed a simple front fastening dress so I used Archie’s shirt as a basis with a dress pattern overlaying it. The white apron is just two rectangles stitched together, held in place at the back with a pin! The navy ribbon with a shiny button makes her petersham belt and silver buckle. In those days when you qualified you could get a fancy silver buckle, mine is beautiful, made in 1901, such a shame we can’t wear them now. We used to wear our hospital badge in between the collar points and we always had a pair of scissors in our top pocket…
I made the cape next, using a cape pattern from one of the Luna Lapin books, I just needed to change the hood into a collar and add some red ribbons to tie across the front.
The final part of the outfit was the cap. I cut a square of cotton, formed the brim by folding the fabric about four times and securing it round a bead pot which turned out to be a perfect bunny head size! The top is meant to have five pleats down each side, I didn’t manage that many but it still looks pretty neat. The tails were then turned up and everything secured with a bit of judicious stitches rather than the safety pins and hairgrips we used to use. Violet wasn’t too keen on the pins I used to secure it on her head either!
Violet didn’t win a place in the final but it was fun to make. It was Nurse Appreciation Day this week too so it was pretty apt.
Next weeks theme is Bridgerton Bunny, a reference to a period drama on TV, but it is basically for any period dress outfit. I’m sitting this one out as I know I haven’t got time this coming week.
On the Monday that our shops reopened my daughter and I went shopping into Leeds. We weren’t interested in queuing round the block for a shoe shop or clothes shop, we just went fabric shopping! It was lovely to be able to see and touch fabric again…and there weren’t any queues! We did get a few bargains though…
In B&M Fabrics they had a £2 a remnant table, Helen is starting a new Etsy shop selling baby clothes so she bought quite a few. In the market Fletchers had some beautiful light weight wool which I couldn’t resist. Whilst in Sam Taylors I had a flick through the pattern books, I’ve been wanting a pretty blouse pattern for a while, I’ve several shirt patterns and tops too, but nothing I would call a blouse. I spotted McCalls 7978 and thought it fitted the bill.
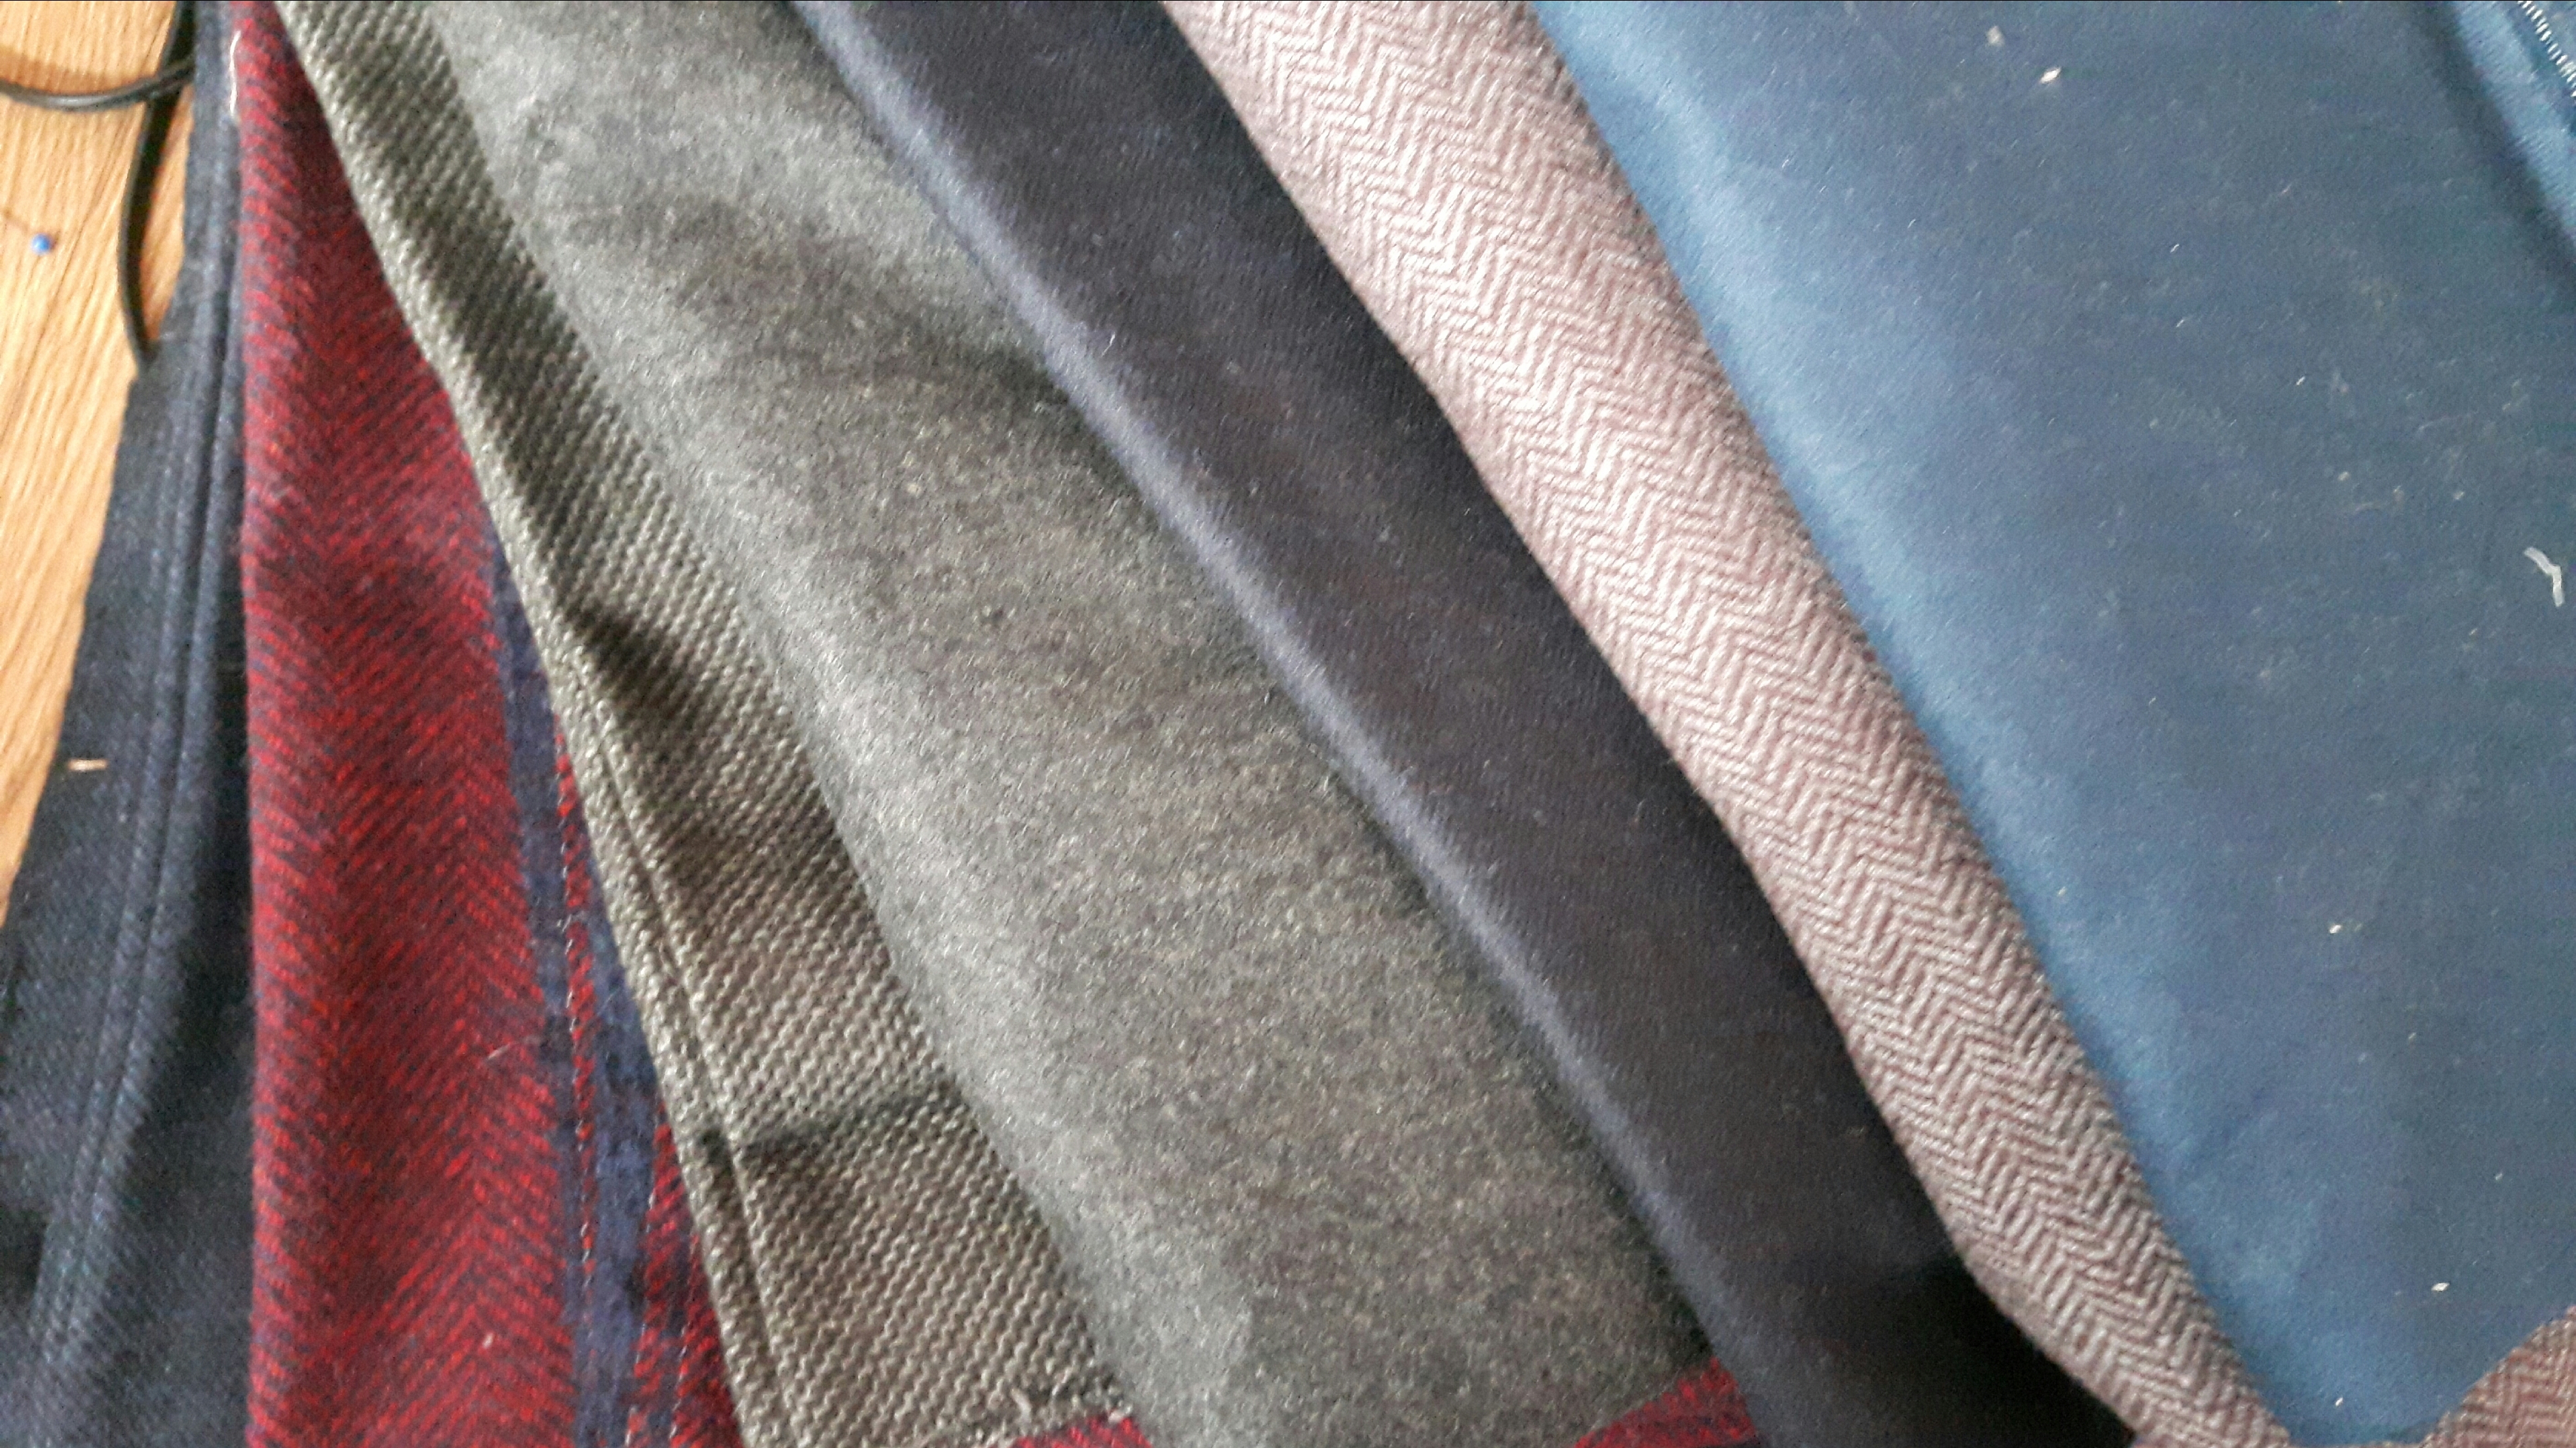
On the way home we called into the Abraham Moon factory shop. It’s only about a 5 minute drive from home and is well worth a visit. Abraham Moon weave beautiful woolen cloth for the upmarket designers, it’s quite trendy now, usually it’s around £40 a metre at least, in the factory shop everything is £20 a metre. However when we arrived they had a display of roll ends…at £5 a metre!!! They were all 2-3m lengths, perfect for skirts, coats, jackets etc. Well I got quite a few, it was too much of a bargain to miss! I bought £80 worth of wool, 16m, even in their mill shop that would usually have been £320!!!
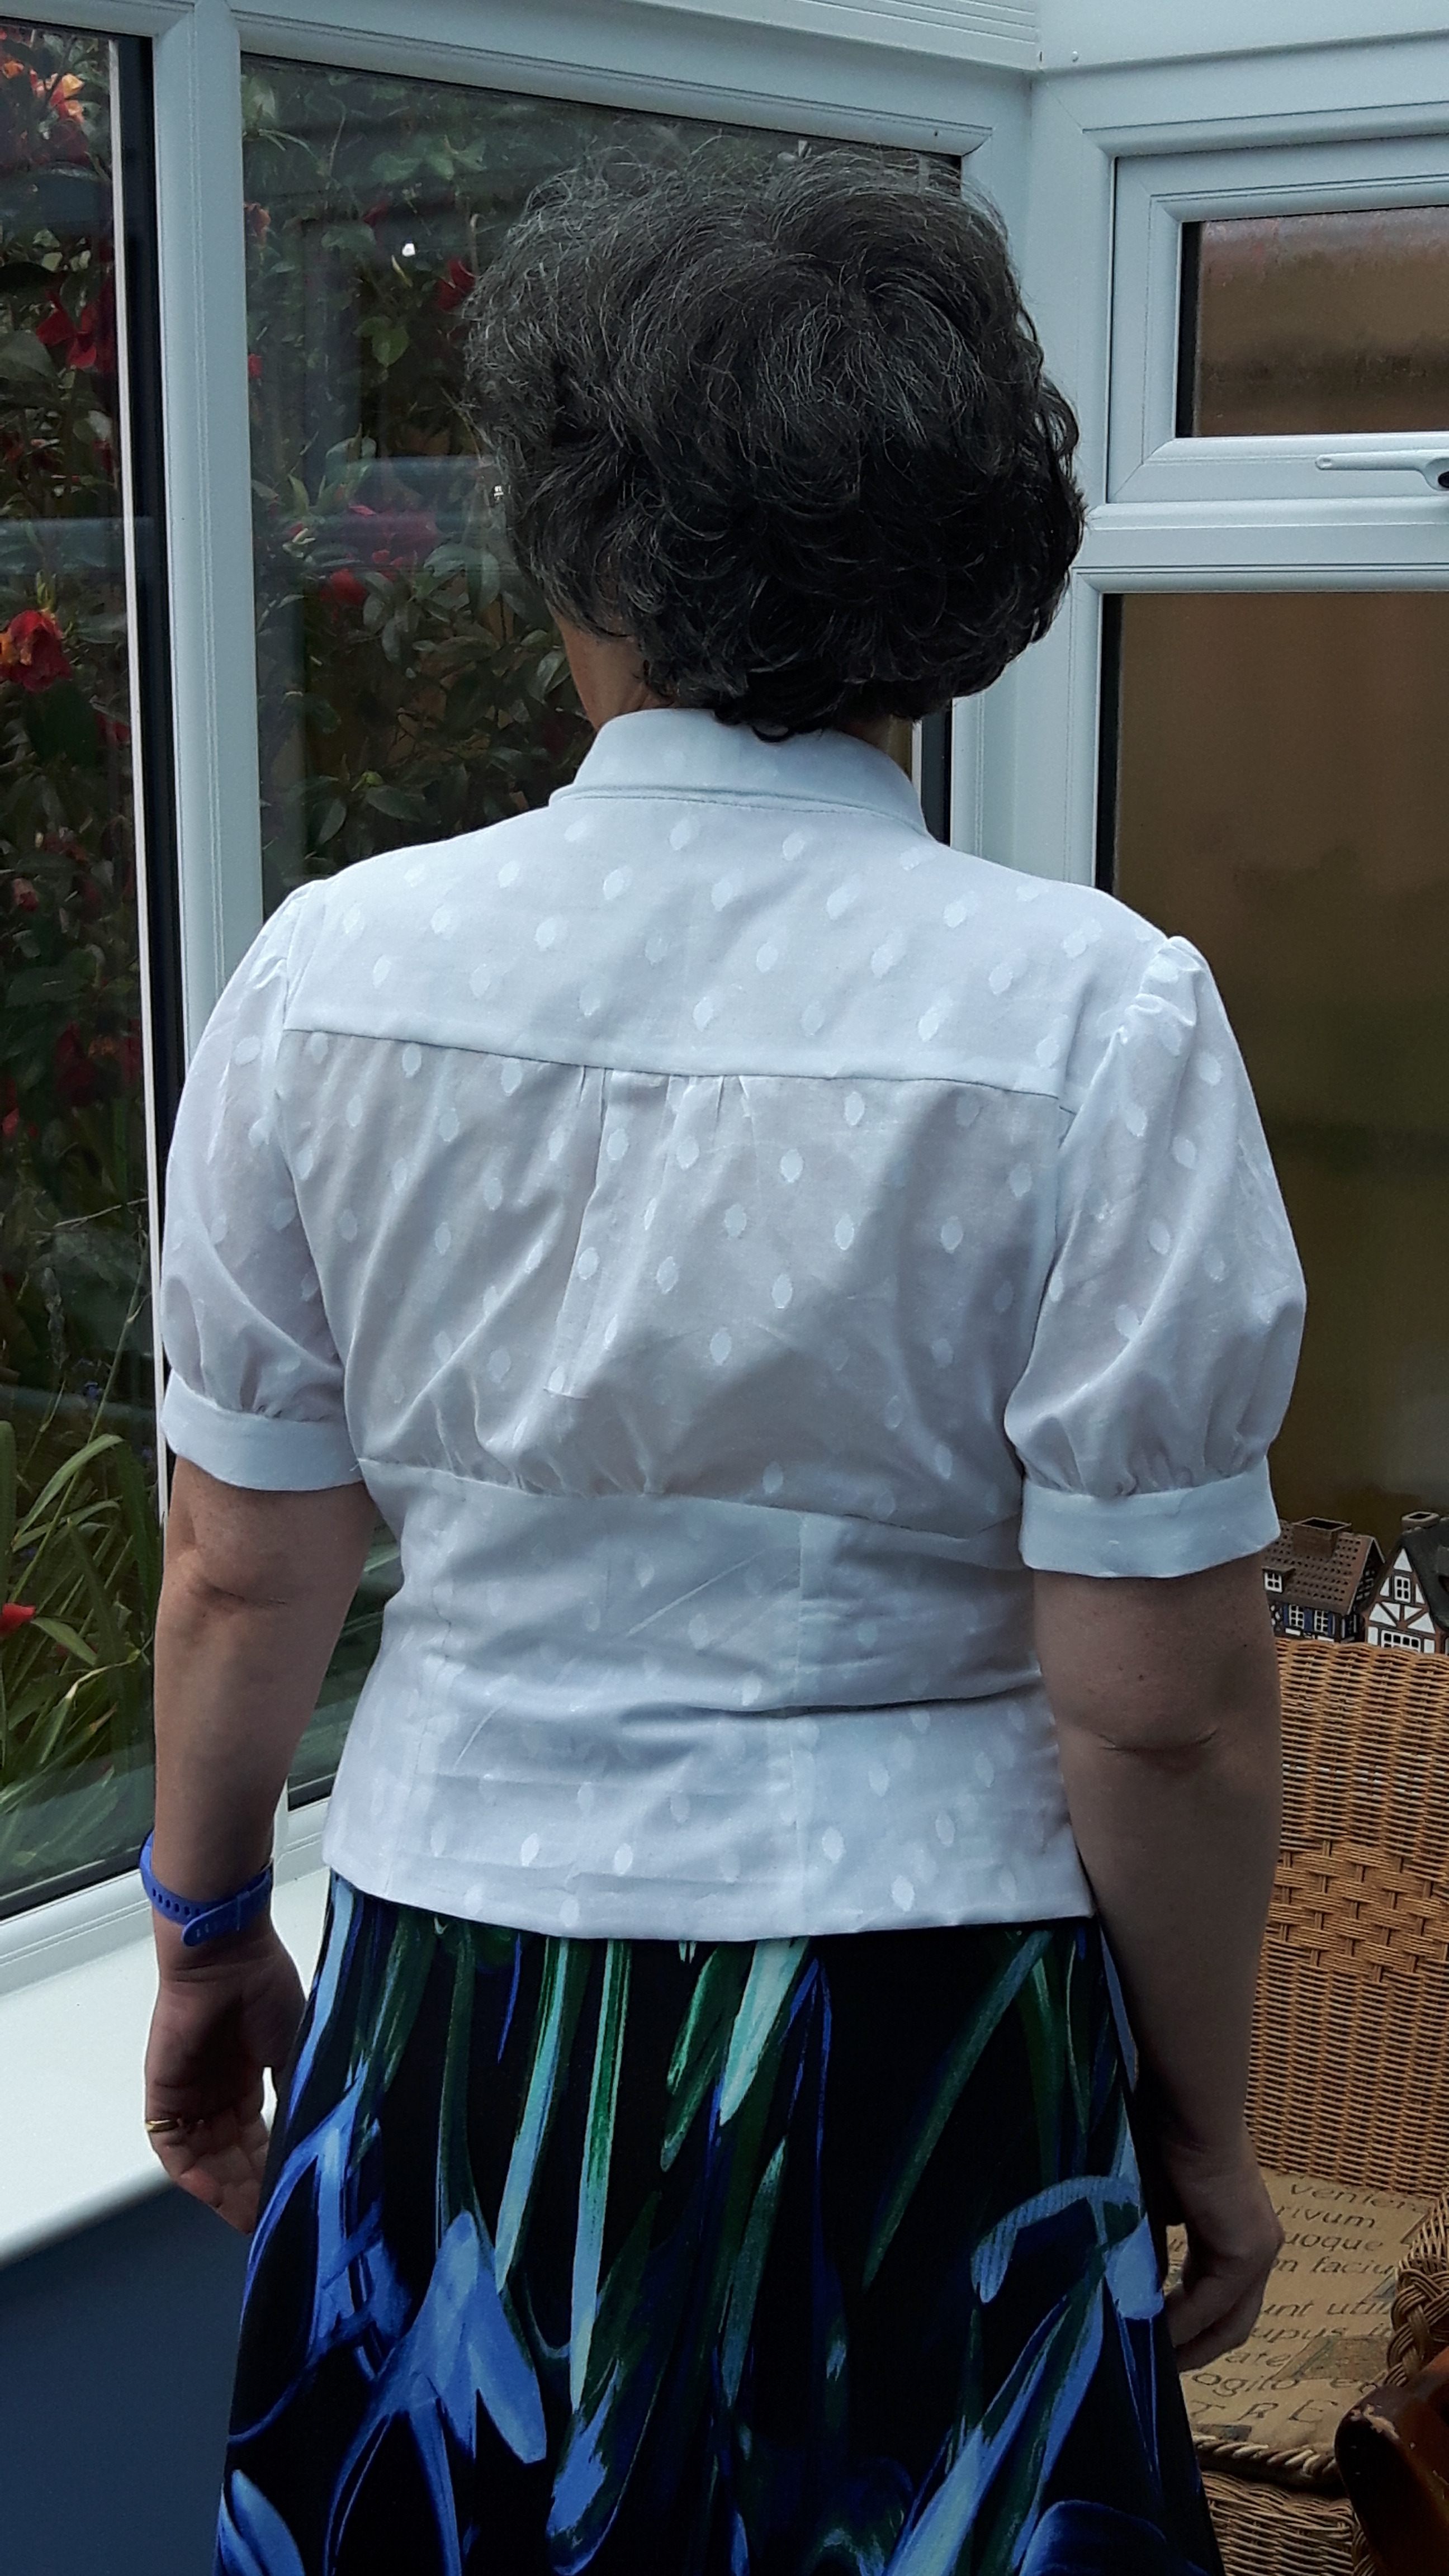
Once home and back in my sewing room I started looking through my stash file for a fabric suitable for my pretty blouse. The blouse has a shaped bodice with gathers just under the bust, loop buttons to fasten and what I would call a shawl collar.
I started my stash file a couple of months ago, I got it from Patterntrace in an attempt to organise my sewing room. It’s an A5 ring binder with card pages pre-printed so you can add a swatch, how much you have and the type of fabric. I also used washi tape to mark the page edges with the quantity, so if my pattern says it needs 2.5 metres I can check my swatches within the 2-3m range easily.
I found a lovely fine cotton, it’s what I would call spotted dimitie but with very big spots! I’ve never made a blouse pattern with so many pieces to cut out, it has over twenty pieces! The lower bodice is fully lined, it’s meant to be fully interfaced too but I felt I didn’t want the stiffness, I did interface the bodice front though as it needed the strength for the button loops. With hindsight (always useful!) it might have been better to use a plain cotton for the lining asI’ve got double dots now!
It went together reasonably well, it was a bit fiddly but nothing major. By having the bottom half lined it also eliminated the problem of finishing off the seams inside. The short side seams and sleeve seams were stitched with a french seam
I decided to cover some buttons for the front, I always think a fabric covered button is less likely to come undone with a rouleau loop button hole. I did use interfacing for these, just because the cotton is so fine it wouldn’t have held for the gathering bit of making these.
I’m pretty pleased with it, I could do with a little more room around my hips so it would sit better at the back. My one issue which I didn’t notice of the pattern envelope, is that it’s quite low cut, put it this way I’m certainly going to have to watch what underwear I wear! I also feel it would sit better if the front gather were under my bust…but that would mean even more cleavage was on show!
If any one can suggest any other ‘blouse’ pattern let me know, though please note I don’t like pussy-bow blouses!
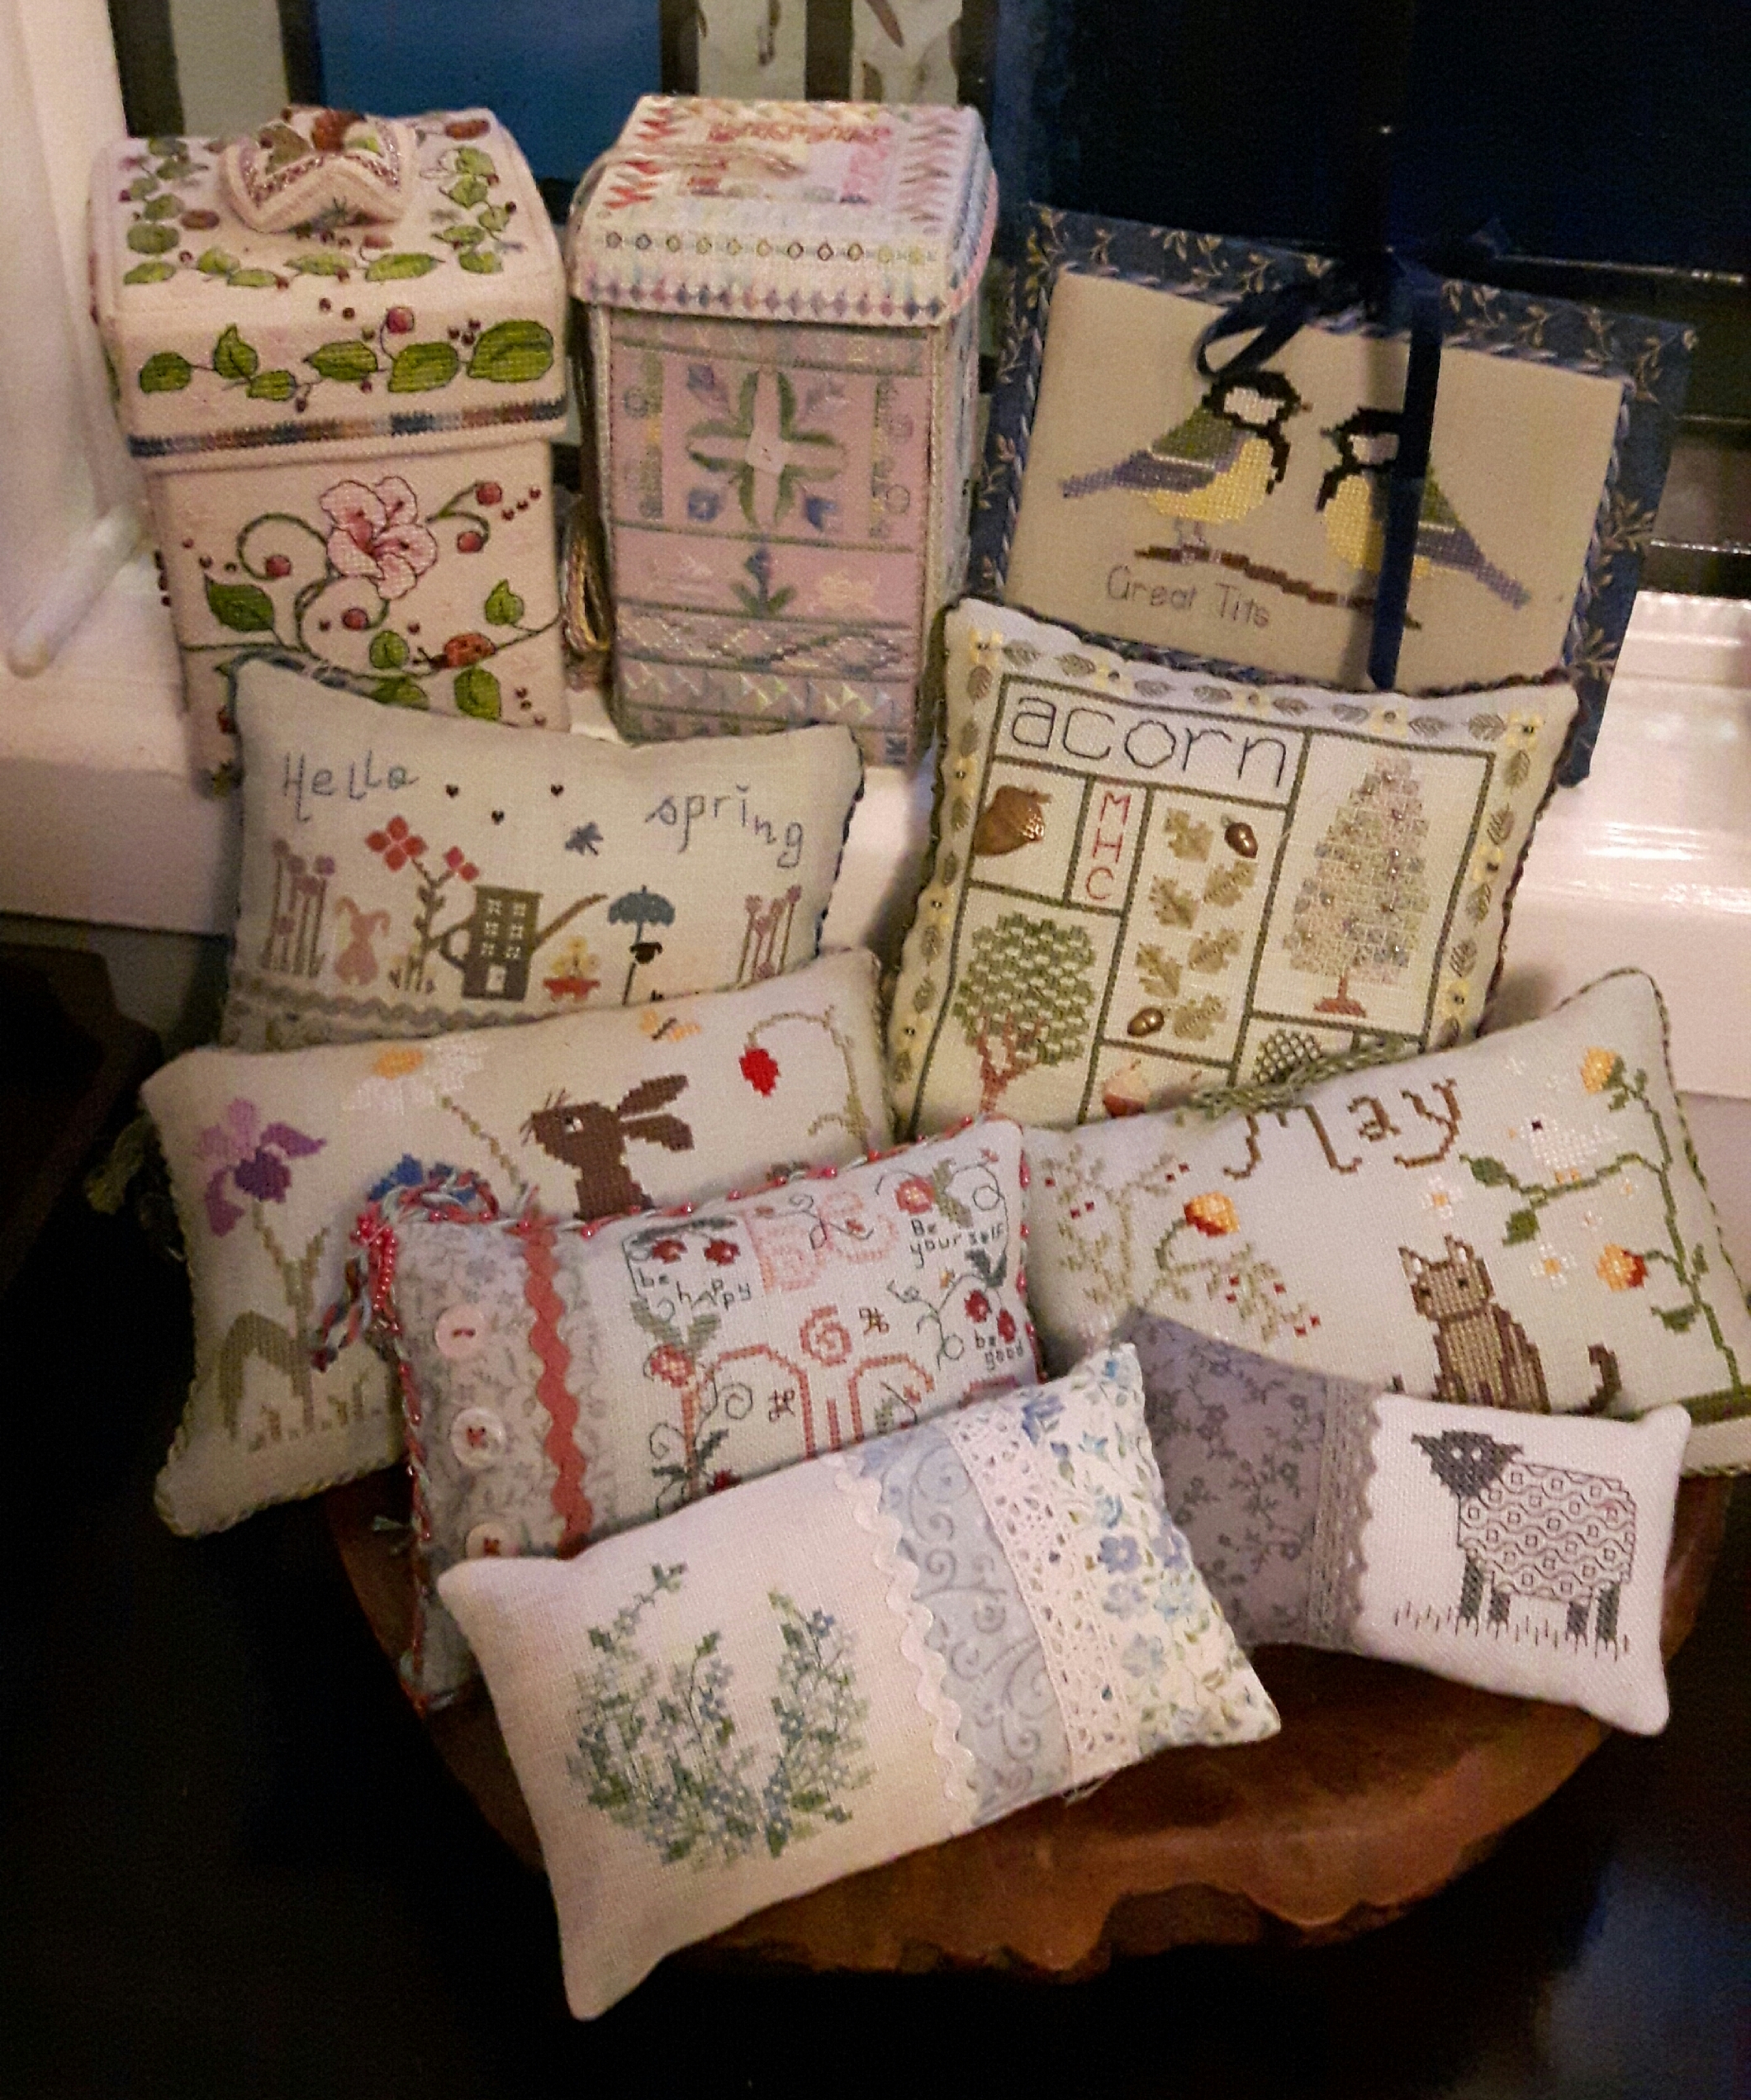
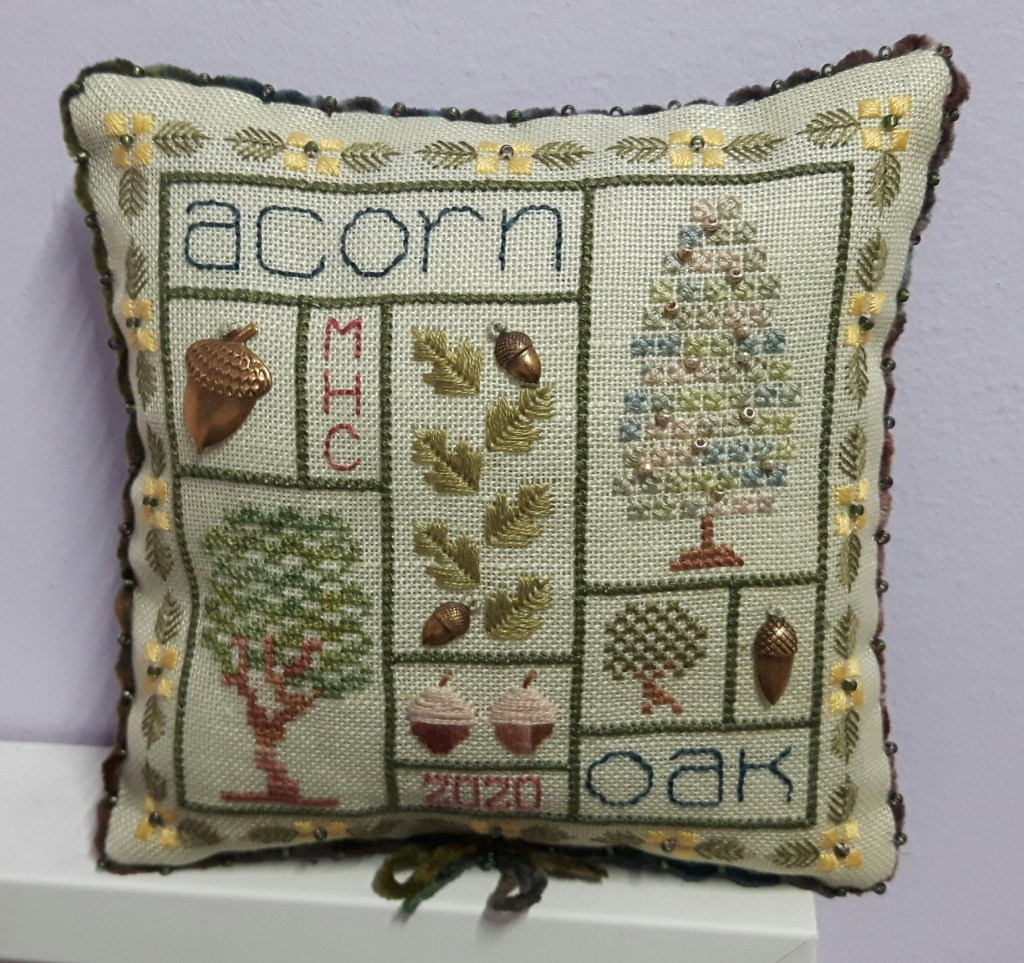
With a new month comes a fresh display of cross-stitch smalls in our dining room. April was full of bunnies and spring ones,well I’ve kept the general spring ones and added a few extra.
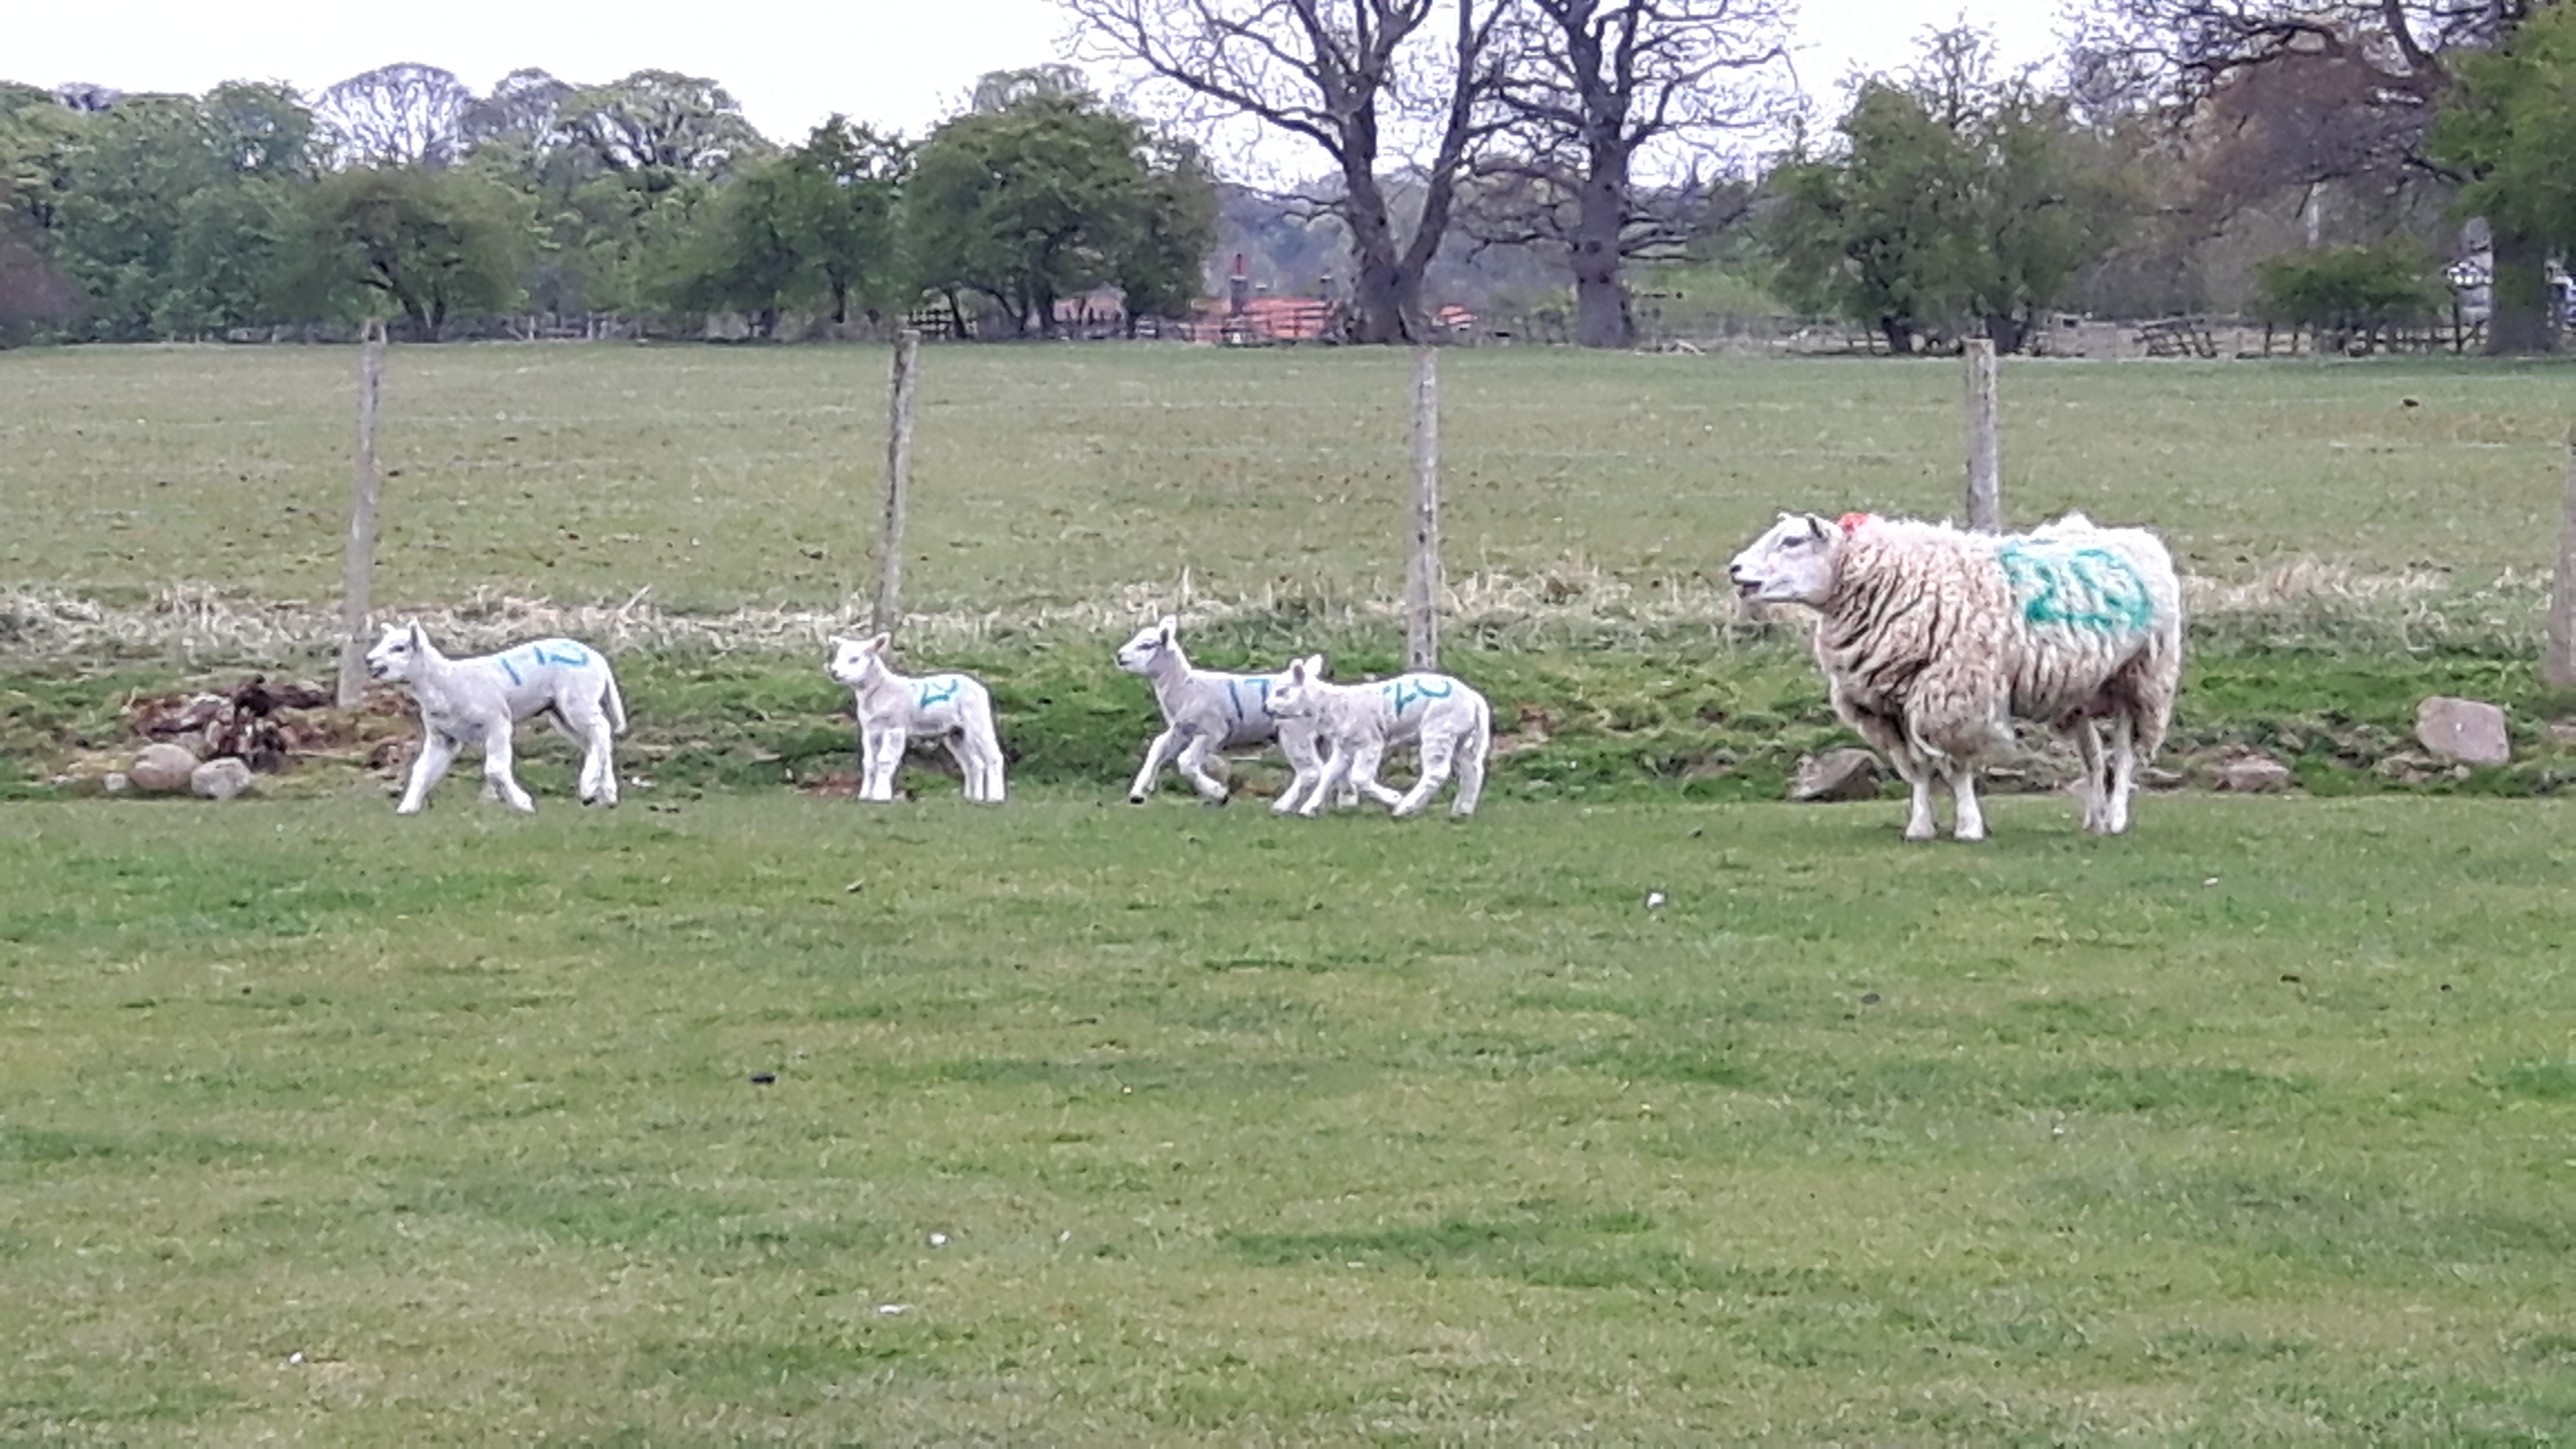
The fields are full of young lambs at the moment, gamboling around as only a lamb can do, so I included a blackwork sheep which I stitched a couple of years ago when my Embroiderers Guild was doing a blackwork project. These lambs were on the walk I did the other day, the ewe was obviously playing nanny as she had six to keep an eye on!
Wild flowers are appearing, I went for a short walk this evening and along the railway line behind us I saw primroses, snakes head fritilary, as well as forget-me-nots. The forget-me-not one is a cross-stitch I stitched years ago and then it sat in my work-box for many years (decades!!) until I dug it out and made it into a cross-stitch small.
The acorn one is a fairly recent stitch, it was a kit I bought on a facebook destash page. There’s an old country saying ‘ If the oak before the ash we will get a splash, if the ash before the oak we will get a soak’…I haven’t spotted either in leaf yet, but we’re going to get wet whatever!
Be Nice is a Lizzie Kate design I think, again I bought the pattern on a destash page.
The small for May is from a free SAL by Snowflake Diaries and at the back as usual there’s the spring sides of the Zoe box by Faby Reilly and the etui by Betsy Morgan. The cross-stitch of great tits was an anniversary card for my OH a couple of years back.
I’ve a few cross-stitches waiting to be made up so hopefully there will be a couple of new ones next month.
The weather doesn’t know what to do today, one minute it’s glorious sunshine with blue skies and fluffy clouds, the next minute it’s raining, I think I even heard thunder this afternoon! It’s been a bit mixed for the last couple of weeks, we’ve had warm sunny days, hail, sleet, rain…all in the same day! The poor plants don’t know whether their coming or going.
The late frosts have damaged quite a few new shoots, one of my acer’s has been quite badly frosted so I’ll leave it a while and see what recovers. A few roses have also got droopy looking shoots too. My other acer is down in the lower garden amongst all the other pots, it seems quite protected down there, I think having a collection of plants there has made almost a micro climate.
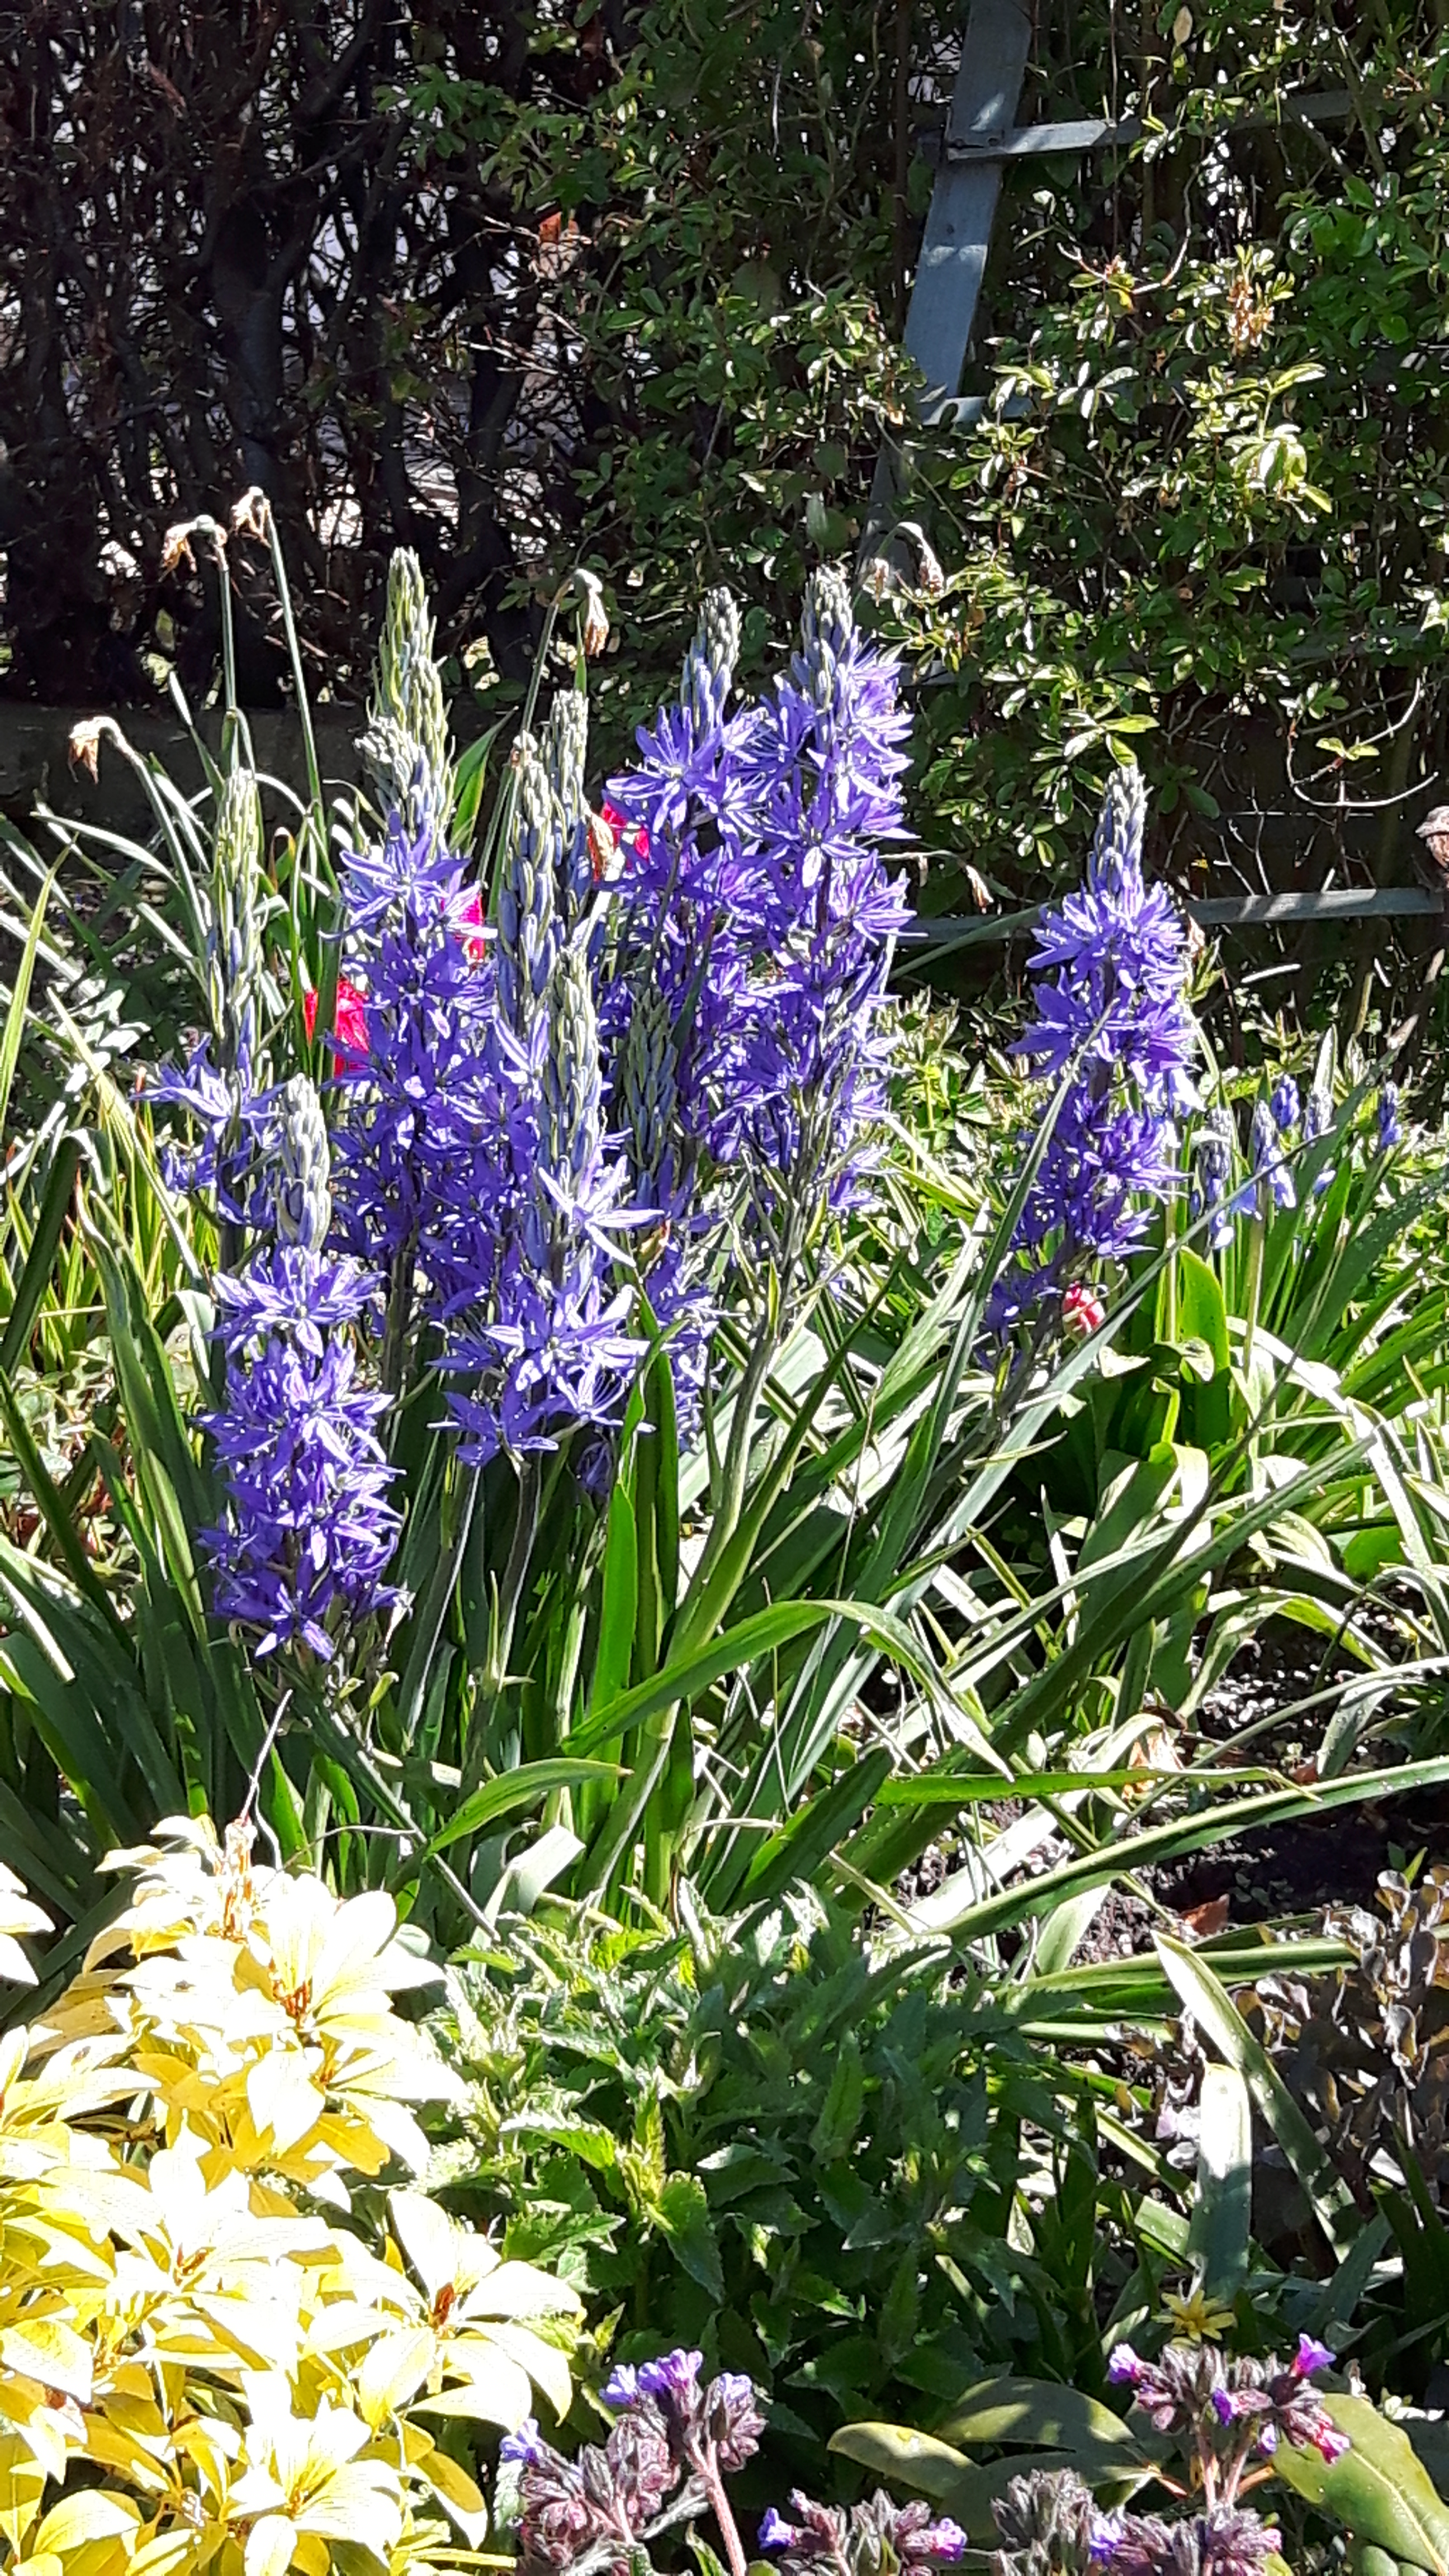
This morning I’ve been weeding, after all the rain and the warmth the perennial weeds are starting to push their heads up, in particular mares tail and bindweed. There’s lots of hairy bittercress too, the chickens used to love eating that. I started off working my way round the patio. The camassia there look stunning, the white broom is just starting to come into flower too.
There’s a little bunch of daffodils by the arch and despite all the weather we’ve had, I’m sure they’ve been flowering for several weeks!
I’ve got several clumps of camassia scattered round the garden, this one is in the Amber & Amethyst garden (AKA the beer garden!)
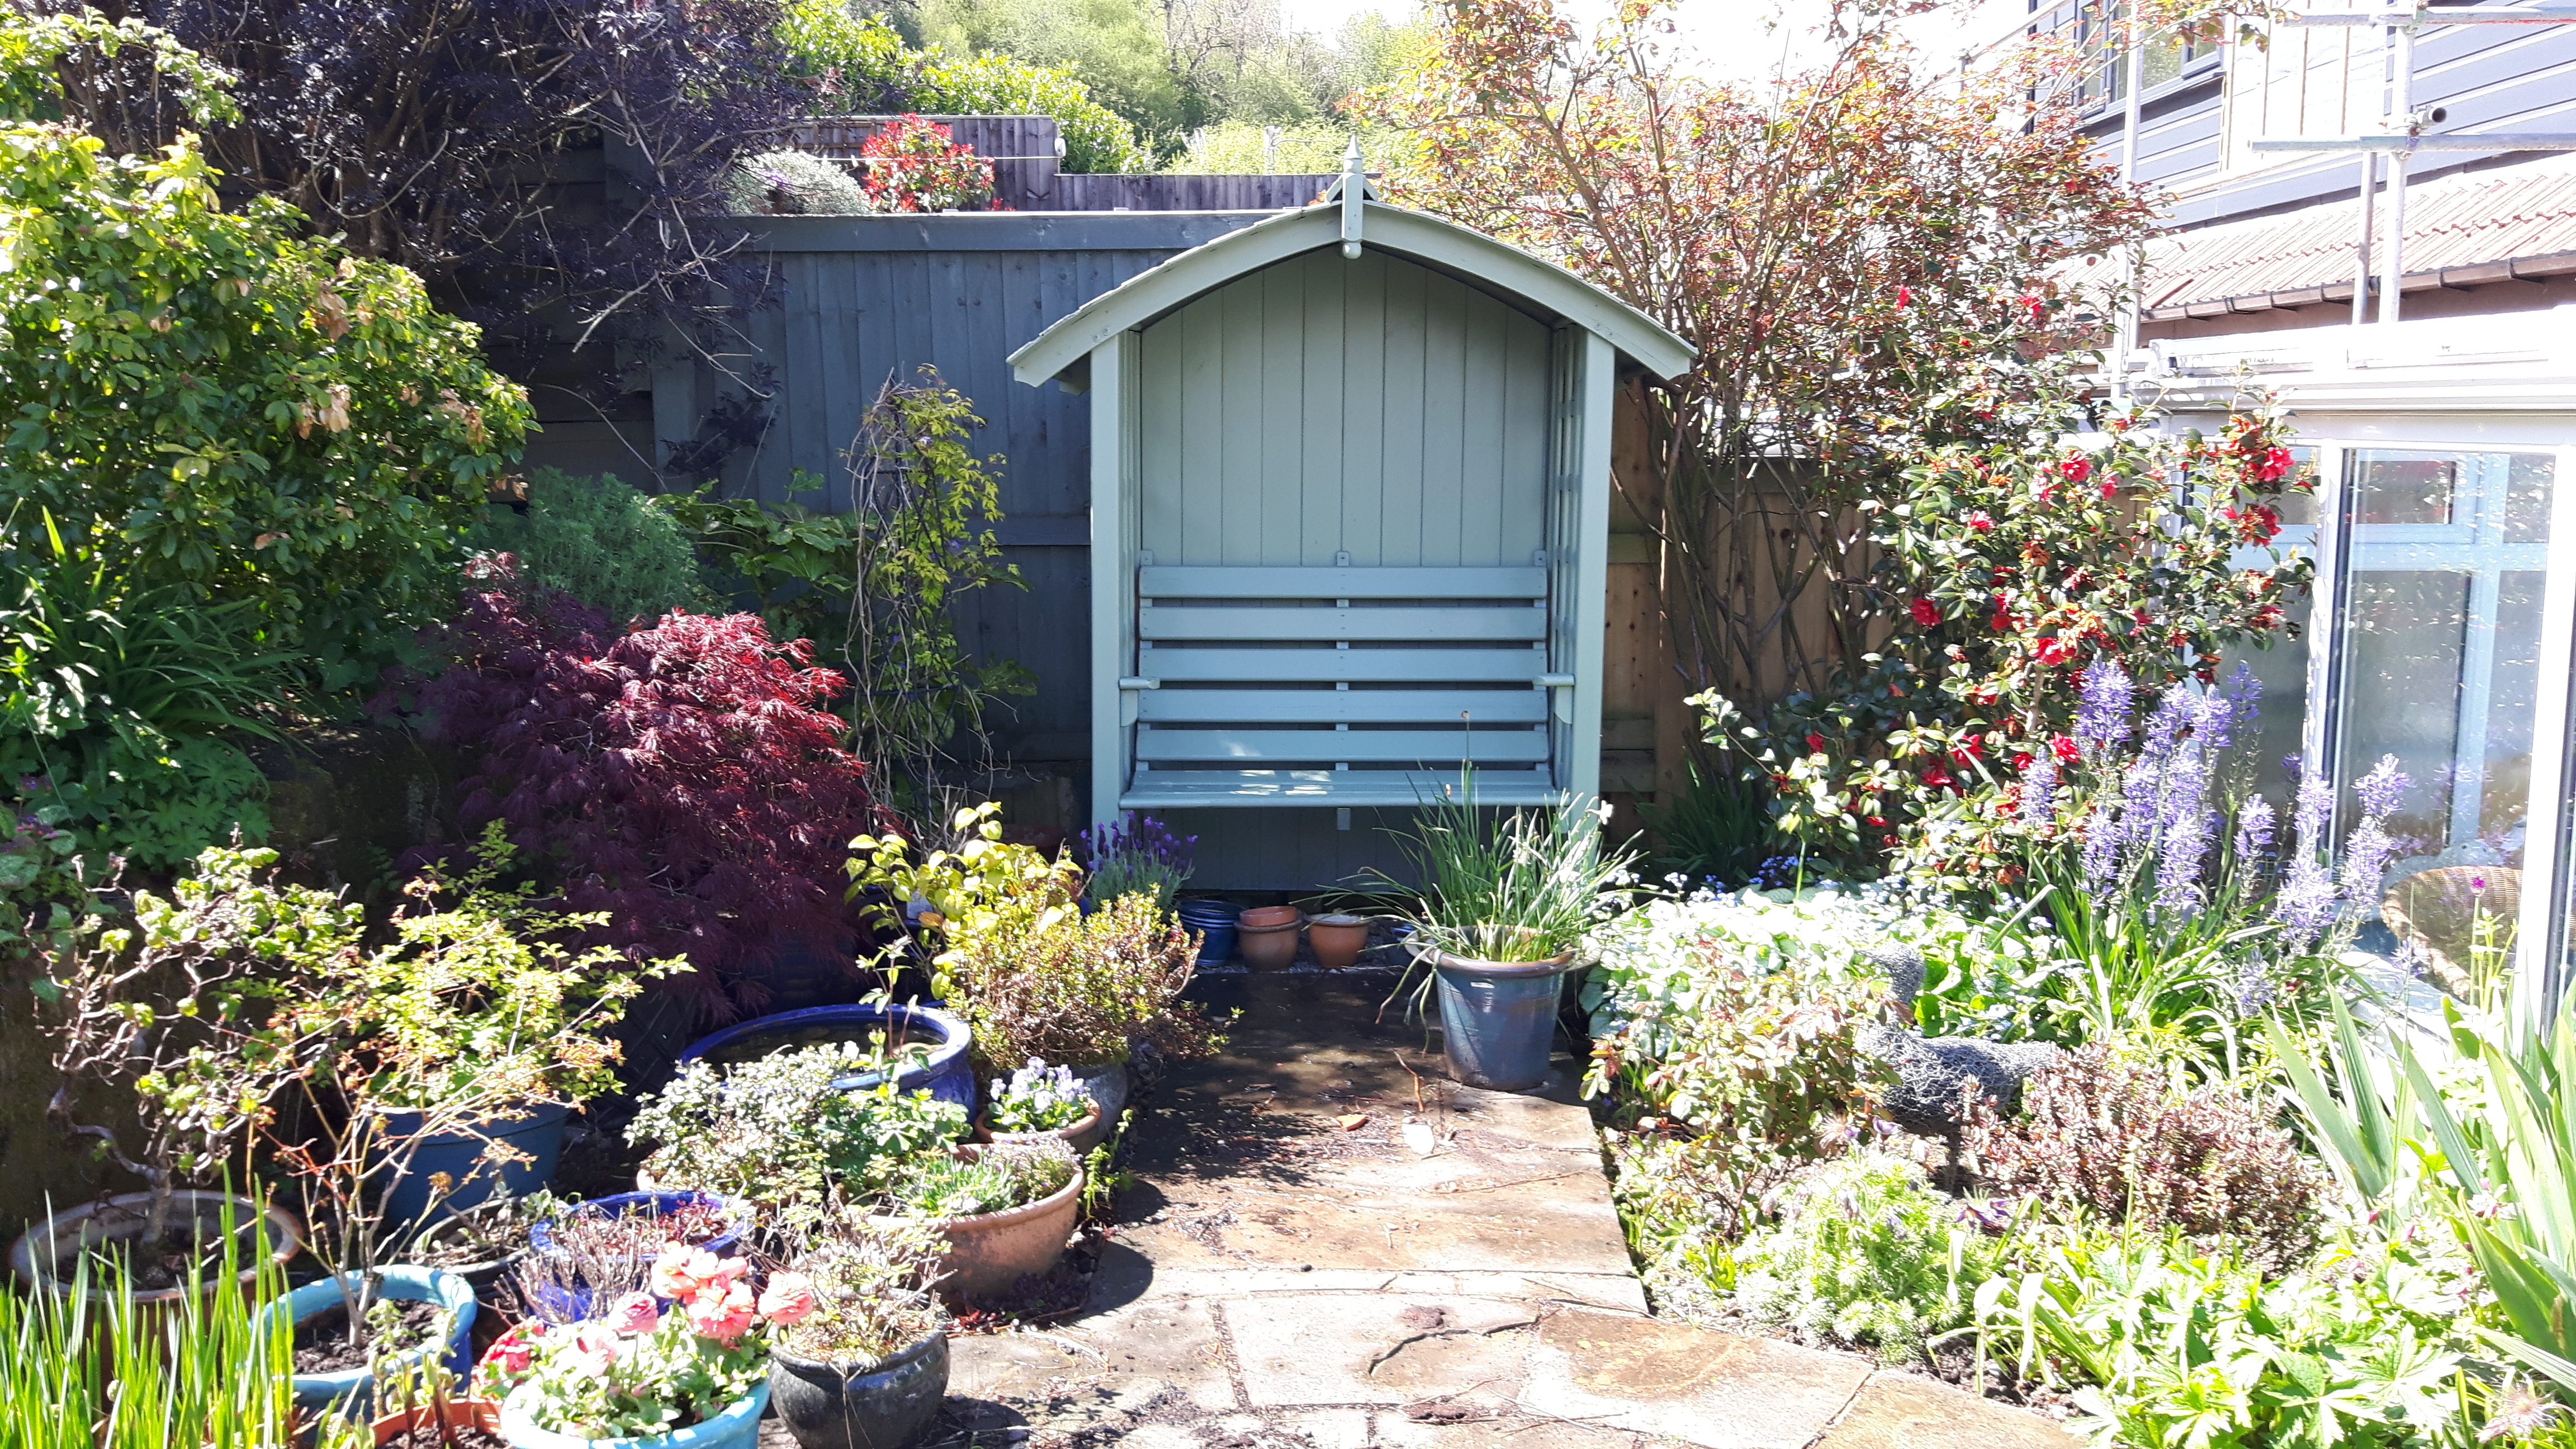
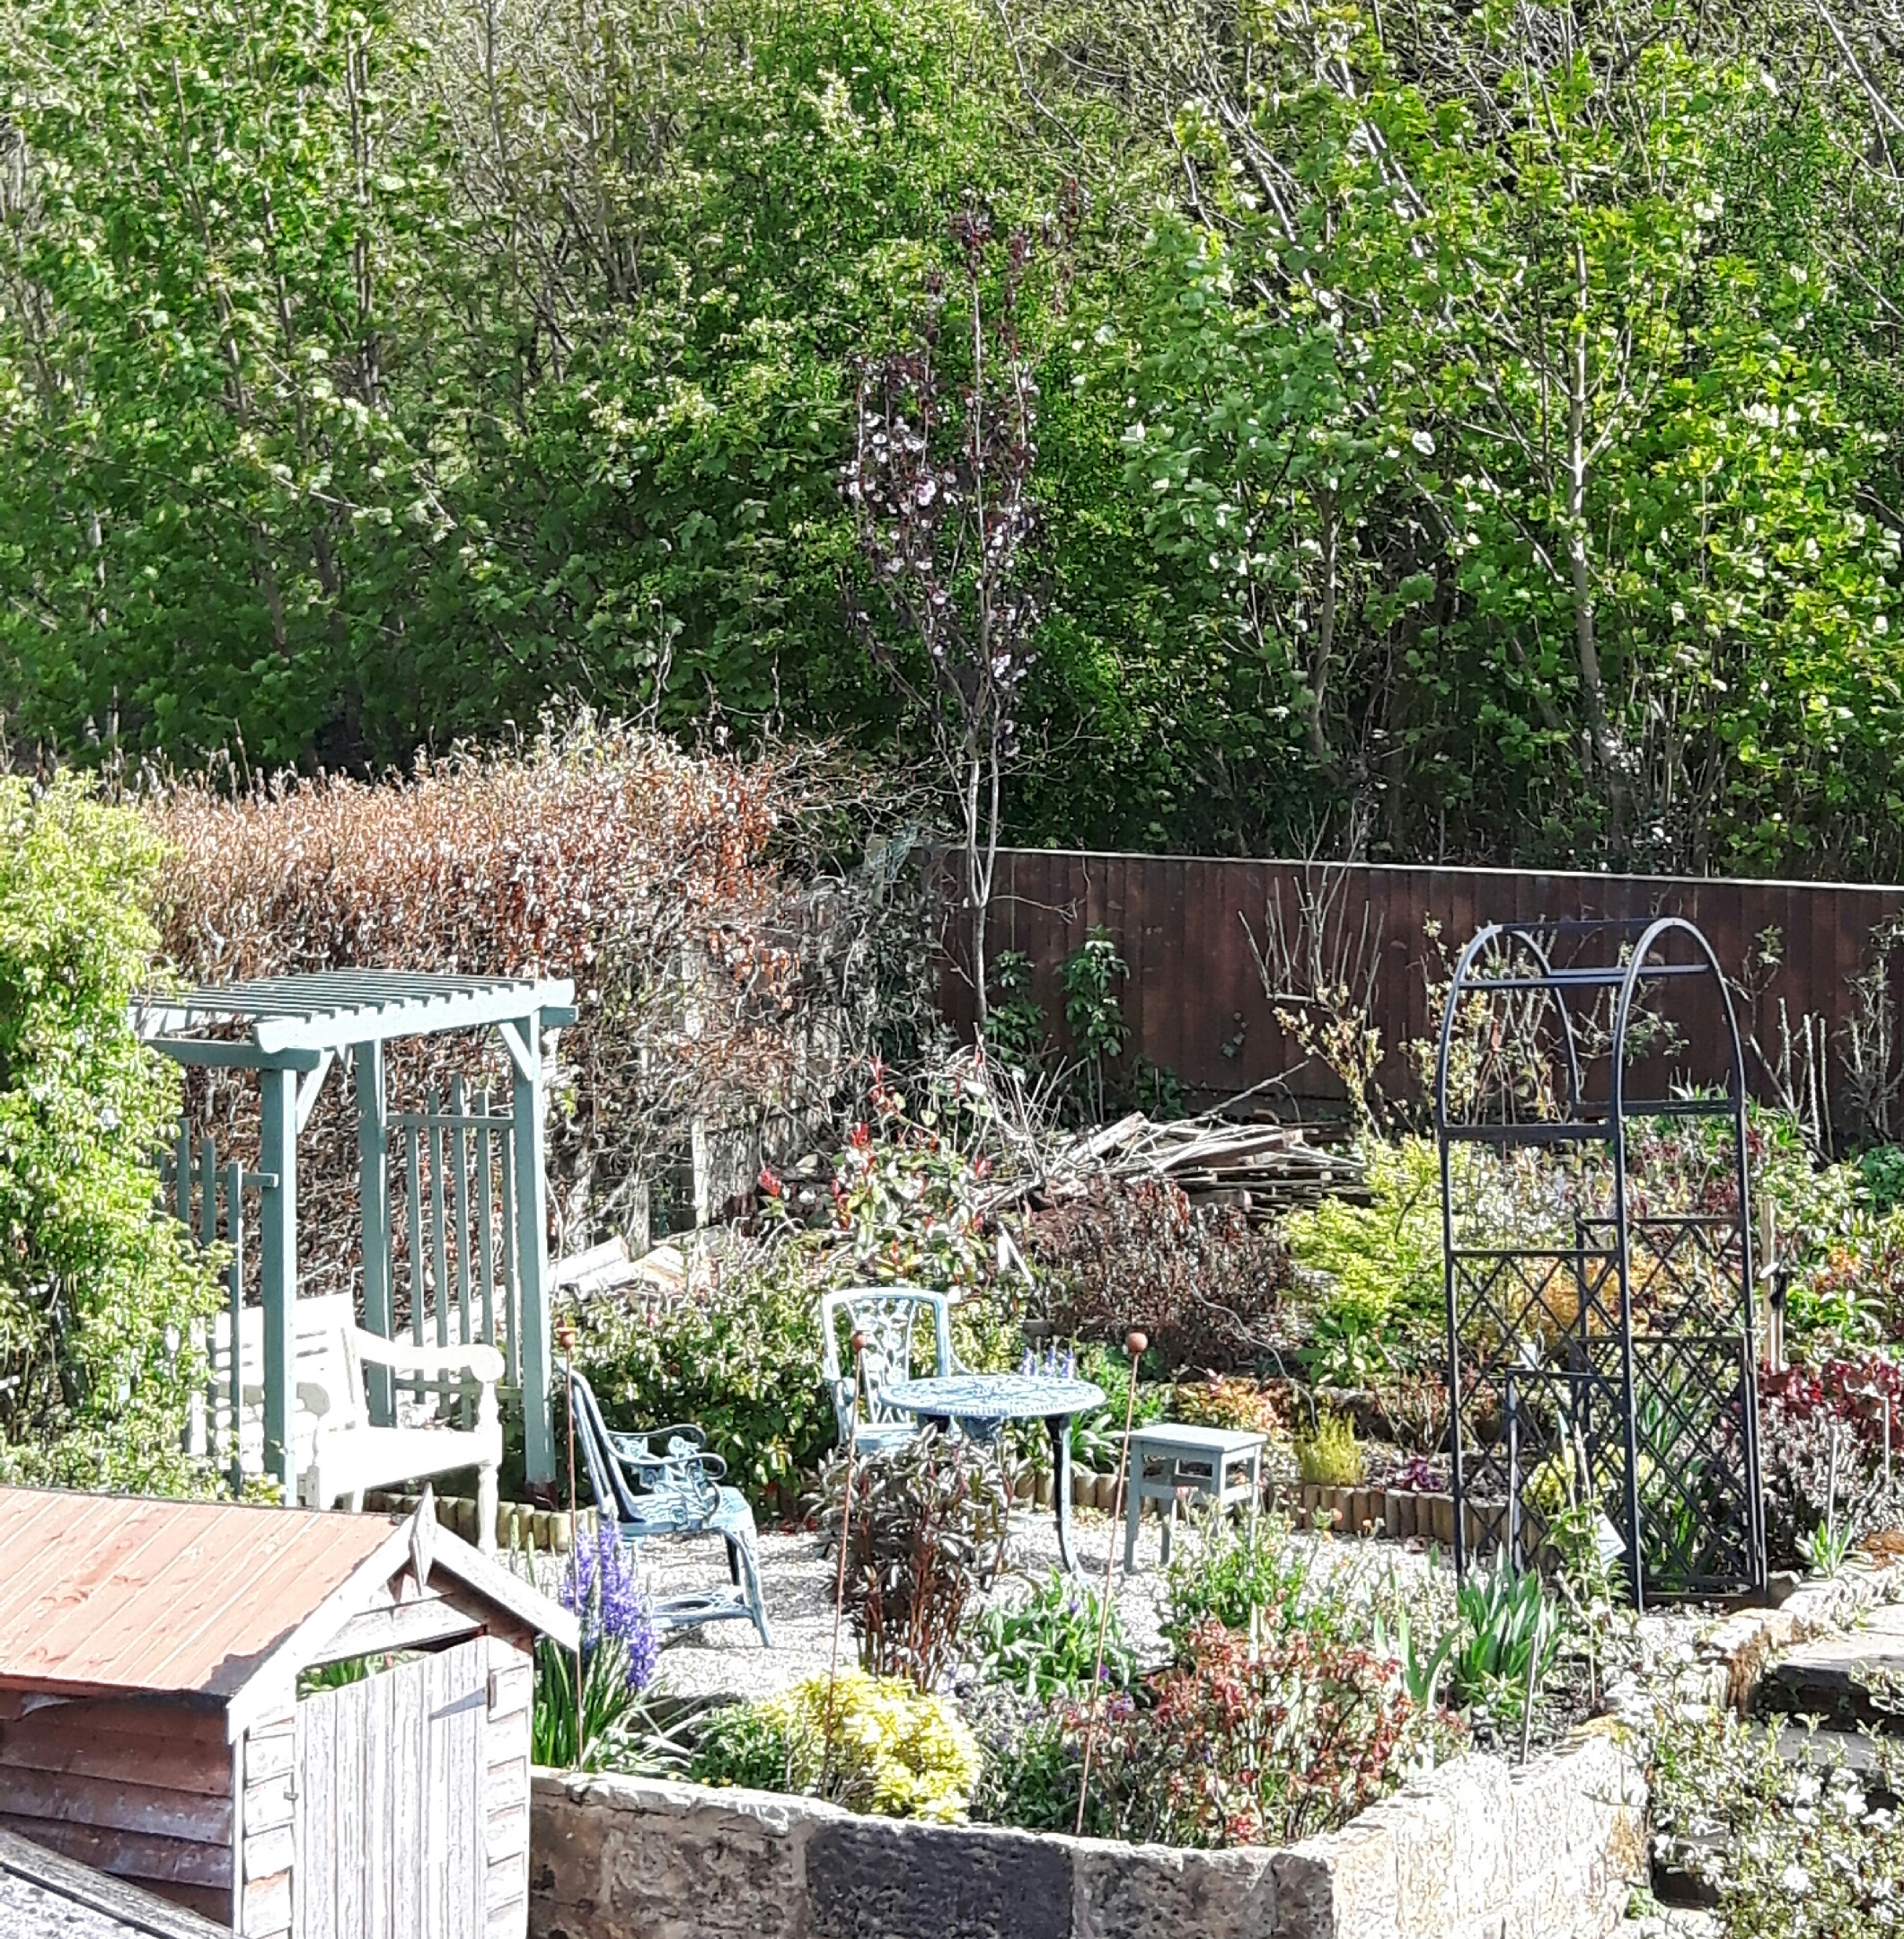
I’m trying to sort out the old compost heap too, so I’ve dug up lots of nettle roots and more bindweed. It’s beautiful compost up there, so once I’ve got all the weeds out I’ll mulch it round the back garden. There’s a big pile of wood to be sorted up there too. In the corner there is a flowering cherry, you can just see it in the photo below of what my OH calls the beer garden!! I planted it a few years ago, at the moment it seems to be growing upwards rather than out, but I’m sure it will fill out in time. I’m hoping in time it will be quite spectacular, it has bronze foliage and good autumn colour too so a real all season interest tree.
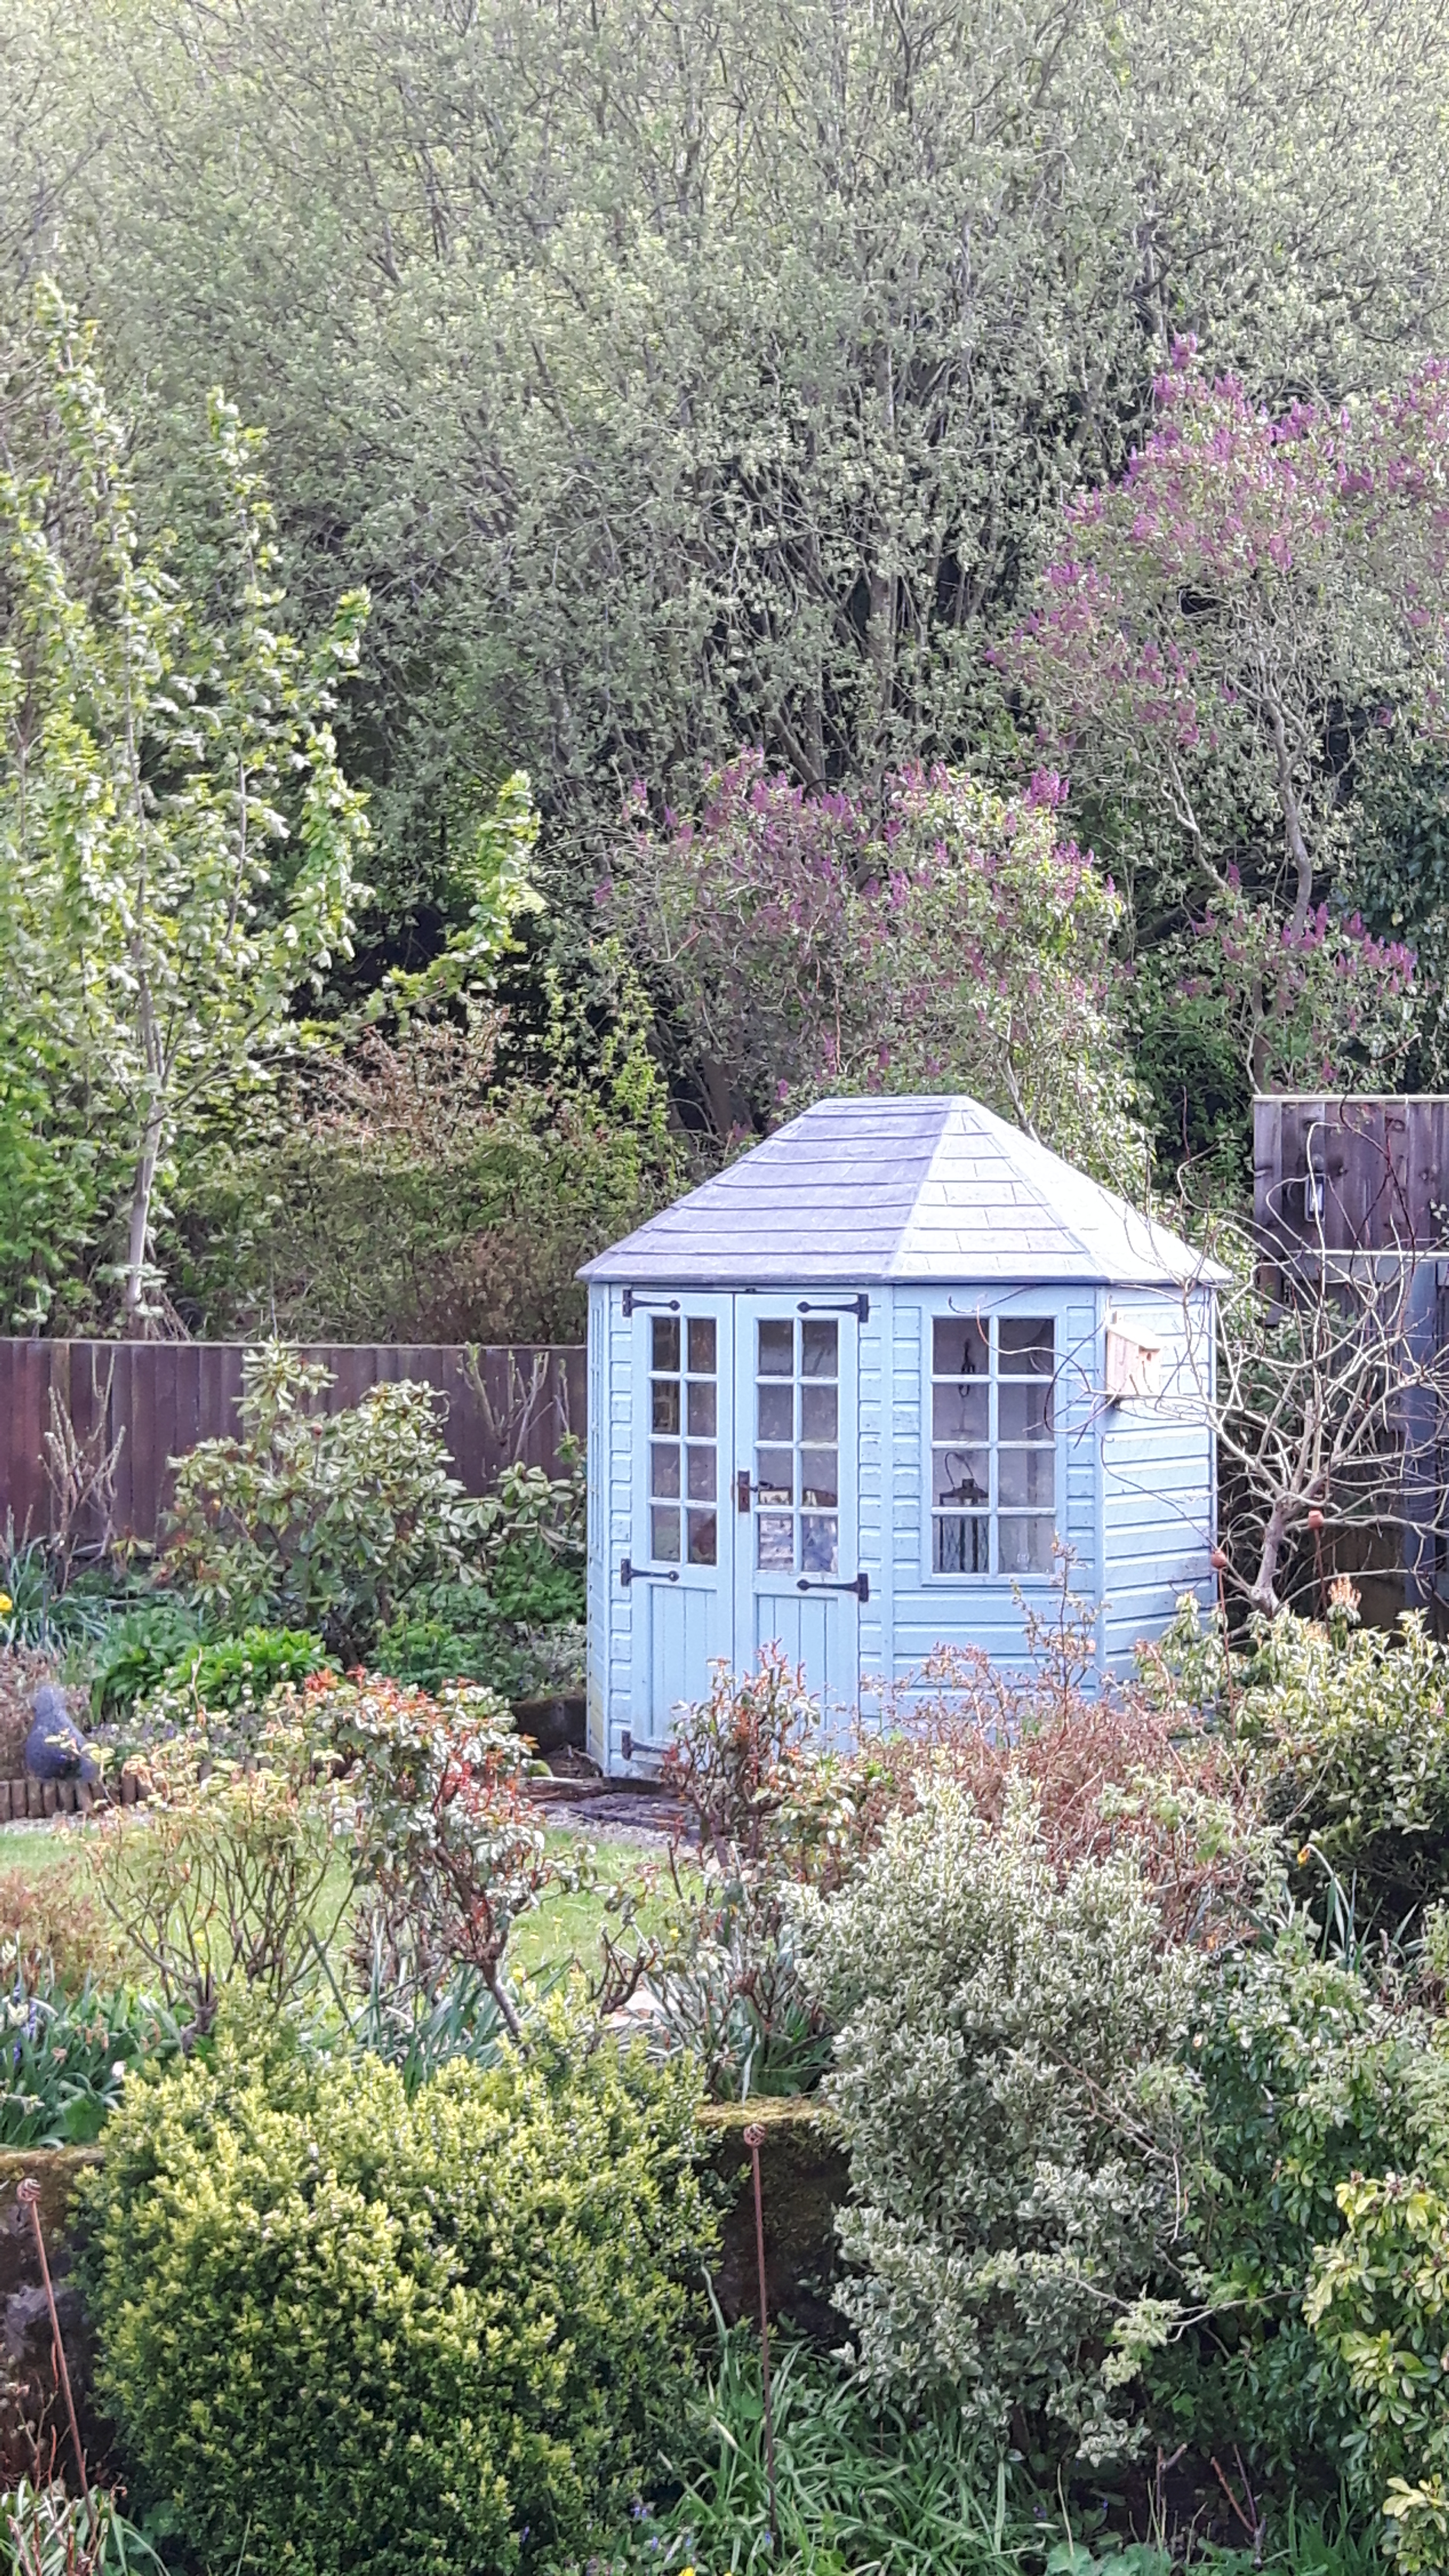
The lilac behind the summerhouse is just coming into flower too, it’s pretty old is this one, they’re not particularly long lived trees, we used to have about four at the side of the drive which the previous owner had planted, one day something made me push against one…and it fell down!! So I pushed against the others and they all fell down! I keep testing this one every so often, I’d rather it fell in a controlled manner rather than suddenly going! They will often sprout again from the base. You can also see in the photo how much the trees behind us are greening up, everything looks so fresh and verdant at this time of year.
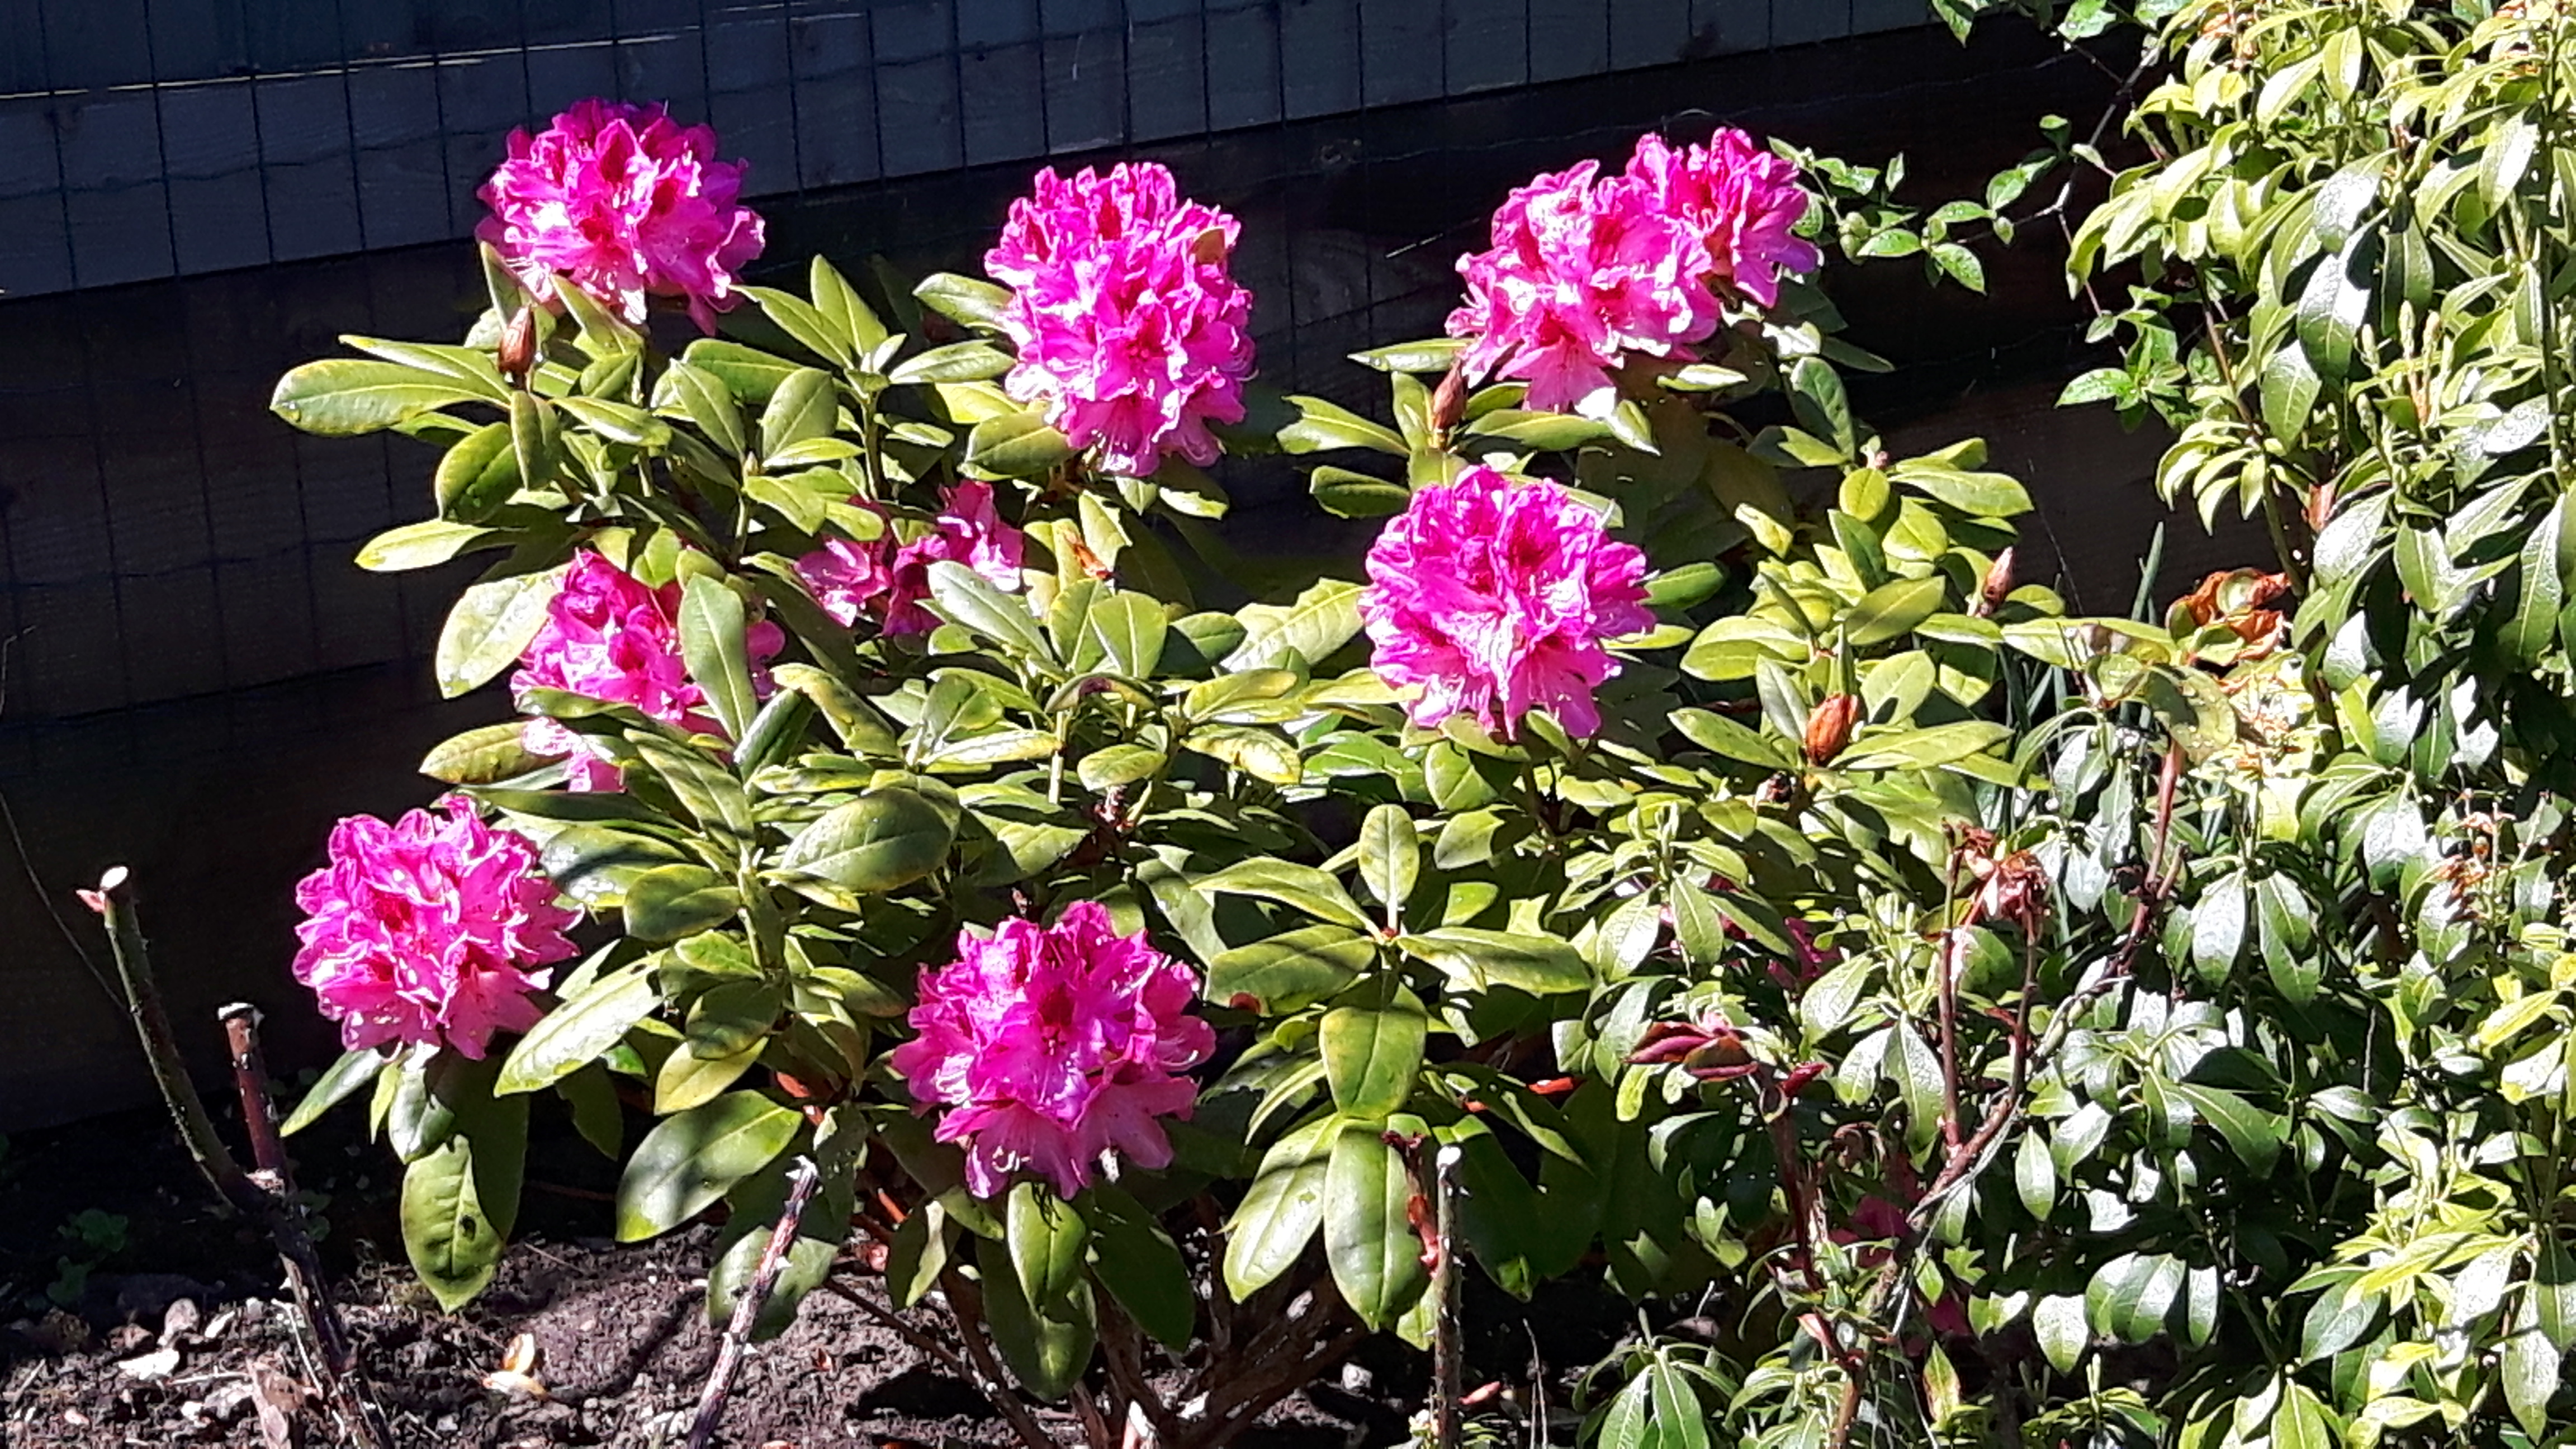
A couple of years ago I planted a rhododendron which I’d bought at the Harrogate Spring Flower Show. It’s just a common pink one but it’s looking gorgeous, once it gets bigger it’s going to look great against the tall fence.
I think we need a concerted effort to ‘tidy up’ the garden, there seems to be various lengths of wood or breeze blocks, empty plant pots …you get the picture! I’ve started trying to bring something down every time I go in the garden, hopefully I’ll get there in time!
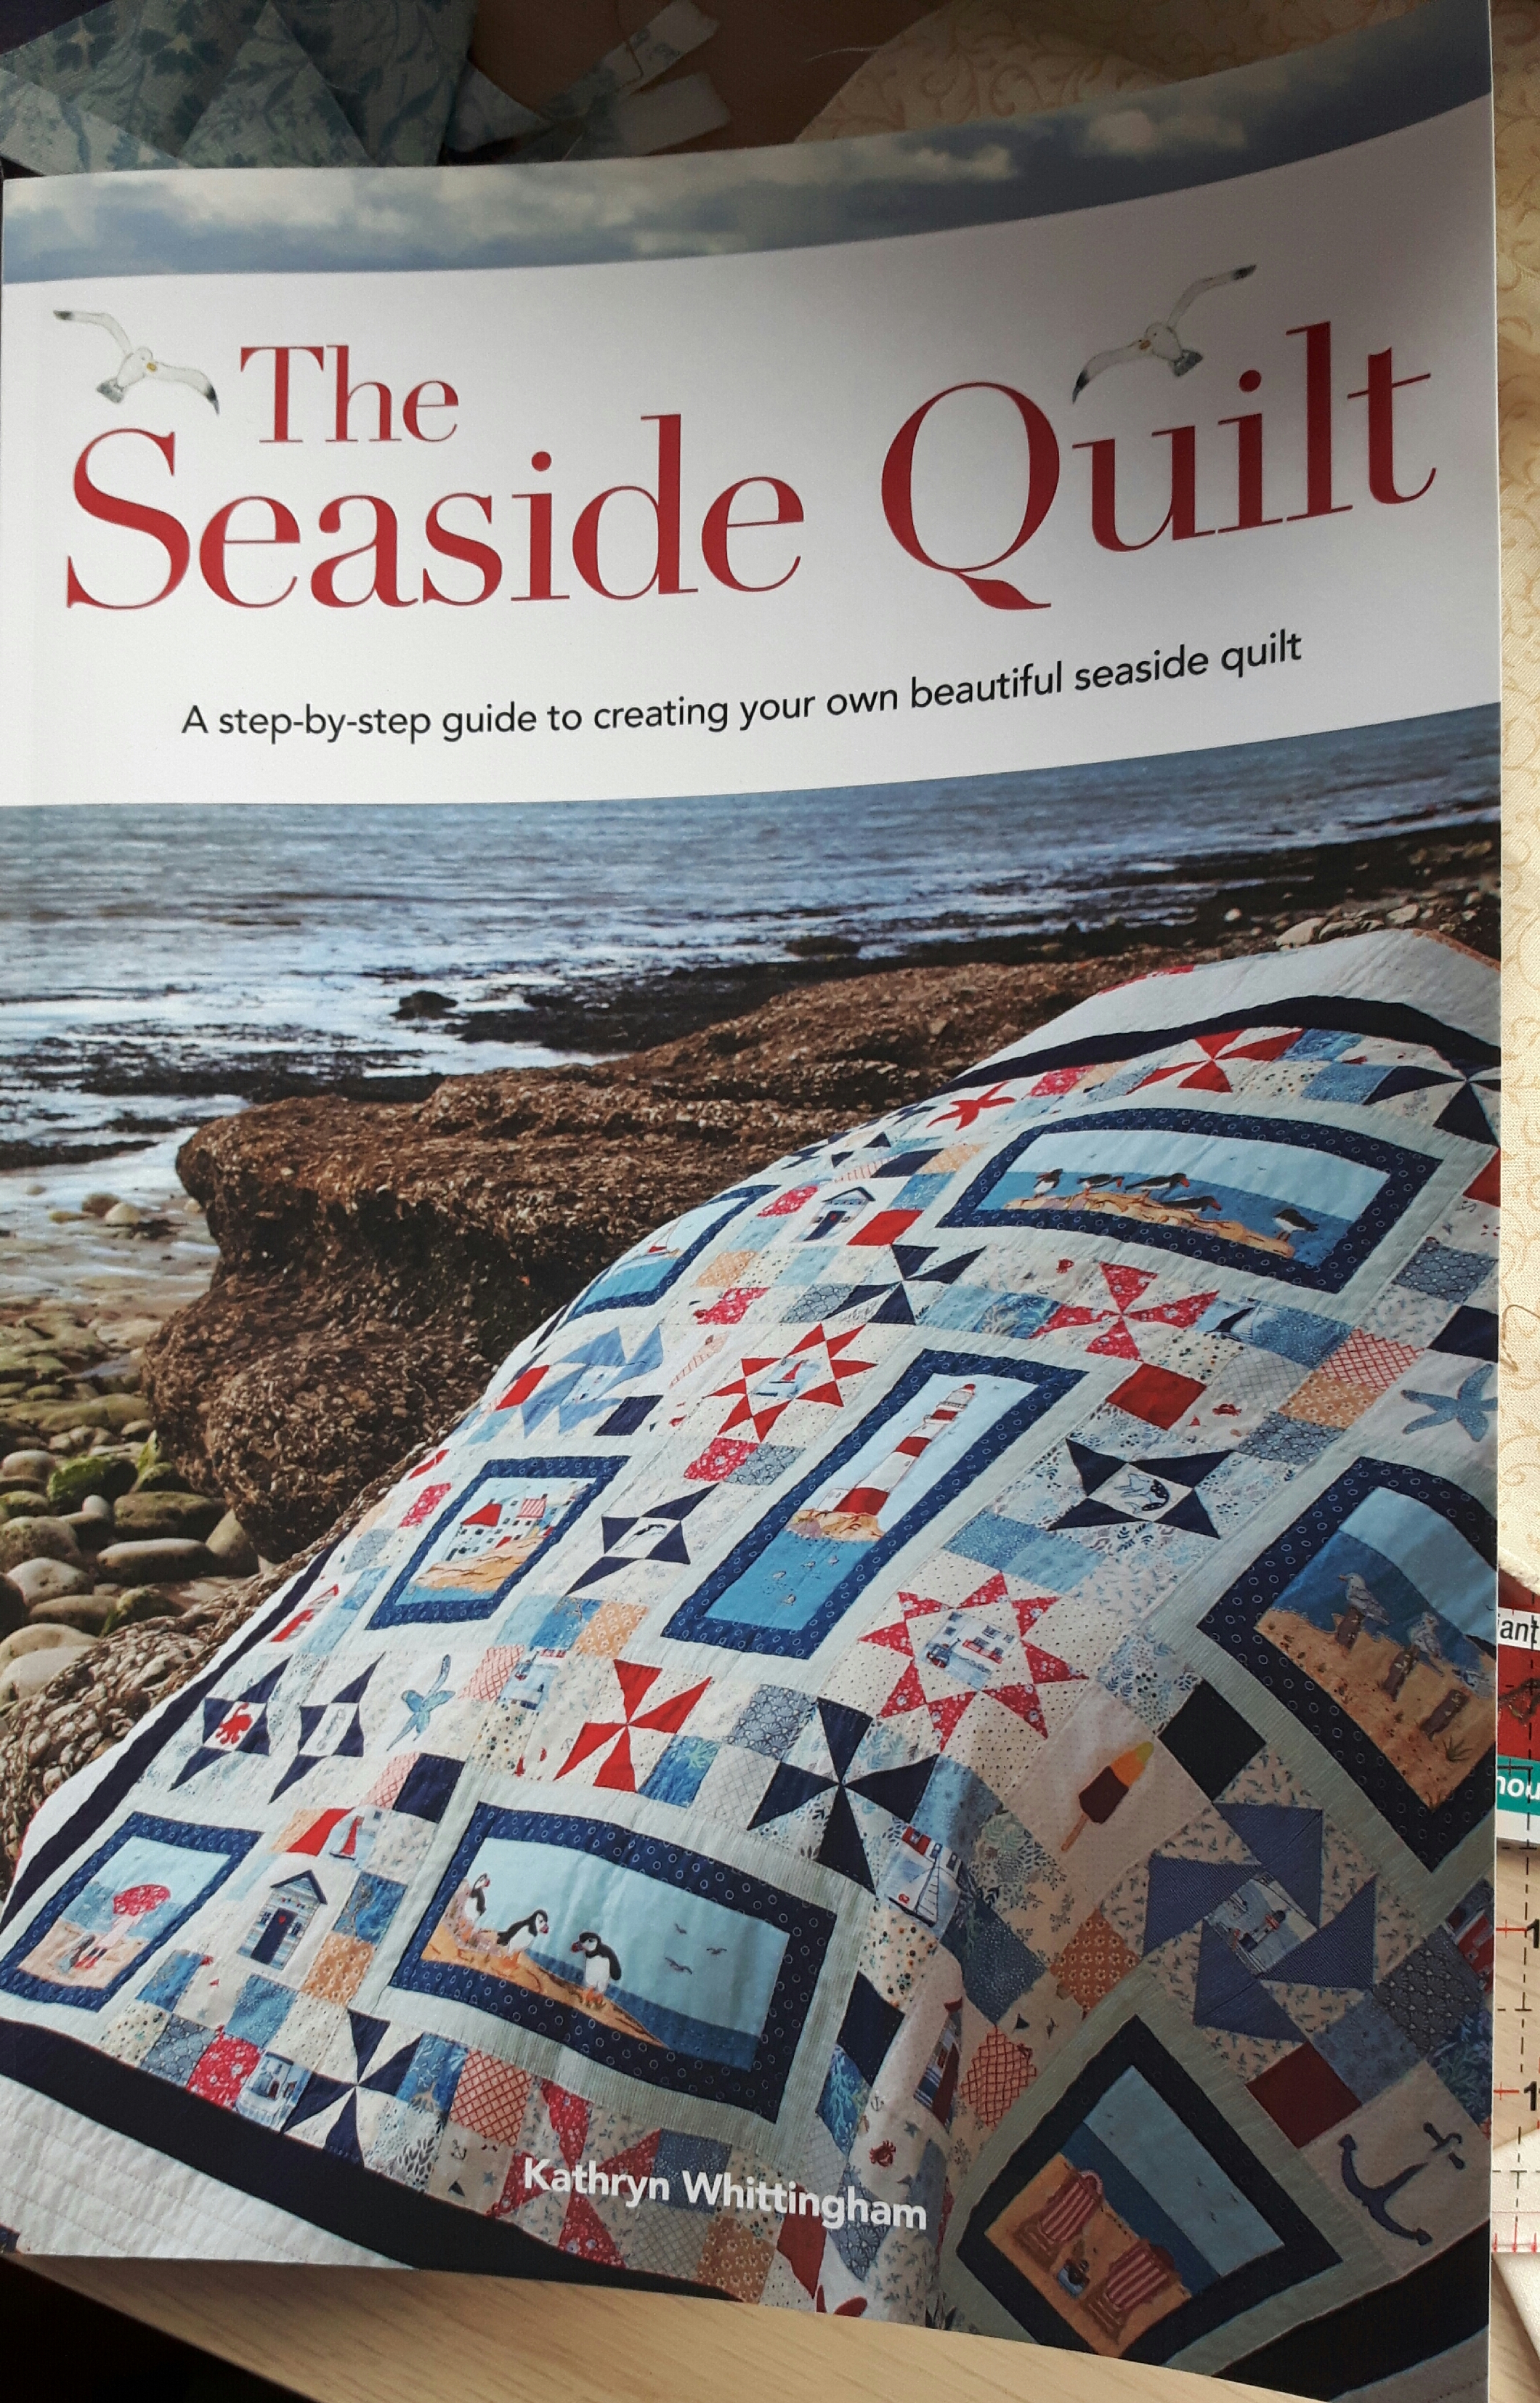
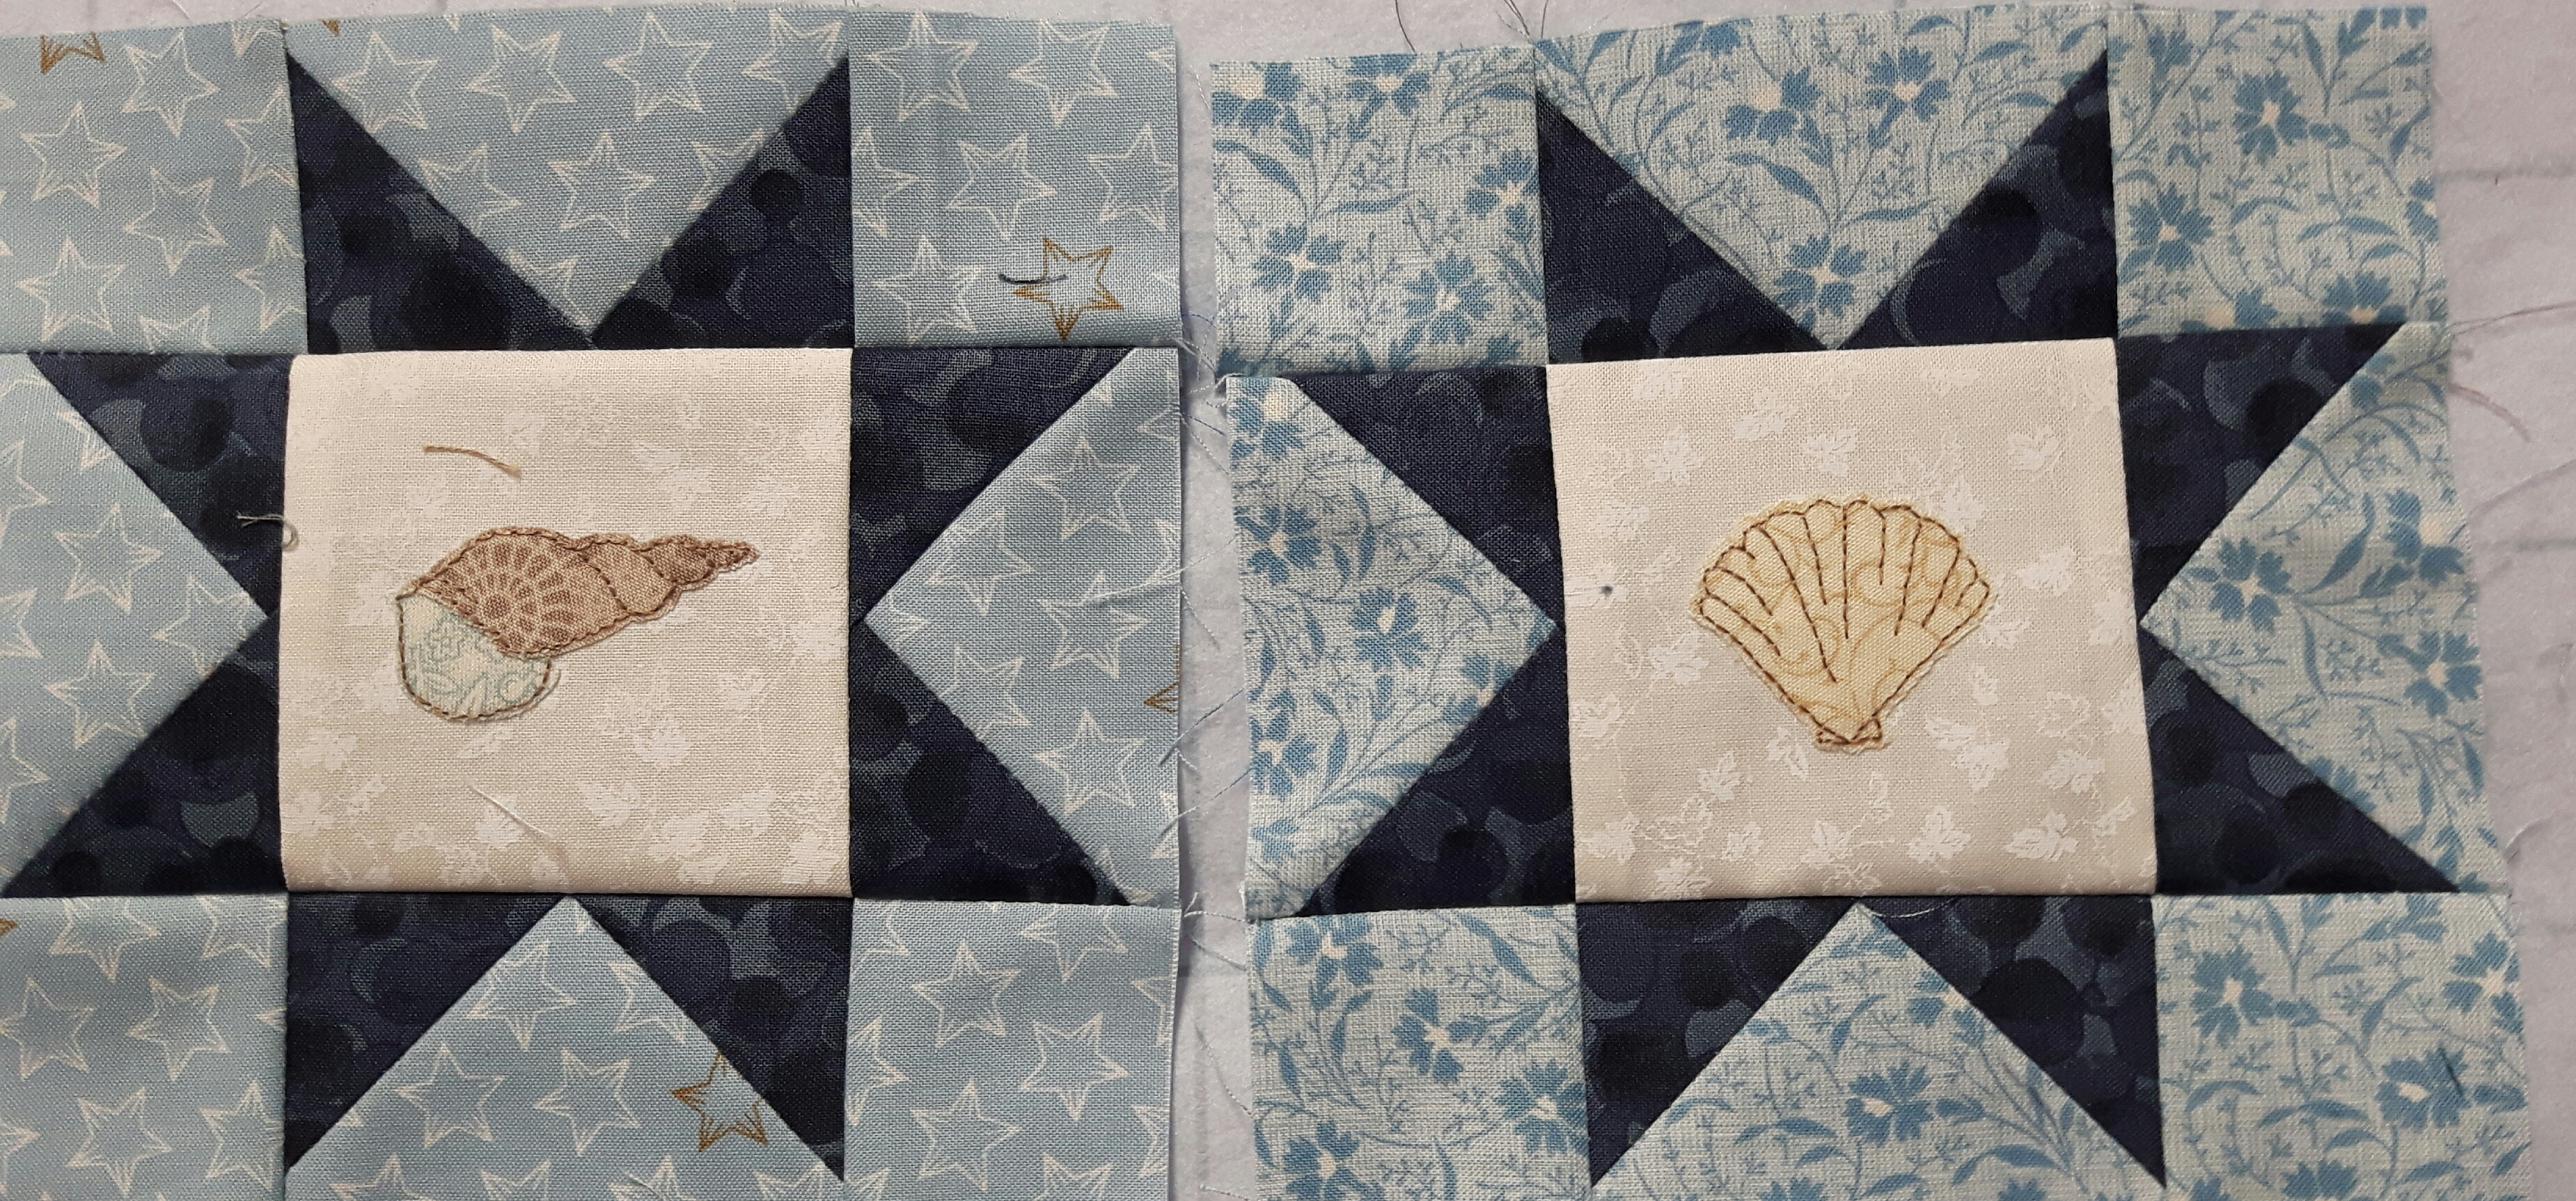
It’s just three weeks since I finished my Cottage Garden quilt, it still makes me smile every time I look at it! My next quilt is by the same designer, Kathryn Whittingham, she’s published a second book called The Seaside Quilt and she very kindly sent me a copy.
Seaside themed stuff doesn’t usually appeal that much but as soon as I saw this quilt I loved it and once I read the introduction I knew why. Kathryn has based this quilt on holidays on the North Yorkshire coast and I spent many a happy holiday in Whitby when my kids were small. The quilt includes applique pictures of beach huts, puffins, boats and the little cottages going down to the sea in the harbours. The photo below is of Staithes, one of the villages she mentions.
Anyway, back to the quilt. I have to confess I only started this on Friday evening…but I have three mini blocks completed. As with the Cottage Garden quilt I’m hand-embroidering, machine piecing and then hopefully hand quilting…
The first two blocks were appliqued seashells in the middle of a star block. The applique is all done with bondaweb and then hand-embroidered, all the patterns are in the back of the book, you just need to trace them onto the bondaweb. To give you an idea of scale these star blocks for the shells finish at 6’5″ square.
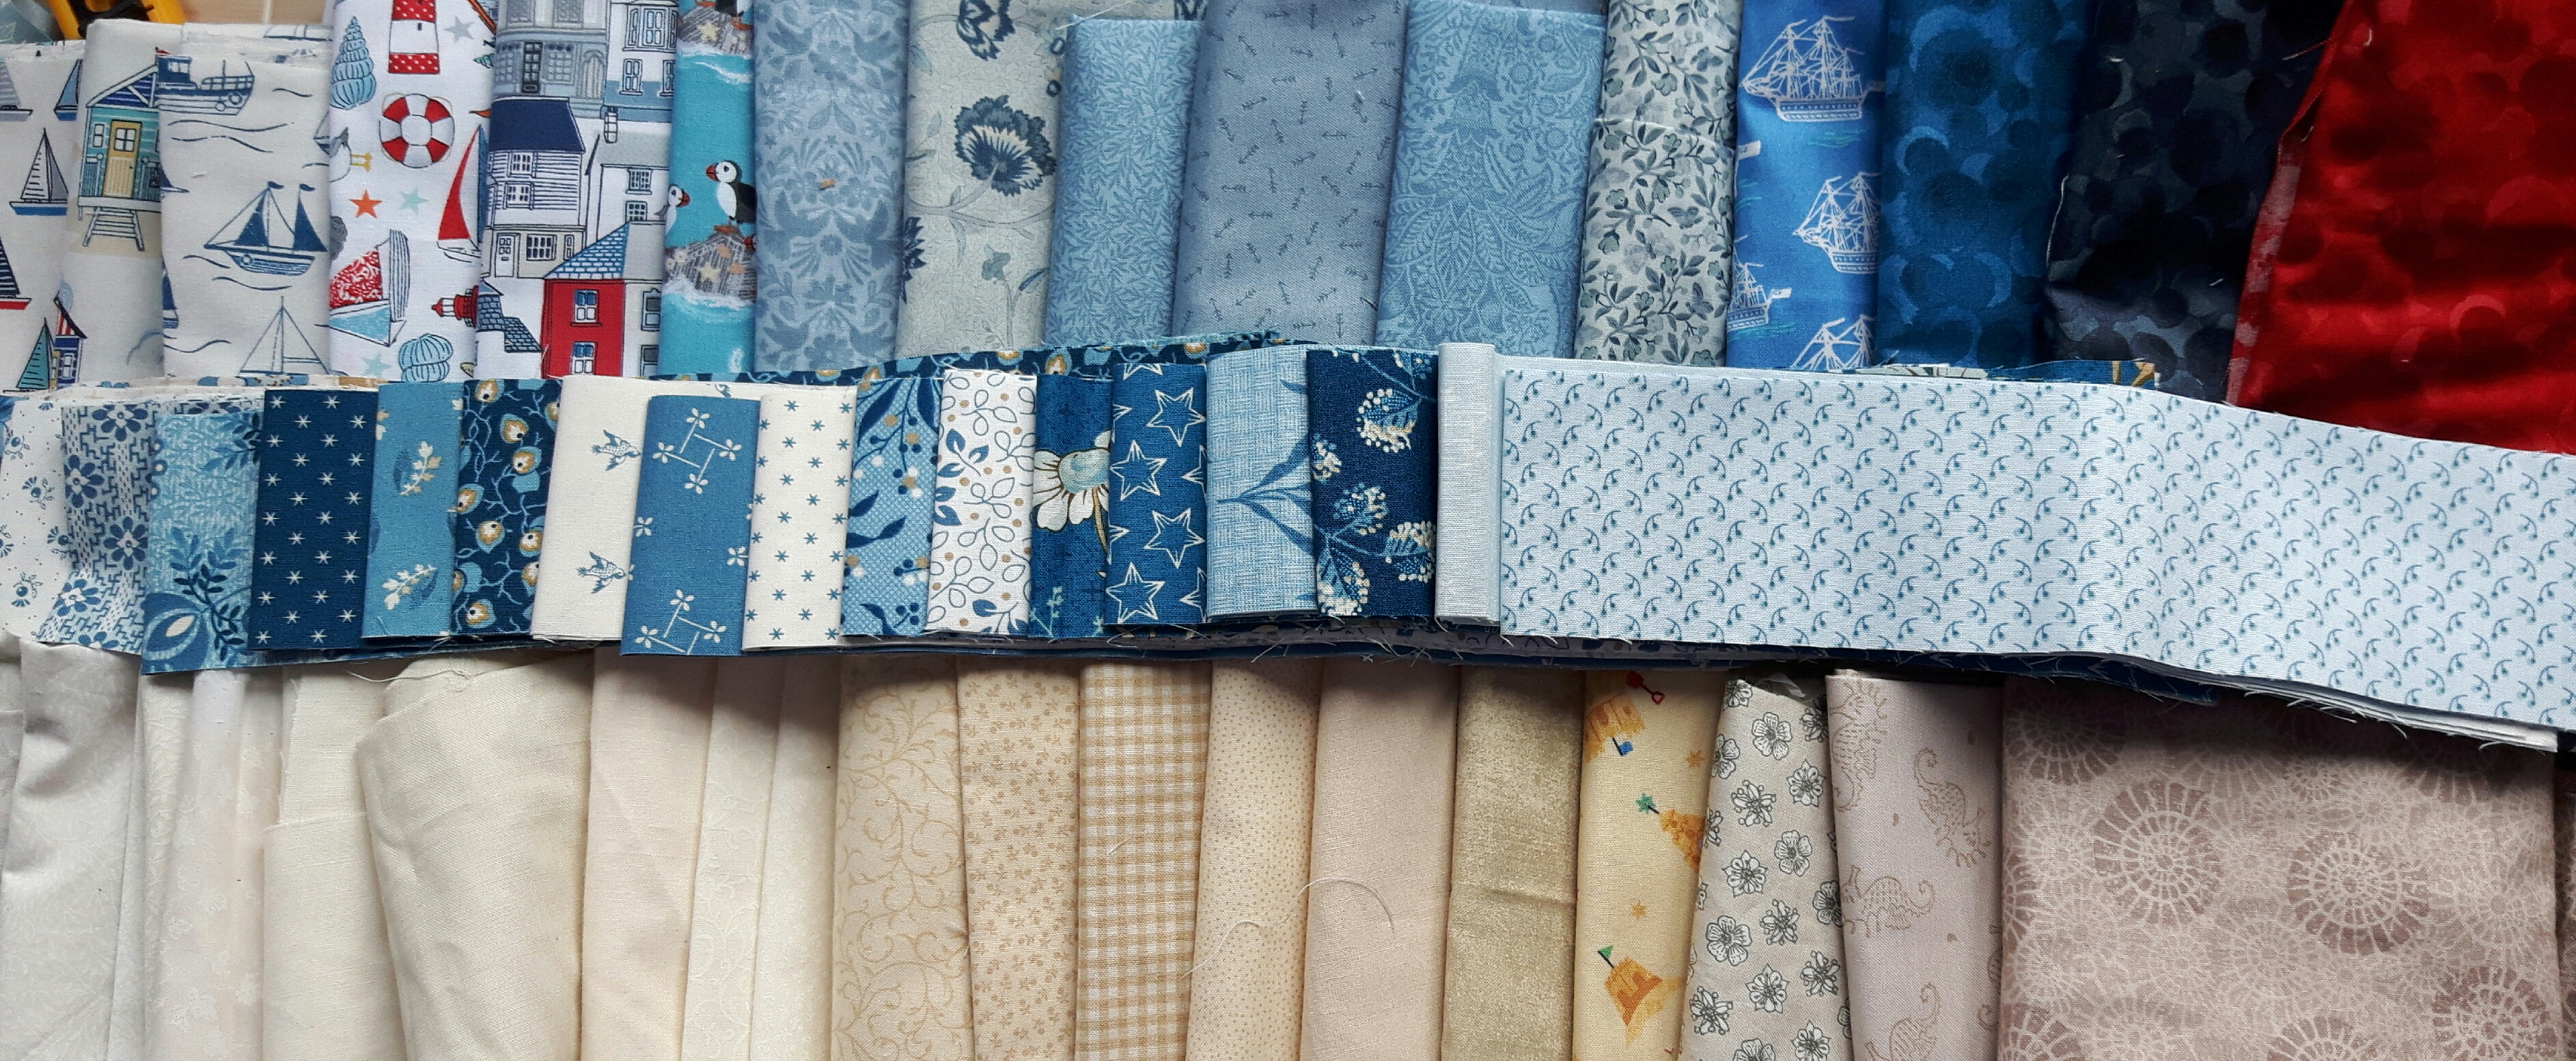
I’ve been collating fabrics for this quilt for a few months, pulling many from my stash and buying fat quarters of others, particularly seaside themed ones. I wasn’t sure if the dark blue Bumbleberry fabrics from Lewis and Irene were going to be too dark, I looked at Kathryn’s quilt and went for it. I think they’re going to be fine. Looking at the photo I think I need to find a couple of red patterned ones too…
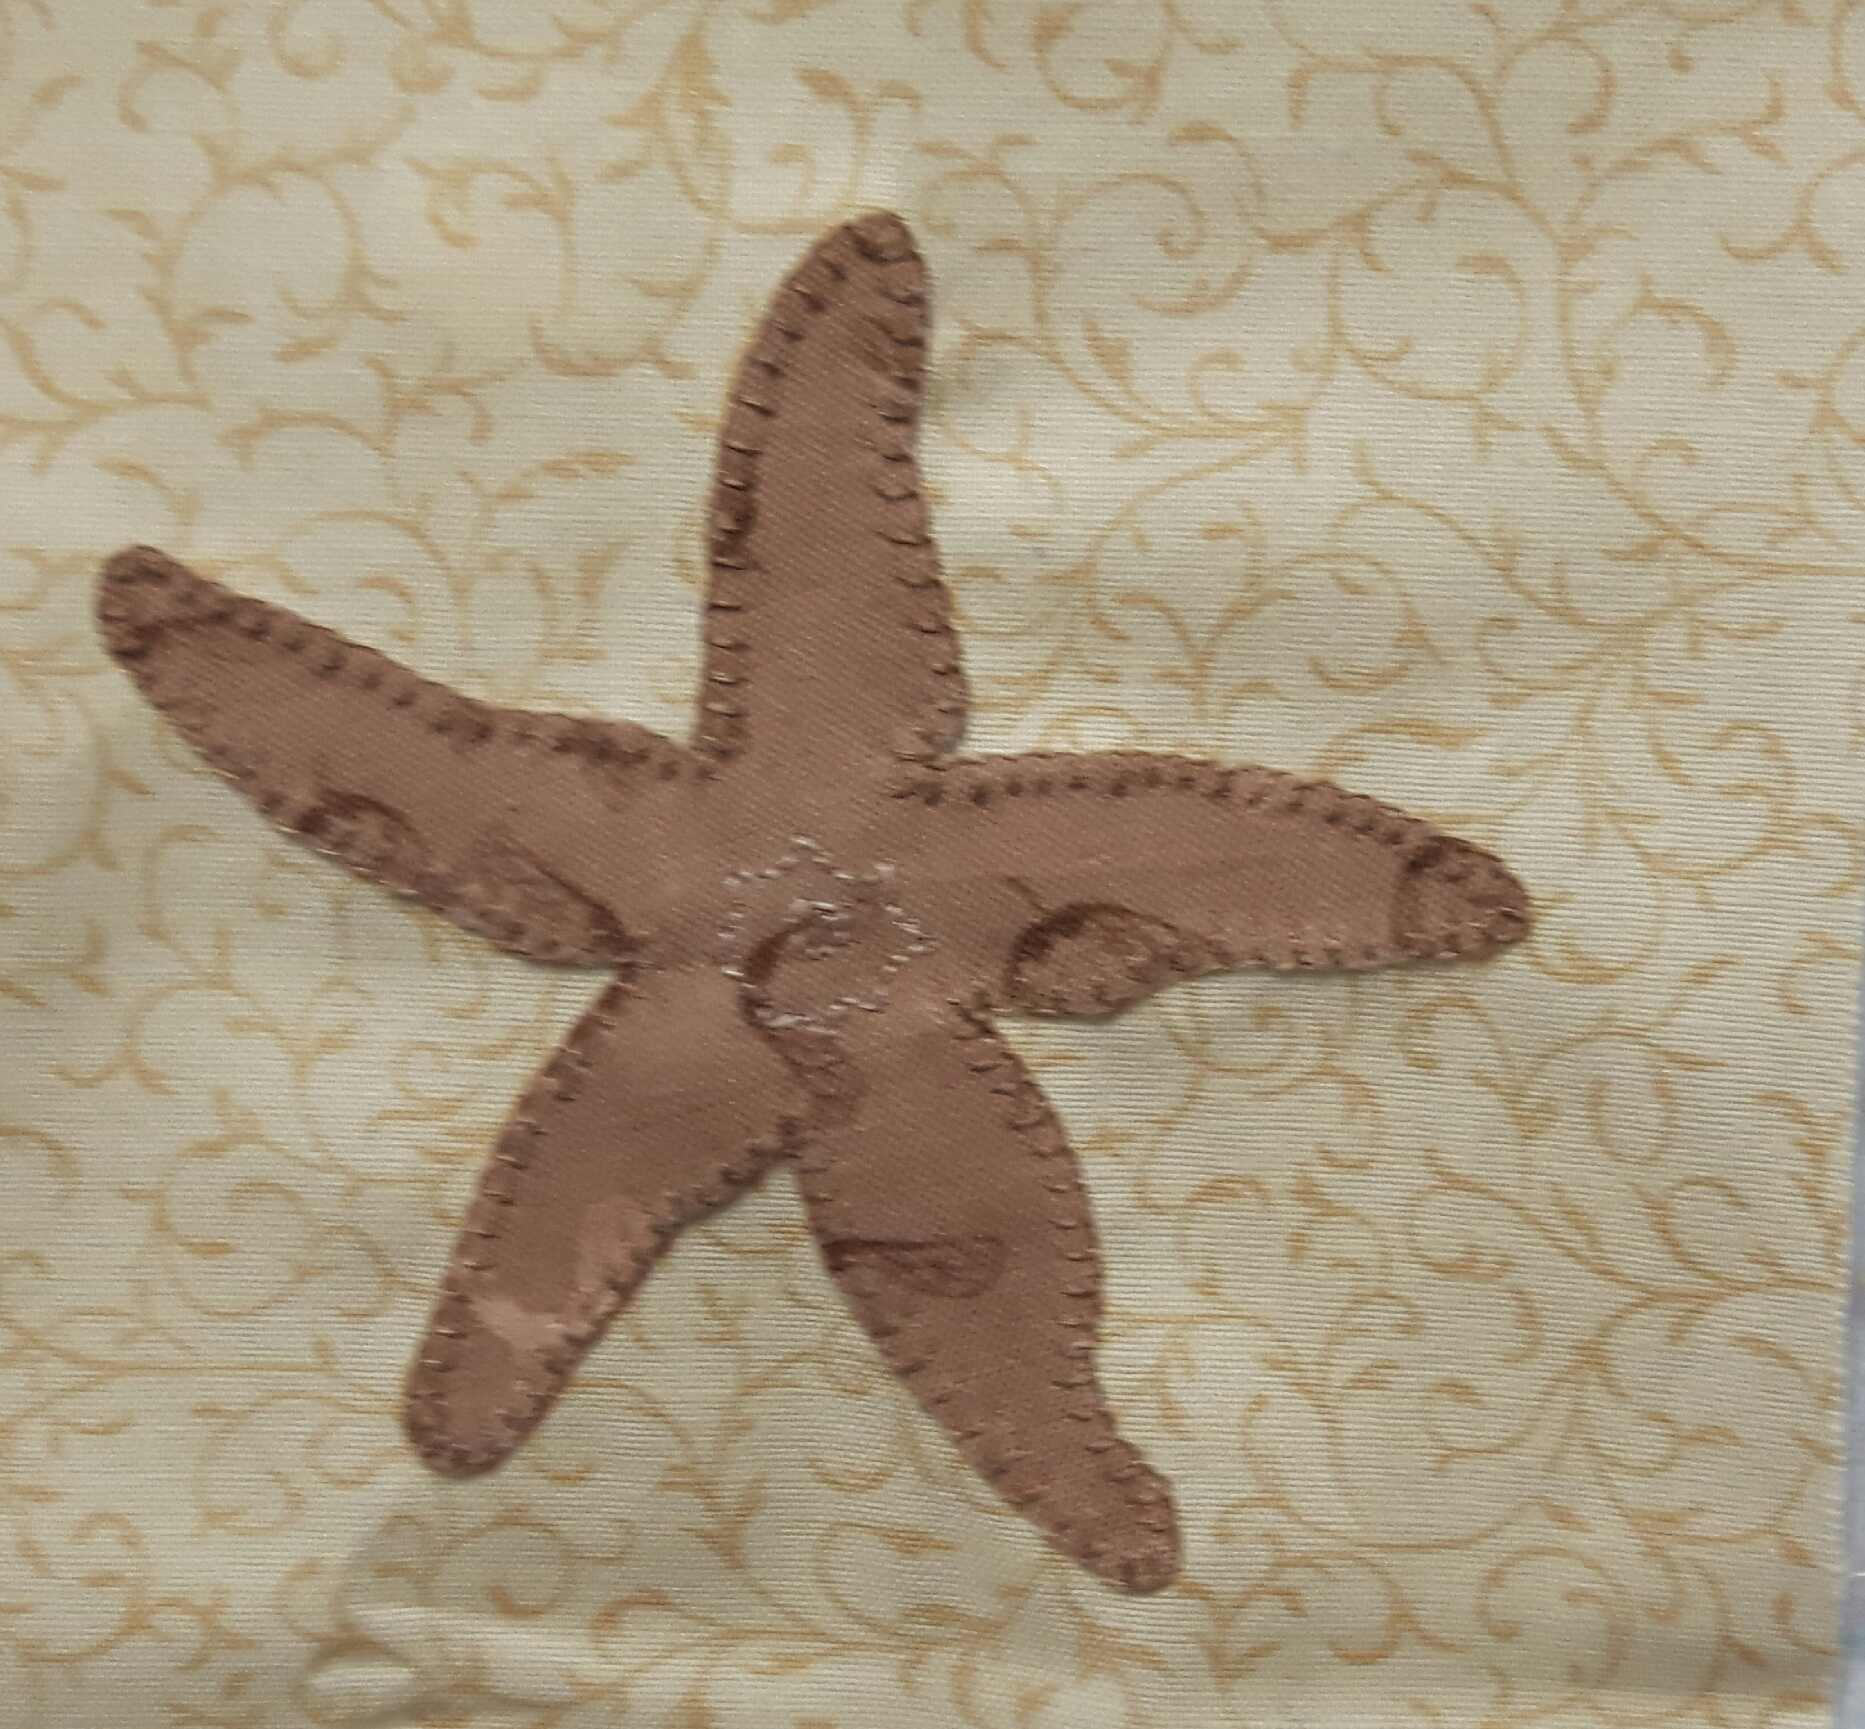
The next block was a starfish, I used a sandy coloured fabric, I’m not very adventurous when it comes to picking colours, I do tend to use the colour they are in real life!
The fourth block to embroider was a beach hut – Whitby has a lovely row a cheerfully painted beach huts. I never used to see the point of a beach hut until I went down to the beach early one morning with the children and people were cooking bacon sandwiches in them! They’re surprisingly expensive to hire or buy! Anyway, I digress…I realised the one fabric I didn’t have in my collection was a nice seaside stripe, I had a quick perusal on the internet and I have two fat quarters winging their way towards me, one of them was actually from a fabric shop in Whitby, very apt! Hopefully one of them will make a nice beach hut!
We’ve got a few days away coming up soon, so I might get myself organised with a few blocks prepared for hand sewing.
Hand Quilt Along Links
This Hand Quilt Along is an opportunity for hand quilters and piecers to share and motivate one another. We post every three weeks, to show our progress and encourage one another. If you have a hand quilting project and would like to join our group contact Kathy at the link below.
Most of you will have heard of the TV series The Great British Sewing Bee, a new series started about three weeks ago. Most of you won’t however have heard of the Great British Sewing Bunny…
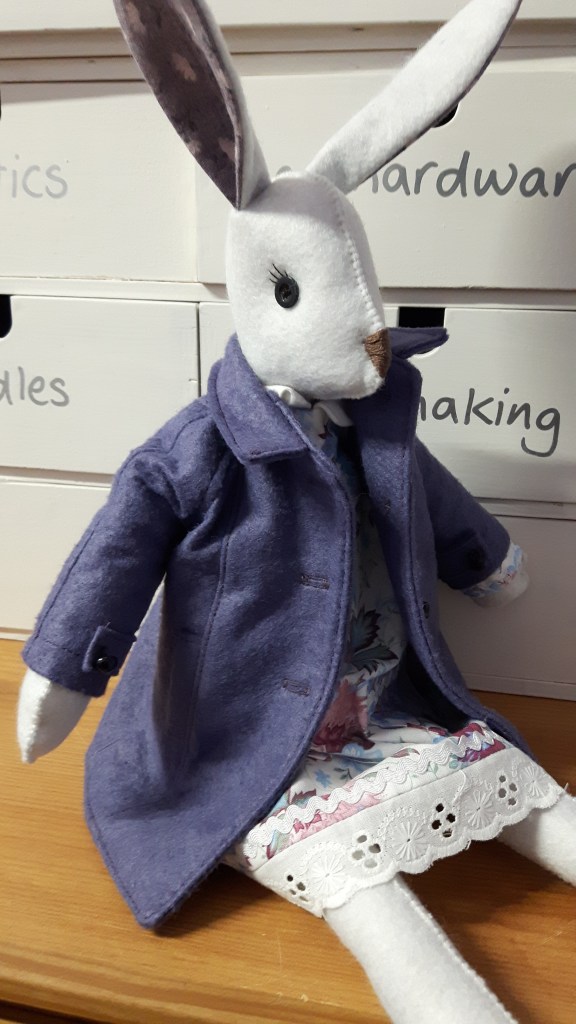
A few months ago I made a Luna Lapin, I called her Violet Speedwell. It was actually the second one I’d made, I gave the first one to my great nephew, he was called Archie. Luna Lapin is the creation of Sarah Peel of Cool Crafting in Kendal. There’s now three books of Luna Lapin, her friends and their clothes. There is also a very friendly facebook page,where people share their makes and some make up stories around them.
Violet and Archie
For the second year running Sarah is organising a sewing competion to run at the same time as the GBSB. Last Thursday she announced the challenge for the week, Blooming Bunnies. So we had a week to think of an outfit for Luna, however there was a time limit of three hours if it was machine sewn or six hours if it was hand sewn, all done by honesty.
With a name like Violet Speedwell there was only one flower I could use as inspiration. I rummaged through my stash and the scrap boxes looking for fabric I could use. I found a small piece left from a fabric box lid I made twenty years ago, it was several layers of fabrics such as silks or organzas, double stitched in a grid and then squares cut away to reveal the fabric underneath. It was the perfect colours, but very small, so Violet has quite a high waisted dress!
I used some fine purple silk for the skirt, I just cut the width of fabric, narrow hemmed it and gathered it up. A purple organza ribbon hid the fact that the gathers weren’t too even! I spotted some purple five petalled wooden buttons in my button drawer and added one to the top of the back bodice.
As the weather is somewhat inclement at the moment I decided she needed a Skye wrap to keep warm, this is a mini version of an adult pattern from Cool Crafting. It’s lined with a pretty cotton with violets on and has the same flower buttons. I also used some purple wool felt to make a bonnet…
Entries had to be posted on facebook on Thursday evening, there were some amazing entries, some people are so imaginative. If you’re on facebook do have a look! I wouldn’t like to be a judge for this, two winners are meant to be chosen each week (there’s four challenges) and they will go through to the final. This week the judges couldn’t whittle it down to two so four were chosen to take part in the final. Exciting stuff!
The new challenge is Super Heroes, I’m not sure if I’ll do this one or not, I’ll see how time goes.
Over the last couple of years I’ve spoken to a couple of people who had seen otters in the river Wharfe, I’ve never seen a wild otter so I’ve been meaning to walk that way ever since. There was also mention of a kingfisher in the same area, something else I’ve never seen. With my new getting fit regime I decided to catch a bus to the little nature reserve where they had been seen and walk back.
It’s only a very small nature reserve but I was quite impressed, there were good paths and most importantly lots of benches, perfect for sitting with a flask of coffee and enjoying the view…
I liked the way they had made the low fencing too, it’s like a rustic version of wattle fencing.
I can’t have been walking along by the river for more than five minutes when a duck by the far bank gave a warning quack and scurried across the water to the other side. I looked over to see what had startled it and spotted the otters! There were two of them swimming along, sometimes bobbing their heads up but easy to follow underwater by the wake behind them. I watched them for several minutes before they disappeared under a bush overhanging the water. It was quite exciting to see them, I just enjoyed the moment rather than trying to take a photo as I knew with my phone they wouldn’t have been clear at all.
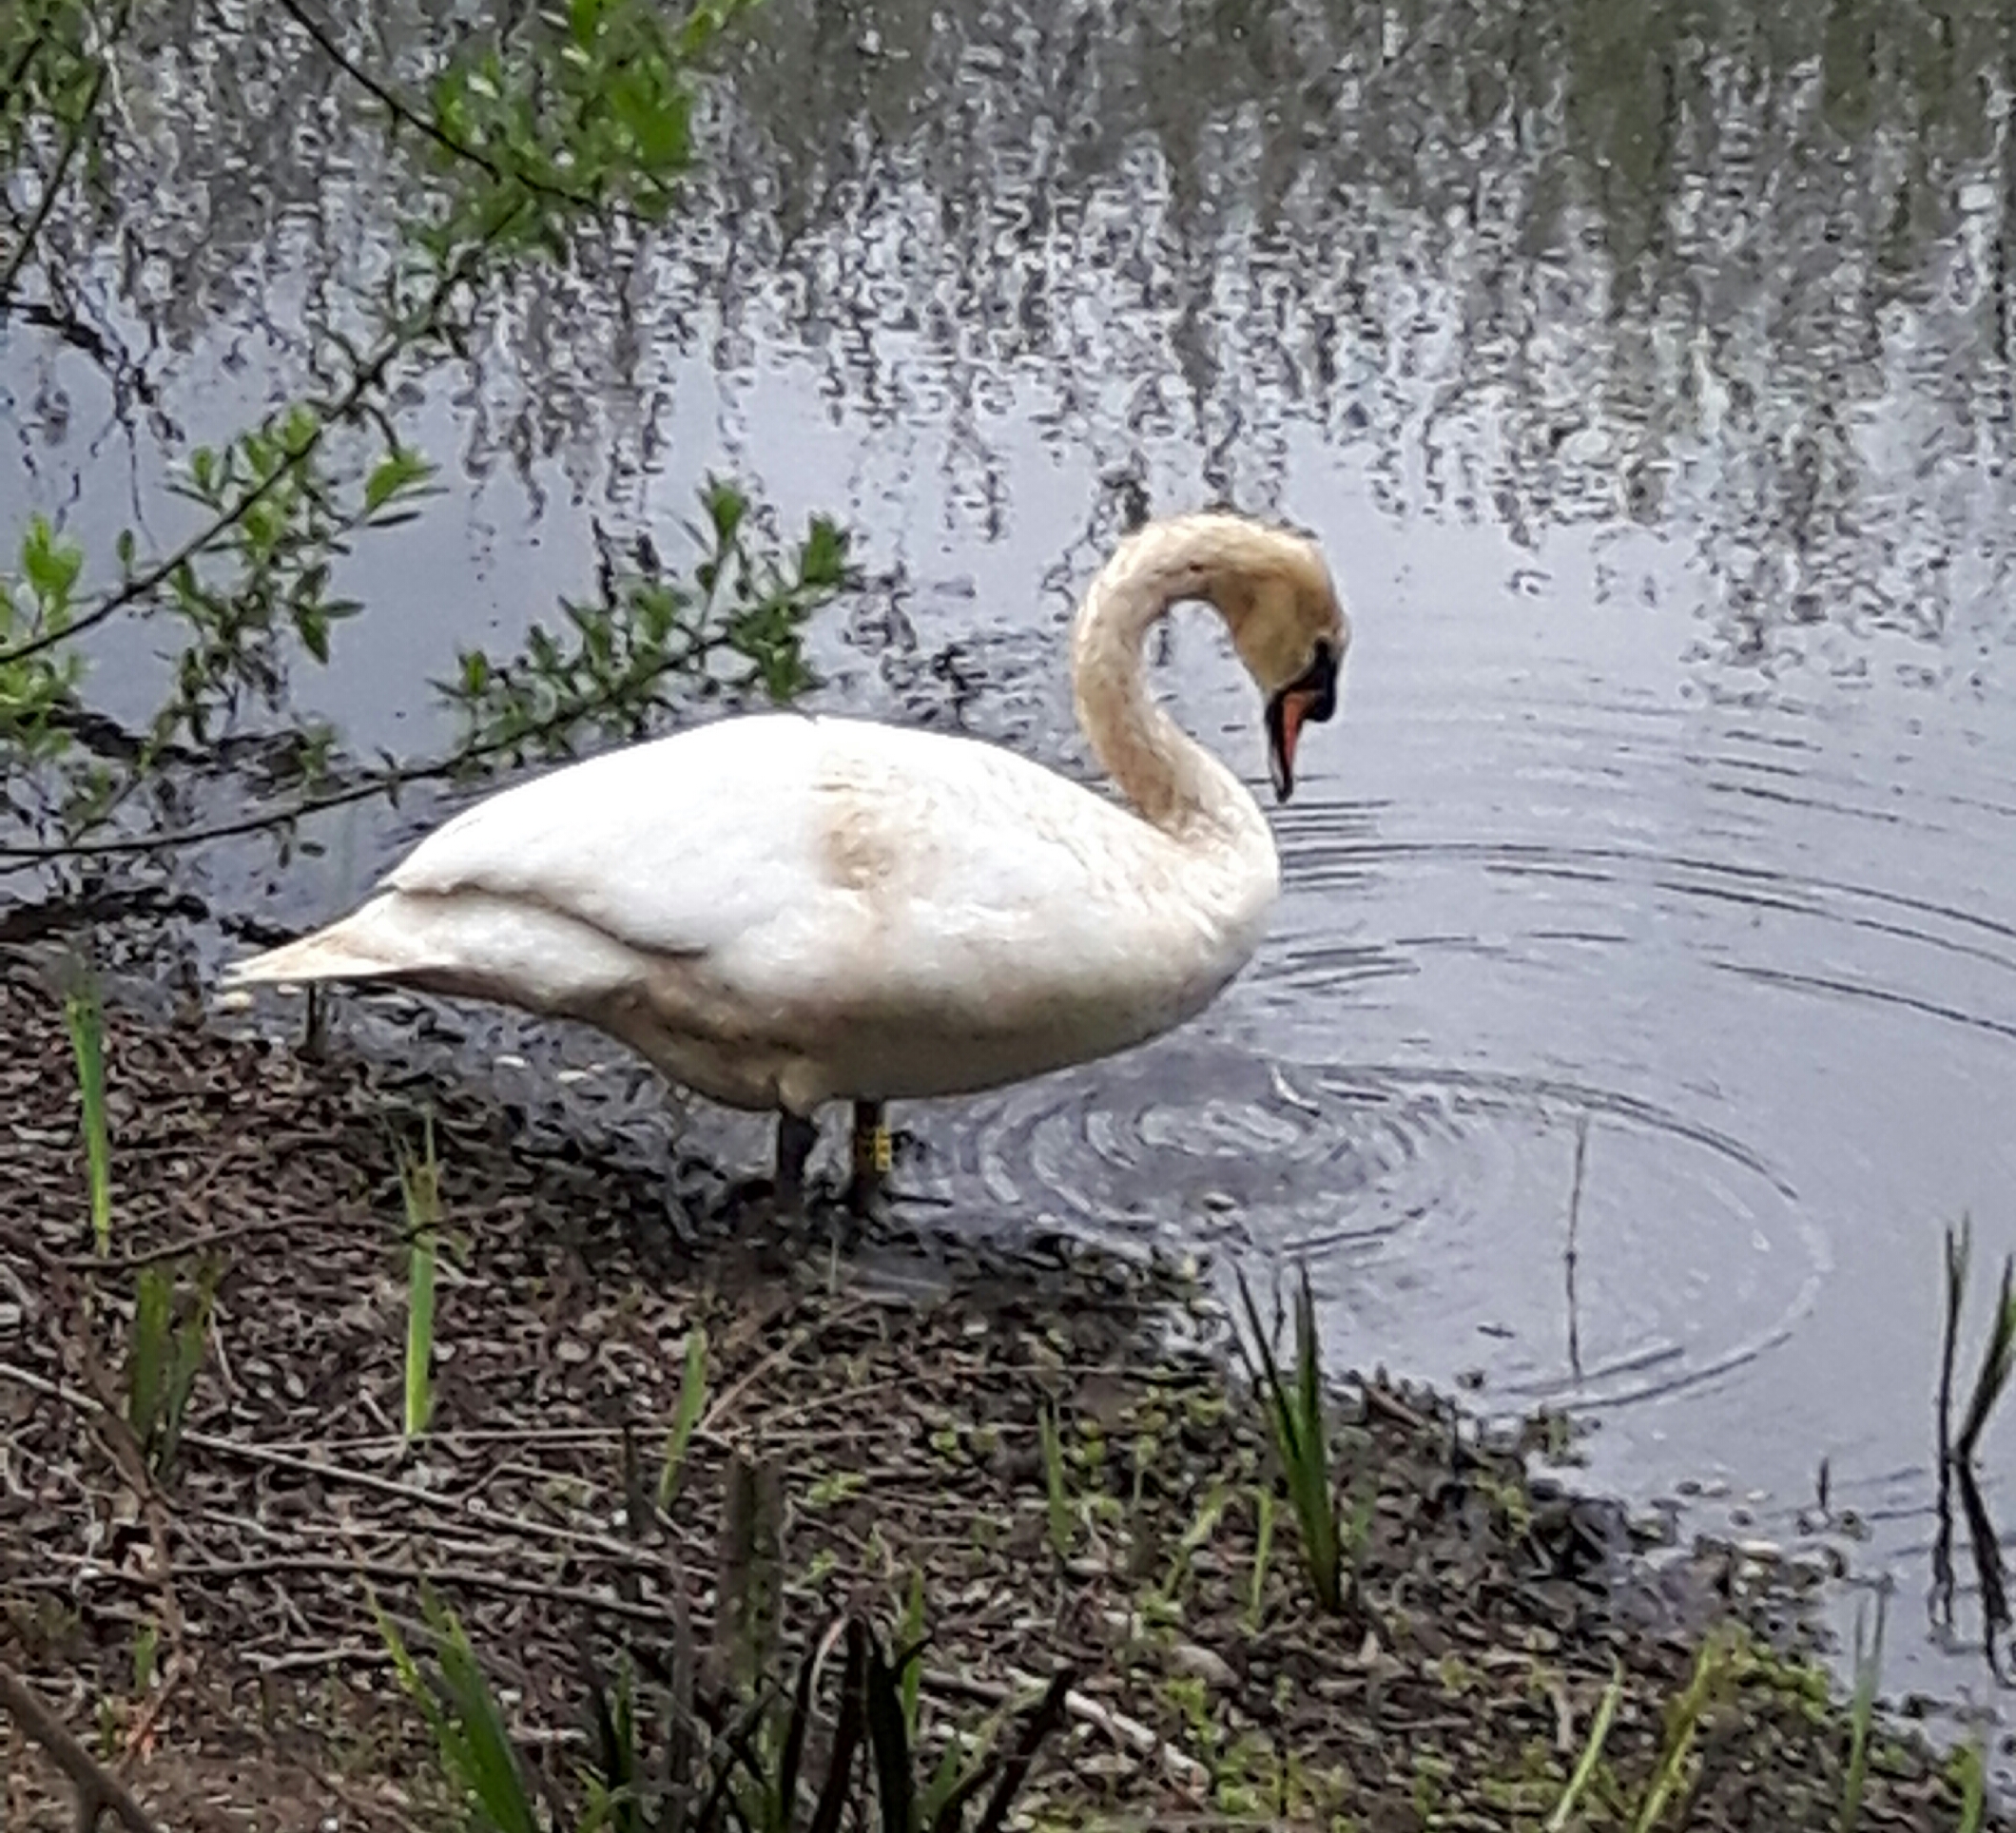
I walked to the end of the reserve and then looped back past a pond with a rather dirty swan, he needs a good preen but he did stand in the classic swan pose for me!
After a coffee on the bench, hoping in vain that the otters would return, I walked along the road to a footpath which skirts round Burley in Wharfedale village, following my nose until I found the stepping stones…
…which I didn’t attempt to cross! There’s been a long running campaign to have a footbridge here which would make a great circular walk. A little further along is the weir which was built to serve what I have since discovered is called a goit, it’s a waterway about the width of a narrow canal, which provided water for the mills in the village.
After a short detour into the village for a sticky bun I returned to the riverside path heading home. I spent quite a few minutes here as there were dozens of swallows, skimming the river for insects. It was first time this year I’d seen swallows, they migrate to Africa for the winter so it’s always a special moment when you see they have returned. I tried to take a photo but you can just make out the occasional spot!
From here it was just a walk across the fields and the golf course to home. Altogether I walked about 6.5 miles and I knew it the next day! I still haven’t seen a kingfisher so I will just have to return another day.
I’m on a bit of a roll at the moment, having felt last weekend that I had rather a lot of different projects on, I’ve got another finish!
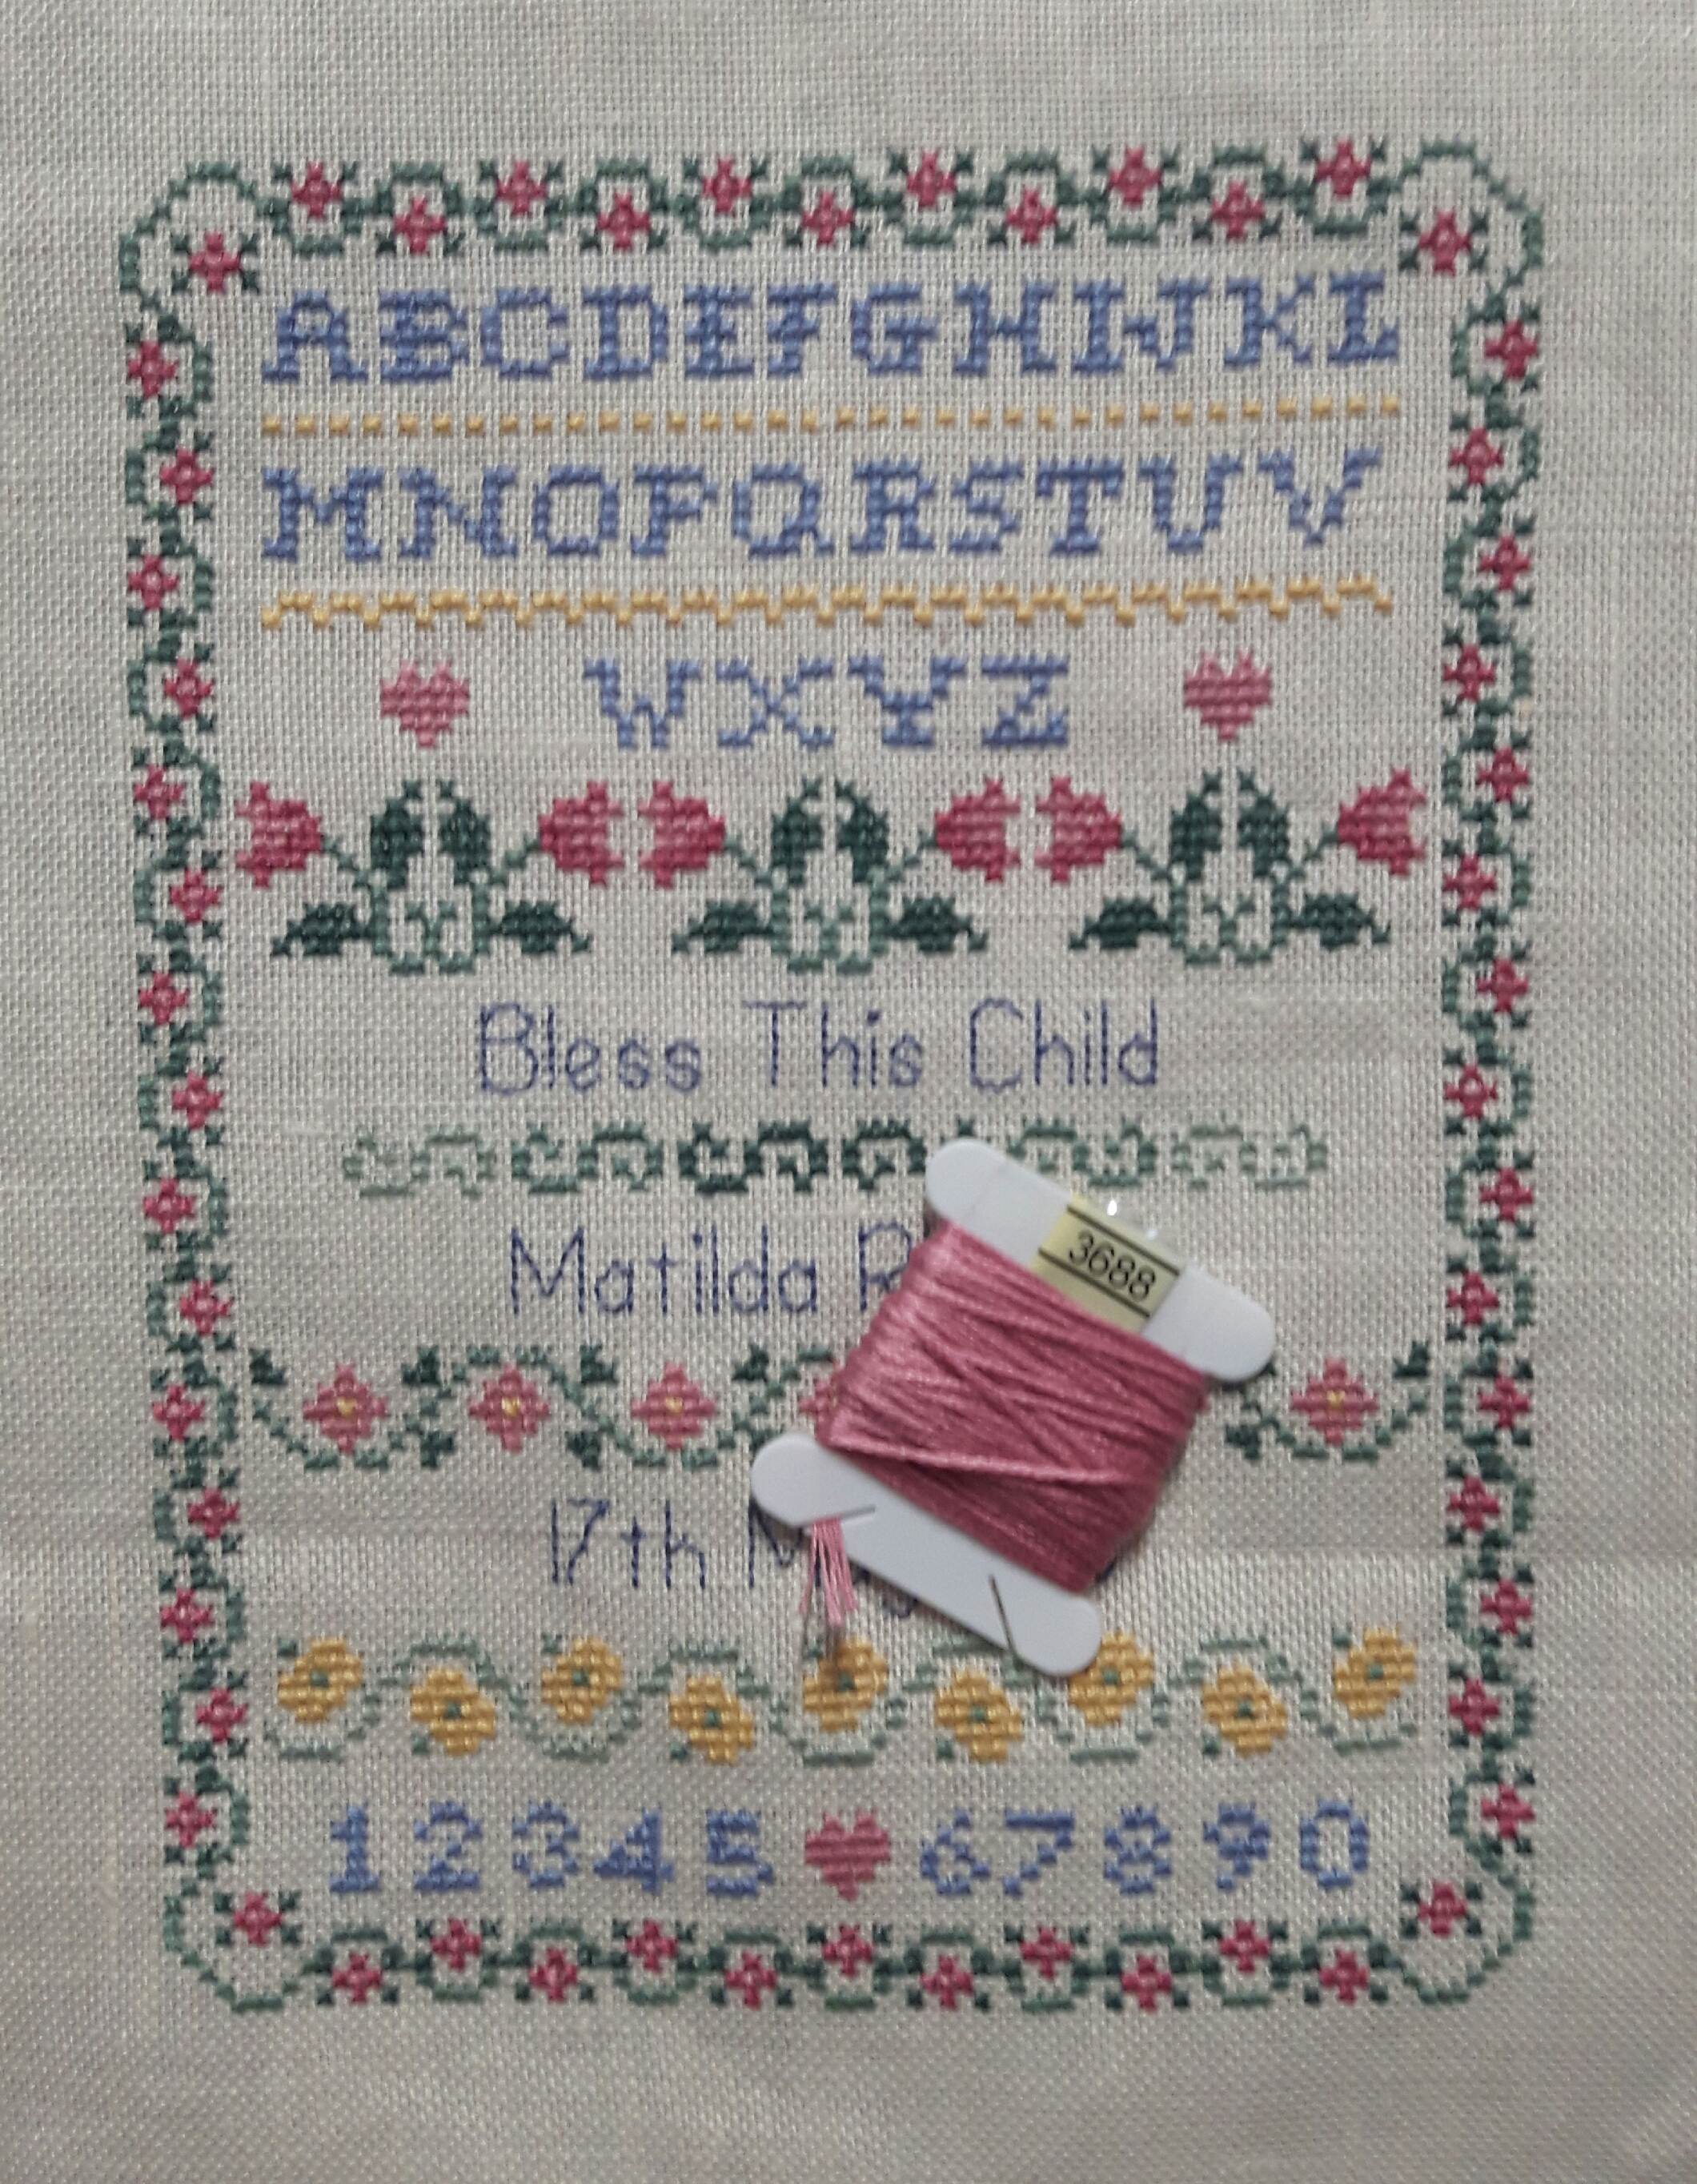
A few weeks ago a friend from Skipton Stitchers (formerly Embroiderers Guild) asked if I would make a birth sampler for her, she does amazing embroidery but feels she hasn’t got the patience for cross-stitch. When her first daughter was born she had a sampler made, but as is often the case, when second daughter arrived they never quite got round to it.
She wanted a sampler which is similar but not a copy. It’s surprising how a change of colour and font changes the whole feel of the design. This was the original one…
It’s typical of it’s time, mid 1980’s. I chose eight colours, two blue ones for the writing, two pink ones, three greens and a soft gold thread. I used a simple font of the details, it’s my usual style of stitching letters as I like the clear simplistic feel.
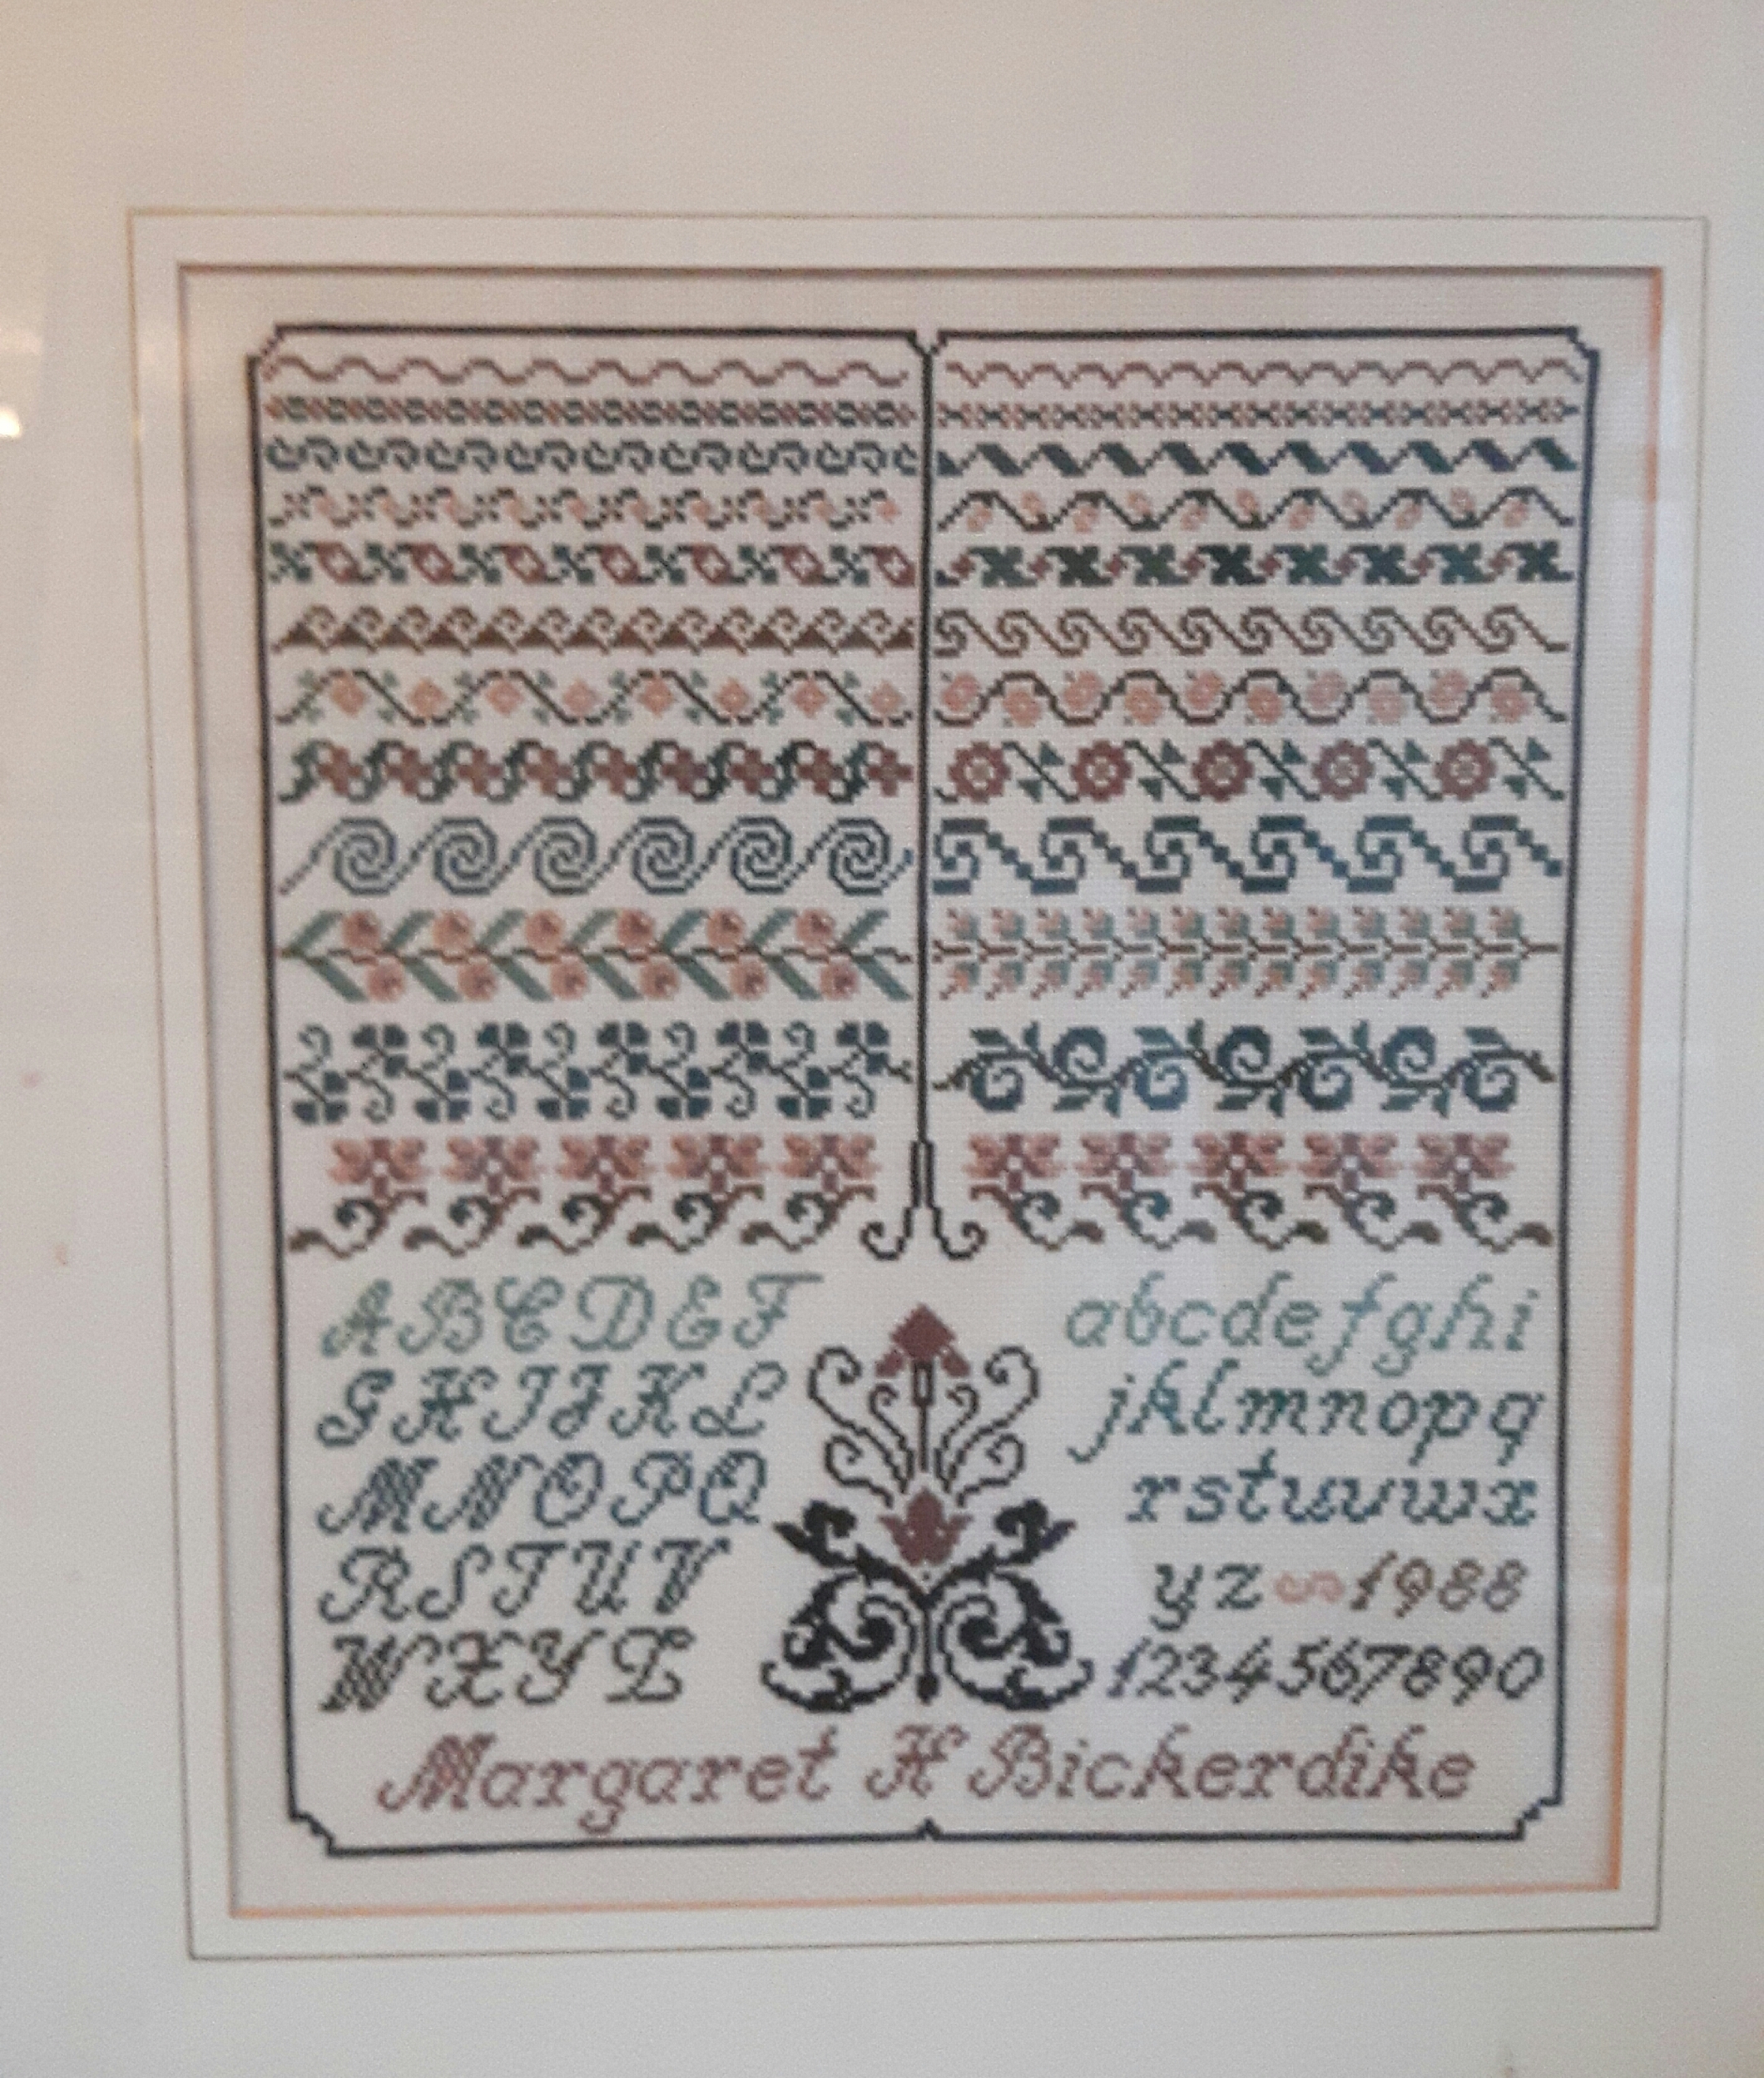
I kept (with slight changes) the wide floral design below the alphabet, it was just too complicated to find one that fitted as well. The three lower borders however come from a sampler I stitched back in 1988…
It’s interesting to see how the colours completely changed the look of a border. The outer border is the same as the original. I felt it was very pink and decided to tone it down a little by using mid green for the zigzag line. I was quite surprised though when I added the dark green leaves that the shape of the zigzag changed completely…
This evening I’ve finished stitching the border and added two hearts and it’s complete, I’m pleased with it as I feel it still has the feel of a traditional style birth sampler but with a few more up-to-date changes. Luckily my friend loves it too.