Stitching on the go

I always have a little stitching project in my handbag for those odd moments when I’m sitting around waiting…at the dentist, in a cafe. It’s usually something small but over autumn it’s been a slightly bigger project which will end up as a wall hanging in my sewing room. It’s a cross-stitch design by Stoney Creek which includes quilting squares, cotton reels and a vintage sewing machine…what more could I want on a sewing room hanging!

The central image is of a vintage sewing machine and it’s taken me quite a while, there’s a lot of dark greys! The design is traditional in that there aren’t any half stitches and the eventual back-stitch goes round the squares rather than rounding them off. This is how far I’ve got so far…

I’m changing the colours for the rest of the design as it’s all dusky pinks, whereas my sewing room is purple. The only bit I’m hesitating on is the tomato pin-cushion which is sitting on the sewing machine. It works in pinks but I’m not sure it will work in purple, but then it could just be a pin-cushion! This decision will wait a while however as since the Knitting and Stitching show this has been put on hold…

I bought a kit from Nutmeg Designs, they’re a small company based up in the village of Reeth in Swaledale, I’ve stitched a few of their designs most recently a cross-stitch postcard of Swaledale.

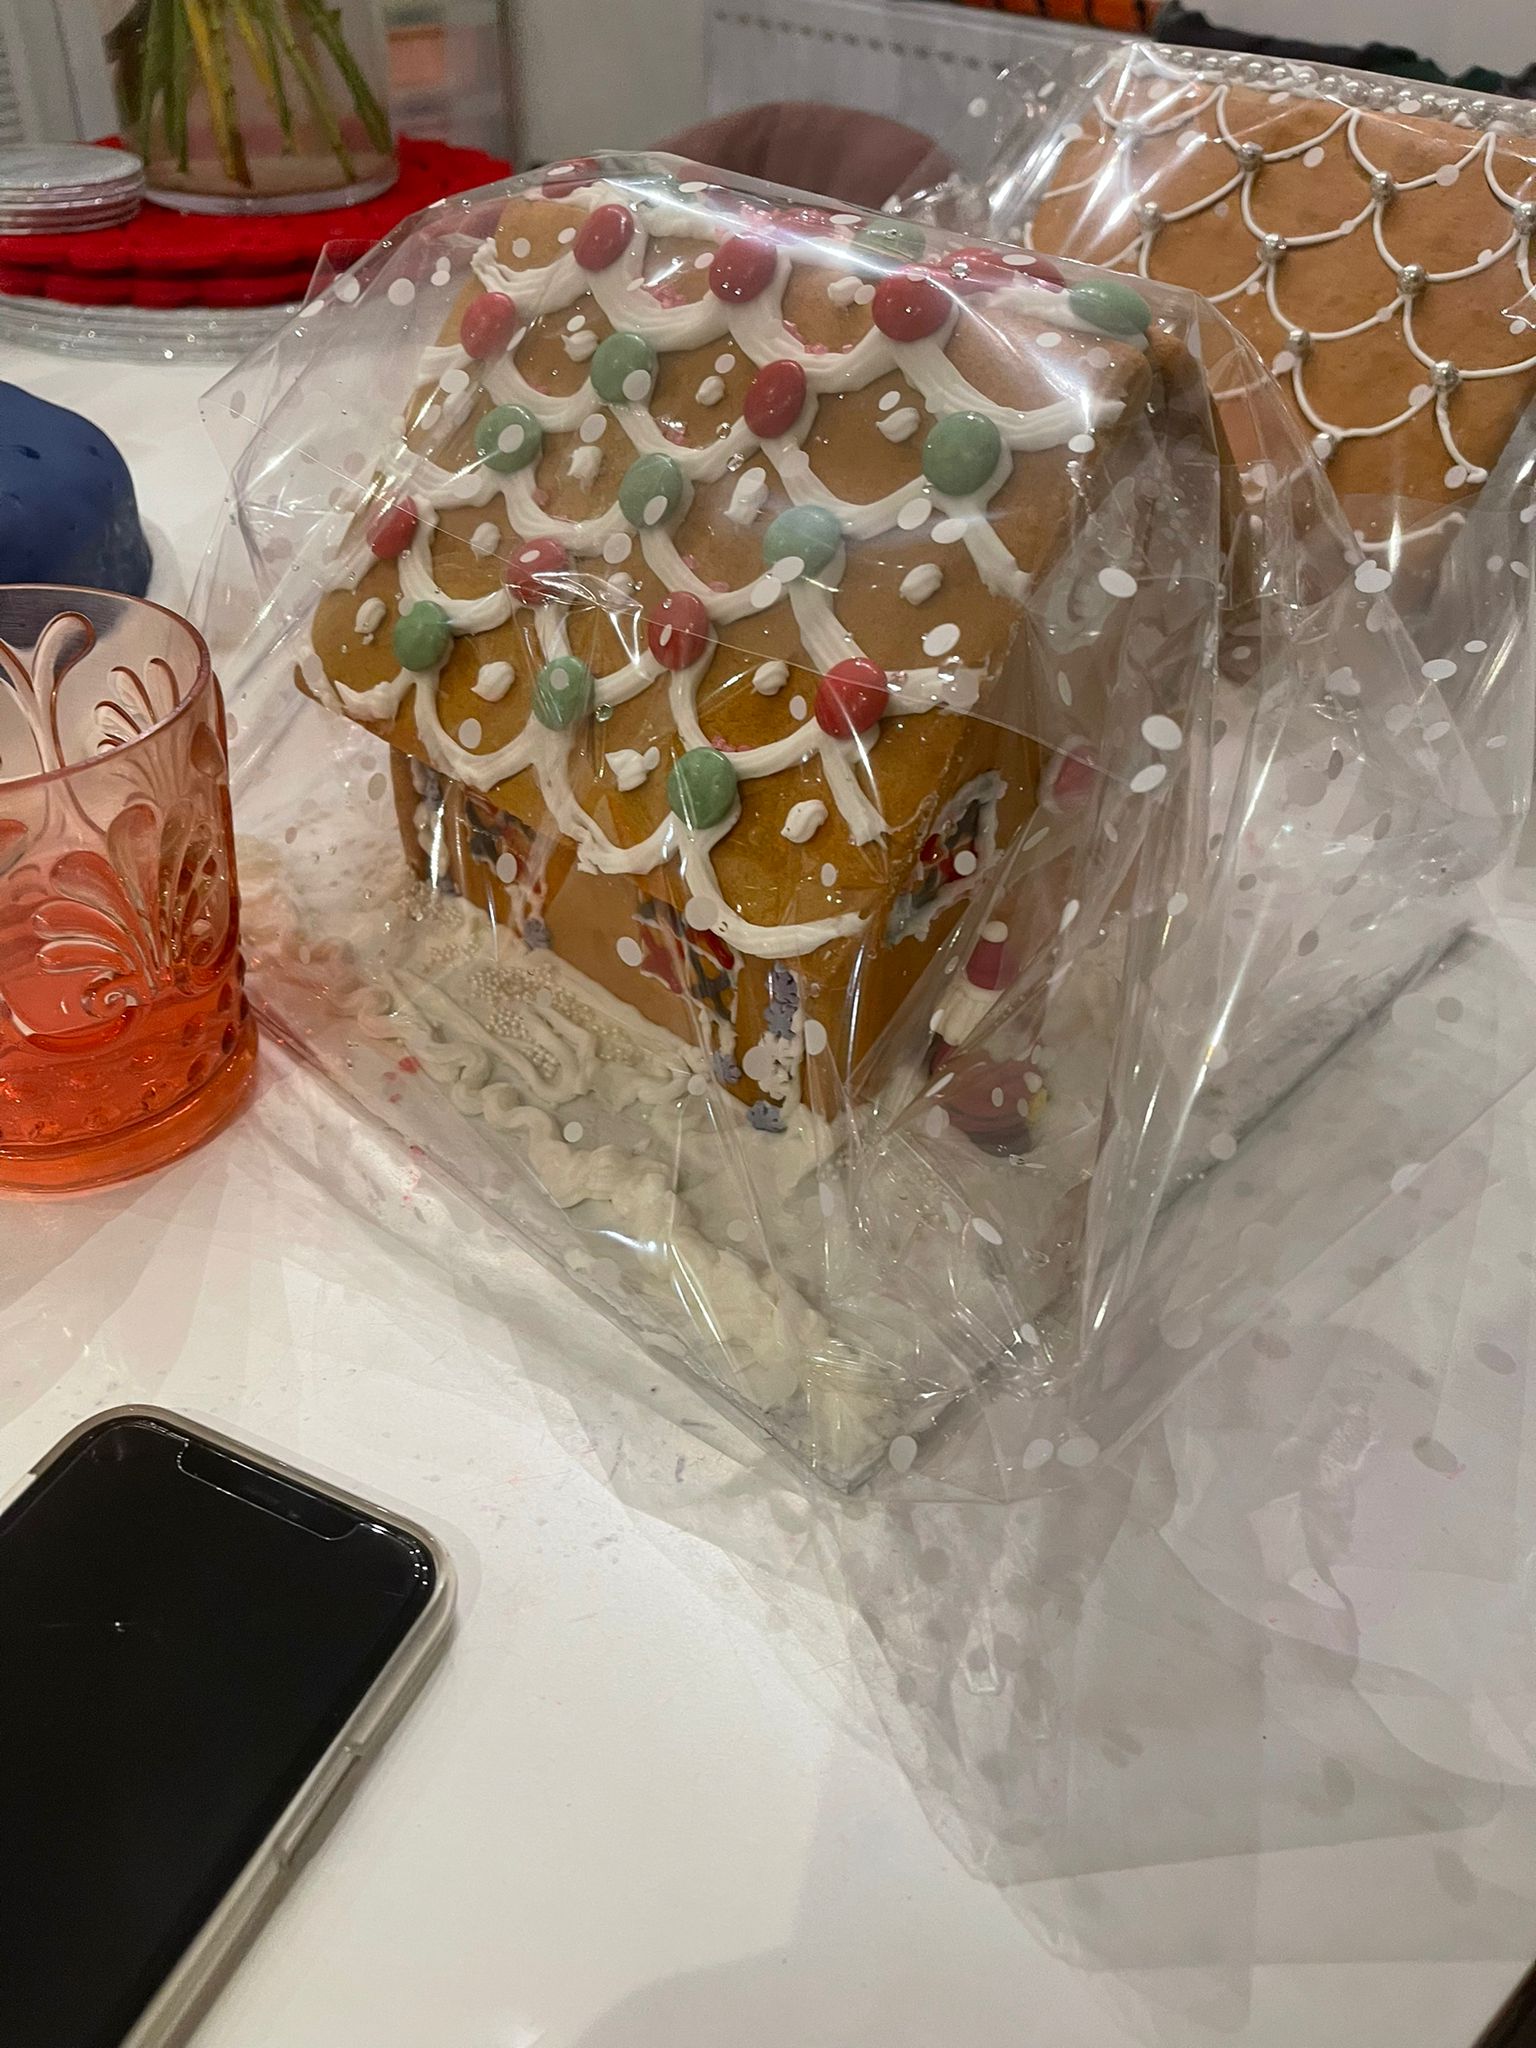
Nutmeg Designs do a lot of 3D designs, such as boxes or models. On their stand at the K&S show I spotted some gorgeous gingerbread house designs, well there was a cottage and a big house, but also a church and a Christmas tree. I bought the kit to make the cottage, it’s stitched on aida and then laced round plastic canvas, I’ve been stitching it as my main project this month, trying to get it finished for Christmas, it’s going to be a close run thing if I do get it finished as there’s an awful lot of stitching. I’m working on the walls of the cottage at the moment…

I’ve still got lots of back-stitching to do and beads to stitch on, then there’s the roof and the porch to stitch! I think I’m pushing it to get it finished for Christmas Day!

I think it will be nice to do one of these kits each year, maybe try and buy them earlier in the autumn, then I’ll have a little gingerbread village!

Posted in Christmas, Crafts, cross-stitch | Tagged , , , | 4 Comments

Christmas Smalls

Each month I try and have a seasonal display of cross-stitch smalls, I’ve made a box full so it does mean they all get a chance to be on display. Obviously this month it’s all my Christmassy ones.

Four of these are Faby Reilly designs, the two humbugs with mistletoe and holly on, the heart and the Merry Christmas one. These last two were from the Christie SAL she did a couple of years ago, I just changed the colours to more traditional ones. The mistletoe was a mini kit from Hobbycraft and the robin is a kit from Fido Stitch Designs, I’ve stitched several of their birds. The tiny mouse at the front which you may miss if I don’t point it out is one from Just Nan, it’s very cute but very tiny!

I’ve a few other cross-stitch or crafty pieces around the house for Christmas…

I like unpacking the Christmas decorations, all the memories that come with them whether they’re one’s I’ve bought or one’s I’ve made. Some of my decorations are ones I made thirty years ago! Happy times!

Posted in Christmas | Tagged , | 8 Comments

Christmas Baking

For many years I’ve tried to have a weeks annual leave at the beginning of December to get everything ready for Christmas, organise presents, order food, write Christmas cards…and decorate cakes. So I’ve been off all last week and managed to get most things done – except Christmas cards, I’ve now managed to buy them but not written one yet!!! Last weekend our two new granddaughters came round to decorate Christmas cakes and gingerbread houses. They’re six and nine and it was lovely to see how excited they were.

We started with gingerbread houses. I’ve been making these for years, I used to get the houses from Ikea (flat-packed obviously!!) but I found the ones from Morrisons may not be quite so cute (no chimneys or open windows) but the gingerbread tastes a lot nicer. It’s also a lot handier for me to buy! I’d bought four, one for us, two for the girls and a spare in case of breakages.

I set everything up in the conservatory with a tray each to work off, lots of cake decorations like stars, glitter bits, hundreds and thousands, silver draghees to break your teeth on!! We’d got icing bags ready and some ready made tubes…and of course a Santa each. We had a great time decorating them and then putting them together. I forgot to take photos at the time but here’s a photo James took yesterday, still wrapped in the snowflake cellophane and not nibbled to my surprise…

They did so well with the icing in piping bags. I think I helped the youngest with the roof icing on the far gingerbread house, but the nearest one is all the nine year old’s work.

A few weeks ago they came round so we could make Christmas cakes, these are what we call rich fruit cakes, they need a good six weeks to mature and last a good while too. You only need a small slice as it’s very rich and filling. Here in Yorkshire we like to serve it with Wensleydale cheese, delicious! I’ve got my truckle of cheese ready in the fridge. So once the gingerbread houses were done we started on decorating their cake.

I showed them how to roll out marzipan, filling in holes in the cakes and using apricot jam to make it stick before smoothing it round the cake. We then rolled out the sugar paste and covered the cake, polishing it with the smoothers. They did a great job. I’d previously made the sleigh and reindeer with royal icing but they helped make houses round the bottom and added the stars. I’ve made this Christmas cake design a few times, it’s from a book on Christmas Cakes I bought when my too were little, it’s such a gorgeous design…

The next day I decorated our gingerbread house, the little holly wreaths and berries were in a cake sprinkles set from Waitrose, they add just that little bit of colour.

I covered our Christmas cake with white icing and then added different sized stars and put some gold stars in the gaps and made a circle of candles and stars…

It’s very simple and quick to do, but I think it’s pretty effective. I just need to make some mince pies and then I think that’s all the Christmas baking ready!

Posted in Christmas, Serendipity | Tagged , | 17 Comments

Christmas Traditions

It’s the third Sunday in Advent today, so I lit another candle on my Advent ring. We always had an Advent ring when I was little and it’s a tradition I’ve carried on. I think it’s nice to see family traditions carrying on through the generations…and just as nice when traditions we start are carried on by our children.

When my kids were little we started a tradition of having a box of Christmas books which came out on 1st December, new ones would be added each year and carol music was included so we could have a little sing song round the piano, read a Christmas story and light the Advent candle. The books were both Christmassy stories and nativity books. There was one classic year when I was ‘reading’ a picture book of the nativity and when it came to the picture of Jesus in his manger Helen said ‘But I want to call him Rachel!!!’ She insisted on calling him Rachel for the rest of the festive season…the vicar looked decidedly nonplussed!

I was delighted a couple of years ago when it was my great nephew’s first Christmas, Helen bought him a Christmas box with some books in, all ready to continue the tradition in a new branch of the family.

Back to my Advent ring… I always used to use fresh foliage from the garden or the back lane, such as ivy, osmanthus, holly, rosemary…anything looking reasonable in the garden! I put them in an oasis ring to keep it going for the four weeks. Three or four years ago I discovered oasis never decomposes, so I started to try and make an oasis free ring. I think the first year I tried a ring of wet straw – not good! Since then I’ve used artificial or dried stuff. The artificial pieces are ones I’ve had for years, I’ve not bought anything new and each year I’m getting better at putting the wreath together.

The wreath is set on a five candle candelabra, I use the centre one for the Advent candle and have the remaining four for the ring. I used an artificial length of foliage twisted round the four candles for the basis and then added various floral pics, pine cones, poppy seed heads, dried limes etc. I add some extra Christmas lights so even when the candles aren’t lit it still looks festive.

Today we lit the third candle as it’s the third Sunday in Advent…

… it looks lovely through our stained glass window.

Posted in Christmas | Tagged , , | 4 Comments

A Pinny or Two

It’s been fun having two little girls to choose gifts for this Christmas, these are my son’s partners children and as they’re buying a house together it seems pretty permanent, so they’re my new to me granddaughters, age six and nine. I’ve made the youngest a mouse from the Luna Lapin books with a bag to match.

The eldest is into baking, so a cookery book was suggested. I found two nice ones in the bookshop in Otley and bought a couple of baking things such as a whisk and a cake tester to go with it. Having made the lovely Miss Mouse for the youngest, I wanted to make a little something to go with the cook books. An apron seemed the obvious thing.

Colour wise she’s into neutrals at the moment, not my forte, but I found a nice light grey print with hares on it. I found a free pattern on the Porcupine Patterns website for a Japanese apron, it’s one of those that crosses over at the back but doesn’t have any straps. I have one for crafty stuff and they’re very easy to wear.

I cut it out and started to sew before I realised I didn’t have enough binding for all the edges, I needed about 5m. In the end I popped into Leeds, did some Christmas shopping at the same time, and called into the haberdashers, Samuel Taylors. I didn’t really want a plain bias binding, they had a nice one which was grey with white flowers, it would have been perfect if it wasn’t so wide! In the end I bought a spotty one as it includes grey spots.

The pattern went together very easily, especially as I did away with a side seam and cut it as one piece. Having finished it I just wasn’t happy with it, the binding was too…well, dotty! It dominated the apron and just looked unbalanced with the hares. This is the back view with the curved edges.

I rummaged through my stash to see if there was anything suitable, I needed a metre, most of my quilting cottons are less than that. Finally I found one, in my seaside quilt box, it’s grey with seagulls on and little yellow flowers. I had just enough if I pieced the shoulders, this also had the advantage that it meant the seagulls were the right way up when they came over the shoulder. As it was quilting cotton, I decided to make it double sided, to give it a bit more body. I found some sandy yellow which needed a bit of fiddling to get it out, but I got there in the end.

As I was making it double sided, I stitched right round the edges, just leaving the top at the front open, I turned it through there and then stitched it up once the shoulders were in place. I top-stitched right round too. I wanted to put a pocket on and found some grey bumbleberry fabric which went well but looked a bit flat, another rummage through a layer cake of bumbleberry fabric and I found the mustardy gold one which really made it pop, I felt the whole pocket in gold was a bit much, but tried with just a top border and it worked, so I lined the pocket with the gold and stitched it to have a gold top.

I decided to add her nick-name on the front together with a little yellow flower, I used bondaweb to attach it and then blanket-stitch round the edge.

I’m pretty pleased with it, I just hope it fits her! There was only one children’s size and she’s a very slim young lady, I can always add a bit to the straps if need be. For now it just needs a good press and then wrapping up. The spare apron can be used here…I just need to make another one!

Posted in Christmas, Dressmaking | Tagged , , | 9 Comments

A Bag for Miss Mouse

Having made Miss Mouse and her clothes, I decided that a bag to keep everything in would be good, and having made up a kit from Raggedy Ruff designs with two mice on I thought they would be perfect on the front…

I found a length of pink batik in my stash, it is very pink! If I’m being picky it’s a bit too sugary pink to go with Miss Mouses’s outfit, but it’s PINK!

I did have a moment trying to remember how I made simple boxed, lined bags, it’s quite a while since I did one but eventually it came back. I bordered the panel with the batik to make a 12″ strip, it needed a little stiffening so I found some waste batting, put calico behind and did a simple wavy line quilting pattern.

Once the piece was ready it was simple enough to join the sides and box the bottom corners. The handles are padded too with a strip of wadding. For the lining I used a quilting fabric with pretty flowers on and a light turquoise background, I’ve had it in my stash a while, it’s very pretty but never seemed to work with any quilt I was making, it was perfect for this.

I’ve just one more present to make and I’m sorted for Christmas…I haven’t bought any cards yet but at least presents will be made!

Posted in Christmas, Machine embroidery, Raggedy Ruff Designs | Tagged , , | 8 Comments

Little Miss Mouse Gets Dressed

A couple of weeks ago I made a mouse from the Luna Lapin books, she’s a Christmas present for a little six year old who loves anything pink! I’m just calling her Miss Mouse at the moment so her new owner can choose her name.

Clearly Miss Mouse needs some clothes! First I made her some bloomers, I used some fabric left when I shortened a fine cotton nightdress for a friend, it already had the lace attached so I just needed to stitch the pintucks and then put them together, she even has a gap left in the back for her tail, the bloomers tie with a satin ribbon – pink of course! The bloomers are actually designed for Luna and she is a little taller than Miss Mouse so they’re a little long, I might decide to put an extra tuck in round the legs…or I might just leave them.

Next in line was a pin-tucked top, I love the little details in these patterns, I also like the fact that they are properly made, there’s no cutting corners for Miss Mouse! I blanket-stitched round the neckline to help hold the facing in place, the trim down the front and round the hem is some I’ve had in my stash for years, I’ve tried to use it with some of my cross-stitch smalls but invariably it was too white, it was just right for a pink top.

I decided to make the wrap dress for Miss Mouse in the same floral fabric as her ears and feet. The inside wrap closes with a press-stud – well actually Miss Mouse has two press-studs as she wanted the V low enough to show off the pretty trim, it gives a bit more room for extra Wensleydale cheese on Christmas Day too. It even has pockets for stashing whatever mice stash in their pockets!

As it’s so cold at the moment Miss Mouse needed a coat, I bought some lovely dusky pink felt from Cool Crafting whilst I was at the Knitting and Stitching Show in Harrogate. I decided to make the Luna ‘corduroy coat’ as it didn’t have quite as much detail as the one I made before for Luna. It is, however, a fully lined, bagged out coat! I usually avoid bagging out coats like the plague as it’s so easy to get it slightly wrong and it doesn’t hang right! For the non-sewers, bagging out is where you stitch the lining to the coat right round the edge, hem to neckline and back round, and then turn it out through a gap in the side seam…all whilst keeping your fingers crossed that it will come out OK! I decided to brave it with a mouse-size coat and it has come out fine!

It’s another Luna sized pattern so the sleeves were a little long, I trimmed them down and blanket-stitched over the edge to make it look finished.

I even managed to make some functioning buttonholes, stitching them wasn’t much of a problem as my machine has an automatic buttonhole foot, but cutting them was somewhat faffy.

I’m really pleased with Miss Mouse, I think a certain little girl will love her.

Posted in Christmas, Luna Lapin, Sewing | Tagged , | 17 Comments

Seaside HQAL

I haven’t got as much done on my Seaside quilt as I had hoped, Christmas preparations and making Christmas presents have taken priority, it seems to be sneaking up rather quickly this year!

Three weeks ago I was skipping a little happy dance having finished the main part of my quilt with just the borders to decide before I started sandwiching and hand quilting it…

I was undecided about borders, in the book ‘The Seaside Quilt’ the designer Kathryn Whittingham (of Patchwork Katy) chose a simple border with a 2″ border of dark blue followed by a 4″ border of a neutral colour and some cornerstones of fussycut fabrics. She felt it was a busy quilt and it needed a calmer border. I was still torn with a piano key border which I used so successfully round my cottage garden quilt. I had a play…

…she was right! I did however decide I wanted a narrower dark blue inner border so I cut out 1.5″ strips so the finished stitched 1″ border would follow on from the block borders. I used a sandy coloured print for the main border with corner stones of the brighter blue and the fishing village print – I do like that fabric.

This morning I tried to photograph it all, it’s too big for my design wall now so I laid it out on the floor of the spare bedroom, stood on tippy toe on a stool with my phone held out as high and level as I could…and I still couldn’t quite get it all on, and it’s not in focus, but you get the idea 🙂

That was the best photo from about twenty!

Once it’s quilted I’m thinking of a dark blue binding with a red flange, but that’s quite a while off! I just need to check I have a big enough piece of wadding and create a backing piece then I can start quilting it. I think it will be a perfect project for winter!

My next post about my Seaside Quilt will be on Boxing Day…less than three weeks to Christmas, I must buy some Christmas cards!

Hand Quilt Along Links

This Hand Quilt Along is an opportunity for hand quilters and piecers to share and motivate one another. We post every three weeks, to show our progress and encourage one another.  If you have a hand quilting project and would like to join our group contact Kathy at the link below. KathyMargaretDebNanetteSharonKarrin, and Daisy

I’ll also be linking up with Kathy’s Quilts for Slow Stitching Sunday.

Posted in Quilt-a-long, Quilting | Tagged , , , | 16 Comments

Jacquie Needlecase SAL

It’s happy dance time, though it nearly wasn’t as I was stitching until about 11pm last night to get it finished. This morning I managed to press it of sorts to make it look a little neater.

Three weeks ago when I last posted about the needlecase I had just started putting it together, whip-stitching the nnedle ads and the thin ‘labels’ together and putting colour specific pins in the dragonfly panels…

Boy was this fiddly to put together!!! It probably doesn’t help that I think I stitch with a fairly firm tension, so whip-stitching 16 count back-stitches isn’t easy – when I made my Anthea book with whip-stitched sides I purposefully did my back-stitching twice the size and tried not to stitch the outline so firm, I seem to have forgotton to relax my tension a bit this time!!

It’s very cleverly made into a Jacob’s Ladder, hence the name Jacquie. Jacob’s Ladders are those things which interconnect to slide between the sides…very difficult to explain! I haven’t any putting together photos as I was concentrating too hard so I’ll just intersperse with photos of the finished needlecase…

Isn’t it gorgeous!! The first half of putting it together wasn’t too tricky, basically two dragonfly panels were stitched together with the sides of the two double-sided pads and the writing strip whip-stitched in-between the pins at the same time. My main problem was the thread catching on wings or wings getting moved when they were underneath and therefore out of sight. I was quite worried by the end that the metal wire in the wings was going to snap, but, touch wood, they all survived.

The two pages are stiffened with rectangles of non-stick bosal. It’s a bit like a very thick vilene interfacing – when I say thick, it’s a good milimetre thick. It’s flexible and has a nice feel but returns to it’s original shape.

The second half was more fiddly as the last two panels were stitched together with the other side of the pads and word strips. The hardest bit was working out how to fold the word strip right to make the Jacob’s ladder. I had to really concentrate in front of the computer to get it right. Faby does warn that these ten stitches were the hardest bit and I have to agree! Once that bit was stitched the final bit came together fairly quickly.

I gave it a careful press this morning, not easy with delicate dragonfly wings and beads. I protected it with a pressing cloth and hoped my wool mat would absorb the beads. It looked much neater for pressing, though with hindsight I would have been better pressing the pads and words well before the final construction.

It was quite a challenge to put together but I’m so pleased with it, it’s beautiful, Faby has excelled herself again! I love the mix of the stumpwork dragonflies with the cross-stitch ones, it literally pushes it to a new dimension. Faby’s instructions were always clear and easy to follow and it was a great introduction to stumpwork. This is my favourite view…

…I’ve just noticed a loose thread on the photo!!! However much I try to spot threads, there’s always one!

If you fancy making this gorgeous needlecase please follow the link to Faby Reilly Designs, she has some beautiful patterns. If you like the dragonflies but don’t feel up to the construction, I think it would also look beautiful as a standard needlecase with felt pages inside instead.

This SAL is organised by Avis from Stitching by the Sea, we all post our progress on our individual projects every three weeks, it’s great for keeping us motivated! Please follow the links to see what everyone has been stitching.

AvisClaireGunConstanzeChristinaKathyMargaretCindyHeidiJackieSunnyMeganDeborahReneeCarmelaSharonDaisyAnneAJCathieLindaHelen

Posted in cross-stitch, embroidery, Stitch-a-long | Tagged , , , , | 23 Comments

…and then there were three!

They always say if you hear a mouse in your house then there’s definitely more than one, I’ve now made another two mice, well pictures of them anyway!

Over the summer Andrea from Raggedy Ruff Designs was selling various odd kits for her gorgeous applique designs. I do find them hard to resist, I have quite a collection waiting to be made and amongst those was a cute little design of a young mouse giving her mum a flower. I decided it would be rather nice on the front of a bag to give Wilhelmina Woodmouse in for my granddaughter at Christmas. The original design had the little mouse in trousers, I changed it to a skirt as she’s a very girly girl.

Andrea uses freezer paper to accurately cut the intricate shapes, she then just holds the pieces in place, I’m not that brave, I use a small dab of fabric glue to hold everything in place whilst I do the first stitching round the edge of everything. I always worry at this point as the outline never looks as neat as I would like…

Next I started adding detail to the mice’s heads and mum’s dress, the hand, feet and tail were filled in too with a very pale pink.

I tried out some new machine embroidery threads too, I’ve been looking for some for a while when Oliver Twists announced a special offer of a full set of machine embroidery threads for half price, it was still a fair outlay, but a very good deal…and I now have lots of colours to choose from…

This is just half of the threads, aren’t they gorgeous! My machine likes them too which is always a bonus!

I added some detail to the young mouse’s outfit and stitched the flowers too, it’s a fairly small design so it didn’t take long to finish. All I need to do now is make a bag with the mice on the front and a felt mouse inside.

If you fancy having a go there are some gorgeous designs on the Raggedy Ruff website, if you follow her on facebook she quite often has odd kits for sale.

Posted in Machine embroidery, Raggedy Ruff Designs | Tagged , , | 4 Comments