
Ever started something to find further down the line it makes things tricky? When I started my #sewing4thesoulbook in the summer I decided that rather than making a book from batting and then embroidering directly onto each page (as Anne Brooke the designer does) I would do each page separately and stitch them onto calico pages like my stitchbook project. It must be easier than directly stitching into a fabric book…
Everything went swimmingly at first, the first hint of trickiness was the woven week, when I had to work out my piece so it would flow across two pages without interfering with the binding. Then three weeks ago I finished a page which includes a window with a view through to the next page…
This was going to take some working out!
I needed to work out a way of having a hole through the two sides of the calico page and the next piece of embroidery, whilst ideally having the ‘view’ working on the previous page…it took some thinking!
In the end I drew through the circle onto the page and ironed some bondaweb inside the page pocket, just big enough to hold the circle closed. I could then make the window in the calico page. I also drew a circle where the next window would be on my next piece and a circle where the ‘view’ would be on the right hand side…..still with me??
This pair of pages was all about circles, we started by making a circle in negative space using lots of seeding stitches, this took quite a while as I’m not very good at ‘random’. I then cut various circle from the upholstery fabric sample book I’m using for this book. I used silk noille as the background, adding a fine muslin behind to give it some stability.
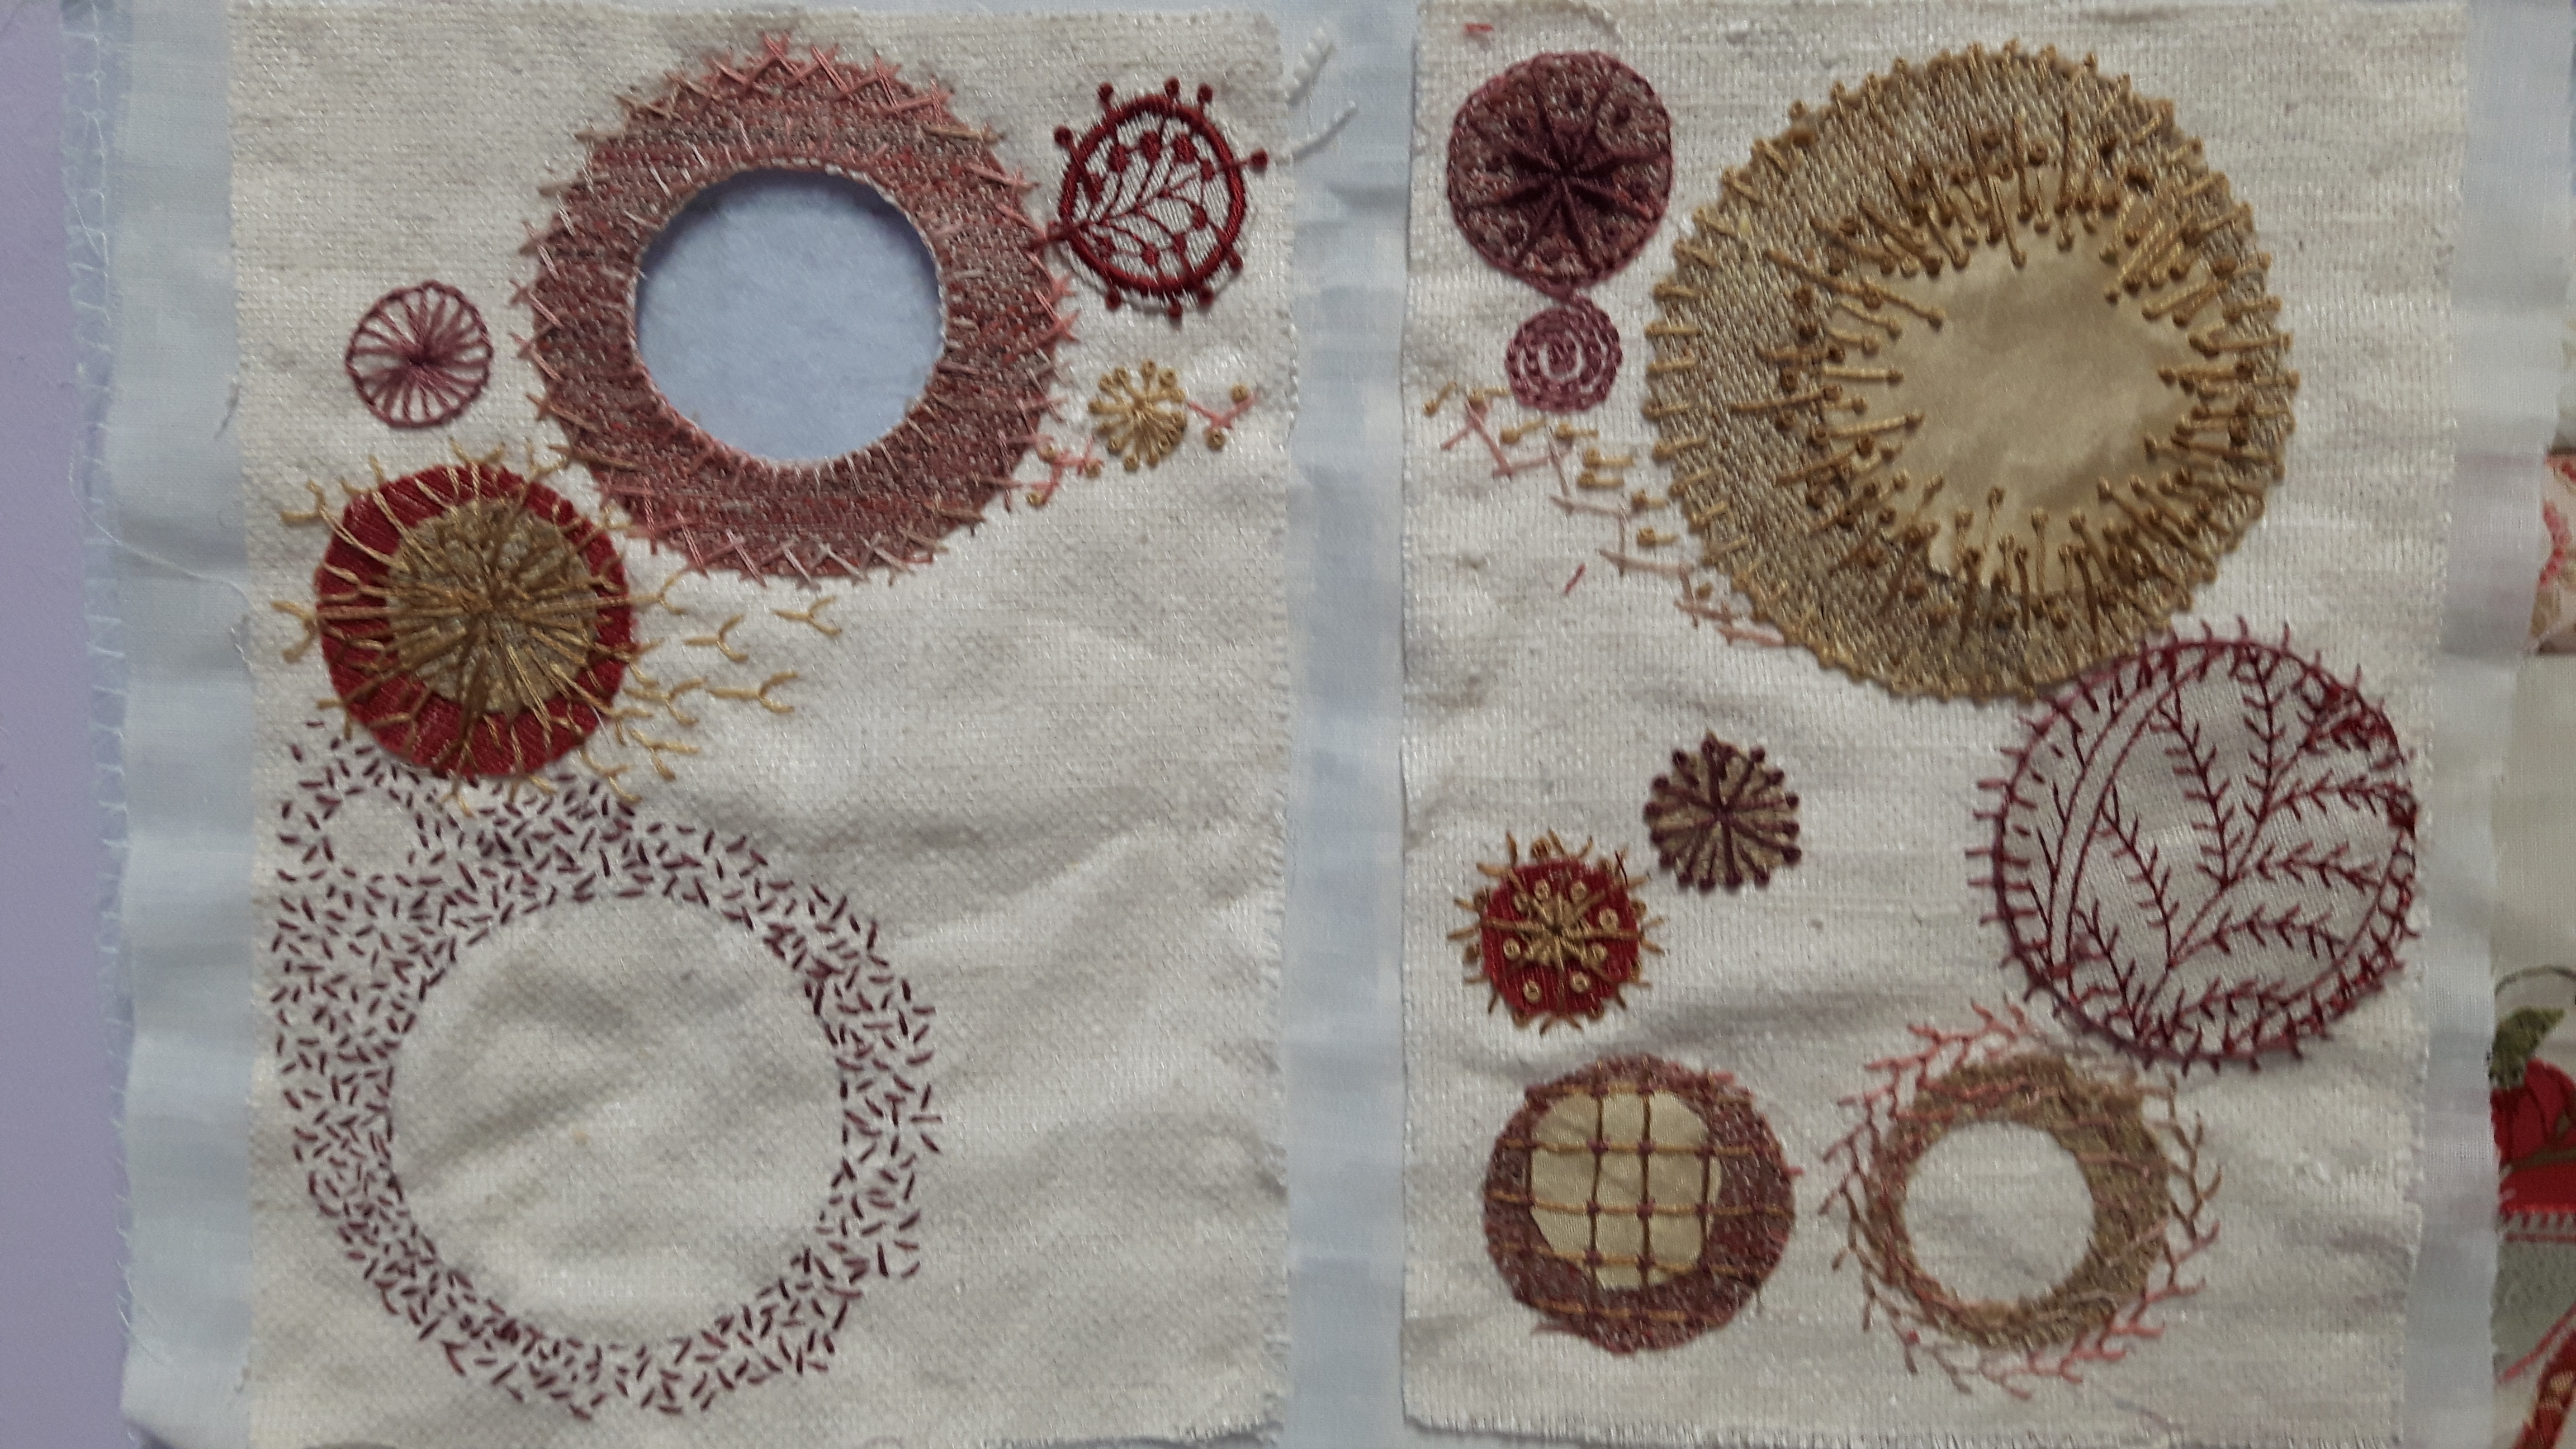
The circle round the window has bondaweb as it frayed too easily for a window. I wanted the big circle seen through the window to look like the evening sun, so I chose two different soft golds and embroidered them with pistil stitch. With these fixed positions in place I could then arrange the other circles around. I decided to make a sort of spiral, adding buttons to complete the look. This was my initial layout part way through the embroidery.

As you can see I was starting to embroider the circles and where possible to then incorporate the embroidery into the general drift of the piece, so the fly stitches are spreading away from the circle. I used herringbone stitch around the window with blanket stitch on the inside. The little embroidered red seed pod is cut from one of the fabrics, I then continued each vein with a pistil stitch. The little circle next to it has a spiders web stitch in the middle and some french knots in between the spokes.
The larger red one has blanket-stitch round both the outer and the inner circle, I really wasn’t happy with this one and changed it later as you will see. By chance I had a circle which was too big, so I cut a smaller circle using my die machine, I then saw the ‘negative space’ and used the ‘waste’ instead, embroidering it with feather stitch, and adding a further circle of feather stitch to the background. The last circle has a lattice of embroidery threads with tiny cross-stitches to hold it in place.
I’d found a few buttons to fill in spaces, but I then decided that actually it might look better with circular stitches instead…
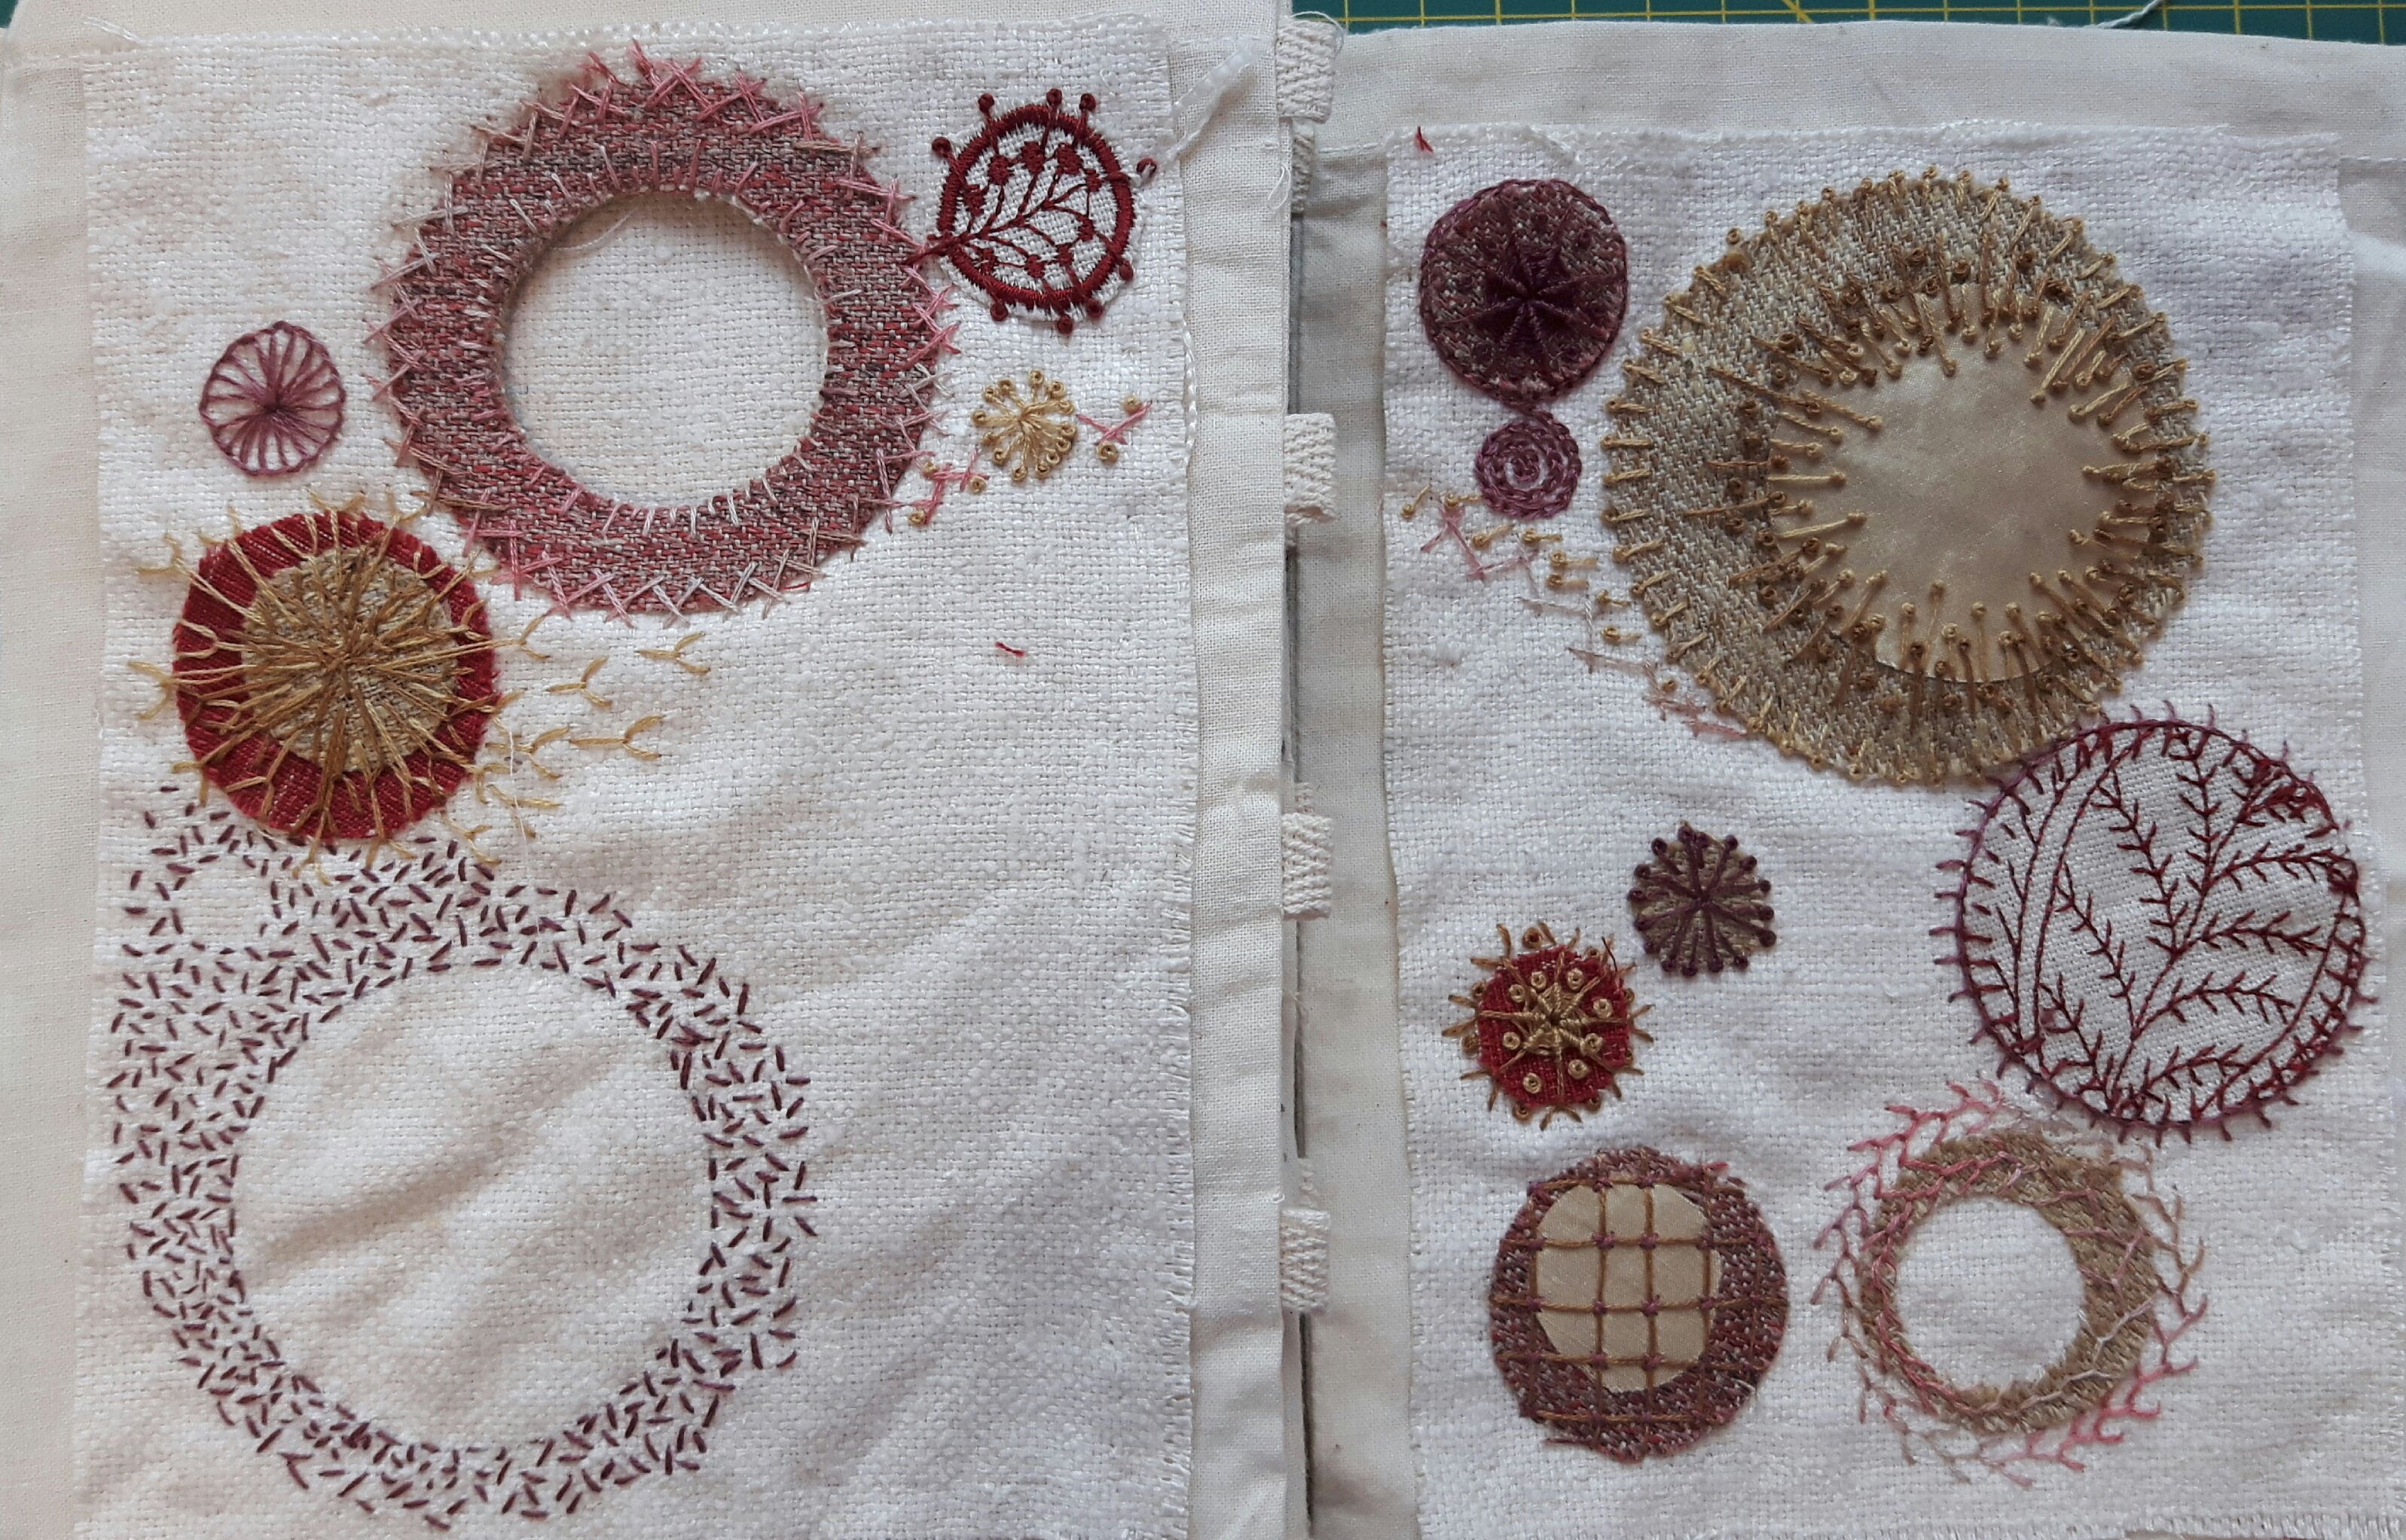
So this was the final finished embroidery. As you can see I removed the red circle to reveal the fabric embroidery, just adding blanket stitch round the edge to soften it. The herringbone from the window flowed across the gap to the sun, mixing with stray pistil stitches as it got nearer. I stitched another negative space circle with the seed stitch, flowing it up to the next circle. Little circles were stitched using blanket stitch, pistil stitch, a spiral of chain stitch, together with fly stitch and french knots over a little circle. It was definitely one of those times when you’re not sure when to stop. I could have done more stitching on the background to accentuate the spiral, but I decided I’d spent enough hours on this piece…and I still had to put it together in the book!
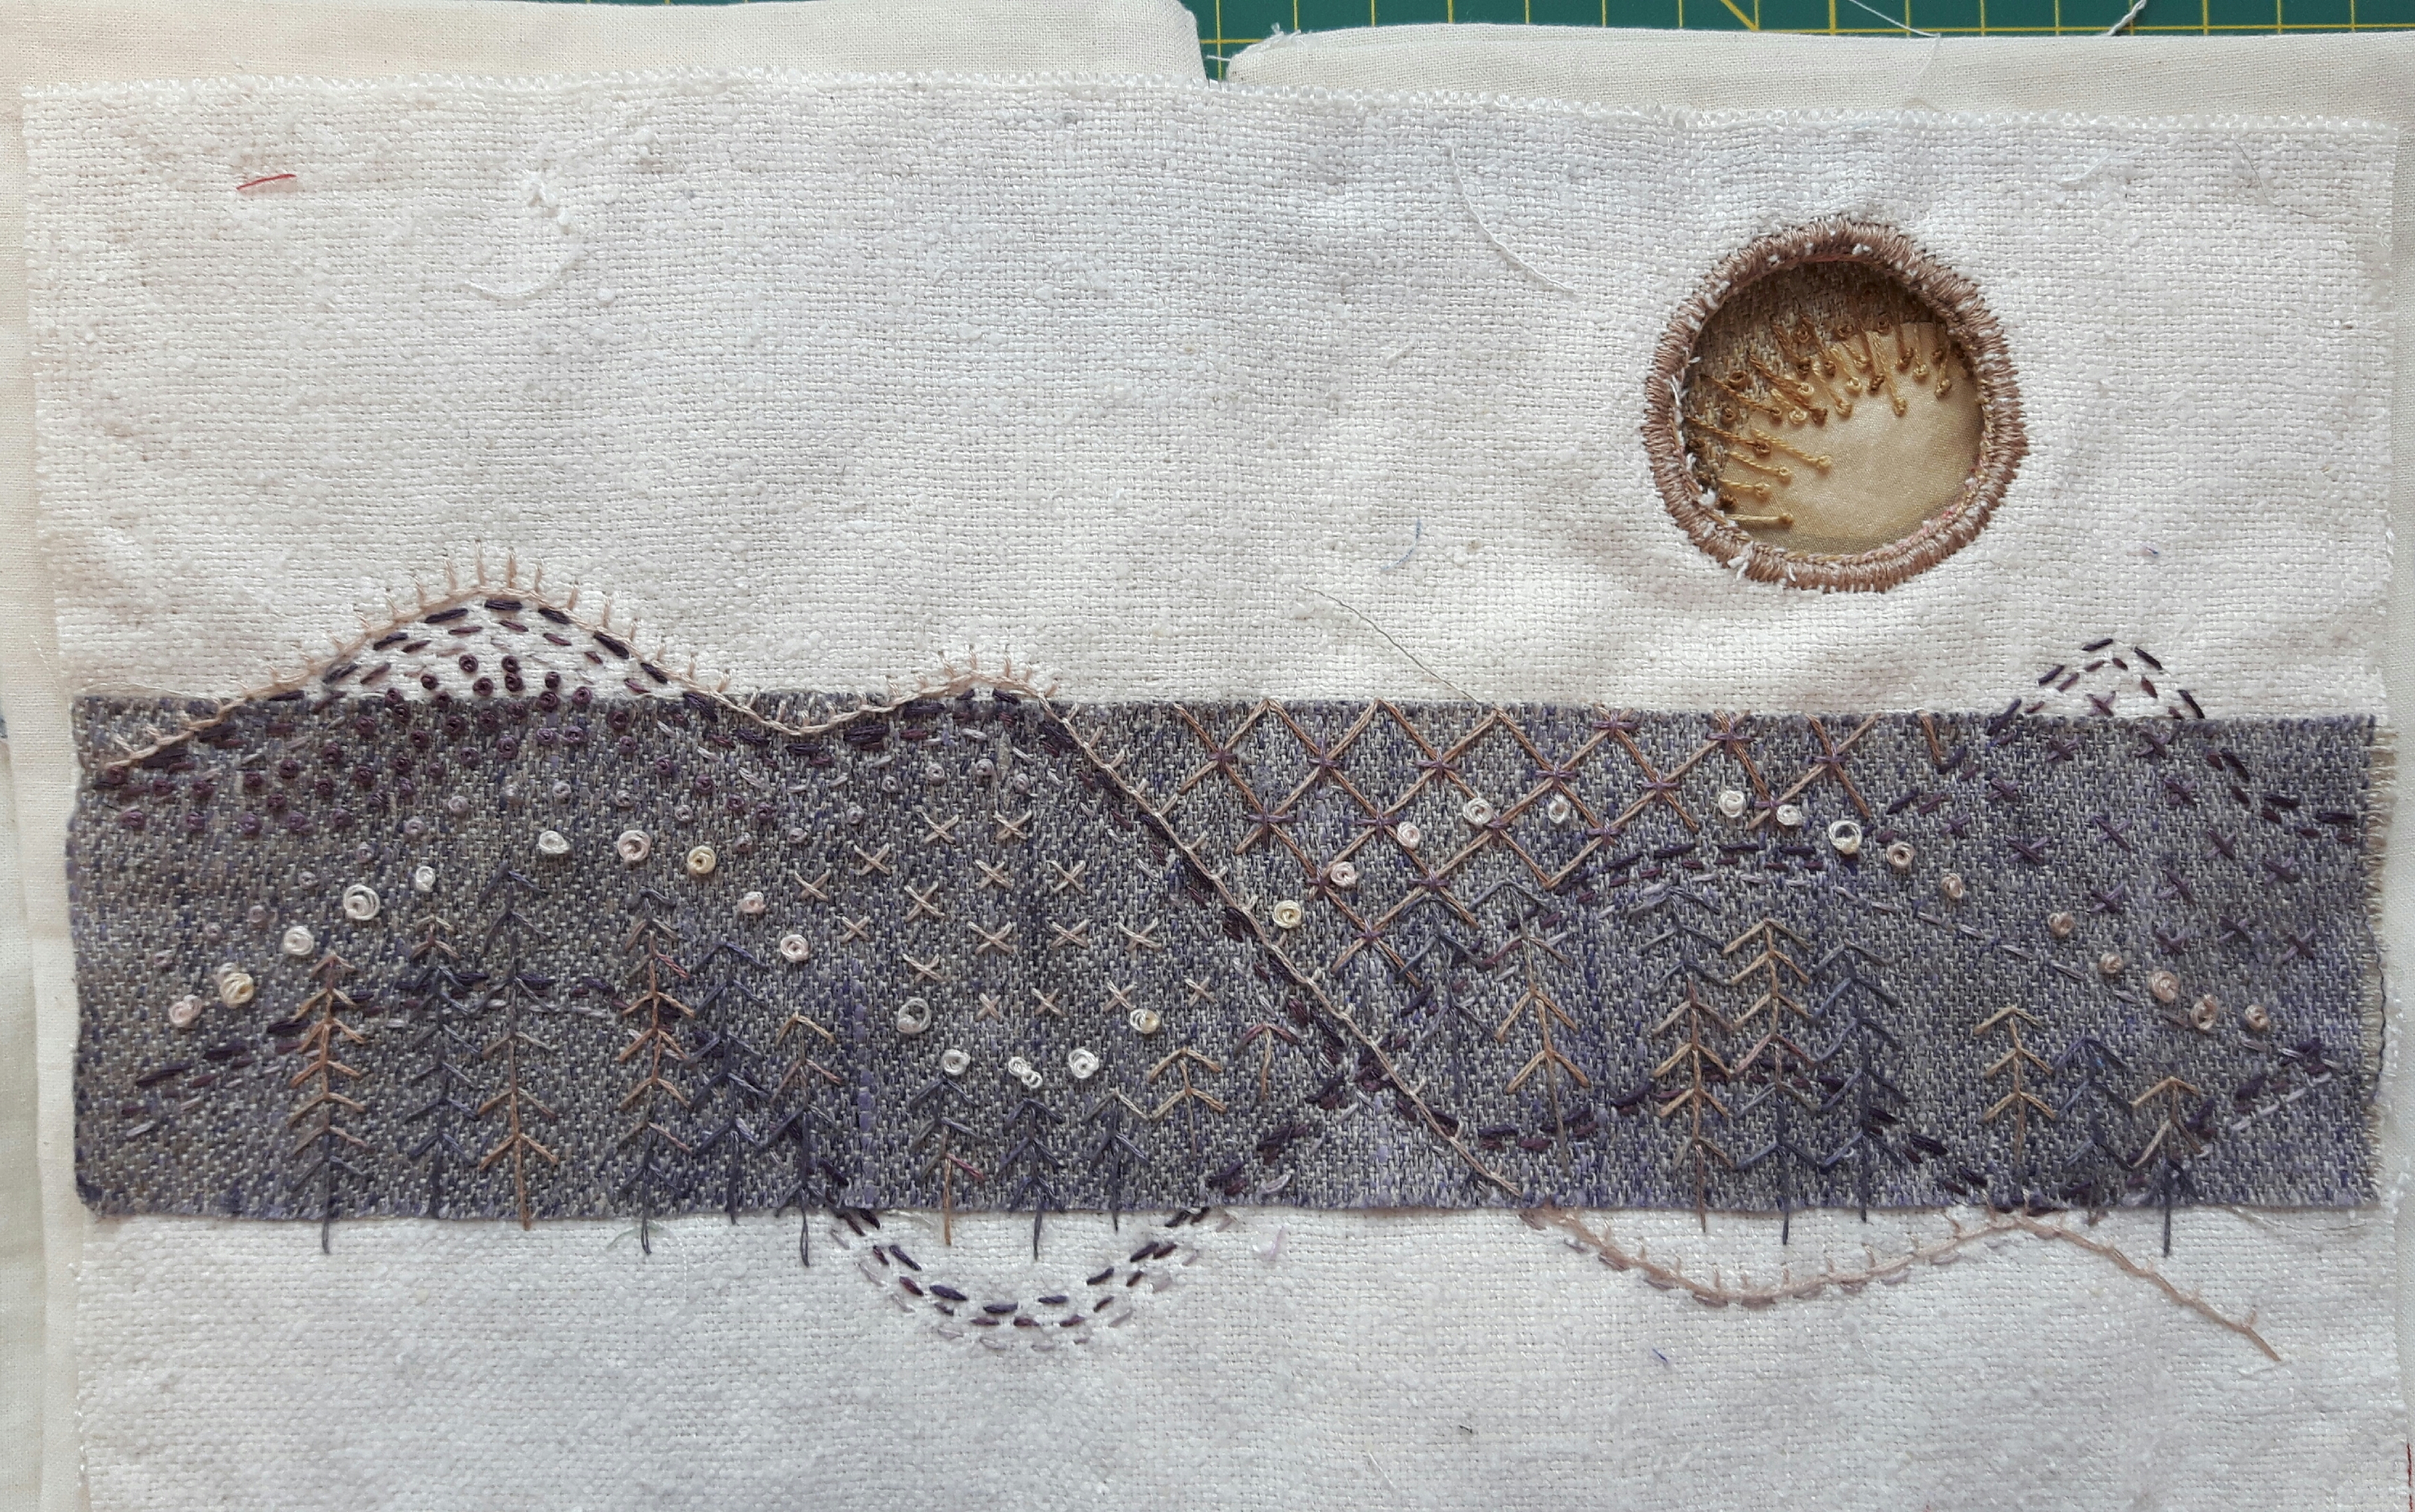
I stitched the previous page embroidery over the hole in the calico page first, just using dressmaking thread and tiny stitches. I cut the calico hole slightly bigger so it wouldn’t be seen in between. Once I knew the windows were secure I could stitch round the rest of the page. I repeated this for the new half of the window. I still wasn’t happy with the final effect of the double sided window, the edges looked messy. I then had the idea of whip stitching the two windows together, through the hole. Both sides had been blanket-stitched so it proved a fairly simple exercise and made all the difference. My final task was to check the right hand page was in a good place for the ‘sun effect’ before stitching it to another calico page.
Phew!! That took some stitching and thinking!!
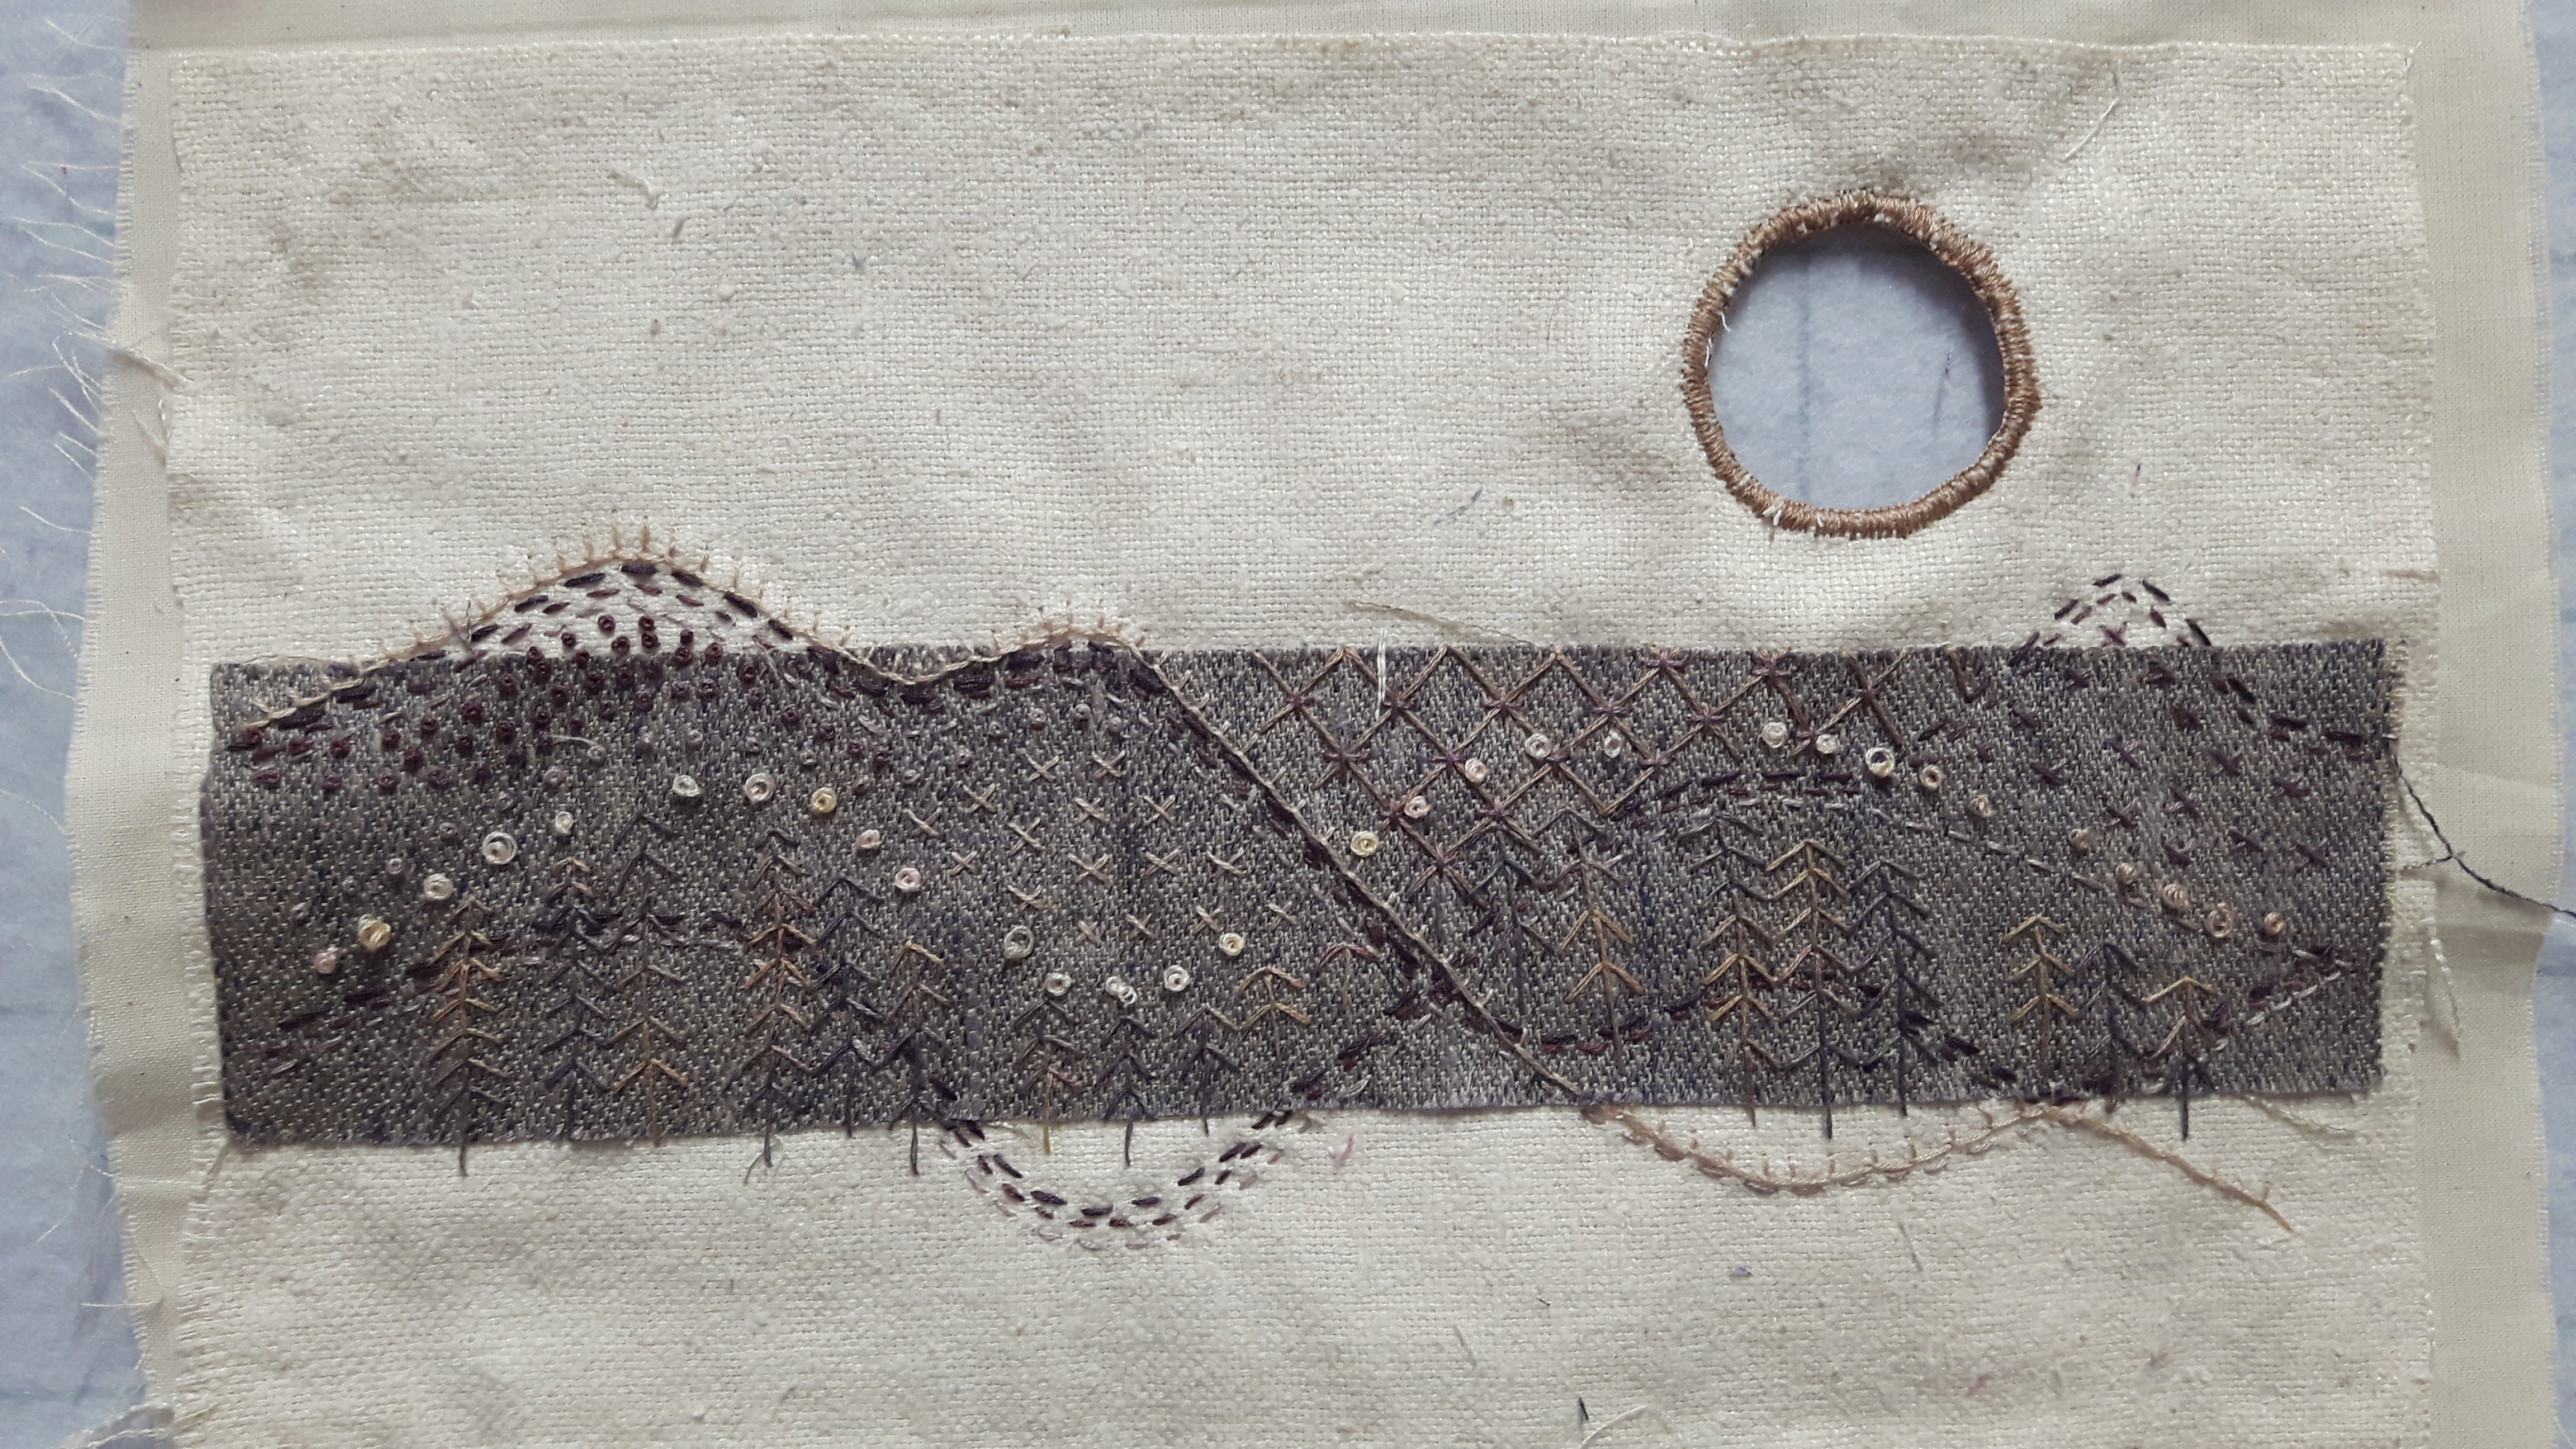
And the view of the sun over Catbells was worth it…
This stitch-a-long is organised by Avis from Stitching by the Sea. We post our progress on our chosen project every three weeks, just long enough to keep us motivated. Please follow the links to see what everyone else is stitching.
Avis, Claire, Gun, Carole, Sue, Constanze, Christina, Kathy, Margaret, Cindy, Heidi, Jackie, Sunny, Hayley, Megan, Deborah, Mary Margaret, Renee, Carmela, Sharon, Daisy, Anne, Connie, AJ, Jenny, Laura, Cathie, Linda, Helen


those circles are all beautiful and you’ve made your “window” work – yay!
LikeLiked by 1 person
Stunning. Thanks for sharing the explanations of your design decisions.
LikeLiked by 1 person
Wow, looks amazing and great to read your process to get this page to work while making the previous page work too. I love the circles and the sun peeking through is really beautiful. Such a talented stitcher and so creative. I love it xx
LikeLiked by 1 person
wow – it came out perfectly. Those circles are fabulous. Love the page and peek thru window 🙂
LikeLiked by 1 person
Margaret, this is so well thought out! I love the negative space circles, what a great element.
LikeLiked by 1 person
My jaw is still in the dropped position. I think this is my favourite bit so far 🙂
LikeLiked by 1 person
Love it, Margaret! 🙂
LikeLiked by 1 person
You really spent a whole lot of time thinking this whole thing out and the result is just beautiful. Wow!
LikeLiked by 1 person
Worth the effort though! 😃
LikeLiked by 1 person
You never cease to amaze with your projects!
W.O.W.!!!
LikeLiked by 1 person
Absolutely gorgeous! I love the design, texture, and colors you’ve chosen.
LikeLiked by 1 person
Brilliant!! Well done!
LikeLiked by 1 person
Wow — Margaret, this is so lovely! It’s fascinating to read how you made your design decisions, too.
LikeLiked by 1 person
You are so cleverly creative, Margaret. I love what you are doing. Can’t wait to see what you do next.
LikeLiked by 1 person
This is so great! Love this kind of projects!
LikeLiked by 1 person
Interesting project. It reminds me slightly of the time I tried shisha (fixing mirrors into fabric).
LikeLiked by 1 person
Ooh I remember trying shisha once – not as easy as it looked! I’ve probably got a few tucked away somewhere!
LikeLike
I remember it was fiddly but enjoyed the little class I did with friends.
LikeLiked by 1 person