It’s three weeks since I last showed you my etui, it’s a design from the Classic Inspirations magasine by Betsy Morgan. I was still embroidering the final pieces then…

I’ve been working hard on it since then, I was ready for a finish but I also had a competition deadline to urge me on. You may recall last year I was short-listed for the Needlecrafter of the Year award with my silk ribbon embroidery. Well I didn’t think it would work for that but I noticed they also had several other competitions, including use of colour. The deadline was Friday and I finished it with hours to spare…
Yes, it’s happy dance time!!!

Once I had finished all the embroidery I had to steadily and methodically go through the construction instructions. I’m afraid I hardly took any photos during the construction – I was too busy concentrating!
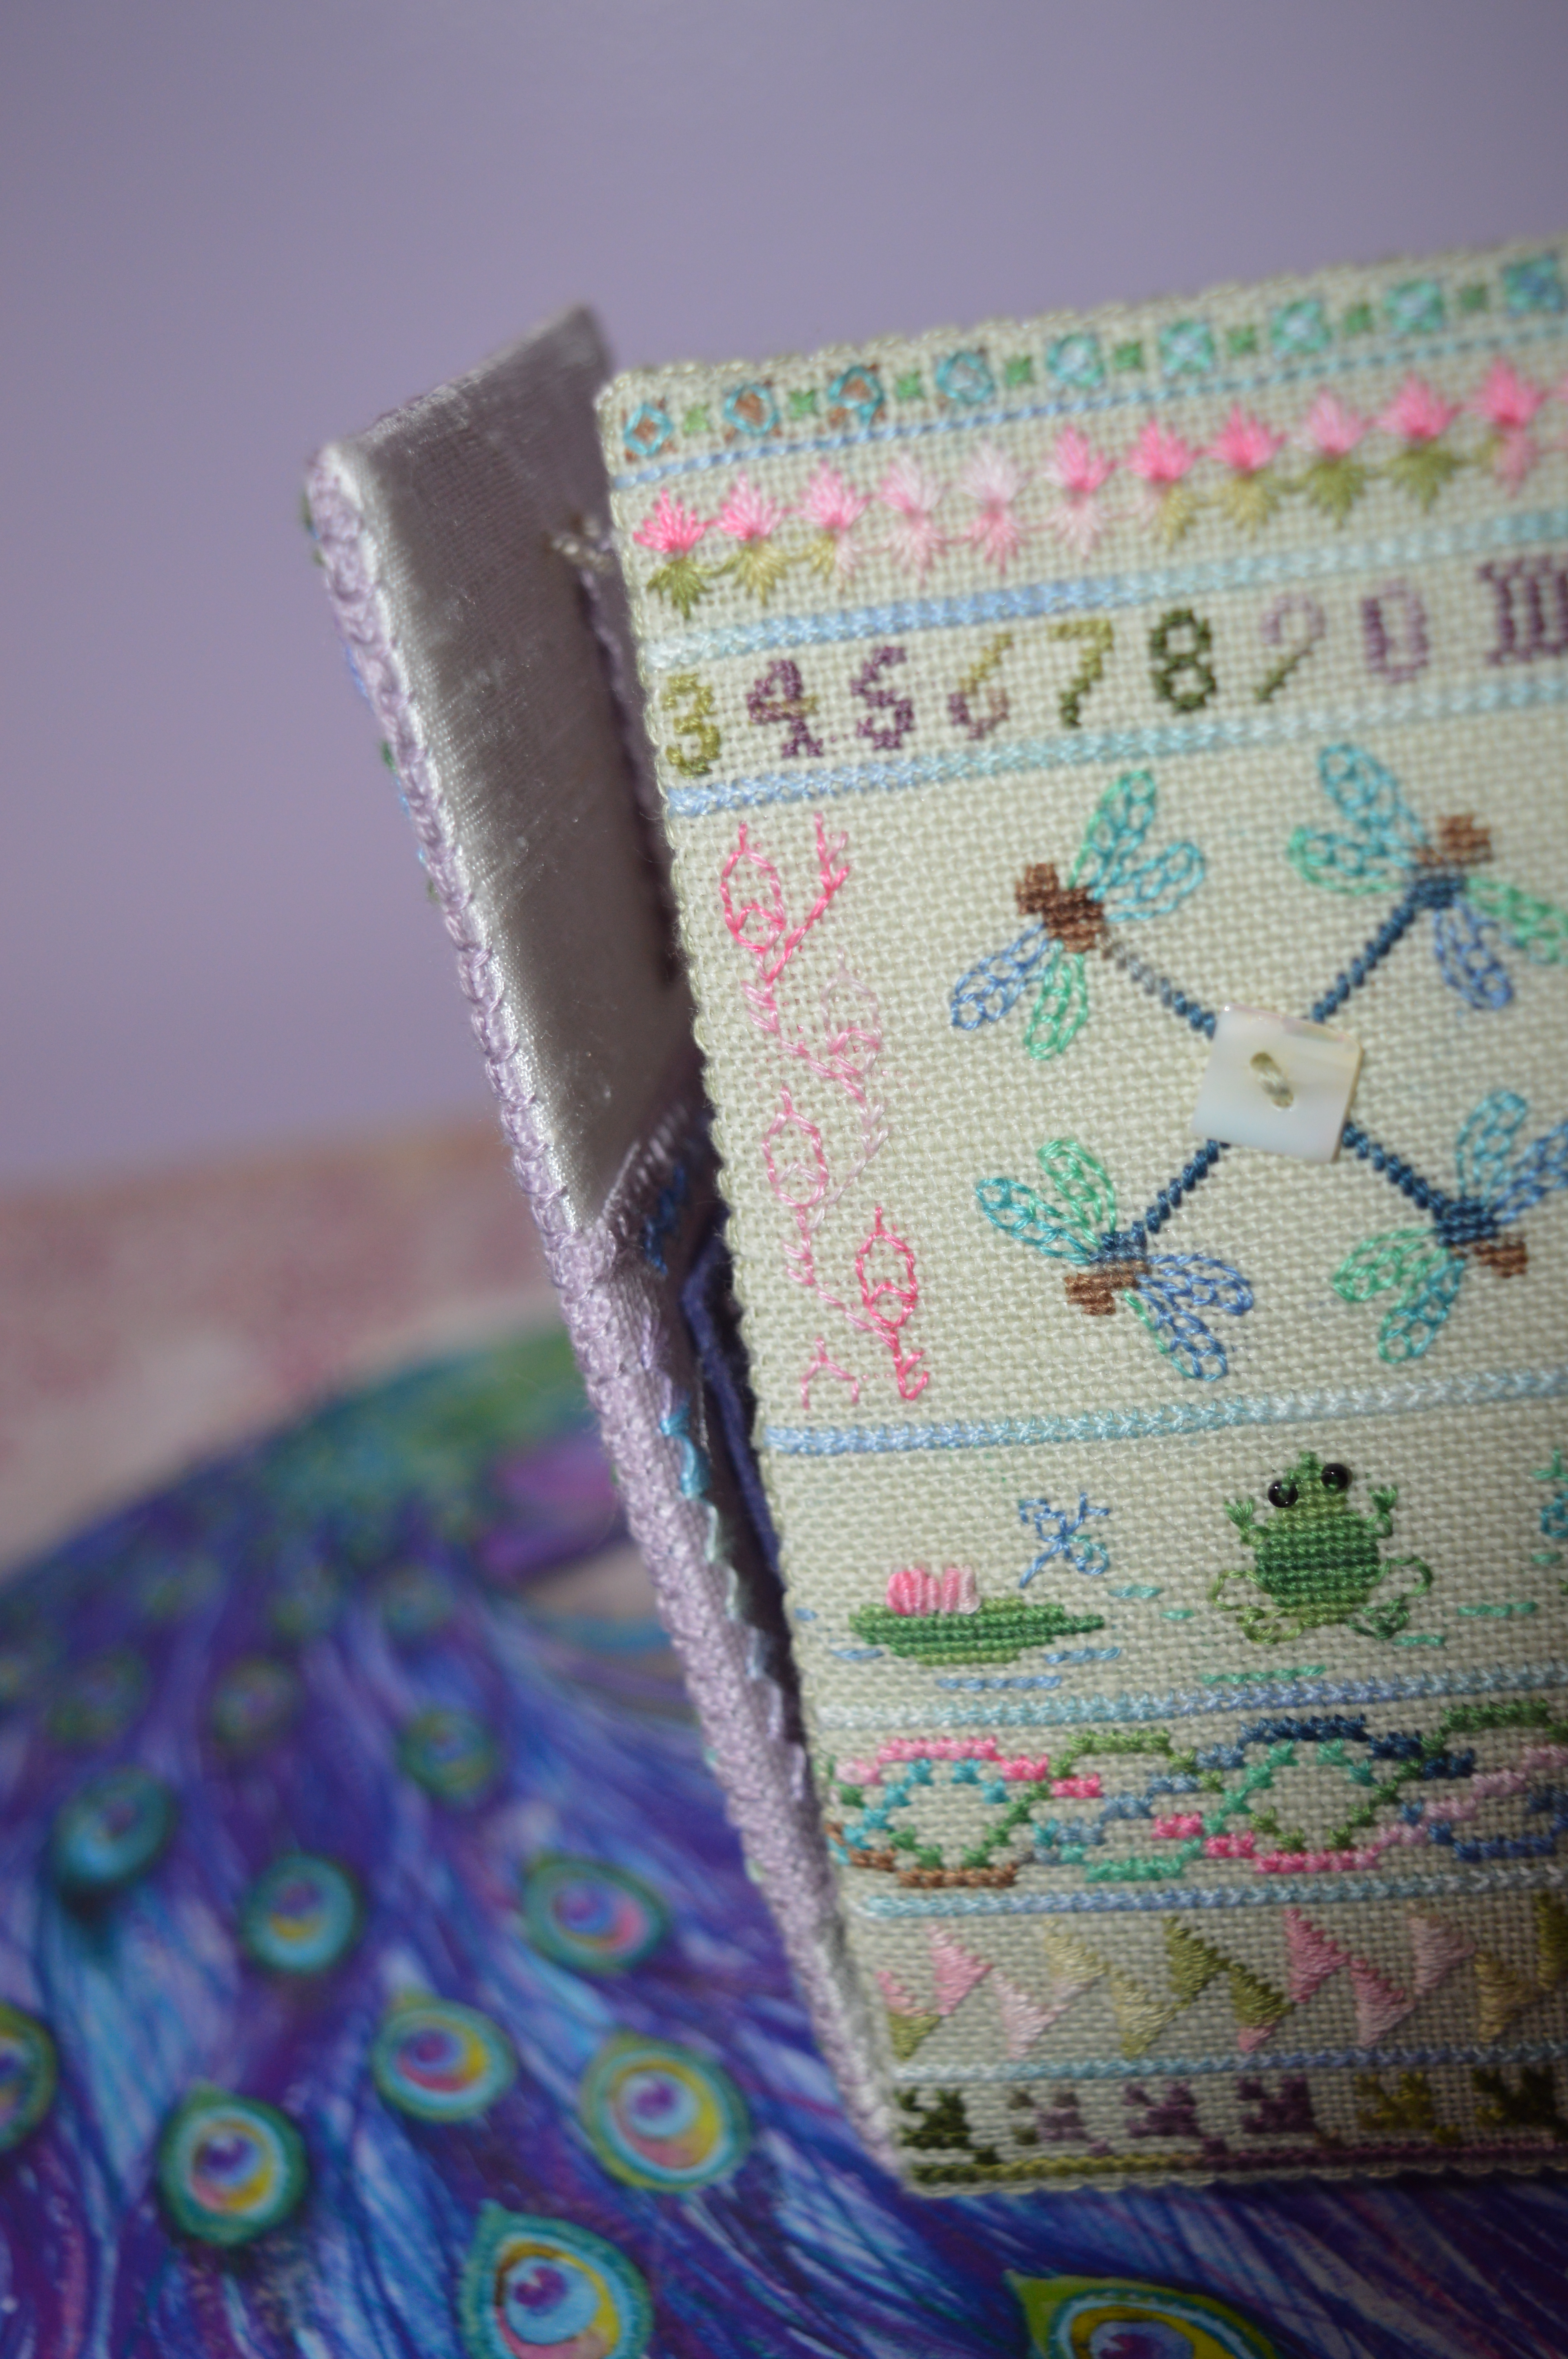
I was surprised to see the etui is made with pelmet vilene, not cardboard. I bought some on line and also bought a stiffer one to try as I wasn’t convinced about just using vilene. All the pieces were backed with a medium weight iron on vilene, just big enough to fit inside the outline stitches. The embroidery was then laced over a piece of pelmet vilene. I did cut out some of the stiffer vilene but I decided it would be too bulky. Each side is lined with silk dupion, again this had a medium weight vilene ironed on and then I gently laced it round another rectangle of pelmet vilene. The pocket strips were cut right next to the nun-stitching, which was a bit terrifying! They were then laid across the silk lining and stitched across the back.
When I first saw the back-stitch outline round each piece, I presumed I would be whip-stitching sides together, however the stitching just seemed to be a way of keeping the edge sharp and neat, I had to run a thread under every backstitch and then make a tiny stitch across to the silk in-between. It does make a neat, even finish.
The base was made the same way. The sides were stitched onto the prepared base using a ladder stitch. I used the thick interlining for the base as I thought it might help the structure.

I had changed the design of the lid from a flat piece to a cornered shape so I had to make it up as I went a long. I used my hera marker to score the interlining along the folds. I ladder-stitched the corners together and folded and pressed the sides under along the stitch-line, I slotted the pelmet vilene in and tacked the sides to the interfacing. The lining was a bit more tricky to work out, in the end I ironed on a square of interfacing which would just fit the centre, I did a little squirt of 505 basting spray just to help it stay in place. I made some tiny stitches into the corners to hold it neatly and then trimmed and turned under the silk against the sides. Clover clips came in very useful here! At the corners I just to make it as neat as I could, I then gave it a good press using the corners on my tailors block.
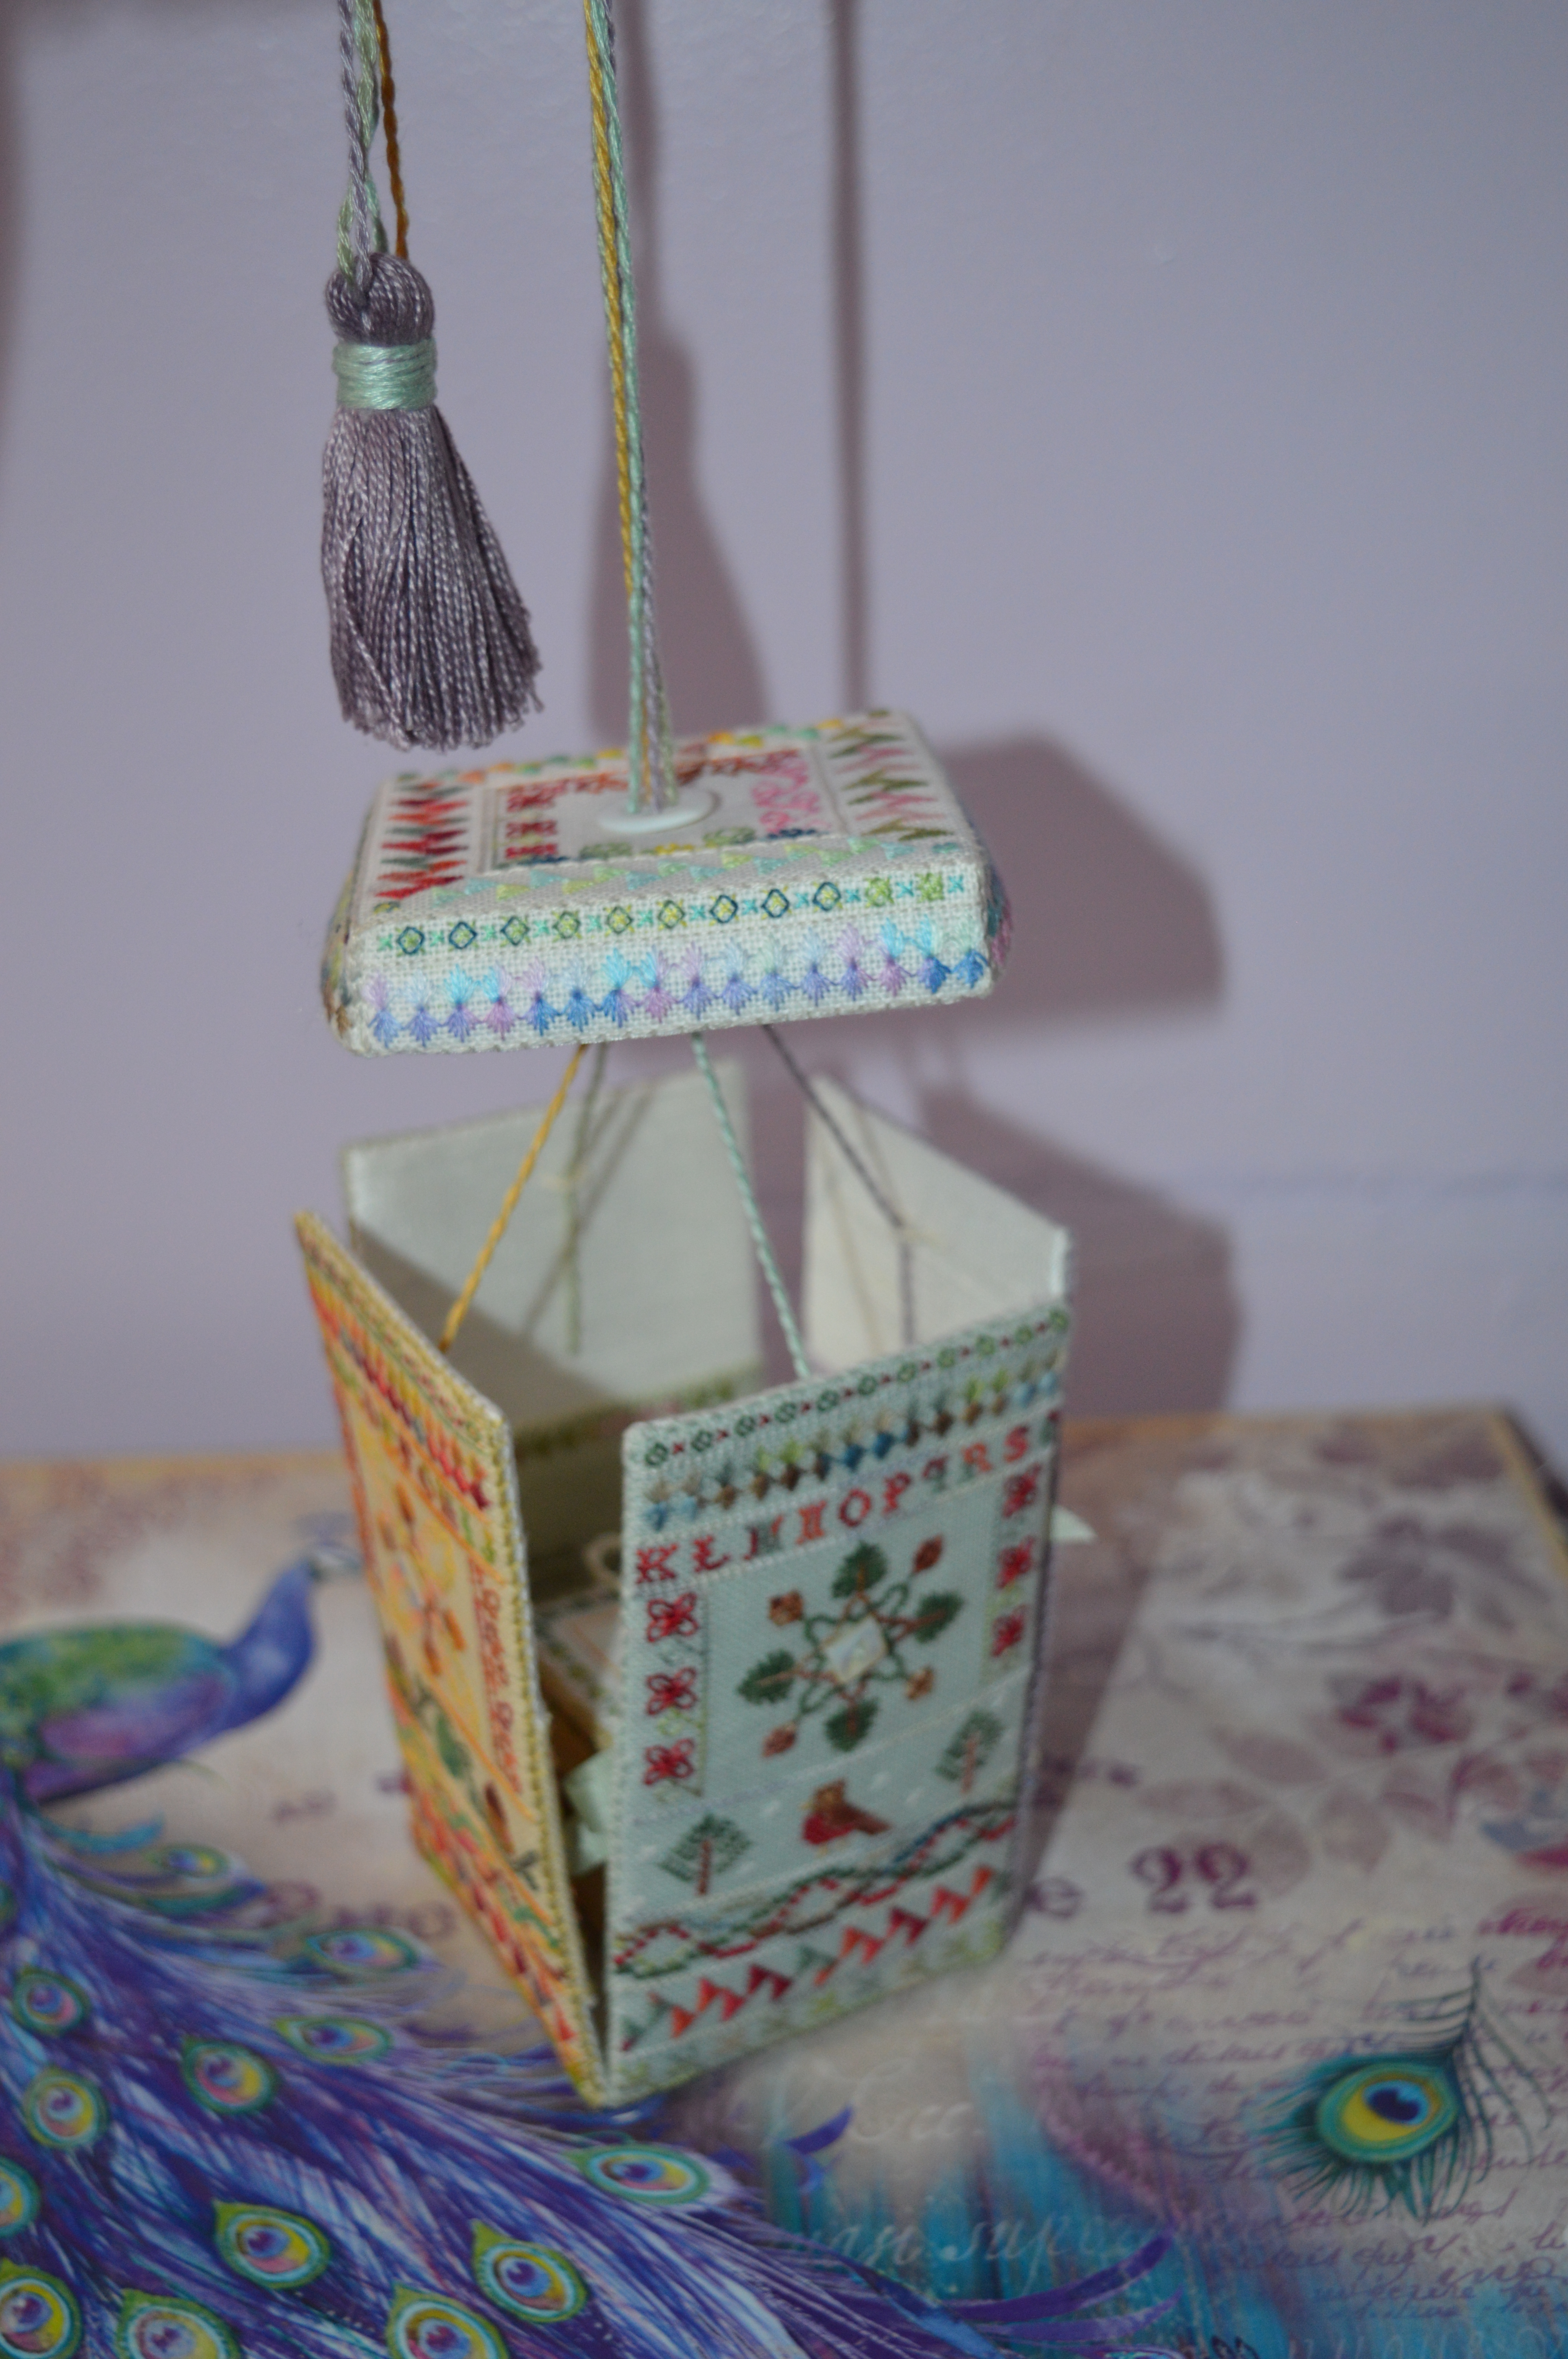
I made four lengths of cord from for co-ordinating DMC threads with a little mother of pearl button threaded at one end before the cording started. This then had to be threaded through the eyelet in the middle of each side using a large darning needle, passed under a buttonhole loop and then up through the corresponding eyelet in the lid and finally through a hole in a larger button on the top! The four cords were tied into two loops and then I made a tassel to go over the top of them using a purple perle thread.

Having made the basic etui, I then turned to the pin cube. This was prepared the same way with interfacing and lacing over pelmet vilene. I then used ladder stitch to join all the sides, stuffing it firmly before the last two sides were stitched. Attaching it to the box proved tricky! I made another length of cord. I then had to find a needle which was large enough to thread the cord through, but small enough to pass through the holes in a little button, and finally long enough to pass right through the pin cube!!! It took some finding! It was a miliners straw needle that passed the test in the end! I had to pass the needle through the button and eyelet on the top, through to the eyelet on the bottom of the pincube – not as simple as it sounds with all the stuffing! It then went through the eyelet in the base, through a button, then all the way back again! It was then just tied in a bow.
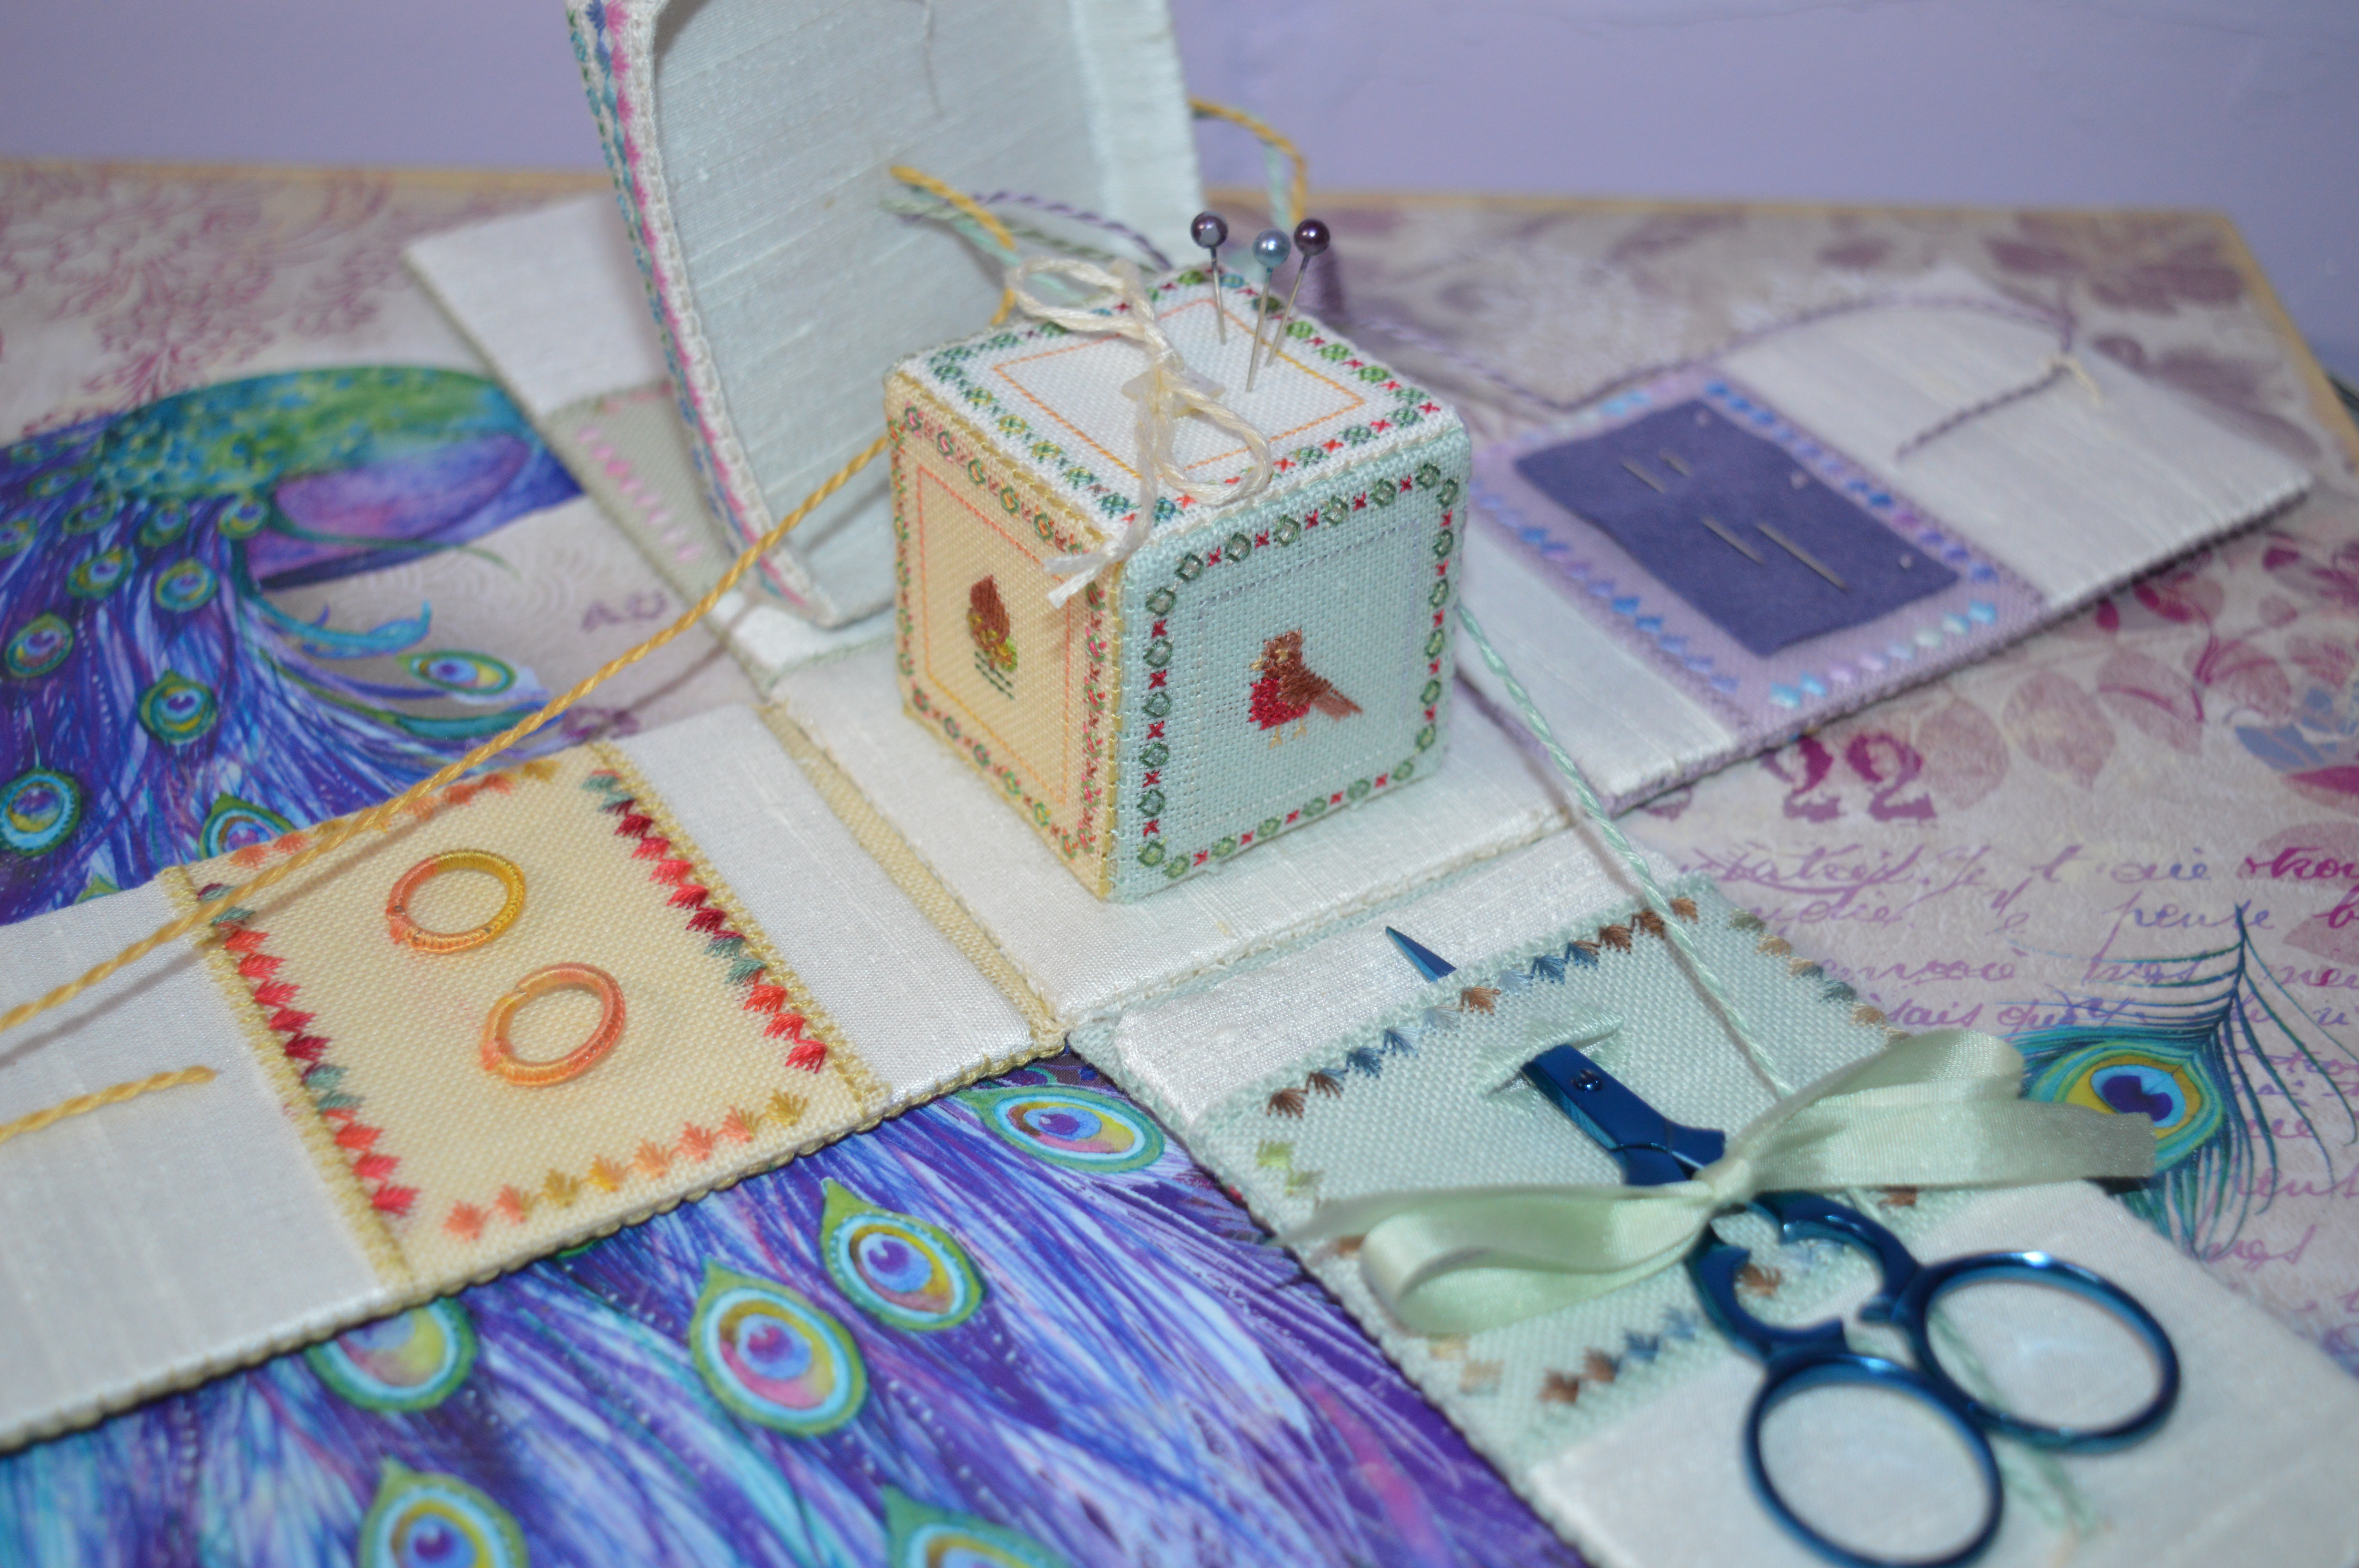
I’ve really enjoyed making this etui, it’s taken about 15 months, though I have made a few other things along the way! I didn’t find the pattern easy to read at all, it took me a long time to get my eye in as it’s written so you count lines, not squares, there’s quite a few miscounts in there! I’m really pleased with how the colours worked out as I used my own choice of thread rather than the ones listed for the project which were way out of my budget. Each side of the etui, the lid and the pincube represents a different season but the design flows round the edges from side to side. It is a lovely design!

I’ve already chosen what I’m stitching next, I need a simpler design which I don’t need to concentrate on too much so I can spend time on my hand-quilting as well. All will be revealed in three weeks time!
This stitch-a-long is organised by Avis of Stitching by the Sea, we post every three weeks which is a great incentive and motivator to keep going on a project! If you would like to join us, just send Avis a message. In the meantime please follow the links to see what everyone else has been stitching.
Avis, Claire, Gun, Carole, LucyAnn, Kate, Jess, Sue, Constanze, Debbierose, Christina, Kathy, Margaret, Cindy, Helen, Steph, Linda, Heidi, Jackie, Sunny, Hayley, Megan, Catherine, Deborah, Connie, Clare, Mary Margaret, Renee, Jenny
I’m also linking up with Kathy’s Quilts for Slow Stitching Sunday, a celebration of all things hand-stitched.


It’s so pretty, and such a clever construction! I have one question, though: what happens to the lid when the etui is open? Don’t the strings interfere with the contents?
LikeLiked by 1 person
Good question – I’d like to know the answer to that too.
It’s very beautiful though – surely heirloom quality and you must surely stand a very good chance in the competition.
LikeLiked by 2 people
It’s pot luck with competitions what the judges are looking for, this one was for use of colour. I’ve used all my own choices of colour, but whether it looks too similar to the original I don’t know. All I had to do was send a photo, so nothing ventures nothing gained!
LikeLike
Thanks Kate, realistically it’s too small to be practical, so the strings can just look pretty and get in the way:-)
LikeLike
🙂
LikeLike
so much work went into this Wonder project – I’d be afraid to use it!
LikeLiked by 1 person
I think it’s just going to sit and look pretty!
LikeLike
A stunning piece, I do hope it for yourself. I don’t think I could bear parting with such an intense piece. Too precious and stunning – congratulations on the Happy Dance
LikeLiked by 1 person
It is for me, as you say it’s taken too long to be given away!
LikeLike
What a lot of work, even after the stitching is finished. It really is beautiful and the colour choices are lovely. Congratulations! Can’t wait to see what your next project is going to be!
LikeLiked by 1 person
Well done! It looks fantastic and the construction sounds complicated but you’ve obviously got a knack for these things. I look forward to seeing what you have for us next!
LikeLiked by 1 person
Wow, what an awesome project!! Beautiful!
LikeLiked by 1 person
I would be dancing too if I had finished such a complicated and beautiful piece. It is no wonder it took so long to finish. You are such a busy lady. I love seeing all you do. You are an inspiration.
LikeLiked by 1 person
That looks amazing and the construction sounds as intricate as the stitching. Congrats on a beautiful finish and good luck in the competition 🙂
LikeLiked by 1 person
I have loved this from SAL 1, and the finished piece is really extraordinary; best of luck in the competition, it is such a unique and intricate piece, it should at least catch their eye and get a second look!
LikeLiked by 1 person
OH my goodness! My brain cannot even comprehend that project!
I don’t know how you do it! Amazing!
LikeLiked by 1 person
Just gorgeous! A labour of love.
LikeLiked by 1 person
Very impressive!
LikeLiked by 1 person
Wow! You have the patience of a saint!! It’s a beautiful finish and I wish you all the best in the competition. It’s a winner in my book.
LikeLiked by 1 person
It is fantastic, what a lovely useful box it will look great next to your favourite stitching chair
LikeLiked by 1 person
Wow, what a beautiful project and such a lot of work. Congratulations on completing it and good luck for the competition, you deserve to do really well 🙂
LikeLiked by 1 person
What a labor of love! This is so gorgeous and the construction so complicated. I truly hope you win!
LikeLiked by 1 person
Completely stunning! Congrats on the finish too 😀 Your fabric colors are beautiful and helps to showcase the different seasons.
LikeLiked by 1 person
Gorgeous work. Well done on getting it finished in time and Good luck!
LikeLiked by 1 person
Beautiful stitching and absolutely exquisite finishing! I hope you win. That is a piece that you will treasure always. I have added your blog to my reader, I found you via Slow Sunday stitching. Have a terrific Slow Sunday Stitching.
LikeLiked by 1 person
The stitching was beautiful, but put together it’s a true work of art! Good luck with the competition!
LikeLiked by 1 person
I’ve watched your progress with this in detail as I love Betsy Morgan designs but know her larger works are beyond me. You’ve done this so well and it looks delightful! I’m tempted to try one of her smalls but from this point, I think I will just watch you tackle her designs. 😉
LikeLiked by 1 person
Oh wow! How beautiful this is. I don’t think I would have the patience to actually complete the construction of this so precisely.
LikeLiked by 1 person
Very beautiful!!
LikeLiked by 1 person
I absolutely love this project! It turned out so well!
LikeLiked by 1 person
You do beautiful work Margaret!
LikeLiked by 1 person
I have loved following this and I was lucky to get a box pattern for by birthday – you’ve inspired me – it’s a stunning piece of work!
LikeLiked by 1 person
Hello Margaret, what a beautiful etui and a great finish. Your work is truly an inspiration. I love your blog, you keep me going. I’m looking forward to seeing your next project. Kind regards Mandy xx
LikeLiked by 1 person
Thanks Mandy for your lovely comment 🙂
LikeLike
Wow! This is truly lovely and the details are amazing. I love the little frog. Congratulations on a gorgeous finish!
LikeLiked by 1 person
I am gobsmacked. This is indeed a piece of heritage work. We all knew it would be stunning. I can only imagine how impressive it must be in person!
LikeLiked by 1 person