
Do you ever get those days when there’s 101 things you could sew, all those half done projects, but you really don’t fancy sewing those, you want something new you can finish…well that was me on Sunday afternoon!
I decided to make myself a clock for my sewing room, a decision helped by the fact the kit I bought a couple of years ago fell off the shelf and threw itself at me!!
The kit was by Springwood House Designs, I bought it at the Knitting & Stitching Show, it contained all the interfacings, buckram, clock parts, metal ring…all I had to do was choose some fabric! This proved trickier than I thought! I needed twelve segments all together, ideally six of one style and six of a simpler fabric so it wasn’t too fussy. I was tempted to use various bits of haberdashery to make the numbers (I’ve seen one like that on Pinterest) but I realised the hands were too big for that. My first thought was the left overs from my Down the Rabbit Hole quilt, but I didn’t quite have enough of colours that would work. I looked at my sewing themed fabrics, but I didn’t have a plainer one that would really go. In the end I decided to just make a pretty clock that would go with my purple sewing room, with a purple batik and a teal one with pink and purple in it.
I read through the instructions and thought it would be one of those where it all made sense when you got there! They didn’t sound complicated, there was just a lot of steps. I took it steady and worked my way through. Unfortunately I found some instructions imprecise (‘Cut a small hole’, how big is a small hole??) and one bit I completely misunderstood leading to my circle being too small…
The actual Dresden plate design was a lot simpler than I thought as each segment was carefully cut out and bond-a-webbed onto some interfacing on which we had to draw the circle and segments, extending the pattern supplied by 1.5″ all round . The instructions then stitched ribbon down the joins.
The bit where I went wrong was right at the beginning where I had to make a segment pattern, I cut out one of the segments in the half circle pattern provided. I think what I was meant to do was to make a pattern from the extended segments drawn on the interfacing. When I’ve re-read the instructions I would still read it the same way.
The result was my Dresden plate looked beautiful, but it was exactly the size of the ring it had to be gathered over! After much cursing I decided to mount the circle on some spare curtain lining, I zig-zagged round but I still wasn’t happy that it would be strong enough to be gathered round without coming away from the stitching. I even tried an embroidery hoop instead of the metal ring, but that wouldn’t stay on at all! I decided to ‘quilt’ it, I used a variegated thread and stitched a meander all over the clock face. It holds the segments nice and secure and it looks pretty too. I also stitched circles around the clock to secure the interfacing onto the backing fabric.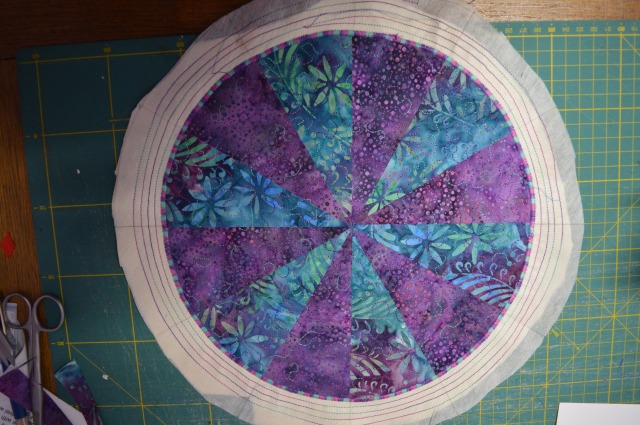
A circle of batik was bondawebbed to the middle and blanket stitched round neatening up the centre. With the extra fabric around the circle I could then gather round the circle and attach it to the ring.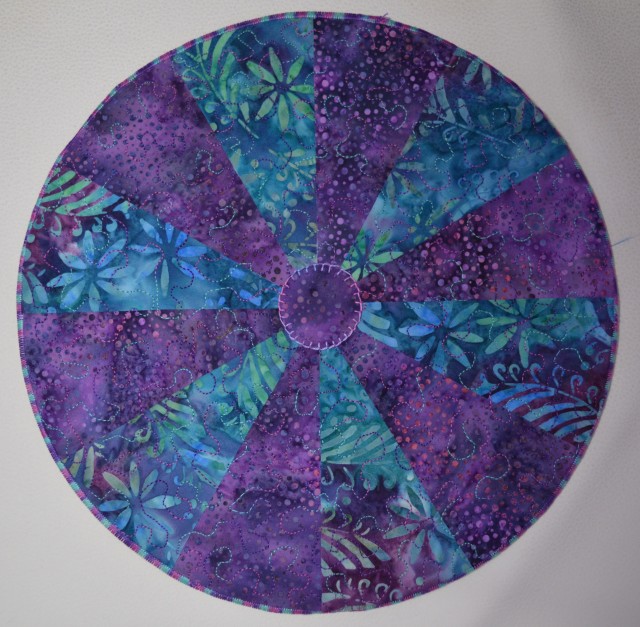
All I had to do now was attach the clock mechanism. There were plenty of written instructions for this but it would have been nice to have a diagram too, I ended up looking on YouTube. However, I eventually managed to fit it, this is the back view, not the prettiest but not usually on display.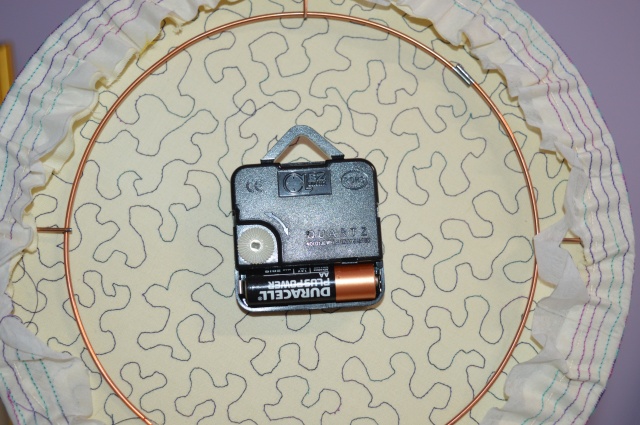
I put a battery in, set the time and hung it up…the second hand stopped at quarter-to, it wouldn’t go ‘up hill’!! I fiddled for ages and eventually resorted to google, another YouTube about why a second hand wouldn’t go round suggested that it might be the battery. By this time it was late at night and I couldn’t find a battery that I could confidently say was brand new so I went to bed a little disappointed.
The next day my OH found a new battery…and it works!
I now have a very pretty clock in my sewing room!
With regards to the kit; it’s less than £10, it contains everything you need apart from your choice of fabric, it makes a great clock but the instructions do need sorting out.


Top marks for persistence! It looks lovely in the batiks. I remember when you bought this – was it really two years ago? 😮
LikeLiked by 1 person
Thanks Tialys, doesn’t time fly when you’re having fun!
LikeLiked by 1 person
It looks great! +100 for persistence too!
LikeLiked by 1 person
What a lovely addition to your sewing room. It’s always a shame when instructions aren’t as good as they could be. Well done on finding a suitable solution!
LikeLiked by 1 person
I think you should write a set of instructions that make sense and send them to the manufacturer to use instead! It’s a very handsome clock, and weirdly, I was looking at clocks for Miz Lizzie’s interior while we were away. Saw a fabulous caravan shaped one with a pendulum which was almost irresistible, but it was a bit pricey. Seems I’ll have to make one for myself too!
LikeLiked by 1 person
I love your tenacity!
LikeLiked by 1 person
Well, your persistence paid off! The clock is beautiful!
LikeLiked by 1 person
Wonderful clock, shame about the instructions. I wonder were they written in English first or were they a translation into English.
LikeLiked by 1 person
Thanks Cathy, the instructions are written in English first, the company is only in Wetherby!
LikeLike
Good for you for carrying on and finishing up with a great conversation piece, colourful ornament and functioning clock. At first I thought one might make a nice compliment for my wall, but then I read your description… and upon second thought, decided yours will be a shining example – and the only one!
LikeLiked by 1 person
That’s a great addition to your sewing room, your creative problem solving saved the day!
LikeLiked by 1 person