
This week I had a wonderful three days at Stitching in the Dales, it’s like a three day embroidery retreat organised by Grassington Embroiderers Guild and is held at Threshfield, the village nextdoor, so as well as three days embroidering you are surrounded by the beautiful countryside of upper Wharfedale.
I stayed at my friends house nearby which made it feel even more like retreat!
 Our tutor was Nicola Jarvis who designs beautiful bird embroideries in the style of William Morris. Just as a topical aside too, Nicola was part of the team that embroidered Kate Middletons wedding dress at the Royal School of Needlework!
I’ve admired her designs for a while and had one on my to do list that appeared in the Classic Inspirations magasine. Some are crewel work embroidery with Appleton’s wool, others are embroidered with DMC silk threads. We could choose to embroider any kit we fancied as she had brought a huge range with her. I chose, after much deliberation, a blackbird, I think he’s gorgeous! Nearly everyone chose a different kit which was nice as you could see other birds developing.
My blackbird design was printed in a soft grey onto a beautiful firm silk with a piece of calico at the back to give it some support.
Nicola was a great tutor, she set us all off on each section, once we were competent at that particular stitch or style, we moved onto the next area. It wasn’t going to be feasible to finish the embroidery in two and a half days but this way we stitched some of every area so we felt confident taking it home to finish.
My first task was my blackbirds legs, these are stitched with rows of split stitch using a single thread of DMC floss. I must admit when Nicola said single thread for all my embroidery and I looked at it I thought this is going to take forever as it looked so fine. I was amazed just how quickly it grew though. I’m definitely converted to single thread! With the blackbirds legs I had to try and line up the split stitch rows, apparently it gives a neater effect, but I thought it also made it more realistic to have a slight banding of the blackbird legs.
The next area to tackle was the black ruff around his neck. This is long and short stitch using split stitch again. I’ve not particularly used split stitch before but it does give an amazingly smooth effect when used to cover an area. Nicola gave me lots of tips to help keep the direction of the stitch right and how to move the stitch around curves. I’m really pleased with this bit, I softened the outline with a few stray feathers, I love it.
The surround of the eye was stitched in satin stitch over a split stitch edge, the split stitch gives it a slightly padded effect and just makes the edge neater. I found it quite tricky trying to keep the direction right in such a small area.
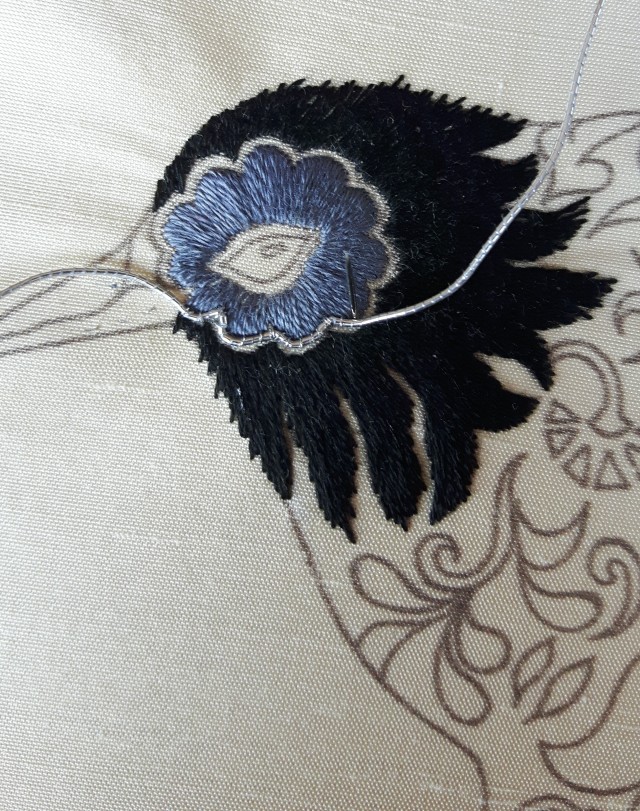
The scalloped edge was then couched with silver Japanese thread, so Nicola taught me about putting lots of stitches in the corners to hold it firm. The ends were pulled through to the back afterwards.
The big black leaves are satin stitch, they will eventually be couched over the top as well. I found it quite tricky keeping the line straight for the whole leaf! The little leaves are in split stitch, they will be surrounded by seed stitch eventually.
Silk shading was the next area to learn. These have to be done in order of proximity, in that the leaf underneath has to be done first, then the split stitch edge of the next one can be made right on the edge. This meant I could stitch the left hand side of the big leaf to learn the technique, but not the right hand side as I need to do the underneath areas first. I found it quite hard to work out the directions of some of the stitches. The bigger leaf has got two shades of grey, the top leaf is waiting for it’s second shade.

The tail was the last area I tackled on the course. There’s four shades of grey graduating across the tail. I found this quite a useful exercise in what not to do! I started at the tip with the lightest grey. As the areas were so little (and probably Nicola wasn’t immediately available and I’m too impatient to wait!) I stitched these in satin stitch but I didn’t do the split stitch edge first to work the satin stitch over, to be honest they just seemed too little and fiddly!! Half way through I found out I should have edged them first, I decided to carry on without so it would all match. However, I decided for the last four dark grey teardrops I would edge them and I could really see the difference, it does sit more neatly…not enough for me to undo the rest though!!

So by the end of the three days this is what my blackbird looked like, this is me and Nicola.
On Friday night I decided to stitch a bit more, I finished off all my loose threads and then just started at the biginning of the instructions and I’m just working my way through. I satin stitched the beak (with the split stitch surround – I learnt my lesson!) stem stitch in yellow around the eye, a little highlight on the eye and now I’m stitching the split stitch twirls and drops below the ruff.
I thoroughly enjoyed my few days stitching in the dales, our room was a haven of peace and tranquility compared to the mixed media room downstairs which was like an explosion of colour, equipment and ‘stuff’. Nicola was a fantastic tutor, patient and encouraging. I learnt so much too, stitches and techniques and confidence too that I can do this sort of embroidery….and I’ve just added another project to my to do list!
I’m linking up with Kathy’s Quilts for Slow Stitching Sunday, why not have a look what everyone else has been creating.


wow!
LikeLiked by 1 person
The bird design is so regally royal 🙂 Truly, it is so lovely. Did you notice that your skirt matched your project perfectly?
LikeLiked by 1 person
What an amazing course to take from a great instructor. Your stitching is amazing. Thanks for all the up close photos and tutorial.
LikeLiked by 1 person
I love the tail, and that the bird looks like it is attending a masquerade ball! Thanks for showing us.
LikeLike
Some great stitching there Margaret, and what an experience to have class with the designer herself!
LikeLike
Wow! beautiful stitching and sounds like a brilliant class!
LikeLike
Gorgeous!
LikeLike
That’s going to be some bird!! And how wonderful to be taught by such an expert
LikeLike
What a wonderful weekend and the blackbird is going to be amazing.
LikeLike
Love that blackbird design – I especially love the last image, where his personality is becoming clear with the work you’ve done on his face. He’s the Fantasttic Brocade Blackbird!
LikeLike
Lovely, you never cease to leave me gob smacked with your talents! xx
LikeLike
Wow this is looking so pretty!
LikeLiked by 1 person
Thank you 🙂
LikeLike
This looks beautiful! You are doing such a wonderful job!
LikeLiked by 1 person
Thanks Kate, it’s coming out much better than I thought it would 🙂
LikeLiked by 1 person
As somebody who has just struggled to put a pink satin stitch nose on a stuffed mouse, I am full of admiration for your beautiful stitching. Blackbirds are my favourite birds and your one is going to be gorgeous.
LikeLiked by 1 person
Thanks Tialys, he’s a lovely design, we’ve got a couple in the garden, one is called Spot as he has a white spot on his wing 🙂
LikeLike
You take embroidery to a new level–it looks great!
LikeLiked by 1 person
Thank you 🙂
LikeLike
Wow what a piece! I love the blues!
LikeLiked by 1 person
What a wonderful opportunity! I have heard from a few people that Nicola is an amazing tutor. I have three of her birds to do in Crewelwork and one in cotton, so maybe with the two of us, there will be a lot of birds going around!
LikeLiked by 1 person
She was great, I want to do the bullfinch next, I’ll look forward to seeing yours 🙂
LikeLiked by 1 person
Pingback: Bertie the Blackbird | thecraftycreek
Stunning work – have you ever embroidered onto the clothes you make???
LikeLiked by 1 person
Thank you, I’ve not embroidered my clothes yet but it is on my to do list, I fancy a classic white shirt with white flowers coming out of the pocket 🙂
LikeLiked by 1 person