 It’s happy dance time again, Snoopy is certainly getting his excercise at the moment as I seem to have a few finishes all at once!
I started this stitch-a-long back in early summer, it’s organised by Faby Reilly, all we saw when we booked on the stitch-a-long was a little glimpse of some stitching, it was enough to know how pretty it was going to be! Every one or two weeks she released another section of the chart, she seemed to time it pretty well with the time I had available to stitch. 
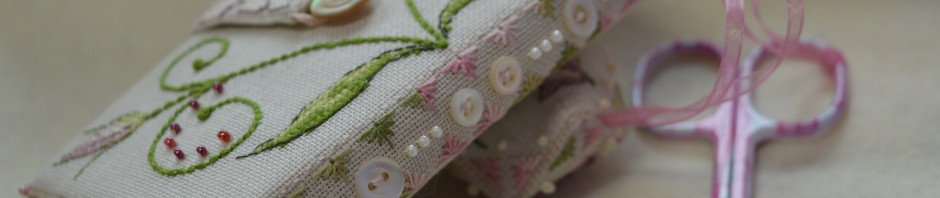
On Monday she released all the finishing instructions. I tackled the biscornu scissor fob first. This was a bit fiddly just because it’s small but it went together easily enough. The back-stitch ruler markings every 5 stitches round the edge help enormously when lining up the corner with the mid side . It’s stitched together with whip-stitch through the back-stitch which gives a lovely neat edge. I love the zig-zag effect of the biscornu, it’s just so pretty.
For the main wallet the pocket and the tab were lined first, I just used some cream quilting fabric and slip-stitched it round. The pocket was stitched on with whip-stitch again and the tab was pinned on to be whip-stitched in when the main pieces went together. The scissors are held in their holder with a ribbon tie, it was meant to be stitched on with a sequin, but as I’d removed my sequins and replaced them with vintage buttons I found another tiny button for the centre.
Whip-stitching three sides together was pretty straight forward, I decided to add a glass bead every tenth stitch (markings were so usuful here as well!) I happened to have some delicate pink ones which matched the embroidery beautifully.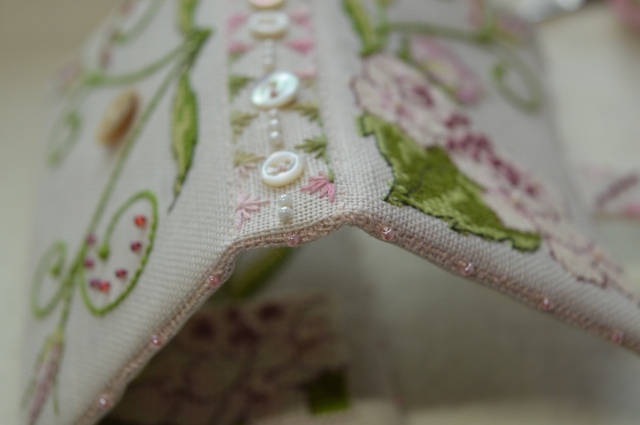
Before the bottom edge could be stitched I had to position the Timtex, I’ve not used this before but it’s like a really stiff, spongy interfacing. The knack I found was to get it exactly the right size, the fiddly bit was getting it positioned on the right side of the seams at the other end! The instructions recommended pinning along the stitching lines of the spines to hold them in place before stitching along the lines at the end. I decided to stitch each spine as I went along, so I positioned the Timtex, whip-stitched along the bottom of that piece before making a running stitch along the edges of the spine to hold it in place. The running stitch wasn’t as easy as it sounds as I had to ensure the line was correct on the outside and the inside! Once one third was done I positioned the next Timtex and stitched the next third of the bottom edge and so on.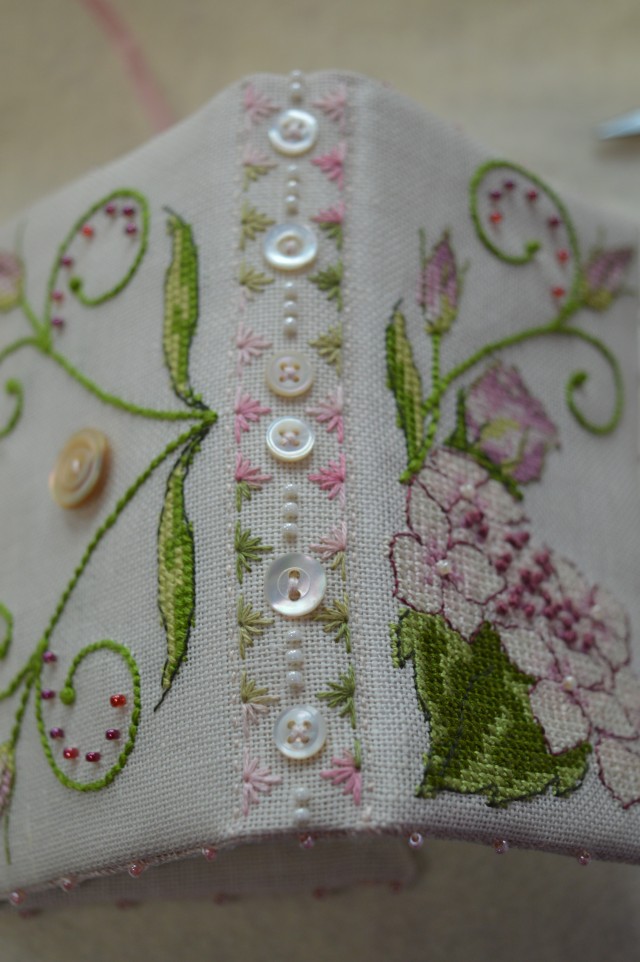
The last part to stitch was the fastener, the instructions suggest velcro or a popper, I wasn’t keen on either so I continued my button theme with a slightly bigger button which has a lovely pink iridescence to it. I made a buttonhole bar at the end of the tab and my Lizzie Stitching Wallet was complete.
I love it! It’s so dainty and beautiful, it’s typical of Faby Reilly’s designs really, I do like her style. I’m planning to use it for my Embroiderers Guild days but I think I might keep it nice until next summer so I can put it in the local shows! If any fancies stitching this I think Faby is planning to release the pdf pattern in November on her website. I’ve thoroughly enjoyed this stitch-a-long and I’ll certainly keep my eye open for any further ones Faby organises. In the meantime I’ve a couple more of Faby’s designs waiting to be stitched!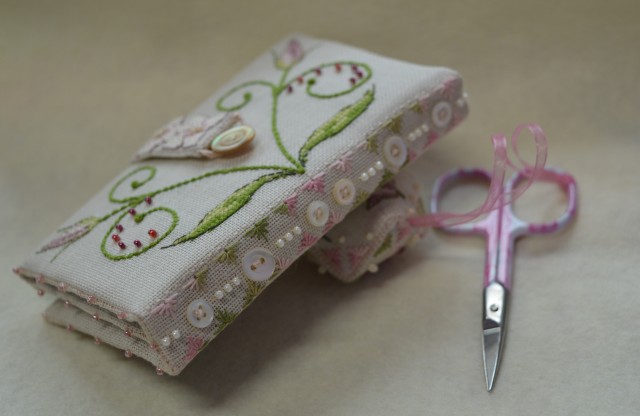
I’m linking up with Kathy’s Quilts for Slow Stitching Sunday, and Handmade Monday on Sum of their Stories, why not follow the link and see what everyone else has been stitching.


You’ve created a real heirloom treasure there. Congratulations, a well-earned happy dance.
LikeLiked by 1 person
It is so beautiful. I marvel at all your creative accomplishments.
LikeLiked by 1 person
It is beautiful indeed ! Congrats !
LikeLiked by 1 person
this is really a lovely piece hugs, Julierose
LikeLiked by 1 person
Beautiful piece, I’d be afraid to use it!
LikeLiked by 1 person
Wow! Your stitching wallet is beautiful! I love the little personal touches you added. Congratulations!
LikeLiked by 1 person
That is one of the prettiest things I have ever seen! That woman can really design something delicate and feminine looking. 🙂
LikeLiked by 1 person
Wonderful job. I have gotten away from embroidery and stitching in general replaced by quilting. But every evening I love doing handwork and have taken out an embroidery project.
LikeLiked by 1 person
Oh my that is beautiful! I’ve never participated in an embroidery SAL but this one makes me wish I had joined in❤️
LikeLiked by 1 person
Oh my goodness, that is so beautiful. I really like the personal changes that you made. It won’t be the same as anyone elses.
LikeLiked by 1 person
Absolutely gorgeous!! Love all the pieces in your set! The beads you added were a perfect finishing touch.
LikeLiked by 1 person
Absolutely gorgeous! I can’t even imagine how you did all those complex tasks!
Even though your showed each step with photos, I’m amazed and confused 🙂
You can be so proud of this work!
LikeLiked by 1 person
It turned out so beautiful!
LikeLiked by 1 person
Who wouldn’t want to sit for some slow stitching with a beautiful wallet like this!
LikeLiked by 1 person
Unbelievable the wonderful stitching you have done. Too beautiful to use.
LikeLiked by 1 person
This is truly beautiful. I real set to treasure. Well done!
LikeLiked by 1 person
It’s stunning, bound to be a winner at shows!
LikeLiked by 1 person
Beautiful piece, lovely stitching
LikeLiked by 1 person
It looks lovely, I really like your use of buttons. I am so glad that you inspired me to join the sew along.
LikeLiked by 1 person
Thanks Debbie, glad you enjoyed it, yours looks gorgeous too, I love the shade of linen you used, mine’s a very pale shade of green, but it’s so pale it doesn’t show up in the photos! You were the first to finish too, quick work 🙂
LikeLike
This turned out beautifully! What a lovely job you did on it!
LikeLiked by 1 person
Truly beautiful and so neatly stitched. If I owned this I’d never get any embroidery done, due to looking at it constantly.
LikeLiked by 1 person
It really is gorgeous and deserves more than one happy dance I’d say 🙂
LikeLiked by 1 person
Absolutely gorgeous!!!
LikeLiked by 1 person
Absolutely gorgeous!! I’m so pleased you finished the strap with a real button! Not something I could suggest in my tutorial because too many stitchers would have a panic attack at the thought of making a button bar – but it’s definitely a much prettier finish. And I know I’ve already said so, but I love your little vintage buttons!
LikeLiked by 1 person
Thanks Faby, glad you like the buttons 🙂
LikeLiked by 1 person
These are so beautiful! They look like the sort of items which will be handed down from generation to generation.
LikeLiked by 1 person
Gosh, it’s turned out so beautifully and all those tiny details you describe in so much detail obviously make for a perfect finish. Never heard of Timtex and it sounds a bit scary to use, if I’m honest! I love the minute beads along the edges. Good call to go with a button fastener, too – Velcro or a popper just wouldn’t have done it justice.
LikeLiked by 1 person
Wow, this is absolutely stunning. What a beautiful thing you have created. Thanks so much for joining us at Handmade Monday and sharing this thing of beauty with us. 🙂
LikeLiked by 1 person
Very nice! What’s the inside look like?
LikeLiked by 1 person
Thanks Meari, the photo at the beginning with the leaf (needle holder) and scissor keep is the inside.
LikeLike
Just beautiful!!!
LikeLiked by 1 person
Pingback: Holly Humbug | thecraftycreek
Pingback: A Good Day at the Show. | thecraftycreek