I’m feeling well chuffed with myself, I have designed and stitched a proper embroidery all by myself! I even remembered to take photos of my progress!!
At Embroiderers Guild we are doing a Travelling Sketchbook project, we’re in groups of six, we each picked a theme for our sketchbooks (mine is mountains) and we swop books each month so we all embroider something for everyone’s book over about six months. At the last meeting we swopped for the first time…
 I have to confess I was a bit overawed when I saw the book I was doing first, it’s beautifully presented, it even has an exquisitely illustrated page for us all to sign! The theme of this book is garden birds…I had a good mooch on pinterest for a bit of inspiration and finally decided to stitch a wren, one reason being that it has quite a recognisable shape! We also have wrens in our garden, one year they nested about 6″ above our back door, under the carport. The singing at dawn and in the evening was glorious but loud, they are known to be one of the loudest songbirds but it seemed to be magnified under the carport! It was very sweet when they were learning to fly as if you opened the backdoor at the wrong moment and put them off they plopped onto the doormat!
 I decided to use some lovely ivory cotton fabric I won in the raffle last month, it’s really soft but firm enough to embroider. I sketched an outline on some scrap paper before using a soft pencil to draw on the fabric. I then used silk paints to colour the background. I’ve only just started using silk paints with embroidery, I really like the effect but I really need to try it out on lots of different types of fabric as it does behave very differently to normal silk painting. The advantage of these silk paints is that they are set with the iron, so it’s pretty quick. Having painted the fabric I then decided I preferred the colours on the back of the fabric. This actually worked quite well as I could follow my outline from the back and not have the line on the front of my work.
 I started outlining the wren with stem stitch, I stitched all the way down the front before deciding to do the rest with a tiny running stitch so it wouldn’t have such an obvious outline and it would also be easy to cover up with other stitches.
Next I had to work out how to embroider and embellish my wren. I used DMC varigated threads for most of it with a couple of their standard ones too. I started with the wren’s breast, I used feather stitch in creamy variegated one and then added another row with a thread with hints of pink in it, adding some french knots as well.
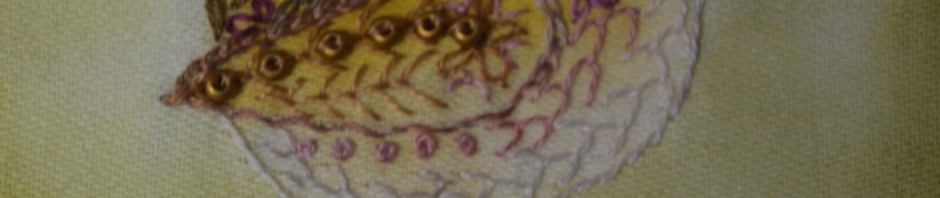
 I chain-stitched round the wing next, added some fly stitches, but it needed something else so I had a rummage in my bead box and found some perfect soft gold beads.
At this point I felt I needed to create the eye and the beak, to give me a bit of focus, initially I just used a french knot for the eye but I later swopped it for a tiny checked sequin (also in my raffle prize!) with a little dark bead on it.
Wrens have quite striking little tails, I tried using spider-web stitch but it didn’t really have the effect I wanted, it looked a bit messy, so I added some more beads!
It took a while to decide how to embroider his head, they have quite dark heads so I used a richer brown thread and just did neat rows of running stitch, very simple but I think it’s worked pretty well. His back was the next puzzle, I had another look on pinterest and noticed someone had used lazy daisy flowers for a birds breast and I decided it may work for his back. I picked a variegated thread that has brown, olive green and deep pink, I love it, it picks up the other pinks I’ve used whilst blending in nicely.

Having stitched my wren I felt he needed to be standing on something, a bit of grounding! This is the only bit I’m not 100% happy with, I started off with brown straight stitches, it needed a bit more so I used the thread from his back to do some french knots and more straight stitches…and some beige threads…and some green…I think if I do another I might try just a light green/beige thread. These things are all a learning experience!
I stabilised the embroidered with some vilene before blanket-stitching round the edge. The finished piece is about 3″ square, so Jenny Wren is just about 1.5″ from beak to tail.
I just need to write a little piece about wrens and attach my embroidery.
I found a lovely poem about wrens to end my piece;
And then at dusk as evening fell
the trilling voice was heard,
of tiny mouse-like Jenny Wren
the Queen of all the birds.

I’m linking up with Kathy’s Quilts for Slow Stitching Sunday, why not follow the link and see what everyone has been hand-stitching.


I’m seriously impressed…. well don it’s gorgeous 👏🏻👏🏻👏🏻
LikeLiked by 1 person
WOW! Just WOW!
LikeLiked by 1 person
Well done! Jenny wren looks fabulous. She must be tiny! You’ve got a lot of detail in such a small area.
LikeLiked by 1 person
Oh how pretty !!!
LikeLiked by 1 person
oh wow! really beautiful! give yourself a pat on the back.
LikeLiked by 1 person
it’s lovely! Well done!
LikeLiked by 1 person
My daughter’s name is Wren, so loved this! Such a pretty bird and your design 🙂
LikeLiked by 1 person
Really lovely. I’m very impressed
LikeLiked by 1 person
Beautiful!
LikeLiked by 1 person
It’s gorgeous! I love the stitching that she stands on!
So fun to follow your creative process!
LikeLiked by 1 person
Wow it is so cute. Love to see your creative process. Very well done!!!
LikeLike
I love your Wren-these are my favorite birds!
LikeLike
You should be quite proud of that adorable little bird. How beautiful it is. Your stitching is wonderful.
LikeLike
Beautiful! And I love the poem too!
LikeLike
Completely sweet and charming, love how it formed under your needle, thread, and imagination.
LikeLike
Great details and texture
Your little bird looks like it could fly off the computer screen!
LikeLike
I love the little wrens….so much voice out of such a tiny body. You have really done them justice with this lovely embroidery!
LikeLike